


Create successful ePaper yourself
Turn your PDF publications into a flip-book with our unique Google optimized e-Paper software.
Tutorial<br />
RASPBERRY PI 101: GET STARTED WITH THE PI CAMERA<br />
GET STARTED WITH<br />
PI CAMERA THE<br />
Snap photos from your Raspberry Pi using its special, programmable camera<br />
You’ll<br />
Need<br />
> Raspberry Pi<br />
> Raspbian<br />
> Pi Camera<br />
Module<br />
magpi.cc/28IjIsz<br />
T<br />
he Raspberry Pi has a few mysterious<br />
connectors on it that you wouldn’t normally<br />
use when hooking it up. We’ve covered the<br />
GPIO pins in a previous issue, but now we’re going<br />
to move onto the CSI port. You’ll find this located<br />
between the HDMI and audio jack on a normal Pi,<br />
and on the edge of a Pi Zero. CSI stands for Camera<br />
Serial Interface and, as the name suggests, it’s used<br />
to connect a camera to the Raspberry Pi. Not just<br />
any camera either: specifically, the Raspberry Pi<br />
Camera Module.<br />
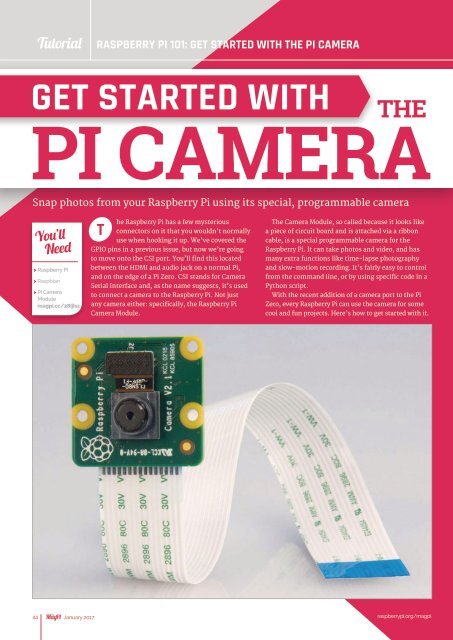
The Camera Module, so called because it looks like<br />
a piece of circuit board and is attached via a ribbon<br />
cable, is a special programmable camera for the<br />
Raspberry Pi. It can take photos and video, and has<br />
many extra functions like time-lapse photography<br />
and slow-motion recording. It’s fairly easy to control<br />
from the command line, or by using specific code in a<br />
Python script.<br />
With the recent addition of a camera port to the Pi<br />
Zero, every Raspberry Pi can use the camera for some<br />
cool and fun projects. Here’s how to get started with it.<br />
44 January xxxx 20162017<br />
raspberrypi.org/magpi