

Brother 1034d overlock

You also want an ePaper? Increase the reach of your titles
YUMPU automatically turns print PDFs into web optimized ePapers that Google loves.
5<br />
Needle<br />
This machine uses a standard home sewing machine<br />
needle.<br />
The recommended needle is SCHMETZ 130/705H.<br />
To remove the needle<br />
(1)Turn the main power switch to the OFF position.<br />
(2)Turn the hand wheel counter-clockwise by hand<br />
until the needle is at its highest position.<br />
(3)Loosen the needle set screw with hexagonal<br />
wrench and remove the needle.<br />
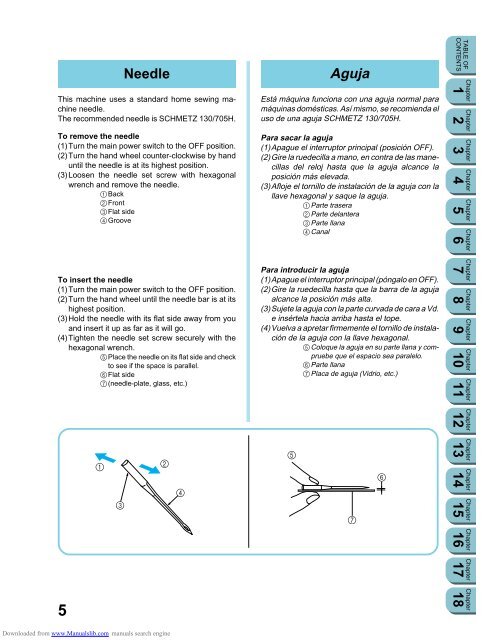
1Back<br />
2Front<br />
3Flat side<br />
4Groove<br />
To insert the needle<br />
(1)Turn the main power switch to the OFF position.<br />
(2)Turn the hand wheel until the needle bar is at its<br />
highest position.<br />
(3)Hold the needle with its flat side away from you<br />
and insert it up as far as it will go.<br />
(4)Tighten the needle set screw securely with the<br />
hexagonal wrench.<br />
5Place the needle on its flat side and check<br />
to see if the space is parallel.<br />
6Flat side<br />
7(needle-plate, glass, etc.)<br />
1 2<br />
3<br />
Downloaded from www.Manualslib.com manuals search engine<br />
4<br />
Aguja<br />
Está máquina funciona con una aguja normal para<br />
máquinas domésticas. Así mismo, se recomienda el<br />
uso de una aguja SCHMETZ 130/705H.<br />
Para sacar la aguja<br />
(1)Apague el interruptor principal (posición OFF).<br />
(2)Gire la ruedecilla a mano, en contra de las manecillas<br />
del reloj hasta que la aguja alcance la<br />
posición más elevada.<br />
(3)Afloje el tornillo de instalación de la aguja con la<br />
llave hexagonal y saque la aguja.<br />
1Parte trasera<br />
2Parte delantera<br />
3Parte llana<br />
4Canal<br />
Para introducir la aguja<br />
(1)Apague el interruptor principal (póngalo en OFF).<br />
(2)Gire la ruedecilla hasta que la barra de la aguja<br />
alcance la posición más alta.<br />
(3)Sujete la aguja con la parte curvada de cara a Vd.<br />
e insértela hacia arriba hasta el tope.<br />
(4)Vuelva a apretar firmemente el tornillo de instalación<br />
de la aguja con la llave hexagonal.<br />
5Coloque la aguja en su parte llana y compruebe<br />
que el espacio sea paralelo.<br />
6Parte llana<br />
7Placa de aguja (Vidrio, etc.)<br />
5<br />
7<br />
6<br />
TABLE OF<br />
CONTENTS<br />
Chapter<br />
1 Chapter<br />
2 Chapter<br />
3 Chapter<br />
4 Chapter<br />
5 Chapter<br />
6 Chapter<br />
7 Chapter<br />
8 Chapter<br />
9 Chapter<br />
10 Chapter<br />
11 Chapter<br />
12 Chapter<br />
13 Chapter<br />
14 Chapter<br />
15 Chapter<br />
16 Chapter<br />
17 Chapter<br />
18


