The Journal of Australian Ceramics Vol 51 No 3 November 2012

Create successful ePaper yourself
Turn your PDF publications into a flip-book with our unique Google optimized e-Paper software.
-------<br />
Focus: Technical<br />
-----------------<br />
~LI:::=::i::===:::U<br />
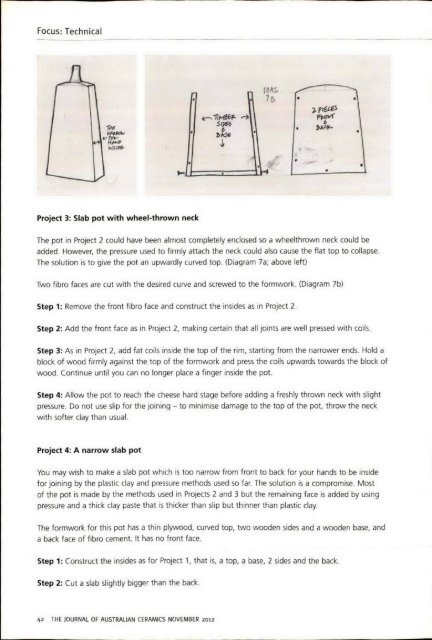
Project 3: Slab pot with wheel-thrown neck<br />
<strong>The</strong> pot in Project 2 could have been almost completely enclosed so a wheelthrown neck could be<br />
added. However, the pressure used to firmly attach the neck could also cause the flat top to collapse.<br />
<strong>The</strong> solution is to give the pot an upwardly curved top. (Diagram 7a; above left)<br />
Two fibro faces are cut with the desired curve and screwed to the formwork. (Diagram 7b)<br />
Step 1: Remove the front fibro face and construct the insides as in Project 2.<br />
Step 2: Add the front face as in Project 2, making certain that all joints are well pressed with coils .<br />
Step 3: As in Project 2, add fat coils inside the top <strong>of</strong> the rim, starting from the narrower ends. Hold a<br />
block <strong>of</strong> wood firmly against the top <strong>of</strong> the formwork and press the coils upwards towards the block <strong>of</strong><br />
wood. Continue until you can no longer place a finger inside the pot.<br />
Step 4: Allow the pot to reach the cheese hard stage before adding a freshly thrown neck with slight<br />
pressure. Do not use slip for the joining - to minimise damage to the top <strong>of</strong> the pot, throw the neck<br />
with s<strong>of</strong>ter clay than usual.<br />
Project 4: A narrow slab pot<br />
You may wish to make a slab pot which is too narrow from front to back for your hands to be inside<br />
for joining by the plastic clay and pressure methods used so far. <strong>The</strong> solution is a compromise. Most<br />
<strong>of</strong> the pot is made by the methods used in Projects 2 and 3 but the remaining face is added by using<br />
pressure and a thick clay paste that is thicker than slip but thinner than plastic clay.<br />
<strong>The</strong> formwork for this pot has a thin plywood, curved top, two wooden sides and a wooden base, and<br />
a back face <strong>of</strong> fibro cement. It has no front face.<br />
Step 1: Construct the insides as for Project 1, that is, a top, a base, 2 sides and the back.<br />
Step 2: Cut a slab slightly bigger than the back.<br />
42 THE JOURNAL OF AUSTRALIAN CERAMICS NOVEMBER <strong>2012</strong>