Estetica Magazine UK (1/2018 COLLECTION)
Estetica Magazine is the world's leading hairdressing magazine. Founded in Italy in 1946 and published today in over 60 countries around the world, it is a global reference point for professionals working in the hair and beauty industry. Techniques, fashion, education and trends are at the core of every issue of Estetica Magazine. Further information about both the printed and digital versions of the magazine is available at www.esteticanetwork.com
Estetica Magazine is the world's leading hairdressing magazine. Founded in Italy in 1946 and published today in over 60 countries around the world, it is a global reference point for professionals working in the hair and beauty industry. Techniques, fashion, education and trends are at the core of every issue of Estetica Magazine. Further information about both the printed and digital versions of the magazine is available at www.esteticanetwork.com

Create successful ePaper yourself
Turn your PDF publications into a flip-book with our unique Google optimized e-Paper software.
1 2 3<br />
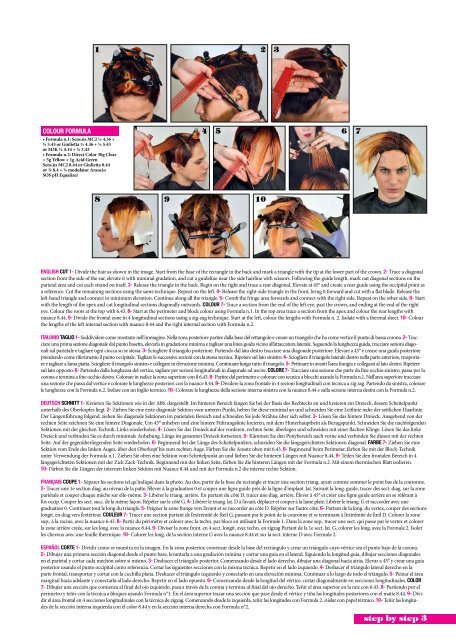
COLOUR FORMULA<br />
• Formula n.1: Sens.ùs MC2 ½ 4.36 +<br />
½ 5.43 or Giulietta ½ 4.36 + ½ 5.43<br />
or M3K ½ 4.14 + ½ 5.43<br />
• Formula n.2: Direct Color 30g Clear<br />
+ 5g Yellow + 1g Acid Green<br />
Sens.ùs MC2 8.44 or Giulietta 8.44<br />
or ¾ 8.4 + ¼ modulator Arancio<br />
SOS pH Equalizer<br />
4 5 6 7<br />
8 9 10<br />
ENGLISH cut 1- Divide the hair as shown in the image. Start from the base of the rectangle in the back and mark a triangle with the tip at the lower part of the crown. 2- Trace a diagonal<br />
section from the side of the ear, elevate it with minimal gradation, and cut a guideline near the side hairline with scissors. Following the guide length, mark out diagonal sections on the<br />
parietal area and cut each strand on itself. 3- Release the triangle in the back. Begin on the right and trace a rear diagonal. Elevate at 45° and create a rear guide using the occipital point as<br />
a reference. Cut the remaining sections using the same technique. Repeat on the left. 4- Release the right-side triangle in the front, bring it forward and cut with a flat blade. Release the<br />
left-hand triangle and connect in minimum elevation. Continue along all the triangle. 5- Comb the fringe area forwards and connect with the right side. Repeat on the other side. 6- Start<br />
with the length of the apex and cut longitudinal sections diagonally outwards. colour 7- Trace a section from the end of the left eye, past the crown, and ending at the end of the right<br />
eye. Colour the roots at the top with 6.43. 8- Start at the perimeter and block colour using Formula n.1. In the top area trace a section from the apex and colour the rear lengths with<br />
nuance 8.44. 9- Divide the frontal zone in 4 longitudinal sections using a zig-zag technique. Start at the left, colour the lengths with Formula n. 2. Isolate with a thermal sheet. 10- Colour<br />
the lengths of the left internal section with nuance 8.44 and the right internal section with Formula n.2.<br />
italiano TAGLIO 1- Suddividere come mostrato nell’immagine. Nella zona posteriore partire dalla base del rettangolo e creare un triangolo che ha come vertice il punto di bassa corona. 2- Tracciare<br />
una prima sezione diagonale dal punto basetta, elevarla in gradazione minima e tagliare una linea guida vicino all’attaccatura laterale. Seguendo la lunghezza guida, tracciare sezioni diagonali<br />
sul parietale e tagliare ogni ciocca su se stessa. 3- Sciogliere il triangolo posteriore. Partendo dal lato destro tracciare una diagonale posteriore. Elevare a 45° e creare una guida posteriore<br />
prendendo come riferimento il punto occipitale. Tagliare le successive sezioni con la stessa tecnica. Ripetere sul lato sinistro. 4- Sciogliere il triangolo laterale destro nella parte anteriore, trasportare<br />
e tagliare a lama piatta. Sciogliere il triangolo sinistro e collegare in elevazione minima. Continuare lungo tutto il triangolo. 5- Pettinare in avanti l’area frangia e collegarsi al lato destro. Ripetere<br />
sul lato opposto. 6- Partendo dalla lunghezza del vertice, tagliare per sezioni longitudinali in diagonale ad uscire. colore 7- Tracciare una sezione che parte da fine occhio sinistro, passa per la<br />
corona e termina a fine occhio destro. Colorare in radice la zona superiore con il 6.43. 8- Partire dal perimetro e colorare con tecnica a blocchi usando la Formula n.1. Nell’area superiore tracciare<br />
una sezione che passa dal vertice e colorare le lunghezze posteriori con la nuance 8.44. 9- Dividere la zona frontale in 4 sezioni longitudinali con tecnica a zig zag. Partendo da sinistra, colorare<br />
le lunghezze con la Formula n.2. Isolare con un foglio termico. 10- Colorare le lunghezze della sezione interna sinistra con la nuance 8.44 e sulla sezione interna destra con la Formula n.2.<br />
deutsch SCHNITT 1- Kreieren Sie Sektionen wie in der Abb. dargestellt. Im hinteren Bereich fangen Sie bei der Basis des Rechtecks an und kreieren ein Dreieck, dessen Scheitelpunkt<br />
unterhalb des Oberkopfes liegt. 2- Ziehen Sie eine erste diagonale Sektion vom unteren Punkt, heben Sie diese minimal an und schneiden Sie eine Leitlinie nahe der seitlichen Haarlinie.<br />
Der Längenführung folgend, ziehen Sie diagonale Sektionen im parietalen Bereich und schneiden Sie jede Strähne über sich selbst. 3- Lösen Sie das hintere Dreieck. Ausgehend von der<br />
rechten Seite zeichnen Sie eine hintere Diagonale. Um 45° anheben und eine hintere Führungslinie kreieren, mit dem Hinterhauptbein als Bezugspunkt. Schneiden Sie die nachfolgenden<br />
Sektionen mit der gleichen Technik. Links wiederholen. 4- Lösen Sie das Dreieck auf der vorderen, rechten Seite, überlegen und schneiden mit einer flachen Klinge. Lösen Sie das linke<br />
Dreieck und verbinden Sie es durch minimale Anhebung. Längs im gesamten Dreieck fortsetzen. 5- Kämmen Sie den Ponybereich nach vorne und verbinden Sie diesen mit der rechten<br />
Seite. Auf der gegenüberliegenden Seite wiederholen. 6- Beginnend bei der Länge des Scheitelpunktes, schneiden Sie die längsgerichteten Sektionen diagonal. farbe 7- Ziehen Sie eine<br />
Sektion vom Ende des linken Auges, über den Oberkopf bis zum rechten Auge. Färben Sie die Ansatz oben mit 6.43. 8- Beginnend beim Perimeter, färben Sie mit der Block-Technik<br />
unter Verwendung der Formula n.1. Ziehen Sie oben eine Sektion vom Scheitelpunkt an und färben Sie die hinteren Längen mit Nuance 8.44. 9- Teilen Sie den frontalen Bereich in 4<br />
längsgerichteten Sektionen mit der Zick Zack-Technik. Beginnend mit der linken Seite, färben Sie die hinteren Längen mit der Formula n.2. Mit einem thermischen Blatt isolieren.<br />
10- Färben Sie die Längen der internen linken Sektion mit Nuance 8.44 und mit der Formula n.2 die interne rechte Sektion.<br />
franÇais COUPE 1- Séparer les sections tel qu’indiqué dans la photo. Au dos, partir de la base du rectangle et tracer une section triang. ayant comme sommet le point bas de la couronne.<br />
2- Tracer une 1e section diag. au niveau de la patte, l’élever à la graduation 0 et couper une ligne guide près de la ligne d’implant. lat. Suivant la long. guide, tracer des sect. diag. sur la zone<br />
pariétale et couper chaque mèche sur elle-même. 3- Libérer le triang. arrière. En partant du côté D, tracer une diag. arrière. Élever à 45° et créer une ligne guide arrière en se référant à<br />
l’os occip. Couper les sect. succ. de la même façon. Répéter sur le côté G. 4- Libérer le triang. lat. D à l’avant, déplacer et couper à la lame plate. Libérer le triang. G et raccorder avec une<br />
graduation 0. Continuer tout le long du triangle. 5- Peigner la zone frange vers l’avant et se raccorder au côté D. Répéter sur l’autre côté. 6- Partant de la long. du vertex, couper des sections<br />
longit. en diag.vers l’extérieur. COULEUR 7- Tracer une section partant de l’extrémité de l’œil G, passant par le point de la couronne et se terminant à l’extrémité de l’œil D. Colorer la zone<br />
sup., à la racine, avec la nuance 6.43. 8- Partir du périmètre et colorer avec la techn. par blocs en utilisant la formule 1. Dans la zone sup., tracer une sect. qui passe par le vertex et colorer<br />
la zone arrière créée, sur les long. avec la nuance 8.44. 9- Diviser la zone front. en 4 sect. longit. avec techn. en zigzag Partant de la 1e sect. lat. G, colorer les long. avec la formule 2. Isoler<br />
les cheveux avec une feuille thermique. 10- Colorer les long. de la section interne G avec la nuance 8.44 et sur la sect. interne D avec formule 2.<br />
espaÑol CORTE 1- Dividir como se muestra en la imagen. En la zona posterior, comenzar desde la base del rectángulo y crear un triángulo cuyo vértice sea el punto bajo de la corona.<br />
2- Dibujar una primera sección diagonal desde el punto base, levantarla a una gradación mínima y cortar una guía en el lateral. Siguiendo la longitud guía, dibujar secciones diagonales<br />
en el parietal y cortar cada mechón sobre sí mismo. 3- Deshacer el triángulo posterior. Comenzando desde el lado derecho, dibujar una diagonal hacia atrás. Elevar a 45° y crear una guía<br />
posterior usando el punto occipital como referencia. Cortar las siguientes secciones con la misma técnica. Repetir en el lado izquierdo. 4- Deshacer el triángulo lateral derecho en la<br />
parte frontal, transportar y cortar con la cuchilla plana. Deshacer el triángulo izquierdo y conectarlo en una elevación mínima. Continuar a lo largo de todo el triángulo. 5- Peinar el área<br />
marginal hacia adelante y conectarla al lado derecho. Repetir en el lado opuesto. 6- Comenzando desde la longitud del vértice, cortar diagonalmente en secciones longitudinales. COLOR<br />
7- Dibujar una sección que comienza al final del ojo izquierdo, pasa a través de la corona y termina al final del ojo derecho. Teñir el área superior en la raíz con 6.43. 8- Partiendo por el<br />
perímetro y teñir con la técnica a bloques usando Formula n°1. En el área superior trazar una sección que pase desde el vértice y tiña las longitudes posteriores con el matiz 8.44. 9- Dividir<br />
el área frontal en 4 secciones longitudinales con la técnica de zigzag. Comenzando desde la izquierda, teñir las longitudes con Formula 2. Aislar con papel térmico. 10- Teñir las longitudes<br />
de la sección interna izquierda con el color 8.44 y en la sección interna derecha con Formula n°2.<br />
step by step 3