RAIL KIT INSTRUCTIONS - EcoTech Marine
RAIL KIT INSTRUCTIONS - EcoTech Marine
RAIL KIT INSTRUCTIONS - EcoTech Marine

Create successful ePaper yourself
Turn your PDF publications into a flip-book with our unique Google optimized e-Paper software.
www.ecotechmarine.com.<br />
Additional Rail Kit information available at<br />
800 785 0338 (Ext. 2) or email us at service@ecotechmarine.com.<br />
If something is missing, contact <strong>EcoTech</strong> <strong>Marine</strong> service at<br />
Review the parts included in the kit that you purchased.<br />
(See illustration reference on inside.)<br />
SHORT <strong>RAIL</strong> <strong>KIT</strong> (XR616)<br />
LONG <strong>RAIL</strong> <strong>KIT</strong> (XR618)<br />
+ONE SHORT <strong>RAIL</strong> <strong>KIT</strong> (XR616-1)<br />
+ONE LONG <strong>RAIL</strong> <strong>KIT</strong> (XR618-1)<br />
Instructions are for the following kits:<br />
<strong>RAIL</strong> <strong>KIT</strong><br />
<strong>INSTRUCTIONS</strong><br />
SHORT <strong>RAIL</strong> <strong>KIT</strong> (XR616)<br />
LONG <strong>RAIL</strong> <strong>KIT</strong> (XR618)<br />
+ONE SHORT <strong>RAIL</strong> <strong>KIT</strong> (XR616-1)<br />
+ONE LONG <strong>RAIL</strong> <strong>KIT</strong> (XR618-1)<br />
TM<br />
If you are using a Rail Kit in conjunction with the<br />
PREMIUM HANGING <strong>KIT</strong>, familiarize yourself with the<br />
hanging kit instructions before beginning. A minimum<br />
of ONE hanging kit per TWO Radions is recommended.<br />
Additionally, make sure that the hanging kit anchors are<br />
capable of supporting multiple Radion fixtures.<br />
1349 Lynn Ave., Bethlehem, PA 18015<br />
610 954 8480 800 785 0338 (toll free) 888 500 2907 (fax)<br />
®<br />
Approx. 19.5 in (49.53 cm) (2 Radions end to end)<br />
LONG <strong>RAIL</strong> <strong>KIT</strong> AND +ONE LONG <strong>RAIL</strong> <strong>KIT</strong><br />
SHORT <strong>RAIL</strong> <strong>KIT</strong> AND +ONE SHORT <strong>RAIL</strong> <strong>KIT</strong><br />
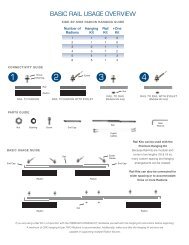
SIDE-BY-SIDE RADION HANGING GUIDE<br />
Number of<br />
Radions<br />
Hanging<br />
Kit<br />
Multiple Kit Examples<br />
Rail<br />
Kit<br />
+One<br />
Kit<br />
1 1 0 0<br />
2 1 1 0<br />
3 2 1 1<br />
4 3 1 2<br />
Rails Radions<br />
5 4 1 3<br />
6 5 1 4 Rails Hangers Radions<br />
<strong>RAIL</strong> <strong>KIT</strong> PARTS (All kits include hex nuts for connecting multiple kits.)<br />
16 in (40.64 cm)<br />
18 in (45.72 cm)<br />
16 in (40.64 cm)<br />
18 in (45.72 cm)<br />
Approx. 31.875 in (80.96 cm) (3 Radions end to end)<br />
Approx. 27.875 in (70.8 cm) (3 Radions end to end)<br />
Approx. 17.5 in (44.45 cm) (2 Radions end to end)
TM<br />
<strong>RAIL</strong> <strong>KIT</strong> STEP-BY-STEP <strong>INSTRUCTIONS</strong><br />
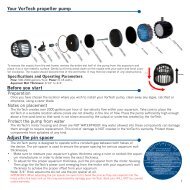
STEP 1:<br />
PLACE RADIONS SIDE BY SIDE<br />
APPROXIMATE PLACEMENT DISTANCE<br />
5.25 in (13.34 cm) – Long Rail Kit<br />
3.25 in (8.26 cm) – Short Rail Kit<br />
End Cap<br />
Side View<br />
STEP 2:<br />
PLACE AN END CAP NOTCH UP<br />
Rail Side View<br />
STEP 3:<br />
PLACE A <strong>RAIL</strong> FACE DOWN<br />
STEP 4:<br />
PLACE AN END CAP NOTCH DOWN<br />
TO COMPLETE THE FIRST <strong>RAIL</strong><br />
OR ADD A +ONE <strong>RAIL</strong><br />
STEP 5:<br />
CREATE A<br />
SECOND <strong>RAIL</strong><br />
STEP 6:<br />
DETERMINE WHERE EYELET<br />
CABLES WILL BE MOUNTED<br />
(OPTIONAL). ATTACH <strong>RAIL</strong>S<br />
TO RADIONS.<br />
Complete Rail<br />
Side View<br />
Radion Radion<br />
Radion Radion<br />
Radion Radion<br />
Radion Radion<br />
Screw<br />
Eyelet<br />
Bushing 1 2 3 4<br />
Rail<br />
Radion<br />
Radion Radion<br />
<strong>RAIL</strong> TO RADION <strong>RAIL</strong> TO RADION WITH EYELET<br />
><br />
><br />
><br />
Radion Radion<br />
<strong>RAIL</strong> TO <strong>RAIL</strong> WITH EYELET<br />
(Multiple kits only)<br />
• Do not install Radions above an aquarium while they are plugged into an electrical outlet. Mount the Radions first and then connect power to the fixtures.<br />
• <strong>EcoTech</strong> is not responsible for any damage to fixures, your aquarium and its livestock or your property as a result of improper use of the rail kits.<br />
• Never hang pointed or sharp objects at eye level where they may come in contact with persons.<br />
><br />
End Cap<br />
Side View<br />
Place Radions parallel to each other on a flat surface with the<br />
power cables on the same side. If using the Long Rail Kit,<br />
Radions should be spaced 5.25 in (13.34 cm) apart. If using<br />
the Short Rail Kit, Radions should be spaced 3.25 in (8.26 cm) apart.<br />
Place an end cap notch up on one Radion so that the screw<br />
holes align with the mounting holes on the Radion.<br />
Place a rail across both radions so that the end cap and the<br />
rail create a solid bar. Make sure that all screw holes align with<br />
the mounting holes on the Radions.<br />
If you are connecting more than two Radions together, you will<br />
use an additional connector rail as supplied in the appropriate<br />
+One Kit. If you are completing a rail, place a second end cap<br />
notch down to complete a solid bar.<br />
Repeat steps 2 through 4 to complete the second rail.<br />
With the rails assembled, determine where the eyelet cables<br />
(optional) will be mounted. Use the images below to identify<br />
rails and/or eyelet cables.<br />
Nut<br />
<strong>RAIL</strong> TO <strong>RAIL</strong><br />
(Multiple kits only)<br />
For video tutorials or more information, please visit us at ecotechmarine.com<br />
or visit our community knowledge base at community.ecotechmarine.com.