

QUILTsocial Issue 13
Welcome to another thrilling issue of QUILTsocial! In this issue we show you ways to explore and use utility and decorative stitches for quilting your quilt and sewing on your binding. Using these stitches for quilting is an underrated method, but highly effective. We encourage you to choose any built-in stitch to add oomph to your binding, see the various stitch-outs. We also show you how to make and apply covered cording like a pro, the tutorial includes how to round the corners for a truly elegant finish. Another tutorial in this issue is how to work therm fleece into quilted projects, like the bowl cozy. Other free projects include the tic tac toe game set - all quilted using the latest Recess line from Banyan Batiks, and the quilted bench cushion cover. We take a close look at some awesome features on the Brother Dreamweaver XE and the ImageStitch app and the mysewnet on the PFAFF creative icon. Download this stunning issue!
Welcome to another thrilling issue of QUILTsocial! In this issue we show you ways to explore and use utility and decorative stitches for quilting your quilt and sewing on your binding. Using these stitches for quilting is an underrated method, but highly effective. We encourage you to choose any built-in stitch to add oomph to your binding, see the various stitch-outs. We also show you how to make and apply covered cording like a pro, the tutorial includes how to round the corners for a truly elegant finish. Another tutorial in this issue is how to work therm fleece into quilted projects, like the bowl cozy. Other free projects include the tic tac toe game set - all quilted using the latest Recess line from Banyan Batiks, and the quilted bench cushion cover. We take a close look at some awesome features on the Brother Dreamweaver XE and the ImageStitch app and the mysewnet on the PFAFF creative icon. Download this stunning issue!

Create successful ePaper yourself
Turn your PDF publications into a flip-book with our unique Google optimized e-Paper software.
4. Cut the unit horizontally into 3 – 5¾”<br />
x 20½” background units.<br />
5. Sew a 1½” x 20½” Fabric O strip<br />
between the three units to make the<br />
game board. Press the seams to the<br />
background units.<br />
But wait, I almost forgot!<br />
Before sewing, make a thin tie out of<br />
Fabric O background fabric to sew into<br />
the game board seam:<br />
1. Cut a 1½” x 20½” strip of Fabric O<br />
background fabric.<br />
2. Lay Right Side Down on ironing<br />
surface and press ¼” over to the back.<br />
Repeat on other edges.<br />
3. Press ¼” over at each end then fold<br />
and press the two pressed edges<br />
together.<br />
4. Sew one seam down the middle of<br />
the tie.<br />
I put safety pins in at this point through<br />
all three layers of the top to keep the<br />
layers from shifting before quilting it.<br />
Change to a quilting needle and<br />
embroidery presser foot to topstitch<br />
around the board.<br />
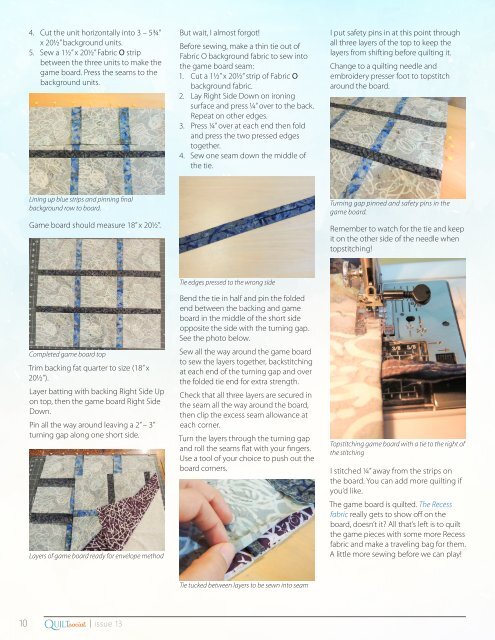
Lining up blue strips and pinning final<br />
background row to board.<br />
Game board should measure 18” x 20½”.<br />
Turning gap pinned and safety pins in the<br />
game board.<br />
Remember to watch for the tie and keep<br />
it on the other side of the needle when<br />
topstitching!<br />
Completed game board top<br />
Trim backing fat quarter to size (18” x<br />
20½”).<br />
Layer batting with backing Right Side Up<br />
on top, then the game board Right Side<br />
Down.<br />
Pin all the way around leaving a 2” – 3”<br />
turning gap along one short side.<br />
Layers of game board ready for envelope method<br />
Tie edges pressed to the wrong side<br />
Bend the tie in half and pin the folded<br />
end between the backing and game<br />
board in the middle of the short side<br />
opposite the side with the turning gap.<br />
See the photo below.<br />
Sew all the way around the game board<br />
to sew the layers together, backstitching<br />
at each end of the turning gap and over<br />
the folded tie end for extra strength.<br />
Check that all three layers are secured in<br />
the seam all the way around the board,<br />
then clip the excess seam allowance at<br />
each corner.<br />
Turn the layers through the turning gap<br />
and roll the seams flat with your fingers.<br />
Use a tool of your choice to push out the<br />
board corners.<br />
Topstitching game board with a tie to the right of<br />
the stitching<br />
I stitched ¼” away from the strips on<br />
the board. You can add more quilting if<br />
you’d like.<br />
The game board is quilted. The Recess<br />
fabric really gets to show off on the<br />
board, doesn’t it? All that’s left is to quilt<br />
the game pieces with some more Recess<br />
fabric and make a traveling bag for them.<br />
A little more sewing before we can play!<br />
Tie tucked between layers to be sewn into seam<br />
Q<br />
10 .com| issue <strong>13</strong><br />
UILTsocial


