QUILTsocial Issue 14
While exploring and playing with the Brother Luminaire XP1 and the Husqvarna Viking Designer EPIC sewing machines, we're after what is original in quilting ideas. In this issue we show you how to piece fabric using decorative stitches instead of the typical quarter inch seam. We use traditional quilt blocks to make a modern quilt, show you how to use the flip and stitch technique of quilt making, the golden 5 steps to add a flange to a binding to give the quilt edge some pop of color. Many free patterns and inspiring new quilting ideas!sew
While exploring and playing with the Brother Luminaire XP1 and the Husqvarna Viking Designer EPIC sewing machines, we're after what is original in quilting ideas. In this issue we show you how to piece fabric using decorative stitches instead of the typical quarter inch seam. We use traditional quilt blocks to make a modern quilt, show you how to use the flip and stitch technique of quilt making, the golden 5 steps to add a flange to a binding to give the quilt edge some pop of color. Many free patterns and inspiring new quilting ideas!sew
Create successful ePaper yourself
Turn your PDF publications into a flip-book with our unique Google optimized e-Paper software.
Step 3 - One final check<br />
Before you hit GO, it’s not a bad idea<br />
to double check the spelling and the<br />
placement to ensure that everything<br />
is exactly as you want it to be. It would<br />
be bad to stitch out the label and spell<br />
your name or some other vital piece of<br />
information incorrectly.<br />
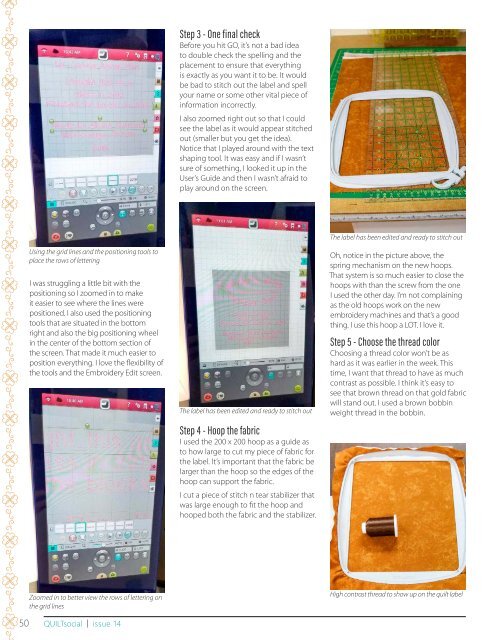
I also zoomed right out so that I could<br />
see the label as it would appear stitched<br />
out (smaller but you get the idea).<br />
Notice that I played around with the text<br />
shaping tool. It was easy and if I wasn’t<br />
sure of something, I looked it up in the<br />
User’s Guide and then I wasn’t afraid to<br />
play around on the screen.<br />
Using the grid lines and the positioning tools to<br />
place the rows of lettering<br />
I was struggling a little bit with the<br />
positioning so I zoomed in to make<br />
it easier to see where the lines were<br />
positioned. I also used the positioning<br />
tools that are situated in the bottom<br />
right and also the big positioning wheel<br />
in the center of the bottom section of<br />
the screen. That made it much easier to<br />
position everything. I love the flexibility of<br />
the tools and the Embroidery Edit screen.<br />
The label has been edited and ready to stitch out<br />
Step 4 - Hoop the fabric<br />
I used the 200 x 200 hoop as a guide as<br />
to how large to cut my piece of fabric for<br />
the label. It’s important that the fabric be<br />
larger than the hoop so the edges of the<br />
hoop can support the fabric.<br />
I cut a piece of stitch n tear stabilizer that<br />
was large enough to fit the hoop and<br />
hooped both the fabric and the stabilizer.<br />
The label has been edited and ready to stitch out<br />
Oh, notice in the picture above, the<br />
spring mechanism on the new hoops.<br />
That system is so much easier to close the<br />
hoops with than the screw from the one<br />
I used the other day. I’m not complaining<br />
as the old hoops work on the new<br />
embroidery machines and that’s a good<br />
thing. I use this hoop a LOT. I love it.<br />
Step 5 - Choose the thread color<br />
Choosing a thread color won’t be as<br />
hard as it was earlier in the week. This<br />
time, I want that thread to have as much<br />
contrast as possible. I think it’s easy to<br />
see that brown thread on that gold fabric<br />
will stand out. I used a brown bobbin<br />
weight thread in the bobbin.<br />
Zoomed in to better view the rows of lettering on<br />
the grid lines<br />
50 <strong>QUILTsocial</strong> | issue <strong>14</strong><br />
High contrast thread to show up on the quilt label


