

Dive Pacific 171 Oct- Nov 2019

Create successful ePaper yourself
Turn your PDF publications into a flip-book with our unique Google optimized e-Paper software.
Let’s first look at the five buttons<br />
on the top left, circled in red. These<br />
are modes specific to Affinity, called<br />
Personas: Photo Editing, Liquify,<br />
Raw Developing, Tone Mapping<br />
and Export. These Personas switch<br />
Affinity into different operating<br />
modes, translating to distinct<br />
toolbars, menu options and side<br />
panels. Typically, you’ll spend<br />
most of your time in the Photo<br />
Editing Persona, which offers<br />
access to the main toolkit, and the<br />
Raw Developing Persona which is<br />
designed for pre-processing of RAW<br />
files.<br />
In this introduction we’ll only look at<br />
the leftmost Persona - Photo Editing.<br />
Basic Image handling<br />
The first steps you are likely to take<br />
after opening an image is to crop,<br />
optimise overall lightness, contrast,<br />
colour balance and colour saturation.<br />
The Crop tool in the Tool bar comes<br />
with additional settings such as ratio<br />
and image size. It also allows you to<br />
rotate and straighten your image.<br />
Have a look at the long list of<br />
Adjustments on the right in Image<br />
1. Very importantly, any of the<br />
image corrections are applied<br />
non-destructively on its own layer,<br />
similar to the Adjustment Layers<br />
in Photoshop. This allows you to go<br />
back anytime and fine-tune or get<br />
rid of any adjustment previously<br />
made, without affecting the pixels of<br />
the image.<br />
Image 1 shows you the simple<br />
two-slider Brightness/Contrast<br />
control in action. Depending on<br />
your skill level you might prefer<br />
adjusting these parameters with<br />
the Levels or the Curves interface.<br />
This also allows you to fine-tune<br />
individual colour channels for colour<br />
corrections. More commonly the<br />
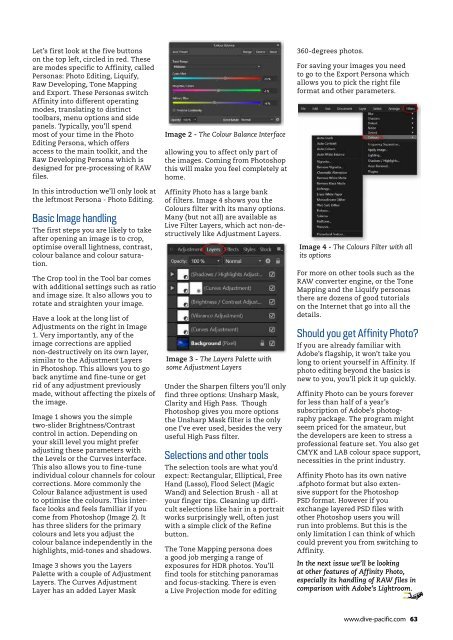
Colour Balance adjustment is used<br />
to optimise the colours. This interface<br />
looks and feels familiar if you<br />
come from Photoshop (Image 2). It<br />
has three sliders for the primary<br />
colours and lets you adjust the<br />
colour balance independently in the<br />
highlights, mid-tones and shadows.<br />
Image 3 shows you the Layers<br />
Palette with a couple of Adjustment<br />
Layers. The Curves Adjustment<br />
Layer has an added Layer Mask<br />
Image 2 - The Colour Balance Interface<br />
allowing you to affect only part of<br />
the images. Coming from Photoshop<br />
this will make you feel completely at<br />
home.<br />
Affinity Photo has a large bank<br />
of filters. Image 4 shows you the<br />
Colours filter with its many options.<br />
Many (but not all) are available as<br />
Live Filter Layers, which act non-destructively<br />
like Adjustment Layers.<br />
Image 3 - The Layers Palette with<br />
some Adjustment Layers<br />
Under the Sharpen filters you’ll only<br />
find three options: Unsharp Mask,<br />
Clarity and High Pass. Though<br />
Photoshop gives you more options<br />
the Unsharp Mask filter is the only<br />
one I’ve ever used, besides the very<br />
useful High Pass filter.<br />
Selections and other tools<br />
The selection tools are what you’d<br />
expect: Rectangular, Elliptical, Free<br />
Hand (Lasso), Flood Select (Magic<br />
Wand) and Selection Brush - all at<br />
your finger tips. Cleaning up difficult<br />
selections like hair in a portrait<br />
works surprisingly well, often just<br />
with a simple click of the Refine<br />
button.<br />
The Tone Mapping persona does<br />
a good job merging a range of<br />
exposures for HDR photos. You’ll<br />
find tools for stitching panoramas<br />
and focus-stacking. There is even<br />
a Live Projection mode for editing<br />
360-degrees photos.<br />
For saving your images you need<br />
to go to the Export Persona which<br />
allows you to pick the right file<br />
format and other parameters.<br />
Image 4 - The Colours Filter with all<br />
its options<br />
For more on other tools such as the<br />
RAW converter engine, or the Tone<br />
Mapping and the Liquify personas<br />
there are dozens of good tutorials<br />
on the Internet that go into all the<br />
details.<br />
Should you get Affinity Photo?<br />
If you are already familiar with<br />
Adobe’s flagship, it won’t take you<br />
long to orient yourself in Affinity. If<br />
photo editing beyond the basics is<br />
new to you, you’ll pick it up quickly.<br />
Affinity Photo can be yours forever<br />
for less than half of a year’s<br />
subscription of Adobe’s photography<br />
package. The program might<br />
seem priced for the amateur, but<br />
the developers are keen to stress a<br />
professional feature set. You also get<br />
CMYK and LAB colour space support,<br />
necessities in the print industry.<br />
Affinity Photo has its own native<br />
.afphoto format but also extensive<br />
support for the Photoshop<br />
PSD format. However if you<br />
exchange layered PSD files with<br />
other Photoshop users you will<br />
run into problems. But this is the<br />
only limitation I can think of which<br />
could prevent you from switching to<br />
Affinity.<br />
In the next issue we’ll be looking<br />
at other features of Affinity Photo,<br />
especially its handling of RAW files in<br />
comparison with Adobe’s Lightroom.<br />
www.dive-pacific.com 63