gpt.07.613.100.b.sw-motech.alu-rack.bmw.g650x.installation.instructions.01.pdf
gpt.07.613.100.b.sw-motech.alu-rack.bmw.g650x.installation.instructions.01.pdf
gpt.07.613.100.b.sw-motech.alu-rack.bmw.g650x.installation.instructions.01.pdf

Create successful ePaper yourself
Turn your PDF publications into a flip-book with our unique Google optimized e-Paper software.
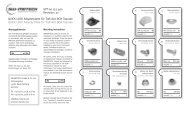
ALU-RACK BMW G 650 X-Challenge & X-Moto<br />
ALU-RACK BMW G 650 X-Challenge & X-Moto<br />
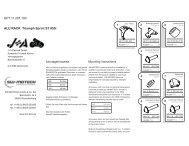
Montagehinweise<br />
Alle vom Motorrad gelösten Schrauben<br />
sind gemäß Herstellerangaben wieder<br />
zu montieren, oder mit von SW-<br />
MOTECH gelieferten Schrauben zu<br />
ersetzen. Falls nicht anderweitig<br />
definiert, diese Schrauben nach Tabelle<br />
anziehen:<br />
M6 9,6 Nm<br />
M8 23 Nm<br />
Gegebenenfalls Schrauben mit flüssiger<br />
Schraubensicherung einkleben.<br />
Prüfen Sie nach 50 km alle<br />
Verbindungen auf festen Sitz.<br />
Max. Zuladung 5 Kg inklusive Koffer<br />
und Adapter.<br />
Ist das Zuladungsgewicht des<br />
Fahrzeuges durch den Hersteller<br />
limitiert, gelten diese Grenzwerte.<br />
SW-MOTECH GmbH & Co. KG<br />
Bahnhofstrasse 44d<br />
35282 Rauschenberg<br />
-Germany-<br />
Tel.: ++ 49 (0) 6425 816 800<br />
Fax: ++ 49 (0) 6425 816 810<br />
www.<strong>sw</strong>-<strong>motech</strong>.com<br />
GPT.07.613.100<br />
Revision: 01<br />
Mounting Instruction<br />
SW-MOTECH products should be<br />
installed by a qualified, experienced<br />
motorcycle technician. If you are unsure<br />
of your ability to properly install a<br />
product, please have the product<br />
installed by your local motorcycle<br />
dealer. SW-MOTECH takes no<br />
responsibility for damages caused by<br />
improper <strong>installation</strong>.<br />
All screws, bolts and nuts, including<br />
all replacement hardware provided by<br />
SW-MOTECH, should be tightened to<br />
the torque specified in the OEM<br />
maintenance manual for your<br />
motorcycle. If no torque specifications<br />
are provided in the OEM maintenance<br />
manual, the following torques may be<br />
used:<br />
M6 9,6 Nm<br />
M8 23 Nm<br />
All screws, bolts and nuts should be<br />
checked after driving the first 50 km<br />
to ensure that all are tightened to the<br />
proper torque.<br />
Medium strength liquid thread-locker<br />
(i.e., "Locktite") should be used to<br />
secure all screws, bolts and nuts.<br />
Max. Load On Rear Carrier: 5 Kg (11<br />
lbs) inclusive case and adapter or the<br />
motorcycle manufacturer’s weight limit,<br />
whichever is less.<br />
1<br />
2<br />
3<br />
4<br />
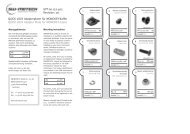
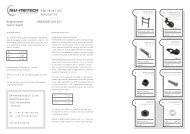
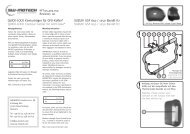
GPT.07.613.001<br />
ALU-RACK<br />
ALU-RACK<br />
schwarz/silber<br />
01<br />
Anzahl/ Pcs. 1<br />
Senkkopfschraube<br />
Counter Sunk Screw<br />
schwarz/silber<br />
M6 x 25 DIN 7991<br />
Anzahl/ Pcs. 4<br />
Senkscheibe<br />
Counter Sunk Washer<br />
schwarz/silber<br />
SE.00.064.02/01<br />
Anzahl/ Pcs. 4<br />
Mutter mit Bund,<br />
selbstsichernd<br />
Lock Nut with Flange<br />
schwarz/black<br />
M6 DIN 6927<br />
Anzahl/ Pcs. 4<br />
5<br />
6<br />
7<br />
Anschraubblech rechts<br />
Support B<strong>rack</strong>et<br />
right side<br />
GPT.07.613.002<br />
02<br />
Anzahl/ Pcs. 1<br />
Senkkopfschraube<br />
Counter Sunk Screw<br />
schwarz/black<br />
M6 x 40 DIN 7991<br />
Anzahl/ Pcs. 4<br />
Senkscheibe<br />
Counter Sunk Washer<br />
SE.00.064.02<br />
schwarz/black<br />
Anzahl/ Pcs. 4<br />
8<br />
9<br />
10<br />
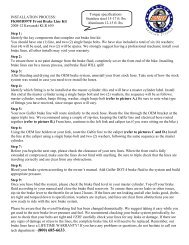
Anschraubblech links<br />
Support B<strong>rack</strong>et<br />
left side<br />
GPT.07.613.003<br />
02<br />
Anzahl/ Pcs. 1<br />
Distanzbuchse<br />
Spacer<br />
Da:20 Di:6,4 h:15<br />
Anzahl/ Pcs. 2<br />
Distanzbuchse<br />
Spacer<br />
Da:20 Di:6,4 h:17<br />
Anzahl/ Pcs. 2<br />
Innensechskantschraube<br />
11<br />
Hexagon Socket Screw<br />
12<br />
silber/silver<br />
M8 x 50 DIN 912<br />
Anzahl/ Pcs. 1<br />
Distanzbuchse<br />
Spacer<br />
Da:18 Di:8,4 h:8<br />
Anzahl/ Pcs. 1
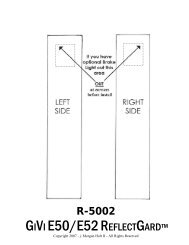
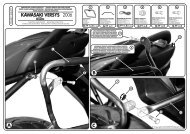
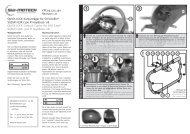
! Auspuff<br />
GPT.07.613.100<br />
10<br />
muss vor Montage des linken Anschraubblechs<br />
(5) an der mit (X) markierten Stelle demontiert werden.<br />
Nach Montage des Anschraubblechs (5) kann der<br />
Auspuff wie gezeigt mit Innensechskantschraube (11),<br />
der Original Unterlegscheiben sowie Distanzbuchse<br />
(12) montiert werden<br />
Exhaust must be removed before installing the left<br />
side support b<strong>rack</strong>et (5) at the (X)-marked place.<br />
After intallation of fixing b<strong>rack</strong>et (5) attach the exhaust<br />
together with hexagon socket screw (11), the original<br />
washers and spacer (12) as shown.<br />
1<br />
2<br />
3<br />
7<br />
6<br />
12 11<br />
X<br />
6 7 9 8 4<br />
4 5<br />
2<br />
3