Pampered chef Fresh-takes-Fall
- No tags were found...

You also want an ePaper? Increase the reach of your titles
YUMPU automatically turns print PDFs into web optimized ePapers that Google loves.
<strong>Fresh</strong> Takes for <strong>Fall</strong><br />
Recipes
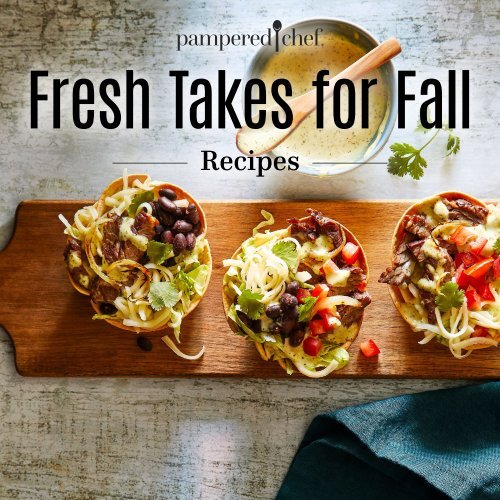
Burrito Cups<br />
→ SERVES 6<br />
Pickled Jalapeño Ranch Dressing<br />
1 cup (250 mL) ranch dressing<br />
¼<br />
¼<br />
Burrito Cups<br />
cup (60 mL) pickled jalapeños<br />
(see cook’s tip)<br />
cup (60 mL) cilantro<br />
1 tbsp (15 mL) vegetable oil, plus more<br />
for brushing<br />
6 (5–6"/13–15-cm) flour tortillas<br />
8 oz. (250 g) skirt steak, trimmed of<br />
½<br />
¼<br />
¼<br />
excess fat<br />
small onion, thinly sliced<br />
tsp (1 mL) salt<br />
tsp (1 mL) garlic powder<br />
1 cup (250 mL) shredded iceberg lettuce<br />
½<br />
Prep Time:<br />
cup (125 mL) black beans, drained<br />
and rinsed<br />
10 mins Total Time: 22 mins<br />
1. Preheat the oven to 375°F (190°C).<br />
2. For the dressing, combine the ranch, jalapeños, and cilantro with the Manual Food<br />
Processor until smooth. Refrigerate until ready to serve.<br />
3. For the burrito cups, lightly brush the oil on both sides of the tortillas. Place each tortilla<br />
into a well of the Large Muffin Pan, and press into the sides to form a cup. Bake until<br />
brown and crisp, about 10–12 minutes.<br />
4. Preheat the Deluxe Electric Grill & Griddle, with the griddle plates, on for<br />
2 minutes.<br />
5. Season the steak and onion with the oil, salt, and garlic powder in a medium bowl.<br />
Toss to coat.<br />
6. When preheated, add the steak and onion to the griddle. Cook in the Closed position.<br />
7. Remove the steak and onion from the griddle and rest for 5 minutes, then slice the steak<br />
against the grain.<br />
8. Add the lettuce, beans, cheese, onions, and steak to the tortilla cups. Top with the<br />
pickled jalapeño ranch dressing and tomatoes.<br />
Cook’s Tips<br />
We love how milder, pickled jalapeños add a subtle heat when combined with ranch. You can<br />
omit the jalapeños, if you’d like.<br />
Make this recipe just the way you like by adding your own unique and creative toppings!<br />
2 oz. (60 g) Monterey Jack cheese,<br />
coarsely grated (½ cup/125 mL)<br />
½<br />
cup (125 mL) chopped plum tomatoes
Veggie and Ricotta Flatbread<br />
→ SERVES 16<br />
2 pkgs (8 oz./235 g each) refrigerated<br />
crescent roll dough<br />
1 large carrot, peeled<br />
1 red bell pepper, seeded and cut<br />
into quarters<br />
1 tsp (5 mL) olive oil<br />
¼<br />
1½<br />
Prep Time:<br />
tsp (1 mL) salt<br />
1 cup (250 mL) whole milk ricotta cheese<br />
1 egg<br />
tsp (7 mL) Garlic & Herb Rub<br />
2 tsp (10 mL) honey<br />
1<br />
⁄8 tsp (0.5 mL) cayenne pepper<br />
Black pepper<br />
20 mins Total Time: 30 mins<br />
1. Preheat the oven to 425°F (220°C). Cover the bottom of the Stone Bar Pan with the<br />
dough. Use your fingers to seal the perforations and press the dough up the sides.<br />
Fold the extra dough over the sides to form a border. Bake until light golden brown,<br />
6–8 minutes.<br />
2. Meanwhile, slice the carrot using the No. 1 thickness of the Rapid-Prep Mandoline.<br />
Place 2 bell pepper quarters on top of one another and place them into the chute of<br />
the Rapid-Prep Mandoline with the tapered part facing the blade. Slice on the No. 3<br />
thickness. In a medium bowl, toss the vegetables with the olive oil and salt.<br />
3. Combine the ricotta, rub, and egg, and mix until smooth. Spread the mixture inside the<br />
border of the dough. Place the vegetables onto the ricotta mixture in an even layer.<br />
4. Bake until the edges are deep golden brown, about 8–10 minutes. Remove the pan from<br />
the oven and let it stand for 5 minutes to let the filling set.<br />
5. Combine the honey and cayenne pepper in a small microwave-safe bowl and microwave<br />
for 10 seconds. Drizzle the flatbread with the honey mixture. Sprinkle with black pepper<br />
and parsley or green carrots tops (see cook’s tip).<br />
Cook’s Tip<br />
If you buy carrots with green tops, don’t let them go to waste! Finely chop the carrot greens<br />
and use them to garnish the flatbread instead of using parsley.<br />
Optional: 1 tsp (5 mL)<br />
chopped parsley
Shrimp Teriyaki<br />
→ SERVES 4<br />
Green Beans & Shrimp<br />
Sauce<br />
1 lb. (450 g) green beans, trimmed and<br />
cut in half<br />
1 tbsp (15 mL) olive oil<br />
1 lb. (450 g) large raw shrimp (31–40<br />
count), peeled, deveined, and tails<br />
removed<br />
1 can (8 oz./250 g) sliced water<br />
chestnuts, drained<br />
1 green onion, sliced<br />
1 tbsp (15 mL) sesame seeds<br />
¼<br />
Prep Time:<br />
Optional: White rice or cauliflower rice<br />
cup (60 mL) low-sodium, gluten-free<br />
soy sauce<br />
1 tbsp (15 mL) rice vinegar<br />
3 garlic cloves, pressed<br />
2 tsp (10 mL) grated fresh ginger<br />
2 tsp (10 mL) sesame oil<br />
1 tsp (5 mL) honey<br />
15 mins Total Time: 30 mins<br />
¹<br />
⁄8–¼ tsp (0.5–1 mL) red pepper flakes<br />
1. Fill the Nonstick Saute & Steam Pan with 2 cups (500 mL) of water. Cover and<br />
bring to a boil over high heat.<br />
2. Remove the lid and place the green beans in an even layer in the steamer and position<br />
it over the top of the pan. Cover the steamer with the lid, reduce to medium heat, and<br />
steam for 8–10 minutes, or until the beans are crisp-tender.<br />
3. For the sauce, combine the soy sauce, rice vinegar, garlic, ginger, sesame oil, honey,<br />
and red pepper flakes in a small bowl. To make a cornstarch slurry, combine the<br />
cornstarch and water in a separate bowl.<br />
4. Turn off the heat. Using oven mitts, remove the lid and steamer from the pot. Set the<br />
green beans aside. Drain the water from the pan and return the pan to medium heat. Heat the<br />
oil for 2 minutes. Add the shrimp and sauce; cook, turning once, until the shrimp are pink<br />
and opaque, about 2–3 minutes. Stir in the green beans and water chestnuts.<br />
5. Stir the cornstarch slurry, then add it to the pan. Cook until thickened, 2–3 minutes.<br />
6. Remove the pan from the heat and sprinkle with the green onion and sesame seeds. If<br />
you’d like, serve over rice or cauliflower rice.<br />
Cook’s Tips<br />
Cornstarch slurries are used to thicken hot, simmering sauces.<br />
Cornstarch is naturally gluten-free. However, it can be processed with other ingredients that<br />
contain gluten. If you need gluten-free cornstarch, check the label.<br />
1 tbsp (15 mL) cornstarch<br />
(see cook’s tip)<br />
1 tbsp (15 mL) water
One-Pot Chicken & Gnocchi<br />
→ SERVES 6<br />
2 slices bacon, cut into ½" (1-cm) pieces<br />
6 boneless, skinless chicken thighs<br />
¼<br />
Prep Time:<br />
(4 oz./125 g each)<br />
tsp (1 mL) salt<br />
¹<br />
⁄8 tsp (0.5 mL) black pepper<br />
1 tbsp (15 mL) Italian Seasoning<br />
Mix, divided<br />
10 mins Total Time: 30 mins<br />
3 garlic cloves, pressed<br />
2 cups (500 mL) 2% or whole milk<br />
1 lb. (450 g) potato gnocchi<br />
2 oz. (60 g) Parmesan cheese, finely<br />
grated (1 cup/250 mL)<br />
1. Heat the Enameled Cast Iron Skillet over medium-high heat for 2–3 minutes. Add<br />
the bacon and cook until crisp, 5–7 minutes, stirring occasionally. Remove the bacon<br />
with a slotted spoon and set aside.<br />
2. Season the chicken with the salt, pepper, and 2 tsp (10 mL) of the seasoning mix.<br />
Add the chicken to the skillet and cook, 5–7 minutes per side, or until the temperature<br />
reaches 165°F (74°C). Remove the chicken from the pan and set aside.<br />
3. Reduce the heat to medium, add the garlic, and cook until fragrant, 10–20 seconds. Add<br />
the milk, gnocchi, cheese, bacon, and remaining seasoning mix. Bring to a boil, reduce<br />
the heat to medium, and cook, stirring frequently, until the milk has reduced slightly and<br />
started to thicken, about 3 minutes.<br />
4. Stir in the peas. Add the chicken and cook on medium-low for an additional 3–5<br />
minutes, or until the sauce thickens slightly.<br />
Cook’s Tip<br />
We love that this sauce doesn’t use heavy cream. The gnocchi releases starch as it simmers<br />
in milk, transforming it into a rich sauce.<br />
½<br />
cup (125 mL) frozen peas
Vegan Black Bean Soup<br />
→ SERVES 8<br />
Soup<br />
Prep Time:<br />
1 tbsp (15 mL) vegetable oil<br />
1 red bell pepper, seeded and cut<br />
into chunks<br />
10 mins Total Time: 35 mins<br />
1 small yellow onion, cut into chunks<br />
1 jalapeño, seeded and quartered<br />
2 garlic cloves, peeled<br />
2 cups (500 mL) low-sodium<br />
vegetable broth<br />
4 cans (15 oz./425 g each) black beans,<br />
undrained, divided (see cook’s tip)<br />
1. Heat the oil in the Enameled Cast Iron Dutch Oven over medium heat for 2–3<br />
minutes. Add the vegetables and garlic to the pot; cook until softened and slightly<br />
browned, 4–6 minutes.<br />
2. Add the broth, 3 cans of undrained beans, cumin, and bay leaf. Bring to a boil, covered,<br />
over high heat. Reduce the heat and simmer, uncovered, stirring occasionally until<br />
thickened, 12–15 minutes.<br />
3. Meanwhile, coarsely chop the salsa ingredients using the Flex+ Food Processor<br />
attachment fitted with the multiuse blade.<br />
4. Remove the soup from the heat and discard the bay leaf. Puree with the Immersion<br />
Blender attachment on high until smooth, about 1 minute.<br />
5. Add the remaining can of beans and stir to combine. Serve the soup with tomato salsa<br />
and sliced avocado, if you’d like.<br />
Cook’s Tip<br />
Adding the liquid from the canned beans gives this soup body and deepens the flavor.<br />
¼<br />
tsp (1 mL) cumin<br />
1 bay leaf<br />
Tomato Salsa<br />
3 plum tomatoes, quartered<br />
¼<br />
¼<br />
cup (60 mL) cilantro, loosely packed<br />
tsp (1 mL) salt<br />
1 lime<br />
Optional: Sliced avocado
Apple Torte<br />
→ SERVES 8<br />
Apple Topping<br />
3 medium Pink Lady apples<br />
¼<br />
½<br />
Crust<br />
(about 1 lb./450 g), cored and cut<br />
in half lengthwise<br />
cup (60 mL) granulated sugar<br />
tsp (2 mL) cinnamon<br />
Optional: ¹<br />
⁄8 tsp (0.5 mL)<br />
ground nutmeg<br />
1 cup (250 mL) flour<br />
¼<br />
½<br />
Prep Time:<br />
15 mins Total Time: 1 hour<br />
cup (60 mL) granulated sugar<br />
cup (125 mL) butter (1 stick), softened<br />
1. Preheat the oven to 375°F (190°C).<br />
2. Slice the apples using the Flex+ Food Processor attachment fitted with the thick slicing<br />
blade. Microwave the apples, covered, until very soft, about 8 minutes. Drain.<br />
3. Combine the sugar, cinnamon, and nutmeg (if using) in a small bowl. Set aside.<br />
4. In a clean food processor bowl, combine the flour and sugar, and pulse 2–3 times to<br />
combine. Cut the butter into quarters and place them into the bowl. Process for 10<br />
seconds, scrape down the bowl, and continue processing for 20–30 seconds, or until<br />
mixture looks like wet sand. Place the crumbs onto the bottom and 1" (2.5 cm) up the<br />
sides of the 9" (23-cm) Springform Pan.<br />
5. For the filling, beat the cream cheese and sugar in a medium bowl using the Hand Mixer<br />
attachment and beaters until smooth. Add the egg and vanilla; beat on low speed until<br />
just blended. Pour the mixture into the crust.<br />
6. Toss the apple slices with the cinnamon sugar mixture. Arrange the apples over the<br />
cream cheese mixture and sprinkle with the almonds. Bake for 30 minutes.<br />
7. Cool completely on a cooling rack. If you’d like, sprinkle with powdered sugar<br />
before serving.<br />
Filling<br />
1 pkg (8 oz./250 g) cream<br />
cheese, softened<br />
¼<br />
cup (60 mL) granulated sugar<br />
1 egg<br />
½<br />
¼<br />
tsp (2 mL) vanilla extract<br />
cup (60 mL) sliced almonds, toasted<br />
(see cook’s tip)<br />
Optional: Powdered sugar for dusting