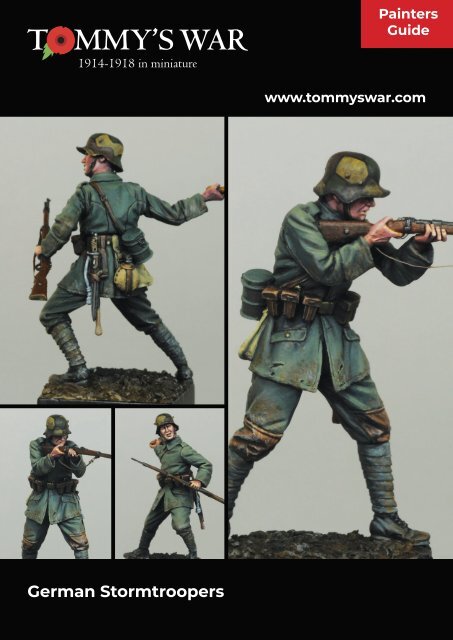
Tommy's War German Stormtrooper painting guide
Our German Stormtrooper painting guide by Alex Long shows how to paint late-war German infantry.
Our German Stormtrooper painting guide by Alex Long shows how to paint late-war German infantry.

You also want an ePaper? Increase the reach of your titles
YUMPU automatically turns print PDFs into web optimized ePapers that Google loves.
T MMY’S WAR<br />
1914-1918 in miniature<br />
Painters<br />
Guide<br />
www.tommyswar.com<br />
Trade Order Catalogue<br />
April 2014<br />
tommyswar.co.uk<br />
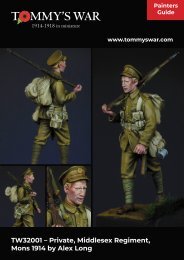
<strong>German</strong> <strong>Stormtrooper</strong>s
T MMY’S WAR<br />
TW32001<br />
Painters Guide<br />
1914-1918 in miniature<br />
Foreword<br />
For this <strong>painting</strong> <strong>guide</strong> I wanted to focus more on<br />
the <strong>German</strong> Infantry uniform & equipment and<br />
weathering, as preparation and flesh <strong>painting</strong> have<br />
already been covered in my first <strong>guide</strong> to <strong>painting</strong><br />
TW32001.<br />
So with that in mind this <strong>guide</strong> will begin with the<br />
figure(s) already assembled, primed in black, with the<br />
face(s) and hands completed, and the initial rough<br />
layer of uniform basecoat informing the main areas of<br />
highlight, as can be seen in fig1<br />
2<br />
Fig 1<br />
www.tommyswar.com
Painting - Uniform colour choices<br />
As always the wet palette is my preferred way to<br />
work, fig2 shows the colours for the uniform laid out<br />
on the palette with the transitions in shade already<br />
mixed in order of light to dark. I have used Vallejo<br />
Acrylics for these as their <strong>German</strong> Field Grey is a very<br />
good approximation of the original colour and easily<br />
manipulated with tonal changes to represent<br />
fading and wear. I have chosen Dark Sea Blue to<br />
darken the Field Grey, this is because it is on the<br />
green side of the blue spectrum and will not<br />
“muddy” the Field Grey, helping maintain the<br />
correct tone in the shadows. The same principle<br />
applies to the Sunny Skintone used in the highlights,<br />
as this flesh colour leans towards yellow and will not<br />
turn the highlights grey, as pure white would.<br />
Fig 3<br />
Now that the transitions are adequately blended<br />
the next stage is to return to the highlights and<br />
shadows and gradually increase the contrast again.<br />
This is achieved by again using very thin layers of all<br />
the pre-mixed uniform colours, gradually building<br />
up to the lightest light and down to the darkest dark<br />
in the areas of highest contrast. Fig4 illustrates this<br />
process, we can also see in the later of these images<br />
that the belts and ammo pouches have been basecoated<br />
in burnt umber.<br />
Fig 2<br />
Painting - Uniform and Equipment<br />
As the figure is already black I have chosen to begin<br />
with the 2nd highlight in thin layers fig1 to provide<br />
contrast before moving on to the 3rd highlight fig3<br />
applied in a more textured fashion.<br />
The harsh transitions between dark and light are<br />
now blended out by applying thin filtered layers of<br />
the mid-tone uniform colour, these should be quite<br />
thin and built up in layers being mindful to allow<br />
each previous layer to thoroughly dry before<br />
progressing to the next fig4.<br />
Fig 4<br />
www.tommyswar.com<br />
3
TIP<br />
Filtering colour in thin glazes should be<br />
done with the side of the brush not the<br />
tip. The key here is always to keep the<br />
layers thin.<br />
As the colour pigment is suspended in<br />
medium and thinned with water, more<br />
colour will settle in the area of the final<br />
sweep of the brush, therefore highlights<br />
should be glazed towards the lightest<br />
point and shadows towards the darkest<br />
point. If you feel the contrast is too high,<br />
then filter over the entire area with the<br />
mid-tone.<br />
Fig 2<br />
Fig 1<br />
4<br />
www.tommyswar.com
Painting - Palette<br />
I always use a wet palette for <strong>painting</strong>, simply<br />
because it keeps the paint workable for longer,<br />
enabling the painter to come back to his work<br />
without having to re-mix paint. In the photo right<br />
we see the palette with a selection of colours used.<br />
I lay the paints out beforehand and pre-mix all the<br />
colour transitions ready on the palette. Below I have<br />
listed all the colours used, all coming from the<br />
Vallejo range of acrylics:<br />
Fig 3<br />
Flesh<br />
70.951<br />
70.928<br />
70.860<br />
70.804<br />
70.814<br />
70.859<br />
White<br />
Light Flesh<br />
Medium<br />
Flesh<br />
Beige red<br />
Burnt Red<br />
Black Red<br />
Uniform<br />
70.830<br />
70.898<br />
70.950<br />
70.845<br />
The colour transitions for each<br />
area of the figure are mixed on<br />
the wet palette from dark to light,<br />
additional tones are created by<br />
adding more volume of either<br />
warm or cold colours.<br />
<strong>German</strong> Field<br />
Grey<br />
Dark Sea<br />
Blue<br />
Black<br />
Sunny<br />
Skin tone<br />
Equipment & Gewehr 98<br />
70.941<br />
70.821<br />
70.950<br />
70.856<br />
70.845<br />
70.823<br />
Burnt Umber<br />
Weathering<br />
<strong>German</strong><br />
Camo Beige<br />
Black<br />
Ochre<br />
Brown<br />
Sunny<br />
Skin tone<br />
Luftwaffe<br />
Camo Green<br />
70.983<br />
70.950<br />
70.856<br />
70.928<br />
Flat Earth<br />
Black<br />
Ochre<br />
Brown<br />
Light Flesh<br />
Colours are referenced from the Vallejo acrylics range. The <strong>guide</strong> indicates the major parts of the figure only:<br />
The <strong>painting</strong> reference should be used as a <strong>guide</strong> only. It is recommended that you test the colours before applying<br />
to the figure.<br />
www.tommyswar.com<br />
5
Fig 5<br />
Fig 6<br />
Fig 8<br />
Fig 7<br />
6<br />
www.tommyswar.com
Fig 11 Fig 12<br />
Painting - The Uniform and Equipment<br />
( Continued )<br />
The burnt umber is highlighted with Sunny Skintone<br />
and focus is put on the edges of all the leatherwork,<br />
this will help give definition to the straps and<br />
pouches and help them stand out against the<br />
uniform, it is also the area which is likely to receive<br />
the most wear. A very dark red (almost black) is then<br />
washed over the leather areas and allowed to settle<br />
in the creases to further define the details. Fig5<br />
shows the development of the leatherwork.<br />
The canvas bag is painted with <strong>German</strong> camo beige,<br />
darkened with black and highlighted with light<br />
flesh.<br />
Fig 9<br />
To achieve a simple woodgrain effect for the Gewehr,<br />
it has first been painted brown umber and then a<br />
grain pattern applied using sunny skintone fig 6.<br />
This looks very harsh to begin with but with a few<br />
thin glazes of a red brown it is made much more<br />
subtle fig 7.<br />
For the tortoise shell camo pattern on the helmet, it<br />
has first been base coated in Ochre Brown, following<br />
this a rough pattern has been painted in with black<br />
fig 8, the resulting segments are then painted in<br />
with a darkened brown umber and Luftwaffe green<br />
fig 9. In addition, the water bottle has been painted<br />
with Ochre Brown, using sunny skintone to highlight<br />
and a dark burnt umber to shade. Gasmask case<br />
is painted in field grey, using the same mix as the<br />
uniform. All metallics have been painted using either<br />
gunmetal or brass as appropriate and washed over<br />
with thin black filters.<br />
Painting - Final details and weathering<br />
With the figure approaching completion it’s time to<br />
add some final details and weathering for a more<br />
authentic look. I began with thin applications of a<br />
flat earth/black mix using a dabbing/stippling action<br />
with the brush, progressively lightening this mix by<br />
adding more flat earth. Small dots and spatters are<br />
added with the tip of the brush, along with changes<br />
in tone created by adding ochre brown and using<br />
a grey/white mix to represent chalky earth marks.<br />
Metal chip marks are applied to the helmet using<br />
a finely sharpened pencil. The Gewehr and leather<br />
straps have also been given a wash with a brown/<br />
orange filter diluted with a touch of satin varnish to<br />
help provide a different texture. See fig 10<br />
Fig 10<br />
www.tommyswar.com<br />
79
This series is commissioned by<br />
Tommy’s <strong>War</strong> Limited<br />
Figure sculpted by Nino Pizzichemi, box art by Alex Long<br />
T MMY’S WAR<br />
1914-1918 in miniature<br />
www.tommyswar.com