Heartscapes & Poured Color 2 Lookbook by Paula Nadelstern
Designing this fabric collection turned out to be Paula’s personal great escape during the isolating quarantine. The design strategies that are the heartbeats of her quilts - symmetry and serendipity laced with abundant color - led her to imaginative patterns, both old and new. It is Paula’s heartfelt wish that this small collection of versatile fabrics will entice quilters of every level to create beautiful patchwork.
Designing this fabric collection turned out to be Paula’s personal great escape during the isolating quarantine. The design strategies that are the heartbeats of her quilts - symmetry and serendipity laced with abundant color - led her to imaginative patterns, both old and new. It is Paula’s heartfelt wish that this small collection of versatile fabrics will entice quilters of every level to create beautiful patchwork.

Create successful ePaper yourself
Turn your PDF publications into a flip-book with our unique Google optimized e-Paper software.
HEARTSCAPES & POURED COLOR 2<br />
BY PAULA NADELSTERN
STARSCAPES BY PAULA NADELSTERN | PAGE 12 PRIMARILY PAISLEY BY CLAUDIA CLARK MYERS | PAGE 16<br />
THE PIVOT BY KAREN BENSON | PAGE 26<br />
HEARTSTRINGS BY PEGGY TRUE<br />
PAGE 28
LET THE GOOD TIMES ROLL<br />
BY PEGGY TRUE<br />
PAGE 32<br />
ROSE WINDOW BY RANDA MULFORD | PAGE 36<br />
NIGHT & DAY<br />
BY PEGGY TRUE<br />
PAGE 34<br />
EXOGENESIS BY RICKI SELVA | PAGE 42<br />
FOLLOW YOUR HEART BY STEPHANIE SHERIDAN | PAGE 44<br />
© 2022 BENARTEX, LLC.<br />
132 WEST 36TH ST, 4TH FLOOR, NEW YORK, NY 10018<br />
PHONE: 212-840-3250 • FAX: 212-921-8204 • INFO@BENARTEX.COM • BENARTEX.COM
LOOKBOOK SPRING 2022<br />
Designing these fabric collections turned out to be my<br />
personal great escape during the isolating quarantine. Relying on the<br />
design strategies that are the heartbeats of my quilts—symmetry and<br />
serendipity laced with abundant color—triggered lots of “what if”<br />
questions leading to imaginative patterns. It is my heartfelt wish that<br />
this smaller-than-usual collection of versatile fabrics entices quilters of<br />
every level to create beautiful patchwork.<br />
The title was conceived when I thought I heard Twyla Tharp<br />
say -- in the American Masters documentary “Twyla Moves” -- that she<br />
starts every new choreography <strong>by</strong> finding the heartscape of the dance.<br />
Wow, I thought, what an imaginative phrase. Is it a technical term?<br />
After rewinding I realized Ms. Tharp actually used the word heartbeat.<br />
So here we are. With the help of lots of clever people at<br />
Benartex and the mill, I found the heartbeat of a new fabric collection<br />
in the midst of a worldwide pandemic. Extreme kudos go to my creative<br />
friends who share my love of pattern and made these extraordinary<br />
quilts: Karen Benson, Randa Mulford, Claudia Clark Myers, Ricki<br />
Selva, Stephanie Sheridan and Peggy True. Randa and Karen also lent<br />
me their illustration and editing skills. All of these quilt mavens worked<br />
extremely hard to make me look good.
MY DESIGN PROCESS<br />
BY PAULA NADELSTERN<br />
Every now and then, a design idea<br />
will simply present itself to me out of the blue,<br />
so to speak. But most of the time, I don’t wait<br />
for inspiration. I flirt with it, wheedle it, stalk it.<br />
I want my quilt to look seamless, but putting it<br />
together is not a seamless process. Designing<br />
moves forward (and back) in fits and starts.<br />
Sometimes I worry this will be the time I don’t<br />
get the magic to work. Usually, I obsessively<br />
stay in that place and try to force it. I whine,<br />
I moan, I kvetch, I curse. At times like this, if<br />
I can stop feeling stressed because I haven’t<br />
figured out the big picture and just get myself<br />
to focus on one small task like cutting or<br />
sewing, the act of doing something calms me<br />
down and the respite often triggers a<br />
possible resolution.<br />
Making a quilt involves so many<br />
different types of tasks, it makes sense to pick<br />
one that fits your prevailing mood. Design<br />
when your powers of observation are at their<br />
most acute, not when something else in your<br />
life is vying for immediate attention. Try not to<br />
be too product-oriented or to judge how you<br />
are doing <strong>by</strong> how long it takes. I know this is<br />
hard because in our complicated lives, time<br />
is a premium commodity. Even our free time<br />
gets rigidly scheduled, making us feel cheated<br />
if we can’t zoom full speed ahead into the<br />
creative zone. The time spent developing an<br />
idea differs from problem to problem, and<br />
person to person. Keep in mind that when<br />
I start a quilt, I don’t have to relearn the<br />
techniques I’ve written five books explaining.<br />
And even though I know what I’m doing, I still<br />
don’t complete an intricate block in a day. It’s<br />
more like four or five long days.<br />
Why are quilters always asked,<br />
“How long did it take?” Is there a right<br />
answer? Is shorter better? Does it make<br />
you more clever that you figured out how<br />
to race through the process in record time<br />
and now you can get on with life’s so-called<br />
important stuff? Or is longer better because<br />
it shows you are industrious and persevering.<br />
After examining my labor-intensive quilts,<br />
people often say, “My, you have so much<br />
patience.” Are they suggesting that anyone<br />
with stamina and an unusual capacity to cope<br />
with boredom could create something like<br />
it if they were so inclined? What about skill,<br />
artistry, passion? Without comparing myself to<br />
Michelangelo, I wonder if that’s the first thing<br />
they would have said watching him flat on his<br />
back for four years.<br />
I’m often asked, what do I do when<br />
I don’t like the finished version, since I don’t<br />
do a mock-up that would in theory show the<br />
finished product before I begin sewing. Here’s<br />
the answer: I critique, audition, whack off,<br />
and add more. I put a scrap of fabric on top<br />
of the component that looks out of sync or<br />
overwhelms the design. I use mirrors to reflect<br />
the impact of the revised version. Typically,<br />
this ritual gets repeated with a wide range of<br />
fabric snippets before I commit to rehabilitative<br />
surgery. Sometimes I decide to leave well<br />
enough alone.<br />
Eventually you have to trust the<br />
process. At some point I realize an ending is<br />
forming, flickering straight ahead like the light<br />
at the end of a tunnel, and I make my way<br />
toward it with confidence. Sometimes, I even<br />
slow the process down and savor the moment.<br />
6 • LOOKBOOK 212-840-3250 • BENARTEX.COM
BENARTEX.COM • 212-840-3250<br />
LOOKBOOK • 7
12 • LOOKBOOK 212-840-3250 • BENARTEX.COM
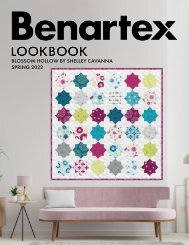
STARSCAPES<br />
DESIGNED BY: PAULA NADELSTERN, BRONX, NY<br />
FINISHED SIZE: 36” X 40”<br />
FABRIC: HEARTSCAPES & POURED COLOR 2<br />
BY PAULA NADELSTERN<br />
I pride myself on being a Patternista hardwired to see pattern<br />
everywhere but I am not, alas, a Pattern Maker. Each new quilt is a bit<br />
improvisational; I figure it out as I go. I rely on my fabrics and design<br />
strategies to lead me, however long it takes, to a happy ending. As<br />
much as I tried to keep this quilt simple, hiccups arose in the middle of<br />
the piecing process when most of the units were already cut and sewn<br />
together. I needed to fit in additional puzzle pieces in order to sew the<br />
major design components together in straight lines (meaning, no insets).<br />
You might find a better way to resolve this.<br />
It is hard, after the fact, to ascertain how much fabric I used.<br />
Tethered initially <strong>by</strong> how many repeats I had in my possession, I have to<br />
admit that limited yardage sparked brainstorms that led to unexpected,<br />
beautiful resolutions. With all of this said, please know I’ve tried my<br />
best and apologize for any snafus in the following instructions.<br />
FABRIC LIST:<br />
6 repeats Heartscape Panel Red Multi (13142-10)<br />
1 yard Stripe Aholic Red Multi (13145-10)<br />
1 yard Secret Garden Red (13144-10)<br />
1 yard Secret Garden Blue (13144-55)<br />
1 yard Whirlwind Black (13147-12)<br />
BACKING:<br />
1½ yards Whirlwind (13147-55)<br />
CUTTING THE PATCHES<br />
Draft one half of Starscape full size on graph paper. I wanted<br />
the quilt to be 36” wide. This determined the length, inevitably a few<br />
inches longer than the width. I taped together two pieces of 17” x 22”<br />
graph paper with bold inch demarcation lines. The grid makes it easier<br />
to measure and draft accurately.<br />
Drafting the pattern full size allows you to create actual size<br />
templates, adding ¼” seam allowance to each template.<br />
Refer to the colored diagram in the piecing section to see<br />
where each numbered patch is used.<br />
PATCH 1<br />
Start in the center. This star is a 6-sided hexagon; therefore,<br />
each of the center triangles is 60º. From the top of the 60º triangle to<br />
the base is 8”. A line drawn from the apex (or tip of the triangle) to the<br />
middle of the baseline is called the “axis of symmetry”. This line passing<br />
down the center divides the triangle into two mirror-image halves.<br />
Although I initially filled the triangle with one fabric, after lots<br />
of auditioning, I eventually divided the triangle into three fabrics. You<br />
can use only one fabric or combine as many as you like. The key is<br />
to use an on-grain, bilaterally symmetrical pattern like 13144: Secret<br />
Garden, 3146: Curlicue, or (my choice) 13142: Heartscape panels.<br />
Place the center of the fabric design exactly on the midline of the<br />
triangle so that the pattern is divided into identical halves on either side<br />
of the center line.<br />
This diagram shows the full Starscape quilt, with the Line A-B<br />
dividing it into two identical halves. The cutting instructions are for all the<br />
patches (pieces) required for the full quilt. The piecing instructions are<br />
for sewing one half of the quilt; you need to make two identical halves<br />
following these instructions.<br />
BENARTEX.COM • 212-840-3250<br />
LOOKBOOK • 13
Make a 60 o , 8” long template using see-through gridded<br />
template plastic. Once you’ve decided where to position the template<br />
on the fabric, use a fine pointed black permanent pen to trace a lot of<br />
the details of the selected motif directly onto the template. These marks<br />
will ensure perfect alignment and help you find the identical patch six<br />
times. Mark on the front of your fabric.<br />
Make six identical Patch 1s.<br />
PATCH 2<br />
Patch 2 = 60 o , 6” long. Mark and cut six. Note the point nearest Patch<br />
14 is the top of the triangle’s design. Choose something that pops for<br />
that location.<br />
PATCH 3<br />
Patch 3 is a 4” square. Mark and cut 24. These can be made using one<br />
piece of fabric or pieced. I pieced mine using two fabrics (Panel Red<br />
and Secret Garden Red) in a quilt pattern I call Sixty-Thirty. Because<br />
I did not have enough fabric to make all 4” squares the same, the four<br />
squares marked 3C are the same 60-30 construction but cut from<br />
different fabrics, Panel Red and Blue Secret Garden.<br />
The four Patch 3Cs are Patch 3s trimmed according to the full-size<br />
diagram.<br />
Patches 3L & 3R are four more Patch 3s trimmed according to the fullsize<br />
diagram. Cut two Patches 3Ls and two Patches 3R.<br />
PATCH 4:<br />
Make a template for Patch 4L/4R from the full-size drawing, Mark one<br />
side 4L. Flip over and mark the other side 4R. Cut two Patch 4Ls and<br />
two Patch 4Rs. Patch 4’s design should appear to continue seamlessly<br />
from Patch 3.<br />
PATCH 5:<br />
Patch 5 is a Patch 3C trimmed. Cut two 5Ls and two 5Rs. To trim: make<br />
one see-through template with ¼ seam allowance on all four sides<br />
from full size diagram. I made four additional Patch 3s, placed the<br />
template facing one direction on two patches, mark and cut. Then flip<br />
the template over facing the other direction, mark and cut.<br />
PATCH 6:<br />
Refer to full size drawing to determine correct shape and size. Continue<br />
the Patch 3 motif. Cut four. An alternate method would be to create a<br />
Patch 3 + Patch 6 unit.<br />
PATCH 7:<br />
Refer to full size drawing for shape and size. Visually continue the Patch<br />
6 motif. Cut four. Consider cutting a Patch 3 + Patch 6 + Patch 7 unit.<br />
PATCH 8:<br />
Refer to full size drawing for shape and size. Visually continue the Patch<br />
5 motif. Cut four: two 8Ls and two 8Rs. Consider cutting a Patch 5 +<br />
Patch 8 unit.<br />
PATCH 9:<br />
Refer to full size drawing to determine correct shape and size. Cut<br />
Patches 9 and 10 from the same designated background fabric. Cut<br />
two Patch 9Ls and two Patch 9Rs.<br />
PATCH 10:<br />
Refer to full size drawing to determine correct shape and size. Cut two<br />
Patch 10Ls and two 10Rs from the Patch 9 fabric.<br />
STRIP 11:<br />
Cut Strips 11, 12, and 13 2” wide from the same fabric. I used an<br />
identical portion of 13145-10: Stripe-a-holic Red Multi with a strong<br />
contrast to the rest of the fabrics. Choosing a stripe automatically<br />
slides the eyes from here to there, forming visual pathways that instill a<br />
welcoming element of motion.<br />
Refer to full-size drawing to determine correct shape and size. Cut four<br />
Strip 11s.<br />
STRIP 12:<br />
Cut six Strip 12s.<br />
STRIP 13:<br />
Cut four Strip 13s.<br />
PATCH 14:<br />
Cut four diamonds, 4” long x 2.5” wide. Patch 14 is an important<br />
design element. Although my Patch 14 does not, consider choosing<br />
a symmetrical motif that POPS! And one that perhaps relates to the<br />
design at the top of Patch 2.<br />
PATCH 15:<br />
Refer to full size drawing for shape and size. Visually continue Patches<br />
3L+4L so the connection between 3+4+15 is camouflaged and<br />
appears seamless. Cut four: two 15Ls and two 15Rs.<br />
PIECING SEQUENCE<br />
This section describes the piercing sequence for one half of the<br />
Starscape quilt. To make the complete quilt, you must create two<br />
identical halves, and then sew the halves together. I pin a lot where<br />
joins motifs must meet accurately.<br />
14 • LOOKBOOK 212-840-3250 • BENARTEX.COM
UNIT COLOR KEY:<br />
Unit 1 -- Pink<br />
Unit 2 -- Green<br />
Unit 3 -- Yellow Orange<br />
Unit 4 -- Aqua<br />
Unit 5 -- Orange<br />
Unit 6 -- Blue<br />
Unit 7 -- Purple<br />
Unit 8 -- Yellow Green<br />
Unit 9 – Olive<br />
1. Make Unit 1 (Pink).<br />
• Sew three Patch 1s together.<br />
• Sew Patch 11 to the left side of (1+1+1)<br />
2. Make Unit 2 (Green).<br />
• Sew Patch 5L to Patch 3C<br />
• Sew Patch 10L to (3C+5L)<br />
• Sew Patch 2 to the short side of Strip 12<br />
• Sew (2+12) to (5+3C+10L)<br />
3. Sew Unit 1 to Unit 2.<br />
4. Make Unit 3 (Yellow Orange).<br />
• Sew Strip 13 to Patch 14<br />
• Sew Patch 8L to (13+14)<br />
5. Sew Unit 3 to Unit (1+2).<br />
6. Make Unit 4 (Blue).<br />
• Sew Patch 3L to Patch 4L<br />
• Sew Patch 9L to (3L+4L)<br />
• Sew 15L to (9L+3L+4L)<br />
• Sew four Patch 3s together<br />
• Sew Patch 6 to (3+3+3+3)<br />
• Sew (9L+3L+4L+15L) to (3+3+3+3+6)<br />
7. Make Unit 5 (Orange).<br />
• Sew short side of Patch 12 to Patch 2<br />
8. Sew Unit 4 to Unit 5.<br />
9. Sew Unit 3 to Unit (4+5).<br />
10. Sew Unit (1+2) to Unit (3+4+5).<br />
11. Make Unit 6 (Blue).<br />
• Sew Strip 13 to Patch 14<br />
• Sew Patch 7 to (13+14)<br />
12. Make Unit 7 (Purple).<br />
• Sew short side of Strip 12 to Patch 2<br />
13. Make Unit 8 (Yellow Green).<br />
• Sew Patch 3R to Patch 4R<br />
• Sew Patch 9R to (3R+4R)<br />
• Sew four Patch 3s together<br />
• Sew Patch 6 to (3+3+3+3)<br />
• Sew Patch 7 to (6+3+3+3+3)<br />
• Sew (9R+3R+4R) to (3+3+3+3+6+7)<br />
14. Make Unit 9 (Olive).<br />
• Sew Patch 3C to Patch 5R<br />
• Sew Patch 10R to (3C+5R)<br />
• Sew Patch 11 to (3C+5R+10R)<br />
• Sew Patch 14 to 8R<br />
• Sew Patch 15R to (14+8R)<br />
• Sew (11+10R+3C+5R) to (15R+14+8R)<br />
15. Sew Unit 7 to Unit 8.<br />
16. Sew Units (7+8) to Unit 9.<br />
17. Sew Unit 6 to Units (7+8+9).<br />
18. Sew Units (1+2+3+4+5) to Units (6+7+8+9) to complete each<br />
half.<br />
Finally, sew the two halves together as shown in the full diagram,<br />
pinning the motifs and seams where they meet.<br />
For more information on how to make templates see pages 84-93 in<br />
my book FABRICADABRA: Simple Quilts, Complex Fabric.<br />
BENARTEX.COM • 212-840-3250<br />
LOOKBOOK • 15
16 • LOOKBOOK 212-840-3250 • BENARTEX.COM
PRIMARILY PAISLEY<br />
DESIGNED BY: CLAUDIA CLARK MYERS, DULUTH, MN<br />
FINISHED SIZE: 36” H X 70” W<br />
FABRIC: HEARTSCAPES & POURED COLOR 2 BY PAULA NADELSTERN<br />
FABRIC LIST:<br />
4* panels <strong>Heartscapes</strong> Panel Red/Multi (13142-10)<br />
1 panel <strong>Heartscapes</strong> Panel Blue/Multi (13142-55)<br />
½ yard Secret Garden Red/Multi (13144-10)<br />
1 yard Stripe Aholic Black/White (13145-12)<br />
½ yard Whirlwind Raspberry (13147-24)<br />
½ yard Whirlwind Citrine (13147-40)<br />
½ yard Whirlwind Lime/Turq (13147-41)<br />
1 yard Whirlwind Royal (13147-55)<br />
½ yard Whirlwind Violet (13147-66)<br />
BACKING:<br />
2¼ yards Whirlwind Royal (13147-55)<br />
TIPS<br />
1*. In order to have the same small kaleidoscope in the center of<br />
each paisley, Claudia needed 8 identical repeats. Because the<br />
kaleidoscope she chose has only 2 repeats per panel, she needed<br />
4 panels. The effect is fantastic, creating a graceful visual path for<br />
the eye to follow around the wreath of paisleys. You can choose<br />
your own selection of kaleidoscopes.<br />
2. Use some 3” to 4” wide fusible permanent stabilizer on the bias<br />
outside edges of the black and white stripe as soon as you cut<br />
them. Claudia says hers got wavy and distorted even with a basting<br />
thread.<br />
3. All of the paisley pieces are cut first from freezer or fusible paper,<br />
ironed onto each fabric, cut out with an eyeballed 1/4” seam<br />
which is turned to the back, ironed and glued. The edges are then<br />
top stitched with a small straight stitch close to the fold.<br />
4. As you are stacking the layers of the paisleys, stitch the edges and<br />
cut away the fabrics from the back, eyeballing a ¼” seam around<br />
the opening and leaving only the top layer. As you work, remove<br />
the paper also but only after the folded edge has been stitched.<br />
5. Note the strip of 13147-66 Whirlwind Violet inset along the<br />
diagonal seam lines. It is made like a long piece of straight binding,<br />
inserted into the seam as you are sewing them together and then<br />
pressed and top stitched close to the folded edge.<br />
BENARTEX.COM • 212-840-3250<br />
LOOKBOOK • 17
BACKGROUND FABRICS PIECED AND UNQUILTED BEFORE PAISLEY LAYER<br />
18 • LOOKBOOK 212-840-3250 • BENARTEX.COM
PAISLEYS ADDED<br />
BENARTEX.COM • 212-840-3250<br />
LOOKBOOK • 19
PRIMARILY PAISLEY TEMPLATE - LARGE SIZE<br />
COPY OR TRACE 4 SECTIONS AT 100%<br />
AND COMBINE TO MAKE ONE LARGE TEMPLATE<br />
(SEE DIAGRAM BELOW)<br />
TEMPLATE DIAGRAM:<br />
LARGE TEMPLATE SECTION 1 OF 4<br />
20 • LOOKBOOK 212-840-3250 • BENARTEX.COM
LARGE TEMPLATE SECTION 2 OF 4<br />
BENARTEX.COM • 212-840-3250<br />
LOOKBOOK • 21
PRIMARILY PAISLEY TEMPLATE - LARGE SIZE<br />
COPY OR TRACE 4 SECTIONS AT 100%<br />
AND COMBINE TO MAKE ONE LARGE TEMPLATE<br />
(SEE DIAGRAM BELOW)<br />
TEMPLATE DIAGRAM:<br />
LARGE TEMPLATE SECTION 3 OF 4<br />
22 • LOOKBOOK 212-840-3250 • BENARTEX.COM
LARGE TEMPLATE SECTION 4 OF 4<br />
BENARTEX.COM • 212-840-3250<br />
LOOKBOOK • 23
PRIMARILY PAISLEY TEMPLATE - SMALL SIZE<br />
COPY OR TRACE 4 SECTIONS AT 100%<br />
AND COMBINE TO MAKE ONE LARGE TEMPLATE<br />
(SEE DIAGRAM BELOW)<br />
TEMPLATE DIAGRAM:<br />
SMALL TEMPLATE SECTION 1 OF 2<br />
24 • LOOKBOOK 212-840-3250 • BENARTEX.COM
SMALL TEMPLATE SECTION 2 OF 2<br />
BENARTEX.COM • 212-840-3250<br />
LOOKBOOK • 25
26 • LOOKBOOK 212-840-3250 • BENARTEX.COM
THE PIVOT<br />
DESIGNED BY: KAREN BENSON, HOUSTON, TX<br />
FINISHED SIZE: 41” X 41”<br />
FABRIC: HEARTSCAPES & POURED COLOR 2 BY PAULA NADELSTERN<br />
FABRIC LIST:<br />
2½ yards <strong>Heartscapes</strong> Panel Blue/Multi (13142-55)<br />
½ yards Medley Red/Multi (13143-10)<br />
1 yard Medley Blue/Multi (13143-55)<br />
1¾ yard Secret Garden Red/Multi (13144-10)<br />
¾ yard Secret Garden Blue/Multi (13144- 55)<br />
1¾ yard Curlique Red (13146-10)<br />
¾ yard Curlique Blue (13146-55)<br />
½ yard Whirlwind Royal (13147-55)<br />
½ yard Whirlwind Violet (13147-66)<br />
1 yard Whirlwind Turquoise (13147-80) Includes binding<br />
BACKING:<br />
1½ yards Whirlwind Royal (13147-55)<br />
40”<br />
E<br />
40”<br />
E<br />
E<br />
E<br />
E<br />
E<br />
C<br />
C C<br />
E C C C C<br />
E C<br />
8a<br />
6b 6b<br />
D<br />
D<br />
D<br />
D 8a<br />
E<br />
E E<br />
6a<br />
E E<br />
E<br />
D<br />
D<br />
D<br />
D<br />
D<br />
D<br />
D<br />
D<br />
C<br />
2a<br />
C C<br />
C<br />
D<br />
D<br />
D<br />
3a<br />
D<br />
2b 2b<br />
3b 3b<br />
C E<br />
E C E<br />
C<br />
E<br />
E 2a<br />
2a E E 3a<br />
3a E<br />
E<br />
E<br />
E<br />
E<br />
C<br />
2b 2b<br />
C<br />
C<br />
3b 3b<br />
D<br />
2a<br />
D<br />
D<br />
3a<br />
D<br />
C<br />
D C C<br />
C<br />
D<br />
D<br />
D<br />
D<br />
D<br />
D<br />
D<br />
E E<br />
E E<br />
E D<br />
D<br />
1a D<br />
D E<br />
7b<br />
1b 1b<br />
7b<br />
C E C<br />
C E C<br />
7a C C 1a<br />
1a C C 7a<br />
C<br />
C<br />
C<br />
C<br />
7b<br />
E<br />
1b<br />
E<br />
1b<br />
7b<br />
E D<br />
D<br />
1a D<br />
D E<br />
E E<br />
E E<br />
D<br />
D<br />
D<br />
D<br />
D<br />
D<br />
C<br />
D<br />
D<br />
4a<br />
C C<br />
C<br />
D<br />
D<br />
D<br />
5a<br />
D<br />
C<br />
4b 4b<br />
5b 5b<br />
C<br />
E<br />
E C E<br />
E<br />
E 4a<br />
4a E E 5a<br />
5a E<br />
E<br />
E C E<br />
E<br />
C<br />
4b 4b<br />
5b 5b<br />
C<br />
D 4a<br />
D<br />
D<br />
D<br />
C<br />
C C<br />
5a<br />
C<br />
D<br />
D<br />
D<br />
D<br />
D<br />
D<br />
D D<br />
E<br />
E E<br />
6a<br />
E E<br />
D<br />
D<br />
D<br />
E<br />
8a<br />
D<br />
6b<br />
C<br />
E<br />
6b 8a<br />
C<br />
E<br />
E C C<br />
C<br />
E E C C C E<br />
E<br />
E<br />
1a = Secret Garden Blue Multi 13144-55<br />
1b = Curlique Blue Multi 13146-55<br />
2a = Secret Garden Red Multi 13144-10<br />
2b = Curlique Red Multi 13146-10<br />
3a = Secret Garden Red Multi 13144-10<br />
3b = Curlique Blue Multi 13146-55<br />
4a = Secret Garden Red Multi 13144-10<br />
4b = Curlique Red Multi 13146-10<br />
5a = Secret Garden Blue Multi 13144-55<br />
5b = Curlique Red Multi 13146-10<br />
6a = Secret Garden Blue Multi 13144-55<br />
6b = Curlique Blue Multi 13146-55<br />
7a = Secret Garden Red Multi 13144-10<br />
7b = Curlique Red Multi 13146-10<br />
8a = Curlique Blue Multi 13146-55<br />
C = Turquoise<br />
D = Violet<br />
E = Royal Blue<br />
BENARTEX.COM • 212-840-3250<br />
LOOKBOOK • 27
28 • LOOKBOOK 212-840-3250 • BENARTEX.COM
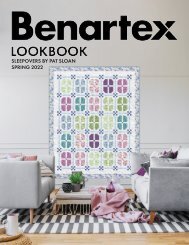
HEARTSTRINGS<br />
DESIGNED BY: PEGGY TRUE, SAN ANTONIO, TX<br />
FINISHED SIZE: 62¾” X 75¾”<br />
FABRIC: HEARTSCAPES & POURED COLOR 2 BY PAULA NADELSTERN<br />
FABRIC LIST<br />
Red version:<br />
1 panel <strong>Heartscapes</strong> Panel Red/Multi (13142-10)<br />
4 smallest medallions cut 4.5” square for corners<br />
1 yard Medley Red/Multi (13143-10) - Border<br />
1½ yards Secret Garden Red/Multi (13144-10)<br />
1½ yards Stripe Aholic Red Multi (13145-10)<br />
1½ yards Curlicue Red Multi (13146-10)<br />
65” LOF Whirlwind Black (13147-12)<br />
For sashings for both Red and Blue versions. I cut with length<br />
of fabric for non stretchy sashings and inner border<br />
1½ yards Whirlwind Raspberry (13147-24)<br />
1½ yards Whirlwind Royal (13147-55)<br />
1½ yards Whirlwind Turquoise (13147-80)<br />
Blue version:<br />
1 panel <strong>Heartscapes</strong> Panel Blue/Multi (13142-55)<br />
4 smallest medallions cut 4.5” square for corners<br />
1 yard Medley Blue/Multi (13143-55) - Border<br />
1½ yards Secret Garden Blue/Multi (13144-55)<br />
1½ yards Stripe Aholic Turquoise/Multi (13145-82)<br />
1½ yards Curlicue Blue Multi (13146-55)<br />
65” LOF Whirlwind Black(13147-12)<br />
For sashings for both Red and Blue versions. I cut with length<br />
of fabric for non stretchy sashings and inner border<br />
1½ yards Whirlwind Royal (13147-55)<br />
1½ yards Whirlwind Violet (13147-66)<br />
1½ yards Whirlwind Turquoise (13147-80)<br />
TIPS/PEGGY’s COMMENTS:<br />
1. Press all fabrics with heavy steam or mist with water while ironing<br />
to preshrink. I noticed that it shrinks more in width than in length. For<br />
successful blocks it is important that the Strata is even, not warped,<br />
and is the correct length (54”) and width (13.25”).<br />
2. If necessary, adjust seams to get to the perfect width. Open the<br />
Strata’s seams first <strong>by</strong> finger pressing. Use light spray starch to give<br />
a good pressing before cutting the squares.<br />
3. For BLOCKS, cut the squares diagonally using the 45-degree line<br />
on your mat. DO NOT stack. Cut each square individually into 4<br />
triangles. Match the like triangles together to become blocks. Pin<br />
for success. Sew together, pressing seams to one side and ‘spin’ the<br />
centers for flattest centers.<br />
4. Pin each block to 12 1/2” square marking on your ironing surface.<br />
Use spray starch again to give blocks a good press.<br />
5. For SASHING, cut the solid black with length of unit on length of<br />
fabric. This prevents stretching. Sashing units are 12.5” x 1.25”.<br />
6. CORNERSTONES are 1.25” square.<br />
7. INNER BORDERS: Cut the Whirlwind INNER BORDERS 1.5” wide,<br />
piecing the 54” lengths to get the correct measurements.<br />
8. FINAL BORDER: Cut Medley at 4.5” across the width of the fabric,<br />
piecing as needed for correct lengths.<br />
9. Border CORNERS are smallest medallions from <strong>Heartscapes</strong><br />
Panels. Cut four 4.5” squares.<br />
10. BINDING can be Black or repeat the Whirlwind color used as<br />
inner border and cornerstones.<br />
BENARTEX.COM • 212-840-3250<br />
LOOKBOOK • 29
Each Strata unit is 54” x 13.25” for 12” finished blocks. I made five<br />
Strata units to get 20 blocks. Make each Strata a different arrangement<br />
of fabric strips for a variety of blocks.<br />
Sew 4 matching triangles together to create 4 different 12” blocks.<br />
Cut 13.25” squares into triangles. The individual strata are 54” x<br />
13.25”. Each Strata unit yields four 13.25”squares.<br />
30 • LOOKBOOK 212-840-3250 • BENARTEX.COM
BLUE VERSION<br />
BENARTEX.COM • 212-840-3250<br />
LOOKBOOK • 31
32 • LOOKBOOK 212-840-3250 • BENARTEX.COM
LET THE GOOD TIMES ROLL<br />
DESIGNED BY: PEGGY TRUE, SAN ANTONIO, TX<br />
FINISHED SIZE: 55½” X 66½”<br />
FABRIC: HEARTSCAPES & POURED COLOR 2 BY PAULA NADELSTERN<br />
FABRIC LIST<br />
2 panels <strong>Heartscapes</strong> Panel Red/Multi (13142-10)<br />
For 12 large medallions<br />
3 panels <strong>Heartscapes</strong> Panel Blue/Multi (13142-55)<br />
For 18 large medallions<br />
½ yard Whirlwind Black (13147-12)<br />
For binding<br />
1 yard Whirlwind Citrine (13147-40)<br />
1 yard Whirlwind Royal (13147-55)<br />
1 yard Whirlwind Violet (13147-66)<br />
1 yard ( Whirlwind Turquoise13147-80)<br />
Individual block. Make 12 with Red medallions, 18 with Blue.<br />
Orientation of rings and background is the same in all blocks.<br />
Turquoise rings align when alternate blocks are rotated.<br />
TIPS/PEGGY’s COMMENTS:<br />
I made see-thru templates <strong>by</strong> adding 1/4” seam allowances to all<br />
shapes. Marking the centers of the arcs helps with seam alignment. If<br />
medallions are a little “off” symmetrically, I pin to a pin-able surface,<br />
pulling into alignment to match the template. I mark with a heat<br />
erasable pen and cut with scissors.<br />
Finger press during the sewing, then block to square up before pressing<br />
with an iron. I used light spray starch for this step.<br />
BENARTEX.COM • 212-840-3250<br />
LOOKBOOK • 33
34 • LOOKBOOK 212-840-3250 • BENARTEX.COM
NIGHT & DAY<br />
DESIGNED BY: PEGGY TRUE, SAN ANTONIO, TX<br />
FINISHED SIZE: 56½” X 68½”<br />
FABRIC: HEARTSCAPES & POURED COLOR 2 BY PAULA NADELSTERN<br />
FABRIC LIST<br />
Includes enough for binding (but not backing) to match the borders<br />
2½ yards Whirlwind Grey (13147-08)<br />
2½ yards Whirlwind Black (13147-12)<br />
2. Make 20 individual blocks. Seam allowances have been cropped.<br />
TIPS/PEGGY’s COMMENTS:<br />
1. This pattern is a Split Ohio Star block design- 12” finished size.<br />
3. Blocks finish at 12” square. Use your favorite method to create Half<br />
Square Triangles (HST) and Quarter Square Triangle units that finish<br />
at 4” square (4.5” unfinished). My favorite method for accuracy is<br />
templates.<br />
4. Cut borders 4.5” wide, pieced as necessary for length. I used HST<br />
units in opposite corners rather than miters. Plan for binding to<br />
match the border, black on black, gray on gray.<br />
BENARTEX.COM • 212-840-3250<br />
LOOKBOOK • 35
36 • LOOKBOOK 212-840-3250 • BENARTEX.COM
ROSE WINDOW<br />
DESIGNED BY: RANDA MULFORD, MOUNTAIN VIEW, CA<br />
FINISHED SIZE: 36” X 36”<br />
FABRIC: HEARTSCAPES & POURED COLOR 2 BY PAULA NADELSTERN<br />
FABRIC LIST:<br />
2 panels <strong>Heartscapes</strong> Panel Red/Multi (13142-10)<br />
1 yard Medley Red/Multi (13143-10)<br />
¾ yard Curlique Red/Multi (13146-10)<br />
1½ yard Whirlwind Black (13147-12)<br />
1-1/8 yard of any fabric for the backing<br />
TIP: Randa said she made heavy use of fused appliqué with satin<br />
stitching to finish the raw edges (rather than trying to piece all the<br />
curved seams), which made the process much faster.<br />
Fused and finished appliqué<br />
This pattern uses fused appliqué pieces for some of the shapes. For this<br />
technique you need to:<br />
1. Apply fusible material (such as WonderUnder, Misty Fuse, or Soft<br />
Fuse) to the wrong side of the fabric.<br />
2. Cut out the shape to be appliquéd.<br />
3. Fuse to shape to the right side of the base fabric, following the<br />
manufacturer’s directions.<br />
4. Finish the indicated edges of the appliquéd shape (that is, any<br />
edge that will not be included in a seam) with a satin stitch or other<br />
decorative stitch to prevent fraying. It’s advisable to use some kind<br />
of stabilizer under the satin stitching to prevent puckering.<br />
Cutting and assembly (refer to the diagram and photo for<br />
additional placement information)<br />
All seams are ¼“, pressed open.<br />
1. Piece A: cut one 9½” square centered on a large mandala from<br />
the panel.<br />
2. Piece B: cut 4 identical rectangles 5” x 9½” from the panel with a<br />
half mandala in each.<br />
3. Piece C: cut 4 identical rectangles 5” x 9½” from the Medley<br />
yardage with a half mandala in each<br />
Fuse black curved shapes to the two outer corners of each rectangle,<br />
overlapping the shapes where they meet in the middle of the long side<br />
of piece C.<br />
Finish the curved edges of the corner shapes with satin stitching (or<br />
some other decorative stitch).<br />
4. Join each piece B to a piece C along the longer edges, with the<br />
black curved corners of piece C away from piece B.<br />
5. Piece D: cut 4 identical squares 5” x 5” from a single mandala from<br />
the panel.<br />
Fuse a black curved shape to the outer corner of each square and<br />
finish the curved edge.<br />
6. Trim ¼” off of the two black sides of each piece D to make a<br />
4¾” square.<br />
7. Piece E: cut 4 identical 9½” squares (somewhat offset from center)<br />
from mandalas in the panel fabric.<br />
BENARTEX.COM • 212-840-3250<br />
LOOKBOOK • 37
Fuse black curved shapes to the three outer corners of each square,<br />
overlapping the shapes where they meet in the middle of the side of<br />
piece E; finish the curved edges.<br />
8. Align a piece D on top of each piece E in the corner that doesn’t<br />
have a black overlay.<br />
Baste the black edges of piece D to the piece E underneath, then finish<br />
the raw edges of the black corner of piece D.<br />
To reduce bulk, trim away the excess fabric of piece E that’s been<br />
covered <strong>by</strong> piece D.<br />
9. Sew a B+C piece to two opposite sides of piece A (with B joining to<br />
A).<br />
10. Sew a D+E piece to two opposite sides of the two remaining<br />
B+C pieces.<br />
11. Sew the B+C+D+E pieces to the long sides of the C+B+A+B+C<br />
piece.<br />
You should now have a 27½” square.<br />
12. From the Curlique fabric and the remaining Medley fabric, cut out<br />
20 curved pieces (“windows”) according to the full-sized template<br />
attached. All of these pieces should be prepared before cutting<br />
with fusible material on the back of the fabric.<br />
13. Piece F: cut two pieces of black Whirlwind fabric, each 6” x 27½”.<br />
On each piece F, arrange 5 “window” pieces in the center of a long<br />
side as shown in the diagram/photo.<br />
Fuse each window shape on to piece F, then finish the curved edges.<br />
14. Sew one piece F (with appliqués) to opposite sides of the center<br />
27½” square.<br />
15. Piece G: cut two pieces black Whirlwind fabric, each 6” x 38”.<br />
On each piece G, arrange 5 “window” pieces in the center of a long<br />
side as shown in the diagram/photo.<br />
Fuse each window shape onto piece G, then finish the curved edges.<br />
16. Sew a piece G to each long side of the center rectangle.<br />
You should now have a 38” square.<br />
17. Make a quilt sandwich and quilt “as desired”.<br />
18. Trim the finished, blocked quilt to 36” square; bind with black<br />
Whirlwind fabric.<br />
ROSE WINDOW CURVED CORNER TEMPLATE<br />
COPY OR TRACE AT 100%<br />
MORE TEMPLATES ON PAGES 40 & 41<br />
38 • LOOKBOOK 212-840-3250 • BENARTEX.COM
BENARTEX.COM • 212-840-3250<br />
LOOKBOOK • 39
ROSE WINDOW TEMPLATE<br />
COPY OR TRACE 4 SECTIONS AT 100%<br />
AND COMBINE TO MAKE ONE LARGE TEMPLATE<br />
(SEE DIAGRAM ON RIGHT)<br />
TEMPLATE DIAGRAM<br />
40 • LOOKBOOK 212-840-3250 • BENARTEX.COM
BENARTEX.COM • 212-840-3250<br />
LOOKBOOK • 41
42 • LOOKBOOK 212-840-3250 • BENARTEX.COM
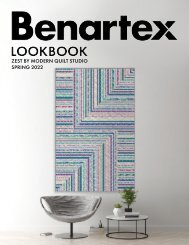
EXOGENESIS<br />
DESIGNED BY: RICKI SELVA, GIG HARBOR, WA<br />
FINISHED SIZE: 36” X 36”<br />
FABRIC: HEARTSCAPES & POURED COLOR 2<br />
BY PAULA NADELSTERN<br />
Each has patterning that connects it to the whole. Ricki’s best<br />
discovery was finding this patch that connected the center and edge.<br />
Ricki needed four of them and this was a very rare motif!<br />
FABRIC LIST:<br />
2½ yards <strong>Heartscapes</strong> Panel Blue/Multi (13142-55)<br />
½ yard Medley Red/Multi (13143-10)<br />
1 yard Medley Blue/Multi (13143-55)<br />
1 yard Secret Garden Red/Multi (13144-10)<br />
1 yard Curlique Red/Multi (13146-10)<br />
BACKING:<br />
1½ yards Whirlwind Royal (13147-55)<br />
TIPS/RICKI COMMENTS:<br />
I used a window template and pinned a patch to the edge of<br />
the window so I could audition for the next patch. When two edges<br />
came together in beautiful harmony, I marked the window’s edges with<br />
a chalk marker. Then I proceeded to map out a sufficient number of<br />
identical patches before I cut into the fabric.<br />
The title is a contemplation of life-force expanding across<br />
the universe. (Curiously, this piece took on a life of its own as I began<br />
designing it.)<br />
The circle on the illustration is only a reference to help Ricki<br />
choose edges that had the right arc, so that when placed together they<br />
made a big circle. There is ONLY straight-line piecing of squares and<br />
triangles in this quilt.<br />
There are four solid black diamonds cut from the spaces<br />
between kaleidoscopes on the <strong>Heartscapes</strong> Panel.<br />
RICKI SAYS: This quilt was so fun to make. It was a constant treasurehunt-puzzle!<br />
BENARTEX.COM • 212-840-3250<br />
LOOKBOOK • 43
44 • LOOKBOOK 212-840-3250 • BENARTEX.COM
FOLLOW YOUR HEART<br />
DESIGNED BY: STEPHANIE SHERIDAN<br />
FINISHED SIZE: 62” X 86”<br />
FABRIC: HEARTSCAPES & POURED COLOR 2 BY PAULA NADELSTERN<br />
FABRIC LIST:<br />
RED VERSION:<br />
A: 1 Panel <strong>Heartscapes</strong> Panel Red/Multi (13142-10)<br />
Fussy Cut: (6) 10-1/2” squares A1<br />
B: 1¼ yard Medley Red/Multi (13143-10)<br />
Fussy Cut: (12) 10-1/2” squares B1<br />
C: 1½ yard Secret Garden Red/Multi (13144-10)<br />
Fussy Cut: (9) 12-1/2” squares C1<br />
D: 1½ yard Curlique Red/Multi (13146-10)<br />
Fussy Cut: (8) 12-1/2” squares D1<br />
E: 1-3/8 yard Whirlwind Black (13147-12) - Includes Binding<br />
(1) 10-1/2” X WOF strip,<br />
subcut (26) 1-1/2” X 10-1/2” strips E1<br />
(2) 12-1/2” X WOF strips,<br />
subcut (10) 1-1/2” X 10-1/2” strips E1 and<br />
(36) 1-1/2” X 12-1/2” strips E2<br />
(9) 2-1/4” X WOF strips *, BINDING<br />
F: 1¼ yard Whirlwind Citrine (13147-40)<br />
1-1/4 YD (6) 6-1/2” X WOF strips,<br />
subcut (36) 6-1/2” squares F1<br />
G: 1½ yard Whirlwind Violet (13147-66)<br />
(6) 6-1/2” X WOF strips,<br />
subcut (32) 6-1/2” squares G1<br />
(8) 1-1/2” X WOF strips *, BORDER<br />
E: 1-3/8 yard Whirlwind Black (13147-12) - Includes Binding<br />
(1) 10-1/2” X WOF strip,<br />
subcut (26) 1-1/2” X 10-1/2” strips E1<br />
(2) 12-1/2” X WOF strips,<br />
subcut (10) 1-1/2” X 10-1/2” strips E1 and<br />
(36) 1-1/2” X 12-1/2” strips E2<br />
(9) 2-1/4” X WOF strips *, BINDING<br />
F: 1½ yard Whirlwind Royal (13147-55)<br />
(6) 6-1/2” X WOF strips,<br />
subcut (36) 6-1/2” squares F1<br />
(8) 1-1/2” X WOF strips *, BORDER<br />
G: 1¼ yard Whirlwind Turquoise (13147-80)<br />
1-1/4 YD (6) 6-1/2” X WOF strips,<br />
subcut (32) 6-1/2” squares G1<br />
BLOCK ASSEMBLY:<br />
Refer to BLOCK DIAGRAMS<br />
1. Sew (1) E1 strip to each side of (1) A1 square, then sew (1) E2 strip<br />
to top and bottom to create BLOCK 1A. Square to 12-1/2”, make<br />
(6).<br />
BLUE VERSION:<br />
A: 1 Panel <strong>Heartscapes</strong> Panel Blue/Multi (13142-55)<br />
Fussy Cut: (6) 10-1/2” squares A1<br />
B: 1¼ yard Medley Blue/Multi (13143-55)<br />
Fussy Cut: (12) 10-1/2” squares B1<br />
C: 1½ yard Secret Garden Blue/Multi (13144-55)<br />
Fussy Cut: (9) 12-1/2” squares C1<br />
D: 1½ yard Curlique Blue/Multi (13146-55)<br />
Fussy Cut: (8) 12-1/2” squares D1<br />
BENARTEX.COM • 212-840-3250<br />
LOOKBOOK • 45
2. Repeat Step 1 using B1 square with E1 and E2 strips to create<br />
BLOCK 1B. Square to 12-1/2”, make (12).<br />
5. Repeat Step 4 using squares shown in diagrams to create remaining<br />
blocks. Square all to 12-1/2’, make number indicated.<br />
3. Draw diagonal line on the wrong side of all F1 and G1 squares.<br />
4. Place (1) F1 square on the upper left and lower right corners of<br />
(1) C1 square. Sew on drawn lines, then trim excess to 1/4” and<br />
press open. Repeat on opposite corners with G1 squares to complete<br />
BLOCK 2A. Square to 12-1/2”. Make (4).<br />
46 • LOOKBOOK 212-840-3250 • BENARTEX.COM
QUILT ASSEMBLY:<br />
Refer to QUILT DIAGRAM for proper block placement and rotation.<br />
6. Sew blocks together into rows, then sew rows together.<br />
ROW 1: 1A - 2A - 1B - 2B - 1A<br />
ROW 2: 2A - 1B - 3A - 1B - 2B<br />
ROW 3: 1B - 3B - 1A - 3C - 1B<br />
ROW 4: 3D - 1B - 2C - 1B - 3D<br />
ROW 5: 1B - 3C - 1A - 3B - 1B<br />
ROW 6: 2B - 1B - 3A - 1B - 2A<br />
ROW 7: 1A - 2B - 1B - 2A - 1A<br />
BLUE VERSION<br />
BORDER ASSEMBLY:<br />
Measure width and length of quilt top to ensure border cutting sizes.<br />
Below are our measurements<br />
7. Sew (1) G (Red version) or F (Blue version) 1-1/2” X (84-1/2”)<br />
strip to each side of quilt, then sew (1) G (Red version) or F (Blue<br />
version) 1-1/2” X (62-1/2”) strip to top and bottom of quilt.<br />
FINISHING:<br />
Cut batting and backing 3” larger than top on all sides. Layer backing,<br />
batting and top together and baste or pin. When quilting is completed,<br />
trim excess batting and backing. Bind with E fabric.<br />
Quilt<br />
SAMPLE<br />
AVAILABLE!<br />
#FOLHRTMD<br />
BENARTEX.COM • 212-840-3250<br />
LOOKBOOK • 47
free pattern<br />
FOLLOW YOUR HEART<br />
BY STEPHANIE SHERIDAN (2 COLORWAYS | 62” X 86”)<br />
48 • LOOKBOOK 212-840-3250 • BENARTEX.COM
Designing this fabric collection turned out to be <strong>Paula</strong>’s personal great escape during the isolating quarantine. The design strategies that<br />
are the heartbeats of her quilts - symmetry and serendipity laced with abundant color - led her to imaginative patterns, both old and new.<br />
It is <strong>Paula</strong>’s heartfelt wish that this small collection of versatile fabrics will entice quilters of every level to create beautiful patchwork.<br />
HEARTSCAPES & POURED COLOR 2: HPC10PK • FQHPCPK (17PC)<br />
MARCH/APRIL 2022 DELIVERY • 11 SKUS • 100% COTTON<br />
FULL COLLECTION (15 YDS): HRTSCP15 • (10 YDS): HRTSCP10 • PAULANADELSTERN.COM<br />
HEARTSCAPES PANEL 13142-10 RED/MULTI<br />
HEARTSCAPES PANEL 13142-55 BLUE/MULTI<br />
BENARTEX.COM • 212-840-3250<br />
LOOKBOOK • 49
MEDLEY 13143-10 RED/MULTI<br />
MEDLEY 13143-55 BLUE/MULTI<br />
SECRET GARDEN 13144-10 RED/MULTI<br />
SECRET GARDEN 13144-55 BLUE/MULTI<br />
STRIPE AHOLIC<br />
13145-10 RED/MULTI<br />
STRIPE AHOLIC<br />
13145-12 BLACK/WHITE<br />
STRIPE AHOLIC<br />
13145-82 TURQUOISE/MULTI<br />
CURLIQUE 13146-10 RED/MULTI<br />
CURLIQUE 13146-55 BLUE/MULTI<br />
50 • LOOKBOOK 212-840-3250 • BENARTEX.COM
<strong>Paula</strong>’s artistic and opulent <strong>Poured</strong> <strong>Color</strong> collection<br />
expands with the addition of a new texture - Whirlwind!<br />
The whorls and stippling are a blend of well-known<br />
artistic techniques, and the bright hues and rich intensity<br />
make this fabric a perfect compliment for <strong>Heartscapes</strong>.<br />
MARCH/APRIL 2022 DELIVERY • 8 SKUS • 100% COTTON<br />
FULL COLLECTION (15 YDS): POURD215 • (10 YDS): POURD210 • PAULANADELSTERN.COM<br />
WHIRLWIND 13147-08 GREY<br />
WHIRLWIND 13147-12 BLACK<br />
WHIRLWIND 13147-24 RASPBERRY<br />
WHIRLWIND 13147-40 CITRINE<br />
WHIRLWIND 13147-41 LIME/TURQ<br />
WHIRLWIND 13147-55 ROYAL<br />
WHIRLWIND 13147-66 VIOLET<br />
WHIRLWIND 13147-80 TURQUOISE<br />
BENARTEX.COM • 212-840-3250<br />
LOOKBOOK • 51
SHOPPING KARMA<br />
I swear this is true. I think I heard on<br />
National Public Radio that they figured out where the<br />
material instinct is located in the brain. (My husband<br />
suggests they may have actually said “maternal<br />
instinct.”) If there is such a thing, it proves human<br />
beings have a natural predisposition to acquire<br />
material. And, obviously, some of us have better<br />
developed gray matter than others. I love printed<br />
textiles. Stick me in a shop brimming with bolts and<br />
my fingers instinctively reach out to fondle the goods,<br />
igniting a lovefest.<br />
If you’re going to develop a knack for<br />
material pursuits, you’ve got to have an attitude. Be<br />
your own advocate. Never make excuses for the<br />
size of your stash. Cloth is as valid a palette as any<br />
other medium. Personally, I feel sorry for the ones<br />
who don’t get it.<br />
52 • LOOKBOOK 212-840-3250 • BENARTEX.COM
precuts available:<br />
HPC10PK • FQHPCPK (17PC)<br />
BENARTEX.COM • 212-840-3250<br />
LOOKBOOK • 53
54 • LOOKBOOK 212-840-3250 • BENARTEX.COM
paula nadelstern<br />
I make my quilts on the same block in the Bronx where I’ve lived my whole life. Until my mother-in-law passed<br />
away in May 2021, we were three generations living within a block of each other on this most northern NYC street:<br />
my daughter, my mother-in-law, my husband and me. For over twenty-five years, my workspace in our ninth floor,<br />
two-bedroom, cram-packed-with-fabric-and-sewing-stuff apartment was the forty-two-inch round kitchen table. Our<br />
perpetual dining companion was a Singer Featherweight, purchased for $25 at a yard sale. I used to call it an old<br />
machine until I learned it was a year younger than I am. Together we made my first quilt (a comforter cover, really) in<br />
1968 in my college dorm. We continued as a team through the first twenty-seven quilts in my kaleidoscopic series.<br />
Today I work in a 15- <strong>by</strong> 10-foot studio revamped from my daughter’s former bedroom. Picture ceiling-high<br />
cupboards stuffed with fabric, drawers overflowing with the paraphernalia quilters collect, six feet of<br />
design wall, and a Bernina poised on a 4 <strong>by</strong> 6-foot counter, waiting to continue the forty-five quilt in<br />
my series.<br />
My interest in things kaleidoscopic began in 1987 when I was struck <strong>by</strong> a bolt of<br />
fabric—a sumptuous, sinfully expensive, bilaterally symmetrical Liberty of London<br />
tana lawn. Little did I know that purchasing a quarter yard would change my<br />
life forever, leading me, three years and four quilts later, to the state-ofthe-art<br />
kaleidoscope and a new career. The lesson from this anecdote<br />
is obvious: buy that piece of fabric no matter how expensive it<br />
is. As I peer through the incredible kaleidoscopes I have<br />
garnered over the years, like a sleuth searching for<br />
clues, I discover my design inspiration all over<br />
again. Who knows what the next turn of the<br />
scope will reveal, to me or to you?<br />
PAULANADELSTERN.COM<br />
BENARTEX.COM • 212-840-3250<br />
LOOKBOOK • 55
ACCESS ALL OF OUR MARKETING ASSETS<br />
NOW ON OUR NEW RETAILER PORTAL!<br />
WWW.BENARTEXMARKETINGHUB.COM<br />
FOLLOW US @BENARTEX<br />
132 WEST 36TH ST, 4TH FLOOR, NEW YORK, NY 10018 • 212-840-3250 • BENARTEX.COM