

Pearl Redbox RBM 20 Module Owner's Manual v
Pearl Redbox RBM 20 Module Owner's Manual v
Pearl Redbox RBM 20 Module Owner's Manual v

You also want an ePaper? Increase the reach of your titles
YUMPU automatically turns print PDFs into web optimized ePapers that Google loves.
3. Press OUT (F4) to access the click output settings.<br />
4. Use DEC- / INC+ or the VALUE / TEMPO DIAL to adjust the settings:<br />
• OutAssign: This setting lets you assign the output through which the click sound will be sent. When set to<br />
“MAIN,” the click will be sent out both channels of the MAIN OUT. When set to “AUX,” the click will be sent out<br />
both channels of the AUX OUT. You can also select “AUX L” or “AUX R,” which lets you send it out only<br />
one of the AUX OUT channels.<br />
Note: If the “Output” setting on the main UTILITIES Menu is set to “MAIN>AUX,” this means the signal sent out the<br />
MAIN OUT will also be sent out the AUX OUT. In this case, the “OutAssign” settings for the AUX OUT will display<br />
“(N/A)” next to it, indicating the click will not be heard over this channel. (To make the AUX OUT available for the<br />
click sound, change the “Output” setting on the main UTILITIES Menu to “MAIN&AUX.”<br />
MIDI (F2)<br />
Pressing MIDI (F2) from the Main UTILITIES menu lets you access pages that<br />
contain the module’s MIDI settings.<br />
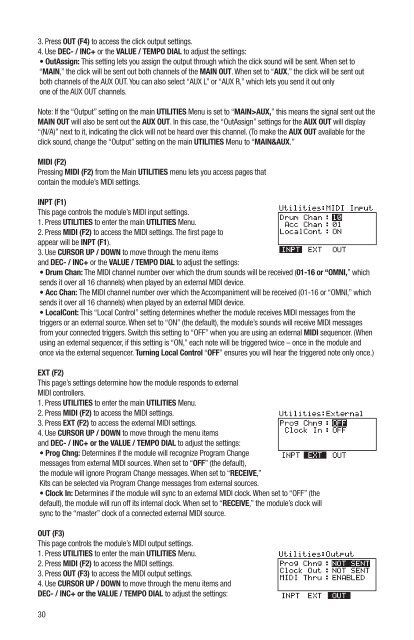
INPT (F1)<br />
This page controls the module’s MIDI input settings.<br />
1. Press UTILITIES to enter the main UTILITIES Menu.<br />
2. Press MIDI (F2) to access the MIDI settings. The first page to<br />
appear will be INPT (F1).<br />
3. Use CURSOR UP / DOWN to move through the menu items<br />
and DEC- / INC+ or the VALUE / TEMPO DIAL to adjust the settings:<br />
• Drum Chan: The MIDI channel number over which the drum sounds will be received (01-16 or “OMNI,” which<br />
sends it over all 16 channels) when played by an external MIDI device.<br />
• Acc Chan: The MIDI channel number over which the Accompaniment will be received (01-16 or “OMNI,” which<br />
sends it over all 16 channels) when played by an external MIDI device.<br />
• LocalCont: This “Local Control” setting determines whether the module receives MIDI messages from the<br />
triggers or an external source. When set to “ON” (the default), the module’s sounds will receive MIDI messages<br />
from your connected triggers. Switch this setting to “OFF” when you are using an external MIDI sequencer. (When<br />
using an external sequencer, if this setting is “ON,” each note will be triggered twice – once in the module and<br />
once via the external sequencer. Turning Local Control “OFF” ensures you will hear the triggered note only once.)<br />
EXT (F2)<br />
This page’s settings determine how the module responds to external<br />
MIDI controllers.<br />
1. Press UTILITIES to enter the main UTILITIES Menu.<br />
2. Press MIDI (F2) to access the MIDI settings.<br />
3. Press EXT (F2) to access the external MIDI settings.<br />
4. Use CURSOR UP / DOWN to move through the menu items<br />
and DEC- / INC+ or the VALUE / TEMPO DIAL to adjust the settings:<br />
• Prog Chng: Determines if the module will recognize Program Change<br />
messages from external MIDI sources. When set to “OFF” (the default),<br />
the module will ignore Program Change messages. When set to “RECEIVE,”<br />
Kits can be selected via Program Change messages from external sources.<br />
• Clock In: Determines if the module will sync to an external MIDI clock. When set to “OFF” (the<br />
default), the module will run off its internal clock. When set to “RECEIVE,” the module’s clock will<br />
sync to the “master” clock of a connected external MIDI source.<br />
OUT (F3)<br />
This page controls the module’s MIDI output settings.<br />
1. Press UTILITIES to enter the main UTILITIES Menu.<br />
2. Press MIDI (F2) to access the MIDI settings.<br />
3. Press OUT (F3) to access the MIDI output settings.<br />
4. Use CURSOR UP / DOWN to move through the menu items and<br />
DEC- / INC+ or the VALUE / TEMPO DIAL to adjust the settings:<br />
30