Image B1.40 manual English - Audio Pro
Image B1.40 manual English - Audio Pro
Image B1.40 manual English - Audio Pro

Create successful ePaper yourself
Turn your PDF publications into a flip-book with our unique Google optimized e-Paper software.
<strong>English</strong><br />
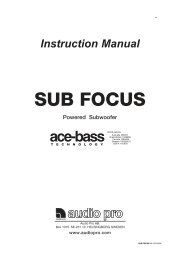
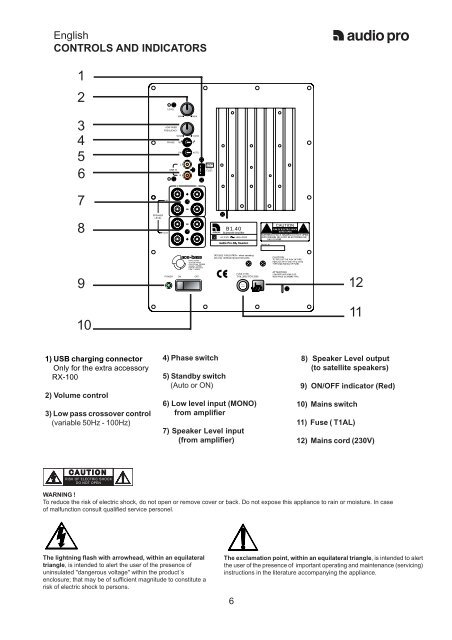
CONTROLS AND INDICATORS<br />
1<br />
2<br />
3<br />
4<br />
5<br />
6<br />
7<br />
8<br />
9<br />
10<br />
1) USB charging connector<br />
Only for the extra accessory<br />
RX-100<br />
2) Volume control<br />
3) Low pass crossover control<br />
(variable 50Hz - 100Hz)<br />
SPEAKER<br />
LEVEL<br />
FREQUENCY<br />
PHASE 180 0<br />
4) Phase switch<br />
5) Standby switch<br />
(Auto or ON)<br />
8) Speaker Level output<br />
(to satellite speakers)<br />
9) ON/OFF indicator (Red)<br />
10) Mains switch<br />
11) Fuse ( T1AL)<br />
12) Mains cord (230V)<br />
WARNING !<br />
To reduce the risk of electric shock, do not open or remove cover or back. Do not expose this appliance to rain or moisture. In case<br />
of malfunction consult qualified service personel.<br />
The lightning flash with arrowhead, within an equilateral<br />
triangle, is intended to alert the user of the presence of<br />
uninsulated "dangerous voltage" within the product´s<br />
enclosure; that may be of sufficient magnitude to constitute a<br />
risk of electric shock to persons.<br />
IN<br />
OUT<br />
LEVEL<br />
MIN<br />
50HZ<br />
ON<br />
L<br />
R<br />
MAX<br />
100HZ<br />
AUTO<br />
R L<br />
POWER ON OFF<br />
RX-100<br />
DC OUT<br />
5V 250mA<br />
<strong>B1.40</strong><br />
6) Low level input (MONO)<br />
from amplifier<br />
7) Speaker Level input<br />
(from amplifier)<br />
The exclamation point, within an equilateral triangle, is intended to alert<br />
the user of the presence of important operating and maintenance (servicing)<br />
instructions in the literature accompanying the appliance.<br />
6<br />
FUSE TYPE:<br />
F US E<br />
CAUTION:<br />
ATTENTION:<br />
12<br />
11
INSTRUCTIONS<br />
<strong>English</strong><br />
Congratulations to your choise of <strong>Audio</strong> <strong>Pro</strong> subwoofer and to a new sound experience.<br />
<strong>Audio</strong> <strong>Pro</strong> subwoofer is a unique product built with advanced technique. It is very easy to<br />
handle and install. It is equipped with the unique <strong>Audio</strong> <strong>Pro</strong> ace-bass technique that in combination<br />
with the built-in amplifier, the long throw woofer and the extremely solid cabinet offers a natural<br />
and deep bass reproduction at sound levels you never thought existed.<br />
The <strong>Audio</strong> <strong>Pro</strong> subwoofer offers extraordinary performance and lots of possibilities. In order<br />
to get the most out of your new subwoofer, we recommend you to spend time and carefully read<br />
these instructions before you connect and start up your system.<br />
What is ace-bass ?<br />
Normally, speaker design is bound to follow the laws of physics. The consequence will be, to get<br />
deep bass, the speakerbox must be very large. With the ace-bass technique we can "change"<br />
the laws of physics in the way that the driver believes it is placed in a much larger speaker box.<br />
Furthermore, the ace-bass technology improves the driver performance. With the ace-bass<br />
technique, we can design smaller subwoofers with deeper and cleaner bass.<br />
1. UNPACKING<br />
Carefully unpack the <strong>Audio</strong> <strong>Pro</strong> subwoofer and check for any damages. If possible, keep the cartonbox if future<br />
transportation is needed.<br />
You should immediately contact your dealer if the subwoofer is damaged .<br />
2. INSTALLATION<br />
There are different methods to connect your subwoofer to a HiFi / Home Theater system. In the following we explain<br />
2 different ways. NOTE! Do not connect the mains cord until all other installation is completed.<br />
2.1 To an amplifier / pre-amplifier with Subwoofer-out terminal.<br />
Connect the enclosed cord from your amplifiers subwoofer-out terminal to LINE IN (6) on the subwoofer. (Also use the<br />
enclosed Y adaptor for L and R inputs)<br />
The audio signal is passing through the cord from the subwoofer-out terminal to the built-in amplifier. By using the<br />
LOWPASS control, the upper frequnency of the subwoofer can be variably selected from 50Hz - 100 Hz.<br />
Note:<br />
Connect the satellite speakers to the main amplifier speaker terminals.<br />
2.2 To Speaker output terminal (High level)<br />
Connect speaker cables from the speaker terminals of your amplifier to the Speaker Level (7) input of the subwoofer.<br />
Carefully check the polarity of the cables (+ to + and - to -). Connect both Left and Right channels. The satellite speakers<br />
are connected to SPEAKER OUTPUT (8) on the subwoofer. Again, carefully check the polarity (+ to + etc).<br />
In this installation, the satellite speakers HIPASS crossover frequency is automatically set to 100 Hz. If you want the<br />
speakers to perform full frequency range, connect them to the main amplifier Speaker Output.<br />
7
<strong>English</strong><br />
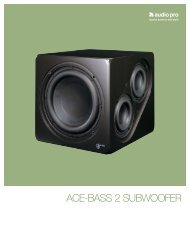
3. FUNCTIONS<br />
Power switch (10):<br />
To switch the subwoofer amplifier to ON or OFF<br />
mode. Make sure it is turned OFF during installation.<br />
Turn OFF the subwoofer when it will not be used for a<br />
longer period of time.<br />
Standby switch (5):<br />
In Auto mode: The amplifier goes automatically into<br />
standby mode if no signal been detected in 20 minutes.<br />
If goes on automatically if signal is detected.<br />
In ON mode: The amplifier will be constanly ON.<br />
Main Power indicator: (9)<br />
The red indicator shows the operation status of the<br />
subwoofer. Red light - subwoofer is on or in standby<br />
mode.<br />
Power indicator: (Blue on front)<br />
The blue indicator shows the operation status. Blue<br />
light - the subwoofer is on.<br />
Volume control (2):<br />
The sound level of the subwoofer can be adjusted. Use<br />
the Level control carefully, remember that<br />
program material may contain very high energy.<br />
1<br />
2<br />
3<br />
4<br />
5<br />
6<br />
7<br />
8<br />
9<br />
10<br />
SPEAKER<br />
LEVEL<br />
FREQUENCY<br />
PHASE 180 0<br />
IN<br />
OUT<br />
LEVEL<br />
MIN<br />
50HZ<br />
ON<br />
L<br />
R<br />
MAX<br />
100HZ<br />
AUTO<br />
R L<br />
POWER ON OFF<br />
RX-100<br />
DC OUT<br />
5V 250mA<br />
<strong>B1.40</strong><br />
8<br />
LowPass (3):<br />
The Lowpass crossover frequency can be adjusted<br />
variably between 50 and 100Hz. This gives you a<br />
unique possibility to perfectly match the Subwoofer to<br />
your satellite speakers. The lowest frequencies will be<br />
reproduced only by the subwoofer.<br />
Phase adjustment (4):<br />
The placement of the subwoofer can have effect on the<br />
phase between subwoofer and satellites. With the<br />
phase adjustment the phase can be switched 180<br />
degrees.<br />
USB charging (1)<br />
With the accessory RX-100, audio signal can be<br />
received wirelessly from another unit equipped with the<br />
transmitter TX-100. RX-100 is powered by this USB<br />
charging connector. An audio cable is connected from<br />
RX-100 to LINE IN.<br />
TX-100 and RX-100 are extra accessories. Please<br />
refer further to the <strong>manual</strong>s of TX/RX-100.<br />
FUSE TYPE:<br />
F U S E<br />
CAUTION:<br />
ATTENTION:<br />
12<br />
11
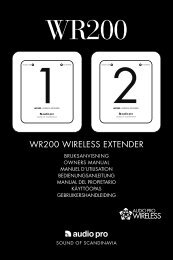
4. PLACEMENT 5. TROUBLESHOOTING<br />
Your <strong>Audio</strong> <strong>Pro</strong> subwoofer is designed to<br />
produce music information in the frequency<br />
range below 100 Hz. The human ear is being<br />
devoided the ability to localize sound of these<br />
low frequencies why the placement of the subwoofer<br />
is not critical. <strong>Audio</strong> <strong>Pro</strong> subwoofers<br />
steep lowpass filters make the placement<br />
easier to fit into your listening room. However<br />
you can use the nature of the acoustic laws in<br />
the following ways:<br />
1. To get the most amplification of the room itself,<br />
place the subwoofer close to a corner at a<br />
distance of about 10 cm from the walls. If you<br />
get to much bass, move the subwoofer slightly<br />
out from the corner or adjust the level.<br />
2. By experimenting with the placement of the<br />
subwoofer, you can optimize the sound quality.<br />
One good rule is to place the subwoofer at the<br />
same wall as the satellite speakers.<br />
3. Never cover the subwoofer or place it where the<br />
built-in amplifier will be covered.<br />
If you should face any problem with the subwoofer<br />
function, please check following points.<br />
If the problem remains after checking these<br />
points, please contact your dealer.<br />
1. Check that all connections have been made<br />
properly. Check if any of the cables are<br />
damaged or short-cirquit.<br />
2. <strong>Audio</strong> <strong>Pro</strong> subwoofers has a sophisticated<br />
overload protection. This protects your<br />
subwoofer from damages caused by to high<br />
volume setting.<br />
6. TECHNICAL SPECIFICATIONS<br />
Amplifier(RMS): .....................................250 Watt<br />
Woofer:................................................................10"<br />
Frequency range:....................................25-100Hz<br />
Lowpass filter:.............50 - 100Hz, 24dB/octave<br />
Highpass filter:.....................100Hz, 6dB/octave<br />
Dimensions: (W).................................355 mm<br />
(H)....................380 mm + 35 mm<br />
(D)..................................355 mm<br />
Weight:(net):...............................................16,6 Kg<br />
Specifications may be changed without notice, <strong>Audio</strong> <strong>Pro</strong><br />
follows a policy of continous advancement in development<br />
9<br />
<strong>English</strong>