


You also want an ePaper? Increase the reach of your titles
YUMPU automatically turns print PDFs into web optimized ePapers that Google loves.
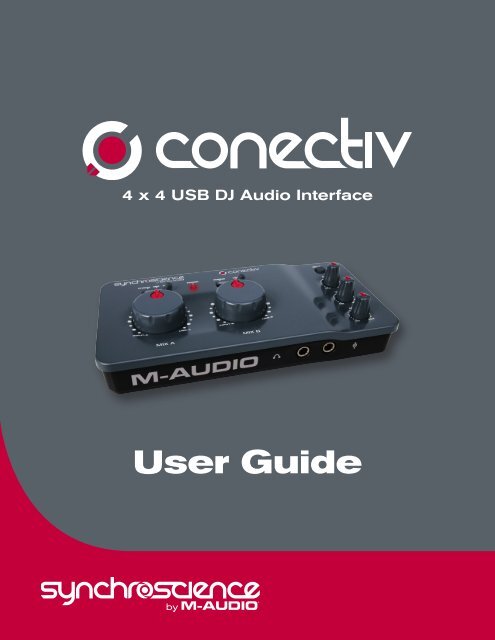
4 x 4 USB DJ <strong>Audio</strong> Interface<br />
<strong>User</strong> <strong>Guide</strong>
Table of Contents <strong>Conectiv</strong> <strong>User</strong> <strong>Guide</strong><br />
Introduction . . . . . . . . . . . . . . . . . . . . . . . . . . . . . . . . . . . . . . . . . . . . . . . . . . . . . . . . . . . . . 3<br />
What’s in the Box? . . . . . . . . . . . . . . . . . . . . . . . . . . . . . . . . . . . . . . . . . . . . . . . . . . . . . . . . . 4<br />
<strong>Conectiv</strong> Features . . . . . . . . . . . . . . . . . . . . . . . . . . . . . . . . . . . . . . . . . . . . . . . . . . . . . . . . . 4<br />
Minimum System Requirements . . . . . . . . . . . . . . . . . . . . . . . . . . . . . . . . . . . . . . . . . . . . . . . . . 5<br />
Operating Systems . . . . . . . . . . . . . . . . . . . . . . . . . . . . . . . . . . . . . . . . . . . . . . . . . . . . . . . . . . 5<br />
Windows . . . . . . . . . . . . . . . . . . . . . . . . . . . . . . . . . . . . . . . . . . . . . . . . . . . . . . . . . . . . . . 5<br />
Macintosh . . . . . . . . . . . . . . . . . . . . . . . . . . . . . . . . . . . . . . . . . . . . . . . . . . . . . . . . . . . . . 5<br />
Hardware . . . . . . . . . . . . . . . . . . . . . . . . . . . . . . . . . . . . . . . . . . . . . . . . . . . . . . . . . . . . . . 5<br />
Windows . . . . . . . . . . . . . . . . . . . . . . . . . . . . . . . . . . . . . . . . . . . . . . . . . . . . . . . . . . . . . . 5<br />
Macintosh . . . . . . . . . . . . . . . . . . . . . . . . . . . . . . . . . . . . . . . . . . . . . . . . . . . . . . . . . . . . . 5<br />
Software Installation . . . . . . . . . . . . . . . . . . . . . . . . . . . . . . . . . . . . . . . . . . . . . . . . . . . . . . . 6<br />
Controls and Connectors . . . . . . . . . . . . . . . . . . . . . . . . . . . . . . . . . . . . . . . . . . . . . . . . . . . . . 6<br />
Top Panel . . . . . . . . . . . . . . . . . . . . . . . . . . . . . . . . . . . . . . . . . . . . . . . . . . . . . . . . . . . . . . 6<br />
Rear Panel . . . . . . . . . . . . . . . . . . . . . . . . . . . . . . . . . . . . . . . . . . . . . . . . . . . . . . . . . . . . . . 7<br />
Front Panel . . . . . . . . . . . . . . . . . . . . . . . . . . . . . . . . . . . . . . . . . . . . . . . . . . . . . . . . . . . . . 7<br />
Hardware Connections . . . . . . . . . . . . . . . . . . . . . . . . . . . . . . . . . . . . . . . . . . . . . . . . . . . . . . 8<br />
Using <strong>Conectiv</strong> . . . . . . . . . . . . . . . . . . . . . . . . . . . . . . . . . . . . . . . . . . . . . . . . . . . . . . . . . . . 9<br />
Understanding <strong>Conectiv</strong>’s <strong>Audio</strong> Routing . . . . . . . . . . . . . . . . . . . . . . . . . . . . . . . . . . . . . . . . . . . . . . . 9<br />
Headphone Monitoring . . . . . . . . . . . . . . . . . . . . . . . . . . . . . . . . . . . . . . . . . . . . . . . . . . . . . . . 11<br />
Using <strong>Conectiv</strong> with SynchroScience Torq and Other DJ Programs . . . . . . . . . . . . . . . . . . . . . . . . . . . . . . . . . . 11<br />
Using Control Vinyl or CDs to Control Your DJ Software . . . . . . . . . . . . . . . . . . . . . . . . . . . . . . . . . . . . . . . . 11<br />
Using Your Computer as an Effects Processor . . . . . . . . . . . . . . . . . . . . . . . . . . . . . . . . . . . . . . . . . . . . 12<br />
Standalone Phono Preamplifier . . . . . . . . . . . . . . . . . . . . . . . . . . . . . . . . . . . . . . . . . . . . . . . . . . . 12<br />
Standalone Microphone Preamplifier . . . . . . . . . . . . . . . . . . . . . . . . . . . . . . . . . . . . . . . . . . . . . . . . 12<br />
The Software Control Panel . . . . . . . . . . . . . . . . . . . . . . . . . . . . . . . . . . . . . . . . . . . . . . . . . . 13<br />
PC . . . . . . . . . . . . . . . . . . . . . . . . . . . . . . . . . . . . . . . . . . . . . . . . . . . . . . . . . . . . . . . . . 13<br />
Mac . . . . . . . . . . . . . . . . . . . . . . . . . . . . . . . . . . . . . . . . . . . . . . . . . . . . . . . . . . . . . . . . 13<br />
Troubleshooting . . . . . . . . . . . . . . . . . . . . . . . . . . . . . . . . . . . . . . . . . . . . . . . . . . . . . . . . . 14<br />
Standalone Mode . . . . . . . . . . . . . . . . . . . . . . . . . . . . . . . . . . . . . . . . . . . . . . . . . . . . . . . . . . 14<br />
Using <strong>Conectiv</strong> with a Computer . . . . . . . . . . . . . . . . . . . . . . . . . . . . . . . . . . . . . . . . . . . . . . . . . . 14<br />
Product Specs . . . . . . . . . . . . . . . . . . . . . . . . . . . . . . . . . . . . . . . . . . . . . . . . . . . . . . . . . . 16<br />
Warranty Terms and Registration . . . . . . . . . . . . . . . . . . . . . . . . . . . . . . . . . . . . . . . . . . . . . . . 17<br />
Warranty Terms . . . . . . . . . . . . . . . . . . . . . . . . . . . . . . . . . . . . . . . . . . . . . . . . . . . . . . . . . . 17<br />
Warranty Registration . . . . . . . . . . . . . . . . . . . . . . . . . . . . . . . . . . . . . . . . . . . . . . . . . . . . . . . . 17
T hank<br />
3<br />
Introduction<br />
1<br />
you for choosing the SynchroScience <strong>Conectiv</strong> USB audio interface. <strong>Conectiv</strong> takes advantage of the convenience<br />
and dependability of the Universal Serial Bus (USB) to provide you with a versatile interface that can be used both live on<br />
stage and in the studio. The interface’s sleek, lightweight, and portable design makes it the perfect travel companion for active<br />
computer-based DJs, musicians, and producers. <strong>Conectiv</strong> attaches to your Mac or PC with a single USB cable and eliminates<br />
the need to open your computer to install any cards. Since the interface draws power from the host computer, it requires no<br />
external power. This means you can easily record and mix from anywhere.<br />
<strong>Conectiv</strong> was created with the software-based DJ, producer, and artist in mind. With its high quality components, flexible<br />
audio routing, and easy-to-use interface, <strong>Conectiv</strong> perfectly complements your computer’s DJ or recording software. The unit<br />
lets you simultaneously record four input channels (two stereo pairs) while playing back four output channels. <strong>Conectiv</strong>’s 1⁄4”<br />
and RCA inputs support mic, line, and phono levels, respectively; allowing you to connect any dynamic microphone, line level<br />
source (such as CD or MP3 players) or turntable. The USB interface carries audio signals to and from your computer with<br />
minimal latency and the high-powered headphone output lets DJs and live performers hear their work in even the noisiest clubs<br />
and stages. All of these features come together to make <strong>Conectiv</strong> the perfect tool for recording, producing, and performing<br />
your musical works.<br />
Even if you’re an experienced DJ, musician, or digital recording enthusiast, please take a moment to read through this <strong>User</strong> <strong>Guide</strong><br />
and familiarize yourself with <strong>Conectiv</strong>’s unique features. You may also want to refer to your audio software’s documentation to<br />
better understand how <strong>Conectiv</strong> can be integrated with the application. Your experience and enjoyment with <strong>Conectiv</strong> will be<br />
greatly enhanced by a good working knowledge of your equipment.<br />
Your <strong>Conectiv</strong> interface comes bundled with SynchroScience Torq, an advanced DJ software application<br />
designed to integrate seamlessly with <strong>Conectiv</strong>. While you are free to use this interface with any ASIO-<br />
or Core <strong>Audio</strong>-compatible software, this guide uses Torq for some of the illustrations and examples. It is<br />
therefore recommended that you install Torq so you can follow along with the examples in this guide.<br />
<strong>User</strong> <strong>Guide</strong>
Your <strong>Conectiv</strong> package contains the following:<br />
< <strong>Conectiv</strong> USB audio interface<br />
4<br />
What’s in the Box?<br />
2<br />
< SynchroScience CD-ROM containing drivers, control panel software, documentation, and Torq DJ application<br />
< USB cable<br />
<strong>Conectiv</strong> has the following features:<br />
< 4-in/4-out audio streaming over a USB 1.1 connection<br />
< RCA inputs supporting phono and line-level sources<br />
< 1/4” microphone input with dedicated gain control knob<br />
< Mix knobs for blending between inputs and audio software outputs<br />
< 1/4” headphone output with high-powered amplifier<br />
< Cue knob for blending between headphone sources<br />
< Cue split switch for various headphone monitoring options<br />
< Master output level knob<br />
< DC power jack for use when bus power is not available<br />
<strong>Conectiv</strong> Features<br />
3<br />
< Driver support for ASIO (Windows XP) and Core <strong>Audio</strong> (Mac OS X 10.3.9 / 10.4.7 or later).<br />
<strong>User</strong> <strong>Guide</strong>
Operating Systems<br />
Hardware<br />
Minimum System Requirements<br />
4<br />
Windows<br />
<strong>Conectiv</strong> is supported under Windows XP with Service Pack 2 or later. It is not supported under Windows 2000,<br />
Windows 98, or Windows ME. Visit the Windows update web pages to make certain you have the most current<br />
updates and fixes supplied by Microsoft.<br />
Macintosh<br />
<strong>Conectiv</strong> is supported under Mac OS X version 10.3.9 / 10.4.7 or later. Earlier versions of the operating system are<br />
not supported.<br />
Windows*<br />
< Pentium III 500 MHz (higher CPU speed may be necessary for laptops)<br />
< 256MB RAM<br />
< Windows XP (SP2)<br />
(Windows 2000, 98, ME, & NT not supported)<br />
Macintosh*<br />
< Macintosh G3**600 / G4**667MHz (higher CPU speed may be necessary for laptops)<br />
< 256MB RAM<br />
< OS X 10.3.9 / 10.4.7 or later (earlier versions of the Macintosh operating system are not supported)<br />
*SynchroScience suggests checking the minimum system requirements for your software, as they may be<br />
greater than the above specifications.<br />
**G3/G4 accelerator cards are not supported; native USB ports required.<br />
5<br />
<strong>User</strong> <strong>Guide</strong>
Y ou<br />
Software Installation<br />
5<br />
must install drivers in order for <strong>Conectiv</strong> to operate properly. Please consult the included Quick Start <strong>Guide</strong> for<br />
installation instructions.<br />
Once the drivers are installed, you may need to configure your audio software to route signals to and from <strong>Conectiv</strong>. Refer to<br />
your program’s user guide to learn how to do this.<br />
Note: Windows XP and Mac OS X will recognize the <strong>Conectiv</strong> interface as a generic USB audio device if it is connected<br />
before you install the drivers. Operation without drivers is not recommended because some of <strong>Conectiv</strong>’s features will not be<br />
accessible in this mode. If you have already connected the interface to your computer, make sure to unplug it before beginning<br />
with the driver installation.<br />
Top Panel<br />
Controls and Connectors<br />
6<br />
1. Source Selector (PHONO, MIC, LINE) – These switches select the input source for each stereo channel<br />
of <strong>Conectiv</strong>. Note that both stereo channels have phono and line-level inputs. However, only Channel A has an<br />
additional Mic input, allowing you to select a dynamic microphone connected to the Mic Input [#15].<br />
2. Power Indicator LED (POWER) – This red LED will illuminate when the interface is receiving power.<br />
3. Split Switch (SPLIT) – This switch selects between Normal and Split monitoring modes for the headphone<br />
output. Press this switch to engage Split monitoring or leave the switch in the Up position for normal monitoring.<br />
For more information about these two modes, see the section entitled “Headphone Monitoring” in Chapter 8.<br />
4. Cue Knob (CUE) – <strong>Conectiv</strong> has two stereo channels, and this knob lets you blend how much of each channel<br />
you’d like to hear in your headphones. This knob is<br />
1<br />
3<br />
covered in greater detail in the “Headphone Monitoring”<br />
section of Chapter 8.<br />
5. Headphone Volume Knob (VOL) – This knob<br />
2<br />
4<br />
controls the volume of the headphone output.<br />
5<br />
6. Mic Gain (MIC) – This knob controls the gain<br />
(volume) of the microphone input.<br />
7. Mix Knobs (MIX) – These knobs allow you to set the<br />
source of each stereo output. To find out more about<br />
this knob, see the section entitled “The Mix Knobs” in<br />
Chapter 8.<br />
7<br />
6<br />
6<br />
<strong>User</strong> <strong>Guide</strong>
Rear Panel<br />
Front Panel<br />
8. RCA Outputs (OUTPUT A, OUTPUT B) – These are <strong>Conectiv</strong>’s main outputs. Connect these RCA jacks to<br />
a DJ mixer, amplified speakers, or another destination. The audio source for these outputs is determined by the Mix<br />
knobs (7).<br />
9. RCA Inputs (INPUT A, INPUT B) – These RCA<br />
input pairs accept stereo signals from a variety of<br />
devices including CD players and turntables. Use the<br />
Source Selector switches (1) to select what type of<br />
device you’ve connected to each of these input pairs.<br />
10. USB 1.1 Port (USB) – The USB port carries digital<br />
audio to and from <strong>Conectiv</strong> and provides power to the<br />
11 12 13<br />
interface. Connect this jack to an available USB port on your computer.<br />
11. Kensington Security Slot – This jack is compatible with Kensington security cables to protect your device<br />
from theft.<br />
12. Grounding Connector (GROUND) – If you are using turntables, ground them by attaching their ground wire<br />
to this connector.<br />
13. DC Power Jack (9V DC) – <strong>Conectiv</strong> can be powered using an optional DC power supply. This input only needs<br />
to be used when your computer cannot supply sufficient power over the USB bus, or when <strong>Conectiv</strong> will be used<br />
as a standalone dual phono preamp.<br />
14. Headphone Jack – Connect your headphones to this 1/4” jack. The volume level of this output is controlled<br />
by the Volume knob (5) and the source is determined by the Cue knob (4).<br />
Be careful when connecting headphones to this output. <strong>Conectiv</strong> features an extremely powerful headphone<br />
amplifier designed to help DJs hear over the noisiest clubs and stages. Because of the high power design, the<br />
output may be extremely loud.<br />
15. 1/4” Microphone Input – This jack accepts a<br />
standard dynamic microphone with a 1/4” TS plug. The<br />
Mic knob (6) controls the gain level of this input.<br />
8 9<br />
14 15<br />
10<br />
7<br />
<strong>User</strong> <strong>Guide</strong>
Channel 1<br />
in<br />
DJ Mixer<br />
Channel 2<br />
in<br />
ground<br />
Turntable<br />
Powered<br />
Speakers<br />
or PA<br />
Hardware Connections<br />
7<br />
CD Player /<br />
Line Level Sources<br />
USB<br />
1. Connect <strong>Conectiv</strong>’s RCA Outputs to your amplifier, powered monitors, or mixer.<br />
2. Connect your stereo headphones to <strong>Conectiv</strong>’s front-panel Phones output.<br />
3. Connect a microphone to the 1/4” Microphone input on the front panel of the interface.<br />
4. Connect your turntables or line-level sources to <strong>Conectiv</strong>’s RCA inputs.<br />
5. Connect <strong>Conectiv</strong>’s USB port to an available USB port on your Mac or PC computer with<br />
a USB cable.<br />
6. If your computer cannot supply sufficient USB bus power, or if you are using <strong>Conectiv</strong> in<br />
standalone mode (without a computer), connect a DC power adapter to the Power jack<br />
(13) on the rear of the interface. <strong>Conectiv</strong> requires a center-positive 9V DC 500 mA power<br />
supply.<br />
Computer<br />
Power Supply<br />
(optional)<br />
If you are using<br />
turntables, be<br />
sure to connect<br />
each turntable’s<br />
ground wire to<br />
the grounding<br />
connector (12)<br />
on the rear of the<br />
interface.<br />
8<br />
<strong>User</strong> <strong>Guide</strong>
C onectiv<br />
9<br />
Using <strong>Conectiv</strong><br />
8<br />
can be used in a variety of ways and several of these scenarios are outlined below. The first section of this<br />
chapter will give you an overview of how signals pass through the interface; remaining sections cover specifics and<br />
include useful tips. If you require additional help, check the M-<strong>Audio</strong> website for more tips, tutorials, and FAQs.<br />
Understanding <strong>Conectiv</strong>’s <strong>Audio</strong> Routing<br />
<strong>Conectiv</strong>’s flexible audio routing allows it to be used in a variety of different situations. Take a look at the diagram below to see<br />
how signals pass through the interface:<br />
Sound<br />
Source<br />
USB<br />
USB<br />
Computer<br />
From Channel B<br />
If we follow input signal A starting at the sound source, the first object we encounter is the Source Selector switch (1). This<br />
switch sets the input sensitivity and determines which input source (mic, line, or phono) will pass to the next stage of the<br />
interface.<br />
Sound<br />
Source<br />
USB<br />
USB<br />
Computer<br />
<strong>User</strong> <strong>Guide</strong>
Next, the signal is doubled and sent to two different destinations at the same time. The first part is routed through the USB port<br />
to your computer for recording or software processing; the other part of the signal is sent to Mix knob A (7). The function of this<br />
knob is covered in detail later in this chapter. At this point, a new audio source is introduced into your signal path: output A of<br />
your audio software. This signal comes into the interface through the USB port and is sent to Mix knob A (just like audio input<br />
A described earlier in this paragraph).<br />
Mix knob A lets you crossfade between your audio sources (input A and your audio software’s output A) and sends the blended<br />
signal to RCA output pair A (8) on the rear of the interface.<br />
Simultaneously, the blended signal from Mix knob A is also sent to the Cue knob (4).<br />
In parallel, input signal B passes the same stages in its dedicated signal path and also sends the blended signal from Mix knob<br />
B to the Cue knob (4). The Cue knob lets you blend between channels A and B to create a special “headphone mix” for the DJ<br />
(this feature is covered in greater detail later in this chapter).<br />
The preceding paragraphs describe <strong>Conectiv</strong>’s entire signal path from input to output. We recommend that you take a moment<br />
to really understand the various ways signals can be routed through the interface. Having a good working knowledge of how<br />
signals are routed within the interface will enable you to adapt <strong>Conectiv</strong> to any situation without having to memorize specific<br />
settings.<br />
The Mix Knobs<br />
The Mix knobs are a key part of <strong>Conectiv</strong>’s flexibility. These knobs function as crossfaders that let you blend between your<br />
inputs (mic, phono, line) and your audio software’s outputs on each channel. In other words, when the knobs are turned<br />
counterclockwise (to the CH-A or CH-B positions), only your microphone, phono, or line-level input is heard from <strong>Conectiv</strong>’s<br />
associated outputs. When the knob is turned clockwise (to the USB-A or USB-B positions), only your audio software’s outputs<br />
are heard. When the Mix knob is set to the twelve o’clock position, both your line input and your computer’s output are heard<br />
in equal proportion.<br />
In some cases, you’ll need to turn the Mix knob clockwise. For example, when you’re mixing music played off of a computer,<br />
you’ll need to set these knobs clockwise in order to hear the computer’s output. In other cases, you must set the knob counterclockwise<br />
to hear the inputs (such as when you’re DJing off of turntables or CD players). In certain cases, you’ll need to use this<br />
knob to blend back and forth between your inputs and your audio software’s outputs. For example, when using your computer<br />
as a DJ effects processor (see below), this knob will act as your wet/dry effects knob.<br />
10<br />
<strong>User</strong> <strong>Guide</strong>
Headphone Monitoring<br />
<strong>Conectiv</strong> offers two different headphone (or “cue”) monitoring options for DJs, which are described below. Use the Split switch<br />
(3) to select which mode you’d like to use. Press the switch to activate Split mode or leave the switch in the Up position to<br />
remain in Normal monitoring mode.<br />
< Normal Mode: In this mode, channels A and B are heard in stereo through your headphones. The Cue knob<br />
(4) determines the balance of channel A to channel B. In other words, when the Cue knob is turned fully counterclockwise,<br />
only Channel A will be heard. Conversely, when the Cue knob is turned fully clockwise, only Channel B<br />
will be heard. When the knob is in the twelve o’clock position, both channels will be heard in equal proportion.<br />
< Split Mode: In Split mode, Channel A is summed to mono and played on the left side of your headphones while<br />
Channel B is summed to mono and played on the right side. The Cue knob (4) adjusts the balance between the<br />
two channels in the same way as in Normal Mode. This style of cueing may make it easier to determine which track<br />
(on the left or right) is out of time when you are beat-matching.<br />
The mode you choose depends entirely on your personal taste. Some DJs are most comfortable monitoring in<br />
Normal mode whereas others prefer Split mode.<br />
Using <strong>Conectiv</strong> with SynchroScience Torq and Other DJ Programs<br />
<strong>Conectiv</strong> integrates seamlessly with popular DJ applications like SynchroScience’s Torq or Native Instruments’ Traktor and<br />
provides an ideal hardware interface for these programs. These applications can be set to either Internal mode (mixing and<br />
cueing takes place entirely within software) or External mode (an external DJ mixer is used for mixing and cueing) and <strong>Conectiv</strong><br />
can be used with either configuration.<br />
< Internal Mode: When your software is set to Internal mode, its master output is sent to one stereo channel of<br />
<strong>Conectiv</strong> while the other stereo channel is heard only in the DJ’s headphones (used for cueing up the next song).<br />
In this scenario, the Mix knobs must be turned fully clockwise so that the output of your DJ software can be heard.<br />
The Cue knob will then allow you to blend between the main output (CH-A, which your audience hears) and the<br />
cue output (CH-B, which only you hear on your headphones).<br />
< External Mode: When your software is set to external mode, your program plays back your music while an<br />
external DJ mixer is used for mixing and cueing. In this scenario, your software plays music into both channels A<br />
and B of <strong>Conectiv</strong>. These channels are then fed into separate channels on your DJ mixer which handles all mixing<br />
and cueing. In this configuration, both Mix knobs must be turned clockwise in order to hear the output of your<br />
software.<br />
Using Control Vinyl or CDs to Control Your DJ Software<br />
If your DJ software supports the use of special control vinyl or CDs through a standard audio interface in order to control<br />
playback of your audio files, connect your turntables or CD players to <strong>Conectiv</strong>’s RCA inputs, set the Source Selector switches<br />
to Phono or CD, and turn the Mix knobs fully clockwise. It’s important to set the Mix knobs fully clockwise so that you only hear<br />
your computer’s output and not the actual control signal contained on the records and CDs.<br />
You’ll need to configure your DJ software to make use of these control signals. Refer to your software’s documentation for<br />
instructions on how to do this.<br />
NOTE: When using control vinyl or control CDs, be sure that the left and right channel outputs of your turntable or CD player<br />
are correctly routed to <strong>Conectiv</strong>’s left and right inputs. If your channels are reversed, Torq will play your music backward.<br />
11<br />
<strong>User</strong> <strong>Guide</strong>
Using Your Computer as an Effects Processor<br />
<strong>Conectiv</strong>’s ability to simultaneously send and receive four channels of audio over USB allows you to use your computer as<br />
a powerful effects processor. This is done by sending your audio sources (turntables or CD players) through <strong>Conectiv</strong> to<br />
software-based effects on your computer. Your effected signal is then blended back into <strong>Conectiv</strong>’s output path using the Mix<br />
knobs. Many DJs find this feature to be a gold mine of new and interesting effects that they can use during a performance,<br />
especially since completely different effects can be applied to <strong>Conectiv</strong>’s two channels.<br />
Start by connecting your turntables or CD players to <strong>Conectiv</strong>’s RCA inputs. Next, connect the RCA outputs to a DJ mixer,<br />
powered speakers, or another destination of your choosing. On your computer, run Torq or any ASIO-compliant program that<br />
can process VST plug-ins in real-time. Make sure that <strong>Conectiv</strong>’s inputs are routed to Torq’s inputs, and that Torq’s outputs are<br />
routed to <strong>Conectiv</strong>’s outputs. Activate Torq’s “Line” input setting (refer to Torq’s <strong>User</strong> <strong>Guide</strong> for more information about this<br />
feature). Finally, enable Torq’s built-in effects or load third party VST effect plug-ins.<br />
Your computer is now processing audio sources and the Mix knobs are acting as “wet/dry” controls for the selected effects.<br />
Turning a Mix knob counter-clockwise will let you hear only your turntable or CD player source while turning the knob fully<br />
clockwise will let you hear only the effected signal. Setting the knob to the twelve o’clock position will blend the source and<br />
processed signals in equal proportion.<br />
Standalone Phono Preamplifier<br />
<strong>Conectiv</strong> can function in standalone mode (without a computer) as a dual-phono preamplifier. In this scenario, simply hook up<br />
your turntables to <strong>Conectiv</strong>’s RCA inputs and connect <strong>Conectiv</strong>’s outputs to an amplifier, powered speakers, or other device<br />
of your choosing.<br />
Make sure that the Mix knobs are turned fully counter-clockwise and that the Source Selector switches (1) are set to Phono.<br />
Note that in this configuration, <strong>Conectiv</strong> must still be powered through either the USB bus or the DC power input.<br />
Standalone Microphone Preamplifier<br />
<strong>Conectiv</strong> can be used as a single-channel microphone preamplifier. Simply hook up your dynamic microphone to <strong>Conectiv</strong>’s<br />
1/4” microphone input and connect <strong>Conectiv</strong>’s Channel A output to a mixer, recorder, or other device of your choosing (Channel<br />
B is not used in this scenario).<br />
Make sure that the Channel A Mix knob is turned fully counter-clockwise and that Channel A’s Source Selector switch (1) is set<br />
to Mic. The Mic knob (6) controls the input gain of your microphone.<br />
Note that in this setting, <strong>Conectiv</strong> must be powered from either the USB bus or the DC power input in order to function<br />
correctly.<br />
12<br />
<strong>User</strong> <strong>Guide</strong>
The Software Control Panel<br />
9<br />
<strong>Conectiv</strong>’s control panel is designed to be simple and easy to use.<br />
PC:<br />
For PC users, <strong>Conectiv</strong>’s audio buffer size is<br />
displayed on the “Latency” tab while additional<br />
information such as the audio driver and device<br />
fi rmware versions are displayed on the “About”<br />
tab. To adjust the audio buffer size, simply drag<br />
the slider and press the “Apply” button. Please<br />
note that this parameter cannot be changed while<br />
an audio application is running.<br />
Mac:<br />
For Mac users, the control panel simply displays<br />
version numbers of software components such as<br />
the audio driver and device fi rmware along with<br />
links to useful sections of the M-<strong>Audio</strong> website.<br />
Buffer size changes must be made through the<br />
host application on the Macintosh operating<br />
system.<br />
13<br />
<strong>User</strong> <strong>Guide</strong>
Troubleshooting<br />
10<br />
<strong>Conectiv</strong> is a high-performance, professional-quality interface that has been tested under a wide variety of conditions. Despite<br />
our thorough testing, <strong>Conectiv</strong> can be used in limitless situations and certain scenarios may result in unexpected performance.<br />
This section will highlight some of the most common difficulties users may experience and provide tips to remedy these problems.<br />
First, we’ll cover issues that might arise when the interface is used in standalone mode. Next, we’ll discuss issues that might<br />
occur when <strong>Conectiv</strong> is used with a computer.<br />
Standalone Mode<br />
If you are having difficulty using <strong>Conectiv</strong> as a standalone device:<br />
< Verify that the interface is receiving power and that the red Power LED is illuminated. In standalone mode, the<br />
interface can be powered through either the USB bus or the DC power input.<br />
< Ensure that the Mix knobs are turned fully counter-clockwise. In standalone mode, these knobs must always remain<br />
fully counter-clockwise for correct audio routing and optimal sound quality.<br />
< Make sure your audio source (turntable, CD player, microphone, etc.) has been properly connected to the<br />
interface.<br />
< Make sure that the Input Source selector switch has been set correctly.<br />
< Verify that your music source is outputting a proper signal.<br />
< Verify that your amplifier, powered speakers, or other audio destination is working correctly.<br />
Using <strong>Conectiv</strong> with a Computer<br />
First and foremost: if you’re using <strong>Conectiv</strong> with your PC or Mac, we recommend that you avoid connecting too many USB<br />
devices to the same port on the computer. USB is a dependable protocol that is well suited for digital audio. Nevertheless,<br />
it is important to remember that audio and multimedia streaming place considerable demands on your processor and use a<br />
significant amount of USB’s available bandwidth. Although it is theoretically possible to connect many devices to one USB port,<br />
this might cause complications and degrade your audio performance.<br />
If you have reduced your number of USB devices and continue to have trouble getting audio in or out of <strong>Conectiv</strong>, please check<br />
the following:<br />
< Verify that <strong>Conectiv</strong>’s drivers are properly installed.<br />
• In Windows XP, go to the control panel and double-click the System icon (under Performance and Maintenance<br />
if you are in Category view).<br />
• Select the Hardware tab and click the Device Manager button.<br />
• Click the plus sign (“+”) next to Sound, Video and Game Controllers, and locate the <strong>Conectiv</strong> listing. If you see<br />
a question mark or exclamation point next to it, or if you don’t see it listed, you may need to reinstall the driver<br />
software.<br />
14<br />
<strong>User</strong> <strong>Guide</strong>
Make sure your audio software has been set up to use the interface. Open your application’s audio settings page<br />
and verify that <strong>Conectiv</strong>’s ASIO, WDM, or Core <strong>Audio</strong> drivers have been selected.<br />
< Ensure that each channel’s Mix knob is not turned fully counter-clockwise as that will mute the computer’s output.<br />
< Double-check your audio connections and cables to make sure everything is plugged in correctly.<br />
< Make sure your amplifier or powered speakers are working correctly.<br />
If <strong>Conectiv</strong> is sending and receiving audio, but you are hearing clicks and pops:<br />
< Make sure your input and output levels are not too loud, as this can cause distortion and clipping.<br />
< Try increasing the buffer size. Larger buffer sizes will result in higher audio latencies, but will improve system<br />
performance and resolve many clicking and popping issues. Increasing the buffer size is often helpful in older or<br />
slower systems.<br />
< If you are using a USB hub, try connecting the interface directly to your computer.<br />
15<br />
<strong>User</strong> <strong>Guide</strong>
48kHz sampling rate, 16-bit unless otherwise stated<br />
Mic Inputs (A/D)<br />
Digital <strong>Audio</strong> Interface Specifications<br />
Input Impedance 340KOhms<br />
Maximum Input Level +4.1 dBu (1.243 Vrms) @ minimum gain<br />
SNR -98 dB, A-weighted<br />
Dynamic Range 98 dB, A-weighted<br />
THD+N 0.00686 % (-83.3 dB) @ -1 dBFS, 1 kHz<br />
16<br />
Product Specs<br />
11<br />
Frequency Response 20 Hz to 20 kHz, +/- 0.2 dB @ 48 kHz sample rate<br />
Pre-amp Variable Gain >25 dB<br />
Phono Inputs (A/D)<br />
Input Impedance 48KOhms<br />
EQ RIAA curve<br />
Gain 43 dB<br />
Line Inputs (A/D)<br />
Input Impedance 48k Ohms<br />
Maximum Input Level at minimum gain +10 dBV (3.162 Vrms), unbalanced<br />
Channel-to-Channel Crosstalk < -100 dB @ 1 Khz<br />
SNR -97 dB, A-weighted<br />
Dynamic Range 97 dB, A-weighted<br />
THD+N 0.00557 % (-85.1 dB) @ -1 dBFS, 1 kHz<br />
Frequency Response 20 Hz to 20 kHz, +/- 0.2 dB @ 48 kHz sample rate<br />
Line Outputs (D/A)<br />
Output Impedance 100 Ohms unbalanced<br />
Maximum Output Level +11.4 dBV (3.711 Vrms), unbalanced<br />
Channel-to-Channel Crosstalk < -109 dB @ 1 Khz<br />
SNR -100 dB, A-weighted<br />
Dynamic Range 95 dB, A-weighted<br />
THD+N 0.00390 % (-88.2 dB) @ -1 dBFS, 1 kHz<br />
Frequency Response 20 Hz to 20 kHz, +/- 0.1 dB @ 48 kHz sample rate<br />
Headphone Output<br />
Maximum Output 0 dBV (1 Vrms, 2.8 Vpp) into 30-ohms<br />
Working Range 16 to 80 ohms<br />
<strong>User</strong> <strong>Guide</strong>
Warranty Terms<br />
Warranty Terms and Registration<br />
12<br />
M-<strong>Audio</strong> warrants products to be free from defects in materials and workmanship, under normal use and provided that the<br />
product is owned by the original, registered user. Visit www.m-audio.com/warranty for terms and limitations applying to your<br />
specific product.<br />
Warranty Registration<br />
Thank you for registering your new M-<strong>Audio</strong> product. Doing so immediately both entitles you to full warranty coverage and helps<br />
M-<strong>Audio</strong> develop and manufacture the finest quality products available. Register online at www.m-audio.com/register to receive<br />
FREE product updates and for the chance to win M-<strong>Audio</strong> giveaways.<br />
<strong>Conectiv</strong><br />
Tested to comply with<br />
FCC standards<br />
FOR HOME OR STUDIO USE<br />
© 2006 Avid Technology, Inc. All rights reserved. Product features, specifications, system requirements and availability are<br />
subject to change without notice. Avid, M-<strong>Audio</strong>, <strong>Conectiv</strong>, SynchroScience and Torq are either trademarks or registered<br />
trademarks of Avid Technology, Inc. All other trademarks contained herein are the property of their respective owners.<br />
WARNING: This product contains chemicals, including lead, known to the State of California to cause cancer, and birth<br />
defects or other reproductive harm. Wash hands after handling.<br />
17<br />
<strong>User</strong> <strong>Guide</strong>


