TF 610 Instruction manual - Toshiba
TF 610 Instruction manual - Toshiba
TF 610 Instruction manual - Toshiba

You also want an ePaper? Increase the reach of your titles
YUMPU automatically turns print PDFs into web optimized ePapers that Google loves.
1<br />
D<br />
4<br />
20<br />
10<br />
C<br />
E<br />
K<br />
I<br />
G<br />
G<br />
H<br />
5 19 2 1 3 23 9<br />
B<br />
1 2 3<br />
4<br />
5<br />
6<br />
7 8 9<br />
0<br />
17 18 21 15 2214 1611<br />
13<br />
12 6 8 7<br />
L<br />
M<br />
F<br />
A<br />
N<br />
01 02 03 G1<br />
04 05 06 G2<br />
07 08 09 G3<br />
10 11 12 G4<br />
13 14 15 G5<br />
16 17 18 G6
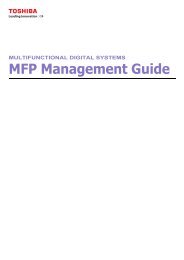
Welcome to your fax machine<br />
A Cover<br />
B Control panel<br />
C Document exit<br />
D Exit tray wire<br />
E Recording paper cassette<br />
1 LCD Display<br />
Displays indications about the<br />
operating modes of your fax<br />
machine. Your control monitor for<br />
all function settings.<br />
2 Fault LED<br />
Lights up if a malfunction occurs or<br />
to indicate paper out or toner out.<br />
3 Busy LED<br />
Flashes or lights up when the fax<br />
machine connects to the line or is<br />
just transmitting or receiving.<br />
4 Job Status<br />
Queries the status of the entered<br />
jobs.<br />
5 Menu keys<br />
Use these keys to start the menu or<br />
select a particular menu item.<br />
6 Cancel key<br />
Deletes jobs in the memory or<br />
deletes the last entry during<br />
programming.<br />
7 Group<br />
Use this key for group selection.<br />
8 One Touch Dialing keys<br />
Sends documents at the push of a<br />
button.<br />
2<br />
F Control panel lock<br />
G Interface for Computer printer cable<br />
H Document guides<br />
I Recording paper exit tray<br />
K Tray wire<br />
9 Copy<br />
Makes a copy of your original.<br />
10 Option<br />
When document hsa been inserted into<br />
machine, press to select special settings<br />
for document transmission.<br />
11 Start<br />
Indicates the sending and receiving<br />
options, confirms entries.<br />
12 Stop<br />
Clears error messages and terminates<br />
input.<br />
13 Redial/pause<br />
Activates the previously dialled number<br />
and inserts a dialling pause.<br />
14 Handset<br />
Used for on-hook dialling.<br />
15 Dial Keypad<br />
Used for entering telephone numbers.<br />
16 ABB. DIAL /ALPHABET<br />
Press this key in order to select a stored<br />
alphabet dial number or a name.<br />
L Document tray wire<br />
M Document tray<br />
N Telephone connection<br />
17 RCV KEY<br />
Switches between automatic and<br />
<strong>manual</strong> reception.<br />
18 Resolution Key<br />
Changes the scan resolution of the<br />
loaded originals.<br />
19 Input<br />
Activates selected menu items and<br />
terminates data input.<br />
20 Direct transmit<br />
Press this key to send the<br />
document directly from the<br />
document feeder (avoiding the<br />
stack memory).<br />
21 Contrast<br />
For adjusting the scanning of dark<br />
or light documents.<br />
22 TX report<br />
The settings for printing out the TX<br />
report can be adjusted individually.<br />
23 ON LINE<br />
Lights up to indicate data being<br />
transmitted from the PC.<br />
GB Welcome to your fax machine<br />
TOSHIBA <strong>TF</strong> <strong>610</strong>
Contents<br />
Preparation<br />
Unpacking ................................................... 4<br />
Remove transport fittings: ........................... 5<br />
Insert process unit ....................................... 5<br />
To make a good impression:<br />
a new toner cartridge ................................. 6<br />
Insert recording paper ................................. 7<br />
Make connections: ..................................... 8<br />
Install recording paper tray ......................... 8<br />
Insert memory card ..................................... 9<br />
Safety instructions ...................................... 9<br />
Installation<br />
The menu system ..................................... 10<br />
Set language ............................................ 11<br />
Enter terminal ID ....................................... 12<br />
Enter the user name ................................. 13<br />
Setting dialling method ............................. 14<br />
Connection to PABX,<br />
obtaining a public line ............................... 15<br />
Connection to PABX, further settings ........ 17<br />
Set date and time ..................................... 18<br />
Reception of documents<br />
Manual reception ...................................... 19<br />
Automatic reception ................................. 19<br />
Set standby mode ..................................... 19<br />
Telephone/fax switch ................................ 20<br />
Fax/TAD switch.......................................... 20<br />
Setting the TAD time ................................ 21<br />
Set remote reception (<strong>manual</strong> reception) . 22<br />
Reception reduction ................................. 23<br />
Local copy ................................................ 24<br />
Set call counter ........................................ 25<br />
Memory reception ..................................... 25<br />
Cancel reception ...................................... 26<br />
Transmit documents<br />
Document format ..................................... 27<br />
Stack mode .............................................. 28<br />
Direct transmission ................................... 29<br />
Automatic fax messages ........................... 30<br />
Transmission with alphabet dialling ........... 31<br />
Transmission with one-touch dialling ......... 31<br />
Transmission with telephone<br />
(<strong>manual</strong> transmission) ............................... 32<br />
Long Dialling ............................................. 32<br />
Transmission with directory function ......... 33<br />
Monitoring ................................................ 34<br />
Set resolution ........................................... 35<br />
Redial ....................................................... 35<br />
Delayed transmission ................................ 36<br />
Single multi-address transmission ............. 37<br />
Stored broadcast ...................................... 38<br />
Polling ....................................................... 39<br />
Reserve polling .......................................... 40<br />
Reduce transmission speed ...................... 41<br />
Stop transmission ..................................... 42<br />
Store numbers<br />
Alphabet dial memory ............................... 43<br />
One-touch dial keys ................................... 45<br />
Group keys ................................................ 45<br />
Report prints<br />
Activate printing report ............................. 48<br />
Transmission report ................................... 48<br />
Transmission and reception journal ........... 49<br />
The multitransmission report ..................... 50<br />
Number list ............................................... 50<br />
Group list .................................................. 50<br />
Jobs in progress ........................................ 50<br />
The function list ........................................ 51<br />
Advanced settings<br />
Functions .................................................. 52<br />
Connection to PABX .................................. 56<br />
Receive footer on/off ................................ 56<br />
Change speaker volume ............................ 57<br />
Adjust ringing tone/key beeps ................... 58<br />
Set transmission report output .................. 59<br />
Temporarily activate TX report .................. 60<br />
Remote maintenance (COMLINE) ............. 60<br />
Power saver .............................................. 61<br />
Switch off error correction ....................... 62<br />
Possible problems<br />
Error codes in journal ................................ 63<br />
Error messages in the Display ................... 64<br />
Transmission problems .............................. 65<br />
Receiving problems ................................... 66<br />
How to clear a paper jam ......................... 67<br />
How to clear a recording paper jam... ...... 67<br />
Handling faxes on your PC<br />
System requirements ................................ 68<br />
Features .................................................... 68<br />
Connection to the PC ................................ 68<br />
Scanning documents into the PC ............. 69<br />
Sending fax messages from the PC .......... 69<br />
Sending faxes to the PC ........................... 70<br />
Your fax machineused as<br />
a PC Printer<br />
Introduction ............................................... 71<br />
Connection to the PC ................................ 71<br />
Install printer driver ................................... 72<br />
Settings of the printer driver ..................... 74<br />
Printout ..................................................... 76<br />
Delete printer driver .................................. 77<br />
UK Connection information<br />
EPA ENERGY STAR ................................... 78<br />
Reset ........................................................ 78<br />
Index<br />
Index ......................................................... 79<br />
<strong>TF</strong> <strong>610</strong> TOSHIBA<br />
Contents<br />
3 GB
Preparation<br />
Unpacking<br />
When unpacking your machine, please check that all parts shown<br />
here are present and in perfect condition.<br />
1. Fax machine<br />
2. Power cable<br />
3. Telephon cable<br />
(not supplied in all<br />
countries)<br />
4. <strong>Instruction</strong> <strong>manual</strong>fax<br />
machine<br />
PC printer <strong>manual</strong><br />
5. Process unit and toner<br />
cartridge<br />
6. Fixer cleaner<br />
7. Progam disk with<br />
Windows TM printer<br />
driver<br />
If anything is missing, or damaged,<br />
please connect your dealer immediately.<br />
4<br />
8. Cleaner<br />
9. Local language label<br />
10. One-touch dialling index<br />
11. Document exit tray<br />
(with wire)<br />
12. Recording paper exit<br />
tray (with wire)<br />
13. Wire for document tray<br />
The correct location<br />
for your fax machine is:<br />
• near a 230 V AC socket*,<br />
• near a telephone connection, ideally<br />
with a single line reserved for your fax<br />
machine.<br />
* No other equipment with high power<br />
consumption (such as a photocopier) or<br />
equipment which generates electrical<br />
noise (such as a radio, computer, radio<br />
transmitting and receiving equipment)<br />
should be connected to this mains<br />
supply.<br />
AC power<br />
You will find the mains connection on the<br />
back of the machine.<br />
Please protect your machine from:<br />
vibration<br />
direct<br />
sunlight<br />
GB Preparation<br />
TOSHIBA <strong>TF</strong> <strong>610</strong><br />
dust<br />
humidity<br />
heat
Preparation Before you start to use your fax machine,<br />
Remove transport<br />
fittings:<br />
Transport fitting<br />
Transport fittings<br />
Insert process unit:<br />
<strong>TF</strong> <strong>610</strong><br />
TOSHIBA<br />
please remove all transport fittings as<br />
illustrated.<br />
In order to transport or move<br />
the machine the toner pack and<br />
the process unit has to be<br />
removed.<br />
When installing the machine for the first time<br />
and later when CHANGE PROC. UNIT is<br />
displayed, insert the new process unit as<br />
decribed below.<br />
Open the control panel and housing<br />
cover as illustrated.<br />
1. The fixer cleaner<br />
This is inserted when installing your machine<br />
for the first time and each time the process<br />
unit is replaced:<br />
Open the control panel cover to the front. Slide<br />
the cleaner underneath to the right, lift and<br />
remove.<br />
Insert the new cleaner first on the right, then<br />
press down firmly on the left.<br />
2. Prepare the process unit<br />
Place a sheet of paper on an even surface and<br />
lay the process unit on this. Remove the seal.<br />
When holding the protective foil, be sure to<br />
avoid contact with any toner.<br />
The print volume achieved with the<br />
first filling of the toner cartridge is less<br />
than that achieved with subsequent<br />
fillings.<br />
Transport fittings<br />
Preparation<br />
Transport fittings<br />
5 GB
Preparation<br />
To make a good<br />
impression:<br />
a new toner cartridge<br />
After printing many pages, TONER NEAR<br />
EMPTY and later TONER EMPTY appear<br />
on the display. This means you must<br />
insert a new toner cartridge in your fax<br />
machine:<br />
6<br />
Shake the process unit<br />
several times side to side to ensure even<br />
spread of toner...<br />
... insert the process unit<br />
First slide the green lock lever on the inside left<br />
of the machine to the back. The process unit is<br />
then inserted with its pins into the lateral<br />
guides and placed exactly in position by<br />
applying slight pressure downwards.<br />
Now pull the lock lever forward again.<br />
Then close the top cover and the control panel<br />
cover again.<br />
Now (re)connect your fax machine to the<br />
socket.<br />
A damaged drum will affect the copy<br />
quality. Therefore: Never touch the<br />
drum surface or expose the drum to<br />
sunlight.<br />
Open the top cover.<br />
Don’t forget: First remove the mains plug from<br />
the socket.<br />
To replace toner:<br />
Slide the green lock lever on the left side of the<br />
machine to the back and remove the process<br />
unit.<br />
Place the process unit on a piece of paper on<br />
an even surface. Lightly tap on the toner<br />
cartridge to prevent any toner residue falling<br />
into the process unit. Pull the tape on the the<br />
toner cartridge upwards before you slide it out<br />
of ist holder.<br />
First shake the new cartridge...<br />
... then place on top of the process unit and<br />
slide it until it locks into place.<br />
GB Preparation<br />
TOSHIBA <strong>TF</strong> <strong>610</strong>
Preparation<br />
Insert recording paper<br />
<strong>TF</strong> <strong>610</strong><br />
TOSHIBA<br />
Now: remove the seal.<br />
When holding the protective foil, be sure to<br />
avoid contact with any toner residue.<br />
Now shake the process unit several times<br />
horizontally before you..<br />
... install the process unit again.<br />
Insert the pins into the lateral guides and then,<br />
by applying slight pressure, lower the unit into<br />
the correct position.<br />
Now pull the lock lever forward again.<br />
Never allow hair or dust to get into the process<br />
unit as this will block the proper supply of toner.<br />
Then close the top cover and the control panel<br />
cover.<br />
You can now connect your fax machine to the<br />
mains again.<br />
From time to time:<br />
clean the housing<br />
Never using abrasive materials to<br />
clean your fax machine - the could<br />
cause damage.<br />
Remove the paper cassette<br />
Press down the cassette plate until it locks into<br />
place.<br />
Insert a stack of A4 paper<br />
Prepare the recording paper by flexing and<br />
fanning out the stack to separate the sheets.<br />
Place the paper so that it lies straight in the<br />
cassette with the side to be printed face-down<br />
and don’t forget:<br />
The paper cassette holds a maximum<br />
250 sheets (80 g/m 2 ).<br />
Then: Slide the cassette into the slot<br />
until you hear it lock into place.<br />
Do not use damp, wrinkled or torn<br />
paper.<br />
Preparation<br />
7 GB
Preparation<br />
Install recording paper<br />
tray<br />
Make connections:<br />
AC power cord<br />
8<br />
Recording Paper Exit Tray:<br />
Insert the Recording Paper Exit Tray Wire into<br />
the holes on the Recording Paper Exit Tray, then<br />
pull down.<br />
The following steps may be performed<br />
more easily with the Recording Paper<br />
Cassette removed from the facsimilie<br />
machine.<br />
Install the Recording Paper Exit Tray underneath<br />
the Recording Paper Cassette.<br />
Document Exit Tray:<br />
Inster the Document Exit Tray into the<br />
Recording Paper Exit opening.<br />
Flip out the folded Tray Wire as shown.<br />
Telephone connection<br />
Connect your fax machine (LINE) to the<br />
telephone socket.<br />
Connecting the AC power<br />
The power connector is located on the rear<br />
right of the machine.<br />
Connect the machine to the mains<br />
only after you have installed the<br />
process unit and the fixer cleaner.<br />
Recording<br />
Paper Exit<br />
Tray<br />
GB Preparation<br />
TOSHIBA <strong>TF</strong> <strong>610</strong><br />
Wire<br />
Phone Plug-in<br />
to the wall<br />
socket<br />
Line cord
Preparation<br />
Insert memory card<br />
Safety instructions<br />
<strong>TF</strong> <strong>610</strong><br />
When your fax machine is<br />
open, always keep the<br />
following in mind:<br />
In case you come into contact<br />
with toner:<br />
TOSHIBA<br />
1. Pull the plug out of the mains socket.<br />
2. 2. Remove the cover for the memory module<br />
(on the rear of the FAX machine) by<br />
loosening the retaining screw.<br />
3. 3. Press the retaining lug into the hole on the<br />
motherboard.<br />
4. Position the memory expansion on the<br />
connector of the motherboard and press<br />
carefully until it snaps into place.<br />
5. Close the cover of the memory module and<br />
tighten the retainer screw again.<br />
• Do not touch any parts inside the fax<br />
machine other than those described here.<br />
The fixer cover can be very hot - even after<br />
the machine has been switched off.<br />
• You should install the process unit as quickly<br />
as possible as exposure to strong light can<br />
demage the drum and reduce the life of the<br />
process unit.<br />
• Never throw old toner cartridges into an<br />
open fire and ensure proper disposal of<br />
packing from exchanged parts as organic<br />
waste.<br />
• Wash hands in cold water and clean<br />
thoroughly with soap.<br />
• Wash eyes with plenty of water.<br />
• If you have inhaled toner, breathe deeply<br />
in the open air.<br />
• If toner gets in your mouth, wash it out<br />
with plenty of water.<br />
• In an emergency, call a doctor.<br />
Preparation<br />
9 GB
Installation<br />
The menu system<br />
You fax machine has a wide range of<br />
settings. The various settings are<br />
presented to the operator via a menu<br />
system in the display.<br />
A special group of keys is used for<br />
activating the menu and also for<br />
navigating within the various menu levels:<br />
The � - key activates the menu and<br />
moves up through the menu<br />
The � - key moves down through the<br />
menu<br />
The � - key selects the corresponding<br />
submenu level.<br />
The � - key selects the higher menu<br />
level.<br />
As soon as a menu item is displayed, use<br />
the ENTER key to select the<br />
corresponding function.<br />
Use the following example to get to know<br />
the menu system: The machine prints out<br />
the menu menu menu list list with the complete menu<br />
structure of your fax machine.<br />
*) Instead of using the ENTER key, you<br />
can alternatively also use the START<br />
key<br />
The fax machine automatically<br />
switches over to the standby<br />
mode if the pause between<br />
entries is longer than one minute. In this<br />
case, entered data are NOT stored.<br />
10<br />
15-03 19:56 M 100%<br />
2x<br />
REPORTS<br />
ACTIVITY REPORT<br />
MENU LIST<br />
ENTER<br />
PRINTING<br />
Standby mode<br />
Page through the menu...<br />
...until you reach this menu item<br />
Select submenu<br />
Page through the menu...<br />
...until you reach this menu item<br />
Confirm with ENTER *)<br />
Menu list is printed out<br />
GB Installation<br />
TOSHIBA <strong>TF</strong> <strong>610</strong>
Installation<br />
Set language<br />
Your fax machine is set to English. Please<br />
carry out the following menu steps if you<br />
wish to use another language for the<br />
menu and the list prints.<br />
<strong>TF</strong> <strong>610</strong> TOSHIBA<br />
15-03 19:56 M 100%<br />
PROGRAM SETUP DATA<br />
2 x<br />
PARAMETER NUMBER =_<br />
ENTER<br />
LANGUAGE ENGLISH<br />
LANGUAGE ?????<br />
ENTER<br />
STOP<br />
Standby mode<br />
Start the menu<br />
Select submenu (2x)<br />
Make your selection<br />
Enter function number<br />
Confirm with ENTER<br />
Set language<br />
Page through the menu...<br />
...until you reach this menu item<br />
Confirm with ENTER<br />
Press STOP, return to standby<br />
mode<br />
Installation<br />
11 GB
Installation<br />
Enter terminal ID<br />
The terminal ID which is part of the<br />
transmissing header contains the number<br />
under which your fax machine can be<br />
reached. The number should be entered<br />
in the international format:<br />
Example:<br />
+44 1932 12345678<br />
12<br />
Fax number<br />
Space<br />
(to improve legibilitly)<br />
Area code (without initial<br />
0)<br />
Country code<br />
Plus symbol (for the<br />
international form)<br />
To enter the characters:<br />
Character Key to be pressed<br />
+ ❊-key<br />
Hyphen � - key<br />
Enter the actual figures via the dial keypad<br />
(as usual).<br />
If you have entered a wrong<br />
number, you can delete this<br />
number by means of the<br />
CANCEL key.<br />
In Germany, the terminal ID entry<br />
is mandatory!<br />
15-03 19:56 M 100%<br />
PROGRAM SETUP DATA<br />
LOCAL ID NUMBER<br />
ENTER<br />
ID:<br />
2x<br />
+44 1932 12345678<br />
ENTER<br />
STOP<br />
Standby mode<br />
Start the menu<br />
Select submenu<br />
Page through the menu...<br />
...until you reach this menu item<br />
Confirm with ENTER<br />
Make your selection<br />
Enter the terminal ID<br />
(see Infotext)<br />
Terminal ID is complete<br />
Confirm with ENTER<br />
Press STOP, return to standy<br />
mode<br />
GB Installation<br />
TOSHIBA <strong>TF</strong> <strong>610</strong>
Installation<br />
Enter the user name<br />
The transmission header not only contains<br />
the terminal ID but also the user name.<br />
This can contain up to 20 characters.<br />
Each digit features several characters<br />
which can be activated by repeatedly<br />
pressing the corresponding key. If you<br />
have found a character of your choice,<br />
press the „�“ key to got to the next<br />
position. Use the „�“ key to got back<br />
one letter and make any corrections. Use<br />
the „0“ key to select special characters.<br />
If you enter too many characters, press<br />
the CANCEL key to delete the unwanted<br />
characters.<br />
When the name is complete, press the<br />
ENTER-key.<br />
Example: TOSHIBA<br />
<strong>TF</strong> <strong>610</strong> TOSHIBA<br />
15-03 19:56 M 100%<br />
PROGRAM SETUP DATA<br />
LOCAL NAME<br />
ENTER<br />
NAME:<br />
NAME: TOSHIBA<br />
ENTER<br />
STOP<br />
Standby mode<br />
Start the menu<br />
Select submenu<br />
Page through the menu...<br />
...until you reach this menu item<br />
Confirm with ENTER<br />
Make your selection<br />
Enter the name<br />
Example: TOSHIBA<br />
1 x 8 = T # 3 x 4 = I #<br />
3 x 6 = O # 2 x 2 = B #<br />
4 x 7 = S # 1 x 2 = A<br />
2 x 4 = H #<br />
Name is complete<br />
Confirm with ENTER<br />
Press STOP, return to standy<br />
mode<br />
Installation<br />
13 GB
Installation<br />
Setting dialling method<br />
There are two dialling methods. The<br />
pulse-dialling method is normally used in<br />
the public switched telephone network. If<br />
your fax machine is connected to a<br />
PABX*, the DTMF dialling method may<br />
also be used. As the public network is<br />
modernised, this dialling method may also<br />
be used in the public network. If you are<br />
in any doubt, first try the pulse-dialling<br />
method (basic setting).<br />
If the dialling procedure fails, try DTMP<br />
dialling. How ever DTMF is the most<br />
efficient.<br />
✽ ) This function may not be available in<br />
machines in certain countries.<br />
14<br />
✽<br />
15-03 19:56 M 100%<br />
PROGRAM SETUP DATA<br />
2 x<br />
PARAMETER NUMBER =_<br />
ENTER<br />
DIAL METHOD TONE<br />
DIAL METHOD 10PPS<br />
ENTER<br />
STOP<br />
Standby mode<br />
Start the menu<br />
Select submenu (2x)<br />
Make your selection<br />
Enter function number<br />
Confirm with ENTER<br />
Set dial method<br />
Example: Tone<br />
Page through the menu...<br />
...until you reach the desired menu item<br />
Example: 10PPS<br />
Confirm with ENTER<br />
Press STOP, return to standy<br />
mode<br />
GB Installation<br />
TOSHIBA <strong>TF</strong> <strong>610</strong>
Installation<br />
Connection to PABX,<br />
obtaining a public line<br />
The <strong>TF</strong> <strong>610</strong> can be connected not only to<br />
the public switched telephone network<br />
(public line) but also to a PABX. In this<br />
case, additional parameters have to be<br />
entered.<br />
With PABXs, the public line is obtained in<br />
various ways:<br />
• Number Dial one digit (or several<br />
digits) in order to obtain<br />
the public line<br />
•Earth key Earth potential is<br />
connected to the voice<br />
wire(s) in order to obtain<br />
the public line<br />
• Flash key With this method of<br />
obtaining the public line,<br />
the connection circuit is<br />
interrupted briefly.<br />
When the method of obtaining a<br />
public line has been entered, you<br />
must always press the key ”❊”<br />
before the actual number when you dial<br />
your fax partner. This is also applicable for<br />
saving the fax numbers (see page 43).<br />
If you have problems if your<br />
machine is connected to an<br />
extension, please read the<br />
“Comments concerning connection to<br />
PABXs” under “Further settings” (page 56).<br />
<strong>TF</strong> <strong>610</strong> TOSHIBA<br />
15-03 19:56 M 100%<br />
PROGRAM SETUP DATA<br />
2 x<br />
PARAMETER NUMBER =_<br />
ENTER<br />
ACCESS OFF<br />
............<br />
ENTER<br />
STOP<br />
Standby mode<br />
Start the menu<br />
Select submenu (2x)<br />
Make your selection<br />
Enter function number<br />
Confirm with ENTER<br />
Set public line<br />
Page through the menu...<br />
Public line Flash: Flash function<br />
Public line Earth key: Earth key function<br />
Public line Digit: Code (see next page)<br />
...until you reach the desired menu item<br />
Confirm with ENTER<br />
Press STOP, return to standy<br />
mode<br />
Installation<br />
15 GB
Installation<br />
Only with CODE setting<br />
16<br />
2 x<br />
PROGRAM SETUP DATA<br />
PARAMETER NUMBER =_<br />
ENTER<br />
ACCESS CODE =<br />
ACCESS CODE = 0<br />
ENTER<br />
STOP<br />
Start the menu<br />
Select submenu (2x)<br />
Make your selection<br />
Enter function number<br />
Confirm with ENTER<br />
Make your selection CODE<br />
Enter the code(s)<br />
(Example: 0)<br />
...until you reach the desired menu item<br />
Confirm with ENTER<br />
Press STOP, return to standy<br />
mode<br />
GB Installation<br />
TOSHIBA <strong>TF</strong> <strong>610</strong>
Installation<br />
Connection to PABX,<br />
further settings<br />
If you wish to connect your fax machine<br />
to a PABX, further settings are necessary.<br />
The following menu procedure sets<br />
default values for connecting a fax<br />
machine to PABXs. If the machine does<br />
not operate perfectly, please refer to page<br />
56 for explanations concerning<br />
connection to PABXs.<br />
<strong>TF</strong> <strong>610</strong> TOSHIBA<br />
PROGRAM SETUP DATA<br />
2 x<br />
PARAMETER NUMBER =_<br />
ENTER<br />
LINE = PUBLIC LINE<br />
LINE = PBX<br />
ENTER<br />
STOP<br />
Start the menu<br />
Select submenu (2x)<br />
Make your selection<br />
Enter function number<br />
Confirm with ENTER<br />
Current setting<br />
The fax machine waits for the<br />
dial tone sent by the exchange<br />
before dialling starts.<br />
Page through the menu...<br />
...until you reach the desired menu item<br />
The setting INIT WAIT X SEC<br />
involves a pause of X seconds<br />
before dialling starts. The fax<br />
does not not check the presence of<br />
a dial tone.<br />
Confirm with ENTER<br />
Press STOP, return to standy<br />
mode<br />
Installation<br />
17 GB
Installation<br />
Set date and time<br />
Enter the current date and time at this<br />
point so that all details relating to date<br />
and time is correct. The internal clock of<br />
your fax machine then runs automatically<br />
- even in the event of a power failure.<br />
18<br />
15-03 19:56 M 100%<br />
4 x<br />
PROGRAM SETUP DATA<br />
DATE & TIME<br />
ENTER<br />
DD-MM-YY HH:MM<br />
15.03.98 19:56<br />
ENTER<br />
STOP<br />
Standby mode<br />
Start the menu<br />
Select submenu<br />
Page through the menu...<br />
...until you reach this menu item<br />
Confirm with ENTER<br />
Make your selection date & time<br />
Enter date and time<br />
Example: March 15th, 19.56 hours<br />
Confirm with ENTER<br />
Press STOP, return to standy<br />
mode<br />
GB Installation<br />
TOSHIBA <strong>TF</strong> <strong>610</strong>
Reception of documents<br />
Set standby mode<br />
If your fax machine is connected to the<br />
PSTN or the PABX, there are four different<br />
ways of receiving documents.<br />
Manual reception<br />
Press the AUTO key.<br />
Automatic reception<br />
Key functions:<br />
• Function Function 37<br />
37<br />
Number of rings before the fax<br />
machine picks up the call (1-10)<br />
• Function Function 38<br />
38<br />
Setting of automatic reception<br />
Press the AUTO key.<br />
<strong>TF</strong> <strong>610</strong> TOSHIBA<br />
The standby mode is indicated with the AUTO<br />
LED. Press the AUTO key to change between<br />
two different reception modes (these are<br />
indicated by the AUTO LED):<br />
If the line is used primarily for telephone traffic<br />
LED “AUTO” off<br />
If the line is reserved exclusively for fax<br />
operation.<br />
LED “AUTO” is lit<br />
AUTO AUTO lamp lamp on:<br />
on:<br />
The following reception modes can be<br />
alternatively set by individual setting of<br />
function function 38 38 (see page 52 et seq.):<br />
• Fax reception mode<br />
• Telephone/fax mode<br />
• Fax/TAD mode<br />
AUTO lamp off:<br />
Manual reception<br />
The call must be accepted <strong>manual</strong>ly; the<br />
fax machine is not activated when the<br />
line rings. If you wish to transmit a<br />
document, you must press the START key<br />
of the fax machine.<br />
Ensure that any fax calls can<br />
indeed be accepted; it is always<br />
necessary to press the START<br />
key.<br />
The fax machine switches over to<br />
reception as soon as the line rings (see<br />
page 25).<br />
The fax machine is always<br />
activated, even if the call is<br />
initiated by a voice partner.<br />
Reception of documents<br />
19 GB
Reception of documents<br />
Telephone/fax switch<br />
Key functions:<br />
• Function Function 38<br />
38<br />
Setting of telephone/fax switch<br />
• Function Function Function 37<br />
37<br />
Number of rings until the fax machine<br />
picks up the call (1-10)<br />
• Function Function Function 36<br />
36<br />
Number of rings (synthetic ringing tone)<br />
from the loudspeaker (1-10)<br />
Press the AUTO key.<br />
Fax/TAD switch<br />
Key functions:<br />
• Function Function 38<br />
38<br />
Set the fax/TAD switch<br />
• Function Function 44<br />
44<br />
Specify the time in which the fax<br />
machine identifies a partner fax (TAD<br />
timer / 1-99 sec.)<br />
Press the AUTO key<br />
20<br />
If the line is used for telephone and also for<br />
operation and if you are usually present in the<br />
same room.<br />
LED “AUTO” is lit<br />
If the line is operated with a TAD or radio<br />
telephone and if you wish to collect the call<br />
from other rooms.<br />
LED “AUTO” is lit<br />
Incoming calls are automatically<br />
distinguished between fax- and voice<br />
calls:<br />
If the call is a voice call the fax rings via<br />
the loudspeaker to notify the user. At this<br />
time the caller will hear a Ring which<br />
indicates that the partner is beeing<br />
called.<br />
In this case take up the handset und<br />
press STOP on the fax machine.<br />
If the call is from another fax machine<br />
the document will be receiverd<br />
automatically without ringing.<br />
Ensure that there is always<br />
someone present in this mode<br />
to accept the call. As soon as<br />
ringing tone is generated, the connection<br />
is established and the caller incurs<br />
charges.<br />
This mode enables you to receive<br />
incoming fax messages and also to<br />
answer telephone calls. There are two<br />
situations:<br />
You are present:<br />
Switch off the call answering equipment<br />
and collect the call at any point. If the<br />
caller is a fax machine, your fax machine<br />
will take over the call and print out the<br />
fax message.<br />
You are absent:<br />
Switch on the call answering equipment.<br />
The call answering equipment records all<br />
telephone calls. Your fax machine<br />
automatically receives any incoming fax<br />
messages.<br />
You must always ensure that<br />
the TAD is connected in this<br />
reception mode. Otherwise, fax<br />
messages cannot be received when the<br />
line is called.<br />
GB Reception of documents<br />
TOSHIBA <strong>TF</strong> <strong>610</strong>
Reception of documents<br />
Setting the TAD time<br />
If you wish to use your fax machine in the<br />
fax/TAD mode, you also have to set the<br />
TAD time.<br />
This is the “listening-time” during which<br />
the fax machine responds to a partner<br />
fax.<br />
TAD time = length of recorded message<br />
+ 10 seconds.<br />
<strong>TF</strong> <strong>610</strong> TOSHIBA<br />
15-03 19:56 M 100%<br />
PROGRAM SETUP DATA<br />
2 x<br />
PARAMETER NUMBER =_<br />
ENTER<br />
FAX/TAD TIMER = 35<br />
ENTER<br />
STOP<br />
Standby mode<br />
Start the menu<br />
Select submenu (2x)<br />
Make your selection<br />
Enter function number<br />
Confirm with ENTER<br />
Set TAD time<br />
Enter the new time<br />
Confirm with ENTER<br />
Press STOP, return to standy<br />
mode<br />
Reception of documents<br />
21 GB
Reception of documents<br />
Set remote reception<br />
(<strong>manual</strong> reception)<br />
If you have connected a (cordless)<br />
telephone to your fax line (as described on<br />
page 19), you may occasionally collect a<br />
call (in the <strong>manual</strong> reception mode) which<br />
was meant for your fax machine. This can<br />
for instance be heard in the form of<br />
periodic whistle. Enter a two-digit code in<br />
your telephone (only DTMF) to activate<br />
your fax machine (virtually by remote<br />
control).<br />
This function can be activated or<br />
deactivated:<br />
22<br />
15-03 19:56 M 100%<br />
2 x<br />
PROGRAM SETUP DATA<br />
PARAMETER NUMBER =_<br />
ENTER<br />
RMT ACTIVATION OFF<br />
RMT ACTIVATION ON<br />
ENTER<br />
PARAMETER NUMBER =_<br />
ENTER<br />
ACTIVATION CODE =**<br />
ENTER<br />
STOP<br />
Standby mode<br />
Start the menu<br />
Select submenu (2x)<br />
Make your selection<br />
Enter function number<br />
Confirm with ENTER<br />
Set remote reception<br />
Page through the menu...<br />
...until you reach the desired menu item<br />
Confirm with ENTER<br />
Make your selection<br />
Enter function number<br />
Confirm with ENTER<br />
Preset key code<br />
Enter the 2-digit key code<br />
(Delete the preset code with the CANCEL<br />
key)<br />
Confirm with ENTER<br />
Press STOP, return to standy<br />
mode<br />
GB Reception of documents<br />
TOSHIBA <strong>TF</strong> <strong>610</strong>
Reception of documents<br />
Reception reduction<br />
Your fax machine uses A4 paper. For<br />
technical reasons the entire length of this<br />
page cannot be used. So the fax machine<br />
reduces the length of the incoming<br />
document. This means that the received<br />
image may be slightly compressed.<br />
In general, this effect is not<br />
problematical. However, if the sizes of the<br />
documents must be absolutely identical, it<br />
is necessary to deactivate the reception<br />
reduction facility. In this case, that part<br />
of the copy which no longer fits on the<br />
page is printed out on a second page.<br />
Original (A4)<br />
Reception reduction: ON<br />
<strong>TF</strong> <strong>610</strong> TOSHIBA<br />
15-03 19:56 M 100%<br />
2 x<br />
PARAMETER NUMBER =_<br />
ENTER<br />
RX REDUCTION AUTO<br />
RX REDUCTION OFF<br />
ENTER<br />
STOP<br />
Standby mode<br />
Start the menu<br />
Select submenu (2x)<br />
Make your selection<br />
Enter function number<br />
Confirm with ENTER<br />
Current setting<br />
Change setting<br />
Confirm with ENTER<br />
Press STOP, return to standy<br />
mode<br />
Reception of documents<br />
23 GB
Reception of documents<br />
Local copy<br />
You can use your fax machine to make<br />
one or more copies (up to 99).<br />
*) The copy is reduced to 96% due to<br />
technical considerations.<br />
24<br />
15-03 19:56 M 100%<br />
DOCUMENT SET<br />
COPY<br />
NUMBER OF COPY =<br />
COPY<br />
START<br />
Standby mode<br />
Load original<br />
Remember:<br />
Printed side face down<br />
Document ready<br />
PRESS COPY KEY<br />
Make your selection<br />
(if only one copy is to be made, please<br />
now press the START key)<br />
Enter number of copies<br />
Confirm with START<br />
Copies are printed *)<br />
The FINE resolution is used for the copy. If<br />
you wish to copy a photograph or a<br />
colour document, please select the<br />
PHOTO resolution (see page 35).<br />
GB Reception of documents<br />
TOSHIBA <strong>TF</strong> <strong>610</strong>
Reception of documents<br />
Set call counter<br />
If your fax machine is set to automatic<br />
reception (FAX, TEL/FAX, see page 20), it<br />
will switch on as soon as it is called.<br />
Under these circumstances, it is thus not<br />
possible for the call to be intercepted by<br />
the telephone.<br />
However, it is possible for your fax<br />
machine to be set in such a way that - in<br />
the event of a telephone call - it is<br />
activated after a specific delay. The call<br />
counter is used for this purpose. You can<br />
use this facility to set the number of<br />
incoming calls (max. 10) before the fax<br />
machine connects to the line.<br />
Memory reception<br />
Under certain circumstances, the<br />
machine cannot print out any further<br />
incoming copies:<br />
• If there is no recording paper<br />
• If there is a paper jam<br />
In order to prevent problems with<br />
reception, the remaining pages are<br />
buffered in the memory of your fax<br />
machine. Once the problem has been<br />
solved, the document is printed out<br />
automatically.<br />
Do not switch off the power<br />
supply as otherwise the contents<br />
of the memory will be lost.<br />
<strong>TF</strong> <strong>610</strong> TOSHIBA<br />
2 x<br />
15-03 19:56 M 100%<br />
PROGRAM SETUP DATA<br />
PARAMETER NUMBER =_<br />
ENTER<br />
AUTO DELAY 01<br />
/<br />
AUTO DELAY XX<br />
ENTER<br />
STOP<br />
ADD PAPER M 86%<br />
ERROR flashes<br />
Standby mode<br />
Start the menu<br />
Select submenu(2x)<br />
Make your selection<br />
Enter function number<br />
Confirm with ENTER<br />
Set number of rings<br />
Page through the menu...<br />
...until you reach the desired value<br />
Confirm with ENTER<br />
Press STOP, return to standy<br />
mode<br />
No paper, memory full<br />
Paper out<br />
Incoming copy is printed out<br />
Reception of documents<br />
25 GB
Reception of documents<br />
Cancel reception<br />
It is not immediately evident whether your<br />
fax machine is transmitting or receiving a<br />
document, as the BUSY lamp does not<br />
provide specific information in this<br />
respect. Press the CANCEL key to display<br />
the job currently being processed by the<br />
fax machine.<br />
26<br />
15-03 19:56 M 66%<br />
CANCEL<br />
RECEIVING JOB<br />
ENTER<br />
CANCEL OK ?<br />
ENTER<br />
CANCELED<br />
BUSY flashes<br />
Standby mode<br />
The fax machine is in the transmission or<br />
reception mode<br />
Press CANCEL<br />
Display message indicates current<br />
reception<br />
Confirm with ENTER<br />
Are you sure?<br />
Confirm with ENTER<br />
Current reception is cancelled<br />
GB Reception of documents<br />
TOSHIBA <strong>TF</strong> <strong>610</strong>
Transmit documents<br />
Document format<br />
The following table gives you an idea of<br />
which documents your fax machine can<br />
handle.<br />
Please note:<br />
• Documents longer than 381 mm can<br />
only be loaded <strong>manual</strong>ly.<br />
• If you load severeal sheets at one<br />
time, they should all be of the same<br />
size and paper quality.<br />
<strong>TF</strong> <strong>610</strong> TOSHIBA<br />
Problem documents ...<br />
May not feed. This applies to<br />
• torn, wrinkled or damp pages<br />
• folded pages or pages with holes<br />
• transparent pages or pages with a smooth,<br />
shiny finish<br />
• textile or metallic douments<br />
There are two ways of avoiding this problem:<br />
... by photocopying or using a carrier<br />
sheet.<br />
Your TOSHIBA dealer can supply you<br />
with the necessary carrier sheets.<br />
Use of carrier sheets:<br />
Place your document face-up on the carrier<br />
sheet under the transparent cover. Carrier<br />
sheets can be used like normal documents<br />
except for one restriction: only one carrier<br />
sheet can be fed at one time.<br />
How to load documents correctly<br />
Remove any paper-clips, staples and similar<br />
objects before transmitting the document. Now<br />
place your documents on the document tray -<br />
up to 20 at one time - as shown.<br />
All documents must be located with the<br />
printed side face down!<br />
Single sheet 2 or more sheets<br />
Document size (max) 216 mm (W) x 1000 mm (L) 216 mm (W) x 381 mm (L)<br />
Document size (min) 148 mm (W) x 105 mm (L)<br />
Effective scanning width 210 mm<br />
How many sheets stacks up to<br />
can be loaded at 20 sheet A4<br />
one time?<br />
Thickness of paper 0,05 ~ 0,15 mm 0,06 ~ 0,1 mm<br />
Quality of paper Uncoated on both sides<br />
Transmit documents<br />
27 GB
Transmit documents<br />
Stack mode<br />
A frequently encountered problem with<br />
fax machines is that the document tray is<br />
blocked while a document is being<br />
transmitted; no other documents can be<br />
transmitted while the fax machine is<br />
transmitting or receiving documents. This<br />
is different with your fax machine: All<br />
documents are read into the memory and<br />
are then transmitted from this memory.<br />
Incoming documents are also read into<br />
the memory before they are printed out.<br />
The advantage of this method is that the<br />
document tray is virtually always free and<br />
that documents can be transmitted<br />
almost irrespective of the transmission or<br />
receiving status of the fax machine.<br />
Each procedure is known as a job. A job<br />
may consist of one or more documents<br />
which you can transmit to your partners.<br />
A job can also be a multi-address<br />
transmission or a delayed transmission.<br />
Your fax machine is able to manage 15<br />
such jobs. Each of these jobs is placed on<br />
a stack, from where they are processed in<br />
sequence. Your fax machine accepts jobs<br />
even while it is transmitting or receiving<br />
documents; this means that the<br />
document tray is always ready. With every<br />
procedure, the fax machine assigns a<br />
reference number to the job; this number<br />
is available via the job list (see Page 50).<br />
This number can also be used for deleting<br />
a specific job.<br />
28<br />
INPUT<br />
MAX. 15 JOBS<br />
JOB NBR. 11<br />
JOB NBR. 10<br />
JOB NBR. 9<br />
JOB NBR. 8<br />
JOB NBR. 7<br />
JOB NBR. 6<br />
JOB NBR. 5<br />
JOB NBR. 4<br />
JOB NBR. 3<br />
JOB NBR. 2<br />
JOB NBR. 1<br />
AUSGABE<br />
LINE<br />
TRANSMISSION<br />
GB Transmit documents<br />
TOSHIBA <strong>TF</strong> <strong>610</strong>
Transmit documents<br />
Direct transmission<br />
In the normal transmission mode your fax<br />
machine reads all documents into the<br />
memory before they are transmitted. If<br />
the documents are too large for the<br />
memory or if you have too many<br />
documents, you can also send directly<br />
from the document tray without reading<br />
the documents into the memory.<br />
If you find that the memory is<br />
frequently too small, ask your<br />
dealer for a memory expansion!<br />
<strong>TF</strong> <strong>610</strong> TOSHIBA<br />
15-03 19:56 M 100%<br />
DOCUMENT SET<br />
DIRECT SEND<br />
DIRECT SEND READY<br />
TEL: 123456789<br />
START<br />
Load original<br />
Remember:<br />
Printed side face down<br />
Document ready<br />
Press DIRECT SEND<br />
Enter fax number<br />
or enter alphabet dialling or one-touch<br />
dialling<br />
Confirm with START<br />
Document is transmitted<br />
Transmit documents<br />
29 GB
Transmit documents<br />
Automatic fax<br />
messages<br />
To send fax messages in the traditional<br />
manner: Insert document(s), enter the fax<br />
number and the connection is<br />
automatically established.<br />
Your benefit: Your documents will leave<br />
the fax immediately. (Refer to page 28)<br />
If you decide to use the listening-in<br />
version (see page 34) , you can also<br />
acoustically monitor the call<br />
establishment process. This is useful<br />
whenever you have problems with<br />
establishing a connection. The reason is<br />
frequently a wrong number, or a fax<br />
machine which is not ready to receive.<br />
With the listening-in alternative,<br />
the document is not read into<br />
the memory; it is retained on the<br />
tray until the receiving fax<br />
machine has been contacted.<br />
Residual memory depends on<br />
the size of the stack!<br />
30<br />
15-03 19:56 M 100%<br />
DOCUMENT SET<br />
TEL: 123456789<br />
START<br />
DOC.READING M98%<br />
JOB ACCEPTED NO.007<br />
15-03 19:56 M 98%<br />
LINE flashes<br />
15-03 19:56 M 100%<br />
Load original<br />
Remember:<br />
Printed side face down<br />
Document ready<br />
If you have inadvertently taken the wrong<br />
document, press the STOP key before<br />
removing the document from the<br />
document feed.<br />
Enter fax number<br />
The entered fax number is displayed. Use<br />
the CANCEL keys to make any<br />
corrections, or press the STOP key to<br />
delete the complete number. Press the<br />
STOP key again if you wish the machine<br />
to eject the document(s) without being<br />
processed.<br />
Confirm with START<br />
While the document is being read:<br />
current memory capacity is displayed.<br />
When the document is read into the<br />
machine, the job number is briefly<br />
displayed.<br />
Dialling the fax partner<br />
The flashing LINE lamp always<br />
indicates when your fax<br />
machine is transmitting or<br />
receiving a document.<br />
After transmission:<br />
Change to standby display: the job is<br />
deleted from the stack memory (can be<br />
identified by means of the changed<br />
memory display).<br />
GB Transmit documents<br />
TOSHIBA <strong>TF</strong> <strong>610</strong>
Transmit documents<br />
Transmission with<br />
alphabet dialling<br />
Alphabet dialling enables you to enter a<br />
double-digit “address” instead of the<br />
(frequently-long) fax number of your<br />
partner. The real fax number is<br />
permanently stored under this “address”.<br />
The alphabet dialling facility enables you<br />
to save time with frequently used fax<br />
numbers.<br />
Please refer to page 43 for<br />
details of how to save alphabet<br />
dialling numbers.<br />
Transmission with onetouch<br />
dialling<br />
One-touch dialling provides you with a very<br />
easy method of dialling the number of<br />
your partner. Your can assign any fax<br />
numbers to 18 keys. You need to press a<br />
key only once in order to reach your<br />
partner.<br />
Please refer to page 45 for<br />
details of how to store one-touch<br />
dialling numbers.<br />
<strong>TF</strong> <strong>610</strong> TOSHIBA<br />
15-03 19:56 M 100%<br />
DOCUMENT SET<br />
ABB/ALPHA<br />
ABB :<br />
TOSHIBA<br />
15-03 19:56 M 100%<br />
DOCUMENT SET<br />
TOSHIBA<br />
Load original<br />
Remember:<br />
Printed side face down<br />
Document ready<br />
Activate the alphabet dial facility<br />
Make your selection: alphabet dial<br />
number<br />
Enter the alphabet dial number<br />
The name is displayed<br />
The connection is established (for<br />
procedure, see page 30, Automatic fax<br />
transmission).<br />
Load original<br />
Remember:<br />
Printed side face down<br />
Document ready<br />
Press a one-touch dial key<br />
The name is displayed<br />
The connection is established (for<br />
procedure, see page 30 , Automatic fax<br />
transmission).<br />
Transmit documents<br />
31 GB
Transmit documents<br />
Transmission with<br />
telephone (<strong>manual</strong><br />
transmission)<br />
The call in this case is established with a<br />
telephone which is additionally connected<br />
to the wall socket. You can thus speak to<br />
the other party before you send the fax<br />
message.<br />
Long dialling<br />
With the long dialling facility, a fax<br />
number which is stored under a speed<br />
dialling key is combined with an additional<br />
fax number. The additional fax number<br />
can be a further speed dialling number, an<br />
alphabet dialling number or a user-defined<br />
number.<br />
For instance, access numbers to private<br />
telephone companies can be easily<br />
combined with other stored fax numbers<br />
at the push of a button.<br />
Criteria for long dialling:<br />
• The first fax number is stored on a<br />
speed dialling key (see page 31)<br />
• The first fax number is terminated with<br />
PAUSE (see page 2)<br />
• Further numbers may be speed dialling<br />
numbers, alphabet dialling numbers or<br />
user-defined numbers<br />
The long dialling facility is also<br />
compatible with the listening-in<br />
function (see page 34). In this<br />
way, you can listen to any<br />
messages, etc. between the<br />
numbers.<br />
*) Example of a long dialling number:<br />
✽ 01234- (the number is terminated<br />
with PAUSE)<br />
32<br />
15-03 19:56 M 100%<br />
DOCUMENT SET<br />
START<br />
15-03 19:56 M 100%<br />
DOCUMENT SET<br />
TOSHIBA<br />
START<br />
Load original<br />
Remember:<br />
Printed side face down<br />
Document ready<br />
Dialling with telephone<br />
If you have agreed the transmission with<br />
your fax partner, or if you hear the fax<br />
tone at the other end:<br />
Confirm with START<br />
Transmission commences<br />
(You can replace the handset, as the fax<br />
machine has now assumed control).<br />
Load original<br />
Remember:<br />
Printed side face down<br />
Document ready<br />
Press the one-touch dialling<br />
key *)<br />
The name which is stored under the onetouch<br />
dialling key is briefly displayed, or<br />
the stored fax number is displayed.<br />
Enter additional number<br />
• Speed dialling key<br />
• Alphabet dialling number<br />
• User-defined number<br />
Press the START key<br />
GB Transmit documents<br />
TOSHIBA <strong>TF</strong> <strong>610</strong>
Transmit documents<br />
Transmission with<br />
directory function<br />
This type of dialling is similar to searching<br />
in a telephone directory. Enter the initial<br />
letter of your partner to search for the<br />
corresponding fax number in the alphabet<br />
dialling memory. This type of dialling is<br />
particularly useful if you know the name of<br />
a specific partner<br />
<strong>TF</strong> <strong>610</strong> TOSHIBA<br />
*)<br />
15-03 19:56 M 100%<br />
DOCUMENT SET<br />
2 x<br />
ALBRECHT<br />
BAUER<br />
BLUME<br />
START<br />
NO ENTRY<br />
ABB/ALPHA<br />
SELECT NAME<br />
Load original<br />
Remember:<br />
Printed side face down<br />
Document ready<br />
Activate directory function<br />
You can now enter the initial letter of<br />
your fax partner.<br />
(see letter input, page 13) *).<br />
(Example: ,B“)<br />
Key „2“<br />
The first name of the corresponding letter<br />
(here "A") is displayed.<br />
Key „2“<br />
Presse the key "2" to display the next<br />
letter (here "B") which is stored under this<br />
key.<br />
Use the keys ▲ and ▼ to select the<br />
desired fax partner with identical starting<br />
letters.<br />
Confirm with START<br />
The connection is established (for<br />
procedure, see page 30, Automatic fax<br />
transmission).<br />
*) This display appears if no name is<br />
stored under the selected letter.<br />
Transmit documents<br />
33 GB
Transmit documents<br />
Monitoring<br />
In case of transmission problems, this<br />
function is very helpfull. Check dialling by<br />
this method allows you to detect wrong<br />
numbers and busy parties also.<br />
With the listening-in alternative,<br />
the document is not not read into<br />
the memory; it is retained on the<br />
tray until the receiving fax machine has<br />
been contacted.<br />
34<br />
15-03 19:56 M 100%<br />
DOCUMENT SET<br />
TEL:<br />
TEL: 12345<br />
Piiiiep<br />
MONITOR<br />
START<br />
Load original<br />
Remember:<br />
Printed side face down<br />
Document ready<br />
Activates monitoring<br />
Make your selection<br />
Your entry<br />
(or alphabet dial number, or one-touch<br />
dial number)<br />
Dialling starts<br />
If another fax machine can be heard<br />
(beep)<br />
Confirm with START<br />
The connection is established<br />
(for procedure, see page 30,<br />
Automatic fax transmission).<br />
If no connection is established,<br />
press the STOP key to<br />
disconnect the fax machine<br />
from the line.<br />
GB Transmit documents<br />
TOSHIBA <strong>TF</strong> <strong>610</strong>
Transmit documents<br />
Set resolution<br />
In its basic setting, your fax machine uses<br />
high resolution for transmitting or copying<br />
your documents. You can however also<br />
adjust the resolution to suit the particular<br />
documents. Use the following as a rough<br />
guide:<br />
STD (basic setting) For hand-written<br />
or typewritten documents<br />
FINE For documents with small type<br />
such as newspapers and<br />
diagrams<br />
SF For documents with very small<br />
and detailed diagrams<br />
GREY 64 grey stages for photographs<br />
or colour documents<br />
Higher resolution has an impact<br />
on transmission time!<br />
To change the resolution, press<br />
the MODE key several times. The<br />
LEDs above this key indicate the<br />
set mode:<br />
LED LED lit lit mode mode set<br />
set<br />
FINE fine resolution<br />
S-FINE superfine resolution<br />
GREY STAGE grey-stage mode<br />
all off standard resolution<br />
Redial<br />
If it was not possible for your fax message<br />
to be sent, this may be due to various<br />
reasons (please read page 65). One<br />
reason may be that the other fax machine<br />
is busy. In this case, it would make sense<br />
to call your partner again at a later time.<br />
This is done automatically by your fax; it<br />
attempts to send the fax message again<br />
approx. every three minutes.<br />
The quantity of last number redial<br />
attempts and the relevant intervals<br />
between attempts can be set in the user<br />
functions (see page 52).<br />
If you have established a<br />
connection via the MONITOR<br />
key, you can redial a number<br />
using the REDIAL/PAUSE key.<br />
<strong>TF</strong> <strong>610</strong> TOSHIBA<br />
Transmit documents<br />
35 GB
Transmit documents<br />
Delayed transmission<br />
You are able to define a certain time at<br />
which the documents will be transmitted;<br />
this enables you to overcome the<br />
problems involved with different time<br />
zones or will enable you to transmit<br />
documents at off-peak rates<br />
The benefit of reading into the memory is,<br />
that your ADF can be used for the next<br />
transmission.<br />
36<br />
15-03 19:56 M 100%<br />
DOCUMENT SET<br />
COMM.OPTION<br />
1 x<br />
SET DELAYED TX TIME<br />
ENTER<br />
TX TIME --:--<br />
ENTER<br />
ENTER TEL NUMBER<br />
ENTER<br />
ABB/ALPHA<br />
START OR TEL NO.<br />
ENTER<br />
Load original<br />
Remember:<br />
Printed side face down<br />
Document ready<br />
Activate send options<br />
Page through the menu...<br />
...until you reach this menu item<br />
Confirm with ENTER<br />
Make your selection for start time<br />
Enter start time<br />
Confirm with ENTER<br />
Make your selection for fax number<br />
Enter the fax number directly, or<br />
via alphabet dialling or via onetouch<br />
dialling<br />
Confirm with ENTER<br />
Make your selection for further fax<br />
numbers (max. 20 numbers)<br />
-or-<br />
Confirm with ENTER<br />
The documents are read into the memory<br />
and sent to the various users.<br />
Max. 5 jobs can be<br />
programmed with a delay.<br />
GB Transmit documents<br />
TOSHIBA <strong>TF</strong> <strong>610</strong>
Transmit documents<br />
Single multi-address<br />
transmission<br />
If you wish to send one document to<br />
several partners without spending a lot of<br />
time, this function can be used to create<br />
a group on one single occasion. The<br />
group is deleted after the procedure has<br />
been completed. Up to 20 users can be<br />
grouped together from one-touch dialling<br />
numbers, alphabet dialling numbers or<br />
standard numbers.<br />
MANUAL BROADCAST<br />
FAXNO. + FAXNO. + FAXNO.<br />
or or or<br />
ABB ABB ABB<br />
or or or<br />
ONE ONE ONE<br />
TOUCH TOUCH TOUCH<br />
<strong>TF</strong> <strong>610</strong> TOSHIBA<br />
15-03 19:56 M 100%<br />
DOCUMENT SET<br />
COMM.OPTION<br />
MANUAL BROADCAST<br />
ENTER<br />
ENTER TEL NUMBER<br />
ENTER<br />
ABB/ALPHA<br />
START OR TEL NO.<br />
ENTER<br />
Load original<br />
Remember:<br />
Printed side face down<br />
Document ready<br />
Activate send options<br />
Confirm with ENTER<br />
Make your selection<br />
Enter the fax number directly, or<br />
via alphabet dialling, or via onetouch<br />
dialling<br />
Confirm with ENTER<br />
Make your selection for further fax<br />
numbers (max. 20 numbers)<br />
-or-<br />
Confirm with ENTER<br />
The documents are read into the memory<br />
and transmitted to the individual users.<br />
Transmit documents<br />
37 GB
Transmit documents<br />
Stored broadcast<br />
If you have a fixed group of fax partners<br />
to whom you frequently have to send<br />
broadcast fax messages, the stored<br />
broadcast facility is just what you need.<br />
You can compose 6 groups of your<br />
choice. These groups are then available<br />
at the push of a button (use the dark grey<br />
one-touch dialling keys).<br />
GROUP BROADCAST 1<br />
ABB 1 + ABB 2 + ABB 3<br />
Please refer to page 45 for<br />
details of how to program<br />
permanent groups.<br />
38<br />
15-03 19:56 M 100% Load original<br />
Remember:<br />
Printed side face down<br />
DOCUMENT SET<br />
SUPERGROUP<br />
Document ready<br />
Press the dark group dialling key<br />
The group name is displayed briefly<br />
The connection is established (for<br />
procedure, see page 30, Automatic fax<br />
transmission).<br />
GB Transmit documents<br />
TOSHIBA <strong>TF</strong> <strong>610</strong>
Transmit documents<br />
Polling<br />
A type of self-service facility enables you<br />
to fetch documents from another partner<br />
if your partner has prepared this function.<br />
“Fax on demand”, i.e. obtaining<br />
information from mailboxes such as<br />
weather reports, traffic reports or stock<br />
market reports, is also possible with this<br />
function.<br />
<strong>TF</strong> <strong>610</strong> TOSHIBA<br />
15-03 19:56 M 100%<br />
COMM.OPTION<br />
4 x<br />
POLLING<br />
ENTER<br />
RX POLLING<br />
ENTER<br />
ENTER TEL NUMBER<br />
ENTER<br />
ABB/ALPHA<br />
Standby mode<br />
Activate send options<br />
Page through the menu...<br />
...until you reach this menu item<br />
Confirm with ENTER<br />
Confirm with ENTER<br />
Make your selection for fax number (from<br />
which a document is to be polled)<br />
Enter the fax number<br />
via the keyboard, or via alphabet dialling,<br />
or one-touch dialling<br />
Confirm with ENTER<br />
The document is polled<br />
Transmit documents<br />
39 GB
Transmit documents<br />
Reserve polling<br />
Other fax partners can poll information<br />
from your fax machine if you set up this<br />
facility with this function.<br />
Your document which you reserve for<br />
polling is read into the memory of the<br />
machine so set the document tray is not<br />
blocked.<br />
This reserve polling facility is unprotected.<br />
This means that any fax machine with a<br />
polling facility will be able to poll the<br />
document.<br />
When the document has been polled, it is<br />
deleted from the memory.<br />
Only one document can be<br />
reserved for polling<br />
40<br />
15-03 19:56 M 100%<br />
DOCUMENT SET<br />
COMM.OPTION<br />
4 x<br />
1 x<br />
POLLING<br />
ENTER<br />
POLLING STANDBY<br />
ENTER<br />
Standby mode<br />
Load original<br />
Remember:<br />
Printed side face down<br />
Document ready<br />
Activate send options<br />
Page through the menu...<br />
...until you reach this menu item<br />
Confirm with ENTER<br />
Page through the menu...<br />
...until you reach this menu item<br />
Confirm with ENTER<br />
The document is read into the memory<br />
and is available for the next polling<br />
procedure<br />
GB Transmit documents<br />
TOSHIBA <strong>TF</strong> <strong>610</strong>
Transmit documents<br />
Reduce transmission<br />
speed<br />
Poor quality telephone lines or bad<br />
connections can cause problems. Sending<br />
and receiving problems are most common<br />
when sending documents to long distance<br />
or overseas. You can set your unit's<br />
transmission speed to 4800BPS for safer<br />
data transfer. This setting is automatically<br />
canceled after the sending session.<br />
<strong>TF</strong> <strong>610</strong> TOSHIBA<br />
15-03 19:56 M 100%<br />
DOCUMENT SET<br />
COMM.OPTION<br />
5 x<br />
TX SPEED<br />
ENTER<br />
TX SPEED 9600<br />
ENTER<br />
TX SPEED 4800<br />
ENTER<br />
DOC. READY 4800<br />
ENTER<br />
ABB/ALPHA<br />
Load original<br />
Remember:<br />
Printed side face down<br />
Document ready<br />
Activate send options<br />
Page through the menu...<br />
...until you reach this menu item<br />
Confirm with ENTER<br />
Speed reduced by one stage (9600 bit/<br />
sec.)<br />
Confirm with ENTER<br />
-or-<br />
Select the next stage<br />
Speed reduced by one stage ( 4800 bit/<br />
sec.)<br />
Confirm with ENTER<br />
Preset transmission speed for the<br />
following TX job<br />
Enter the fax number<br />
via the keyobard, or via alphabet dialling<br />
or one-touch dialling<br />
Confirm with ENTER<br />
The connection is established (for<br />
procedure, see page 30, Automatic fax<br />
transmission).<br />
Transmit documents<br />
41 GB
Transmit documents<br />
Stop transmission<br />
You may inadvertently dial the wrong<br />
partner or you may enter a wrong<br />
number. You then have to interrupt this<br />
procedure. It is possible for this procedure<br />
to be situated between other jobs. As a<br />
result of stack mode, it is possible for the<br />
current transmission not to be directly<br />
related to the actions of the operator.<br />
These procedures are deleted by „paging“<br />
through the job stack; search for the<br />
appropriate job and delete the specific<br />
job.<br />
As the display indicates only the job<br />
numbers and the time, it is advisable for<br />
the job list to be printed out (see page 50)<br />
in order to obtain a more precise<br />
allocation.<br />
JOB DELETE<br />
42<br />
JOB NBR. 15<br />
JOB NBR. 9<br />
JOB NBR. 8<br />
JOB NBR. 7<br />
JOB NBR. 6<br />
JOB NBR. 5<br />
JOB NBR. 4<br />
JOB NBR. 3<br />
JOB NBR. 2<br />
JOB NBR. 1<br />
JOB CANCELED<br />
15-03 19:56 M 100%<br />
CANCEL<br />
JOB NR. 005 18:11<br />
JOB NO.007 19:32<br />
ENTER<br />
DELETE OK ?<br />
ENTER<br />
DELETED<br />
Standby mode<br />
Activate CANCEL<br />
The first job is displayed<br />
The time indicated after the job<br />
number is the time at which the<br />
job was entered.<br />
Page through the various jobs<br />
...until you reach the desired job<br />
Confirm with ENTER<br />
Are you sure?<br />
Confirm with ENTER<br />
The job is cancelled<br />
GB Transmit documents<br />
TOSHIBA <strong>TF</strong> <strong>610</strong>
Store numbers<br />
Alphabet dial memory<br />
The alphabet dial facility enables you to<br />
enter a short “address” instead of the<br />
(frequently long) fax number of your<br />
partner.<br />
The real fax number is stored under this<br />
„address“. With frequently used fax<br />
numbers, the alphabet dial facility enables<br />
you to save time.<br />
120 alphabet dial memories are available<br />
and the name as well as the number of<br />
your partner can be stored in this<br />
memory. You can use up to 15 characters<br />
of your choice in this memory.<br />
ABB NO. 120 09154/87823 BROWN<br />
ABB NO. 119 024/8768 EVENS<br />
•<br />
•<br />
•<br />
ABB NO. 003 054/938734 IRVING<br />
ABB NO. 002 04544/6723 MARKS<br />
ABB NO. 001 054/376014 MILES<br />
Use the numeric keys for entering the<br />
alpha-numeric characters. Each digit<br />
features several characters which can be<br />
activated by repeatedly pressing the<br />
corresponding key. If you have found a<br />
character of your choice, press the � key<br />
to go to the next position. Use the „�“<br />
key to go back one letter and make any<br />
corrections. Use the CANCEL key to<br />
delete the left-hand character.<br />
Please note that you must press<br />
the „❊“ button before the actual<br />
fax number if your fax machine<br />
is connected to a PABX.<br />
<strong>TF</strong> <strong>610</strong> TOSHIBA<br />
ENTER<br />
Go to A<br />
A ENTER<br />
15-03 19:56 M 100%<br />
3x<br />
ENTER DIAL NUMBER<br />
ENTER ABB DIAL<br />
NAME:_<br />
DELETE<br />
Go to B<br />
ENTER ABB NUMBER =<br />
TEL:_<br />
ENTER<br />
ENTER:1 DELETE:2<br />
ENTER ABB NUMBER =1<br />
ENTER<br />
TEL: 123456789<br />
ENTER<br />
Standby mode<br />
Page through the menu...<br />
...until you reach this menu item<br />
Select submenu<br />
Confirm with ENTER<br />
Decision:<br />
Enter: Go to A<br />
Delete: Go to B<br />
Select a menu item<br />
Make your selection for alphabet dial<br />
number<br />
Enter alphabet dial number<br />
Example: 1<br />
Confirm with ENTER<br />
Make your selection for fax number *)<br />
Enter fax number<br />
Confirm with ENTER<br />
Make your selection for the name<br />
(press START to skip)<br />
Store numbers<br />
43 GB
Store numbers<br />
44<br />
B DELETE<br />
NAME: TOSHIBA<br />
ENTER<br />
PRESS OT OR START<br />
ENTER<br />
ENTER ABB NUMBER =<br />
STOP<br />
ENTER ABB NUMBER =<br />
ENTER<br />
ABB :TOSHIBA<br />
ENTER<br />
DELETED<br />
ENTER ABB NUMBER =<br />
STOP<br />
Enter the name<br />
(Example TOSHIBA)<br />
T= 1 x 8 # I= 3 x 4 #<br />
O= 3 x 6 # B= 2 x 2 #<br />
S= 4 x 7 # A= 1 x 2 #<br />
H= 2 x 4 #<br />
Confirm with ENTER<br />
Input option: one-touch dial key (see page<br />
45)<br />
-or-<br />
Confirm with ENTER<br />
Make your selection for the next alphabet<br />
dial number<br />
-or-<br />
Press STOP, return to standy<br />
mode<br />
Select a menu item<br />
Make your selection for the alphabet dial<br />
number to be deleted<br />
Enter alphabet dial number<br />
Example: 01<br />
Confirm with ENTER<br />
The name stored under alphabet dial is<br />
displayed.<br />
Confirm with ENTER<br />
Alphabet dial deleted<br />
Make your selection for further alphabet<br />
dial numbers to be deleted<br />
Press STOP, return to standy<br />
mode<br />
GB Store numbers<br />
TOSHIBA <strong>TF</strong> <strong>610</strong>
Store numbers<br />
One-touch dial keys<br />
The one-touch dial facility is a very easy<br />
method of dialling your partner. You can<br />
store fax numbers on 16 keys. You need<br />
only press one key in order to dial your<br />
partner.<br />
It is essential that the number has already<br />
been stored under an alphabet dial<br />
number previously.<br />
ABB NO. 120<br />
ABB NO. 119<br />
•<br />
•<br />
•<br />
ABB NO. 003<br />
ABB NO. 002<br />
ABB NO. 001<br />
Group keys<br />
<strong>TF</strong> <strong>610</strong> TOSHIBA<br />
ONE TOUCH NBR. 16<br />
ONE TOUCH NBR. 15<br />
ONE TOUCH NBR. 2<br />
ONE TOUCH NBR. 1<br />
If you have a fixed number of partners to<br />
whom you frequently send broadcast<br />
transmissions, the stored broadcast<br />
facility is just what you need. There are 6<br />
methods of creating groups of your<br />
choice. You can also assign four of these<br />
groups to four special keys so that a<br />
broadcast transmission can be initiated at<br />
the push of a button. If a permanent<br />
group is to be defined, all users of a<br />
group must be already be in the alphabet<br />
dial directory.<br />
GROUP BROADCAST 1<br />
Go to A<br />
PRESS OT OR START<br />
ENTER ABB NUMBER =<br />
STOP<br />
15-03 19:56 M 100%<br />
ENTER DIAL NUMBER<br />
ENTER ABB DIAL<br />
1 x<br />
ENTER GROUP DIAL<br />
ENTER<br />
ENTER:1 DELETE:2<br />
ABB 1 + ABB 2 + ABB 3<br />
ENTER ERASING ERASING<br />
THE WHOLE<br />
GROUP<br />
3x<br />
Go to B<br />
SINGLE<br />
NUMBERS<br />
FROM THE<br />
GROUP<br />
Go to C<br />
The procedure is the same as that<br />
described on page 43(alphabet dialling)<br />
If alphabet dial numbers have already<br />
been entered, simply press the START<br />
key until you arrive at this point in the<br />
menu:<br />
Input option: one-touch dial key<br />
Press one-touch dial key<br />
Make your selection for the next alphabet<br />
dial number<br />
-or-<br />
Press STOP, return to standby<br />
mode<br />
Standby mode<br />
Page through the menu...<br />
...until you reach this menu item<br />
Select submenu<br />
Page through the menu...<br />
...until you reach this menu item<br />
Confirm with ENTER<br />
Decision:<br />
Enter: Go to A<br />
Erasing the whole<br />
group: Go to B<br />
Erasing single numbers<br />
from the group: Go to C<br />
Store numbers<br />
45 GB
Store numbers<br />
46<br />
A ENTER<br />
SELECT GROUP BUTTON<br />
ABB :<br />
NAME: TOSHIBA<br />
ABB :<br />
NAME:<br />
ENTER<br />
ENTER<br />
ENTER<br />
ENTER<br />
STOP<br />
Select a menu item<br />
Make your selection for the group button<br />
Press the desired group button<br />
Make your selection for the alphabet dial<br />
number to be assigned to the group<br />
Enter the alphabet dial numbers<br />
Confirm with ENTER<br />
The corresponding name is displayed<br />
Confirm with ENTER<br />
Make further selection of alphabetdial<br />
number to be assigned to the group<br />
GB Store numbers<br />
TOSHIBA <strong>TF</strong> <strong>610</strong><br />
-or-<br />
Confirm with ENTER<br />
Make your selection group name<br />
Enter the group name<br />
(Example of entry: see page 13)<br />
Confirm with ENTER<br />
Press STOP, return to standy<br />
mode
Store numbers<br />
<strong>TF</strong> <strong>610</strong> TOSHIBA<br />
B ERASING THE<br />
WHOLE GROUP<br />
SELECT GROUP BUTTON<br />
TOSHIBA<br />
ENTER<br />
DELETE OK ?<br />
ENTER<br />
STOP<br />
C ERASING SINGLE<br />
NUMBERS FROM<br />
THE GROUP<br />
SELECT GROUP BUTTON<br />
TOSHIBA<br />
/<br />
12345678 ect.<br />
ENTER<br />
DELETE OK ?<br />
ENTER<br />
ENTER:1 DELETE:2<br />
STOP<br />
Select a menu item<br />
Make your selection for the group button<br />
to be deleted<br />
Press the desired group button<br />
The corresponding name is displayed<br />
Confirm with ENTER<br />
Are you sure?<br />
Confirm with ENTER<br />
Press STOP, return to standby<br />
mode<br />
Select a menu item<br />
Make your selection for the group button<br />
to be deleted<br />
Press the desired group button<br />
The corresponding name is displayed<br />
Select the appropriate numbers<br />
Confirm with ENTER<br />
Are you sure?<br />
Confirm with ENTER<br />
Further changes<br />
- or -<br />
Press STOP, return to standby<br />
mode<br />
Store numbers<br />
47 GB
Report prints<br />
Activate printing report<br />
Not all reports are printed out<br />
automatically; they have to be requested<br />
specially. These lists can provide<br />
information concerning the current state<br />
of the fax machine. The following reports<br />
can be printed:<br />
• Transmission report<br />
• Multitransmission report<br />
• Transmission and reception journal<br />
• ABB Number list<br />
• Group list<br />
• Function list<br />
• List of jobs in memory<br />
Transmission report<br />
This report can be printed after every<br />
transmission or in the event of a defective<br />
transmission. It provides information about<br />
the most important transmission data.<br />
Please refer to page 59/60 for switching<br />
ON/OFF.<br />
48<br />
15-03 19:56 M 100%<br />
2x<br />
REPORTS<br />
ENTER<br />
ACTIVITY REPORT<br />
............<br />
ENTER<br />
The lists are retrieved as follows:<br />
Standby mode<br />
Page through the menu...<br />
...until you reach the desired menu item<br />
Confirm with ENTER<br />
The first menu item is displayed<br />
Page through the menu...<br />
...until you reach the desired menu item<br />
Confirm with ENTER<br />
The list is printed out<br />
*** SUCCESSFUL TX REPORT ***<br />
01-04-98 01:19 ID:+44193212345678<br />
TEG FT <strong>TF</strong><strong>610</strong><br />
JOB NBR. ------------- 001<br />
START TIME ------------- 01:19<br />
ID No. ------------- 111<br />
RESOLUTION ------------- STANDARD<br />
TOTAL PAGE ------------- 00<br />
MACHINE ENGAGED ------------- 00'28<br />
INFORMATION ------------- OK<br />
GB Report prints<br />
TOSHIBA <strong>TF</strong> <strong>610</strong>
Report prints<br />
Transmission and<br />
reception journal<br />
Your fax machine will record messages<br />
which you transmit or receive in the form<br />
of transmission and reception journals.<br />
These lists are printed out automatically<br />
after every 20 transmissions or receptions<br />
or at your request.<br />
The journal also informs you of the<br />
number of copies printed per process unit<br />
(drum counter) or all copies (total printed<br />
pages).<br />
<strong>TF</strong> <strong>610</strong><br />
TOSHIBA<br />
No. DATE START IDENTIFICATION PAGE TIME INFO JOB No.:<br />
� � � � � � � �<br />
TRANSMISSION<br />
*** ACTIVITY REPORT ***<br />
01-04-98 15:02 ID: +44 1932 12345678<br />
FAX/TELECOM MKTG<br />
DRUM COUNTER = 000002<br />
SCAN PAGE = 000245<br />
01 11-08 08:00 00 00'00 008 001<br />
02 11-10 09:17 12345678 00 00'35 STOP 002<br />
03 11-00 09:24 987654321 01 00'30 OK ECM 004<br />
RECEPTION<br />
04 11-08 14:17 +04965321 01 00'36 OK ECM<br />
05 21-08 06:00 00 00'45 011<br />
06 15-10 14:30 5432101 04 01'58 OK ECM<br />
� NO. Lists the communications in the order they<br />
occurred.<br />
� DATE Date of transmission<br />
� START Start of transmission<br />
� IDENTIFICATION Number pf faxpartner<br />
� PAGE Gives the number of pages per transmission or<br />
reception.<br />
� TIME Time of transmission<br />
� INFO Result of transmission (see 58, 59)<br />
OK<br />
OK_ECM<br />
STOP<br />
001-360<br />
OK-PC<br />
OK PEC<br />
Group without any errors<br />
ECM<br />
� JOB NO. Current job number<br />
the operator has stopped<br />
the transmission<br />
description of the<br />
transmission error<br />
(see page 59)<br />
transmission as PC Fax<br />
Report prints<br />
49 GB
Report prints<br />
The multitransmission<br />
report<br />
After a broadcast transmission (group<br />
dialling), the machine prints out a list of<br />
fax partners who have been reached or<br />
who have not been reached by group<br />
dialling. This list is always printed out<br />
when group dialling has been completed.<br />
Number list<br />
This list contains all numbers and<br />
corresponding names in the alphabet dial<br />
memory. The list also sets out the<br />
assignation of the various one-touch dial<br />
keys.<br />
Group list<br />
This is a list of the alphabet dial numbers<br />
allocated to the particular groups.<br />
Jobs in progress<br />
This list indicates which jobs are still<br />
stored by the fax machine or which jobs<br />
still have to be progressed. This<br />
information may be useful if you have<br />
stored any urgent jobs or if you wish to<br />
delete a particular job.<br />
50<br />
*** BROADCAST REPORT***<br />
01-04-98 09:15 ID: +44 1932 12345678 NAME: TOSHIBA<br />
<strong>TF</strong><strong>610</strong><br />
JOB No. 050<br />
NO. TELEPHONE NUMBER ENTRY INFO.<br />
01 11 NG<br />
02 12 NG<br />
03 13 OK<br />
04 14 OK<br />
*** ABBREVATED DIAL LIST ***<br />
01-04-98 09:15 ID: +44 1932 12345678 NAME: TOSHIBA<br />
No. OT No. NAME TELEPHONE NUMBER<br />
01 OT01 ALBRECHT 01010101<br />
02 OT02 BAUER 02020203<br />
03 OT03 BLUME 03030303<br />
04 OT04 MEIER 04040404<br />
05<br />
06<br />
*** GROUP LIST ***<br />
01-04-98 09:15 ID: +44 1932 12345678 NAME: TOSHIBA<br />
GROUP1 NAME: SUPER<br />
No. ENTRY NAME TELEPHONE NUMBER<br />
01 ABB01 ALBRECHT 0123456<br />
02 ABB02 BAUER 6543210<br />
03 ABB03 BLUME 987654321<br />
GROUP2 NAME:<br />
No. ENTRY NAME TELEPHONE NUMBER<br />
01<br />
02<br />
*** PENDING JOBS LIST ***<br />
01-04-98 09:15 ID: +44 1932 12345678 NAME: TOSHIBA<br />
JOB No. CONTENTS TIMER ACCEPT REMOTE TELEPHONE NUMBER /NAME<br />
003 TRANSMISSION 16:14 OT02 BAUER<br />
004 BROADCAST 16:15 GROUP1 SUPER<br />
007 POLLING STANBY 16:21<br />
GB Report prints<br />
TOSHIBA <strong>TF</strong> <strong>610</strong>
Report prints<br />
The function list<br />
This list provides information concerning<br />
all settings of the fax machine. They<br />
correspond with the settings which you<br />
have made (For explanations, see page<br />
53).<br />
The following operating data were also<br />
displayed:<br />
DRUM COUNTER:<br />
Number of pages printed per process unit<br />
TOTAL PRINT COUNTER:<br />
Total number of pages printed by the fax<br />
machine<br />
TOTAL TX PAGES:<br />
Total number of pages transmitted<br />
TOTAL RX PAGES:<br />
Total number of pages sent<br />
TOTAL COPY PAGES:<br />
Total number of copied pages<br />
OPTION MEMORY:<br />
Memory expansion available?<br />
123...ABC...:<br />
Operating software version<br />
Keep this list for any service work which<br />
may be necessary.<br />
<strong>TF</strong> <strong>610</strong><br />
No. CONTENTS<br />
TOSHIBA<br />
01 ECM FUNCTION ON<br />
02 CONFIRMATION OFF<br />
03 FIRST PAGE IMAGE OFF<br />
04 HEADER PRINT INSIDE<br />
05 RECEIVE FOOTER ON<br />
06 TX SPEED 14400<br />
07 RCV SPEED 14400<br />
08 NOT USED<br />
09 NOT USED<br />
10 NOT USED<br />
11 NOT USED<br />
12 NOT USED<br />
13 RDC ACCEPTANCE ON<br />
14 NOT USED<br />
15 NOT USED<br />
16 NOT USED<br />
17 NOT USED<br />
18 NOT USED<br />
19 NOT USED<br />
20 DIAL METHOD ✽<br />
TONE<br />
21 REDIAL TIMES 5<br />
22 REDIAL INTERVAL 2 MIN<br />
23 DUAL INTERVAL 5 MIN<br />
24 BUSY TONE ON<br />
25 INITIAL WAIT<br />
26 PAUSE WAIT 3 SEK<br />
27 ACCESS DIGIT<br />
28 ACCESS CODE =0<br />
29 NOT USED<br />
30 NOT USED<br />
31 NOT USED<br />
32 NOT USED<br />
33 NOT USED<br />
34 NOT USED<br />
35 NOT USED<br />
36 PSEUDO RING TIMES 04<br />
37 AUTO DELAY 01<br />
38 RCV MODE= FAX/TAD<br />
39 TEL DELAY 06<br />
40 NOT USED<br />
41 RMT ACTIVATION OFF<br />
42 ACTIVATION CODE = **<br />
43 DEACTIVATION CODE = ##<br />
44 FAX/TAD TIMER =35<br />
45 SILENT DETECTION<br />
46 PC TRANSFER DEF. OFF<br />
47 CNG DETECTON ON<br />
48 NOT USED<br />
49 NOT USED<br />
50 NOT USED<br />
*** OPTIONS REPORT ***<br />
01-04-98 09:15 ID: +44 1932 12345678 NAME: TOSHIBA<br />
<strong>TF</strong><strong>610</strong><br />
USER OPTIONS<br />
No. CONTENTS<br />
51 NOT USED<br />
52 NOT USED<br />
53 NOT USED<br />
54 NOT USED<br />
55 PAPER SIZE A4<br />
56 DEFAULT RES. STD<br />
57 COPY REDUCT. 96%<br />
58 POWER SAVE ON<br />
59 DOC. LENGTH 1 M<br />
60 NOT USED<br />
61 CALENDAR DD-MM-YY<br />
62 LANGUAGE ENGLISH<br />
63 SCAN CNT. DEF NORMAL<br />
64 NOT USED<br />
65 RX REDUCTION AUTO<br />
66 NOT USED<br />
67 NOT USED<br />
68 NOT USED<br />
69 NOT USED<br />
70 NOT USED<br />
DRUM COUNTER = 00000<br />
TOTAL PRINT COUNTER = 00000<br />
TOTAL TX PAGES = 00000<br />
TOTAL RX PAGES = 00000<br />
TOTAL COPY PAGES = 00000<br />
OPTION MEMORY = NO<br />
0200KFNMOESBJa DE<br />
Report prints<br />
51 GB
Advanced settings<br />
Functions<br />
This functions are used to setup how your<br />
fax machine operates. The actual settings<br />
can be viewed by printing a function list<br />
(see page 51).<br />
The following sheme shows you how to<br />
change each setting:<br />
52<br />
15-03 19:56 M 100%<br />
2 x<br />
PARAMETER NUMBER =_<br />
ENTER<br />
SELECT OPTIONS<br />
ENTER<br />
PARAMETER NUMBER =_<br />
STOP<br />
Standby mode<br />
Start the menu<br />
Select submenu (2x)<br />
Make your selection for function number<br />
Enter function number<br />
Confirm with ENTER<br />
Function is displayed<br />
Change the function value, depending on<br />
the particular type, by paging or by<br />
entering data via the numeric keypad<br />
Confirm with ENTER<br />
Enter further data<br />
GB Advanced settings<br />
TOSHIBA <strong>TF</strong> <strong>610</strong><br />
-or-<br />
Press STOP, return to stanby<br />
mode
Advanced settings<br />
The following functions (Parmeter)<br />
are available:<br />
Function no.<br />
<strong>TF</strong> <strong>610</strong><br />
01<br />
02<br />
03<br />
04<br />
05<br />
06<br />
07<br />
13<br />
20<br />
21<br />
22<br />
23<br />
]<br />
TOSHIBA<br />
Function<br />
ECM<br />
CONFIRMATION<br />
FIRST PAGE IMAGE<br />
HEADER PRINT<br />
RECEIVE FOOTER<br />
TX SPEED<br />
RCV SPEED<br />
RDC ACCEPTANCE<br />
DIAL METHOD TONE<br />
REDIAL TIMES<br />
REDIAL INT.<br />
DUAL INTERVAL<br />
✽ ) This function may not be available in machines in certain countries.<br />
Description<br />
Error correction (ECM) is as follows:<br />
ON: Activated<br />
OFF: Deactivated<br />
Transmission report is produced:<br />
ON: After every transmission<br />
CONFIRMATION OFF: Only after<br />
transmission errors.<br />
A part of the document (to recognize it)<br />
can be printed on the report.<br />
REPORT VISUAL ON: print<br />
REPORT VISUAL OFF: print not<br />
Select, if the TX header will be transmitted<br />
to te other party.<br />
ON: Is transmitted<br />
OFF: Is not transmitted<br />
Select, if the actual date and time will be<br />
printed on the footer line of received<br />
documents.<br />
ON: Is printed<br />
OFF: Is not printed<br />
Preset transmission speeds, transmission<br />
BPS = BIT / Sec.<br />
9600 BPS, 7200 BPS, 4800 BPS, 2400 BPS<br />
Preset transmission speed, reception<br />
BPS = BIT / Sec.<br />
9600 BPS, 4800 BPS<br />
Actual COMLINE status<br />
ON COMLINE enabled<br />
OFF COMLINE disabled<br />
ONE only one COMLINE session<br />
Dialling method: DTMF<br />
PULSE DIALLING<br />
Number of redial attempts if transmission<br />
is not successful<br />
02 2 twice<br />
~<br />
10 10 times<br />
Period between redial attempts if<br />
transmission is not successful<br />
30 SEC 30 seconds<br />
~<br />
1 MIN<br />
2 MIN<br />
3 MIN<br />
10 MIN<br />
20 MIN 20 minutes<br />
Period between redial attempts if line is<br />
busy<br />
1 MIN 1 minute<br />
~<br />
10 MIN 10 minutes<br />
Advanced settings<br />
53 GB
Advanced settings<br />
54<br />
Function no:<br />
24<br />
25<br />
26<br />
27<br />
28<br />
36<br />
37<br />
38<br />
39<br />
Function<br />
BUSY TONE<br />
PUBLIC LINE<br />
PAUSE WAIT TONE<br />
ACCESS<br />
ACCESS CODE<br />
CALLING TIMES<br />
AUTO DELAY<br />
RCV MODE=<br />
TEL DELAY<br />
Description<br />
The successful detection depend on the<br />
PBAX.<br />
ON: active<br />
OFF: not active<br />
Type of connection<br />
PUBLIC LINE: Before dialling a tone check<br />
is made, PABX tones are not accepted<br />
PABX: Dialling after a delay of 3 sec., no<br />
tone check before begin of dialling<br />
INIT WAIT 4 SEC: Dialling after a delay of<br />
4 sec., no tone check before begin of<br />
dialling<br />
~<br />
INIT WAIT 6.0 SEC: Dialling after a delay<br />
of 6 sec., no tone check before begin of<br />
dialling<br />
Procedure after obtaining public line/<br />
pause wait<br />
PAUSE WAIT TONE: Further dialling only<br />
after line access dial tone, PABX tones<br />
are not accepted<br />
PAUSE WAIT 3.0 SEC: Dialling after a<br />
delay of 3 sec., no tone check, after<br />
obtaining public line/pause wait<br />
~<br />
PAUSE WAIT 6.0 SEC: Dialling after a<br />
delay of 6 sec., no tone check, after<br />
obtaining public line/pause wait<br />
Procedure for obtaining public line<br />
(*-key)<br />
NO PUBLIC LINE<br />
PUBLIC LINE FLASH:Flash-Function<br />
PUBLIC LINE EARTH KEY:<br />
Earth key Function<br />
PUBLIC LINE DIGIT: Public line<br />
obtained via code<br />
Enter a (max.) 4-digit code for obtaining<br />
public line. (only useful by ACCESS DIGIT)<br />
Number of synthetic ring signals set in<br />
the TEL/FAX mode<br />
1 SYNTH. RING TEL/FAX 1 ring<br />
~<br />
10 SYNTH. RINGS TEL/FAX 10 rings<br />
Number of rings before the fax machine<br />
connects to the line in the automatic<br />
receive mode (AUTO lamp is lit)<br />
1st RING<br />
~<br />
10th RING<br />
Reception type in automatic mode (AUTO<br />
LED is lit)<br />
TEL/FAX TEL/FAX mode<br />
FAX/TAD FAX/TAD mode<br />
Not relevant for European models<br />
GB Advanced settings<br />
TOSHIBA <strong>TF</strong> <strong>610</strong>
Advanced settings<br />
<strong>TF</strong> <strong>610</strong><br />
Function no:<br />
41<br />
42<br />
43<br />
44<br />
45<br />
46<br />
47<br />
55<br />
56<br />
57<br />
58<br />
59<br />
61<br />
62<br />
63<br />
65<br />
TOSHIBA<br />
Function<br />
RMT ACTIVATION<br />
ACTIVATIONCODE=<br />
DEACTIVATION CODE<br />
FAX/TAD TIMER=<br />
SILENT DETECTION=<br />
PC TRANSFER<br />
CNG DETECTION<br />
PAPER SIZE<br />
DEFAULT RES<br />
COPY REDUC.<br />
POWER SAVE<br />
DOC. LENGTH<br />
CALENDAR<br />
LANGUAGE<br />
SCAN CONTRAST<br />
RX REDUCTION<br />
Description<br />
Activate the fax machine with a DTMF<br />
remote control code<br />
ON Enabled<br />
OFF Disabled<br />
Enter the sequence of characters to be<br />
used as the remote control code<br />
Enter the sequence of characters to be<br />
used to disconnect the fax machine from<br />
the line.<br />
Period during which the fax machine can<br />
detect another fax machine (in FAX/TAD<br />
mode)<br />
Minimum length of pause in speech<br />
before fax machine switches into the FAX<br />
mode (with FAX/TAD mode)<br />
Fax dates are transferred to the<br />
connected PC<br />
ON OFF<br />
To realize another fax in the FAX/TAD-<br />
Mode.<br />
ON OFF<br />
Paper sizes for PC printer operation:<br />
A4 DIN A4 size<br />
LETTER Letter size<br />
LEGAL Legal size<br />
Preset resolution<br />
STD Standard resolution<br />
FINE Fine resolution<br />
Reduction for copy<br />
OFF 100%<br />
96%<br />
92%<br />
90%<br />
86%<br />
83%<br />
72%<br />
Power saver (heater turns off)<br />
ON / active OFF / not active<br />
Max. length of documents<br />
1m / 1meter 10m / 10meter<br />
Format of date in display and in the lists<br />
(example: March 15th, 1998)<br />
YY-MM-DD 99-03-18<br />
DD-MM-YY 15-03-98<br />
MM-DD-YY 03-15-98<br />
To select a language for display and lists.<br />
Default contrast setting for a scanning<br />
document<br />
BRIGHTER Low coverage on<br />
document<br />
NORMAL Normal coverage on<br />
document<br />
DARKER High coverage on<br />
document<br />
Reduction of received documents<br />
OFF: no reduction<br />
AUTO: dynamic reduction<br />
Advanced settings<br />
55 GB
Advanced settings<br />
Connection to PABX<br />
If the <strong>TF</strong> <strong>610</strong> is connected to a PABX, the<br />
functions have to be modified. The<br />
standard setting for this case is described<br />
starting on page 14. If any problems or<br />
malfunctions occur, please consider the<br />
following items; you may have to discuss<br />
these items with the operator of the PABX:<br />
Receive footer on/off<br />
As proof of the date on which the<br />
document is received, your fax machine<br />
can print the local date and time as an<br />
additional line on the received document.<br />
If this facility has been activated, the<br />
receive footer is printed at the bottom of<br />
the received document.<br />
56<br />
15-03 19:56 M 100%<br />
2 x<br />
PARAMETER NUMBER =_<br />
ENTER<br />
RECEIVE FOOTER OFF<br />
RECEIVE FOOTER OFF<br />
ENTER<br />
STOP<br />
• Does the PABX have public line<br />
capability?<br />
• Does the PABX have DDI capability?<br />
• Have you entered the ”❊” key before<br />
the actual fax number?<br />
• How is the public line obtained (earth<br />
key, flash, number)?<br />
• What dialling method is used (pulsedialling,<br />
DTMF dialling)?<br />
• Is function 25 set to EXTENSION?<br />
• Is function 26 set to TONE CHECK<br />
PAUSE BUTTON*?<br />
• Is the correct dialling method set in<br />
function 20?<br />
• Has the correct method of obtaining<br />
a public line been set in function 27?<br />
• Have the correct codes for obtaining<br />
a public line been set in function 28<br />
(if the public line is obtained via a<br />
code)?<br />
• Is line access made with "❊"-key?<br />
*) Alternatively, you can set function 26<br />
to 4 seconds.<br />
Standby mode<br />
Start the menu<br />
Select submenu (2x)<br />
Make your selection for the function<br />
number<br />
Enter function number<br />
Confirm with ENTER<br />
Current setting<br />
Change setting<br />
Confirm with ENTER<br />
Press STOP, return to standby<br />
mode<br />
GB Advanced settings<br />
TOSHIBA <strong>TF</strong> <strong>610</strong>
Advanced settings<br />
Change speaker volume<br />
If you listen into a fax transmission<br />
process, the call establishment procedure<br />
is relayed via the built-in speaker. This<br />
means that you can also listen to the<br />
actual call establishment process. The<br />
volume can be adjusted as follows:<br />
<strong>TF</strong> <strong>610</strong><br />
TOSHIBA<br />
15-03 19:56 M 100%<br />
SELECT OPTIONS<br />
2 x<br />
SPEAKER VOLUME<br />
ENTER<br />
SPEAKER VOL. >>><br />
ENTER<br />
Standby mode<br />
Start the menu<br />
Select submenu<br />
Page through the menu...<br />
...until you reach the desired menu item<br />
Confirm with ENTER<br />
Current volume is displayed and indicated<br />
acoustically<br />
Change the volume<br />
Confirm with ENTER<br />
Advanced settings<br />
57 GB
Advanced settings<br />
Adjust ringing tone/key<br />
beeps<br />
The volume of the ringing signal (synthetic<br />
ringing) in the TEL/FAX mode can be<br />
adjusted as follows. This setting also<br />
affects the key beep. No beeps are<br />
generated if the volume is set to<br />
minimum.<br />
58<br />
15-03 19:56 M M 100% Standby mode<br />
SELECT OPTIONS<br />
RINGER VOLUME<br />
ENTER<br />
RINGER VOL. >>><br />
ENTER<br />
Start the menu<br />
Select submenu<br />
Page through the menu...<br />
...until you reach the desired menu item<br />
Confirm with ENTER<br />
The current volume is displayed and<br />
indicated acoustically<br />
Adjust the volume<br />
Confirm with ENTER<br />
GB Advanced settings<br />
TOSHIBA <strong>TF</strong> <strong>610</strong>
Advanced settings<br />
Set transmission report<br />
output<br />
This report can be printed after every<br />
transmission or only for errored<br />
transmissions. It provides information<br />
concerning the most important<br />
transmission data.<br />
It is also possible to print part of the first<br />
document of the job in the transmission<br />
report.<br />
<strong>TF</strong> <strong>610</strong><br />
TOSHIBA<br />
15-03 19:56 M 100%<br />
2 x<br />
PARAMETER NUMBER =_<br />
ENTER<br />
CONFIRMATION ERROR<br />
ENTER<br />
PARAMETER NUMBER =_<br />
ENTER<br />
FIRST PAGE IMAGE OFF<br />
FIRST PAGE IMAGE ON<br />
ENTER<br />
STOP<br />
Standby mode<br />
Start the menu<br />
Select submenu (2x)<br />
Make your selection for the function<br />
number<br />
Enter function number<br />
Confirm with ENTER<br />
Current status<br />
Change the status as follows<br />
ON Transmission reported printed<br />
after every transmission<br />
OFF Transmission report printed only<br />
for errored transmissions<br />
Confirm with ENTER<br />
Make your selection for the function<br />
number<br />
Enter function number<br />
Confirm with ENTER<br />
Current setting<br />
Change setting<br />
Confirm with ENTER<br />
Press STOP, return to standby<br />
mode<br />
Advanced settings<br />
59 GB
Advanced settings<br />
Temporarily activate TX<br />
report<br />
If output of the TX report is restricted with<br />
function function 02 02 (see page 59), a general<br />
printout of the TX report can be requested<br />
for a set transmission job.<br />
Remote maintenance<br />
(COMLINE)<br />
Your fax machine permits remote<br />
diagnosis. This means that the internal<br />
settings can be read and changed via a<br />
telephone line. In order to ensure that<br />
data protection is assured, COMLINE is<br />
possible only after you enable your<br />
machine for this facility.<br />
60<br />
DOCUMENT SET<br />
TX REPORT<br />
TX REPORT ON<br />
ENTER TEL NUMBER<br />
TEL: 12345<br />
START<br />
15-03 19:56 M 100%<br />
2 x<br />
PARAMETER NUMBER =_<br />
ENTER<br />
RDC ACCEPTANCE OFF<br />
RDC ACCEPTANCE ONE<br />
ENTER<br />
STOP<br />
Load original<br />
Remember:<br />
Printed side face down<br />
Document ready<br />
Press TX report key<br />
Preparation of TX report printout<br />
Enter fax number<br />
or enter alphabet dial or one-touch dial<br />
number<br />
Confirm with START<br />
Document is transmitted, and TX report is<br />
then printed out<br />
Standby mode<br />
Start the menu<br />
Select submenu (2x)<br />
Make your selection for the function<br />
number<br />
Enter function number<br />
Confirm with ENTER<br />
Current setting<br />
Change setting<br />
Confirm with ENTER<br />
Press STOP, return to standby<br />
mode<br />
GB Advanced settings<br />
TOSHIBA <strong>TF</strong> <strong>610</strong>
Advanced settings<br />
Power saver<br />
The printing unit of your fax machine<br />
requires a heat source of approx. 170°<br />
Celsius to be able to print spontaneously.<br />
This heat source is heated at certain<br />
intervals in order to maintain the<br />
temperature at the required level. This<br />
consumes electricity, and the fan also has<br />
to run constantly. If you wish to save<br />
power or prevent the fan noise, you can<br />
switch off the constant heating facility.<br />
The heating would then only be activated<br />
when a fax is received. The delay involved<br />
before the fax document is printed out is<br />
approx. 1 minute.<br />
<strong>TF</strong> <strong>610</strong><br />
TOSHIBA<br />
15-03 19:56 M 100%<br />
2 x<br />
PARAMETER NUMBER =_<br />
ENTER<br />
POWER SAVE ON<br />
POWER SAVE OFF<br />
ENTER<br />
STOP<br />
Standby mode<br />
Start the menu<br />
Select submenu (2x)<br />
Make your selection for the function<br />
number<br />
Enter function number<br />
Confirm with ENTER<br />
Current setting<br />
Change setting<br />
Confirm with ENTER<br />
Press STOP, return to standby<br />
mode<br />
Advanced settings<br />
61 GB
Advanced settings<br />
Switch off error<br />
correction<br />
Your fax machine is equipped with an<br />
error correction facility (ECM). If your fax<br />
partner also has an error correction<br />
facility, this permits error-free fax<br />
transmission. One effect linked with ECM<br />
is that the transmission time increases if<br />
there are any problems on the line. This<br />
may involve very high costs with oversees<br />
calls. For this reason, the error correction<br />
facility can be temporarily disabled.<br />
62<br />
15-03 19:56 M 100%<br />
2 x<br />
PARAMETER NUMBER =_<br />
ENTER<br />
ECM FUNCTION ON<br />
ECM FUNCTION OFF<br />
ENTER<br />
STOP<br />
Standby mode<br />
Start the menu<br />
Select submenu (2x)<br />
Make your selection for the function<br />
number<br />
Enter function number<br />
Confirm with ENTER<br />
Current setting<br />
Change setting<br />
Confirm with ENTER<br />
Press STOP, return to standby<br />
mode<br />
GB Advanced settings<br />
TOSHIBA <strong>TF</strong> <strong>610</strong>
Possible problems<br />
Error codes in journal<br />
The display message transmission error is<br />
expained by the indicated error code.<br />
The same code if shown also in the in the<br />
jounal and transmission repot.<br />
Code Number<br />
STOP<br />
OK<br />
001<br />
002<br />
003<br />
005-007<br />
008<br />
009-011<br />
014<br />
020<br />
100-103<br />
104-106<br />
111<br />
112-126<br />
141<br />
142-157<br />
252-355<br />
Cause<br />
Press STOP to clear error messages.<br />
The transmission is interrupted by the stop<br />
button.<br />
The document has been transmitted without<br />
any errors.<br />
Top cover or rear cover open<br />
Paper jam or document too long. Is the<br />
memory full? Ask your dealer for a memory<br />
extension.<br />
Recording paper jam or recording paper<br />
cassette is empty<br />
Line error<br />
Line error<br />
Line error<br />
Printing error<br />
Errors on the line mean that parts of the<br />
document are difficult to read; however, the<br />
document is transmitted completely.<br />
Line error<br />
Unsuccessful polling<br />
Mailbox transmission<br />
Line error<br />
Line error<br />
Line error<br />
A remote control error occurs<br />
How to correct<br />
Try again<br />
This is how it should be<br />
Close all parts<br />
Remove the document. See also page 67<br />
Send the document from the document<br />
feed<br />
Remove jammed paper or load new<br />
paper without switching off the machine,<br />
see page 67<br />
Repeat transmission, try switching over to<br />
4800 BPS.<br />
No telephone line was detected.<br />
Repeat transmission, try switching over to<br />
4800 BPS.<br />
Check toner, process unit and paper<br />
transport<br />
No special measures necessary. If this<br />
frequently occurs with one particular fax<br />
partner, switch over to 4800 BPS.<br />
Repeat transmission, try switching over to<br />
4800 BPS.<br />
An incorrect password has been used, or<br />
no document was loaded for polling<br />
An attempt has been made to transmit a<br />
document to a box or relay. Check<br />
whether a <strong>TF</strong> 861/831/631 is installed at<br />
the far end.<br />
Repeat transmission, try switching over to<br />
4800 BPS.<br />
No telephone line was detected.<br />
Repeat transmission, try switching over to<br />
4800 BPS.<br />
Consult your dealer<br />
<strong>TF</strong> <strong>610</strong> TOSHIBA<br />
Possible problems<br />
63 GB
Possible problems<br />
Error messages in the<br />
Display<br />
Your fax machine reports an operating<br />
error or fails to perform the required<br />
function. Before you make an unnecessary<br />
call on your service technician, take your<br />
time and see if you can help yourself. This<br />
checklist will help<br />
you recognise and eliminate errors.<br />
Display<br />
DOCUMENT JAM<br />
ADD PAPER<br />
PAPER JAM<br />
CLOSE TOP COVER<br />
NO PROCESS UNIT M100%<br />
PROCESS UNIT NEAR END<br />
CHANGE PROCESS UNIT<br />
TONER NEAR EMPTY<br />
TONER EMPTY<br />
MEMORY FULL<br />
CHECK CARTRIDGE M100%<br />
NO DOCUMENT<br />
PC COMM. ERROR M100%<br />
SYSTEM ERROR XXX<br />
COMM. FX XXX<br />
64<br />
Cause<br />
Documents are jammed in the document tray.<br />
The recording paper cassette is empty.<br />
The recording paper is jammed.<br />
The top cover is open.<br />
The process unit is not installed.<br />
The process unit is running out.<br />
The process unit is empty.<br />
The toner is running out.<br />
There is not enough toner for printing.<br />
The memory is full.<br />
There is no ink cartridge, or the ink cartridge<br />
has not been inserted correctly.<br />
No document present<br />
Communication to the PC has failed<br />
The fax machine has malfunctioned<br />
The fax machine has malfunctioned<br />
Corrective action<br />
Press STOP key and remove the paper<br />
Load a new recording paper in the<br />
cassette (see page 7). Do not switch the<br />
machine off! or any data in the memory<br />
are lost.<br />
Remove the jammed paper (see<br />
instructions on page 67).<br />
Close the top cover. Have you inserted<br />
the process unit correctly?<br />
Install the process unit correctly. Pull the<br />
lock lever forward.<br />
Order a new process unit from your<br />
TOSHIBA dealer.<br />
Replace the process unit.<br />
Order a new toner cartridge. Install a new<br />
toner cartridge. About 100 sheets can be<br />
printed after this is displayed. See page<br />
6.<br />
Install a new toner cartridge. See page 6.<br />
Contact your dealer, as a memory<br />
expansion unit is availiable. Use the<br />
document tray to transmit documents.<br />
Insert the cartridge correctly. See page 5.<br />
The action requires a document<br />
Try to remedy by pressing the STOP<br />
button<br />
Contact your TOSHIBA dealer<br />
Attempt to clarify the problem unsing the<br />
following pages.<br />
GB Possible problems<br />
TOSHIBA <strong>TF</strong> <strong>610</strong>
Possible problems<br />
Transmission problems<br />
Problem<br />
Your document is not automatically pulled<br />
into the feeder.<br />
The line LED does not flash when you<br />
press the START button<br />
The document is damaged during sending<br />
or copying.<br />
Your fax machine performed transmission<br />
correctly but the message was not<br />
received by the receiver.<br />
The receiver received a blank sheet<br />
instead of the document sent.<br />
The receiver reports: The document<br />
transmitted is difficult to read.<br />
Abbreviated or one-touch dialling do not<br />
work.<br />
No dial tone is heard when handset is offhook.<br />
Your call does not arrive although you<br />
have dialled the correct number.<br />
Your fax machine reports an operating error or<br />
fails to perform the required function. Before<br />
you make an unnecessary call on your service<br />
technician, take your time and see if you can<br />
possible causes ...<br />
Your machine displays an error.<br />
The display is blank.<br />
Document size or thickness of paper are not<br />
acceptable.<br />
The operator control panel is not firmly locked.<br />
You replaced the receiver before pressing<br />
START.<br />
Document format or paper thickness not as<br />
specified.<br />
The document guides are not properly adjusted<br />
to the paper size.<br />
The other machine is out of paper.<br />
You loaded your document in the machine with<br />
the image face-up.<br />
Your machine’s document reader is dirty or<br />
damaged.<br />
RESOLUTION and CONTRAST are not set<br />
correctly.<br />
The telephone connection is poor.<br />
Abbreviated or one-touch dialling number is not<br />
correctly stored.<br />
The telephone is not correctly connected.<br />
The fax machine is not correctly connected.<br />
Your fax machine has been set to the wrong<br />
dialling mode.<br />
If you are connected to a PABX: You have set<br />
the wrong line type.<br />
Your fax machine is not connected to the<br />
PSTN.<br />
help yourself. This checklist will help<br />
you recognise and eliminate errors.<br />
... and solutions<br />
If the display gives an error message,<br />
clear the fault and delete the display with<br />
STOP.<br />
Check there is power on the machine.<br />
The machine must be switched on (see<br />
page 8).<br />
Use acceptable documents only (see<br />
page 27).<br />
Close the cover. It should be firmly locked<br />
in place on both sides.<br />
Try again. Replace the receiver only when<br />
you have pressed START.<br />
Use acceptable documents only (see<br />
page 27).<br />
Adjust the document guides accordingly.<br />
Ask the receiver to put paper in his<br />
machine.<br />
Send your document again: the image<br />
must be face-down on your document<br />
feeder.<br />
Make a copy of your document on your<br />
fax machine (see page 24). If your copy is<br />
also difficult to read, clean the document<br />
reader.<br />
Make a copy on your fax machine (see<br />
page 24) and adjust the settings to your<br />
document. You can also improve<br />
document quality: By making the print on<br />
the photocopy darker, enlarging or<br />
reducing. (see page 35). Then send<br />
again.<br />
Redial. You may get a better connection.<br />
Check and correct stored numbers (see<br />
page 43).<br />
Check that your telephone is connected<br />
correctly to the socket (see page 8).<br />
Plug the connecting cable of your fax<br />
machine into the socket (see page 8).<br />
Switch to the correct dialling procedure:<br />
DTMF or pulse-dialling (see page 14).<br />
Set the line types to EXTENSION (see<br />
page 15).<br />
Plug the connecting cable of your fax<br />
machine into the socket (see page 8).<br />
<strong>TF</strong> <strong>610</strong> TOSHIBA<br />
Possible problems<br />
65 GB
Possible problems<br />
Receiving problems<br />
Problem<br />
You press START to receive an document.<br />
But you receive nothing.<br />
Your recording paper is not fed out.<br />
The dcoument received is difficult to read.<br />
You receive a completely blank document.<br />
The document received is partially printed.<br />
66<br />
Your fax machine reports an operating error or<br />
fails to perform the required function. Before<br />
you make an unnecessary call on your service<br />
possible causes ...<br />
Your have an error displayed.<br />
The fax machine is not correctly connected.<br />
The display is blank.<br />
There is still a document in the feeder.<br />
Your fax machine is set in <strong>manual</strong> receiving<br />
mode and you replaced the handset before<br />
pressing START.<br />
The operator control panel is not closed.<br />
The recording paper in your machine is<br />
jammed.<br />
Document quality is poor.<br />
The telephone connection is poor.<br />
The sender made a mistake when loading the<br />
document.<br />
The operator control panel of your fax machine<br />
is not closed properly on both sides.<br />
technician, take your time and see if you<br />
can help yourself. This checklist will help<br />
you recognise and eliminate errors.<br />
... and solutions<br />
If the display shows an error message,<br />
eliminate the fault and delete the display<br />
with STOP.<br />
Check the wiring. See page 8.<br />
Check there is power to the machine.<br />
The machine must be switched on (see<br />
page 8).<br />
Press STOP and remove the document.<br />
When receiving the next fax, be sure to<br />
replace the handset only after you have<br />
pressed START.<br />
Close the cover. Both sides of the cover<br />
must be firmly locked in place.<br />
Remove the jammed paper (see page<br />
67).<br />
Ask the sender to reset the resolution and<br />
contrast or improve the quality of the<br />
document e.g. by making the print on the<br />
photocopy darker, enlarging or reducing.<br />
Then have it send again.<br />
Ask the sender to transmitt the document<br />
again (see Page 7).<br />
Check whether the sender loaded in the<br />
correct manner.<br />
Close the cover. Both sides of the cover<br />
must be firmly locked in place.<br />
GB Possible problems<br />
TOSHIBA <strong>TF</strong> <strong>610</strong>
Possible problems<br />
How to clear a paper<br />
jam...<br />
When documents are fed in and<br />
recording paper fed out, this can lead to<br />
minor problems from time to time which,<br />
however, you can easily put right yourself.<br />
Just one point to remember: your fax<br />
machine should not be switched off as<br />
this would delete all the stored fax<br />
messages.*<br />
* If you switched off your fax machine by<br />
mistake and thus deleted any fax message<br />
stored in the memory, ask for a reception<br />
report to be printed out. This gives the<br />
sender and you can ask him to send the<br />
message again.<br />
How to clear a<br />
recording paper jam<br />
<strong>TF</strong> <strong>610</strong><br />
TOSHIBA<br />
How to clear a document jam<br />
Press the release button<br />
top open the control panel cover.<br />
Keep the power ON!<br />
The jammed document<br />
can be carefully removed.<br />
Do not try to send the jammed<br />
document again. Use a carrier sheet<br />
or make a photocopy and transmit this<br />
instead.<br />
Close the control panel.<br />
Take care that the cover locks firmly into place.<br />
Now by pressing STOP delete the error<br />
message.<br />
After opening<br />
the rear cover of the housing or the top cover,<br />
you will see whether paper has jammed here.<br />
Carefully remove any jammed paper without<br />
applying force. Don’t forget to firmly close the<br />
back cover again!<br />
If paper has jammed under the process unit, lift<br />
the paper guide upwards and remove the<br />
process unit. You can then easily free any<br />
jammed paper without applying force.<br />
Has the recording paper jammed around the<br />
fixer unit?<br />
Then - if necessary - press the release lever of<br />
the fixer unit downwards and at the same time<br />
carefully pull out the jammed paper.<br />
Caution: HOT!<br />
When closing the machine,<br />
ensure that all covers firmly lock into place.<br />
Do not touch any parts inside the<br />
machine other than those described<br />
here. The header cover may be very<br />
hot - even when the machine is switched off.<br />
Never open the recording paper cassette when<br />
paper is jammed.<br />
Possible problems<br />
67 GB
Handling faxes on your PC<br />
System requirements<br />
You can also use the features of your fax<br />
machine your PC. The fax functions can<br />
also be used in addition to the printer<br />
function. The following minimum<br />
requirements are essential in this respect:<br />
• IBM compatible PC with i80486<br />
processor or higher<br />
• 8 MB RAM or higher<br />
• Serial (V.24) interface for connection<br />
to the <strong>TF</strong> <strong>610</strong><br />
• Microsoft Windows 3.11 / 95<br />
operating system<br />
• Fax software TOSHIBA TOSHIBA SmartLink<br />
SmartLink<br />
Features<br />
The following features are available in<br />
conjunction with the software TOSHIBA<br />
SmartLink SmartLink: SmartLink<br />
The PC fax interface complies<br />
with the fax fax class1 class1 standard<br />
Connection to the PC<br />
68<br />
Mode Description<br />
PC scanner Scans documents into the PC via the document feeder of the fax<br />
machine.<br />
PC fax, transmission Files created under Windows can be transmitted directly via the<br />
fax machine (i.e. without being printed out)<br />
PC fax, reception Incoming faxes are transferred to the PC as an image file via the<br />
fax machine without being printed out. If the PC is not switched<br />
on, the pages are automatically printed out.<br />
OCR Received faxes or scanned texts are converted into readable<br />
ASCII text with the OCR module.<br />
1. Switch off the PC and the <strong>TF</strong> <strong>610</strong>.<br />
2. Connect the 25-pin sub-D connector to the<br />
corresponding socket on the fax machine,<br />
and secure the connection with the<br />
connector screws.<br />
Pin assignment of serial cable<br />
Sub-D 9 pin socket (female)<br />
Sub-D 25 pin socket (male)<br />
3. Connect the cable to the serial interface of<br />
your PC.<br />
PC-Fax<br />
Connect the <strong>TF</strong> <strong>610</strong> before the<br />
installation.<br />
GB Handling faxes on your PC<br />
TOSHIBA <strong>TF</strong> <strong>610</strong>
Handling faxes on your PC<br />
Scanning documents<br />
into the PC<br />
You can transfer your documents to your<br />
PC via the sheet feed of your <strong>TF</strong> <strong>610</strong>. The<br />
document is then available as an image<br />
file in your PC, and can be processed as<br />
required.<br />
*) This display indicates whether your PC<br />
is actually ready to receive.<br />
The following conditions must be fulfilled:<br />
• Ensure that the cable has been<br />
connected correctly<br />
• The PC must be switched on<br />
• The fax program must be loaded and<br />
active<br />
• The fax program must be set to<br />
automatic reception<br />
Otherwise, the <strong>TF</strong> <strong>610</strong> will display the<br />
following after a certain amount of time:<br />
<strong>TF</strong> <strong>610</strong><br />
PC COMM. ERROR #001<br />
In this case, clear the error message by<br />
pressing the STOP button, and remedy the<br />
problem<br />
Documents scanned in this way<br />
are stored in the form of image<br />
files in your PC. An OCR program<br />
must process this file if it is to be<br />
integrated within a word processing<br />
program. This process is essential if the<br />
file is to be used as a text file.<br />
Sending fax messages<br />
from the PC<br />
If you have for instance created text or<br />
graphics via a word processing program,<br />
you do not need to print out the text or<br />
graphics in order to send a fax document.<br />
PC-fax Software transfers your document<br />
via the cable from your PC to the fax<br />
machine together with the fax number<br />
which you have specified when you were<br />
processing the document. Following<br />
internal transmission, the job is then<br />
handled as a normal job in your fax<br />
machine.<br />
TOSHIBA<br />
DOCUMENT SET<br />
COMM.OPTION<br />
TRAY SEND<br />
1x<br />
PC SCANNER<br />
ENTER<br />
PC READY ?<br />
ENTER<br />
DOC.READING M98%<br />
TRANSMITTING TO PC<br />
15-03 19:56 M 100%<br />
RECEIVING FROM PC<br />
JOB ACCEPTED NO.007<br />
15-03 19:56 S 89%<br />
Insert document with text side<br />
down<br />
Document is ready<br />
Press TX OPTIONS key<br />
Page through the menu...<br />
...until you reach the desired menu item<br />
Confirm with ENTER<br />
PC ready? *)<br />
Confirm with ENTER<br />
Return to the standby mode<br />
PC is transmitting the fax data to the fax<br />
machine<br />
PC transfer complete: the job is stored as<br />
a new job in the stack<br />
Return to the standby mode<br />
Depending on the contents of the stack,<br />
the job is soon sent by the fax machine.<br />
Handling faxes on your PC<br />
69 GB
Handling faxes on your PC<br />
Sending faxes to the PC<br />
If you have connected a PC to your fax<br />
machine, you can send documents<br />
directly to your PC.<br />
The following requirements are essential<br />
for this process:<br />
• Function number 46 (receive to PC) is<br />
set to ON (for setting, see page 55).<br />
• The fax software is loaded and<br />
activated.<br />
• The connection to the PC has been<br />
established.<br />
The following error message is displayed if<br />
your fax machine cannot reach the PC:<br />
PC COMM. ERROR #001<br />
In this case, the incoming fax document<br />
is printed out on the fax machine. The<br />
error message does not affect the ability<br />
of the fax machine to receive further<br />
documents.<br />
A fax document received in this<br />
way is stored in the form of an<br />
image file in the PC. An OCR<br />
program must process a file before any<br />
received text can be integrated in a word<br />
processing program. This is essential if<br />
this file is to be used as a text file.<br />
70<br />
GB Handling faxes on your PC<br />
TOSHIBA <strong>TF</strong> <strong>610</strong>
Your fax machine used as a PC printer<br />
Introduction<br />
Your fax machine can be used as a PC<br />
printer under Microsoft Windows 3.11 /<br />
95 / N. For this purpose, you have to<br />
install a printer driver on the supplied disk.<br />
The printout speed very much depends on<br />
the performance of the connected PC.<br />
If software is to be updated from Win<br />
3.11 to Win 95, we recommend that you<br />
deinstall the TOSHIBA printer driver before<br />
the update (see page 27).<br />
The printer driver can be<br />
reinstalled when the software<br />
has been successfully updated<br />
to a higher Windows version.<br />
Connection to the PC<br />
You need a bidirectional parallel printer<br />
cable (IEEE 1284-1994 standard) for the<br />
connection to the PC.<br />
1. Switch off the PC and the fax<br />
machine<br />
2. Connect the PC and the fax machine<br />
with the printer cable<br />
3. Switch the fax machine on, and then<br />
switch the PC on<br />
4. Start Windows<br />
<strong>TF</strong> <strong>610</strong><br />
TOSHIBA<br />
Your fax machine used as a PC printer<br />
71 GB
Your fax machine used as a PC printer<br />
Install printer driver<br />
The illustrated examples refer to the<br />
Windows 95 interface.<br />
• Insert the installation disk in the drive<br />
of your PC<br />
• Click on “Start“<br />
• Select “Run” in the menu<br />
• Click on the “Browse“ button<br />
• Select the drive containing the<br />
installation disk<br />
• Open the directory with the language<br />
of your choice<br />
• Double click on the “Setup“ entry<br />
• Click on OK to start the installation<br />
72<br />
GB Your fax machine used as a PC printer<br />
TOSHIBA <strong>TF</strong> <strong>610</strong>
Your fax machine used as a PC printer<br />
• Click on “Next“<br />
• Select the printer port (LPT) where the<br />
fax machine is connected. LPT1 is the<br />
default setting.<br />
• If you wish, you can change the<br />
proposed printer name.<br />
• If the fax machine is to be defined as<br />
the standard printer in Windows, click<br />
on “Yes“<br />
• Click on “Finish“<br />
A new program group is created<br />
• Remove the installation disk from the<br />
drive.<br />
<strong>TF</strong> <strong>610</strong><br />
TOSHIBA<br />
Your fax machine used as a PC printer<br />
73 GB
Your fax machine used as a PC printer<br />
Settings of the printer<br />
driver<br />
The printer driver has a wide range of<br />
settings for providing the best results in<br />
various print applications.<br />
The following examples illustrate some of<br />
the most important settings.<br />
Access the settings of the printer<br />
driver:<br />
• Click on “Start“<br />
• Select the menu item “Settings“<br />
• Select the submenu item “Printers“<br />
• Double click on the THOSHIBA printer<br />
driver.<br />
• Click on the “Printer“ menu<br />
• Select the menu item “Properties“<br />
The system opens the “Properties Properties Properties“ Properties<br />
window of the printer driver.<br />
The “Properties Properties Properties“ Properties window consists of<br />
registers which can be selected with a<br />
mouse click. The printer functions are<br />
controlled by the registers “General“ and<br />
“Details“, which are automatically created<br />
during installation and contain technical<br />
program parameters, and also by the<br />
registers “Paper“, “Graphic“ and “Device<br />
Options“ .<br />
These three registers are available in any<br />
Windows application; simply select the<br />
corresponding printer device in the<br />
program’s own “File“ menu.<br />
74<br />
GB Your fax machine used as a PC printer<br />
TOSHIBA <strong>TF</strong> <strong>610</strong>
Your fax machine used as a PC printer<br />
Contents of the “Paper“ register:<br />
Paper Size:<br />
Size of the print paper<br />
Orientation:<br />
Landscape or portrait output<br />
Paper Source:<br />
Choice of paper cassette (permanent<br />
setting in <strong>TF</strong><strong>610</strong>)<br />
Copies:<br />
Number of copies to be printed per page<br />
More Options, Output Bin:<br />
Facility for defining the printout sequence<br />
Contents of the “Graphics“<br />
register:<br />
Resolution:<br />
Choice of resolution (permanent setting in<br />
<strong>TF</strong><strong>610</strong>)<br />
Dithering:<br />
Type of grey scale reproduction<br />
None:<br />
No grey scale reproduction<br />
Coarse:<br />
Coarse rastering<br />
Fine:<br />
Fine rastering<br />
Line Art:<br />
Grey reproduction with special patterns<br />
Error Diffusion:<br />
Airbrush effect, best grey reproduction<br />
<strong>TF</strong> <strong>610</strong><br />
Processing speed various with<br />
the choice of grey scale<br />
reproduction.<br />
Intensity:<br />
Use this slide bar to regulate the intensity<br />
of the printer (click on and drag the slide<br />
bar). Only meaningful for reproducing grey<br />
scales.<br />
TOSHIBA<br />
Your fax machine used as a PC printer<br />
75 GB
Your fax machine used as a PC printer<br />
Contents of the “Device Options“<br />
register:<br />
Print Quality:<br />
Quality of printout (permanent setting in<br />
<strong>TF</strong><strong>610</strong>)<br />
Printout<br />
Documents are generally printed out with<br />
the “Print“ command in the particular<br />
application.<br />
As soon as the print job has been sent to<br />
the printer driver, the status window of the<br />
printer driver is displayed (depending on<br />
the particular setting, you have to click on<br />
the small rectangular symbol in the status<br />
line).<br />
This window provides detailed information<br />
concerning the current print status. You<br />
are also notified of the current operating<br />
statuses of the printer; the current<br />
situation is indicated by graphical<br />
elements.<br />
Use the “Pause“, “Resume“ and “Cancel“<br />
keys to monitor the print job at any time.<br />
76<br />
GB Your fax machine used as a PC printer<br />
TOSHIBA <strong>TF</strong> <strong>610</strong>
Your fax machine used as a PC printer<br />
Delete printer driver<br />
In order to delete the printer driver from<br />
the operating system, please proceed as<br />
follows (example from Windows 95):<br />
• Click Click on on the the entry entry “ “TOSHIBA “ OSHIBA<br />
Windows Windows Printer“ Printer“ in in in the the task task line line. line<br />
• Double click on the “Uninstall“ icon<br />
You are subsequently informed of the<br />
deinstallation procedure. The printer driver<br />
is deleted when the system is next<br />
started.<br />
<strong>TF</strong> <strong>610</strong><br />
If there is no entry in the task<br />
line, select the “Uninstall“ icon<br />
via your program library<br />
TOSHIBA<br />
Your fax machine used as a PC printer<br />
77 GB
UK Connection information<br />
Reset<br />
You can restore the original factory<br />
settings or reset your fax machine if you<br />
are unable to eliminate the error code by<br />
taking the action suggested on pages 63-<br />
66.<br />
We declare, that TOSHIBA is using<br />
mark in compliance with<br />
EN 50 082-1, EN 55 022/B and<br />
EN 60 950<br />
This TOSHIBA Facsimile<br />
Transceiver is intended for<br />
connection to public<br />
telecommunication services as<br />
follows:<br />
By using the cable described as<br />
TEL LINE CABLE in the packaging<br />
list of the instruction <strong>manual</strong>. This<br />
cable plugs into the socket on the<br />
left hand side of the <strong>TF</strong> <strong>610</strong> which<br />
is marked LINE and the other end<br />
into the standard PSTN analogue<br />
socket found in the UK.<br />
EPA ENERGY STAR<br />
Addendum to the <strong>TF</strong><strong>610</strong> Operator’s Manual<br />
78<br />
This terminal equipment complies with<br />
the following requirements:<br />
Group 3 fax modem<br />
Automatic call initiation<br />
Storage of telephone numbers for<br />
retrieval by a predetermined code<br />
Automatic dialling<br />
Automatic repeat attempts<br />
Call progress monitor<br />
Series connection facility<br />
LD or MF dialling<br />
Operation with or without dial tone<br />
being present.<br />
Any other usage will invalidate<br />
the approval of the apparatus if as<br />
a result, it then ceases to conform<br />
to the standards against which<br />
approval was granted.<br />
The United States Environmental Protection Agency (EPA) has introduced a voluntary program, the ENERGY STAR<br />
Program, to encourage the widespread and voluntary use of energy-efficient technologies that enhance the<br />
workplace, improve product performance, prevent pollution, and reduce your energy costs. As an ENERGY STAR<br />
Partner, to <strong>Toshiba</strong> Europa (I.G.) GmbH has determinded that this facsimile model meets the ENERGY STAR<br />
guidelines for energy efficiency. ENERGY STAR guidelines require that all ENERGY STAR facsimiles maintain very low<br />
power consumption during idle state or have a „Power Saver“ feature that will automatically stand-down to an idle<br />
state after a period of inactivity.<br />
For more information on the ENERGY STAR Program, please contact:<br />
ENERGY STAR Printers/Fax Machines<br />
US EPA (62021)<br />
Washington, DC 20460<br />
ENERGY STAR is an U.S. registered mark.<br />
START<br />
15.03.98 19:56<br />
Switch off your fax machine.<br />
Keep START and STOP pressed down<br />
while switching your machine back on.<br />
As soon as a message is displayed,<br />
release.<br />
After reset, repeat the installation<br />
procedure (see page 10).<br />
The abbreviated numbers, date<br />
and time will NOT be erased.<br />
GB UK Connection information<br />
TOSHIBA <strong>TF</strong> <strong>610</strong><br />
STOP
Index<br />
Alphabet dial memory ............................... 43<br />
Alphabet dialling ....................................... 31<br />
Broadcast report ....................................... 50<br />
Broadcast, single ...................................... 37<br />
Broadcast, stored ...................................... 38<br />
Call counter .............................................. 25<br />
Cleaner ....................................................... 5<br />
Code ......................................................... 16<br />
Comline .................................................... 60<br />
Copy ......................................................... 24<br />
Date .......................................................... 18<br />
Dialling method ......................................... 14<br />
Document jam .......................................... 67<br />
Documents ............................................... 27<br />
Drum counter ........................................... 51<br />
Earth key ................................................... 15<br />
ECM .......................................................... 62<br />
Error codes ............................................... 63<br />
Error correction ......................................... 62<br />
Error messages ......................................... 64<br />
Establish connections.................................. 8<br />
Fax class1 ................................................. 68<br />
Flash key ................................................... 15<br />
Function list ............................................... 51<br />
Functions .................................................. 52<br />
Group dialling ...................................... 37, 38<br />
Group keys ................................................ 45<br />
Group list .................................................. 50<br />
ID .............................................................. 12<br />
<strong>TF</strong> <strong>610</strong><br />
TOSHIBA<br />
Journal ..................................................... 49<br />
Key beeps ................................................. 58<br />
Key beeps, volume ................................... 58<br />
Language .................................................. 11<br />
Last number redial .................................... 35<br />
List, functions ........................................... 51<br />
List, groups ............................................... 50<br />
List, numbers ............................................ 50<br />
List, reservation ......................................... 50<br />
Long dialling .............................................. 32<br />
Memory card .............................................. 9<br />
Memory expansion .................................... 51<br />
Memory reception ..................................... 25<br />
Memory .................................................... 29<br />
Menu ........................................................ 10<br />
Number list ............................................... 50<br />
Obtain outside line .................................... 15<br />
One-touch dialling keys ............................. 45<br />
One-touch dialling ..................................... 31<br />
PABX ......................................................... 15<br />
PABXs ........................................................ 56<br />
Paper jam ................................................. 67<br />
PC ............................................................. 68<br />
Polling ....................................................... 39<br />
Power saver .............................................. 61<br />
Printer driver ............................................. 72<br />
Printer ....................................................... 71<br />
Problems, receiving ................................... 66<br />
Problems, transmission ............................. 65<br />
Process unit ................................................ 5<br />
Provider ..................................................... 32<br />
Receive footer .......................................... 56<br />
Reception problems .................................. 66<br />
Reception reduction ................................. 23<br />
Reception, automatic ............................... 19<br />
Reception, <strong>manual</strong> ................................... 19<br />
Recording paper exit tray, install ................. 8<br />
Recording paper, insert ............................... 7<br />
Reports, broadcast ................................... 50<br />
Reservation list .......................................... 50<br />
Reservation, polling ................................... 40<br />
Reset ........................................................ 78<br />
Resolution ................................................. 35<br />
Ring, volume ............................................. 58<br />
Ringer ....................................................... 58<br />
Scanning .................................................. 69<br />
Screening volume ..................................... 57<br />
Screening ........................................... 34, 57<br />
SmartLink .................................................. 68<br />
Stack memory .......................................... 28<br />
Switch, TAD .............................................. 20<br />
Switch, telephone ..................................... 20<br />
TAD time ................................................... 21<br />
Telephone companies ............................... 32<br />
Telephone directory ................................... 33<br />
Telephone ................................................. 32<br />
Time ......................................................... 18<br />
Toner cartridge............................................ 6<br />
Toner change .............................................. 6<br />
Transmission problems .............................. 65<br />
Transmission speed ................................... 41<br />
Transmission, delayed ............................... 36<br />
Transmission, stop ..................................... 42<br />
Transport ..................................................... 5<br />
Transport fittings ......................................... 5<br />
TX report ....................................... 48, 59, 60<br />
User name ................................................ 13<br />
Index<br />
79 GB