

All-Wheel Drive and 4-Wheel Drive - Vehicles we focus on
All-Wheel Drive and 4-Wheel Drive - Vehicles we focus on
All-Wheel Drive and 4-Wheel Drive - Vehicles we focus on

You also want an ePaper? Increase the reach of your titles
YUMPU automatically turns print PDFs into web optimized ePapers that Google loves.
A M<strong>on</strong>thly Publicati<strong>on</strong> for GM Dealership Service Professi<strong>on</strong>als<br />
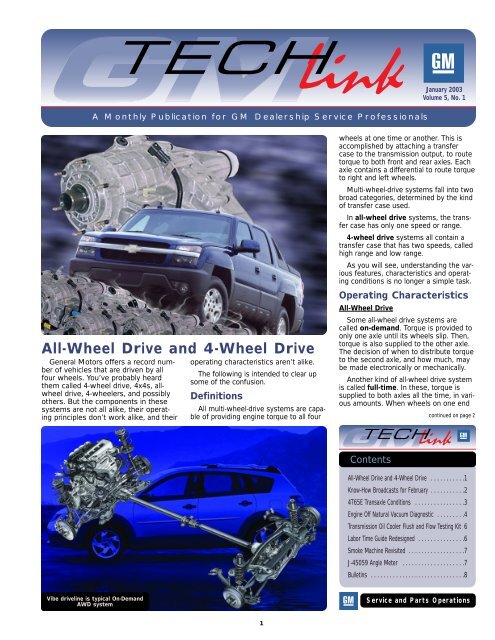
<str<strong>on</strong>g>All</str<strong>on</strong>g>-<str<strong>on</strong>g>Wheel</str<strong>on</strong>g> <str<strong>on</strong>g>Drive</str<strong>on</strong>g> <str<strong>on</strong>g>and</str<strong>on</strong>g> 4-<str<strong>on</strong>g>Wheel</str<strong>on</strong>g> <str<strong>on</strong>g>Drive</str<strong>on</strong>g><br />
General Motors offers a record number<br />
of vehicles that are driven by all<br />
four wheels. You’ve probably heard<br />
them called 4-wheel drive, 4x4s, allwheel<br />
drive, 4-wheelers, <str<strong>on</strong>g>and</str<strong>on</strong>g> possibly<br />
others. But the comp<strong>on</strong>ents in these<br />
systems are not all alike, their operating<br />
principles d<strong>on</strong>’t work alike, <str<strong>on</strong>g>and</str<strong>on</strong>g> their<br />
Vibe driveline is typical On-Dem<str<strong>on</strong>g>and</str<strong>on</strong>g><br />
AWD system<br />
operating characteristics aren’t alike.<br />
The following is intended to clear up<br />
some of the c<strong>on</strong>fusi<strong>on</strong>.<br />
Definiti<strong>on</strong>s<br />
<str<strong>on</strong>g>All</str<strong>on</strong>g> multi-wheel-drive systems are capable<br />
of providing engine torque to all four<br />
1<br />
January 2003<br />
Volume 5, No. 1<br />
wheels at <strong>on</strong>e time or another. This is<br />
accomplished by attaching a transfer<br />
case to the transmissi<strong>on</strong> output, to route<br />
torque to both fr<strong>on</strong>t <str<strong>on</strong>g>and</str<strong>on</strong>g> rear axles. Each<br />
axle c<strong>on</strong>tains a differential to route torque<br />
to right <str<strong>on</strong>g>and</str<strong>on</strong>g> left wheels.<br />
Multi-wheel-drive systems fall into two<br />
broad categories, determined by the kind<br />
of transfer case used.<br />
In all-wheel drive systems, the transfer<br />
case has <strong>on</strong>ly <strong>on</strong>e speed or range.<br />
4-wheel drive systems all c<strong>on</strong>tain a<br />
transfer case that has two speeds, called<br />
high range <str<strong>on</strong>g>and</str<strong>on</strong>g> low range.<br />
As you will see, underst<str<strong>on</strong>g>and</str<strong>on</strong>g>ing the various<br />
features, characteristics <str<strong>on</strong>g>and</str<strong>on</strong>g> operating<br />
c<strong>on</strong>diti<strong>on</strong>s is no l<strong>on</strong>ger a simple task.<br />
Operating Characteristics<br />
<str<strong>on</strong>g>All</str<strong>on</strong>g>-<str<strong>on</strong>g>Wheel</str<strong>on</strong>g> <str<strong>on</strong>g>Drive</str<strong>on</strong>g><br />
Some all-wheel drive systems are<br />
called <strong>on</strong>-dem<str<strong>on</strong>g>and</str<strong>on</strong>g>. Torque is provided to<br />
<strong>on</strong>ly <strong>on</strong>e axle until its wheels slip. Then,<br />
torque is also supplied to the other axle.<br />
The decisi<strong>on</strong> of when to distribute torque<br />
to the sec<strong>on</strong>d axle, <str<strong>on</strong>g>and</str<strong>on</strong>g> how much, may<br />
be made electr<strong>on</strong>ically or mechanically.<br />
Another kind of all-wheel drive system<br />
is called full-time. In these, torque is<br />
supplied to both axles all the time, in various<br />
amounts. When wheels <strong>on</strong> <strong>on</strong>e end<br />
C<strong>on</strong>tents<br />
c<strong>on</strong>tinued <strong>on</strong> page 2<br />
<str<strong>on</strong>g>All</str<strong>on</strong>g>-<str<strong>on</strong>g>Wheel</str<strong>on</strong>g> <str<strong>on</strong>g>Drive</str<strong>on</strong>g> <str<strong>on</strong>g>and</str<strong>on</strong>g> 4-<str<strong>on</strong>g>Wheel</str<strong>on</strong>g> <str<strong>on</strong>g>Drive</str<strong>on</strong>g> . . . . . . . . . . .1<br />
Know-How Broadcasts for February . . . . . . . . . . .2<br />
4T65E Transaxle C<strong>on</strong>diti<strong>on</strong>s . . . . . . . . . . . . . . . .3<br />
Engine Off Natural Vacuum Diagnostic . . . . . . . . .4<br />
Transmissi<strong>on</strong> Oil Cooler Flush <str<strong>on</strong>g>and</str<strong>on</strong>g> Flow Testing Kit 6<br />
Labor Time Guide Redesigned . . . . . . . . . . . . . . .6<br />
Smoke Machine Revisited . . . . . . . . . . . . . . . . . .7<br />
J-45059 Angle Meter . . . . . . . . . . . . . . . . . . . .7<br />
Bulletins . . . . . . . . . . . . . . . . . . . . . . . . . . . . . .8<br />
Service <str<strong>on</strong>g>and</str<strong>on</strong>g> Parts Operati<strong>on</strong>s
c<strong>on</strong>tinued from page 1<br />
of the vehicle begin to slip, torque is<br />
routed to the opposite end, where tracti<strong>on</strong><br />
is still present.<br />
Although operati<strong>on</strong> of all-wheel drive<br />
vehicles is mostly transparent, they can<br />
make more noise <str<strong>on</strong>g>and</str<strong>on</strong>g> have more unusual<br />
characteristics than 2-wheel drive systems.<br />
There are more parts rotating, <str<strong>on</strong>g>and</str<strong>on</strong>g><br />
more gears meshing.<br />
When an <strong>on</strong>-dem<str<strong>on</strong>g>and</str<strong>on</strong>g> system engages<br />
the sec<strong>on</strong>d axle, the occupants may hear<br />
<str<strong>on</strong>g>and</str<strong>on</strong>g> feel the comp<strong>on</strong>ents working. The<br />
driver may also be aware of sensati<strong>on</strong>s<br />
<str<strong>on</strong>g>and</str<strong>on</strong>g> noises when making turns, even <strong>on</strong><br />
high-tracti<strong>on</strong> surfaces where the sec<strong>on</strong>d<br />
axle is not called <strong>on</strong> to operate.<br />
4-<str<strong>on</strong>g>Wheel</str<strong>on</strong>g> <str<strong>on</strong>g>Drive</str<strong>on</strong>g>, Part Time<br />
In part time 4-wheel drive systems,<br />
torque is normally sent <strong>on</strong>ly to the rear<br />
axle. When the driver chooses, the fr<strong>on</strong>t<br />
axle can also be engaged. Further, the<br />
driver can select bet<str<strong>on</strong>g>we</str<strong>on</strong>g>en high <str<strong>on</strong>g>and</str<strong>on</strong>g> low<br />
ranges. Some part-time systems also<br />
offer an Auto functi<strong>on</strong> that selects<br />
bet<str<strong>on</strong>g>we</str<strong>on</strong>g>en 2-wheel <str<strong>on</strong>g>and</str<strong>on</strong>g> 4-wheel drive<br />
modes according to need, without the<br />
driver having to do anything. Even in<br />
these systems, ho<str<strong>on</strong>g>we</str<strong>on</strong>g>ver, the driver must<br />
choose bet<str<strong>on</strong>g>we</str<strong>on</strong>g>en high <str<strong>on</strong>g>and</str<strong>on</strong>g> low range.<br />
In a part-time system, the occupants<br />
may feel or hear “something” when the<br />
fr<strong>on</strong>t axle engages. The transfer case<br />
makes more noise in 4-high mode than in<br />
2-high mode. And the extra gear reduc-<br />
Typical part-time 4WD transfer case<br />
ti<strong>on</strong> of 4-low mode is pr<strong>on</strong>e to making<br />
even more noise.<br />
Part time systems have no differential<br />
or other device to allow fr<strong>on</strong>t <str<strong>on</strong>g>and</str<strong>on</strong>g> rear<br />
propshafts to turn at different rates. So, if<br />
the vehicle is operated in 4-wheel mode<br />
- Thanks to Tracy Timmerman<br />
<strong>on</strong> hard pavement, driveline binding can<br />
cause the tires to “crow-hop,” which can<br />
be heard <str<strong>on</strong>g>and</str<strong>on</strong>g> felt. This results because all<br />
four of the tires do not rotate exactly the<br />
same number of rpm, either side to side<br />
or fr<strong>on</strong>t to rear. Eventually, this difference<br />
causes the driveline to begin to bind, or<br />
”wind up,” <str<strong>on</strong>g>and</str<strong>on</strong>g> <strong>on</strong>e tire or other must<br />
temporarily break tracti<strong>on</strong> with the pavement<br />
to relieve the pent-up energy. On<br />
unpaved surfaces, tires can slip as necessary<br />
to overcome binding, without causing<br />
crow-hop or noise.<br />
Running the engine with the transfer<br />
case in Neutral may result in noise, <str<strong>on</strong>g>and</str<strong>on</strong>g><br />
shifting into or out of Neutral can result<br />
in some normal gear clash.<br />
4-<str<strong>on</strong>g>Wheel</str<strong>on</strong>g> <str<strong>on</strong>g>Drive</str<strong>on</strong>g>, Full Time<br />
The automatic 4-wheel drive system<br />
provides torque to all four wheels all the<br />
time, similar to the all-wheel drive system.<br />
But like other 4-wheel drive systems,<br />
it also has a low range. The driver<br />
can select (depending <strong>on</strong> the model) 4<br />
HI, 4HI Lock, 4 LO Lock, <str<strong>on</strong>g>and</str<strong>on</strong>g> neutral.<br />
Typical full-time 4WD transfer case<br />
4-<str<strong>on</strong>g>Wheel</str<strong>on</strong>g> <str<strong>on</strong>g>Drive</str<strong>on</strong>g>, Active<br />
This system provides the driver with<br />
five choices: 2 HI, Auto 4WD, 4 HI, 4 LO,<br />
<str<strong>on</strong>g>and</str<strong>on</strong>g> neutral.<br />
These vehicle can be driven c<strong>on</strong>tinuously<br />
in Auto, although there is a fuel<br />
ec<strong>on</strong>omy <str<strong>on</strong>g>and</str<strong>on</strong>g> noise penalty.<br />
When driven in 4-HI or 4-LO, these<br />
vehicles can experience crow hopping as<br />
<str<strong>on</strong>g>we</str<strong>on</strong>g>ll. Ho<str<strong>on</strong>g>we</str<strong>on</strong>g>ver, when driven in Auto, the<br />
operati<strong>on</strong> of the clutch pack compensates<br />
for different driveshaft speeds.<br />
<str<strong>on</strong>g>All</str<strong>on</strong>g> Systems<br />
Some noises in these vehicles aren’t<br />
new -- they’ve been present in<br />
Know-How Broadcasts for February<br />
Emerging February 12, 9:00 AM, 12:30 PM,<br />
Issues 2003 3:30 PM EasternTime<br />
Technology February 27, 9:00 AM, 12:30 PM,<br />
Close-Up 2003 3:30 PM EasternTime<br />
2<br />
GM TechLink is a m<strong>on</strong>thly magazine<br />
for all GM retail technicians <str<strong>on</strong>g>and</str<strong>on</strong>g><br />
service c<strong>on</strong>sultants providing timely<br />
informati<strong>on</strong> to help increase knowledge<br />
about GM products <str<strong>on</strong>g>and</str<strong>on</strong>g><br />
improve the performance of the<br />
service department.<br />
Manager, Product Readiness:<br />
R. M. (Bob) Savo<br />
GM Parts <str<strong>on</strong>g>and</str<strong>on</strong>g> Service Operati<strong>on</strong>s<br />
�bob.savo@GM.com<br />
Publisher & Editor:<br />
Mark Stesney<br />
GM Parts <str<strong>on</strong>g>and</str<strong>on</strong>g> Service Operati<strong>on</strong>s<br />
�Mark.Stesney@GM.com<br />
Technical Editor:<br />
Jim Horner<br />
�Jim.Horner@S<str<strong>on</strong>g>and</str<strong>on</strong>g>yCorp.com<br />
1-248-816-3641<br />
Producti<strong>on</strong> Manager:<br />
Marie Meredith<br />
Desktop Publishing:<br />
Greg Szpaichler, MediaWurks<br />
�spake@mediawurks.com<br />
FAX number: �<br />
1-248-649-5465<br />
Write to: �<br />
TechLink<br />
PO Box 500<br />
Troy, MI 48007-0500<br />
GM TechLink <strong>on</strong> the Web: �<br />
http://service.gm.com<br />
General Motors service tips are<br />
intended for use by professi<strong>on</strong>al technicians,<br />
not a "do-it-yourselfer." They<br />
are written to inform those technicians<br />
of c<strong>on</strong>diti<strong>on</strong>s that may occur <strong>on</strong><br />
some vehicles, or to provide informati<strong>on</strong><br />
that could assist in the proper<br />
service of a vehicle. Properly trained<br />
technicians have the equipment, tools,<br />
safety instructi<strong>on</strong>s <str<strong>on</strong>g>and</str<strong>on</strong>g> know-how to<br />
do a job properly <str<strong>on</strong>g>and</str<strong>on</strong>g> safely. If a c<strong>on</strong>diti<strong>on</strong><br />
is described, do not assume<br />
that the bulletin applies to your vehicle<br />
or that your vehicle will have that<br />
c<strong>on</strong>diti<strong>on</strong>. See a General Motors dealer<br />
servicing your br<str<strong>on</strong>g>and</str<strong>on</strong>g> of General<br />
Motors vehicle for informati<strong>on</strong> <strong>on</strong><br />
whether your vehicle may benefit from<br />
the informati<strong>on</strong>.<br />
Inclusi<strong>on</strong> in this publicati<strong>on</strong> is not necessarily<br />
an endorsement of the individual<br />
or the company.<br />
Copyright© 2003 General Motors Corporati<strong>on</strong><br />
<str<strong>on</strong>g>All</str<strong>on</strong>g> rights reserved.
c<strong>on</strong>tinued from page 2<br />
Typical active 4WD transfer case<br />
4WD/AWD vehicles all<br />
al<strong>on</strong>g. But today’s vehicles<br />
are made to operate<br />
<str<strong>on</strong>g>and</str<strong>on</strong>g> ride more quietly, so<br />
these normal noises <str<strong>on</strong>g>and</str<strong>on</strong>g><br />
sensati<strong>on</strong>s are more<br />
noticeable.<br />
One way to determine<br />
if a noise or c<strong>on</strong>diti<strong>on</strong> is<br />
unusual or typical is to operate a similar<br />
vehicle under similar c<strong>on</strong>diti<strong>on</strong>s.<br />
It’s necessary to drive the vehicle<br />
under c<strong>on</strong>diti<strong>on</strong>s that duplicate the customer’s<br />
c<strong>on</strong>cern. Be sure to try all<br />
ranges, in both 2- <str<strong>on</strong>g>and</str<strong>on</strong>g> 4-wheel drive.<br />
Try the Auto range if equipped. <str<strong>on</strong>g>Drive</str<strong>on</strong>g> in<br />
straight lines, <str<strong>on</strong>g>and</str<strong>on</strong>g> also in circles.<br />
TIP: In part-time 4WD systems, it’s<br />
important that all tires are the same circumference,<br />
to avoid driveline binding,<br />
<str<strong>on</strong>g>and</str<strong>on</strong>g> the resulting crow-hopping. Tires<br />
should be not <strong>on</strong>ly the same size but<br />
also the same br<str<strong>on</strong>g>and</str<strong>on</strong>g> <str<strong>on</strong>g>and</str<strong>on</strong>g> type. This is<br />
because circumferences can vary a little<br />
am<strong>on</strong>g br<str<strong>on</strong>g>and</str<strong>on</strong>g>s <str<strong>on</strong>g>and</str<strong>on</strong>g> types. It may not<br />
be much, but it can be enough to<br />
cause problems. Proper <str<strong>on</strong>g>and</str<strong>on</strong>g> even tire<br />
inflati<strong>on</strong> is also extremely important<br />
<str<strong>on</strong>g>and</str<strong>on</strong>g> frequently overlooked. And excessive<br />
<str<strong>on</strong>g>we</str<strong>on</strong>g>ar of <strong>on</strong>e tire can cause different<br />
circumferences.<br />
- Thanks to BJ Lackey<br />
Current Transfer Case Applicati<strong>on</strong>s<br />
3<br />
4T65E Transaxle<br />
C<strong>on</strong>diti<strong>on</strong>s<br />
Owners of 2003 vehicles equipped<br />
with the 4T65E automatic transaxle (RPO<br />
MN3, MN7, M15, <str<strong>on</strong>g>and</str<strong>on</strong>g> M76) may experi-<br />
ence harsh shift, TCC shudder during<br />
decel, TCC applied in 2nd gear, <str<strong>on</strong>g>and</str<strong>on</strong>g> DTC<br />
P0742. This may be caused by an internal<br />
failure of the PWM solenoid.<br />
Determine the date code, located <strong>on</strong><br />
the electrical c<strong>on</strong>nector. Replace the<br />
solenoid if the date is bet<str<strong>on</strong>g>we</str<strong>on</strong>g>en 2217 <str<strong>on</strong>g>and</str<strong>on</strong>g><br />
2240. The suspect solenoid leaks<br />
bet<str<strong>on</strong>g>we</str<strong>on</strong>g>en the O-rings, shown.<br />
Transmissi<strong>on</strong>s with build dates before<br />
date code 254 (stamped <strong>on</strong> upper right<br />
side of transmissi<strong>on</strong> tag) are c<strong>on</strong>sidered<br />
to c<strong>on</strong>tain the suspect PWM solenoids.<br />
To determine if the solenoid is the<br />
cause of the c<strong>on</strong>diti<strong>on</strong>s, test drive the<br />
vehicle with the Tech 2 c<strong>on</strong>nected <str<strong>on</strong>g>and</str<strong>on</strong>g><br />
m<strong>on</strong>itor Transmissi<strong>on</strong> Release Pressure.<br />
The status should be YES until TCC<br />
applies, then the display should read NO.<br />
Suspect the PWM solenoid if the status<br />
remains NO during accel, the<br />
upshifts are harsh, <str<strong>on</strong>g>and</str<strong>on</strong>g> the vehicle shudders<br />
during downshifts during decel.<br />
Another approach is to c<strong>on</strong>nect a Tech<br />
2, shift to <str<strong>on</strong>g>Drive</str<strong>on</strong>g> range <str<strong>on</strong>g>and</str<strong>on</strong>g> manually<br />
apply third gear with the Tech 2. If the<br />
engine stumbles <str<strong>on</strong>g>and</str<strong>on</strong>g>/or stalls, suspect<br />
the PWM solenoid.<br />
Replace the PWM solenoid (item 334<br />
in the 4T65E Technician’s Guide). The<br />
current part number is 24214974, <str<strong>on</strong>g>and</str<strong>on</strong>g><br />
the Labor Operati<strong>on</strong> Number is K6557.<br />
IMPORTANT: Do not replace the valve<br />
body if all valves appear to operate<br />
freely.<br />
- Thanks to Darryl Butler
Engine Off<br />
Natural Vacuum<br />
Diagnostic<br />
The EVAP system <strong>on</strong> a vehicle is<br />
intended to prevent evaporated fuel<br />
(vapor) in the fuel system from leaking<br />
out into the atmosphere. According to<br />
OBD II rules, the vehicle must perform<br />
self-tests periodically to detect <str<strong>on</strong>g>and</str<strong>on</strong>g> indicate<br />
the presence of leaks. The present<br />
st<str<strong>on</strong>g>and</str<strong>on</strong>g>ard requires being able to detect<br />
leaks as small as 0.020-inch (0.51 mm).<br />
The new Engine Off Natural Vacuum<br />
(EONV) diagnostic system is used <strong>on</strong> the<br />
following 2003 trucks with V6 <str<strong>on</strong>g>and</str<strong>on</strong>g> V8<br />
engines:<br />
- federal emissi<strong>on</strong> vehicles with GVW<br />
of 8600 pounds (3900 kg) or less.<br />
- California emissi<strong>on</strong> vehicles with<br />
GVW of 14,000 pounds (6350 kg) or<br />
less<br />
For the applicable vehicles, the EONV<br />
diagnostic replaces <strong>on</strong>ly the previous<br />
small-leak detecti<strong>on</strong> method. <str<strong>on</strong>g>All</str<strong>on</strong>g> of the<br />
other EVAP system comp<strong>on</strong>ent tests are<br />
still used during engine operati<strong>on</strong>. These<br />
include large leak, restricted vent, excessive<br />
vacuum, <str<strong>on</strong>g>and</str<strong>on</strong>g> others.<br />
Then, after shutdown, the EONV test<br />
runs, provided all of the engine-<strong>on</strong> tests<br />
passed.<br />
Operating Principles<br />
EONV uses the natural pressure<br />
changes in the fuel tank to detect leaks.<br />
Pressure in a sealed c<strong>on</strong>tainer follows<br />
temperature changes. That is, pressure<br />
rises when temperature rises. Pressure<br />
drops when temperature drops.<br />
While a vehicle is driven, the fuel in<br />
the tank is warmed, even <strong>on</strong> returnless<br />
fuel systems, by warm air from the<br />
engine, radiator <str<strong>on</strong>g>and</str<strong>on</strong>g> exhaust system.<br />
Pressure increases in the fuel tank. This<br />
is true even in cold ambient temperatures.<br />
After shutdown, pressure rises for<br />
awhile, then eventually drops when the<br />
fuel in the tank cools. The EONV system<br />
uses the presence or absence of natural<br />
pressure changes to detect leaks. If there<br />
is even a tiny leak, the expected pressure<br />
changes do not occur.<br />
In the sealed system, a finite amount<br />
of pressure or vacuum will be seen. With<br />
a 0.020-inch (.51 mm) leak present, little<br />
or no pressure or vacuum is observed.<br />
Experiment<br />
At room temperature, tighten the cap<br />
Railway tanker collapsed<br />
due to trapped vacuum<br />
<strong>on</strong> an empty plastic soda pop bottle <str<strong>on</strong>g>and</str<strong>on</strong>g><br />
put it in the refrigerator. After a few minutes,<br />
look at the bottle.<br />
As the air temperature in the bottle<br />
drops, so does pressure, indicated by the<br />
Plain bottle, left, collapsed after<br />
refrigerating, right<br />
partial collapse of the bottle.<br />
This is an oversimplified representati<strong>on</strong><br />
of what happens to a fuel tank after shutdown<br />
when the fuel <str<strong>on</strong>g>and</str<strong>on</strong>g> tank cool down.<br />
4<br />
EVAP system comp<strong>on</strong>ents unchanged<br />
With even a tiny pinhole in<br />
the pop bottle or cap, this will<br />
not occur because the leak<br />
permits the pressure within<br />
the bottle to equalize with the<br />
air pressure around the bottle.<br />
What’s Different<br />
About the EVAP<br />
Hardware <strong>on</strong> EONV<br />
Systems<br />
Actually, n<strong>on</strong>e of the hardware<br />
has changed. <str<strong>on</strong>g>All</str<strong>on</strong>g> of the<br />
same plumbing, solenoids,<br />
valves, <str<strong>on</strong>g>and</str<strong>on</strong>g> fuel tank<br />
pressure/vacuum sensor are the same.<br />
The software in the PCM has changed to<br />
make the test run, <str<strong>on</strong>g>and</str<strong>on</strong>g> the canister vent<br />
solenoid is wired to battery voltage<br />
instead of Igniti<strong>on</strong> 1.<br />
Previous leak detecti<strong>on</strong> methods <str<strong>on</strong>g>we</str<strong>on</strong>g>re<br />
performed with the engine running.<br />
EONV m<strong>on</strong>itors EVAP system pressure<br />
or vacuum with the key off. So it may<br />
take up to 40 minutes for the PCM to<br />
po<str<strong>on</strong>g>we</str<strong>on</strong>g>r down.<br />
TIP: This is important to remember<br />
when performing a parasitic draw test <strong>on</strong><br />
vehicles equipped with EONV.<br />
To avoid battery rundown, the diagnostic<br />
limits the number of tests run over a<br />
specific period of time. When an EONV<br />
test passes, the calibrated time bet<str<strong>on</strong>g>we</str<strong>on</strong>g>en<br />
tests is lengthened.<br />
Step-by-Step Operati<strong>on</strong><br />
Although the EONV test runs after<br />
engine shutdown, the process actually<br />
begins even before the engine is started.<br />
That’s because the EONV test can be<br />
enabled <strong>on</strong>ly after all other engine run-
ning EVAP tests have run, which requires<br />
a l<strong>on</strong>g cold-soak shutdown. For all practical<br />
purposes, this limits the EONV to<br />
occur not more than <strong>on</strong>ce per day. A l<strong>on</strong>g<br />
cold-soak meets these requirements:<br />
- start up intake air temperature (IAT)<br />
is bet<str<strong>on</strong>g>we</str<strong>on</strong>g>en 39°-86°F (4°-30°C)<br />
- start up engine coolant temperature<br />
(ECT) is less than 86°F (30°C)<br />
- start up IAT <str<strong>on</strong>g>and</str<strong>on</strong>g> ECT are within 15°F<br />
(8°C) of each other<br />
After startup, the following must also<br />
be satisfied before EONV is enabled:<br />
- ambient temperature must be<br />
bet<str<strong>on</strong>g>we</str<strong>on</strong>g>en 40° <str<strong>on</strong>g>and</str<strong>on</strong>g> 96°F (4° <str<strong>on</strong>g>and</str<strong>on</strong>g> 35°C).<br />
For more informati<strong>on</strong> <strong>on</strong> this, see<br />
Sub-Functi<strong>on</strong>s below.<br />
- fuel level bet<str<strong>on</strong>g>we</str<strong>on</strong>g>en 15% <str<strong>on</strong>g>and</str<strong>on</strong>g><br />
85% full<br />
- engine run time, distance traveled,<br />
<str<strong>on</strong>g>and</str<strong>on</strong>g> engine coolant temperature<br />
must indicate that the system is<br />
adequately warmed up<br />
- certain DTCs not present. Refer to SI<br />
for specifics.<br />
There are three tests that make up the<br />
EONV diagnostic: volatility, pressure, <str<strong>on</strong>g>and</str<strong>on</strong>g><br />
vacuum.<br />
Volatility Test -- The EONV diagnostic<br />
is very sensitive to large amounts of fuel<br />
vaporizati<strong>on</strong> due to high volatility fuel.<br />
The volatility test makes sure the vaporizati<strong>on</strong><br />
rates will not negatively affect the<br />
test results.<br />
The EONV volatility test runs immediately<br />
after key-down if all the enable criteria<br />
have been met. The PCM m<strong>on</strong>itors<br />
pressure for a calibrated amount of time<br />
with the canister vent open <str<strong>on</strong>g>and</str<strong>on</strong>g> uses preprogrammed<br />
values to predict fuel volatility.<br />
The logic behind this test is that if<br />
pressure builds in the system with the<br />
canister vent open, it will certainly be<br />
able to mask a 0.020-inch (.51 mm) leak<br />
with the vent closed.<br />
If the test determines that the volatility<br />
of the fuel is high, the PCM aborts the<br />
diagnostic. If the fuel is moderately<br />
volatile, the diagnostic runs, with compensati<strong>on</strong><br />
for volatility. For low fuel<br />
volatility, the diagnostic runs without correcti<strong>on</strong>s.<br />
Pressure Test -- The pressure test<br />
begins by closing the canister vent solenoid<br />
<str<strong>on</strong>g>and</str<strong>on</strong>g> observing the pressure increase<br />
inside the fuel tank. At this point, the fuel<br />
is still warm enough for some amount of<br />
vaporizati<strong>on</strong> to occur.<br />
- If the pressure increase reaches the<br />
calibrated pressure threshold, the<br />
diagnostic passes, meaning the<br />
system is leak-free, <str<strong>on</strong>g>and</str<strong>on</strong>g> the test is<br />
over. The pressure threshold is a<br />
functi<strong>on</strong> of predicted ambient<br />
temperature <str<strong>on</strong>g>and</str<strong>on</strong>g> fuel level.<br />
- If a vacuum occurs, the diagnostic<br />
switches directly to vacuum testing<br />
without bleed-down.<br />
- If the pressure threshold is not<br />
reached, the PCM records the peak<br />
pressure that is reached, <str<strong>on</strong>g>and</str<strong>on</strong>g> adjusts<br />
the vacuum threshold for the<br />
vacuum test. Then, the PCM opens<br />
the canister vent valve <str<strong>on</strong>g>and</str<strong>on</strong>g> waits for<br />
system pressure to bleed down.<br />
The pressure must decay a calibrated<br />
amount from the peak pressure for the<br />
PCM to c<strong>on</strong>sider it a peak, <str<strong>on</strong>g>and</str<strong>on</strong>g> switch to<br />
the vacuum test. The adjusted vacuum<br />
threshold equals the difference bet<str<strong>on</strong>g>we</str<strong>on</strong>g>en<br />
the pressure peak <str<strong>on</strong>g>and</str<strong>on</strong>g> the pressure<br />
threshold.<br />
Vacuum Test -- During vacuum testing,<br />
the PCM closes the canister vent<br />
valve <str<strong>on</strong>g>and</str<strong>on</strong>g> m<strong>on</strong>itors the tank vacuum to<br />
determine if the vacuum threshold is<br />
reached.<br />
- If the vacuum threshold is reached,<br />
indicating that the system can hold a<br />
vacuum, the diagnostic passes, <str<strong>on</strong>g>and</str<strong>on</strong>g><br />
the test is complete.<br />
- If the vacuum threshold is not<br />
reached, the PCM must compare<br />
this with previously stored tests<br />
before determining whether to call it<br />
a “fail.” This is explained below.<br />
TIP: These individual test results cannot<br />
be displayed <strong>on</strong> the Tech 2. After at<br />
least three successful completi<strong>on</strong>s, the<br />
“pass” flag will display.<br />
Diagnostic Result<br />
The PCM quantifies the diagnostic<br />
result, incorporating the results of the<br />
pressure <str<strong>on</strong>g>and</str<strong>on</strong>g> vacuum tests. The current<br />
result is compared with the previously<br />
stored results. If this moves above the<br />
fail threshold within the PCM, the MIL is<br />
turned <strong>on</strong> <str<strong>on</strong>g>and</str<strong>on</strong>g> DTC P0442 is set, indicating<br />
a leak larger than 0.020-inch (.51<br />
mm).<br />
Sub-Functi<strong>on</strong>s<br />
The EONV system must perform several<br />
sub-functi<strong>on</strong>s to run the EONV diagnostic.<br />
Determining Ambient Temperature -<br />
- The EONV must estimate ambient<br />
temperature. Because EONV occurs at<br />
the end of the drive cycle, measuring<br />
intake air temperature at start-up will<br />
5<br />
not suffice. The PCM:<br />
- Uses vehicle speed <str<strong>on</strong>g>and</str<strong>on</strong>g> airflow to<br />
calculate an offset value, which is<br />
subtracted from the intake air<br />
temperature to predict ambient<br />
temperature.<br />
- Equates the estimated ambient<br />
temperature to intake air<br />
temperature for a calibrated amount<br />
of time after a cold start.<br />
Refueling Determinati<strong>on</strong> -- The PCM<br />
looks for a net increase in fuel level over<br />
the course of a test. The PCM also looks<br />
for an abrupt change in vacuum over a<br />
calibrated amount of time, as <str<strong>on</strong>g>we</str<strong>on</strong>g>ll as<br />
changes in fuel level or system pressure<br />
that indicate a refueling event. The PCM<br />
detects refueling events <strong>on</strong>ly when the<br />
vent is closed.<br />
If a refueling event is detected, the<br />
PCM aborts the diagnostic <str<strong>on</strong>g>and</str<strong>on</strong>g> opens the<br />
canister vent. The canister vent must be<br />
opened quickly to prevent the canister<br />
vent from corking closed. Corking is a<br />
c<strong>on</strong>diti<strong>on</strong> when the canister vent solenoid<br />
is not opened quickly enough, causing<br />
pressure in the EVAP system to hold<br />
the canister vent solenoid closed.<br />
Rati<strong>on</strong>ality Test -- The rati<strong>on</strong>ality test<br />
determines if the refueling detecti<strong>on</strong> was<br />
caused by an intermittent signal, or an<br />
actual refueling of the vehicle. During the<br />
test, the PCM checks to see if the current<br />
fuel level is greater than the initial<br />
fuel level for a calibrated amount of time.<br />
If the calibrated amount of time passes<br />
<str<strong>on</strong>g>and</str<strong>on</strong>g> the PCM is not able to determine<br />
whether the fuel level is greater, the refueling<br />
event is declared irrati<strong>on</strong>al <str<strong>on</strong>g>and</str<strong>on</strong>g> a<br />
DTC is set for the sensor that falsely<br />
detected the refueling event.<br />
Other<br />
TIP: Because the PCM remains <strong>on</strong> during<br />
the EONV test, serial data may be<br />
observed using the Tech 2. You can<br />
watch the vent valve comm<str<strong>on</strong>g>and</str<strong>on</strong>g>s <str<strong>on</strong>g>and</str<strong>on</strong>g> the<br />
values from the FTP sensor, for instance.<br />
After the PCM completes the EONV test,<br />
it po<str<strong>on</strong>g>we</str<strong>on</strong>g>rs down <str<strong>on</strong>g>and</str<strong>on</strong>g> serial data stops.<br />
TIP: If a customer is going to take their<br />
vehicle to an I/M inspecti<strong>on</strong> stati<strong>on</strong> after<br />
service involving clearing DTCs, explain<br />
that they should wait four days. The<br />
EONV test usually runs <strong>on</strong>ly <strong>on</strong>ce per day<br />
due to the cold-soak requirement. And<br />
the I/M status bit “flag” will set<br />
ready/complete <strong>on</strong>ly after at least three<br />
successful completi<strong>on</strong>s.<br />
- Thanks to Jack Woodward, Chad<br />
Lehner <str<strong>on</strong>g>and</str<strong>on</strong>g> Jeff Kemph
Transmissi<strong>on</strong> Oil<br />
Cooler Flush <str<strong>on</strong>g>and</str<strong>on</strong>g><br />
Flow Testing Kit<br />
GM studies indicate that restricted transmissi<strong>on</strong><br />
oil flow is detrimental to the life of any<br />
automatic transmissi<strong>on</strong>. Plugged oil coolers <str<strong>on</strong>g>and</str<strong>on</strong>g><br />
oil cooler line restricti<strong>on</strong>s cause insufficient<br />
transmissi<strong>on</strong> lubricati<strong>on</strong> <str<strong>on</strong>g>and</str<strong>on</strong>g> elevated operating<br />
temperatures which can lead to premature<br />
transmissi<strong>on</strong> failure. Many repeat repair cases<br />
can be prevented by following published procedures<br />
for transmissi<strong>on</strong> oil cooler flushing <str<strong>on</strong>g>and</str<strong>on</strong>g><br />
flow checking.<br />
J-45096 TransFlow is a transmissi<strong>on</strong> oil cooling<br />
system flusher <str<strong>on</strong>g>and</str<strong>on</strong>g> flow tester <str<strong>on</strong>g>and</str<strong>on</strong>g> will be<br />
released in December.<br />
A major advantage of this new tool is that it<br />
uses c<strong>on</strong>venti<strong>on</strong>al Dexr<strong>on</strong> III automatic transmissi<strong>on</strong><br />
fluid as the cleaning agent. Unlike earlier<br />
oil cooler flushing tools, it doesn’t use detergents,<br />
other chemical cleaning agents or hot<br />
water, so there is no hazardous waste to dispose<br />
of.<br />
The J-45096 TransFlow is installed in a<br />
wheeled cabinet similar to the ACR 2000 airc<strong>on</strong>diti<strong>on</strong>ing<br />
service stati<strong>on</strong>. It is equipped with:<br />
- 32 quart oil supply vessel<br />
- 34 quart waste oil vessel<br />
- air pressure supply fitting<br />
- digital flow rate indicator<br />
- 10-foot 12V DC po<str<strong>on</strong>g>we</str<strong>on</strong>g>r cable<br />
- 10-foot black supply oil hose with quick c<strong>on</strong>nect<br />
fitting<br />
- 10-foot clear waste oil hose with quick c<strong>on</strong>nect<br />
fitting<br />
The TransFlow equipment is c<strong>on</strong>nected to<br />
the vehicle’s transmissi<strong>on</strong> oil cooler lines using<br />
the current cooler line adapters. Two adapters<br />
are included with the TransFlow. Five other<br />
adapters have been released in the past. And<br />
three of the comm<strong>on</strong> <strong>on</strong>es are available in the<br />
Labor Time Guide<br />
Redesigned<br />
INFORMATION FOR SERVICE MAN-<br />
AGERS AND WARRANTY ADMINIS-<br />
TRATORS IN THE US<br />
Effective February 1, 2003, the GM<br />
Labor Time Guide will be redesigned. It will<br />
now have the same overall appearance <str<strong>on</strong>g>and</str<strong>on</strong>g><br />
functi<strong>on</strong> as other GM service documents,<br />
such as SI <str<strong>on</strong>g>and</str<strong>on</strong>g> owner’s manuals.<br />
The new Labor Time Guide will be sent<br />
to you <strong>on</strong> two CDs, <strong>on</strong>e c<strong>on</strong>taining the<br />
applicati<strong>on</strong> <str<strong>on</strong>g>and</str<strong>on</strong>g> the other c<strong>on</strong>taining the<br />
data.<br />
In the future, you will receive updates<br />
every sec<strong>on</strong>d m<strong>on</strong>th (m<strong>on</strong>ths with ‘even’<br />
numbers, such as April, June, etc.).<br />
Usage Tips<br />
To use the new Labor Time Guide, you<br />
must first “build” the vehicle in questi<strong>on</strong>.<br />
This is d<strong>on</strong>e by using pulldown menus to<br />
specify model year, make <str<strong>on</strong>g>and</str<strong>on</strong>g> model.<br />
J-45096-KIT. <str<strong>on</strong>g>All</str<strong>on</strong>g> of these<br />
are itemized <str<strong>on</strong>g>and</str<strong>on</strong>g> illustrated<br />
in the User’s Manual.<br />
C<strong>on</strong>tact Kent-Moore at<br />
1.800.345.2233 for additi<strong>on</strong>al<br />
informati<strong>on</strong>.<br />
In the flush mode, air<br />
pressure forces clean<br />
transmissi<strong>on</strong> fluid<br />
through the oil cooler <str<strong>on</strong>g>and</str<strong>on</strong>g><br />
lines. This removes dirty<br />
oil <str<strong>on</strong>g>and</str<strong>on</strong>g> blockages. To<br />
enhance the cleaning<br />
acti<strong>on</strong>, the oil is agitated<br />
with bursts of air. The<br />
cooler is flushed first in the backflush directi<strong>on</strong>,<br />
then the normal flow directi<strong>on</strong>.<br />
Waste oil is collected in a built-in waste tank.<br />
After flushing, use the digital flow rate indicator<br />
in the J-45096 to perform a flow test. The<br />
User’s Manual includes minimum flow rate<br />
charts.<br />
TIP: Minimum flow rates vary, depending <strong>on</strong><br />
whether the oil cooler is made of aluminum or<br />
steel. And the flow rates also vary with temperature.<br />
Be sure you determine both these facts<br />
before performing the flow test.<br />
The flow test indicates whether the oil cooler<br />
<str<strong>on</strong>g>and</str<strong>on</strong>g> cooler lines still have restricti<strong>on</strong>s, which<br />
must be addressed before the repair is completed.<br />
If required, the TransFlow will provide an<br />
encrypted 7-digit warranty code following the<br />
flow test.<br />
The entire flush <str<strong>on</strong>g>and</str<strong>on</strong>g> flow test procedure<br />
takes <strong>on</strong>ly 5-8 minutes.<br />
The waste tank can be emptied either using a<br />
sucti<strong>on</strong> hose in the port provided or by draining<br />
from the built-in drain fitting at the bottom of<br />
the tank. In either case, the waste oil can be<br />
disposed of the same as any other drained<br />
transmissi<strong>on</strong> fluid.<br />
Procedures in SI will be changed to accommodate<br />
the new J-45096 flush <str<strong>on</strong>g>and</str<strong>on</strong>g> flow tester.<br />
- Thanks to Dan Popoff, Russ Dobs<strong>on</strong> <str<strong>on</strong>g>and</str<strong>on</strong>g> Dave<br />
Rol<str<strong>on</strong>g>and</str<strong>on</strong>g><br />
EXAMPLE: 2003 Buick LeSabre<br />
Click Next, then click Labor Time Guide.<br />
You can now search for specific labor<br />
operati<strong>on</strong>s three ways.<br />
- By name, using comm<strong>on</strong> industry<br />
nomenclature<br />
- By number, if you know it<br />
- By menu<br />
Spaces are provided for you to type in<br />
the name or number.<br />
6<br />
TransFlow<br />
c<strong>on</strong>nectors<br />
The menu lists the operati<strong>on</strong> categories<br />
by letter <str<strong>on</strong>g>and</str<strong>on</strong>g> by name. If you are unsure of<br />
the exact terminology or number, this is<br />
probably the best way to c<strong>on</strong>duct your<br />
search. Simply click your choice. These<br />
names follow SI terminology.<br />
EXAMPLE: J Engine<br />
In most cases, the next screen presents<br />
sub-categories within the broad category.<br />
Again, click <strong>on</strong> your choice. These names<br />
also follow SI terminology.<br />
EXAMPLE: Engine Mechanical<br />
Within the sub-category, your search<br />
results are arranged by 5-digit labor codes,<br />
follo<str<strong>on</strong>g>we</str<strong>on</strong>g>d by the labor operati<strong>on</strong> titles.<br />
Click <strong>on</strong> your choice to see the operati<strong>on</strong><br />
number al<strong>on</strong>g with the labor time associated<br />
with that number, expressed in hours<br />
<str<strong>on</strong>g>and</str<strong>on</strong>g> tenths.<br />
TIP: “Add times” are also displayed<br />
when appropriate.<br />
- Thanks to Terrie Nichols<strong>on</strong> <str<strong>on</strong>g>and</str<strong>on</strong>g> Lisa Scott
Smoke Machine<br />
Revisited<br />
In the November 2002 issue <str<strong>on</strong>g>we</str<strong>on</strong>g> covered<br />
the operating principles <str<strong>on</strong>g>and</str<strong>on</strong>g> diagnostic<br />
tips for the EVAP system <strong>on</strong> the<br />
P<strong>on</strong>tiac Vibe <str<strong>on</strong>g>and</str<strong>on</strong>g> Chevrolet Prizm. This<br />
m<strong>on</strong>th, <str<strong>on</strong>g>we</str<strong>on</strong>g>’re covering the EONV system<br />
used <strong>on</strong> some 2003 trucks.<br />
So, it’s appropriate to revisit the<br />
J-41413-200 Evaporative Emissi<strong>on</strong><br />
System Tester (the EEST, or “smoke<br />
machine”) which <str<strong>on</strong>g>we</str<strong>on</strong>g> first covered in the<br />
November 2001 issue. Here are some<br />
additi<strong>on</strong>al pointers you may find useful.<br />
J-45059 Angle Meter<br />
The new essential J-45059 Angle<br />
Meter has just been shipped to dealers.<br />
It is used to ensure proper fastener tightness<br />
when using the torque-to-angle procedure.<br />
The new meter is unlike earlier<br />
torque/angle meters in several ways.<br />
First, it does not require an anchor arm,<br />
so it’s very c<strong>on</strong>venient to use, even in<br />
c<strong>on</strong>fined places. Sec<strong>on</strong>d, it does not<br />
measure the initial torque, just the final<br />
angle. So you’ll use your normal torque<br />
wrench, plus the angle meter.<br />
A Brief Look at the<br />
Science of Tightening<br />
Fasteners<br />
Fricti<strong>on</strong> is the resistance to relative<br />
moti<strong>on</strong> bet<str<strong>on</strong>g>we</str<strong>on</strong>g>en two surfaces. It is present<br />
bet<str<strong>on</strong>g>we</str<strong>on</strong>g>en the threads of a fastener<br />
<str<strong>on</strong>g>and</str<strong>on</strong>g> the threads of a comp<strong>on</strong>ent, <str<strong>on</strong>g>and</str<strong>on</strong>g><br />
bet<str<strong>on</strong>g>we</str<strong>on</strong>g>en the bolt head <str<strong>on</strong>g>and</str<strong>on</strong>g> the surface of<br />
the comp<strong>on</strong>ent. When a threaded fastener<br />
is tightened with a wrench, up to 90%<br />
of the torque applied to the fastener is<br />
necessary to overcome fricti<strong>on</strong>. Only<br />
about 10% of the force is used to hold<br />
the comp<strong>on</strong>ents together. This is called<br />
clamp load.<br />
Fastener fricti<strong>on</strong> <str<strong>on</strong>g>and</str<strong>on</strong>g> clamp load can be<br />
affected by thread cleanliness, thread<br />
TIP: You may want to refer to the earlier<br />
article first. If necessary, you can find a<br />
copy of it <strong>on</strong> the TechLink <str<strong>on</strong>g>we</str<strong>on</strong>g>bsite at<br />
http://service.gm.com.<br />
The EEST was developed to help you<br />
locate tiny leaks in the EVAP system,<br />
which are defined by OBD 2 as 0.020inch<br />
(0.51 mm) or larger. It does this by<br />
pressurizing the system with vaporized<br />
mineral oil, which appears as smoke<br />
when it escapes from a leak. The tool<br />
includes a bright light to help you pinpoint<br />
the smoke.<br />
The EEST is also equipped with a precisi<strong>on</strong><br />
flowmeter, to help you determine<br />
whether you’ve repaired the leak <strong>on</strong>ce<br />
you’ve located <str<strong>on</strong>g>and</str<strong>on</strong>g> fixed it.<br />
Using the Smoke Tester<br />
The EEST can be c<strong>on</strong>nected to the<br />
EVAP system two places, depending <strong>on</strong><br />
instructi<strong>on</strong>s in SI. These are the underhood<br />
EVAP service port with the green<br />
cap, <str<strong>on</strong>g>and</str<strong>on</strong>g> the fuel filler neck.<br />
You can c<strong>on</strong>nect at the service port<br />
without disturbing any fittings or c<strong>on</strong>necti<strong>on</strong>s<br />
in the system.<br />
TIP: If the leak you’re looking for happens<br />
to be bet<str<strong>on</strong>g>we</str<strong>on</strong>g>en the filler neck <str<strong>on</strong>g>and</str<strong>on</strong>g><br />
the filler cap, removing <str<strong>on</strong>g>and</str<strong>on</strong>g> replacing the<br />
cap for testing could cause the leak to<br />
disappear.<br />
TIP: It’s recommended that the fuel<br />
tank not be full before performing a<br />
smoke test.<br />
size, how often the fastener<br />
has been used, <str<strong>on</strong>g>and</str<strong>on</strong>g><br />
the fit of the wrench <strong>on</strong><br />
the bolt head.<br />
C<strong>on</strong>sistent clamp load<br />
is always important, but<br />
has taken <strong>on</strong> a new level<br />
of c<strong>on</strong>cern in modern,<br />
light<str<strong>on</strong>g>we</str<strong>on</strong>g>ight engine comp<strong>on</strong>ents.<br />
Ovetightening can<br />
lead to distorted parts<br />
(such as cylinder bores)<br />
<str<strong>on</strong>g>and</str<strong>on</strong>g> undertightening can<br />
lead to leaks <str<strong>on</strong>g>and</str<strong>on</strong>g> parts<br />
coming loose.<br />
Torque-to-Angle<br />
It’s become fairly comm<strong>on</strong><br />
to temporarily<br />
assemble parts to the<br />
proper clamp load before<br />
machining them. For<br />
instance, cylinder bores are machined<br />
with bore plates bolted <str<strong>on</strong>g>and</str<strong>on</strong>g> torqued into<br />
place <strong>on</strong> the engine block. C<strong>on</strong>necting<br />
rod <str<strong>on</strong>g>and</str<strong>on</strong>g> crankshaft bearing bores are<br />
machined with the caps torqued into<br />
place. When these parts are assembled<br />
in the plant, or reassembled in the service<br />
department after repair, it’s necessary<br />
to apply the same c<strong>on</strong>sistent torque<br />
to the fasteners to ensure that the parts<br />
assume their proper as-machined shapes.<br />
When a bolt is tightened, it stretches a<br />
7<br />
This is because in some vehicles, the<br />
fuel filler neck enters the tank from the<br />
side. If the fuel is above this level, smoke<br />
from the service port has to pass through<br />
liquid fuel to reach the filler neck <str<strong>on</strong>g>and</str<strong>on</strong>g> cap.<br />
Most or all of the smoke will dissolve in<br />
the fuel <str<strong>on</strong>g>and</str<strong>on</strong>g> may not reach the filler area.<br />
So to be sure you’ve tested everything in<br />
the system for leaks, it may be necessary<br />
to “smoke” the system from both<br />
the service port <str<strong>on</strong>g>and</str<strong>on</strong>g> from the filler neck.<br />
Numerous filler neck adapters are supplied<br />
for this purpose.<br />
Importance of Testing with<br />
the Flowmeter<br />
Many vehicles do not have an EVAP<br />
service bay test to determine if an effective<br />
EVAP leak repair has been d<strong>on</strong>e. So,<br />
the flowmeter in the EEST is the <strong>on</strong>ly<br />
practical method to be sure you’ve actually<br />
located <str<strong>on</strong>g>and</str<strong>on</strong>g> repaired a small leak.<br />
TIP: You will learn in the accompanying<br />
article that the EONV small leak self-test<br />
will not report a pass/fail until it has run<br />
three successive small leak diagnostics.<br />
This takes three days of operati<strong>on</strong>, at the<br />
very least. Again, use the flowmeter to<br />
determine if you’ve made a proper repair.<br />
With most systems, using the flowmeter<br />
is a good way to prevent comebacks.<br />
But with EONV, it’s impossible to<br />
know you’ve made an effective repair by<br />
any other means.<br />
- Thanks to Jack Woodward<br />
little. This is called elastic<br />
deformati<strong>on</strong>. When<br />
the bolt stretches, its<br />
clamp load is very predictable.<br />
When a bolt turns<br />
<strong>on</strong>e revoluti<strong>on</strong>, it<br />
moves a distance equal<br />
to the distance<br />
bet<str<strong>on</strong>g>we</str<strong>on</strong>g>en two adjacent<br />
threads. For instance, a<br />
bolt with 18 threads<br />
per inch moves 1/18inch<br />
per revoluti<strong>on</strong>.<br />
Engineers can determine<br />
the amount of<br />
stretch a bolt needs, to<br />
apply the proper clamp<br />
load. This is related<br />
directly to the amount<br />
the bolt is turned, in<br />
degrees. By specifying how far the bolt<br />
has to be turned (measured in degrees),<br />
after a preliminary torque is reached, the<br />
engineers can precisely c<strong>on</strong>trol clamp<br />
load.<br />
A typical cylinder head installati<strong>on</strong> may<br />
call for tightening the bolts in stages. For<br />
instance <strong>on</strong> the L18 head bolts, first<br />
torque to 30 Nm. On the sec<strong>on</strong>d pass<br />
verify 30 Nm <str<strong>on</strong>g>and</str<strong>on</strong>g> torque 120° in<br />
sequence. On the third pass, depending<br />
<strong>on</strong> bolt length:<br />
c<strong>on</strong>tinued <strong>on</strong> page 8
Bulletins - December 2002<br />
This review of service bulletins released<br />
through mid-December lists the bulletin number,<br />
superseded bulletin number (if applicable),<br />
subject <str<strong>on</strong>g>and</str<strong>on</strong>g> models.<br />
GENERAL INFORMATION:<br />
99-00-89-015B; replaces 99-00-89-015A;<br />
Light Service Support Vehicle (LSSV); 1999-<br />
2003 Chevrolet Silverado, Suburban, Tahoe<br />
4WD Models with Military Upfit<br />
HVAC:<br />
02-01-39-007; Automatic Dual Z<strong>on</strong>e<br />
HVAC Battery Draw; 2003 LD Trucks <str<strong>on</strong>g>and</str<strong>on</strong>g><br />
Hummer H2<br />
STEERING:<br />
02-02-32-012; Rattle/Knock Noise When<br />
Turning While Driving Over Rough Roads<br />
(No Fix at This Time, Fix Under<br />
Development); 1999-2002 Chevrolet<br />
Cavalier, P<strong>on</strong>tiac Sunfire<br />
SUSPENSION:<br />
01-03-10-012A; replaces 01-03-10-012;<br />
Guidelines for Using E2020 <str<strong>on</strong>g>Wheel</str<strong>on</strong>g><br />
Alignments, E2000 Toe Adjust <str<strong>on</strong>g>and</str<strong>on</strong>g> E0200,<br />
E0201, E0203, E0204 <str<strong>on</strong>g>Wheel</str<strong>on</strong>g> Balance; 1989-<br />
2003 Passenger Cars <str<strong>on</strong>g>and</str<strong>on</strong>g> LD Trucks, 2003<br />
Hummer H2<br />
DRIVELINE AXLE:<br />
01-04-18-001A; replaces 01-04-18-001;<br />
<str<strong>on</strong>g>Drive</str<strong>on</strong>g>line Characteristics for <str<strong>on</strong>g>All</str<strong>on</strong>g>-<str<strong>on</strong>g>Wheel</str<strong>on</strong>g> <str<strong>on</strong>g>and</str<strong>on</strong>g><br />
Four-<str<strong>on</strong>g>Wheel</str<strong>on</strong>g> <str<strong>on</strong>g>Drive</str<strong>on</strong>g> Systems; 2003 <str<strong>on</strong>g>and</str<strong>on</strong>g> Prior<br />
LD Truck Models with AWD or 4WD<br />
02-04-21-006A; replaces 02-04-21-006;<br />
Inoperative 4WD/AWD Lamps or System;<br />
2002-03 LD Trucks with Electr<strong>on</strong>ic Shift or<br />
Active Transfer Case (RPO NP1, NP4, or<br />
NP8)<br />
BRAKES:<br />
02-05-22-004B; replaces 02-05-22-004;<br />
Trailer Brakes Applied When<br />
Headlights/Park Lamps Are On, Brake<br />
C<strong>on</strong>troller Illuminati<strong>on</strong> (Modify Brake<br />
C<strong>on</strong>troller Wiring Harness) specified 2002-<br />
03 LD Trucks <str<strong>on</strong>g>and</str<strong>on</strong>g> Hummer H2<br />
02-05-27-001A; replaces 02-05-27-001;<br />
Antilock Brake System (ABS) Indicator<br />
Illuminates When Po<str<strong>on</strong>g>we</str<strong>on</strong>g>r Takeoff (PTO) is<br />
Engaged (Replace Electr<strong>on</strong>ic Brake C<strong>on</strong>trol<br />
Module EBCM); specified 2001-02<br />
Chevrolet <str<strong>on</strong>g>and</str<strong>on</strong>g> GMC Trucks with Air Antilock<br />
Brakes (RPO JE5) <str<strong>on</strong>g>and</str<strong>on</strong>g> <str<strong>on</strong>g>All</str<strong>on</strong>g>is<strong>on</strong> Auto<br />
Transmissi<strong>on</strong><br />
J-45059 Angle Meter from page 7<br />
- tighten bolts 1, 2, 3, 6, 7, 8, 9, 10,<br />
11, 14, 16, 17, an additi<strong>on</strong>al 60°<br />
- tighten bolts 15 <str<strong>on</strong>g>and</str<strong>on</strong>g> 18, an<br />
additi<strong>on</strong>al 45°<br />
- tighten bolts 4, 5, 12, 13, an<br />
additi<strong>on</strong>al 30°<br />
Measuring the tightening in degrees is<br />
the purpose of the J-45059 Angle Meter.<br />
Using the J-45059 Angle<br />
Meter<br />
These are the highlights. Refer to the<br />
instructi<strong>on</strong>s that come with the meter for<br />
full details.<br />
The J-45059 Angle Meter is designed<br />
ENGINE/PROPULSION<br />
SYSTEM:<br />
02-06-01-022A; replaces 02-06-01-022;<br />
Informati<strong>on</strong> <strong>on</strong> Engine Ticking; specified LD<br />
Trucks 2002-03 with 6.6L Duramax Diesel<br />
Engine (VIN 1 -- RPO LB7)<br />
02-06-03-012; Proper Diagnostic<br />
Procedures for No Start, No Crank, Battery,<br />
Generator, Gauges, SES, SIR, Brake<br />
Security, Theft, ABS, Hot, DIC Messages,<br />
Lamp, Light, Diagnostic Testing; 1997-2003<br />
Passenger Cars, LD Trucks, Hummer H2<br />
02-06-04-026A; replaces 02-06-04-026;<br />
Engine Backfire <str<strong>on</strong>g>and</str<strong>on</strong>g> Related <str<strong>on</strong>g>Drive</str<strong>on</strong>g>ability<br />
Issues; 1999-2002 Chevrolet <str<strong>on</strong>g>and</str<strong>on</strong>g> GMC B7<br />
School Bus <str<strong>on</strong>g>and</str<strong>on</strong>g> C6-7 C<strong>on</strong>venti<strong>on</strong>al Cab MD<br />
Models with 7.4L or 8.1L Engine (VINs B, E<br />
-- RPOs L21, L18) <str<strong>on</strong>g>and</str<strong>on</strong>g> IMPCO/Quantum<br />
Technologies LPG Fuel System<br />
02-06-04-052; Engine Stalls, No Start,<br />
Hard Start (Repair Fuel Pump Feed Circuit);<br />
1990-2002 Chevrolet <str<strong>on</strong>g>and</str<strong>on</strong>g> GMC H6-7 C-<br />
Series MD with Gas Engine<br />
02-06-04-053; Revised DTC P0403<br />
Exhaust Gas Recirculati<strong>on</strong> (EGR) Solenoid<br />
C<strong>on</strong>trol Circuit; 2000 Chevrolet Venture,<br />
Oldsmobile Silhouette, P<strong>on</strong>tiac M<strong>on</strong>tana<br />
with 3.4L Engine (VIN E -- RPO LA1)<br />
02-06-04-055; Vehicle is Difficult to Fill<br />
with Fuel (Install Fuel Filler Baffle); 2003<br />
Chevrolet Express, GMC Savana, Except<br />
with Left Side Door <str<strong>on</strong>g>and</str<strong>on</strong>g> Cutaway, Cube <str<strong>on</strong>g>and</str<strong>on</strong>g><br />
Cab-Chassis<br />
02-06-05-005; Exhaust/Muffler Heat<br />
Shield Rattle, Popping Noise Under Vehicle<br />
(Install Heat Shield Retaining Straps <strong>on</strong><br />
Muffler); 2002 Cadillac Escalade, GMC<br />
Denali with 5.3L or 6.0L Gas Engine (VINs<br />
T, N -- RPOs LM7, LQ9)<br />
TRANSMISSION/TRANSAXLE:<br />
02-07-30-032A; replaces 02-07-30-032;<br />
<str<strong>on</strong>g>All</str<strong>on</strong>g>is<strong>on</strong> Transmissi<strong>on</strong> C<strong>on</strong>trol Module<br />
FastLearn Procedure Update Required After<br />
Transmissi<strong>on</strong> Repairs; 2002-03 Chevrolet<br />
Silverado, GMC Sierra with <str<strong>on</strong>g>All</str<strong>on</strong>g>is<strong>on</strong> 1000<br />
Series Automatic Transmissi<strong>on</strong><br />
02-07-30-040; Difficult Shifting from Park<br />
to <str<strong>on</strong>g>Drive</str<strong>on</strong>g> Range (Replace Shift Indicator<br />
Slide within Floor C<strong>on</strong>sole); 2001-02 P<strong>on</strong>tiac<br />
Aztek<br />
02-07-30-042; <str<strong>on</strong>g>All</str<strong>on</strong>g>is<strong>on</strong> Transmissi<strong>on</strong><br />
Service Repairs; specified 2003 Chevrolet<br />
Kodiak <str<strong>on</strong>g>and</str<strong>on</strong>g> GMC TopKick models with<br />
<str<strong>on</strong>g>All</str<strong>on</strong>g>is<strong>on</strong> 1000-2400 Series Transmissi<strong>on</strong><br />
for use with a st<str<strong>on</strong>g>and</str<strong>on</strong>g>ard 1/2-inch drive<br />
extensi<strong>on</strong> <str<strong>on</strong>g>and</str<strong>on</strong>g> a ratchet or torque<br />
wrench.<br />
TIP: The bolt must already<br />
be tightened to the specified<br />
initial torque before final<br />
angle-tightening.<br />
Begin by turning the<br />
meter <strong>on</strong>; the last-set value<br />
will display. Use the<br />
up/down arrows to set the<br />
display to the desired angle<br />
value. The range is 0-199° in<br />
1° increments.<br />
Attach the meter to the<br />
1/2-inch extensi<strong>on</strong>, as close<br />
as practical to the socket,<br />
8<br />
02-07-30-043; <str<strong>on</strong>g>All</str<strong>on</strong>g>is<strong>on</strong> Transmissi<strong>on</strong><br />
Service Repairs; 2001-03 Chevrolet<br />
Silverado <str<strong>on</strong>g>and</str<strong>on</strong>g> GMC Sierra HD 2500 <str<strong>on</strong>g>and</str<strong>on</strong>g><br />
3500 with <str<strong>on</strong>g>All</str<strong>on</strong>g>is<strong>on</strong> 1000 Series Auto<br />
Transmissi<strong>on</strong> (RPO M74)<br />
02-7-30-048; Pressure C<strong>on</strong>trol Solenoid<br />
Replacement for 4T65-E, 4T40-E <str<strong>on</strong>g>and</str<strong>on</strong>g> 4T45-<br />
E Transaxle/Transmissi<strong>on</strong>; specified 2000-03<br />
vehicles with RPO Codes MN4, MN5, M13,<br />
M15, MN3, MN7 OR M76<br />
BODY AND ACCESSORIES:<br />
02-08-42-005; Snowplow Roof Beac<strong>on</strong><br />
(Lamp) Inoperative (Install Bypass Harness);<br />
2003 Chevrolet Silverado, Suburban, Tahoe,<br />
GMC Sierra, Yuk<strong>on</strong>, XL with Snow Plow<br />
Provisi<strong>on</strong> (RPO VYU) <str<strong>on</strong>g>and</str<strong>on</strong>g> Roof Mounted<br />
Lamp Provisi<strong>on</strong>s (RPO TRW/5G4)<br />
02-08-44-018; Diagnostic Informati<strong>on</strong> for<br />
No Audio Out of Speakers <strong>on</strong> One or More<br />
Channels; 2003 Cadillac Escalade, Chevrolet<br />
Silverado, Suburban, Tahoe, GMC Sierra,<br />
Yuk<strong>on</strong>, XL, Hummer H2 with Premium<br />
Bose Sound Systems<br />
02-08-46-010A; replaces 02-08-46-010;<br />
Programming OnStar Module for Canadian<br />
French Voice Recogniti<strong>on</strong>; specified 2003<br />
Passenger Cars, LD Trucks, Hummer H2,<br />
with OnStar<br />
02-08-48-001; Stati<strong>on</strong>ary Glass Urethane<br />
Adhesives -- Additi<strong>on</strong>al Materials<br />
Recognized; 2003 <str<strong>on</strong>g>and</str<strong>on</strong>g> prior Passenger Cars<br />
<str<strong>on</strong>g>and</str<strong>on</strong>g> Trucks, 2003 Hummer H2<br />
02-08-49-004A; replaces 02-08-49-004;<br />
Instrument Panel Cluster (IPC) Gauges<br />
Read Zero at Times, Gauges Inop at Times<br />
(Reprogram (PC); 2002 Chevrolet TrailBlazer,<br />
EXT, GMC Envoy, XL, Oldsmobile Bravada<br />
02-08-63-003; Bumper Fascia Cover<br />
Retainers Pulling Out of Fascia (Trim<br />
Fascia); 2002-03 Chevrolet Avalanche<br />
02-08-64-022; Cycling Po<str<strong>on</strong>g>we</str<strong>on</strong>g>r Folding<br />
Mirror to Remain in Locked Positi<strong>on</strong> After<br />
Transport; 2003 LD Trucks with Po<str<strong>on</strong>g>we</str<strong>on</strong>g>r<br />
Folding Exterior Mirror (RPO DL3), Hummer<br />
H2 with Po<str<strong>on</strong>g>we</str<strong>on</strong>g>r Folding Exterior Mirror (RPO<br />
DL7)<br />
02-08-110-006; Revised Sunshade<br />
Replacement; 2002-03 Chevrolet TrailBlazer,<br />
EXT, GMC Envoy, XL, Oldsmobile Bravada<br />
02-08-127-001; Availability of Rear<br />
Parking Assist Sensor Service Harness;<br />
2001-03 Chevrolet Venture, Oldsmobile<br />
Silhouette, P<strong>on</strong>tiac M<strong>on</strong>tana<br />
using the spring-loaded clamp.<br />
Install the socket to the bolt. Without<br />
turning the bolt, apply pressure in the<br />
directi<strong>on</strong> of tightening to remove<br />
all free play from the wrench.<br />
Then press the On/Zero butt<strong>on</strong><br />
<str<strong>on</strong>g>and</str<strong>on</strong>g> hold until the meter sounds a<br />
short beep <str<strong>on</strong>g>and</str<strong>on</strong>g> flashes.<br />
Tighten the bolt. When the preset<br />
angle is reached, the meter<br />
sounds a l<strong>on</strong>g beep <str<strong>on</strong>g>and</str<strong>on</strong>g> flashes.<br />
After use, the meter will shut<br />
itself off within a minute to c<strong>on</strong>serve<br />
battery po<str<strong>on</strong>g>we</str<strong>on</strong>g>r.<br />
- Thanks to Tracy Flood <str<strong>on</strong>g>and</str<strong>on</strong>g> R<strong>on</strong><br />
Minoletti