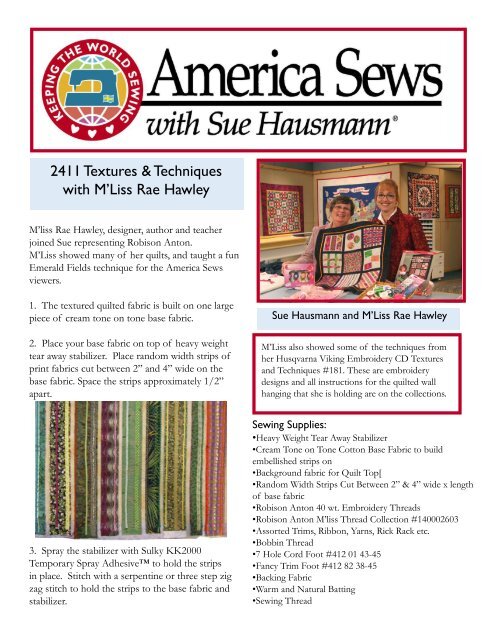
2411 Textures & Techniques with M'Liss Rae ... - Husqvarna Viking
2411 Textures & Techniques with M'Liss Rae ... - Husqvarna Viking
2411 Textures & Techniques with M'Liss Rae ... - Husqvarna Viking

You also want an ePaper? Increase the reach of your titles
YUMPU automatically turns print PDFs into web optimized ePapers that Google loves.
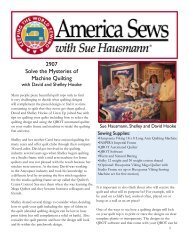
<strong>2411</strong> <strong>Textures</strong> & <strong>Techniques</strong><br />
<strong>with</strong> M’Liss <strong>Rae</strong> Hawley<br />
M’liss <strong>Rae</strong> Hawley, designer, author and teacher<br />
joined Sue representing Robison Anton.<br />
M’Liss showed many of her quilts, and taught a fun<br />
Emerald Fields technique for the America Sews<br />
viewers.<br />
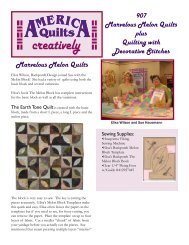
1. The textured quilted fabric is built on one large<br />
piece of cream tone on tone base fabric.<br />
2. Place your base fabric on top of heavy weight<br />
tear away stabilizer. Place random width strips of<br />
print fabrics cut between 2” and 4” wide on the<br />
base fabric. Space the strips approximately 1/2”<br />
apart.<br />
3. Spray the stabilizer <strong>with</strong> Sulky KK2000<br />
Temporary Spray Adhesive to hold the strips<br />
in place. Stitch <strong>with</strong> a serpentine or three step zig<br />
zag stitch to hold the strips to the base fabric and<br />
stabilizer.<br />
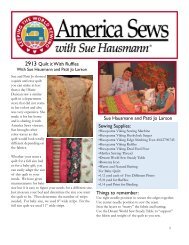
Sue Hausmann and M’Liss <strong>Rae</strong> Hawley<br />
M’Liss also showed some of the techniques from<br />
her <strong>Husqvarna</strong> <strong>Viking</strong> Embroidery CD <strong>Textures</strong><br />
and <strong>Techniques</strong> #181. These are embroidery<br />
designs and all instructions for the quilted wall<br />
hanging that she is holding are on the collections.<br />
Sewing Supplies:<br />
•Heavy Weight Tear Away Stabilizer<br />
•Cream Tone on Tone Cotton Base Fabric to build<br />
embellished strips on<br />
•Background fabric for Quilt Top[<br />
•Random Width Strips Cut Between 2” & 4” wide x length<br />
of base fabric<br />
•Robison Anton 40 wt. Embroidery Threads<br />
•Robison Anton M’liss Thread Collection #140002603<br />
•Assorted Trims, Ribbon, Yarns, Rick Rack etc.<br />
•Bobbin Thread<br />
•7 Hole Cord Foot #412 01 43-45<br />
•Fancy Trim Foot #412 82 38-45<br />
•Backing Fabric<br />
•Warm and Natural Batting<br />
•Sewing Thread
4. Thread <strong>with</strong> decorative thread on top and<br />
bobbin thread in the bobbin. Stitch decorative<br />
stitching along the strips. Snap on your Fancy Trim<br />
Foot. Add ribbons, Rick Rack trims etc. along the<br />
strips. Snap on the 7 Hole Cord Foot. Thread <strong>with</strong><br />
cords and select a decorative stitch. Stitch over the<br />
cords. M’Liss uses a large assortment of different<br />
types and colors of Robison Anton threads,<br />
metallic threads, heavier weight threads, Variegated,<br />
Twister Tweeds and more! Embellish the strips.<br />
5. Use a rotary cutter, mat and ruler to cut the<br />
embellished fabric cutting across the strip to create<br />
strips, approximately 2” wide. Leave the stabilizer<br />
on the back.<br />
6. Lay the strips on the vase fabric. Layer <strong>with</strong><br />
backing and batting fabric. Add borders. M’Liss<br />
used a print for the background fabric <strong>with</strong> an off<br />
white background and fl owers. It added a nice<br />
contrast to the embellished strips.<br />
7. Using a serpentine or three step zig zag, stitch<br />
the strips in place onto the background fabric<br />
through all the layers.<br />
8. Add cords, couching, ribbons, etc. to hold them<br />
onto the background fabric. Leave the tails hanging.<br />
9. Bind the quilt as desired. For instructions on<br />
binding a quilt, go to www.husqvarnaviking.com,<br />
USA, Education, Tips and Hints.<br />
Thanks to the underwriter:<br />
www.robisonanton.com
<strong>2411</strong> Quick Project<br />
Laptop Case<br />
<strong>with</strong> Nancy Estep<br />
Nancy Estep, <strong>Husqvarna</strong> <strong>Viking</strong> Educator joined<br />
Sue and M’Liss <strong>with</strong> a case for a laptop computer.<br />
You could also use it as a book bag or purse as well!<br />
Cut:<br />
One of each piece below from Fashion fabric, one<br />
from lining and one from batting:<br />
16” x 14” for front - curve bottom corners<br />
16” x 14” back - curve bottom corners<br />
41” x 4” for sides/bottom<br />
16” x 10” for back pocket –<br />
One piece 16” along top, cut 9” down on left side,<br />
13 ½” down on right side and connect at angle<br />
along the bottom from the left and right sides for<br />
fl ap.<br />
Handle: cut one from fashion fabric and one from<br />
batting 40” x 2”<br />
Cut one strip from lining fabric 40” x 4”<br />
1 yard of ¼” piping from lining fabric or use<br />
purchased piping<br />
Sew:<br />
½” seam allowance allowed<br />
throughout<br />
1. On wrong side of fashion fabric<br />
spray lightly <strong>with</strong> KK2000 Temporary Spray<br />
Adhesive and secure batting to hold in place on<br />
the front, back, fl ap, pocket, and narrow strips for<br />
handles.<br />
2. Embellish the front fl ap of the bag <strong>with</strong> the<br />
embroidery of your choice if desired. Nancy<br />
chose a design that came on her Designer SE.<br />
Hoop Tear Easy Stabilizer. Thread <strong>with</strong> Robison<br />
Anton 40 wt. on top and bobbin thread in the<br />
bobbin. Select your embroidry design. Place<br />
your fl ap on the hooped stabilizer and touch FIX<br />
to baste the fl ap to the stabilizer. Embroider the<br />
Sue Hausmann, M’Liss <strong>Rae</strong> Hawley<br />
and Nancy Estep<br />
Sewing Supplies:<br />
•1 1/2 yards Fashion Fabric<br />
•1 1/2 yards lining<br />
•Warm and Natural Batting<br />
•<strong>Husqvarna</strong> <strong>Viking</strong> Sewing/Embroidery Machine<br />
•Sulky KK2000 Temporary Spray Adhesive<br />
•Steam-A-Seam 2<br />
•Single Welt Cord Foot #412 62 70-45<br />
•Clear Seam Guide Foot #413 03 48-45<br />
•Edge Stitching Foot #412 79 67-45<br />
•Cotton Cable Cord for piping or purchased Maxi<br />
Piping<br />
•Sulky Tear Easy Stabilizer<br />
•Robison Anton 40 wt. Embroidery Thread<br />
•Bobbin Thread
design.<br />
3. Make piping from strips of fabric or use<br />
purchased piping. Snap on your Single Welt Cord<br />
Foot and stitch piping along the top of the back<br />
pocket section (16” edge).<br />
4. Place the lining right sides together <strong>with</strong> the<br />
pocket piece and stitch along the top of pocket,<br />
leaving the sides and bottom open. Turn and press.<br />
5. Place the lining side of the pocket onto the right<br />
side of the back piece and baste along the sides and<br />
bottom matching the raw edges.<br />
6. place the front and side bottom piece right sides<br />
together <strong>with</strong> the side and bottom edges of the<br />
back and sew along the sides and bottom, clipping<br />
where necessary. Turn and press.<br />
7. Stitch piping along the bottom of right side of<br />
the front fl ap<br />
8. Place fl ap front and lining right sides together<br />
and sew the sides and bottom piped edges leaving<br />
upper edge open. Turn and press.<br />
9. Pin fl ap to back section right side of front fl ap<br />
top edge to right side of back top edge and baste in<br />
place.<br />
Handles:<br />
1. With wrong sides together place narrow handle<br />
section in the center of the wider section. Fold the<br />
long edges of the wider piece ½” to the wrong side,<br />
press and fold ½” again over the handle. Place<br />
Steam-A-Seam 2 along the edges and press to fuse<br />
in place.<br />
2. Snap on your Edge Stitching Foot and topstitch.<br />
Place the handles on top edges of the front and side<br />
bottom pieces of bag and center, having raw edges<br />
even and baste.<br />
3. Construct lining the same as bag section. With<br />
right sides together place bag inside of lining and<br />
sew around the top leaving a section open along the<br />
back edge to turn bag.<br />
4. After turning press and insert Steam-A-Seam 2<br />
in the opening. Press <strong>with</strong> steam to fuse.<br />
Thanks to the underwriter<br />
of our Quick Project:<br />
www.robison-anton.com
![[pdf] husqvarna viking sewing machine stitch comparison chart](https://img.yumpu.com/11869478/1/190x146/pdf-husqvarna-viking-sewing-machine-stitch-comparison-chart.jpg?quality=85)