LTI 20.20 TS/M SPEEDSCOPE - Tele-Traffic
LTI 20.20 TS/M SPEEDSCOPE - Tele-Traffic
LTI 20.20 TS/M SPEEDSCOPE - Tele-Traffic

You also want an ePaper? Increase the reach of your titles
YUMPU automatically turns print PDFs into web optimized ePapers that Google loves.
TELE - TRAFFIC (UK)<br />
LIMITED<br />
<strong>LTI</strong> <strong>20.20</strong> <strong>TS</strong>/M<br />
<strong>SPEEDSCOPE</strong><br />
OPERATIONS MANUAL<br />
2008<br />
<strong>Tele</strong>-<strong>Traffic</strong> (UK) Limited<br />
LaserTec Centre<br />
B2 Harris Road<br />
Warwick CV34 5JU<br />
Tel No. 01926 407272<br />
Fax No. 01926 407977<br />
Email: tt@teletraffic.co.uk<br />
www.teletrafficuk.com<br />
OPERATIONS MANUAL<br />
<strong>LTI</strong> <strong>20.20</strong> <strong>TS</strong>/M<br />
<strong>SPEEDSCOPE</strong><br />
HAND HELD SPEED MEASUREMENT<br />
EQUIPMENT<br />
© Copyright – <strong>Tele</strong>-<strong>Traffic</strong> (UK) Limited 2004
INTRODUCTION<br />
Following the recommendation of the Road <strong>Traffic</strong> Law Review and the subsequent<br />
provisions in the Road <strong>Traffic</strong> Act 1991, speed detection devices used for road traffic<br />
enforcement are required to be type approved by the Secretary of State.<br />
The Road <strong>Traffic</strong> Offenders (Prescribed Devices) Order 1993 prescribed devices<br />
'designed or adapted for recording a measurement of the speed of motor vehicles<br />
activated by means of a light beam or beams'. In plain terms this means light beam<br />
or laser devices.<br />
Following a period of rigorous testing and evaluation the <strong>LTI</strong> <strong>20.20</strong> <strong>TS</strong>/M<br />
Speedscope was type approved by the Secretary of State on 20 th March 1996.<br />
(ROAD TRAFFIC - Light Beam Speed Measuring Device Approval 1993).<br />
During the testing procedures the device was found to have a theoretical accuracy in<br />
its laser speed measuring mode of +/- 0.35km/h which in any practical operational<br />
sense equates to +/- 0mph.<br />
In addition to its laser speed measuring function the device will also measure and<br />
display a range to target, a facility which can be utilised for other measuring<br />
requirements. It also has a function which allows the measurement of speed by<br />
time/distance using a pre-fed check distance provided by the laser facility.<br />
The device is capable of enhancement by a series of peripherals. These include<br />
download of data into a data collector, video capture of offences to video film and<br />
prints for hard evidence.<br />
All these options utilise the standard <strong>LTI</strong> <strong>20.20</strong> <strong>TS</strong>/M Speedscope for the measuring<br />
device.<br />
This Operations Manual has been designed to meet the requirements of the <strong>Traffic</strong><br />
Committee of the Association of Chief Police Officers and will provide all the detail<br />
that a trainer will need.<br />
© Copyright – <strong>Tele</strong>-<strong>Traffic</strong> (UK) Limited 2004
CONTEN<strong>TS</strong><br />
SECTION 1 LASERS – A TECHNICAL DESCRIPTION 2<br />
Lasers: An Overview 3<br />
Lasers as Applied to Velocity Measurement 4<br />
Eye Safety 4<br />
SECTION 2 <strong>LTI</strong> <strong>20.20</strong> <strong>SPEEDSCOPE</strong> 5<br />
Equipment Description 6<br />
SECTION 3 SIGHTING SCOPE 8<br />
Alignment 9<br />
Alignment Test 9<br />
Realignment 10<br />
Scope Filter 10<br />
SECTION 4 SET UP 11<br />
Line of Sight 12<br />
Angular (Cosine) Effect 12<br />
SECTION 5 OPERATION 16<br />
Instrument Confidence Check<br />
17<br />
Calibration 17<br />
Speed Measurement by Laser 18<br />
Line of Sight 19<br />
Trapping of Erroneous Readings (Laser Mode) 19<br />
Operational Handling Techniques 20<br />
Speed Measurement using Time/Distance<br />
between Two Points 22<br />
Trapping of Erroneous Readings (Timing Mode) 25<br />
Set Up - A Check List 26<br />
SECTION 6 MAINTENANCE 27<br />
SECTION 7 SPECIFICATIONS 29<br />
- 1 -<br />
© Copyright – <strong>Tele</strong>-<strong>Traffic</strong> (UK) Limited 2004
SECTION 1<br />
LASERS - A TECHNICAL DESCRIPTION<br />
CONTEN<strong>TS</strong>:<br />
Lasers<br />
Lasers as Applied to Velocity Measurement<br />
Eye Safety<br />
- 2 -<br />
© Copyright – <strong>Tele</strong>-<strong>Traffic</strong> (UK) Limited 2004
LASERS: AN OVERVIEW<br />
Light is a form of electromagnetic radiation the same as radio and microwaves. The<br />
difference is that light has a much higher frequency than either radio or microwaves.<br />
The light emitted by a laser is no different from that emitted by any other source but a<br />
LASER has a unique method of generating light.<br />
The word LASER is actually an acronym that stands for "Light Amplification by<br />
Stimulated Emission of Radiation". In its simplest form a LASER is made by<br />
sandwiching a piece of active material, the lasing medium, between two mirrors. The<br />
two mirrors and the lasing medium form an optical resonator that allows the<br />
generation of laser light. The atoms of the lasing medium are put into an excited<br />
state by an external energy source. That is they are made to store some of the energy.<br />
The atoms can be made to give up this stored energy as a light wave when another<br />
light wave interacts with the atoms. By making sure that the two mirrors are<br />
positioned exactly the right distance apart, the light that bounces back and forth forms<br />
a standing wave. Under these conditions the light waves emitted by the atoms of the<br />
lasing medium combine to increase the strength of the standing wave. Just having<br />
the light going back and forth in the optical resonator is not particularly useful in<br />
itself. So one of the mirrors is designed to allow a portion of the light to escape.<br />
LASERS can be made from a great many different materials including solids, liquids<br />
and gases. Also the design of the optical resonator and the method of exciting and<br />
lasing mediums can vary widely. But whatever form the laser takes the light is<br />
generated by the same basic mechanism.<br />
The type of LASER used in the <strong>LTI</strong> <strong>20.20</strong> <strong>TS</strong>/M Speedscope is an infrared semiconductor<br />
laser diode. The laser diode has several important properties that make it<br />
the ideal choice for speed measurement purposes:<br />
1. The laser diode emits a narrow cone of radiation from a very<br />
small area. This allows the light to be collimated into the<br />
very narrow beam that gives the <strong>LTI</strong> <strong>20.20</strong> <strong>TS</strong>/M<br />
Speedscope pin-point targeting.<br />
2. The laser diode switches on and off extremely quickly<br />
typically in less than one billionth of a second. This gives<br />
the <strong>LTI</strong> <strong>20.20</strong> <strong>TS</strong>/M Speedscope superior accuracy.<br />
3. Like all LASERS the laser diode emits only a very narrow<br />
band of frequencies. This allows the detector to be "tuned" to<br />
the exact wavelength of the laser diode. This is why the <strong>LTI</strong><br />
<strong>20.20</strong> <strong>TS</strong>/M Speedscope can operate during daytime when<br />
there is a lot of background radiation from the sun. (The<br />
instrument sees laser light, all other radiation is filtered out.)<br />
- 3 -<br />
© Copyright – <strong>Tele</strong>-<strong>Traffic</strong> (UK) Limited 2004
4. The laser diode emits in the infrared position of the<br />
electromagnetic spectrum so it is invisible to the human eye<br />
and cannot be a distraction to operators of vehicles.<br />
LASERS AS APPLIED TO VELOCITY MEASUREMENT<br />
PRINCIPLE OF OPERATION<br />
The <strong>LTI</strong> <strong>20.20</strong> <strong>TS</strong>/M Speedscope determines speed by measuring the time of flight<br />
of very short pulses of infrared light. This method is fundamentally different from<br />
Doppler frequency shift measurements and in its simplest form can be described as<br />
follows.<br />
Since the speed of light is a constant, the time it takes the LASER pulse to travel to<br />
the target and back is directly proportional to the distance to the target. By firing two<br />
pulses a known time apart two distances can be calculated. The change in distance<br />
divided by the time interval between the two pulses gives the speed of the target.<br />
In theory it is possible to make a speed measurement using only two pulses as<br />
described above. In practice this would be prone to errors such as a shift of the<br />
aiming point between pulses. To eliminate the possibility of such errors independent<br />
tests are applied to the pulse data and failure of any one of the tests results in an error<br />
being displayed. The actual speed calculation that the <strong>LTI</strong> <strong>20.20</strong> <strong>TS</strong>/M Speedscope<br />
uses is not the simple distance divided by time formula outlined above. The distance<br />
to the target is not used and the target speed is derived from the entire data set using<br />
the method of least squares. This gives the best possible result and the least chance<br />
of errors.<br />
ADVANTAGES OF LASER SPEED MEASUREMENT<br />
The pulse measurement process used in the <strong>LTI</strong> <strong>20.20</strong> <strong>TS</strong>/M Speedscope is<br />
inherently superior to the Doppler process used in radar guns. This is because the<br />
target speed is measured directly from the change in position of the target rather than<br />
by inference from a Doppler frequency shift.<br />
So the <strong>LTI</strong> <strong>20.20</strong> <strong>TS</strong>/M Speedscope cannot be fooled by rotating or vibrating<br />
objects. Also the <strong>LTI</strong> <strong>20.20</strong> <strong>TS</strong>/M Speedscope can discriminate between<br />
approaching and departing targets and will give an accurate zero speed for stationary<br />
targets.<br />
EYE SAFETY<br />
The <strong>LTI</strong> <strong>20.20</strong> <strong>TS</strong>/M Speedscope is designed to meet stringent eye safety<br />
requirements and is classified as eye-safe to Class 1 limits. This means that there can<br />
be no risk of damage to the eye even after nearly three hours of continuous exposure.<br />
To comply with these limits the radiated light power must be extremely low. By<br />
comparison the <strong>LTI</strong> <strong>20.20</strong> <strong>TS</strong>/M Speedscope outputs only one twentieth the light<br />
power of the typical TV remote control.<br />
- 4 -<br />
© Copyright – <strong>Tele</strong>-<strong>Traffic</strong> (UK) Limited 2004
SECTION 2<br />
<strong>LTI</strong> <strong>20.20</strong> <strong>TS</strong>/M<br />
<strong>SPEEDSCOPE</strong><br />
CONTEN<strong>TS</strong>:<br />
Equipment Description<br />
- 5 –<br />
© Copyright – <strong>Tele</strong>-<strong>Traffic</strong> (UK) Limited 2004
EQUIPMENT DESCRIPTION<br />
The <strong>LTI</strong> <strong>20.20</strong> <strong>TS</strong>/M Speedscope is a hand held device some 205mm x 130mm x<br />
88mm and weighing approximately 2kg.<br />
On the top of the equipment is a sighting scope with a polaroid filter on the front to<br />
assist the operator in variable light conditions.<br />
On the bottom is a pistol grip containing the trigger mechanism.<br />
It is powered by a 12v Dc source from a supplied battery.<br />
At the rear is the control panel containing the function and control switches i.e.<br />
Power on/off, Display Intensity, Test Mode, Timing Mode and Speed/Range.<br />
The readout display is also located on this face together with a serial port which<br />
facilitates connection to the peripheral equipment.<br />
The device is calibrated in miles per hour and metres but can be re-calibrated by the<br />
supplier to any unit of measurement of Speed/Range.<br />
On the front face are two lenses which transmit the laser beam and receive the return<br />
signal.<br />
Further technical details can be found on the data sheet at page 30 of this manual.<br />
The sighting scope mounted on the top of the device contains within it a red dot<br />
which is aligned with the beam and in use is placed by the operator on the target<br />
vehicle, thus ensuring that the beam hits only the target vehicle.<br />
The ‘red dot’ is only visible to the operator and cannot be seen by and does not<br />
physically appear on the target vehicle. It is an optical effect for the operator only.<br />
The laser pulse method of measurement can best be described as follows:<br />
Upon sighting the target the operator presses the trigger<br />
and activates a short burst of pulses which strike the<br />
target and provide a return signal having taken a<br />
number of measurements in a matter of milliseconds.<br />
The software in the <strong>LTI</strong> <strong>20.20</strong> <strong>TS</strong>/M Speedscope then<br />
constructs a profile of these measurements and makes<br />
comparisons to ensure consistency. If the<br />
measurements are consistent then the device will<br />
provide a speed and range reading in 0.3 seconds.<br />
- 6 -<br />
© Copyright – <strong>Tele</strong>-<strong>Traffic</strong> (UK) Limited 2004
If any inconsistencies are found the software will trap<br />
the error and display only an error reading. It will not<br />
display a spurious or false reading.<br />
- 7 -<br />
© Copyright – <strong>Tele</strong>-<strong>Traffic</strong> (UK) Limited 2004
SECTION 3<br />
SIGHTING SCOPE<br />
CONTEN<strong>TS</strong>:<br />
Alignment<br />
Alignment Test<br />
Realignment<br />
Scope Filter<br />
- 8 -<br />
© Copyright – <strong>Tele</strong>-<strong>Traffic</strong> (UK) Limited 2004
SCOPE ALIGNMENT<br />
Scope alignment is set at the factory. The only reason the scope might ever go out of<br />
alignment would be from a heavy blow. Because verification of proper alignment is<br />
critical to intrument operation a test has been incorporated into the instrument. By<br />
following this test procedure the operator of the instrument can verify that the<br />
instrument's light beam is hitting the sighted target.<br />
For evidential purposes it is recommended that this check is carried out at each<br />
enforcement session.<br />
SCOPE ALIGNMENT TEST<br />
A) Put the intrument in test mode by pressing the test<br />
button on the back panel of the instrument. The<br />
display will read "tt".<br />
B) Select a target not less than 50 metres away. The<br />
instrument will emit an audible tone when the<br />
instrument trigger is depressed which will change<br />
pitch when the laser beam acquires a target. (A<br />
telephone pole is an excellent target because you can<br />
aim the instrument skyward eliminating anything in the<br />
background to interfere with the test.)<br />
C) When scanning across the telephone pole the highest<br />
pitch or "on target" tone will be heard when the<br />
instrument's laser beam is hitting the pole. At this<br />
point the red dot in the scope should be centred on<br />
the test target (telephone pole). This same<br />
procedure should be followed both vertically and<br />
horizontally. This test ensures the accuracy of the<br />
targeting mechanics in the <strong>LTI</strong> <strong>20.20</strong> <strong>TS</strong>/M<br />
Speedscope.<br />
D) In the unlikely event that the scope goes out of<br />
alignment refer to the following instructions to<br />
realign the scope.<br />
- 9 -<br />
© Copyright – <strong>Tele</strong>-<strong>Traffic</strong> (UK) Limited 2004
REALIGNMENT OF SCOPE<br />
A) Remove the elevation and windage caps. Put the Laser<br />
Speed Detector in test mode.<br />
B) With the LASER rested on a tripod support sight a<br />
small target at least 200 metres away by scanning the<br />
LASER until you hear the "on target" tone both<br />
horizontally and vertically.<br />
C) Sight through the scope and use the elevation and<br />
windage adjustment screws to move the red aiming<br />
dot to the same target.<br />
� To move the point of impact up, turn the<br />
elevation adjustment screw clockwise and vice versa<br />
to move the point of impact down.<br />
� To move the point of impact to the left turn the<br />
windage adjustment screw clockwise and vice versa<br />
to move the point of impact to the right.<br />
D) Use the test mode in the Laser Speed Detector to<br />
double check the new alignment.<br />
E) Replace the elevation and windage caps.<br />
SCOPE FILTER<br />
The scope filter adjusts for brightness and contrast providing maximum versatility<br />
during extreme light conditions.<br />
- 10 -<br />
© Copyright – <strong>Tele</strong>-<strong>Traffic</strong> (UK) Limited 2004
SECTION 4<br />
SET UP<br />
CONTEN<strong>TS</strong>:<br />
Line of Sight<br />
Angular (Cosine) Effect<br />
- 11 -<br />
© Copyright – <strong>Tele</strong>-<strong>Traffic</strong> (UK) Limited 2004
SET UP<br />
In setting up to use the Laser Speed Detector it is important to keep two parameters in<br />
mind for proper use of the instrument. These two parameters are as follows:<br />
1. Clear line of sight to the section of roadway at which<br />
you will be targeting traffic.<br />
2. Setting up to minimise the angular or cosine effect.<br />
This process is identical to what you are accustomed to<br />
in setting up to use radar instruments.<br />
LINE OF SIGHT<br />
While setting up it is important that a position be chosen which has a clear view to the<br />
section of road that will be targeted. It is important that no trees, telephone poles,<br />
buildings, etc. are situated between the instrument and the section of the road that will<br />
be targeted.<br />
ANGULAR OR COSINE CONSIDERATIONS<br />
The angular or cosine effect on the laser is identical to the manner in which<br />
radar is affected. Therefore set up to minimise this effect will be the same as it is<br />
with radar. Those not familiar with the angular or cosine effect should study this<br />
section very thoroughly. One item that should be emphasised here is that it is<br />
important to keep a constant aiming point or in other words keep the ‘red dot’ just<br />
above the aiming area of the vehicle for the full 0.3 second measurement period. If<br />
the aiming point is not kept constant the instrument will produce an error reading thus<br />
eliminating operator error.<br />
If a target vehicle is moving directly toward or away from the laser the velocity<br />
calculation as measured by the laser will be equal to true speed of the target vehicle.<br />
Very often however this is not the case. For safety reasons thelaser will usually be<br />
set up a short distance from the travelled portion of the road. Therefore vehicles<br />
travelling along the roadway will not be heading directly toward or away from the<br />
laser - in other words some angle between the direction of travel of the vehicle<br />
and the position of the laser is created.<br />
- 12 -<br />
© Copyright – <strong>Tele</strong>-<strong>Traffic</strong> (UK) Limited 2004
When a target vehicle's direction of travel creates a significant angle with the position<br />
of the laser the relative speed will be less than the true speed. Since the time/distance<br />
calculation is based on the relative speed the laser speed measurement may be less<br />
than the true speed of the vehicle. This is known as the angular or cosine effect.<br />
(Cosine is a trigonometric function related to this principle.)<br />
The difference between the measured and true speeds depends upon the angle<br />
between the ideal location for the laser (the point at which the vehicle would be<br />
moving directly toward or away from the laser) and the actual position of the laser.<br />
© Copyright – <strong>Tele</strong>-<strong>Traffic</strong> (UK) Limited 2004<br />
10º<br />
20º<br />
40º<br />
70º<br />
<strong>LTI</strong> <strong>20.20</strong><br />
The larger the angle the lower the measured speed. This effect always works to<br />
the advantage of the driver of the vehicle.<br />
Loosely speaking the angular effect is not significant as long as the angle itself<br />
remains small. The following table indicates how laser speed measurement can<br />
differ from true speed as a function of angle.<br />
As can be seen in this table the angular effect does not become a factor until the angle<br />
reaches about 10°. When a target vehicle passes by at a 90° angle the laser is unable<br />
to perceive any of its speed because at an angle of 90° the target is getting neither<br />
closer to nor farther away from the laser. This can best be understood by imagining a<br />
target vehicle being driven in a perfect circle around a laser unit. Because the vehicle<br />
is getting neither closer to nor farther from the laser there is no way to measure<br />
time/distance. Because the distance part of the equation is not changing the speed<br />
measurement reading becomes "0".<br />
- 13 -<br />
90º
TRUE SPEED AS AFFECTED BY ANGULAR EFFECT<br />
(COSINE)<br />
TRUE SPEED (mph) 30 50 60 80 100 110<br />
_____________________________________________________<br />
ANGLE TO<br />
TARGET<br />
0° 30 50 60 80 100 110<br />
1° 29.99 49.99 59.99 79.99 99.99 109.99<br />
3° 29.96 49.93 59.92 79.88 99.86 109.84<br />
5° 29.89 49.81 59.77 79.69 99.62 109.57<br />
10° 29.54 49.24 59.09 78.78 98.48 108.33<br />
15° 28.98 48.30 57.94 77.28 96.58 106.24<br />
20° 28.19 46.99 56.38 75.18 93.97 103.36<br />
45° 21.21 35.36 42.43 56.57 70.71 77.78<br />
90° 00.00 00.00 00.00 00.00 00.00 00.00<br />
______________________________________________________<br />
As can be seen in this table the angle effect is negligible until 10° is exceeded.<br />
The angular effect decreases as the range to the target vehicle increases. At the<br />
maximum range of the LASER the vehicle is so far away the angle that exists<br />
between it and the LASER unit is very small and thus the perception of the LASER of<br />
the target speed is identical to its true speed. As the target vehicle approaches the<br />
LASER unit the angle between them increases. As soon as this angle becomes large<br />
enough the LASER unit will perceive the speed of the target as less than it really is.<br />
To minimise the angular effect on the LASER the angle should be kept small by<br />
setting up the LASER as close to the road as possible without creating safety risks.<br />
The LASER should be targeted down the road at sufficient ranges so as not to create<br />
an angular effect.<br />
For practical application the following chart is provided to indicate acceptable<br />
parameters for setup to minimise the angular effect. Given the distance the LASER<br />
is setup from the roadway and the range to the target vehicle, the following chart<br />
indicates the decrease in target speed from true speed. Multiplying the true speed by<br />
the appropriate number found in the chart will give you the resulting target speed.<br />
- 14 -<br />
© Copyright – <strong>Tele</strong>-<strong>Traffic</strong> (UK) Limited 2004
RANGE TO TARGET<br />
VEHICLE IN METRES 30 100 150 300 600<br />
_____________________________________________________<br />
SETUP DISTANCE<br />
FROM ROADWAY<br />
IN METRES<br />
3 .9950 .9995 .9998 .9999 1.0000<br />
10 .9682 .9950 .9987 .9997 .9999<br />
15 .8660 .9886 .9950 .9987 .9997<br />
30 .0000 .9539 .9798 .9950 .9987<br />
60 .0000 .7999 .9165 .9798 .9950<br />
_____________________________________________________<br />
The diagonal created by bold faced numbers provides a boundary showing acceptable<br />
parameters v. unacceptable parameters. Everything above the diagonal represents<br />
acceptable parameters. Parameters below the diagonal begin to produce errors that<br />
would be unacceptable.<br />
It should be stressed again that with the LASER the angular or cosine effect is always<br />
to the advantage of the driver of the vehicle.<br />
- 15 -<br />
© Copyright – <strong>Tele</strong>-<strong>Traffic</strong> (UK) Limited 2004
SECTION 5<br />
OPERATION<br />
CONTEN<strong>TS</strong>:<br />
Instrument Confidence Check<br />
Calibration<br />
Speed Measurement by Laser<br />
Line of Sight<br />
Trapping of Erroneous Readings (Laser Mode)<br />
Operational Handling Techniques<br />
Speed Measurement using Time/Distance between Two Points<br />
Trapping of Erroneous Readings (Timing Mode)<br />
Set Up - A Check List<br />
- 16 -<br />
© Copyright – <strong>Tele</strong>-<strong>Traffic</strong> (UK) Limited 2004
OPERATION<br />
Operational procedures are as follows:<br />
INSTRUMENT CONFIDENCE CHECK<br />
Using the on/off switch on the back panel of the instrument turn the instrument on.<br />
A) SELF TEST<br />
When the instrument is initialised it puts itself through a<br />
self check. The Microcontroller in the instrument<br />
interrogates each circuit board. If everything tests<br />
positive the instrument display will go from "8.8.8.8." to<br />
dashes, i.e. "- - - -". If the instrument does not test positive,<br />
an error message (E 50) will appear in the display. If an<br />
error message does appear double check your power<br />
source. If the power source is not the problem contact<br />
<strong>Tele</strong>-<strong>Traffic</strong> (UK) Limited for assistance.<br />
B) DISPLAY TEST<br />
To test that all segments of the display are functioning<br />
properly press the "test" button and keep it depressed.<br />
When this button is pressed all segments of the display<br />
will light up with "8.8.8.8.". If any segment of the<br />
display is not functioning properly a flaw will be evident<br />
in one of the numbers displayed. If there is a problem<br />
the display will have to be replaced.<br />
CALIBRATION<br />
Because a radio frequency is not used there is nothing in the instrument that can drift<br />
out of frequency. Therefore the tests mentioned above and the scope alignment<br />
test represent the majority of the calibration required. The speed calculations are<br />
referred to a crystal control time base which is guaranteed to have less than 100 parts<br />
per million (PPM) error over the full operating temperature of the<br />
instrument. Therefore additional calibration is not necessary but if verification of<br />
calibration is desired the following steps can be followed to verify proper calibration<br />
of the range and timing accuracy of the instrument. These two functions are the two<br />
elements that calculate the speed measurement.<br />
- 17 -<br />
© Copyright – <strong>Tele</strong>-<strong>Traffic</strong> (UK) Limited 2004
This can be done by following the procedures listed below:<br />
a. Establish a known distance between two stationary<br />
points. For example this could be done with a metal<br />
tape measuring between a designated point on which the<br />
operator will stand and a sign or a telephone pole. The<br />
ranging accuracy of the Laser can be checked by having<br />
the operator stand on the designated point, aim the Laser<br />
at the target (whether it be a sign or telephone pole) pull<br />
the trigger and a "0" reading should be displayed for the<br />
speed measurement. By pressing the speed/range button the<br />
Laser should then display the correct distance.<br />
The timing accuracy of the instrument is verified by the<br />
"0" speed measurement. An accurate "0" reading of a<br />
stationary target is identical in nature to an accurate<br />
50mph reading of a moving vehicle.<br />
By verifying the ranging and timing accuracy of the<br />
instrument with the above test the two elements used to<br />
measure velocity have been checked and proper "calibration"<br />
is verified.<br />
b. If additional verification is desired the instrument can<br />
be checked against a calibrated speedometer by shooting a<br />
stationary target from a moving vehicle and comparing the<br />
speedometer of the vehicle against the Laser. The stationary<br />
target is subject to the normal cosine error limitations and<br />
must be within a 10° angle off the road.<br />
The <strong>LTI</strong> <strong>20.20</strong> <strong>TS</strong>/M Speedscope is not susceptible to radio frequencies and electromagnetic<br />
interference, therefore, checks are not required (as with radar) to identify<br />
such potential problems.<br />
SPEED MEASUREMENT BY LASER<br />
To measure the velocity of a vehicle using LASER follow the procedure below:<br />
• Aim the Laser at the registration plate area of the target<br />
vehicle.<br />
• Pull the trigger.<br />
- 18 -<br />
© Copyright – <strong>Tele</strong>-<strong>Traffic</strong> (UK) Limited 2004
• Keep the Laser sighted on the target vehicle for<br />
approximately 0.3 second until a beep is heard which indicates the<br />
speed has<br />
been recorded. It is very important that the aiming point<br />
remains constant for the entire 0.3 second measurement<br />
period.<br />
If the Laser moves off the target during this time the instrument will produce an error<br />
reading.<br />
• A digital readout of the speed will then be displayed on the<br />
back panel of the instrument.<br />
• This readout will remain on the display until the trigger is<br />
squeezed again or until the instrument is turned off.<br />
There is no waiting period required between speed measurements, therefore if<br />
multiple readings are desired you simply keep the instrument sighted on the target<br />
vehicle and squeeze the trigger again. As many as 3 readings per second are<br />
possible.<br />
LINE OF SIGHT<br />
An important requirement of the Laser Speed Detector that must be adhered to at all<br />
times is that the operator must have a clear line of sight to the target vehicle. It is<br />
important that nothing intersects the Laser beam as it travels between the<br />
instrument and the target. If at any time an object does intersect the beam while a<br />
velocity measurement is being taken the instrument will display an error message.<br />
TRAPPING OF ERRONEOUS READINGS<br />
Various hardware and software traps have been incorporated into the instrument that<br />
make it very difficult to produce an erroneous reading. If anything intersects the<br />
beam of the instrument while a speed measurement is being taken the instrument will<br />
detect the intrusion and an error message will be displayed. Other improper uses of<br />
the instrument will result in error readings for example:<br />
A) In the unlikely event that a car or a telephone pole was to pass<br />
between the instrument and the target vehicle during the 0.3<br />
second required to measure the speed the instrument would<br />
display an error message.<br />
B) If during the 0.3 second measurement period the instrument is<br />
panned off the target vehicle the instrument would display an<br />
error message.<br />
- 19 -<br />
© Copyright – <strong>Tele</strong>-<strong>Traffic</strong> (UK) Limited 2004
Error messages and their definitions are as follows:<br />
E01 The target was out of range or was too close.<br />
EO2 Lost the target due to a beam interruption or the<br />
target goes out of range.<br />
E03 Unstable reading due to poor aiming or panning off the<br />
target.<br />
DOF-Indicates a measurement over the maximum set<br />
measurement distance, i.e. 999.9 metres.<br />
LOB-Indicates low Battery and the <strong>LTI</strong> will stop working.<br />
OPERATIONAL HANDLING TECHNIQUES<br />
The time required to take a good reading is 0.3 second and although this seems small<br />
a certain steadiness of hand is necessary to hold the device steady for that period. It<br />
is a skill that is easily acquired with practise but it does require the development of a<br />
personal technique.<br />
It is recommended that the provided shoulder rest is used and a position similar to that<br />
of holding a rifle is adopted. Some operators may find, however, that resting it on<br />
the crook of the other arm is an alternative approach.<br />
Adopt a firm stance.<br />
In the same way as using a firearm do not tense but try to adopt a relaxed but firm<br />
grip.<br />
Try to allow the target to track into your sight without sudden or abrupt panning of<br />
the device.<br />
Identify clearly in your mind the difference between the audible note emitted for an<br />
error reading and that for a good reading. In the event of an error reading try again as<br />
soon as possible. Remember that you can theoretically take three readings a second.<br />
Try to aim the beam at as nearly vertical a surface on the target vehicle as possible<br />
and avoid the glass surfaces. The best area to aim for is in the vicinity of the<br />
registration plate. This is not because of the reflective properties (although that helps<br />
marginally) but because it is usually nearly vertical. The further from the vertical the<br />
more probable an error reading is likely to be generated.<br />
- 20 -<br />
© Copyright – <strong>Tele</strong>-<strong>Traffic</strong> (UK) Limited 2004
Once you have a good reading it is automatically locked in until you touch the trigger<br />
again. Pressing the Speed/Range function button will toggle the reading between<br />
speed and range. The speed readout will always be a steady display whilst the range<br />
will flash.<br />
The device can be used for targets travelling in either direction without any change of<br />
function. For approaching targets the speed will display as a positive figure whilst<br />
for receding traffic the speed display will be preceded by a negative ( - ) sign. The<br />
range function remains the same.<br />
In accordance with current ACPO Code of Practice the equipment should not be<br />
used through glass.<br />
Operators will find the range at which they are most comfortable but the operational<br />
range approximates to 1 kilometre. In practical terms you should have no difficulty<br />
in acquiring targets at 600 - 700 metres and with practice at greater distances.<br />
The device can be used at night in the same way as in daylight hours. Try to<br />
individually identify the headlights and aim between them at the registration plate<br />
area. If the laser beam hits the headlight directly it may give an error reading.<br />
Inclement weather as experienced in the United Kingdom should not present any<br />
problems but in conditions of rain or a high moisture content in the air there may be a<br />
marginal reduction in range.<br />
- 21-<br />
© Copyright – <strong>Tele</strong>-<strong>Traffic</strong> (UK) Limited 2004
SPEED MEASUREMENT USING TIME/DISTANCE<br />
BETWEEN TWO POIN<strong>TS</strong><br />
Built into the <strong>LTI</strong> <strong>20.20</strong> <strong>TS</strong>/M Speedscope is a programmed computer interfaced<br />
with a laser range measurement function enabling the instrument to measure the speed<br />
of the vehicle utilising distance divided by time. The computer employs the<br />
mathematical formula for the determination of speed:<br />
A) Mathematical Equation<br />
© Copyright – <strong>Tele</strong>-<strong>Traffic</strong> (UK) Limited 2004<br />
SPEED = DISTANCE / TIME<br />
An operator determines that the distance between two points<br />
is half a mile. A vehicle is checked travelling this distance in<br />
20 seconds. The mathematical equation to arrive at miles per<br />
hour is as follows:<br />
Time is 20 seconds logged in <strong>LTI</strong> <strong>20.20</strong><br />
3600 second per hour<br />
Distance is .5000 miles<br />
To calculate the vehicle's speed divide distance by time:<br />
Speed = Distance = .5000 = .5000 x 3600 = 90mph<br />
Time 20 20<br />
3600<br />
B) Actual Operation<br />
Two methods may be used to determine the distance between<br />
two visible points using the range measurement function in<br />
the <strong>LTI</strong> <strong>20.20</strong> <strong>TS</strong>/M.Speedscope. Once the target distance<br />
is attained it is a simple procedure to time vehicles through<br />
the target area.<br />
METHOD 1<br />
From reference point A the operator sights the LASER on<br />
reference point B acquiring the distance between points A and<br />
B.<br />
- 22 -
EXAMPLE<br />
From a bridge over the roadway the operator sights the<br />
LASER on a sign up the road and acquires the distance<br />
between the bridge and the sign. This distance will then be<br />
used in conjunction with the timing mode function in the<br />
<strong>LTI</strong> <strong>20.20</strong> <strong>TS</strong>/M Speedscope to determine a vehicle's speed<br />
through these two points.<br />
METHOD 2<br />
From a position alongside the road the operator sights the<br />
LASER on a reference point acquiring a distance reading to<br />
that point. From the same position the operator then sights<br />
the LASER past the first point to another reference point<br />
acquiring the distance to this second point. The <strong>LTI</strong> <strong>20.20</strong><br />
<strong>TS</strong>/M Speedscope timing mode computer will automatically<br />
determine the distance between these two reference points.<br />
EXAMPLE<br />
From the roadside the operator sights the LASER to a<br />
sign alongside the road and obtains the distance to the<br />
sign. Then from the same position the operator sights<br />
the LASER past the sign to a telephone pole obtaining<br />
the distance to the pole. The <strong>LTI</strong> <strong>20.20</strong> <strong>TS</strong>/M Speedscope<br />
computer then calculates the linear measurement between the<br />
sign and the telephone pole. This length of roadway between<br />
the sign and the telephone pole may be used as the target area<br />
to time vehicles through.<br />
NOTE: When using the LASER to measure distance it is necessary that the section<br />
of road between the two reference points be straight. When using Method 2 it is<br />
important that the two reference points used are along the same line. Most operators<br />
will acquire the distance between two reference points and then drive to a position<br />
with a good viewpoint, off the road, to time and detect vehicles exceeding the speed<br />
limits.<br />
- 23 -<br />
© Copyright – <strong>Tele</strong>-<strong>Traffic</strong> (UK) Limited 2004
OPERATIONAL SEQUENCE - METHOD 1<br />
From reference point A the operator shoots to reference point B<br />
acquiring distance between point A and B.<br />
1) Depress the Timing Mode Button on the back of the<br />
LASER. D1 appears on the display.<br />
2) Sight the LASER on reference point B down the road and<br />
pull the trigger. Distance to reference point B is displayed.<br />
3) Depress the Timing Mode Button. D2 appears.<br />
4) Depress the Timing Mode Button again as a second distance<br />
is not necessary using Method 1 and TOD appears (Time<br />
over Distance) on the display. The timing mode feature of<br />
the <strong>LTI</strong> <strong>20.20</strong> is now ready to identify vehicle speed.To<br />
determine the speed of a vehicle the operator pulls the<br />
trigger when a vehicle passes point A and again pulls<br />
the trigger when the vehicle passes point<br />
B. This measures the time it took for the<br />
vehicle to drive the target distance and<br />
automatically the timing mode feature computes and displays<br />
the speed of the vehicle on the display readout.<br />
OPERATIONAL SEQUENCE - METHOD 2<br />
From the same position the operator targets separate reference<br />
points A and B setting up a speed enforcement zone between points<br />
A and B.<br />
1) Depress the Timing Mode Button on the back of the<br />
LASER. D1 is displayed.<br />
2) Sight the LASER on point A along the road and pull the<br />
trigger. Distance to reference point A appears on the display.<br />
3) Depress Timing Mode Button. D2 is displayed.<br />
4) Sight LASER on point B further down the road in line with<br />
point A and pull the trigger. Distance to reference point B<br />
appears on the display.<br />
5) Depress Timing Mode button. Distance between reference<br />
point A and B appears on the display.<br />
- 24 -<br />
© Copyright – <strong>Tele</strong>-<strong>Traffic</strong> (UK) Limited 2004
6) Depress Timing Mode button. TOD appears (Time over<br />
Distance) and the Timing Mode feature of the <strong>LTI</strong> <strong>20.20</strong> is<br />
ready to identify vehicle speeds between points A and B. To<br />
determine the speed of a vehicle the operator pulls the<br />
trigger when a target vehicle passes point A as before<br />
and pulls the trigger again when the same<br />
vehicle passes point B.<br />
This computes the speed of the vehicle by measuring the time it took to travel the<br />
distance between points A and B and then the speed is automatically displayed.<br />
Regardless of which method is used vehicles may be continuously checked between<br />
reference points. This distance initially measured is stored and utilised to determine<br />
each vehicle's velocity until a new location for speed enforcement is required.<br />
Pressing the timing mode switch will toggle to the actual time in seconds taken by the<br />
target vehicle between the check points. This display will flash. A further pressure<br />
on the timing mode switch will toggle back to the actual speed.<br />
To clear the distance stored in the memory when moving to a new site press the<br />
speed/range switch and then return to the timing mode. New distances may then be<br />
inserted.<br />
1. It should be noted that this form of speed measurement<br />
determines the average speed of the vehicle over a distance<br />
not the peak speed of the vehicle.<br />
2. A reference point can be any visually detectable and<br />
stationary mark on or near the roadway. A flat surface such<br />
as a road sign will provide the greatest reflection of the laser<br />
beam and provide the longest range between two reference<br />
points.<br />
3. It is important that whatever part of the target vehicle you use<br />
at the beginning of the check you use at the end.<br />
4. The response time of the operator in hitting the trigger will be<br />
the same when the vehicle passes both reference points<br />
ensuring consistent vehicle speed measurement.<br />
TRAPPING OF ERRONEOUS READINGS<br />
(In Timing Mode)<br />
In this mode you may see two further error readings:<br />
E04 - The computed distance between your reference points is<br />
too short for accurate measurement.<br />
E05 - The computed distance between your reference points is<br />
too long for accurate measurement.<br />
- 25 -<br />
© Copyright – <strong>Tele</strong>-<strong>Traffic</strong> (UK) Limited 2004
<strong>LTI</strong> <strong>20.20</strong> <strong>TS</strong>/M<br />
<strong>SPEEDSCOPE</strong><br />
SET UP<br />
CHECK LIST<br />
1. Connect to 12v DC power source (Battery or car)<br />
2. Switch on and listen for the four tones<br />
3. Press and hold 'TEST MODE' - Check that the 8.8.8.8.<br />
segment display operates<br />
(After a short time a four digit number will appear - that is the<br />
software version applicable to the equipment and is for<br />
technician's information only).<br />
4. Release 'TEST MODE' - 'tt' should appear on the display<br />
5 * Carry out checks for scope alignment<br />
6. Press and release 'SPEED/RANGE'<br />
7. ** Carry out checks for range accuracy<br />
8. If displays other than E01, E02, E03 or correct data are<br />
seen refer to manual<br />
9. If all checks are satisfactory then the equipment is ready to<br />
operate<br />
NB * It is recommended that this check be carried out<br />
at each enforcement period on a site<br />
** This check needs to be carried out twice daily in<br />
accordance with the ACPO Code of Practice<br />
Once the above checks are carried out the <strong>LTI</strong> <strong>20.20</strong> <strong>TS</strong>/M<br />
Speedscope can be used in all its functions with confidence.<br />
- 26 -<br />
© Copyright – <strong>Tele</strong>-<strong>Traffic</strong> (UK) Limited 2004
SECTION 6<br />
MAINTENANCE<br />
- 27 -<br />
© Copyright – <strong>Tele</strong>-<strong>Traffic</strong> (UK) Limited 2004
MAINTENANCE<br />
The <strong>LTI</strong> <strong>20.20</strong> <strong>TS</strong>/M Speedscope is self calibrating. There are no moving parts or<br />
radio frequencies to go out of alignment. Standard power surge protection eliminates<br />
any concern over use of the 12v source of the vehicle. With the laser optics inset and<br />
interconnecting aluminium extrusion the <strong>LTI</strong> <strong>20.20</strong> <strong>TS</strong>/M Speedscope can withstand<br />
the roughest treatment and most extreme environments. These features provide<br />
operators with virtually no user maintenance.<br />
* THERE ARE SOME DISPLAY MESSAGES WHICH<br />
ARE SYSTEM MESSAGES AND NORMALLY DO NOT<br />
APPEAR:<br />
E50 - E53 Indicates error during self calibration.<br />
E60 - E63 Indicates error under programme test.<br />
Both these error messages will prevent the <strong>LTI</strong> <strong>20.20</strong> <strong>TS</strong>/M Speedscope from<br />
functioning operationally and indicate that it requires service.<br />
For information regarding service or maintenance please contact:<br />
<strong>Tele</strong>-<strong>Traffic</strong> (UK) Limited<br />
LaserTec Centre<br />
C2 Harris Road<br />
Warwick CV34 5JU<br />
<strong>Tele</strong>phone No: 01926 407272<br />
Fax No: 01926 407977<br />
Email: tt@teletraffic.co.uk<br />
www.teletrafficuk.com<br />
- 28 -<br />
© Copyright – <strong>Tele</strong>-<strong>Traffic</strong> (UK) Limited 2004
SECTION 7<br />
SPECIFICATIONS<br />
- 29 -<br />
© Copyright – <strong>Tele</strong>-<strong>Traffic</strong> (UK) Limited 2004
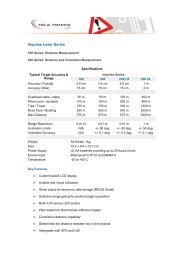
SPECIFICATIONS<br />
Power Requirement 12V DC Nominal<br />
Maximum Range 999.9 metres<br />
Minimum Range 9 metres<br />
Maximum Speed Range > 200mph<br />
Minimum Speed Range 0<br />
Acquisition Time 0.3 second<br />
Beam Divergence 3 milliradians<br />
(The instrument will give a positive speed reading for an approaching target and<br />
a negative reading for a departing target).<br />
Temperature -30°C / +60°C<br />
Dimensions 3.5" x 5" x 8"<br />
Weight 4.5lbs<br />
Eye Safety Class 1<br />
IEC 825-84 + 1/90<br />
CENELEC HD 482 S1<br />
EN 60825<br />
SSIFS 1980:2<br />
Scope Filter System Dual Polaroid Filters<br />
(Provides maximum versatility<br />
during extreme light conditions)<br />
Red Dot scope targeting. Provides pinpoint accuracy while allowing full field of<br />
vision.<br />
- 30 -<br />
© Copyright – <strong>Tele</strong>-<strong>Traffic</strong> (UK) Limited 2004