REPARAR PARPADEO DE LUCES EN ... - XsaraUsuarios.es
REPARAR PARPADEO DE LUCES EN ... - XsaraUsuarios.es
REPARAR PARPADEO DE LUCES EN ... - XsaraUsuarios.es

You also want an ePaper? Increase the reach of your titles
YUMPU automatically turns print PDFs into web optimized ePapers that Google loves.
<strong>REPARAR</strong> <strong>PARPA<strong>DE</strong>O</strong> <strong>DE</strong> <strong>LUCES</strong> <strong>EN</strong> CITRO<strong>EN</strong> XSARA<br />
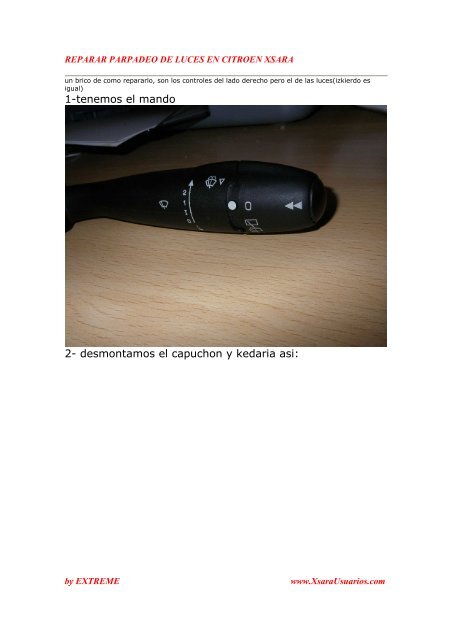
un brico de como repararlo, son los control<strong>es</strong> del lado derecho pero el de las luc<strong>es</strong>(izkierdo <strong>es</strong><br />
igual)<br />
1-tenemos el mando<br />
2- d<strong>es</strong>montamos el capuchon y kedaria asi:<br />
by EXTREME www.<strong>XsaraUsuarios</strong>.com
<strong>REPARAR</strong> <strong>PARPA<strong>DE</strong>O</strong> <strong>DE</strong> <strong>LUCES</strong> <strong>EN</strong> CITRO<strong>EN</strong> XSARA<br />
3-apretamos la <strong>es</strong>pecie de grapa y tiramos por la parte ke<br />
utilizamos para accionar las luc<strong>es</strong> hacia fuera. <strong>DE</strong>SPACIO<br />
para ke los muell<strong>es</strong> no salgan disparados y perderlos<br />
by EXTREME www.<strong>XsaraUsuarios</strong>.com
<strong>REPARAR</strong> <strong>PARPA<strong>DE</strong>O</strong> <strong>DE</strong> <strong>LUCES</strong> <strong>EN</strong> CITRO<strong>EN</strong> XSARA<br />
4- <strong>es</strong>tiramos un pelin los muell<strong>es</strong> y los montamos en la te<br />
de plastico en <strong>es</strong>ta posicion(si se mira hacia dentro se tiene<br />
ke ver el agujero libre)<br />
by EXTREME www.<strong>XsaraUsuarios</strong>.com
<strong>REPARAR</strong> <strong>PARPA<strong>DE</strong>O</strong> <strong>DE</strong> <strong>LUCES</strong> <strong>EN</strong> CITRO<strong>EN</strong> XSARA<br />
5-doblamos un poco la placa metalica en el mismo sentido<br />
en ke ya viene doblada y la colocamos en su sitio( una pata<br />
<strong>es</strong> mas grande ke otra y cada una tiene su sitio)<br />
by EXTREME www.<strong>XsaraUsuarios</strong>.com
<strong>REPARAR</strong> <strong>PARPA<strong>DE</strong>O</strong> <strong>DE</strong> <strong>LUCES</strong> <strong>EN</strong> CITRO<strong>EN</strong> XSARA<br />
6- en el otro trozo de mando hay la placa con la guia de<br />
cobre ke se dobla con el uso al pasar la arandela por<br />
encima, pu<strong>es</strong> se le pasa un d<strong>es</strong>tornillador plano con cuidado<br />
y se aplasta un poco<br />
by EXTREME www.<strong>XsaraUsuarios</strong>.com
<strong>REPARAR</strong> <strong>PARPA<strong>DE</strong>O</strong> <strong>DE</strong> <strong>LUCES</strong> <strong>EN</strong> CITRO<strong>EN</strong> XSARA<br />
7- volvenos a colocar el accionador de luc<strong>es</strong> en su sitio<br />
mirando ke la part<strong>es</strong> salient<strong>es</strong> coincidan (lo de arriba de la<br />
foto) y colocamos el capuchon en su sitio<br />
by EXTREME www.<strong>XsaraUsuarios</strong>.com
<strong>REPARAR</strong> <strong>PARPA<strong>DE</strong>O</strong> <strong>DE</strong> <strong>LUCES</strong> <strong>EN</strong> CITRO<strong>EN</strong> XSARA<br />
pu<strong>es</strong> si habeis seguido los pasos bien ya teneis arregladas<br />
las luc<strong>es</strong><br />
Brico de XTREME para XSARAUSUARIOS.COM<br />
by EXTREME www.<strong>XsaraUsuarios</strong>.com