TM 808 - White's Metal Detectors
TM 808 - White's Metal Detectors
TM 808 - White's Metal Detectors

You also want an ePaper? Increase the reach of your titles
YUMPU automatically turns print PDFs into web optimized ePapers that Google loves.
<strong>TM</strong> <strong>808</strong><br />
Instruction Manual<br />
(English Edition)<br />
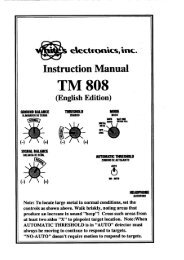
NOTE:<br />
To locate large metal in normal conditions, set the controls as<br />
shown above. Walk briskly, noting areas that produce an increase in<br />
sound - beep. Cross these areas from at least two sides ( X ) to pinpoint<br />
target location. When AUTOMATIC THRESHOLD is in AUTO, detector<br />
must always be moving to respond to targets. NO-AUTO doesn't require<br />
motion to respond to targets.
A Message from...<br />
Kenneth R. White<br />
Congratulations, and thank you for choosing the <strong>TM</strong> <strong>808</strong>.<br />
As an avid detectorist, I commend you for making an excellent choice<br />
in deep seeking equipment. <strong>White's</strong> continually strives to achieve<br />
performance and reliability above and beyond your expectations.<br />
Your new <strong>TM</strong> <strong>808</strong> has been hand built and carefully tested. Properly<br />
cared for, it will last years.<br />
The following instructions are intended to familiarize you with this<br />
fine detector, and give you a good understanding of the basics. Obviously,<br />
there is no substitute for field experience. Practice using your<br />
detector in the field, and study this manual carefully. Before long<br />
you may be able to teach the experts a thing or two!<br />
People use <strong>White's</strong> metal detectors to find valuables every day.<br />
Regardless of a metal detectors performance, it is the operator who<br />
makes the critical decisions that result in great recoveries. A metal<br />
detector is simply a tool which greatly increases the capabilities of<br />
the user to find such valuables. Knowing your detector, and researching<br />
good places to use it, are key elements to successful metal<br />
detecting.<br />
Another important factor today is obtaining permission prior to<br />
searching private property, and the necessary permits prior to<br />
searching publicly owned lands. These steps, as well as refilling dug<br />
holes, and removing trash you discover, will go a long ways toward<br />
protecting the hobby from future restrictive legislation.<br />
We know in a very short time you will be using the <strong>TM</strong> <strong>808</strong> to help<br />
you find valuables. We are proud to continue <strong>White's</strong> tradition of<br />
high performance and reliability with your <strong>TM</strong> <strong>808</strong>.
Table of Contents<br />
Assembly .................................................................................................. 4<br />
Batteries ................................................................................................5-6<br />
Description of Controls<br />
Operation<br />
Threshold .................................................................................. 7<br />
Signal Balance .......................................................................... 8<br />
Ground Balance ........................................................................ 9<br />
Automatic Threshold ................................................................ 10<br />
Push-Button ............................................................................. 11<br />
Headphone Jack ..................................................................... 11<br />
Tuning (Ground Balancing) ................................................12-14<br />
Locating <strong>Metal</strong> ......................................................................... 15<br />
Determining <strong>Metal</strong> Depths.............................................. ......... 16<br />
Caring For Your Instrument......................................................... ........... 17<br />
Warranty Statement ................................................................................ 18<br />
NOTES ................................................................................................ 19<br />
Carton / Carry Case ..................................................................Back Cover<br />
Manufacturers Information ........................................................Back Cover<br />
(3)
Assembly Instructions<br />
1) Remove all parts from the shipping carton, taking note of how the instrument<br />
fits into the inserts. Save this carton (and inserts) for future storage or travel.<br />
See back cover for further Carton / Carry case instructions.<br />
2) Assemble the front loop or antenna as shown, by compressing the button on<br />
the short rod protruding from the front of the control box, sliding the loop onto this<br />
short rod, and aligning the button on the control box short rod with the hole on<br />
the front antenna so that it locks into place. Use the thumbnut and bolt to further<br />
sucure the antenna.<br />
3) Assemble the rear loop or antennas as shown, by compressing the button on<br />
the short rod protruding from the rear of the control box, sliding the loop onto this<br />
short rod, and aligning the button on the control box short rod with the hole on<br />
the rear antenna so that it locks into place. Use the thumbnut and bolt to further<br />
sucure the antenna.<br />
4) Continue by reviewing the next section on Batteries.<br />
Front Loop (Antenna)<br />
Thumbnut<br />
&<br />
Bolt<br />
Meter<br />
Control Box<br />
Short Rod Control<br />
Front Of Panel<br />
Control Box Short<br />
Rod Rear Of<br />
Control Box<br />
(4)<br />
Handle<br />
Thumbnut<br />
&<br />
Bolt<br />
Battery<br />
Pack<br />
Rear Loop<br />
(Antenna)
The standard battery holder supplied with your instrument holds four "C"<br />
size batteries. Alkalines are recommended as they supply more consistent power<br />
for longer time periods. Rechargeable "C" size batteries may also be used in this<br />
holder, although they will need to be removed from the holder for recharging.<br />
Using The Standard Battery Holder:<br />
1) Remove the battery holder lid by applying gentle pressure down on the two<br />
locking tab openings on one side (just enough so that they unlock), flip the pack<br />
over and apply gentle pressure on the other two locking tab openings. The lid will<br />
then slip off.<br />
“C” Cell HOLDER<br />
FOAM<br />
SPRING<br />
PUSH FOAM<br />
TO BASE<br />
OF SPRING<br />
Batteries<br />
2) Insert the small foam squares inside the two springs on the lid, and<br />
the two in the holder, to prevent loss of spring tension<br />
3) Note the position of each cell. The flat side of each battery cell fits against one<br />
of the four springs. There are two springs on the lid, and two in the case. The batteries<br />
fit alternating +, -, +, -.<br />
4) Install new "C" cells. Caution: If the cells are put in backwards the detector<br />
may blow a fuse. Fuses can only be replaced by authorized service centers.<br />
5) Line up the locking tabs on the lid with the locking tab openings on the battery<br />
holder. Snap the lid and holder together.<br />
6) Open the battery compartment door on the side of the control box nearest the<br />
rear antenna, by pulling the battery door knob.<br />
(5)
Batteries continued ...<br />
7) Insert the battery holder into the detector so that the decal on the battery<br />
holder is facing toward the control panel of the detector.<br />
8) Close the battery compartment door by first pressing on the door itself to<br />
close and hold it into position, then press the battery compartment knob in, until<br />
it snaps locked.<br />
Rechargeable Batteries<br />
Although this instrument doesn't normally come with a rechargeable<br />
battery system, high quality systems are available for this model. <strong>White's</strong><br />
rechargeable battery #802-5185 and charger #509-0020 are recommended,<br />
for U.S.A. 110V use. These are sealed sets which offer the durability of spot<br />
welded contacts, and the conveniences of automatic charge, trickle charge, and<br />
maintainenance charge. Please contact your dealer.<br />
(6)
Description of Controls<br />
THRESHOLD<br />
ZUMBIDO<br />
( ) )<br />
The THRESHOLD control turns the <strong>TM</strong> <strong>808</strong> On and OFF and adjust<br />
the volume of the background hum, or as it is commonly called, the "threshold".<br />
Turning the THRESHOLD control clockwise the power is turned ON and the batteries<br />
automatically check on the METER for a few moments. For the <strong>TM</strong> <strong>808</strong> to<br />
operate properly, battery test must indicate in the upper yellow highlighted area<br />
of the METER. In average temperatures, new batteries will provide<br />
approximately 12 hours of continuous use. In cold climates, battery life<br />
will be reduced. The THRESHOLD control must be adjusted for a slight<br />
background sound or THRESHOLD that is heard continuously during searching.<br />
The THRESHOLD control should be adjusted to give a barely audible<br />
hum. A slightly lower setting is used with headphones, and slightly higher when<br />
used without headphones, particularly when being used in a high noise environment.<br />
A setting in the NORMAL area will usually be appropriate. Generally,<br />
the lower the THRESHOLD can be set while still hearing a slight hum, the<br />
better. The THRESHOLD may fade over changing ground indicating the PUSH<br />
BUTTON on the handle needs to be squeezed and released which will return or<br />
reset the THRESHOLD hum. This resetting may be needed at regular intervals,<br />
unless AUTOMATIC THRESHOLD is on AUTO which automatically maintains<br />
THRESHOLD.<br />
(7)
Description of Controls continued.....<br />
SIGNAL BALANCE<br />
BALANCIA DE SENAL<br />
The SIGNAL BALANCE control adjusts the receive signal of the detector.<br />
The NORMAL position works well for most searching situations. This setting<br />
will provide more than adequate performance with little interference from electrical<br />
sources. If interference from extreme ground minerals, or electrical sources<br />
(radio, power lines, etc.) cause erratic behavior (extreme fluctuations in the<br />
threshold hum), or produce difficulties in setting the GROUND BALANCE control,<br />
the SIGNAL BALANCE control should be set further toward the (-) setting. If<br />
little interference is experienced and ground balancing can easily be achieved,<br />
the SIGNAL BALANCE control may be set slightly further clockwise toward (+).<br />
However, great caution should be used when increasing beyond NORMAL. If<br />
the detector operates erratically, due to the use of too (+) a setting, the response<br />
from deeper targets will be obscured. Additionally, if the GROUND BALANCE<br />
can not be set correctly, the SIGNAL BALANCE is overloading the detectors receive<br />
signal, and will reduce detection depth. The optimum setting is one which<br />
gives smooth operation allowing deep targets to be heard clearly, and GROUND<br />
BALANCE achieved with a reasonable degree of effort. If the instruments performance<br />
seems temperamental or unstable, a SIGNAL BALANCE setting slightly<br />
toward (-) should be selected.<br />
(8)
Description of Controls continued.....<br />
GROUND BALANCE<br />
ELIMINADOR DE TIERRA<br />
For the best results, the GROUND BALANCE control needs to be adjusted<br />
each time the detector is used. The NORMAL setting works well for most<br />
conditions. GROUND BALANCE is adjusted to cancel out or ignore common<br />
mineralization in the ground thus, allowing the deepest available penetration.<br />
A setting clockwise toward (+) is used for higher mineralization and a setting<br />
counterclockwise toward the (-) would be sufficient for low mineralized soils.<br />
The method for adjusting this control will be covered in the section on TUNING.<br />
In a nut shell, when GROUND BALANCE is set properly little or no change in<br />
THRESHOLD hum is noted as the detector is lifted slightly up or down in relationship<br />
to the ground. It should also be noted that the AUTOMATIC THRESH-<br />
OLD control, which will be discussed in the next section, should be set in the<br />
NO-AUTO position while the GROUND BALANCE control is being adjusted. The<br />
GROUND BALANCE control and the SIGNAL BALANCE control work hand in<br />
hand to tune out undesired responses, and provide the deepest possible penetration<br />
(detection depth).<br />
(9)
Description of Controls continued.....<br />
AUTOMATIC THRESHOLD<br />
ZUMBIDO DE AUTOAJUSTO<br />
AUTO<br />
NO AUTO<br />
The AUTOMATIC THRESHOLD control is used to activate (AUTO),<br />
or disable (NO-AUTO), the automated threshold resetting feature. This feature<br />
offers automatic threshold maintenance. When AUTO is used it allows the<br />
threshold hum of the detector to remain smooth or constant regardless of small<br />
changes in the ground mineralization, or upward / downward drift of the electronic<br />
signal. When NO-AUTO is used changes in threshold which are normal for<br />
such instruments, require manual resetting (squeezing and releasing the PUSH<br />
BUTTON on the handle).<br />
IMPORTANT: The detector must be kept in motion when using the<br />
AUTO position. Standing still over the target will cause the target signal to fade<br />
away.<br />
In the NO-AUTO position, AUTOMATIC THRESHOLD is not functioning.<br />
Use this position when adjusting the GROUND REJECT control to compensate<br />
for the ground. It can be used as a searching mode if the ground mineralization<br />
does not change rapidly, and there isn't external interference from radio signals<br />
etc. In the NO-AUTO position the detector does not have to be kept in motion<br />
when passing over the target. You can stand over the target without the target<br />
signal fading away. It can be valuable to help pinpoint the center of a deep<br />
target. When using this NO-AUTO position it will be necessary to press and<br />
release the reset button on the end of the handle at regular intervals, to keep the<br />
threshold hum constant and free from upward or downward drift. If the threshold<br />
sound gradually increases or decreases while searching, press and release the<br />
button to return the detector to the normal threshold hum. This requires skill and<br />
experience, most users should operate in AUTO until some field experience is<br />
gained.<br />
(10)
Description of Controls continued.....<br />
PUSH BUTTON<br />
The PUSH BUTTON is located on the tip of the carrying handle. It is<br />
used in the NO-AUTO position to reset the threshold hum when it drifts up or<br />
down. It does the job manually, that the AUTO position does automatically. Also<br />
used during pinpointing, when the PUSH BUTTON is pressed and released with<br />
the detector over a target, the signal will be reduced in intensity and magnitude<br />
aiding in locating the targets center. As will be described later, the PUSH BUT-<br />
TON is also used to reset the threshold during GROUND REJECT tuning. When<br />
pressing and releasing the PUSH BUTTON, do so slowly. Depress, hold for a<br />
second, and then release for the best results.<br />
HEADPHONE<br />
AUDIOFONO<br />
The speaker is automatically turned off when headphones are plugged<br />
in. Maximum detection depth and longest battery life are achieved through the<br />
use of headphones. Most 1/4 standard 8-100 ohm headphones will function<br />
correctly with this model. This is a stereo jack thus stereo headphones, or those<br />
with a stereo switch, are necessary in order to hear the signal in both ear cups.<br />
(11)
Tuning<br />
1) Set the SIGNAL BALANCE, and GROUND BALANCE, to their NOR-<br />
MAL positions. Set the AUTOMATIC THRESHOLD to the AUTO position.<br />
2) Turn the THRESHOLD clockwise and check the meter to determine<br />
conditions of battery pack (must be 75% or higher to operate the detector). The<br />
THRESHOLD control, at this point, needs to be readjusted for a very faint hum.<br />
The detector will operate well (locate metal) in most locations with the controls at<br />
these settings. However, for optimum performance and penetration depth, fine<br />
tuning of the GROUND BALANCE and SIGNAL BALANCE controls are necessary.<br />
GROUND BALANCE PROCEDURE<br />
3) Set the AUTOMATIC THRESHOLD control to the NO-AUTO position.<br />
Note: Stay away from all metallic objects . . . . .cars, pipe, concrete re-bar,<br />
etc. Remove all significant metal from your body. . . . .belt buckles, car keys,<br />
watches, knives, etc.<br />
4) Hold the instrument at arms length at your side as if you were holding<br />
a suitcase (approximately 18 inches above the ground), press the PUSH<br />
BUTTON on the handle, hold for a second and release. The threshold tone<br />
will be heard. Raise the instrument approximately six inches further above the<br />
ground. If the THRESHOLD hum changes little or not at all, the initial GROUND<br />
REJECT control setting "NORMAL" is adequate for searching in that particular<br />
area. Switch the AUTOMATIC THRESHOLD control to the AUTO positions and<br />
proceed to search.<br />
5) However, if the THRESHOLD hum does change as the instrument is<br />
lifted, leave the AUTOMATIC THRESHOLD control in the NO-AUTO position and<br />
proceed to adjust to the ground in the following manner:<br />
(12)
Ground Balance Procedure<br />
A.) If the THRESHOLD level<br />
decreased or faded when the instrument<br />
was lifted, turn the GROUND<br />
BALANCE control slightly counterclockwise<br />
toward (-). Lower the unit back<br />
to arm's length, press and release the<br />
PUSH BUTTON control, and again raise<br />
the instrument about six inches further<br />
above the ground while listening to the<br />
THRESHOLD hum. If the THRESHOLD<br />
still decreases or fades, then repeat this<br />
procedure until the THRESHOLD level<br />
remains about the same as the instrument<br />
is raised about 6 inches further<br />
above the ground.<br />
B) If the THRESHOLD level increases<br />
or beeps when the instrument is lifted,<br />
then just the opposite procedure as<br />
described above is required. Adjust the<br />
GROUND BALANCE control slightly<br />
clockwise toward the (+). Lower the<br />
unit back to arms length, press and<br />
release the PUSH BUTTON control, and<br />
again lift the instrument about six inches<br />
listening for any change in the THRESH-<br />
OLD hum. Again these procedures<br />
(A and B) need to be repeated until the<br />
THRESHOLD level changes little or not<br />
at all, as the instrument is raised about 6<br />
inches further above the ground.<br />
C) Remember to press, hold for a second,<br />
and release the PUSH BUTTON<br />
on the handle after each adjustment<br />
(13)<br />
Lift about six inches<br />
if threshold fades,<br />
turn Ground Balance<br />
slightly counterclockwise,<br />
(-) lower, press & release<br />
Push Button, and again<br />
lift listening to threshold.<br />
Lift about six inches<br />
if threshold increases,<br />
turn Ground Balance<br />
slightly clockwise, (+)<br />
lower, press & release Push<br />
Button, and again lift listening<br />
to threshold.
Ground Balance Procedure Continued...<br />
is made to the GROUND BALANCE control while the detector is held at arms<br />
length like a suitcase. Determine whether the sound increases or decreases<br />
when the detector is raised about six inches further above the ground and make<br />
the appropriate GROUND BALANCE<br />
correction. Lower the loop and press<br />
and release the PUSH BUTTON.<br />
Continue with this procedure until there<br />
is little or no change in THRESHOLD<br />
when the DETECTOR is lifted.<br />
D) The GROUND BALANCE procedure<br />
becomes critical as the SIGNAL<br />
BALANCE control is turned toward<br />
(+) . The SIGNAL BALANCE control<br />
need not be set past the NORMAL<br />
range for most searching. If GROUND<br />
BALANCE cannot be accomplished as<br />
set out above, try moving to a different<br />
location as you may be over a buried<br />
metal object. If trouble persists, turn<br />
SIGNAL BALANCE control slightly<br />
counterclockwise toward (-) and try<br />
again. The greatest detection depth (deepest penetration) will be achieved by a<br />
SIGNAL BALANCE setting suited for the conditions, indicated by smooth stable<br />
operation, and the ability to set the GROUND BALANCE control. If GROUND<br />
BALANCE is appropriate at NORMAL, or if finding the correct GROUND BAL-<br />
ANCE setting is relatively easy, you may want to turn the SIGNAL BALANCE<br />
control slightly clockwise toward (+), and repeat the GROUND BALANCING<br />
steps. This assures the best SIGNAL BALANCE setting for the conditions,<br />
thus the greatest detection depth. The AUTOMATIC THRESHOLD should be<br />
returned to AUTO once GROUND BALANCE is completed.<br />
(14)<br />
Once <strong>TM</strong> <strong>808</strong> can be<br />
lifted about six inches,<br />
with little or no change<br />
in threshold, Ground<br />
Balance is set correctly.
Locating <strong>Metal</strong><br />
The volume will increase and the meter will read higher when the<br />
instrument is passed over a buried metal object. When the target is close to the<br />
surface, the meter may go full scale and the volume of the beep will increase to<br />
maximum. Remember, when searching in the AUTO position, the detector must<br />
be kept in motion when trying to find the center of the target. If the detector is<br />
stopped over the target, the sound of the signal will fade. Cross the suspected<br />
target area from at least two directions noting the area of loudest sound and meter<br />
indication. This procedure of "X-ing" over the target pinpoints target center.<br />
When using the NO-AUTO position, a surface target can appear to be<br />
VERY large. This is normal. The target must be "narrowed down" to determine<br />
its location more accurately. Pass over the target area from at least two different<br />
directions. When the meter goes "full scale", momentarily press and release<br />
the PUSH BUTTON control. Continue to cross the target pressing and releasing<br />
the PUSH BUTTON control several times. There will be a point where the meter<br />
reading and speaker beep will "peak" out and start to drop back down. It is at<br />
this peak that the front loop is over the buried metal object. Pressing and releasing<br />
the push-button while the target is under the loop, will "shrink" the signal and<br />
make pinpointing easier. When using NO-AUTO, the PUSH BUTTON is needed<br />
to pinpoint the target whereas in the AUTO position, the AUTOMATIC THRESH-<br />
OLD function pinpoints automatically.<br />
The most efficient way to search an area is to use a grid-like pattern<br />
over the area selected. Try to keep the grid lines no more than five feet apart.<br />
Make several passes in one direction, then turn 90 degrees and make several<br />
more passes to assure that you have not missed any buried object. The target<br />
will usually be pinpointed under the front loop or antenna.<br />
Sometimes deeper targets will appear to locate closer toward the rear<br />
of the instrument. Usually this will be no more than 3 or 4 inches from the rear of<br />
the front loop even for the deepest targets.<br />
(15)
PINPOINT MARKS<br />
TARGET CENTER<br />
METAL<br />
TARGET<br />
Determining <strong>Metal</strong> Depths<br />
Once the center of a target has been pinpointed, and marked, the<br />
approximate depth it is located in the ground can be determined by using the<br />
following triangulating method.<br />
1) Move off to one side of the pinpointed target center mark.<br />
2) Set AUTOMATIC THRESHOLD to the NO-AUTO position.<br />
Press and release the PUSH BUTTON on the handle, while<br />
holding the instrument at arms length.<br />
3) Move directly toward the pinpoint mark stopping when the<br />
target first begins to respond. At this point the distance from the<br />
center of the front loop or antenna, to the pinpoint mark, is the<br />
approximate depth the metal is located in the ground.<br />
TARGET<br />
DEPTH<br />
EQUALS<br />
TARGET DEPTH<br />
(16)<br />
TARGET SOUND<br />
BEGINS<br />
NOTE: This method produces<br />
approximate depths of deep<br />
targets. It may not work well<br />
on shallow large targets.
Caring For Your Instrument<br />
1) Water can damage your instrument. The <strong>TM</strong> <strong>808</strong> is not water proof, only<br />
water resistant. This instrument must be protected from showers, heavy rain, or<br />
submersion in water.<br />
2) Clean the control box and antennas with a damp cotton cloth. Automotive<br />
or furniture wax can be used to polish this instrument if so desired however,<br />
use only cotton cloths. The instrument should be cleaned after heavy use on or<br />
around a saltwater beach. The warranty does not cover cosmetic imperfections<br />
due to wear, or exposure to sun and salt air.<br />
3) Heat and cold can have an adverse effect on your detector. When not<br />
searching, rest your detector in the shade. When left in a car on a warm day,<br />
cover it to protect it from the direct sun. Store your detector indoors in a heated<br />
area during the winter months, with the batteries removed from the control box,<br />
and the batteries removed from the battery holder.<br />
4) Care must be taken so that the front and or rear antennas are not bent during<br />
storage or use. These are precision parts, their function and performance are<br />
very much altered by physical shape and dimensions.<br />
5) The battery holder requires some attention with time and use. With the batteries<br />
removed from the holder, use a screw driver, or finger nail file, to clean<br />
any build up of residue on the contacts inside the holder and on the contracts on<br />
the lid. The contacts on the outside of the battery holder may also need to be<br />
cleaned if residue is visible.<br />
CAUTIONS:<br />
Some "C" size batteries on the market today (usually uncommon brand<br />
rechargeable "C"s) are not the appropriate physical length to work properly in<br />
your battery holder. Compare the length of standard batteries to any rechargeable,<br />
or off brand battery, prior to purchasing. If problems are noted immediately<br />
after a battery brand change, try a different battery type before proceeding.<br />
DO NOT USE ANY LUBRICANTS ON ANY PART OF YOUR DETECTOR!<br />
(17)
Limited Warranty<br />
If within two years (24 months) from the original date of purchase, your <strong>White's</strong><br />
detector fails due to defects in either material or workmanship, <strong>White's</strong> will repair or<br />
replace at its option, all necessary parts without charge for parts or labor.<br />
Simply return the complete detector to the Dealer where you purchased it, or<br />
to your nearest Authorized Service Center. The unit must be accompanied by a<br />
detailed explanation of the symptoms of the failure. You must provide proof of dateof-purchase<br />
before the unit is serviced.<br />
This is a transferable manufacturer warranty, which covers the instrument two years<br />
from the original purchase date, regardless of the owner.<br />
Items excluded from the warranty are non-rechargeable batteries, accessories that<br />
are not standard equipment, shipping / handling costs outside the continental USA,<br />
Special Delivery costs (Air Freight, Next Day, 2nd Day, Packaging Services, etc.)<br />
and all shipping / handling costs inside the continental USA 90 days after purchase.<br />
<strong>White's</strong> registers your purchase only if the Sales Registration Card is filled out<br />
and returned to the factory address soon after original purchase for the purpose of<br />
recording this information, and keeping you up-to-date regarding <strong>White's</strong> ongoing<br />
research & development.<br />
The warranty does not cover damage caused by accident, misuse, neglect,<br />
alterations, modifications, unauthorized service, or prolonged exposure to corrosive<br />
compounds, including salt.<br />
Duration of any implied warranty (e.g., merchantability and fitness for a particular<br />
purpose) shall not be longer than the stated warranty. Neither the manufacturer or<br />
the retailer shall be liable for any incidental or consequential damages. Some states<br />
however, do not allow the limitation on the length of implied warranties, or the<br />
exclusion of incidental or consequential damages. Therefore, the above limitations<br />
may not apply to you.<br />
In addition, the stated warranty gives you specific legal rights, and you may have<br />
other rights which vary from state-to-state.<br />
The foregoing is the only warranty provided by <strong>White's</strong> as the manufacturer of your<br />
metal detector. Any "extended warranty" period beyond two years, which may be<br />
provided by a Dealer or other third party on your detector, may be without <strong>White's</strong><br />
authority involvement and consent, and might not be honored by <strong>White's</strong>.
NOTES<br />
(19)
Twist & insert each end of handle<br />
(provided) through top of shipping<br />
carton into second flap.<br />
(CARRY CASE)<br />
Carton / Carry Case<br />
Peel off protective paper and apply<br />
the four (provided) hook & loop tape<br />
squares. Two on underside corner of<br />
first flap, and two on top outside edge<br />
of second flap.<br />
(CARRY CASE)<br />
<strong>White's</strong> Electronics, Inc.<br />
1011 Pleasant Valley Road<br />
Sweet Home, OR USA 97386<br />
Distribution (800) 547-6911<br />
Factory (541) 367-6121<br />
FAX: 541-367-2968<br />
or visit us on the web at<br />
www.whiteselectronics.com<br />
P/N 621-0499 Printed in USA Revised 1/07
<strong>TM</strong> <strong>808</strong><br />
Manual Instructivo<br />
(Versión en Español)<br />
NOTA:<br />
Para localizar metal de tamaño grande bajo condiciones normales, ajusta<br />
los controles tal como se muestra arriba. Camina de prisa, tomando nota de las<br />
áreas donde se produce un incremento en el sonido – “bip”. Haga una equis por<br />
encima de estas áreas desde por lo menos dos direcciones ( X ) para hacer una<br />
localización exacta del objetivo. Cuando el UMBRAL AUTOMÁTICO está puesto<br />
en “AUTO”, el detector siempre tiene que estar en movimiento para responder a<br />
los objetivos. La posición “NO-AUTO” no requiere ningún movimiento para poder<br />
responder a los objetivos.
Un Mensaje de...<br />
Kenneth R. White<br />
Felicidades, le agradecemos que haya elegido al <strong>TM</strong> <strong>808</strong>.<br />
Como el ávido prospector que soy, lo felicito por su buena elección de un<br />
equipo excelente para la búsqueda profunda. En White’s siempre estamos<br />
buscando alcanzar el rendimiento y la confiabilidad destacado que llegue mas<br />
allá de sus expectativas.<br />
Su nuevo <strong>TM</strong> <strong>808</strong> ha sido elaborado a mano y cuidadosamente probado. Con<br />
el cuidado adecuado, le durara muchos años.<br />
Las instrucciones a continuación le familiarizarán con este apreciable<br />
detector, y le darán un buen conocimiento básico. Obviamente, no existe<br />
ningún sustituto para la experiencia. Practique el uso con su detector en el<br />
campo y estudie cuidadosamente este instructivo. ¡Quizás usted se haga<br />
experto muy pronto y podrá enseñarle a los expertos algunas cosas!<br />
La gente utiliza los detectores de White’s para hallar artículos de valor cada<br />
día. Independientemente del funcionamiento de un detector de metales,<br />
quien lo opera es el que toma decisiones importantes las cuales resultan en<br />
buenos hallazgos. Un detector de metales es simplemente una herramienta<br />
que aumente a rasgos grandes la capacidad del usuario para hallar tales<br />
artículos de valor. Los elementos claves para el éxito de la prospección de<br />
metales son el conocer bien a su detector, y el hacer investigaciones previas<br />
sobre los mejores lugares en donde usarlo.<br />
Otro factor importante en la actualidad es el de obtener los permisos<br />
necesarios antes de prospectar en propiedad privada y propiedad publica.<br />
Estos pasos, junto con el hecho de rellenar los hoyos de excavación, y<br />
remover la basura que desentierra, ayudarán mucho para proteger este<br />
pasatiempo de tener restricciones a futuro por la legislatura.<br />
Sabemos que dentro de poco tiempo usted estará usando el <strong>TM</strong> <strong>808</strong> para<br />
ayudarle a encontrar artículos de valor. Nos enorgullece continuar la<br />
tradición de alta calidad, rendimiento y confiabilidad de White’s<br />
con su <strong>TM</strong> <strong>808</strong>.
Tabla de Contenido<br />
Ensamblaje .................................................................................................... 4<br />
Baterías ....................................................................................................5-6<br />
Descripción de Controles<br />
Operación<br />
Umbral ............................................................................................ 7<br />
Balance de Señal ........................................................................... 8<br />
Balance de Suelo ........................................................................... 9<br />
Umbral Automático ....................................................................... 10<br />
Botón ............................................................................................ 11<br />
Conexión de Audífonos ................................................................ 11<br />
Afinación (Balance de Suelo) ..................................................12-14<br />
Localizando <strong>Metal</strong>es ..................................................................... 15<br />
Determinando las Profundidades de <strong>Metal</strong>es.... .......................... 16<br />
El Cuidado De Su Instrumento.................................... ................................ 17<br />
Declaración de Garantía .............................................................................. 18<br />
NOTAS ..................................................................................................... 19<br />
Caja / Estuche para Cargar........................................... .......... Contraportada<br />
Información sobre el Fabricante ............................................... Contraportada<br />
(3)
Instrucciones de Ensamblaje<br />
1) Remueva todas las partes de la caja de envío, nota la manera que el instrumento<br />
se amolda dentro de las inserciones. Guarda la caja (y las inserciones) para<br />
almacenar a futuro o para viajar. Vea la contraportada para más instrucciones sobre<br />
la Caja / Estuche para Cargar.<br />
2) Ensamble el aro o antena delantera de la manera que se muestra, apretando el<br />
botón del tubo corto que sale por enfrente de la caja de control, deslice el aro por<br />
encima de este tubo corto, y alinee el botón en el tubo corto de la caja de control<br />
con el hoyo en la antena delantera de manera que quede puesto en su lugar. Use el<br />
tornillo y la tuerca para fijar a la antena.<br />
3) Ensamble el aro o antena posterior de la manera que se muestra, apretando el<br />
botón en el tubo corto que sale por detrás de la caja de control, deslice el aro por<br />
encima de este tubo corto, y alinee el botón en el tubo corto de la caja de control<br />
con el hoyo en la antena posterior de manera que quede puesto en su lugar. Use el<br />
tornillo y la tuerca para fijar a la antena.<br />
4) Continué revisando la siguiente sección sobre Baterías.<br />
Aro Delantera (Antena)<br />
Tornillo y<br />
Tuerca<br />
Caja de Control<br />
Medidor<br />
Mango<br />
Tubo Corto<br />
Frente de<br />
la Caja de<br />
Control<br />
Panel de<br />
Control<br />
Tubo Corto<br />
Detrás de<br />
la Caja de<br />
Control<br />
(4)<br />
Caja de<br />
Baterías<br />
Tornillo y<br />
Tuerca<br />
Aro Posterior<br />
(Antena)
La caja estándar de baterías que viene con su instrumento es para cuatro<br />
baterías tamaño “C”. Se recomienda el uso de alcalinas porque le dan una<br />
mayor consistencia de energía por periodos de tiempo más largos. Las baterías<br />
recargables tamaño “C” también se pueden usar en esta caja, pero se tendrán que<br />
remover para recargarlas.<br />
Utilizando la Caja estándar de Baterías:<br />
1) Remueve la tapa la caja de batearías. Aplica un poco de presión hacia abajo<br />
encima de las dos lengüetas de seguridad de un lado (solo lo suficiente para que se<br />
destraben), voltea la caja y presione un poco las otras dos lengüetas de seguridad.<br />
Entonces se deslizara la tapa.<br />
SOSTÉN DE LA<br />
CELULA “C”<br />
HULE ESPUMA<br />
Baterías<br />
RESORTE<br />
PRESIONE EL<br />
HULE ESPUMA EN<br />
LA BASE DEL<br />
RESORTE<br />
2) Inserte los dos cuadritos de hule espuma dentro de los dos resortes que están<br />
encima de la tapa, y las dos que están en la caja, para prevenir la pérdida de tensión<br />
en los resortes<br />
3) Note la posición de cada célula. El lado plano de cada célula de batería queda<br />
pegado a uno de los cuatro resortes. Hay dos resortes en la tapa, y dos en la caja.<br />
Las baterías se alternan +, -, +, -.<br />
4) Instale nuevas células “C”. Precaución: Si las células se insertan al revés el<br />
detector puede fundir un fusible. Los fusibles solo se pueden reemplazar por un<br />
centro de servicio autorizado.<br />
5) Alinee las lengüetas de seguridad en la tapa con las aberturas de las lengüetas<br />
de seguridad en la caja de baterías. Cierre abrochando la tapa y la caja juntas.<br />
6) Abra la puerta del compartimiento de batería que está en el lado de la caja de<br />
control más cercano a la antena posterior, jalando la perrilla de la puerta de batería.<br />
(5)
Baterías, continuación...<br />
7) Inserte la caja de baterías dentro del detector de manera que la etiqueta en<br />
la caja de baterías quede abajo hacia el panel de control del detector.<br />
8) Cierre la puerta del compartimiento de batería. Primero presione la puerta<br />
para cerrarlo y detenlo en su lugar, luego presione la perrilla del compartimiento<br />
de batería hacia adentro, hasta que se abroche y quede cerrado.<br />
Baterías Recargables<br />
Aunque un sistema de baterías recargables usualmente no viene incluido<br />
con este instrumento, hay sistemas de alta calidad disponibles para este modelo.<br />
Para uso de 110V (110 voltios) en los EE.UU. se recomiendan la batería recargable<br />
de White’s #802-5185 y el cargador #509-0020. Son juegos sellados las cuales<br />
ofrecen la durabilidad de los contactos soldados, y la conveniencia de un cargo<br />
automático, carga lenta, y mantenimiento de carga.<br />
(6)
Descripción de Controles<br />
THRESHOLD<br />
ZUMBIDO<br />
( ) )<br />
El control de UMBRAL (THRESHOLD) Prende y Apaga el <strong>TM</strong> <strong>808</strong> y ajusta<br />
el volumen del zumbido de fondo, o como comúnmente se le llama, el “umbral”.<br />
Dándole vuelta al control de UMBRAL hacia la derecha prende el instrumento y el<br />
medidor automáticamente prueba las baterías por unos momentos. Para que el<br />
<strong>TM</strong> <strong>808</strong> opere como es debido, la prueba de batería debe mostrar dentro del área<br />
amarillo en la parte superior del MEDIDOR. Bajo las circunstancias de temperaturas<br />
normales las baterías nuevas le proveerán aproximadamente 12 horas de uso<br />
continuo. En los climas fríos se reducirá la duración de las baterías. Debe ajustar<br />
el control de UMBRAL para un sonido ligero de fondo o UMBRAL que se escucha<br />
continuamente durante una búsqueda.<br />
Se debe ajustar el control de UMBRAL para dar un zumbido tan leve que<br />
apenas y se escuche. Con audífonos se usa un ajuste un poco más bajo y uno un<br />
poco más alto cuando no se usan audífonos, particularmente cuando esté en un<br />
ambiente de muy ruidoso. Casi siempre será adecuada una configuración en el<br />
área de NORMAL. Por lo general, lo mas bajo que puede configurar el UMBRAL<br />
y aun seguir escuchando un leve zumbido, es mejor. En terreno cambiante se<br />
puede desvanecer el UMBRAL, esto le indica que necesita apretar y soltar el botón<br />
(PUSH BUTTON) en el mango lo cual reajustara el zumbido del UMBRAL. Tal vez<br />
sea necesario reajustar de esta manera a menudo, a menos de que esté prendido<br />
el UMBRAL AUTOMÁTICO (AUTOMATIC THRESHOLD) lo cual automáticamente<br />
mantiene el UMBRAL.<br />
(7)
Descripción de Controles, continuación.....<br />
SIGNAL BALANCE<br />
BALANCIA DE SENAL<br />
El control del BALANCE DE SEÑAL (SIGNAL BALANCE) ajusta la señal<br />
de recepción del detector. La posición de NORMAL funciona bien para la mayoría<br />
de los casos de búsqueda. Esta posición le proveerá un funcionamiento adecuado<br />
en áreas con muy poca interferencia por las fuentes eléctricas. Si la interferencia de<br />
una presencia alta de minerales en el suelo, o fuentes eléctricas (radios, cables de<br />
luz, etc.) causa un comportamiento errático (fluctuaciones extremas en el zumbido<br />
del umbral), o produce dificultades al configurar el control del BALANCE DE SUELO<br />
(GROUND BALANCE), debe posicionar el control del BALANCE DE SEÑAL más<br />
hacia la posición de (-). Si experimenta poca interferencia y puede lograr con facilidad<br />
el balance de suelo, puede ajustar el control del BALANCE DE SEÑAL un poco<br />
más a la derecha hacia (+). Sin embargo, debe ejercer mucha precaución cuando<br />
incrementa más allá de NORMAL. Si el detector opera erráticamente, debido al uso<br />
de una configuración demasiado hacia (+), la respuesta de objetivos más profundos<br />
se verá oscurecida. Además, si no logra configurar correctamente el BALANCE DE<br />
SUELO, entonces el BALANCE DE SEÑAL está sobrecargando la señal recibidor<br />
del detector, y reducirá la profundidad de detección. La configuración óptima es la<br />
que dé una operación uniforme y permite oír claramente el sonido de los objetivos<br />
profundos, y se logre el BALANCE DE SUELO con un grado de esfuerzo razonable.<br />
Si el instrumento funciona de manera inestable o errático, debe elegir una configuración<br />
de BALANCE DE SEÑAL levemente hacia (-).<br />
(8)
Descripción de Controles, continuación.....<br />
GROUND BALANCE<br />
ELIMINADOR DE TIERRA<br />
Para los mejores resultados, necesita ajustar el control del BALANCE DE<br />
SUELO cada vez que use el detector. La configuración NORMAL funciona bien<br />
bajo la mayoría de las condiciones. Ajusta el BALANCE DE SUELO para cancelar<br />
o ignorar la mineralización que es común en el suelo, así también logra la más<br />
profunda penetración disponible. Para la mineralización mas alta se usa la posición<br />
a la derecha hacia (+) y para los suelos con poca mineralización la posición a la<br />
izquierda hacia (-) será suficiente. El método para ajustar este control lo cubriremos<br />
en la sección de AFINACION. En pocas palabras, si configura correctamente el<br />
BALANCE DE SUELO notará muy poco o incluso ningún cambio del zumbido de<br />
UMBRAL cuando mueve el detector levemente hacia arriba o abajo en relación al<br />
suelo. Debe notar que el control del UMBRAL AUTOMÁTICO, lo cual se explicará<br />
en la siguiente sección, debe estar en la posición de NO-AUTO mientras se ajusta el<br />
control del BALANCE DE SUELO. El control del BALANCE DE SUELO y el control<br />
del BALANCE DE SEÑAL funcionan en conjunto para cancelar respuestas no<br />
deseadas, y proveer la penetración mas profunda que sea posible (profundidad de<br />
detección).<br />
(9)
Descripción de Controles, continuación......<br />
AUTOMATIC THRESHOLD<br />
ZUMBIDO DE AUTOAJUSTO<br />
AUTO<br />
NO AUTO<br />
Se usa el control de UMBRAL AUTOMÁTICO para activar (AUTO), o<br />
desactivar (NO-AUTO), la característica automatizada que reajusta el umbral. Esta<br />
característica le ofrece la mantenencia de umbral automático. Cuando se usa AUTO<br />
permite que el zumbido del umbral del detector permanezca estable y constante<br />
independientemente de los pequeños cambios en la mineralización del suelo o la<br />
desviación hacia arriba/abajo de la señal electrónica. Cuando se usa NO-AUTO los<br />
cambios de umbral que son normales para instrumentos así, requiere ser reajustado<br />
manualmente (apretando y soltando el BOTÓN en el mango).<br />
IMPORTANTE: El detector debe mantenerse en movimiento cuando se usa la<br />
posición de AUTO. Si permanece estacionario por encima del objetivo la señal se<br />
desvanecerá.<br />
En la posición de NO-AUTO, el UMBRAL AUTOMÁTICO no está funcionando.<br />
Use esta posición cuando está ajustando el control del RECHAZO DE SUELO<br />
(GROUND REJECT) para poder compensar por el suelo. Se puede utilizar en el<br />
modo de búsqueda si la mineralización del suelo no cambia con rapidez, y si no hay<br />
interferencia externa de señales de radio, etc. En la posición de NO-AUTO no es<br />
necesario que el detector se mantenga en movimiento cuando pasa por encima de<br />
un objetivo. Puede pararse encima de un objetivo sin que la señal se desvanezca.<br />
Esta característica le puede ser de valor para hacer una localización exacta del<br />
centro de un objetivo profundo. Cuando use la posición de NO-AUTO será necesario<br />
presionar y soltar con frecuencia el botón de reajuste que está en la punta del<br />
mango, para mantener el zumbido de umbral constante y libre de desviación hacia<br />
arriba o abajo. Si el sonido de umbral aumenta o disminuye gradualmente mientras<br />
busca, apriete y suelte el botón para que el detector vuelva al zumbido de umbral<br />
normal. Esto requiere habilidad y experiencia, la mayoría de los usuarios deben<br />
operarlo en AUTO hasta que hayan logrado un poco mas de experiencia.<br />
(10)
Descripción de Controles, continuación......<br />
BOTÓN<br />
El BOTÓN está localizado en la punta del mango para cargar. Se usa en la<br />
posición de NO-AUTO para reajustar el zumbido de umbral cuando se desvía hacia<br />
arriba o abajo debido a interferencias. Manualmente desempeña el mismo trabajo<br />
que realiza automáticamente la posición de AUTO. También se usa durante la<br />
localización exacta, cuando apriete y suelte el BOTÓN mientras que el detector esté<br />
encima del objetivo, se reducirá la intensidad y magnitud de la señal para facilitar la<br />
localización del centro del objetivo. Como después se explicara, el BOTÓN también<br />
se usa para reajustar el umbral durante la afinación del RECHAZO DE SUELO. Al<br />
presionar y soltar el BOTÓN, hágalo despacio. Presione, sostenlo por un segundo,<br />
y luego suéltelo para obtener los mejores resultados.<br />
HEADPHONE<br />
AUDIOFONO<br />
La bocina se apaga automáticamente cuando se conectan los audífonos. Con<br />
el uso de audífonos se obtendrá la máxima profundidad de detección y alargará<br />
la duración de las baterías. La mayoría de los audífonos estándar 1/4 de 8-100<br />
ohm funcionan bien con este modelo. Este modelo tiene una conexión de estéreo<br />
así que los audífonos deben ser compatibles con la conexión de estéreo para que<br />
escuche la señal en ambos oídos.<br />
(11)
Afinación<br />
1) Coloque el BALANCE DE SEÑAL, y el BALANCE DE SUELO, en sus<br />
posiciones de NORMAL. Coloque el UMBRAL AUTOMÁTICO en la posición de<br />
AUTO.<br />
2) Gire el UMBRAL hacia la derecha y revise el medidor para ver la<br />
condición de las baterías (debe tener una carga de 75% o más alto para operar<br />
el detector). Ahora tiene que reajustar el control del UMBRAL para un zumbido<br />
leve. El detector funcionará bien (localizará metales) en la mayoría de las áreas<br />
si los controles están configurados de esta manera. Pero, para un funcionamiento<br />
y profundidad de detección óptimo es necesario un ajuste fino de los controles del<br />
BALANCE DE SUELO y BALANCE DE SEÑAL.<br />
PROCEDIMIENTO DEL BALANCE DE SUELO<br />
3) Coloque el control de UMBRAL AUTOMÁTICO en la posición de NO-<br />
AUTO. Nota: Permanezca alejado de cualquier objeto metálico. . . . .automóviles,<br />
tuberías, barrillas de cemento, etc. Despréndase de todos los objetos de metal que<br />
tenga en su persona. . . . .hebillas, llaves de auto, relojes, navajas, etc.<br />
4) Sostén el instrumento con el brazo a su costado de manera como<br />
si fuera un maletín (aproximadamente 18 pulgadas arriba del suelo), presione el<br />
BOTÓN en el mango, manténgalo apretado por un segundo y suéltelo. Escuchará<br />
el tono del umbral. Levante el instrumento aproximadamente 6 pulgadas más<br />
encima del suelo. Si el zumbido del UMBRAL cambia muy poco o no cambia nada,<br />
entonces la posición inicial del control del RECHAZO DE SUELO que es “NORMAL”<br />
es adecuada para realizar una búsqueda en esa área. Cambie el control del<br />
UMBRAL AUTOMÁTICO a la posición de AUTO para proceder con la búsqueda.<br />
5) Sin embargo, si el zumbido del UMBRAL llega a cambiar cuando usted<br />
alza el instrumento, deje el control del UMBRAL AUTOMÁTICO en la posición de<br />
NO-AUTO y ajuste para el suelo de la siguiente manera:<br />
(12)
Procedimiento Del Balance De Suelo, continuación<br />
A) Si el nivel de UMBRAL disminuye<br />
o desvanece cuando el instrumento es<br />
alzado, ajusta el BALANCE DE SUELO<br />
un poco a la izquierda hacia (-). Baje el<br />
instrumento al nivel del brazo extendido,<br />
presione y suelte el control del BOTÓN,<br />
y álzalo de nuevo 6 pulgadas más<br />
encima del suelo mientras escucha el<br />
zumbido del UMBRAL. Si aun disminuye<br />
el sonido de UMBRAL, entonces repita<br />
este procedimiento hasta que el nivel del<br />
UMBRAL permanezca más o menos igual<br />
mientras eleva el instrumento 6 pulgadas<br />
más por encima del suelo.<br />
B) Si el nivel de UMBRAL aumenta o<br />
suena con un “bip” cuando el instrumento<br />
es alzado, entonces ajústalo con el<br />
procedimiento opuesto al que se describió<br />
arriba. Ajuste el control del BALANCE<br />
DE SUELO un poco a la derecha hacia el<br />
(+). Baje el instrumento al nivel del brazo<br />
extendido, presione y suelte el control<br />
del BOTÓN, y álzalo de nuevo 6 pulgadas<br />
más mientras escuche por si hay cualquier<br />
cambio en el zumbido del UMBRAL.<br />
Deben repetirse estos procedimientos (A y<br />
B) hasta que el nivel del UMBRAL cambie<br />
muy poco o no cambia nada, mientras<br />
que alza el instrumento 6 pulgadas más<br />
encima del suelo.<br />
C) Recuerde presionar, sostener por un<br />
segundo y soltar el BOTÓN en el mango<br />
después de cada ajuste que le haga<br />
al control del BALANCE DE SUELO<br />
mientras que sostenga el detector con el<br />
brazo extendido, como si fuera un maletín.<br />
(13)<br />
Álzalo seis pulgadas,<br />
si el umbral desvanece<br />
ajusta el Balance de<br />
Suelo levemente hacia<br />
la izquierda (-) baje,<br />
presione y suelte<br />
el Botón, y álzalo<br />
de nuevo mientras<br />
escucha al umbral.<br />
Álzalo seis pulgadas,<br />
si el umbral aumenta<br />
ajusta el Balance de<br />
Suelo levemente hacia<br />
la derecha (+) baje,<br />
presione y suelte el<br />
Botón, y álzalo de nuevo<br />
mientas escucha al<br />
umbral.
Procedimiento Del Balance De Suelo, continuación<br />
Determine si el sonido aumenta o disminuye cuando eleve el detector como 6<br />
pulgadas más por encima del suelo y haga los ajustes necesarios para corregir el<br />
BALANCE DE SUELO. Baje el aro y presione y suelte el BOTÓN. Continúe con<br />
este procedimiento hasta que haya muy<br />
poco o ningún cambio en el UMBRAL al<br />
alzar el DETECTOR.<br />
D) El procedimiento para el BALANCE<br />
DE SUELO es crítico cuando el control<br />
del BALANCE DE SEÑAL es ajustado<br />
hacia (+) . Para la mayoría de las<br />
búsquedas no es necesario ajustar el<br />
control del BALANCE DE SEÑAL más<br />
allá de la gama de NORMAL. Si no se<br />
logra el BALANCE DE SUELO de la<br />
forma descrita arriba, intente moverse<br />
a otra área ya que es posible que usted<br />
esté por encima de un objeto de metal<br />
enterrado. Si el problema persiste,<br />
ajuste el control del BALANCE DE SE-<br />
ÑAL un poco a la izquierda hacia (-) e inténtelo<br />
de nuevo. Se logrará la máxima<br />
profundidad de detección (la penetración<br />
mas profunda) con una afinación de<br />
BALANCE DE SEÑAL adecuado para<br />
esas condiciones, lo cual se indica con la<br />
operación estable y consistente y la habilidad de configurar el control del BALANCE<br />
DE SUELO. Si el BALANCE DE SUELO es adecuado en NORMAL, o si es fácil<br />
hallar la correcta configuración del BALANCE DE SUELO, quizás quiera darle vuelta<br />
al control del BALANCE DE SEÑAL un poco a la derecha hacia (+), y repetir los<br />
pasos para el BALANCE DE SUELO. Esto le asegurará la mejor configuración de<br />
BALANCE DE SEÑAL para las condiciones dadas, y así también le dará la máxima<br />
profundidad de detección. Una vez que logre el BALANCE DE SUELO el UMBRAL<br />
AUTOMÁTICO debe ser regresado a la posición de AUTO.<br />
(14)<br />
Si puede levantar al<br />
<strong>TM</strong> <strong>808</strong> seis pulgadas,<br />
con poco o ningún<br />
cambio en el umbral,<br />
ha logrado configurar<br />
correctamente el<br />
Balance de Suelo.
Localizando <strong>Metal</strong>es<br />
El volumen aumentará y el medidor le indicará un nivel alto cuando el<br />
instrumento se detiene encima de un objeto metálico enterrado. Cuando el objetivo<br />
está cercano a la superficie, el medidor quizás llene la escala completa y el volumen<br />
del sonido “bip” se aumentará hasta el máximo. Recuerde, cuando esté buscando<br />
en la posición de AUTO, tendrá que mantener al detector en movimiento mientras<br />
busque el centro del objetivo. Si el detector se detiene por encima del objetivo, el<br />
sonido de la señal se desvanecerá. Haga una cruz desde por lo menos dos lados<br />
por encima del área donde piense que pueda estar el objetivo, note el área donde<br />
el sonido y la indicación del medidor son más fuertes. Este procedimiento de hacer<br />
una “X” por encima del objetivo logra una localización exacta del centro del objetivo.<br />
Cuando se usa la posición de NO-AUTO, un objetivo que esté por la superficie<br />
del suelo puede aparentar ser MUY grande. Esto es normal. Debe “enangostar”<br />
al objetivo para poder determinar su localización con mas exactitud. Pase por<br />
encima del objetivo por lo menos desde dos lados diferentes. Cuando el medidor<br />
llene la “escala completa”, presione y suelte el control del BOTÓN momentáneamente.<br />
Continué haciéndole una cruz por encima del objetivo varias veces presionando<br />
y soltando el control del BOTÓN. Habrá un punto en la cual la indicación del<br />
medidor y el sonido del “bip” llegarán al punto máximo y luego comenzarán a bajar<br />
de nuevo. En este punto es cuando aro delantero se encuentra por encima del<br />
objeto de metal. Presionando y soltando el botón mientras que el objetivo esté por<br />
debajo del aro, logrará que se “reduzca” la señal y facilitará la localización exacta.<br />
Cuando use NO-AUTO, necesita el BOTÓN para hacer una localización exacta<br />
del objetivo, mientras que en la posición de AUTO, la característica del UMRABL<br />
AUTOMÁTICO hace la localización exacta automáticamente.<br />
La forma más eficaz de buscar en un área así es con un patrón de<br />
forma cuadrícula sobre el área seleccionada. Trate de mantener a las líneas de la<br />
cuadrícula no más de cinco pies por separados. Pase varias veces en una misma<br />
dirección, luego gire 90 grados y haga varias pasadas más para asegurarse de<br />
que no haya pasado por alto algún objeto enterrado. Por lo general la localización<br />
exacta del objetivo se hará debajo del aro o antena delantera.<br />
A veces los objetivos más profundos aparecerán más cercanos a la parte<br />
de atrás del instrumento. Por lo general será no más de 3 o 4 pulgadas desde la<br />
parte de atrás del aro delantero, aun para los objetivos más profundos.<br />
(15)
Determinando Las Profundidades de <strong>Metal</strong>es<br />
Una vez que el centro del objetivo haya sido localizado, y marcado, se<br />
puede determinar la profundidad aproximada a la que está localizado en el suelo<br />
usando el siguiente método de triangulación.<br />
1) Muévase a un lado de la marca de localización exacta del objetivo.<br />
2) Coloque el UMBRAL AUTOMÁTICO en la posición de NO-AUTO.<br />
Presione y suelte el BOTÓN en el mango mientras sostiene el instrumento<br />
al nivel del brazo extendido.<br />
3) Muévase directamente hacia la marca de localización exacta deteniéndose<br />
cuando el objetivo apenas comience a responder. Aquí en este<br />
punto, la distancia desde el centro del aro o antena delantera hasta la<br />
marca de localización precisa será la profundidad aproximada a la que<br />
está enterrado el metal.<br />
LA LOCALIZACIÓN<br />
EXACTA MARCA<br />
EL CENTRO DEL<br />
OBJETIVO<br />
OBJETIVO<br />
METÁLICO<br />
IGUALA LA<br />
PROFUNDIDAD DEL<br />
OBJETIVO<br />
PROFUNDIDAD<br />
DEL OBJETIVO<br />
(16)<br />
COMIENZA EL<br />
SONIDO DEL<br />
OBJETIVO<br />
NOTA: Este método indica la<br />
profundidad aproximada de<br />
objetivos profundos. Tal vez no<br />
funcione bien con los objetivos<br />
superficiales de tamaño<br />
grande.
El Cuidado De Su Instrumento<br />
1) El agua puede dañar a su instrumento. El <strong>TM</strong> <strong>808</strong> no es impermeable, sólo<br />
es resistente al agua. Debe proteger al instrumento contra lluvias, tormentas, y la<br />
sumersión en agua.<br />
2) Limpie la caja de control y las antenas con un paño húmedo de algodón. Puede<br />
usar cera para autos o muebles para pulir el instrumento si así lo desea, pero<br />
sólo utilice paños de algodón. Debe limpiar el instrumento después del uso en<br />
o alrededor de una playa de agua salada. La garantía no cubre imperfecciones<br />
cosméticos que resultan por el uso, o por exposición al sol o al aire salado.<br />
3) El calor y el frió pueden ocasionar un efecto desagradable en su detector.<br />
Cuando no esté buscando, ponga su detector en la sombra. Cuando lo deja en el<br />
carro en un día caluroso, tápalo para protegerlo de los rayos directos del sol. Las<br />
temperaturas extremas de bajo-cero también pueden causar problemas. Almacene<br />
su detector adentro en un lugar con calefacción durante los meses de invierno, con<br />
las baterías removidas de la caja de control, y removidas del sostén de baterías.<br />
4) Debe ejercer cuidado para que la antena delantera y la antena posterior no<br />
se doblen durante el uso o almacenamiento. Estas son piezas muy precisas,<br />
su función y rendimiento se alteran mucho con los cambios de forma física y<br />
dimensiones.<br />
5) El sostén de baterías requiere de su atención con el tiempo y el uso. Remueve<br />
las baterías del sostén, use un desarmador, o una lija de uñas, para limpiar cualquier<br />
residuo que se haya formado en los contactos dentro del sostén o en los contactos<br />
dentro de la tapa. Si los contactos al exterior del sostén de baterías tienen residuos<br />
también necesitarán ser limpiados.<br />
PRECAUCIÓN:<br />
Algunas baterías tamaño “C” que se venden hoy en día (usualmente las<br />
marcas no comunes de “C” recargables) no son lo suficiente largas para funcionar<br />
adecuadamente en el sostén de baterías. Compare la medida de baterías estándar<br />
con la de cualquier batería recargable o de marca no conocida, antes de comprarlas.<br />
Si nota problemas enseguida de haber cambiado la marca de baterías, pruebe otra<br />
marca de baterías antes de continuar.<br />
¡NO USE NINGÚN LUBRICANTE EN NINGUNA PARTE DE SU DETECTOR!<br />
(17)
Garantía Limitada<br />
Si dentro de dos años (24 meses) desde la fecha original de su compra, falla su detector<br />
de White’s debido a algún defecto ya sea en material o elaboración, White’s reparará o<br />
reemplazará a su discreción, todas las piezas necesarias sin cargos por las piezas o mano de<br />
obra.<br />
Simplemente devuelve el detector completo a la Agencia donde lo compró, o al Centro de<br />
Servicio Autorizado más cercano. El instrumento debe ser acompañado por una explicación<br />
detallada informando sobre los síntomas de la falla. Debe proveer alguna prueba de la fecha<br />
de compra antes de que se le de servicio al instrumento.<br />
Esta garantía de fábrica es transferible, la cuál cubre al instrumento por dos años a partir de<br />
la fecha de compra original, sin importar quien sea el dueño.<br />
Los artículos excluidos de la garantía son las baterías no-recargables, los accesorios que<br />
no sean equipo estándar, el costo de envío / manejo fuera de EE.UU. continental, costo<br />
de envío por Paquetería Especial (Flete Aéreo, Servicio al Día Siguiente, Servicio a Dos<br />
Días, Servicios de Paquetería, etc.) y todos los costos de envío / manejo dentro de EE.UU.<br />
continental pasando 90 días después de la compra.<br />
White’s registra su compra solamente si usted llena la Tarjeta de Registro de Venta y<br />
la devuelve a la dirección de la fábrica poco tiempo después de la compra original con<br />
el propósito de registrar esta información, y mantenerle informado con respecto a la<br />
investigación y desarrollo que se lleva a cabo continuamente por White’s.<br />
La garantía no cubre daños causados por accidentes, mal uso, negligencia, alteraciones,<br />
modificaciones, servicio no autorizado, o exposición prolongada a elementos corrosivos,<br />
incluyendo la sal.<br />
La duración de cualquier garantía implícita (por ejemplo, la facilidad de venta y aptitud<br />
para algún uso en particular) no será más larga que el tiempo de la garantía declarada.<br />
Ni el fabricante ni la agencia de venta se harán responsables por daños incidentales o<br />
consecuenciales. Sin embargo, algunos estados no permiten la limitación de la duración<br />
de garantías implícitas, ni la exclusión de daños incidentales o consecuenciales. Por lo<br />
consiguiente, quizás no se aplican a usted las limitaciones previamente mencionadas.<br />
Además, la garantía declarada le da específicos derechos legales, y quizás tenga otros<br />
derechos los cuales varían de estado a estado.<br />
La garantía previamente declarada es la única garantía provista por White’s como el<br />
fabricante de su detector de metales. Cualquier periodo de “garantía extendida” más allá<br />
de dos años, provisto por un Distribuidor o un tercer partido para su detector, puede ser sin<br />
la autorización, el asentimiento y la participación de White’s, y tal vez no sea honrada por<br />
White’s.
NOTAS<br />
(19)
Caja/ Estuche para Cargar<br />
Doble e inserte cada orilla del asa<br />
(incluido) a través de la solapa por la parte<br />
superior de la caja de envió.<br />
(ESTUCHE PARA CARGAR)<br />
Quite el papel protector y coloque los cuatro<br />
cuadritos (vienen incluidos) con adhesivo<br />
para enganchar. Dos en la parte posterior de<br />
la esquina de la primera solapa, y dos en la<br />
parte superior de la esquina de la segunda<br />
solapa.<br />
(ESTUCHE PARA CARGAR)<br />
<strong>White's</strong> Electronics, Inc.<br />
1011 Pleasant Valley Road<br />
Sweet Home, OR USA 97386<br />
Distribución (800) 547-6911<br />
Fábrica (541) 367-6121<br />
FAX: 541-367-6629<br />
o visítanos en el Internet en<br />
HYPERLINK “http://www.whiteselectronics.com”<br />
P/N 621-0499 mpreso en EE.UU. Revisado 1/07