Instructions for Use TransForce®2 Transverse ... - Ortho Organizers
Instructions for Use TransForce®2 Transverse ... - Ortho Organizers
Instructions for Use TransForce®2 Transverse ... - Ortho Organizers
You also want an ePaper? Increase the reach of your titles
YUMPU automatically turns print PDFs into web optimized ePapers that Google loves.
<strong>Instructions</strong> <strong>for</strong> <strong>Use</strong><br />
TransForce ®2 <strong>Transverse</strong> Arch<br />
Developing Appliances<br />
424-500, 424-526 – 424-532<br />
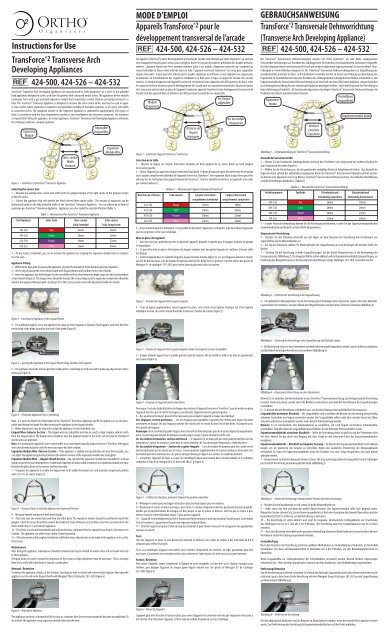
TransForce 2 <strong>Transverse</strong> Arch Developing Appliances are manufactured by <strong>Ortho</strong> <strong>Organizers</strong>® as a series of pre-adjusted<br />
fixed appliances designed to correct arch <strong>for</strong>m <strong>for</strong> patients with contracted dental arches. The appliances deliver smooth<br />
continuous <strong>for</strong>ce with a pre-activated expansion module that incorporates a nickel titanium coil spring enclosed in a<br />
tube. The TransForce 2 <strong>Transverse</strong> Appliance is designed to increase the inter-canine width, and may be used in upper<br />
or lower arches where expansion is required to accommodate crowding in the labial segments, or to correct arch width<br />
in contracted arches. The expansion module of the <strong>Transverse</strong> Appliance is calibrated to approximately 200 grams of<br />
<strong>for</strong>ce, in accordance with the <strong>for</strong>ce requirements needed in arch development <strong>for</strong> transverse expansion. No activation<br />
is required after fitting the appliance. As a fixed appliance, TransForce 2 <strong>Transverse</strong> Arch Developing Appliances eliminate<br />
the challenges with non-compliant patients.<br />
Expansion<br />
Module<br />
Adjustable<br />
Lingual Wire<br />
MODE D’EMPLOI<br />
Appareils TransForce ®2 pour le<br />
développement transversal de l’arcade<br />
Module<br />
d’expansion<br />
Distance de<br />
l’espace<br />
intercanin<br />
Arc lingual<br />
adjustable<br />
Arc du module<br />
d’expansion<br />
GEBRAUCHSANWEISUNG<br />
TransForce ®2 Transversale Dehnvorrichtung<br />
(<strong>Transverse</strong> Arch Developing Appliance)<br />
424-500, 424-526 – 424-532 424-500, 424-526 – 424-532<br />
Les appareils TransForce 2 pour le développement transversal de l’arcade sont fabriqués par <strong>Ortho</strong> <strong>Organizers</strong>® en tant que<br />
série d’appareils fixes préajustés conçus pour corriger la <strong>for</strong>me de l’arcade des patients présentant des arcades dentaires<br />
rétrécies. L’appareil fournit une <strong>for</strong>ce continue régulière grâce à un module d’expansion préactivé qui comprend un<br />
ressort hélicoïdal en titane-nickel enfermé dans un tube. L’appareil transversal TransForce 2 est conçu pour augmenter<br />
l’espace intercanin ; il peut aussi être utilisé pour les arcades supérieure ou inférieure si une expansion est requise pour<br />
accommoder un encombrement des segments vestibulaires ou bien pour corriger la largeur de l’arcade des arcades<br />
rétrécies. Le module d’expansion de l’appareil transversal est étalonné pour s’approcher des 200 grammes de <strong>for</strong>ce, selon<br />
les exigences de <strong>for</strong>ce nécessaire pour le développement de l’arcade pour une expansion transversale. Aucune activation<br />
n’est nécessaire après la mise en place de l’appareil. Comme les appareils TransForce 2 pour développement transversal de<br />
l’arcade sont des appareils fixes, ils éliminent les défis posés par les patients non coopératifs.<br />
Die TransForce 2 Transversalen Dehnvorrichtungen werden von <strong>Ortho</strong> <strong>Organizers</strong>® als eine Reihe vorangepasster<br />
festsitzender Vorrichtungen zur Korrektur der Zahnbogen<strong>for</strong>m für Patienten mit komprimierten Zahnbogen hergestellt.<br />
Die Vorrichtungen liefern eine kontinuierliche Kraft mit einem voraktivierten Expansionsmodul, in das eine Nickel-Titan-<br />
Federspule in einem Röhrchen integriert ist. Die TransForce 2 Transversale Dehnvorrichtung dient zur Vergrößerung des<br />
Eckzahnabstands und kann im Ober- und Unterkiefern verwendet werden, in denen eine Dehnung zur Beseitigung von<br />
Engständen im Frontzahnbereich oder eine Korrektur der Zahnbogenbreite in komprimierten Kiefern er<strong>for</strong>derlich ist. Das<br />
Expansionsmodul der Transversalen Dehnvorrichtung ist auf eine Kraft von etwa 200 Gramm kalibriert, entsprechend den<br />
zur Zahnbogenentwicklung für eine transversale Expansion benötigten Kräften. Nach dem Einpassen der Vorrichtung ist<br />
keine Aktivierung er<strong>for</strong>derlich. Als festsitzende Apparaturen beseitigen TransForce 2 Transversale Dehnvorrichtungen die<br />
Probleme mit schlecht mitarbeitenden Patienten.<br />
Expansionsmodul<br />
Abstand<br />
zwischen<br />
Eckzähnen<br />
Verstellbarer<br />
Lingualdraht<br />
Expansionsmodul-draht<br />
Figure 1 – Schematics of TransForce 2 <strong>Transverse</strong> Appliance<br />
Inter-canine<br />
Width<br />
Distance<br />
Expansion<br />
Module Wire<br />
Selecting the Correct Size<br />
1 – Measure the existing inter-canine arch width from the gingival margin of the right canine to the gingival margin<br />
of the left canine.<br />
2 – Choose the appliance that will provide the finish desired inter-canine width. The amount of expansion can be<br />
determined based on the fully extended width of the TransForce 2 <strong>Transverse</strong> Appliance. You can achieve up to 8mm of<br />
expansion per TransForce 2 <strong>Transverse</strong> Appliance. Appliances are color-coded <strong>for</strong> easy identification (Table 1).<br />
Table 1 – Measurement <strong>for</strong> TransForce 2 <strong>Transverse</strong> Appliance<br />
Part Numbers Color-Code Inter-canine Inter-canine<br />
Fully Extended<br />
Fully Compressed<br />
424-526 Red 26mm 18mm<br />
424-528 Green 28mm 20mm<br />
424-530 Purple 30mm 22mm<br />
424-532 Pink 32mm 24mm<br />
3 – At any stage in treatment, you can de-activate the appliance by crimping the expansion module tube to compress<br />
it on the wire.<br />
Appliance Fitting<br />
1 – Within three days prior to placing the appliance, prepare the patient <strong>for</strong> molar bands by placing separators.<br />
2 – On the day of placement, select molar bands with lingual sheaths and confirm correct size of bands.<br />
3 – Insert the appliance into both lingual sheath assemblies until the distal extension blade snaps into the latching indent<br />
of each sheath (Figure 2). The lingual wires should be towards the occlusal edge and the expansion module wire should be<br />
towards the gingival, Weingart pliers (Catalog # 201-303) can be used to insert the placement blade into sheath.<br />
Figure 1 – Schéma de l’appareil TransForce 2 transversal<br />
Sélection de la taille<br />
1 – Mesurer la largeur de l’arcade intercanine existante du bord gingival de la canine droite au bord gingival<br />
de la canine gauche.<br />
2 – Choisir l’appareil qui apportera l’espace intercanin final désiré. Le degré d’expansion peut être déterminé en se basant<br />
sur la largeur complètement détendue de l’appareil transversal TransForce 2 . Une expansion allant jusqu’à 8mm peut être<br />
obtenue lors de l’utilisation d’un appareil transversal TransForce 2 . Pour les identifier facilement, les appareils sont codés<br />
par couleur (tableau 1).<br />
Tableau 1 – Mesures pour l’appareil transversal TransForce 2<br />
Numéros de référence Code couleur Largeur intercanine Largeur intercanine<br />
complètement détendue complètement comprimée<br />
424-526 Rouge 26mm 18mm<br />
424-528 Vert 28mm 20mm<br />
424-530 Pourpre 30mm 22mm<br />
424-532 Rose 32mm 24mm<br />
3 – À tout moment durant le traitement, il est possible de désactiver l’appareil en sertissant le tube du module d’expansion<br />
pour le comprimer contre l’arc métallique.<br />
Mise en place de l’appareil<br />
1 – Dans les trois jours précédant la mise en place de l’appareil, préparer le patient pour les bagues molaires en plaçant<br />
les séparateurs.<br />
2 – Le jour de la mise en place, sélectionner des bagues molaires avec des gaines linguales et confirmer la bonne taille<br />
des bagues.<br />
3 – Insérer l’appareil dans les clavettes linguales jusqu’à la butée mésiale (figure 2). Les arcs linguaux doivent se trouver<br />
du côté du bord occlusal ; l’arc du module d’expansion doit lui être dirigé vers les gencives. On peut utiliser des pinces de<br />
Weingart (n° de catalogue : 201-303) pour insérer lame do placement dans la clavette.<br />
Abbildung 1 – Schemadarstellung der TransForce 2 Transversalvorrichtung<br />
Auswahl der korrekten Größe<br />
1 – Messen Sie die bestehende Zahnbogenbreite zwischen den Eckzähnen vom Gingivarand des rechten Eckzahns bis<br />
zum Gingivarand des linken Eckzahns.<br />
2 – Wählen Sie die Vorrichtung aus, die die gewünschte endgültige Breite im Eckzahnbereich liefert. Das Ausmaß der<br />
Expansion kann anhand der vollständig ausgezogenen Breite der TransForce 2 Transversalvorrichtung bestimmt werden.<br />
Sie können eine Expansion von bis zu 8mm je TransForce 2 Transversalvorrichtung erreichen. Zur einfachen Identifikation<br />
sind die Vorrichtungen farbkodiert. (Tabelle 1)<br />
Tabelle 1 – Messung für TransForce 2 Transversalvorrichtung<br />
Artikelnummern Farbkode Eckzahnabstand Eckzahnabstand<br />
Vollständig expandiert Vollständig komprimiert<br />
424-526 Rot 26mm 18mm<br />
424-528 Grün 28mm 20mm<br />
424-530 Violett 30mm 22mm<br />
424-532 Rosa 32mm 24mm<br />
3 – In jeder Phase der Behandlung können Sie die Vorrichtung deaktivieren, in dem Sie das Expansionsmodulröhrchen<br />
zusammendrücken und dadurch auf dem Draht komprimieren.<br />
Einpassen der Vorrichtung<br />
1 – Bereiten Sie den Patienten innerhalb von drei Tagen vor dem Einsetzen der Vorrichtung durch Einbringen von<br />
Separierhilfen auf die Molarenbänder vor.<br />
2 – Am Tag des Einsetzens wählen Sie Molarenbänder mit Lingualfassung aus und bestätigen die korrekte Größe der<br />
Bänder.<br />
3 – Schieben Sie die Vorrichtung in beide Lingualfassungen, bis der distale Klingen<strong>for</strong>tsatz in die Verriegelung der<br />
Fassung einrastet (Abbildung 2). Die lingualen Drähte sollten okklusal und der Expansionsmoduldraht gingival liegen, zur<br />
Einführung des Klingen<strong>for</strong>tsatzes in die Fassung kann eine Weingart-Zange (Katalognr. 201-303) verwendet werden.<br />
Figure 2 – Inserting the Appliance in the Lingual Sheath<br />
4 – For additional support, tie in the appliance by using an elastic ligature or Stainless Steel ligature wire from the front<br />
mesial hook of the blade around to the back of the blade (Figure 3).<br />
Figure 2 – Insertion de l’appareil dans la gaine linguale<br />
4 – Pour un appui supplémentaire, nouer l’appareil en place, soit à l’aide d’une ligature élastique soit d’une ligature<br />
métallique en inox, du crochet mésial frontal de la lame vers l’arrière de la lame (figure 3).<br />
Abbildung 2 – Einführen der Vorrichtung in die Lingualfassung<br />
4 – Als zusätzliche Sicherung fixieren Sie die Vorrichtung durch Anbringen einer elastischen Ligatur oder eines Edelstahl-<br />
Ligaturdrahts vom vorderen, mesialen Haken des Klingen<strong>for</strong>tsatzes um das hintere Ende des Fortsatzes (Abbildung 3).<br />
Figure 3 – Securing the Appliance in the Lingual Sheath Using Stainless Steel Ligature<br />
5 – The appliance should be tried on patients’ model prior to cementing to verify size and to make any adjustments where<br />
necessary (Figure 4).<br />
Figure 3 – Fixation de l’appareil dans la gaine linguale à l’aide d’une ligature en acier inoxydable<br />
5 – Essayer d’abord l’appareil sur le modèle patient avant de cimenter afin de vérifier la taille et de faire les ajustements<br />
nécessaires (figure 4).<br />
Abbildung 3 – Sicherung der Vorrichtung in der Lingualfassung mit Edelstahl-Ligatur<br />
5 – Die Vorrichtung sollte vor dem Zementieren auf dem Patientenmodell einprobiert werden, um die Größe zu verifizieren<br />
und bei Bedarf die nötigen Korrekturen vorzunehmen (Abbildung 4).<br />
Figure 4 – Fitting the Appliance Prior to Cementing<br />
Note: It is easier to attach the molar bands to the TransForce 2 <strong>Transverse</strong> Appliance and fit the appliance in as one piece,<br />
rather than fitting the bands first then inserting the appliance in the lingual sheaths.<br />
6 – Minor adjustments may be required to adapt the appliance to each individual case:<br />
Lingual Wires Anterior Section – The lingual wires are adjustable and may be used to align irregular anterior teeth<br />
from the lingual aspect. The lingual wires should be near the gingival margin of the teeth and can also be trimmed if<br />
shorter arms are preferred.<br />
Note: It is essential to expand the inter-canine width to accommodate lingually displaced incisors. There<strong>for</strong>e, the lingual<br />
wires should remain passive until the necessary space has been created.<br />
Expansion Module Wire Anterior Section – If the appliance is slightly too big and does not clear the bicuspids, you<br />
can adjust the appliance by placing a bend on the anterior corners of the expansion module wire using pliers.<br />
Expansion Module Wire – Lingual Sheath Section – You can bend the expansion module wire towards the occlusal<br />
margin to prevent tissue impingement. If additional expansion of molar width is required, the expansion module wire may<br />
be held with pliers distal to the canines and bent buccally.<br />
7 – Compress the appliance to enable the lingual wire to fit within the dental arch and maintain compressed position<br />
with a ¼”, 6 ½ oz. elastic (Figure 5).<br />
Figure 4 – Essayage de l’appareil avant cimentation<br />
Remarque : il est plus facile d’attacher les bagues des molaires à l’appareil transversal TransForce 2 , puis de mettre en place<br />
l’appareil d’un bloc que de mettre les bagues, puis d’insérer l’appareil dans les gaines linguales.<br />
6 – Des ajustements mineurs peuvent être nécessaires pour adapter l’appareil à chaque cas individuel :<br />
Arcs linguaux, section antérieure – Les arcs linguaux sont ajustables et peuvent être utilisés pour aligner les dents<br />
antérieures en lingual. Les arcs linguaux doivent être situés juste en retrait du bord incisif des dents. Ils peuvent aussi<br />
être ajustés en longueur.<br />
Remarque : il est essentiel d’agrandir l’espace intercanin afin de faire de la place pour les incisives déplacées lingualement.<br />
Aussi, les arcs linguaux doivent-ils demeurer passifs jusqu’à ce que l’espace nécessaire ait été créé.<br />
Arc du module d’expansion, section antérieure – Si l’appareil est un tout petit peu trop grand et interfère avec les<br />
prémolaires, l’ajuster en créant un coude dans les coins antérieurs de l’arc du module d’expansion à l’aide de pinces.<br />
Arc du module d’expansion – Section de la gaine linguale – L’arc du module d’expansion peut être coudé vers le<br />
bord occlusal pour qu’il ne touche pas les tissus. Si une expansion supplémentaire de l’espace molaire est nécessaire, l’arc<br />
du module peut être maintenu avec des pinces de façon distale par rapport aux canines et coudé buccalement.<br />
7 – Comprimer l’appareil de façon à ce que l’arc métallique lingual soit contenu dans l’arcade dentaire et le maintenir<br />
comprimé à l’aide d’un élastique de 6,35 mm et de 184,27 g (figure 5).<br />
Abbildung 4 – Einpassen der Vorrichtung vor dem Zementieren<br />
Hinweis: Es ist einfacher, die Molarenbänder an der TransForce 2 Transversalvorrichtung zu befestigen und die Vorrichtung<br />
in einem Stück einzusetzen, anstatt zuerst die Bänder zu zementieren und dann die Vorrichtung in die Lingualfassungen<br />
einzuführen.<br />
6 – Es können kleinere Korrekturen er<strong>for</strong>derlich sein, um die Vorrichtung an den individuellen Fall anzupassen.<br />
Lingualdrähte anteriorer Abschnitt – Die Lingualdrähte sind verstellbar und können zur Ausrichtung unregelmäßig<br />
stehender Frontzähne von lingual verwendet werden. Die Lingualdrähte sollten nahe dem incisalen Rand der Zähne<br />
verlaufen und können auch gekürzt werden, wenn kürzere Arme bevorzugt werden.<br />
Hinweis: Es ist entscheidend, den Eckzahnabstand zu vergrößern, um nach lingual verschobene Schneidezähne<br />
einzuordnen. Deshalb sollten die Lingualdrähte passiv bleiben, bis der benötigte Platz geschaffen wurde.<br />
Expansionsmoduldraht anteriorer Abschnitt – Wenn die Vorrichtung etwas zu groß ist und die Prämolaren nicht<br />
frei lässt, können Sie das durch eine Biegung mit einer Zange an den anterioren Ecken des Expansionmoduldrahts<br />
korrigieren.<br />
Expansionsmoduldraht – Abschnitt an lingualer Fassung – Sie können den Expansionsmoduldraht nach okklusal<br />
biegen, um ein Quetschen von Gewebe zu vermeiden. Wenn eine zusätzliche Erweiterung des Molarenabstands<br />
er<strong>for</strong>derlich ist, kann der Expansionsmoduldraht distal der Eckzähne mit einer Zange festgehalten und nach bukkal<br />
gebogen werden.<br />
7 – Komprimieren Sie die Vorrichtung mit einem 6,35mm, 184.27g. Gummizug, damit der Lingualdraht in den Zahnbogen<br />
passt und die Vorrichtung zusammengedrückt bleibt (Abbildung 5).<br />
Figure 5 – Using an Elastic to Hold the Appliance in Compressed Position<br />
8 – Mix band cement and place in both molar bands.<br />
9 – Place and seat one molar band and then the other band. The expansion module should be positioned toward the<br />
gingival. Check <strong>for</strong> secure fit until the cement has hardened. Clean off excess cement after cement has set and remove the<br />
elastic band (step 7) to activate the appliance.<br />
10 – The device is activated immediately and will provide slow, continuous <strong>for</strong>ce to expand the arch up to 2mm every 6 to<br />
8 weeks. The appliance can achieve up to 8mm of total expansion.<br />
11 – After placement and throughout treatment, additional minor adjustments can be made to the appliance intra-orally,<br />
if necessary.<br />
Maintenance<br />
After fitting the appliance, maintenance should be minimal and may be limited to routine visits of 6 to 8 week intervals<br />
to check progress.<br />
If lingual wires are used to control the alignment of the incisors a slight adjustment may be necessary. This is normally<br />
done intra-orally with triple beak or concave-convex pliers.<br />
Removal / Retention<br />
To remove the appliance, simply cut the Stainless Steel ligature wire or stretch and remove elastic ligature, then snap the<br />
appliance out of each molar lingual sheath with Weingart Pliers (Catalog No. 201-303) (Figure 6).<br />
Figure 5 – À l’aide d’un élastique, maintenir l’appareil en position comprimée<br />
8 – Mélanger le ciment pour les bagues et le placer dans les deux bagues pour les molaires.<br />
9 – Positionner et mettre en place une bague, puis l’autre. Le module d’expansion doit être positionné de façon gingivale.<br />
Vérifier que le positionnement de la bague est bon jusqu’à ce que le ciment se durcisse. Une fois que le ciment a pris,<br />
enlever l’excès et retirer l’élastique (étape 7) pour activer l’appareil.<br />
10 – L’appareil est immédiatement activé et fournira une <strong>for</strong>ce continue et lente qui accroîtra l’arcade jusqu’à 2 mm toutes<br />
les 6 à 8 semaines. L’appareil peut fournir une expansion totale de 8mm.<br />
11 – Une fois l’appareil en place et tout au long du traitement, il peut s’avérer nécessaire de lui apporter des ajustements<br />
mineurs en bouche.<br />
Suivi<br />
Une fois l’appareil en place, le suivi devrait être minimal se limitant à des visites de routine à des intervalles de 6 à 8<br />
semaines pour vérifier le progrès.<br />
Si les arcs métalliques linguaux sont utilisés pour contrôler l’alignement des incisives, un léger ajustement peut être<br />
nécessaire. L’ajustement est normalement fait intra-oralement à l’aide de pinces à trois becs ou concaves/convexes.<br />
Retrait / Rétention<br />
Pour retirer l’appareil, couper simplement la ligature en acier inoxydable ou bien tirer sur la ligature élastique pour<br />
l’enlever, puis dégager l’appareil de chaque gaine lingual molaire avec des pinces de Weingart (n° de catalogue<br />
201-303) (figure 6).<br />
Abbildung 5 – Halten der Vorrichtung in komprimierter Position mit einem Gummizug<br />
8 – Mischen Sie den Bandzement an und setzen Sie beide Molarenbänder ein.<br />
9 – Dabei zuerst das eine und dann das andere Band einsetzen. Das Expansionsmodul sollte nach gingival zeigen.<br />
Überprüfen Sie den sicheren Sitz, bis der Zement ausgehärtet ist. Nach dem Aushärten des Zements Überschüsse und das<br />
Gummiband (Schritt 7) entfernen, um die Vorrichtung zu aktivieren.<br />
10 – Die Vorrichtung ist so<strong>for</strong>t aktiviert und sorgt für langsame, kontinuierliche Kraftapplikation zur Erweiterung<br />
des Zahnbogens um bis zu 2 mm alle 6 bis 8 Wochen. Die Vorrichtung kann eine Gesamtexpansion von bis zu 8mm<br />
erreichen.<br />
11 – Nach dem Einsetzen und während der gesamten Behandlung können bei Bedarf jederzeit intraoral weitere kleinere<br />
Korrekturen an der Vorrichtung vorgenommen werden.<br />
Instandhaltung<br />
Nach dem Einsetzen der Vorrichtung sind keine größeren Maßnahmen zur Instandhaltung er<strong>for</strong>derlich; im Normalfall<br />
beschränken sich diese auf Routinekontrollen in Abständen von 6 bis 8 Wochen, um den Behandlungs<strong>for</strong>tschritt zu<br />
überprüfen.<br />
Wenn Lingualdrähte zur Stellungskorrektur der Schneidezähne verwendet werden, können kleinere Anpassungen<br />
er<strong>for</strong>derlich sein. Diese werden normalerweise intraoral mit einer Drahtbiege- oder Hohlkehlzange vorgenommen.<br />
Entfernung/Retention<br />
Um die Vorrichtung zu entfernen, schneiden Sie einfach den Edelstahl-Ligaturdraht durch oder dehnen und entfernen die<br />
elastische Ligatur; dann lösen Sie die Vorrichtung mit einer Weingart-Zange (Katalognr. 201-303) aus der Lingualfassung<br />
am Molarenband (Abbildung 6).<br />
Figure 6 – Removal of Appliance<br />
The appliance can be de-activated and left in place as a retainer after the necessary expansion has been accomplished. To<br />
de-activate the appliance crimp expansion module tube onto the wire.<br />
Figure 6 – Retrait de l’appareil<br />
L’appareil peut être désactivé et laissé en place pour servir d’appareil de contention une fois que l’expansion nécessaire a<br />
été atteinte. Pour désactiver l’appareil, sertir le tube du module d’expansion sur l’arc métallique.<br />
Abbildung 6 – Entfernen der Vorrichtung<br />
Die Vorrichtung kann deaktiviert und als Retainer im Mund belassen werden, wenn die er<strong>for</strong>derliche Expansion erreicht<br />
wurde. Zur Deaktivierung der Vorrichtung das Expansionsmodulröhrchen auf den Draht andrücken.
ISTRUZIONI PER L’USO<br />
TransForce ®2 Apparecchi ortodontici per<br />
lo sviluppo trasversale delle arcate<br />
Gli apparecchi ortodontici per lo sviluppo trasversale delle arcate TransForce 2 sono prodotti da <strong>Ortho</strong> <strong>Organizers</strong>® come<br />
una serie di apparecchi fissi pre-adattati, progettati per correggere la <strong>for</strong>ma dell’arcata nei pazienti con arcate dentali<br />
contratte. Questi apparecchi esercitano una <strong>for</strong>za lenta, in modo continuo, attraverso un modulo di espansione preattivato<br />
che incorpora una molla a spirale in nichel titanio, inserita in un tubo. L’apparecchio trasversale TransForce 2 è<br />
progettato per aumentare la larghezza (distanza) inter-canini e può essere utilizzato nelle arcate superiori o inferiori dove<br />
sia richiesta l’espansione dell’arcata per risolvere l’affollamento dentale nei segmenti labiali o correggere la larghezza<br />
nelle arcate contratte. Il modulo di espansione dell’apparecchio trasversale è calibrato per una <strong>for</strong>za di circa 200 grammi, in<br />
con<strong>for</strong>mità con i requisiti di <strong>for</strong>za necessari per lo sviluppo delle arcate nell’espansione trasversale. Dopo che l’apparecchio<br />
è stato adattato, non è richiesta alcuna attivazione. Essendo apparecchi fissi, gli Apparecchi TransForce 2 per lo sviluppo<br />
trasversale delle arcate eliminano i problemi che si incontrano nei pazienti con scarsa aderenza al trattamento.<br />
Modulo di<br />
espansione<br />
Filo linguale<br />
regolabile<br />
INSTRUCCIONES DE USO<br />
Aparatos para Desarrollo Transversal<br />
de Arcada TransForce ®2<br />
424-500, 424-526 – 424-532 424-500, 424-526 – 424-532<br />
Los Aparatos para Desarrollo Transversal de Arcada TransForce 2 son fabricados por <strong>Ortho</strong> <strong>Organizers</strong>® como<br />
parte de una serie de aparatos fijos, preajustados, diseñados para corregir la <strong>for</strong>ma de la arcada en pacientes con arcadas<br />
dentales constreñidas. Los aparatos aplican una fuerza leve, continua, mediante un módulo de expansión preactivado que<br />
consiste en un muelle bobinado de níquel-titanio dentro de un tubo. El Aparato Transversal TransForce 2 está diseñado para<br />
aumentar el espacio entre los caninos y puede utilizarse en arcadas superiores o inferiores donde se requiera expandir<br />
para acomodar un apilamiento en los segmentos labiales o corregir el espacio transversal de una arcada cuando esta se<br />
encuentra constreñida. El módulo de expansión del Aparato Transversal se calibra aproximadamente a 200gr de fuerza, de<br />
acuerdo con los requisitos de fuerza necesarios para el desarrollo de una expansión transversal dentro de una arcada. Una<br />
vez insertado el aparato no requiere activación. Al ser aparatos de fijación, los Aparatos de Desarrollo de Arcada Transversal<br />
TransForce 2 eliminan los problemas con aquellos pacientes que no cumplen.<br />
Módulo de<br />
Expansión<br />
Alambre Lingual<br />
Ajustable<br />
Misura della<br />
larghezza<br />
inter-canini<br />
Filo del modulo<br />
di espansione<br />
Distancia<br />
Intercanina<br />
Alambre del Módulo de<br />
Expansión<br />
Figura 1 – Rappresentazione schematica dell’Apparecchio Trasversale TransForce 2<br />
Figura 1 – Esquema de aplicación del Aparato Transversal TransForce 2<br />
Como seleccionar la talla correcta<br />
1 – Mida el ancho intercanino de la arcada desde el margen gingival del canino derecho hasta el margen gingival del<br />
canino izquierdo.<br />
2 – Elija el aparato que proporcione el adecuado espacio intercanino definitivo. El rango de expansión puede obtenerse<br />
a partir del Aparato Transversal TransForce 2 en extensión total. Se puede conseguir hasta 8mm de expansión por cada<br />
Aparato Transversal TransForce 2 . Para conocer el rango de expansión que puede obtenerse con el Aparato Transversal<br />
TransForce 2 ver Tabla 1. Cada aparato se rige por un código de colores para su fácil identificación (Tabla 1).<br />
Tabla 1 – Medidas del Aparato Transversal TransForce 2<br />
Número de parte Código-color Extensión Total intercanina Compresión total<br />
intercanina<br />
424-526 Rojo 26mm 18mm<br />
424-528 Verde 28mm 20mm<br />
424-530 Morado 30mm 22mm<br />
424-532 Rosa 32mm 24mm<br />
3 – El aparato puede ser desactivado en cualquier momento del tratamiento. Esto se consigue “crimpando” el tubo con el<br />
módulo de expansión, comprimiéndolo contra el alambre.<br />
Como Posicionar el Aparato<br />
1 – Dentro de los tres días previos al posicionamiento del aparato, prepare al paciente para las bandas molares aplicando<br />
separadores.<br />
2 – El día del posicionamiento, seleccione bandas molares con vainas linguales y confirme que su tamaño es el correcto.<br />
3 – Inserte el aparato en ambos ensambles de las bandas linguales hasta que el extremo distal de la lámina conecte con<br />
la indentación en pestillo de cada una de los cajetines (Figura 2). Los alambres linguales deben situarse oclusalmente y el<br />
alambre del módulo de expansión debe ir en dirección gingival. Se pueden utilizar las pinzas de Weingart (Catálogo No.<br />
201-303) para insertar la bayoneta dentro del cajetín.<br />
Selezionare la misura giusta.<br />
1 – Misurare la profondità dell’arcata intercanini, dal margine gengivale del canino destro fino al margine gengivale<br />
del canino sinistro.<br />
2 – Scegliere l’apparecchio che <strong>for</strong>nirà la larghezza finale desiderata tra i canini. Il grado di espansione può essere stabilito<br />
in base alla larghezza in estensione completa dell’Apparecchio Trasversale TransForce 2 . Si possono ottenere fino a 8mm<br />
di espansione con l’Apparecchio Trasversale TransForce 2 . Gli apparecchi sono provvisti di un codice a colori per facilitarne<br />
l’identificazione (Tabella 1)<br />
Tabella 1 – Misure dell’Apparecchio Trasversale TransForce 2<br />
Numero di codice Codice a colori Distanza inter-canini Distanza inter-canini<br />
in estensione completa in compressione completa<br />
424-526 Rosso 26mm 18mm<br />
424-528 Verde 28mm 20mm<br />
424-530 Viola 30mm 22mm<br />
424-532 Rosa 32mm 24mm<br />
3 – In qualsiasi stadio del trattamento, è possibile disattivare l’apparecchio piegando il tubo del modulo di espansione<br />
per comprimerlo sul filo.<br />
Inserimento dell’apparecchio<br />
1 – Nei tre giorni che precedono l’inserimento dell’apparecchio, preparare il paziente per le bande per molari inserendo<br />
i separatori.<br />
2 – Nel giorno dell’inserimento, scegliere bande molari provviste di cannule linguali e provarle nella bocca del paziente per<br />
confermare di avere scelto le bande delle dimensioni corrette.<br />
3 – Inserire l’apparecchio in entrambi gli assemblaggi delle cannule linguali fino a che la lama di estensione distale si<br />
inserisce a scatto nella dentellatura di chiusura di ogni cannula (Figura 2). I fili linguali dovrebbero essere rivolti verso il<br />
bordo occlusale e il filo del modulo di espansione dovrebbe essere rivolto verso il gengivale, possono essere utilizzate le<br />
pinze Weingart (Num.catalogo 201-303) per inserire l’ansa a baionetta nella cannula linguale.<br />
Figure 2 – Modo de insertar el aparato en la Vaina Lingual<br />
4 – Para obtener un soporte adicional, asegure la posición del aparato aplicando una ligadura elástica o un alambre de<br />
ligadura de acero inoxidable desde el gancho frontomedial de la lámina girándola hacia su cara posterior (Figura 3).<br />
Figura 2 – Inserimento dell’Apparecchio nella cannula linguale<br />
4 – Per garantire un ulteriore sostegno, legare l’apparato utilizzando una legatura elastica o un filo di legatura in acciaio<br />
inossidabile dal gancio mesiale anteriore della lama facendolo passare intorno alla parte posteriore della lama (Figura 3).<br />
Figure 3 – Modo de fijar el Aparato en la Vaina Lingual mediante una Ligadura de Acero Inoxidable.<br />
5 – El aparato debe ser previamente comprobado en el modelo del paciente para verificar su tamaño antes de cementarlo<br />
o si es el caso, para realizar algún ajuste necesario (Figura 4).<br />
Figura 3 – Fissaggio dell’Apparecchio nella cannula linguale utilizzando una legatura in acciaio inossidabile<br />
5 – L’apparecchio deve essere provato sul modello del paziente prima di cementarlo per verificarne le dimensioni e<br />
apportare qualsiasi modifica eventualmente richiesta (Figura 4).<br />
®<br />
Figure 4 – Modo de Insertar el Aparato antes de Cementar<br />
Nota: Es más fácil aplicar las bandas molares al Aparato Transversal TransForce 2 y luego insertarlo en una sola pieza, en<br />
lugar de encajar las bandas primero y luego insertar el aparato en las vainas linguales.<br />
6 – Pueden ser necesarios algunos ajustes leves para adaptar el aparato a cada caso individual.<br />
Alambres Linguales – Sección anterior – Los alambres linguales son ajustables y pueden usarse para alinear piezas<br />
anteriores malposicionadas en la cara lingual. Los alambres linguales deben situarse cerca del margen gingival de la pieza<br />
dentaria y también pueden recortarse si se prefiere un brazo mas corto.<br />
Nota: Es esencial expandir el espacio intercanino para alojar los incisivos desplazados lingualmente. Por lo tanto, los<br />
alambres linguales deberían permanecer pasivos hasta que se haya creado el espacio necesario.<br />
Alambre del Módulo de Expansión – Sección Anterior – Si el aparato es ligeramente más grande y no hay espacio<br />
entre premolares, con unas pinzas se puede ajustar el aparato poniendo un doblez en las esquinas anteriores del alambre<br />
del módulo de expansión.<br />
Alambre del Módulo de Expansión – Sección Vaina Lingual – Se puede curvar el alambre del módulo de expansión<br />
hacia el margen oclusal para evitar el pinzamiento con el tejido blando. Si se necesita una expansión adicional del espacio<br />
molar, el alambre del módulo de expansión puede sujetar con unas pinzas distalmente a los caninos y curvarse hacia<br />
bucal.<br />
7 – Comprimir el aparato para hacer que el alambre lingual se inserte dentro de la arcada dental y mantener la posición en<br />
compresión con elásticos a 6,35mm, 184,27 g. (Figura 5).<br />
Distributed by:<br />
Figura 4 – Prova dell’ Apparecchio prima di cementarlo<br />
Nota: È più facile collegare le bande molari all’Apparecchio Trasversale TransForce 2 e inserire l’apparecchio in un unico<br />
pezzo, invece di adattare prima le bande e inserire successivamente l’apparecchio nelle cannule linguali.<br />
6 – Potrebbero essere richiesti piccoli aggiustamenti per adattare l’apparato a ogni singolo caso:<br />
Fili linguali della sezione anteriore – I fili linguali sono regolabili e possono essere utilizzati per allineare denti<br />
anteriori irregolari posizionati sul versante linguale. I fili linguali dovrebbero essere appena in prossimità del margine<br />
gengivale dei denti e possono essere anche tagliati se si preferisce avere bracci più corti.<br />
Nota: È essenziale aumentare la larghezza inter-canini per accomodare gli incisivi spostati sul versante linguale. Pertanto,<br />
i fili linguali devono rimanere passivi fino a quando non sia stato creato lo spazio necessario.<br />
Filo del modulo di espansione per la sezione – Se l’apparecchio è leggermente più grande e non lascia liberi i<br />
premolari, lo si può regolare inserendo un’ansa sugli angoli anteriori del filo del modulo di espansione, utilizzando le<br />
pinze.<br />
Filo del modulo di espansione, sezione della cannula linguale, è possibile piegare il filo del modulo di espansione<br />
verso il margine occlusale per evitare che urti contro i tessuti. Se è richiesto un ulteriore aumento della larghezza tra<br />
i molari, il filo del modulo di espansione può essere tenuto con le pinze distalmente ai canini e piegato in direzione<br />
vestibolare.<br />
7 – Comprimere l’apparecchio per consentire al filo linguale di adattarsi all’interno dell’arcata dentale e tenerlo in<br />
posizione compressa con un elastico 6,35mm e 184,27g.(Figura 5).<br />
<strong>Ortho</strong> <strong>Organizers</strong>, Inc.<br />
1822 Aston Avenue<br />
Carlsbad, CA 92008<br />
USA<br />
Tel: 800.547.2000, +(1) 760 448 8600<br />
Fax: 800.888.7244, +(1) 760 448 8607<br />
USASales@<strong>Ortho</strong><strong>Organizers</strong>.com<br />
IntlOrders@<strong>Ortho</strong><strong>Organizers</strong>.com<br />
Visit the <strong>Ortho</strong> <strong>Organizers</strong>’ Web site<br />
at <strong>Ortho</strong><strong>Organizers</strong>.com<br />
Figure 5 – Modo de mantener al Aparato en compresión mediante elásticos<br />
8 – Hacer la mezcla de cemento y aplicarla a ambas bandas molares.<br />
9 – Poner y asentar una banda molar y luego la siguiente. El módulo de expansión deberá posicionarse en dirección<br />
gingival. Asegúrese de un encajado firme hasta que el cemento haya fraguado y retire la banda elástica (paso 7) para<br />
activar el aparato.<br />
10 – El aparato se activa inmediatamente y aplicará una fuerza leve, continua que expandirá la arcada hasta 2mm cada 6<br />
a 8 semanas. El aparato puede alcanzar hasta 8mm de expansión total.<br />
11 – Después de posicionarlo y a lo largo de todo el tratamiento, pueden realizarse ajustes menores adicionales intraorales<br />
si es necesario.<br />
Mantenimiento<br />
Después de insertar el aparato, el mantenimiento suele ser mínimo y se debe limitar a visitas programadas a intervalos de<br />
6 a 8 semanas para comprobar los avances.<br />
Si se usan alambres linguales para controlar el alineamiento de los incisivos, puede ser necesario un ligero ajuste. Esto<br />
normalmente se realiza intraoralmente con unas pinzas de pico triple o pinzas cóncavo-convexas.<br />
Extracción/Retención<br />
Para retirar el aparato, simplemente corte la ligadura de acero inoxidable o estire y retire la ligadura elástica, luego<br />
desconecte el aparato de sus pestillos en cada vaina molar lingual con las pinzas de Weingart (Catálogo No. 201-303)<br />
(Figura 6).<br />
Figura 5 – Uso di un elastico per mantenere l’apparecchio in posizione compressa<br />
8 – Miscelare il cemento per bande e inserire entrambe le bande molari.<br />
9 – Inserire e posizionare la prima banda e successivamente l’altra banda. Il modulo di espansione deve essere posizionato<br />
verso il lato gengivale. Verificare che siano fissate saldamente fino a quando il cemento non si sia indurito. Rimuovere il<br />
cemento in eccesso, dopo che si è indurito, e rimuovere la banda elastica (passaggio 7) per attivare l’apparecchio.<br />
10 – Il dispositivo è immediatamente attivato e produrrà una <strong>for</strong>za lenta e continua per estendere l’arcata anche di 2mm<br />
ogni 6 - 8 settimane. Questo apparecchio consente di raggiungere fino a 8mm di espansione totale.<br />
11 – Dopo il suo inserimento e durante tutto il trattamento, se necessario, possono essere apportati altri piccoli<br />
aggiustamentiintra-oralmente.<br />
Manutenzione<br />
Dopo l’adattamento dell’apparecchio, la manutenzione dovrebbe essere minima e può essere limitata a visite regolari a<br />
intervalli di 6 - 8 settimana per controllare i progressi.<br />
Se vengono utilizzati i fili linguali per controllare l’allineamento degli incisivi può essere necessario un piccolo<br />
aggiustamento che può essere normalmente eseguito intraoralmente con una pinze a tre becchi e con una pinza<br />
conconcavo-convessa.<br />
Rimozione/Ritenzione<br />
Per rimuovere l’apparecchio tagliare semplicemente il filo di legatura in acciaio inossidabile oppure tirare e rimuovere la<br />
legatura elastica e quindi estrarre a scatto l’apparecchio da ciascuna cannula linguale sulla banda molare utilizzando le<br />
pinze Weingart (Num.catalogo 201-303) (Figura 6).<br />
mdi Europa GmbH<br />
Langenhagener Str. 71<br />
30855 Langenhagen, Germany<br />
49 511 39 08 9530<br />
2<br />
Figura 6 – Modo de retirar el aparato<br />
El aparato puede ser desactivado y dejado en su sitio como retenedor una vez que se ha conseguido la expansión necesaria.<br />
Para desactivar el aparato realice un “crimpado” del tubo del módulo de expansión contra el alambre.<br />
Figura 6 – Rimozione dell’apparecchio<br />
L’apparecchio può essere disattivato e lasciato in sede come un retainer dopo avere ottenuto l’espansione necessaria. Per<br />
disattivare l’apparecchio schiacciare il tubo del modulo di espansione per comprimerlo sul filo.<br />
<strong>Ortho</strong> <strong>Organizers</strong> and TransForce are registered<br />
trademarks of <strong>Ortho</strong> <strong>Organizers</strong>, Inc.<br />
INS63A<br />
Rev C


