digit al - Auta
digit al - Auta
digit al - Auta

Create successful ePaper yourself
Turn your PDF publications into a flip-book with our unique Google optimized e-Paper software.
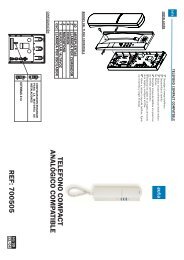
Materi<strong>al</strong> y funcionamiento/Materi<strong>al</strong> and Functioning<br />
Relación de Materi<strong>al</strong>/List of Materi<strong>al</strong>s<br />
COMPONENTES NOMBRE UNIDADES REF.<br />
COMPONENTS NAME UNITS<br />
-Monitor M. compact DIGITAL (1) 702005<br />
Monitor Compact DIGITAL M.<br />
-Distribuidor Video DV-4S (1) 750498<br />
Video Distributor DV-4S<br />
-Mod. Conex. DIGITAL Mod. Conex. COMPACT DIG. (1) 750299<br />
DIGITAL Bracket DIG. COMPACT bracket<br />
-Placa Placa DIGITAL TECLADO (2) 6*****<br />
Panel<br />
KEYPAD DIGITAL Panel<br />
-Mod. F/V COMPACT Dig. MFV COMPACT DIGITAL (1)<br />
DIG. F/V COMPACT Mod. DIGITAL COMPACT MFV<br />
-Caja de empotrar Caja empotrar (2) 50902*<br />
Mounting Box Mounting Box<br />
-Alimentador ATF-98 (1) 715103<br />
Power Supply Unit ALV - 3.5A (1) 715403<br />
-Alimentador aux. ATF-12 (1) 715203<br />
Aux. Power Supply<br />
-Módulo de control Módulo de control (1) 600005<br />
Control Module Control Module<br />
-Mód. filas columnas Mód. filas columnas (1) 600002<br />
Rows & Columns Mod. Rows & Columns Mod.<br />
-Abrepuertas Abrepuertas (1) 720001<br />
Funcionamiento/Functioning<br />
Llamada desde la placa de c<strong>al</strong>le<br />
Para re<strong>al</strong>izar la llamada a una vivienda deberemos teclear el código de la vivienda y pulsar campana , seguidamente la placa envia el código correspondiente y el teléfono<br />
o monitor genera el tono de llamada durante un tiempo max. de 30 seg., en la placa aparece el mensaje "*LLAMANDO* NUEVO COD _ _ _".<br />
En caso de error <strong>al</strong> introducir el código de la vivienda se puede rectificar pulsando la tecla C y repitiendo el proceso.<br />
Establecimiento de la comunicación<br />
Si durante la fase de llamada levantamos el brazo telefónico estableceremos la comunicación, en la placa de teclado aparecerá el mensaje "COMUNICACIÓN ESTABLECIDA".<br />
Durante la comunicación podremos accionar el abrepuertas del acceso presionando la tecla correspondiente del teléfono o monitor.<br />
La comunicación terminará <strong>al</strong> colgar el brazo telefónico o transcurrir más de 1 m 30 seg. En ambos casos desaparecerá el<br />
mensaje de "COMUNICACION ESTABLECIDA", aparecerá el mensaje "FIN DE LA LLAMADA" y a continuación el mensaje<br />
"INTRODUCIR COD _ _ _"<br />
Función del abrepuertas en la placa.<br />
Para re<strong>al</strong>izar el accionamiento del abrepuertas mediante el teclado de la placa procederá como se describe seguidamente:<br />
1.- Pulsar y a continuación introducir el código de cuatro dígitos para la apertura(El cod. por defecto es 0000).<br />
2.- Pulsar de nuevo y se accionará el abrepuertas.<br />
Person<strong>al</strong>izar el cod. de abrepuertas.<br />
Para re<strong>al</strong>izar el accionamiento del abrepuertas mediante le teclado de la placa se procederá como se describe seguidamente:<br />
1.- Pulsar e introducir el código 1664, pulsar .<br />
2.- En la placa aparece el mensaje "ANTIGUO CODIGO _ _ _ _", teclear el cod. antiguo y pulsar .<br />
3.- A continuación aparece el mensaje "NUEVO CODIGO _ _ _ _", teclear el código nuevo y pulsar . El cod. ya está cambiado.<br />
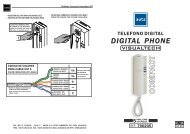
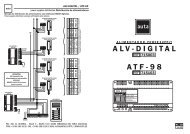
Esquemas Unifilares/Schematic Representation<br />
ALIMENTADOR<br />
POWER SUPPLY<br />
4<br />
TF. COMPACTDIGITAL<br />
DIGITAL COMPACT PH.<br />
4<br />
4<br />
4<br />
(1) Unidades según inst<strong>al</strong>ación<br />
Units depending on inst<strong>al</strong>lation<br />
(2) Ver mod., serie y ref. de la placa de c<strong>al</strong>les<br />
(3)<br />
See references on cat<strong>al</strong>ogue<br />
*El ALV-3.5A no suministra corriente <strong>al</strong>terna<br />
(R-C) por lo que se debe inst<strong>al</strong>ar junto a un ATF-12 para<br />
accionar el abrepuertas y la iluminación de los tarjeteros.<br />
*The power supply unit ALV-DIGITAL 3.5A does not give A/C<br />
current (R-C). So it has to be inst<strong>al</strong>led with and ATF-12 power<br />
supply unit to release the electric<strong>al</strong> strike & to light the cardholder<br />
ALIMENTADOR<br />
POWER SUPPLY<br />
MAX.<br />
ATF-98 20 10<br />
ALV-3.5A + ATF-12* 80 40<br />
C<strong>al</strong>l<br />
In the <strong>digit</strong><strong>al</strong> system the c<strong>al</strong>l is done in 2 phases:<br />
1st phase: Di<strong>al</strong> the flat number on the keypad and press<br />
2nd phase: The flat number code is transmited and the corresponding phone would ring 4 times during 30 seconds. The message “*CALLING* NEW CODE_ _ _” is showed up on<br />
the panel.<br />
The c<strong>al</strong>l can be readdressed by repeating 1st phase.<br />
The c<strong>al</strong>l can be cancelled by pressing C key.<br />
Communication<br />
Picking up the hanset, the communication starts. The LCD screen would show the message “COMMUNICATION ESTABLISHED”.<br />
Pressing the door release button at phone, the door will be released.<br />
Communication will be finish by hanging up the hanset or after 90 seconds. The LCD screen will show the message “END OF CALL”, then the message “INTRODUCE CODE_ _ _”<br />
will be show again.<br />
Remark:<br />
The electric<strong>al</strong> strike is activated by 2 seconds impulses.<br />
Door opener function on the panel<br />
The door release can be released from the panel´s keypad:<br />
1st phase: Push and di<strong>al</strong> the code 0000 (code from factory).<br />
2nd phase: Push again, the door will be released.<br />
How to modify the door release code<br />
1st phase: Push and di<strong>al</strong> the code 1664, then push again.<br />
2nd phase: The panel will show you the message “OLD CODE_ _ _”. Di<strong>al</strong> the old code (0000 if is the first time the code is modified) and push .<br />
1 ACCESO F<br />
1 ACCES A<br />
SECCIONES<br />
W. SECTIONS<br />
HASTA/UP TO<br />
100 M.<br />
HASTA/UP TO<br />
200 M.<br />
Alim. SEPARADA<br />
(SEPARATE Supply<br />
1 mm² (AWG17) 1.5 mm² (AWG15)<br />
0.5 mm² (AWG20) 1 mm² (AWG17)<br />
EL CABLEADO NO DEBE PASAR CERCA DE LA LINEA ELÉCTRICA<br />
THE WIRING MUST NOT BE RUN CLOSE TO THE ELECTRICAL LINE<br />
(<br />
1 ACCESO FV<br />
1 ACCES AV<br />
COAXIAL<br />
1<br />
3<br />
COAXIAL<br />
3<br />
1<br />
MAX.<br />
MONITOR COMPACT DIGITAL<br />
DIGITAL COMPACT MONITOR<br />
TECLADO/KEYPAD<br />
Portero teclado<br />
DIGITAL<br />
1 2 3<br />
1 2 3<br />
4 5 6<br />
4 5 6<br />
2<br />
220 Vac<br />
7 8 9<br />
C 0<br />
Abrepuertas<br />
Door Opener<br />
4 2<br />
2<br />
220 Vac<br />
7 8 9<br />
C 0<br />
4 2<br />
Abrepuertas<br />
Door Opener<br />
7 7