

SAFEFIX plus TT 9 - 18 kg - iSiteTV
SAFEFIX plus TT 9 - 18 kg - iSiteTV
SAFEFIX plus TT 9 - 18 kg - iSiteTV

You also want an ePaper? Increase the reach of your titles
YUMPU automatically turns print PDFs into web optimized ePapers that Google loves.
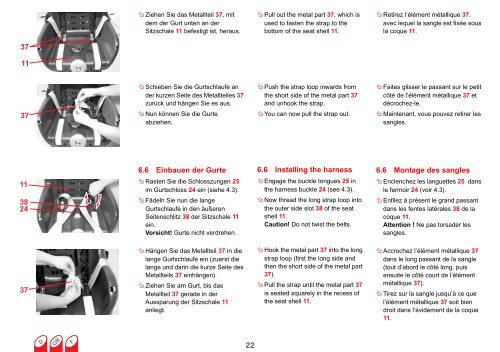
� Ziehen Sie das Metallteil 37, mit<br />
dem der Gurt unten an der<br />
Sitzschale 11 befestigt ist, heraus.<br />
� Schieben Sie die Gurtschlaufe an<br />
der kurzen Seite des Metallteiles 37<br />
zurück und hängen Sie es aus.<br />
� Nun können Sie die Gurte<br />
abziehen.<br />
6.6 Einbauen der Gurte<br />
� Rasten Sie die Schlosszungen 25<br />
im Gurtschloss 24 ein (siehe 4.3).<br />
� Fädeln Sie nun die lange<br />
Gurtschlaufe in den äußeren<br />
Seitenschlitz 38 der Sitzschale 11<br />
ein.<br />
Vorsicht! Gurte nicht verdrehen.<br />
� Hängen Sie das Metallteil 37 in die<br />
lange Gurtschlaufe ein (zuerst die<br />
lange und dann die kurze Seite des<br />
Metallteils 37 einhängen).<br />
� Ziehen Sie am Gurt, bis das<br />
Metallteil 37 gerade in der<br />
Aussparung der Sitzschale 11<br />
anliegt.<br />
22<br />
� Pull out the metal part 37, which is<br />
used to fasten the strap to the<br />
bottom of the seat shell 11.<br />
� Push the strap loop inwards from<br />
the short side of the metal part 37<br />
and unhook the strap.<br />
� You can now pull the strap out.<br />
6.6 Installing the harness<br />
� Engage the buckle tongues 25 in<br />
the harness buckle 24 (see 4.3).<br />
� Now thread the long strap loop into<br />
the outer side slot 38 of the seat<br />
shell 11.<br />
Caution! Do not twist the belts.<br />
� Hook the metal part 37 into the long<br />
strap loop (first the long side and<br />
then the short side of the metal part<br />
37).<br />
� Pull the strap until the metal part 37<br />
is seated squarely in the recess of<br />
the seat shell 11.<br />
� Retirez l’élément métallique 37,<br />
avec lequel la sangle est fixée sous<br />
la coque 11.<br />
� Faites glisser le passant sur le petit<br />
côté de l’élément métallique 37 et<br />
décrochez-le.<br />
� Maintenant, vous pouvez retirer les<br />
sangles.<br />
6.6 Montage des sangles<br />
� Enclenchez les languettes 25 dans<br />
le fermoir 24 (voir 4.3).<br />
� Enfilez à présent le grand passant<br />
dans les fentes latérales 38 de la<br />
coque 11.<br />
Attention ! Ne pas torsader les<br />
sangles.<br />
� Accrochez l’élément métallique 37<br />
dans le long passant de la sangle<br />
(tout d’abord le côté long, puis<br />
ensuite le côté court de l’élément<br />
métallique 37).<br />
� Tirez sur la sangle jusqu’à ce que<br />
l’élément métallique 37 soit bien<br />
droit dans l’évidement de la coque<br />
11.