DLC3E IB - Cuisinart
DLC3E IB - Cuisinart
DLC3E IB - Cuisinart

You also want an ePaper? Increase the reach of your titles
YUMPU automatically turns print PDFs into web optimized ePapers that Google loves.
1. INTRODUCTION<br />
You have just bought a <strong>Cuisinart</strong>® Mini-Processor.<br />
This appliance is a quality tool allowing you to realize all kinds of dishes<br />
quickly and easily. It chops, grinds, mashes, emulsifies and mixes your foods<br />
in a few seconds. Its blade has a sharpened edge allowing to chop, mix or<br />
mash, while the thicker edge allows to grind hard foods such as coffee beans<br />
or walnuts. Equipped with a powerful reversible motor, it gets through all the<br />
operations in a few seconds.<br />
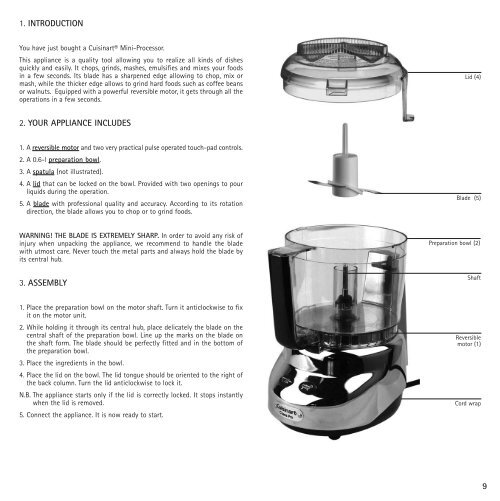
2. YOUR APPLIANCE INCLUDES<br />
1. A reversible motor and two very practical pulse operated touch-pad controls.<br />
2. A 0.6-l preparation bowl.<br />
3. A spatula (not illustrated).<br />
4. A lid that can be locked on the bowl. Provided with two openings to pour<br />
liquids during the operation.<br />
5. A blade with professional quality and accuracy. According to its rotation<br />
direction, the blade allows you to chop or to grind foods.<br />
WARNING! THE BLADE IS EXTREMELY SHARP. In order to avoid any risk of<br />
injury when unpacking the appliance, we recommend to handle the blade<br />
with utmost care. Never touch the metal parts and always hold the blade by<br />
its central hub.<br />
3. ASSEMBLY<br />
1. Place the preparation bowl on the motor shaft. Turn it anticlockwise to fix<br />
it on the motor unit.<br />
2. While holding it through its central hub, place delicately the blade on the<br />
central shaft of the preparation bowl. Line up the marks on the blade on<br />
the shaft form. The blade should be perfectly fitted and in the bottom of<br />
the preparation bowl.<br />
3. Place the ingredients in the bowl.<br />
4. Place the lid on the bowl. The lid tongue should be oriented to the right of<br />
the back column. Turn the lid anticlockwise to lock it.<br />
N.B. The appliance starts only if the lid is correctly locked. It stops instantly<br />
when the lid is removed.<br />
5. Connect the appliance. It is now ready to start.<br />
Lid (4)<br />
Blade (5)<br />
Preparation bowl (2)<br />
Shaft<br />
Reversible<br />
motor (1)<br />
Cord wrap<br />
9