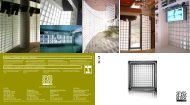
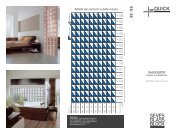
Vetroclick System - GLASBAUSTEINE
Vetroclick System - GLASBAUSTEINE
Vetroclick System - GLASBAUSTEINE

Create successful ePaper yourself
Turn your PDF publications into a flip-book with our unique Google optimized e-Paper software.
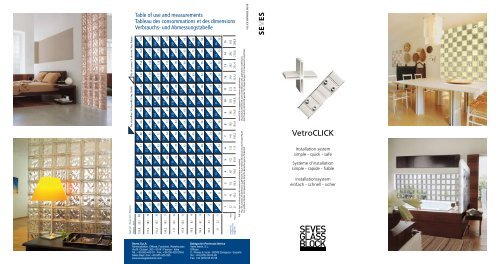
Table of use and measurements<br />
Tableau des consommations et des dimensions<br />
Verbrauchs- und Abmessungstabelle<br />
VCLICK EN/FR/DE 06/10<br />
No. of profiles / N. de profils / Anz. Profile No. of crosses / N. de croix / Anz. Kreuze<br />
Height (cm) / Hauteur (cm) / Höhe (cm)<br />
Pegasus Basic<br />
31 52 73 94 115 136 157 178 199 220 241 262 283 304 325<br />
193,8 202 10<br />
22 33 44 55 66 77 88 99 110 121 132 143 154 165 176<br />
28 47 66 85 104 123 142 161 180 199 218 237 256 275 294<br />
174,6 182 9<br />
20 30 40 50 60 70 80 90 100 110 120 130 140 150 160<br />
25 42 59 76 93 110 127 144 161 178 195 212 229 246 263<br />
155,4 162 8<br />
18 27 36 45 54 63 72 81 90 99 108 117 126 135 144<br />
22 37 52 67 82 97 112 127 142 157 172 187 202 217 232<br />
136,2 142 7<br />
16 24 32 40 48 56 64 72 80 88 96 104 112 120 128<br />
19 32 45 58 71 84 97 110 123 136 149 162 175 188 201<br />
117 122 6<br />
14 21 28 35 42 49 56 63 70 77 84 91 98 105 112<br />
16 27 38 49 60 71 82 93 104 115 126 137 148 159 170<br />
97,8 102 5<br />
12 18 24 30 36 42 48 54 60 66 72 78 84 90 96<br />
13 22 31 40 49 58 67 76 85 94 103 112 121 130 139<br />
78,6 82 4<br />
10 15 20 25 30 35 40 45 50 55 60 65 70 75 80<br />
10 17 24 31 38 45 52 59 66 73 80 87 94 101 108<br />
59,4 62 3<br />
8 12 16 20 24 28 32 36 40 44 48 52 56 60 64<br />
7 12 17 22 27 32 37 42 47 52 57 62 67 72 77<br />
40,2 42 2<br />
6 9 12 15 18 21 24 27 30 33 36 39 42 45 48<br />
4 7 10 13 16 19 22 25 28 31 34 37 40 43 46<br />
21 22 1<br />
4 6 8 10 12 14 16 18 20 22 24 26 28 30 32<br />
1 2 3 4 5 6 7 8 9 10 11 12 13 14 15<br />
22 42 62 82 102 122 142 162 182 202 222 242 262 282 302<br />
Basic<br />
21 40,2 59,4 78,6 97,8 117 136,2 155,4 174,6 193,8 213 232,2 251,4 270,6 289,8<br />
Pegasus<br />
Length (cm)<br />
Longueur (cm)<br />
Länge (cm)<br />
VetroCLICK is suggested for interior applications.<br />
Les produits VetroCLICK sont conseillés pour des applications intérieures.<br />
Die Produkte VetroCLICK werden für Anwendungen im Innenbereich empfohlen.<br />
For lager surfaces specific structural calculations are needed.<br />
Pour les surfaces de dimensions supérieures il faut réaliser des calculs structurels spécifiques.<br />
Für größere Flächen sind gesonderte statische Berechnungen erforderlich.<br />
N.B.<br />
<strong>Vetroclick</strong><br />
Installation system<br />
simple - quick - safe<br />
Système d’installation<br />
simple - rapide - fiable<br />
Installationssystem<br />
einfach - schnell - sicher<br />
Seves S.p.A.<br />
Administration, Offices, Factories, Warehouses<br />
Via R. Giuliani, 360 - 50141 Firenze - Italia<br />
Tel.: +39 055 449 51 - Fax: +39 055 425 009 6<br />
Sales Dept. Fax: +39 055 455 295<br />
www.sevesglassblock.com<br />
Delegación Península Ibérica<br />
Vetro Iberia, S.L.<br />
Offices<br />
C./ Rosas 6, local - 50009 Zaragoza - España<br />
Tel.: +34 (976) 30 60 26<br />
Fax: +34 (976) 55 25 58
patented system / système breveté /<br />
patentiertes system PCT/ES2010/000047<br />
Installation system<br />
VetroCLICK is a dry installation system for creating glass block walls simply,<br />
quickly and safely. VetroCLICK simplifies installation with the use of a few<br />
accessories: a profile and a cross.<br />
IMPORTANT: before starting the installation process:<br />
Mark with a pencil the dimensions of the glass block wall on the floor and wall,<br />
making sure that these lines are square and level. If the wall is created with a<br />
wooden profile or another type of material, make sure the profile is securely<br />
fastened to the floor and wall.<br />
Système d’installation<br />
VetroCLICK est un système d’installation à sec qui permet de réaliser des parois en<br />
brique de verre de manière simple, rapide et fiable. VetroCLICK facilite le processus<br />
d’installation grâce à quelques accessoires seulement: un profil et une croix<br />
IMPORTANT avant de commencer l’installation :<br />
Dessiner avec un crayon sur le sol et sur le mur les dimensions de la paroi en brique de<br />
verre que l’on veut réaliser, en veillant à ce que les lignes soient correctement dessinées<br />
et bien planes. Si la paroi est réalisée avec un profil en bois ou autre matériau, il faut<br />
fixer solidement le profil au sol ou au mur.<br />
Installationssystem<br />
VetroCLICK ist ein Trockeninstallationssystem, das die Realisierung von<br />
Glasziegelwänden auf einfache, rasche und sichere Weise gestattet. VetroCLICK<br />
erleichtert das Installationsverfahren dank der Verwendung von wenig<br />
Zubehör: ein Profil und ein Kreuz.<br />
WICHTIG: vor dem Beginn der Installation:<br />
Mit Bleistift auf dem Fußboden und an der Wand die Abmessungen der Glassteinwand<br />
zeichnen, die man realisieren will, darauf achten, dass diese Linien rechtwinklig und<br />
in der Waage sind. Falls die Wand mit einem Profil aus Holz oder anderem Material<br />
realisiert wird, muss das Profil gut an Fußboden und an der Mauer befestigt werden.<br />
➊➌ ➍ ➍ ➌➊<br />
➋<br />
➎<br />
➏ ➏<br />
1 Score line of the profile for the end blocks of linear or curved walls<br />
3 Slit for inserting the PEGASUS Q19 glass block<br />
4 Slit for inserting the PEGASUS R09 glass block<br />
2 Slit for inserting the BASIC 1919/8 block<br />
5 Slit for inserting the BASIC 1909/8 block<br />
6 Score line of the profile for Basic 1909/8 blocks<br />
➎<br />
1 Signe de coupe du profil pour les briques de terminaison de la paroi linéaire ou courbe.<br />
3 Fissure en correspondance de laquelle il faut insérer la brique de verre PEGASUS Q19<br />
4 Fissure en correspondance de laquelle il faut insérer la brique de verre PEGASUS R09<br />
2 Fissure en correspondance de laquelle il faut insérer la brique BASIC 1919/8<br />
5 Fissure en correspondance de laquelle il faut insérer la brique BASIC 1909/8<br />
6 Signe de coupe du profil pour les briques Basic 1909/8<br />
1. Schnittzeichen des Profils für die linearen oder gekrümmten Endbausteine der Wand<br />
3. Im Anschluss an diesen Schlitz Glasbaustein PEGASUS Q19 einfügen<br />
4. Im Anschluss an diesen Schlitz Glasbaustein PEGASUS R09 einfügen<br />
2. Im Anschluss an diesen Schlitz Glasbaustein BASIC 1919/8 einfügen<br />
5. Im Anschluss an diesen Schlitz Glasbaustein BASIC 1909/8 einfügen<br />
6. Schnittzeichen des Profils für die Glasbausteine Basic 1909/8<br />
➋<br />
Installation process / Processus d’installation / Installationsverfahren<br />
A<br />
T<br />
L<br />
Cut the tabs of a cross into an<br />
“L” shape (for the starting angle)<br />
or “T” shape (for the first row of<br />
blocks) (photo 4 and figure 1).<br />
Couper les branches d’une croix<br />
jusqu’à former un “L” (pour<br />
l’angle de départ) ou un “T”<br />
(pour la première rangée de<br />
briques) (photo A et dessin 1).<br />
1 Die Flügelchen eines Kreuzes Couper une croix en forme de L (photo A) et l’encastrer avec les profils en correspondance<br />
schneiden, bis sie ein „L“ bilden de la fissure qui indique la brique de verre choisie (Pegasus ou Basic) jusqu’à former un<br />
(für den Ausgangswinkel) oder angle droit. En correspondance des trous présents sur le profil, dessiner les points qui<br />
ein „T“ (für die erste Reihe servent sur le sol et sur le mur et faire les trous avec la perceuse. Insérer les chevilles et<br />
Glasstein) (foto A und plan 1).<br />
visser la structure en équerre réalisée auparavant avec VetroCLICK (photo 1).<br />
If creating flag walls or parapets (or using end blocks)<br />
Si l’on doit réaliser des parois libres sur 2 cotés (ou utilisation de briques de finition)<br />
Im Fall der Realisierung der Wand mit Fahne (oder Verwendung der Endwand)<br />
B<br />
In case of incorrect positioning<br />
En cas de mauvaise mise en place<br />
Im Fall der falschen Anordnung<br />
C<br />
Cut the profile in correspondence of the score<br />
line that marks the end block of the wall or<br />
rectangular block (photo B, point 1).<br />
Couper le profil en correspondance du signe<br />
de coupe qui indique la brique terminale ou la<br />
brique rectangulaire (photo B, point 1).<br />
Das Profil im Anschluss an das Schnittzeichen<br />
schneiden, das den Endbaustein der Wand oder<br />
den rechtwinkligen Baustein angibt (foto B,<br />
punkt 1).<br />
If the cross is positioned incorrectly inside the<br />
groove, fix the joint by lifting the tab of the<br />
cross (photo C).<br />
En cas de mauvaise mise en place de la croix<br />
à l’intérieur de la rainure, pour rectifier le point<br />
d’encastrement, relever l’ailette de la croix (photo C).<br />
Im Fall der falschen Anordnung des Kreuzes<br />
im Inneren der Rille, um den Einschnittpunkt zu<br />
berichtigen, das Flügelchen des Kreuzes selbst<br />
anheben (foto C).<br />
1<br />
2<br />
3<br />
Cut a cross into an “L” shape (photo A)<br />
and, depending on the glass block chosen<br />
(Pegasus or Basic), use the profiles to insert<br />
it into the appropriate slot until a right<br />
angle is formed.<br />
Draw the necessary points on the floor<br />
and wall next to the holes present on the<br />
profile. Drill the holes. Place the wedges and<br />
screw the structure to the square created<br />
beforehand with VetroCLICK (photo 1).<br />
Ein Kreuz in der Form eines L schneiden (Foto A) und einkerben mit den Profilen im<br />
Anschluss an den Schlitz, der den gewählen Glasbaustein anzeigt. (Pegasus oder Basic),<br />
bis ein rechter Winkel gebildet wird. Im Anschluss an die Löcher, die auf dem Profil<br />
vorhanden sind, die nötigen Punkte auf den Fußboden und die Mauer zeichnen und<br />
mit dem Bohrer die Löcher bohren. Die Dübel anbringen und die Struktur rechtwinklig<br />
anschrauben, die zuvor mit VetroCLICK realisiert wurde. (foto 1).<br />
Cut a cross into a “T” shape (photo A)<br />
and join it to the profiles. Continue to<br />
add profiles and crosses, repeating the<br />
drawing, drilling and screwing operations<br />
until reaching the desired width of the wall<br />
(photo 2).<br />
Couper une croix en forme de T (photo A) et l’encastrer avec les profils. Continuer à<br />
ajouter des profils et des croix en répétant les opérations de dessin, perforation et<br />
vissage jusqu’à atteindre la largeur de la paroi voulue (photo 2).<br />
Ein Kreuz in der Form eines L schneiden (Foto A) und einkerben mit den Profilen<br />
Weiterhin Profile und Kreuze hinzufügen und die Zeichnungen, Löcher und Schrauben<br />
hinzufügen, bis die gewünschte Breite der Wand erreicht wird (foto 2).<br />
Once all the horizontal profiles have been<br />
positioned, start inserting the vertical profiles<br />
by inserting them into the slits according to<br />
the glass block chosen (Pegasus or Basic).<br />
(Photo 3).<br />
Après avoir mis tous les profils en horizontal,<br />
commencer à poser les profils verticaux<br />
en les encastrant dans les fissures qui<br />
correspondent à la brique de verre choisie<br />
(Pegasus ou Basic). (Photo 3).<br />
Sobald alle Profile in der Waagrechte angebracht sind, mit dem Einfügen der Profile<br />
in der Senkrechte beginnen und sie in die Schlitze einkerben, die dem gewählten<br />
Glasziegel entsprechen (Pegasus oder Basic). (Foto 3).<br />
4<br />
5<br />
8<br />
10<br />
Finish the joints with quick-setting mortar.<br />
Finir le joint avec un mortier à prise et séchage rapide.<br />
Fuge verfeinern mit Mörtel und raschem Trocknen.<br />
6<br />
Place the glass blocks in between the vertical<br />
profiles until the row is completed (photo 4).<br />
Mettre les briques de verre entre les<br />
profils verticaux jusqu’à compléter la<br />
rangée (photo 4).<br />
Die Glasziegel zwischen den Profilen in<br />
der Senkrechte anbringen und die Reihe<br />
beenden (Foto 4).<br />
Insert a “T” shape cross into the top block leaning against the wall (laterally) in order<br />
to continue the installation process with VetroCLICK (photos 5, 6, and 7).<br />
Encastrer une croix en forme de T au dessus de la brique posée contre la paroi (latéralement)<br />
pour pouvoir continuer le processus d’installation avec VetroCLICK (photo 5,6,7).<br />
Ein Kreuz in T-Form oberhalb des (seitlich) an die Wand gestützten Bausteins einkerben,<br />
um das Installationsverfahren mit VetroCLICK fortsetzen zu können (fotos 5,6,7).<br />
Add more rows of VetroCLICK accessories (photos 8 and 9) and glass block rows<br />
(photos 10 and 11) until the whole wall is completed.<br />
Ajouter d’autres rangées d’accessoires VetroCLICK (photo 8,9) et des rangées de<br />
briques en verre (photo 10,11) jusqu’à compléter la paroi dessinée auparavant.<br />
Weitere Reihen Zubehör VetroCLICK (fotos 8,9) und Reihen mit Glasbaustein<br />
(fotos 10,11) bis zum Vollenden der zuvor geplanten Wand.<br />
11<br />
9<br />
7


![SGB_Mendini 77x19.ps [ 1 ], page 1-2 @ Normalize ... - NBD-online](https://img.yumpu.com/26261560/1/190x190/sgb-mendini-77x19ps-1-page-1-2-normalize-nbd-online.jpg?quality=85)