Installation guide for 3 way diverter | Guide d'installation ... - Riobel
Installation guide for 3 way diverter | Guide d'installation ... - Riobel
Installation guide for 3 way diverter | Guide d'installation ... - Riobel

You also want an ePaper? Increase the reach of your titles
YUMPU automatically turns print PDFs into web optimized ePapers that Google loves.
We thank you <strong>for</strong> choosing a <strong>Riobel</strong> product. It’s a top quality product, made to last and keep its original look <strong>for</strong> a<br />
very long time. Be<strong>for</strong>e starting with the installation, please take a few minutes to read the instructions in this booklet.<br />
We suggest that you keep the booklet <strong>for</strong> future referral or in case of any problem.<br />
Warranty<br />
Be<strong>for</strong>e proceeding to the installation, it is very important to ensure that the interior of the water pipes is clean. Look<br />
<strong>for</strong> calcareous residue, sand, solder or any other particles.<br />
This <strong>Riobel</strong> product includes a Limited lifetime warranty on the finish and all working parts and is guaranteed from<br />
the initial purchase date against all manufacturing defects. The warranty offered on our products will be honored<br />
only if the installation is made by a certified master plumber. The warranty does not cover:<br />
installation or removal charges;<br />
normal wear of the components;<br />
units that have not been installed according to the manufacturer’s instructions and in con<strong>for</strong>mity with the rules,<br />
codes and laws currently governing plumbing installation;<br />
all problems resulting of improper care or use of inappropriate cleaning products. Do not use acid detergents,<br />
abrasive sponges, metallic pads, alcohol-based detergents, disinfectants or other solvents;<br />
damage caused by hard water, calcareous deposits or sediments.<br />
<strong>Installation</strong> <strong>guide</strong> <strong>for</strong> 3 <strong>way</strong> <strong>diverter</strong> |<br />
<strong>Guide</strong> d’installation pour déviateur 3 voies<br />
In case of any problem, the defective parts must be returned correctly packaged with the original proof of purchase<br />
to your original retailer. Only <strong>Riobel</strong> inc. can authorize the replacement of a defective product; or if not<br />
available, the replacement by a similar part or product. This warranty is applicable to the original buyer as long as<br />
he owns the property, with proof of purchase and it is not transferable. This warranty does not cover any labor<br />
costs and/or any damages caused during the installation, the repair or the replacement, nor accidental or collateral<br />
damages. <strong>Riobel</strong> inc. does not offer warranty on their products as <strong>for</strong> merchant value specific warranty of any<br />
particular use, explicit or implicit statutory or tacit other than <strong>for</strong>eseen above.<br />
Technical in<strong>for</strong>mation is subject to change without notice.<br />
Nous vous remercions d’avoir choisi un produit <strong>Riobel</strong>. Il s’agit d’un produit de haute qualité, conçu pour durer et<br />
garder son aspect original. Nous vous invitons, avant de procéder à l’installation, à lire attentivement ce <strong>guide</strong>.<br />
Nous vous suggérons aussi de le conserver comme référence pour un besoin futur ou dans le cas d’éventuelles<br />
réclamations.<br />
Garantie<br />
Avant de procéder au montage, il est indispensable de s'assurer de la propreté de l'intérieur des tubes d'arrivée<br />
d'eau et de l'absence de calcaire, de sable ou autres particules.<br />
La robinetterie <strong>Riobel</strong> que vous venez d’acquérir possède une garantie à VIE limitée sur les pièces et la finition à<br />
partir de la date d’achat contre tout vice de fabrication. La garantie offerte sur nos produits ne sera honorée que si<br />
l’installation est effectuée par un maître plombier certifié. La garantie ne couvre pas :<br />
les frais d’installation ou de désinstallation ;<br />
l’usure normale des composantes ;<br />
l’unité qui n’a pas été installée selon les instructions du manufacturier et qui ne respecte pas les codes et les lois<br />
en vigueur régissant un tel travail ;<br />
les problèmes résultant d’un mauvais entretien ou de l’utilisation de produits d’entretien inadéquats. Ne pas utiliser<br />
les détergents acides, les éponges abrasives, les tampons métalliques, les détersifs à base d'alcool, les désinfectants<br />
ou autres solvants ;<br />
les dommages causés par des eaux dures, des dépôts de calcaires ou de sédiments.<br />
TORONTO<br />
11, Cidermill ave. Unit 5<br />
Concord (Ontario)<br />
L4K 4B6<br />
Tel.: 905‐760‐9009<br />
1‐888‐287‐5354<br />
Fax: 905‐760‐1292<br />
info@riobel.ca<br />
UNITED STATES<br />
Tel.: 1‐866‐473‐8442<br />
Fax: 1‐866‐909‐8442<br />
MONTRÉAL<br />
820, rue Nobel<br />
St‐Jérôme (Québec)<br />
J7Z 7A3<br />
Tél. : 450‐432‐0442<br />
1‐866‐473‐8442<br />
Télec. : 450‐432‐1095<br />
www.riobel.ca<br />
En cas de problèmes, il est impératif de retourner la pièce correctement emballée ainsi que la preuve d’achat à<br />
votre détaillant initial. Seul <strong>Riobel</strong> inc. est habilité à décider du remplacement des pièces reconnues défectueuses<br />
par un produit identique ou comparable, si non disponible. La garantie s’applique à l’acheteur original,<br />
avec preuve d’achat, aussi longtemps qu’il sera propriétaire de la maison et n’est pas transférable. Cette garantie<br />
ne couvre pas les frais de main-d’œuvre engagés et/ou les dommages survenus lors de l’installation, la réparation<br />
ou le remplacement, ni les dommages accidentels ou indirects. <strong>Riobel</strong> inc. n’accorde, pour ses produits, aucune<br />
garantie de valeur marchande, aucune garantie spécifique pour un usage particulier, ni aucune garantie expresse<br />
ou implicite, tacite ou statuaire autre que celle prévue ci-dessus.<br />
Sous réserve de modifications techniques sans préavis.<br />
2
♦<br />
♦<br />
♦<br />
♦<br />
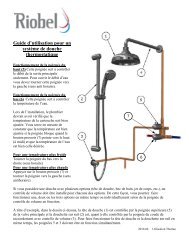
3 <strong>way</strong> <strong>diverter</strong> / Déviateur 3 voies<br />
3 accessories can be connected to this <strong>diverter</strong>.<br />
Up to 2 accessories can be used at the same time (see the picture<br />
below).<br />
3 accessoires peuvent être connectés à ce déviateur.<br />
Vous pouvez utiliser jusqu’à 2 accessoires à la fois (voir l’image cidessous).<br />
Warning: Do not block up any outlets.<br />
If only two outlets are necessary <strong>for</strong> this configuration, redirect any unused outlet<br />
to one in use. (image1)<br />
Attention: Ne condamner aucune sortie<br />
Si seulement deux sorties sont nécessaires pour votre configuration, rediriger la<br />
sortie non-utilisée vers une sortie qui est utilisée (image1).<br />
♦For use of two outlets only. The<br />
unused outlet must be joining<br />
one of the 2 used outlets.<br />
Image1<br />
♦Pour l’utilisation de deux sorties<br />
seulement, vous devez raccorder<br />
la sortie non utilisée à<br />
une des deux sorties utilisées.<br />
♦Never block up any unused<br />
outlets as per opposing<br />
(image2). This configuration<br />
would generate cartridge failure.<br />
Image2<br />
♦Ne jamais condamner la sortie<br />
inutilisée comme illustrée cicontre<br />
(image2).<br />
Cette configuration entrainera un<br />
bris de la cartouche.<br />
This image is <strong>for</strong> illustrative purposes only /<br />
Cette image est à titre indicatif seulement<br />
Gui-27 rev 01 09/2010<br />
3<br />
Gui-27 rev 01 09/2010<br />
4
Diverter installation<br />
A. Determine the <strong>diverter</strong> position on the wall.<br />
B. Drill a 1½” hole at the set position in the wall (it is mandatory to use this set dimension in<br />
order to access cartridge after completion of wall)<br />
C. Install water supply (red flagged connexion (see image 3), spaced from the other), as well as<br />
all other water exit ( three remaining connexions).<br />
D. Fix the <strong>diverter</strong> at proper required depth depending on model (image2).<br />
E. Leave the template in position until work is completed.<br />
<strong>Installation</strong> du déviateur<br />
Trim installation <strong>guide</strong><br />
A. Remove template (1) and unscrew adapter to pull it out (2).<br />
B. Screw flange (4) all the <strong>way</strong> on adapter (2), then screw decorative flange (3).<br />
C. Screw adapter assembly and flange (2-3-4) on threaded rod (6) insuring the threads on the<br />
adapter (2) are well engaged on the cartridge (5) (turn the end to confirm it is well engaged).<br />
D. Measure the distance « X » between the finished wall and the flange.<br />
E. Remove the adapter assembly and flange from the rod and cut threaded rod including the cartridge<br />
rod (all at once). Cut to the dimension « Y » (or X + 1/8”(3mm)).<br />
F. Screw the adapter assembly and flange back on the threaded rod all the <strong>way</strong> to the wall; make<br />
sure to install the O-ring under the flange.<br />
A. Déterminer la position du déviateur dans le mur.<br />
B. Percer un trou de 1½” à la position appropriée<br />
dans le mur (très important de respecter cette<br />
dimension afin de pouvoir accéder à la cartouche<br />
une fois le mur terminé).<br />
C. Installer la tuyauterie d’alimentation (connexion<br />
décalée par rapport aux autres et munie d’une<br />
étiquette rouge, voir image 3) et ensuite celles<br />
des sorties d’eau (les trois autres connexions).<br />
D. Solidifier le déviateur à la bonne profondeur selon<br />
le modèle à installer (image 2).<br />
E. Laisser le gabarit sur l’embout jusqu’à la fin des<br />
travaux.<br />
Finished wall /<br />
Mur fini<br />
Image1<br />
<strong>Guide</strong> d’installation de la finition<br />
A. Retirer le gabarit protecteur (1) et dévisser l’adaptateur pour le retirer (2).<br />
B. Visser la rosace jusqu’au bout (4) sur l’adaptateur (2) et ensuite visser la bague décorative (3).<br />
C. Visser l’assemblage de l’adaptateur et de la rosace (2-3-4) sur la tige filetée (6) en vous assurant<br />
que les rainures de l’adaptateur (2) sont bien engagées sur la cartouche (5) (tournez le<br />
bout afin d’être certain qu’il est bien engagé).<br />
D. Mesurer la distance « X » entre la rosace et le mur fini.<br />
E. Dévisser l’assemblage de l’adaptateur et de la rosace de la tige filetée pour ensuite couper la<br />
tige filetée ainsi que la tige de la cartouche (dans la même opération). Couper l’équivalent de<br />
la dimension « Y » (soit X + 1/8”(3mm)).<br />
F. Visser l’assemblage de l’adaptateur et de la rosace sur la tige filetée jusqu’au mur, en s’assurant<br />
d’installer le joint torique sous la rosace.<br />
Template /<br />
Gabarit<br />
Finished wall / Mur fini<br />
Minimum 3” [76 mm]<br />
Maximum 4 3/8” [111 mm]<br />
Image3<br />
1 1/2”<br />
[38 mm]<br />
X<br />
Water inlet /<br />
Entrée d’eau<br />
Water inlet /<br />
Entrée d’eau<br />
Image2<br />
X + 1/8” [3mm]<br />
Y<br />
Gui-27 rev 01 09/2010<br />
5<br />
Gui-27 rev 01 09/2010<br />
6
Handle KSTQ<br />
Handle installation / <strong>Installation</strong> de la poignée<br />
A. Remove end cap (11).<br />
B. Insert handle (13) on the adapter (10).<br />
C. Tight Allen screw (12) using 2.5mm key.<br />
D. Re-install end cap.<br />
Handle TM<br />
A. Remove end cap (7).<br />
B. Insert handle (9) on the adapter (10).<br />
C. Tight screw (8) using Philips screwdriver.<br />
D. Re-install cap.<br />
FEATURES AND BENEFITS | CARACTÉRISTIQUES ET AVANTAGES<br />
INTERTEK approvals <strong>for</strong> the standards; CSA B125, ASME and<br />
NSF 61. Certified; CMR248<br />
Approbation INTERTEK selon les normes; CSA B125, ASME et<br />
NSF 61. Certifié; CMR248<br />
Poignée KSTQ<br />
A. Retirer le cache -vis (11).<br />
B. Insérer la poignée (13) sur l’adaptateur<br />
(10).<br />
C. Serrer la vis Allen (12) à l’aide d’une clé<br />
2.5mm.<br />
D. Remettre le cache vis en place.<br />
Poignée TM<br />
A. Dévisser le capuchon (7).<br />
B. Insérer la poignée (9) sur l’adaptateur (10).<br />
C. Serrer la vis (8) à l’aide d’un tournevis Philips.<br />
D. Revisser le capuchon en place.<br />
Adhesive sticker to identify outlets<br />
options are available to place<br />
on flange. / Vous pouvez apposer<br />
ces autocollants sur la rosace<br />
pour identifier vos sorties. Voir<br />
l’image ci-dessous.<br />
Pressure balance and thermostatic valves handles match lavatory and tub<br />
faucets (handles); this ensures a perfectly harmonious bathroom.<br />
Les poignées des valves à pression équilibrée et thermostatique sont<br />
agencées à celle du robinet de lavabo et de la baignoire; ce qui assure une<br />
salle de bain parfaitement coordonnée.<br />
Chrome, Brushed Nickel (PVD), Polished Nickel (PVD), Gold (PVD) and Night<br />
Brushed (PVD); covered by lifetime warranty.<br />
Chrome, Nickel Brossé (PVS), Nickel Poli (PVS), Or (PVS) et Nuit Brossée<br />
(PVS); Garantie à vie.<br />
German ceramic cartridge; offers smooth handling and lifetime warranty.<br />
Cartouches de céramique allemandes; sans friction et garantie à vie.<br />
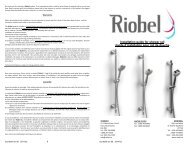
Hand shower /<br />
Douchette<br />
Body jet /<br />
Jet de corps<br />
Designed, engineered and inspected by / Conçu, développé et inspecté par<br />
ST-JÉRÔME (QUÉBEC) CANADA<br />
Shower head /<br />
Tête de douche<br />
TORONTO<br />
11, Cidermill ave. Unit 5<br />
Concord, Ontario<br />
L4K 4B6<br />
Tel. : 905-760-9009<br />
1-888-287-5354<br />
Fax : 905-760-1292<br />
UNITED STATES<br />
Tel.: 1-866-473-8442<br />
Fax: 1-866-909-8442<br />
www.riobel.ca<br />
MONTRÉAL<br />
820, rue Nobel<br />
St-Jérôme, Québec<br />
J7Z 7A3<br />
Tél. : 450-432-0442<br />
1-866-473-8442<br />
Téléc. : 450-432-1095<br />
Info@riobel.ca www.riobel.ca<br />
Gui-27 rev 01 09/2010<br />
7<br />
Gui-27 rev 01 09/2010<br />
8