GB OFV functionality check at operator level - Ceia
GB OFV functionality check at operator level - Ceia
GB OFV functionality check at operator level - Ceia

You also want an ePaper? Increase the reach of your titles
YUMPU automatically turns print PDFs into web optimized ePapers that Google loves.
<strong>OFV</strong>kit_InstrUse005I<strong>GB</strong>FDEv4<br />
<strong>OFV</strong> <strong>functionality</strong> <strong>check</strong> <strong>at</strong> oper<strong>at</strong>or <strong>level</strong><br />
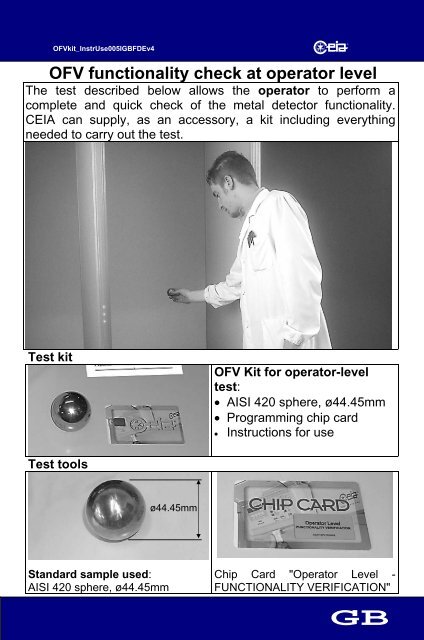
The test described below allows the oper<strong>at</strong>or to perform a<br />
complete and quick <strong>check</strong> of the metal detector <strong>functionality</strong>.<br />
CEIA can supply, as an accessory, a kit including everything<br />
needed to carry out the test.<br />
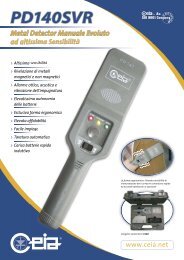
Test kit<br />
<strong>OFV</strong> Kit for oper<strong>at</strong>or-<strong>level</strong><br />
test:<br />
• AISI 420 sphere, ø44.45mm<br />
• Programming chip card<br />
• Instructions for use<br />
Test tools<br />
ø44.45mm<br />
Standard sample used:<br />
AISI 420 sphere, ø44.45mm<br />
Chip Card "Oper<strong>at</strong>or Level -<br />
FUNCTIONALITY VERIFICATION"<br />
<strong>GB</strong>
<strong>OFV</strong>kit_InstrUse005I<strong>GB</strong>FDEv4<br />
General notes about the test procedure<br />
The oper<strong>at</strong>or must<br />
carry out the test<br />
without wearing<br />
metal objects!<br />
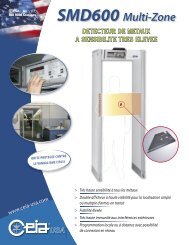
Panel models<br />
Transit heights:<br />
• The LED bar built into<br />
the transmitter panel<br />
lights up to indic<strong>at</strong>e the<br />
height of the passage.<br />
• The transit should be as<br />
horizontal as possible.<br />
>10cm<br />
>10cm<br />
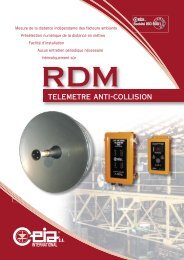
Column models<br />
>10cm<br />
>10cm<br />
Trajectory: centre of the<br />
g<strong>at</strong>e.<br />
The transit should start <strong>at</strong><br />
least 10 cm from the EMD<br />
entry point and end <strong>at</strong> least<br />
10 cm from the MD exit<br />
point.<br />
Transit heights:<br />
• The LED bar built into<br />
the transmitter panel<br />
lights up to indic<strong>at</strong>e the<br />
height of the passage.<br />
• The transit should be as<br />
horizontal as possible.<br />
>25cm<br />
>25cm<br />
>25cm<br />
>25cm<br />
Trajectory: centre of the<br />
g<strong>at</strong>e<br />
The transit should start <strong>at</strong><br />
least 25 cm from the EMD<br />
entry point and end <strong>at</strong> least<br />
25 cm from the MD exit<br />
point.<br />
<strong>GB</strong>
<strong>OFV</strong>kit_InstrUse005I<strong>GB</strong>FDEv4<br />
Procedure<br />
1. Preparing the test<br />
Remove all metal objects from your person and pass the arm which will move the<br />
sphere through the unit. Both the display of the exit electronics unit should remain green<br />
and no audio alarm should be activ<strong>at</strong>ed.<br />
2. Activ<strong>at</strong>ing the <strong>OFV</strong> test<br />
<strong>OFV</strong><br />
• Insert the chip card "Oper<strong>at</strong>or Level -<br />
FUNCTIONALITY VERIFICATION"<br />
• Wait until the display shows the message<br />
"<strong>OFV</strong>"<br />
• Remove the card<br />
3. Carrying out the passes<br />
Display Buzzer Action Notes<br />
WAIT --<br />
Preparing for the first pass:<br />
bring the sample to the front<br />
of the g<strong>at</strong>e in the starting<br />
position.<br />
PASS<br />
continuous<br />
sound<br />
WAIT --<br />
First pass.<br />
Carry out the transit <strong>at</strong> the<br />
height indic<strong>at</strong>ed by the LED<br />
bar, along the center line,<br />
as horizontal as possible!<br />
Return the test item only<br />
after the end of the sound<br />
indic<strong>at</strong>ion.<br />
Preparing for the second<br />
pass: bring the sample to<br />
the front of the g<strong>at</strong>e again,<br />
in the starting position for<br />
the next pass.<br />
PASS<br />
: : : : :<br />
4. End of test<br />
continuous<br />
sound<br />
Repe<strong>at</strong> the transits <strong>at</strong> the<br />
heights indic<strong>at</strong>ed by the<br />
LED bar, till ground.<br />
Display Buzzer Action Notes<br />
<strong>OFV</strong><br />
Positive test result<br />
OK<br />
<strong>OFV</strong><br />
:<br />
continuous<br />
sound<br />
<strong>GB</strong>
<strong>OFV</strong>kit_InstrUse005I<strong>GB</strong>FDEv4<br />
When the <strong>OFV</strong> function is activ<strong>at</strong>ed, the Metal Detector prepares to carry out a test<br />
with the spherical sample contained in the kit: the detector loads a factory program<br />
and <strong>check</strong>s th<strong>at</strong> the values read during the transit of the sphere correspond to a<br />
reference table stored in the electronics unit.<br />
This test <strong>check</strong>s th<strong>at</strong> all the transmitting/receiving channels of the Metal Detector are<br />
calibr<strong>at</strong>ed and oper<strong>at</strong>ing correctly. The sample is in no way rel<strong>at</strong>ed to the security<br />
<strong>level</strong> set on the Metal Detector.<br />
This sample should NEVER be used to <strong>check</strong> the alarm trigger threshold <strong>at</strong> a<br />
specific Security Level .<br />
After a successful test, the current Security Level can be <strong>check</strong>ed, if required,<br />
by pressing the key on the electronics unit.<br />
Error messages<br />
Display Buzzer Action/meaning<br />
<strong>OFV</strong><br />
NOIS<br />
<strong>OFV</strong><br />
:<br />
REP<br />
intermittent sound<br />
Electromagnetic noise <strong>level</strong> too high for the test to be<br />
carried out correctly: remove the source of the<br />
interference. This message appears for a few<br />
seconds, and then the procedure aborts<br />
autom<strong>at</strong>ically.<br />
The sample transit was wrong or did not happen <strong>at</strong><br />
all. Repe<strong>at</strong> the pass correctly<br />
N.B.: after three unsuccessful passes the procedure<br />
aborts autom<strong>at</strong>ically.(<strong>OFV</strong> FAIL message)<br />
Procedure failed: Repe<strong>at</strong> the test correctly.<br />
N.B.: the behaviour of the Metal Detector may vary<br />
depending on the value of a programming parameter<br />
accessible only <strong>at</strong> superuser <strong>level</strong> (OFB, see<br />
Programming section of the manual):<br />
<strong>OFV</strong><br />
FAIL<br />
<strong>OFV</strong><br />
:<br />
intermittent sound<br />
• If OFB=YES, the detector enters an irreversible<br />
st<strong>at</strong>e of alarm because it is not oper<strong>at</strong>ional: repe<strong>at</strong><br />
the test from the beginning by inserting the Chip<br />
Card; if the procedure is successful, the metal<br />
detector will become oper<strong>at</strong>ional again, otherwise<br />
it must be reset by the superuser.<br />
• if OFB=NO, the detector goes back to oper<strong>at</strong>ing as<br />
it did before the test; it is the oper<strong>at</strong>or's<br />
responsibility to record the failure of the<br />
<strong>functionality</strong> test.<br />
WRONINSE<br />
The chip card has not been inserted correctly:<br />
please, repe<strong>at</strong> the insertion with the right orient<strong>at</strong>ion.<br />
<strong>GB</strong>
<strong>OFV</strong>kit_InstrUse005I<strong>GB</strong>FDEv4<br />
Test de fonctionnement <strong>OFV</strong> par l’opér<strong>at</strong>eur<br />
Le test décrit ci-dessous permet à l’opér<strong>at</strong>eur de vérifier rapidement le fonctionnement du<br />
détecteur de métaux. CEIA fournit en tant qu’accessoire un kit comprenant tout le nécessaire pour<br />
la réalis<strong>at</strong>ion du test.<br />
Test kit<br />
Kit <strong>OFV</strong> pour le test par<br />
l’opér<strong>at</strong>eur:<br />
• sphère en AISI 420, ø44.45mm<br />
• carte à puce de programm<strong>at</strong>ion<br />
• mode d’emploi<br />
Outils<br />
ø44.45mm<br />
Échantillon utilisé :<br />
sphère en AISI 420, ø44.45mm<br />
Carte à puce "Oper<strong>at</strong>or Level -<br />
FUNCTIONALITY VERIFICATION"<br />
F
<strong>OFV</strong>kit_InstrUse005I<strong>GB</strong>FDEv4<br />
Notes générales<br />
L’opér<strong>at</strong>eur doit<br />
effectuer le test sans<br />
porter sur lui des<br />
objets métalliques!<br />
Modèle à panneaux<br />
Hauteurs de passage:<br />
• La barre lumineuse du<br />
panneau émetteur<br />
indique la hauteur de<br />
passage de<br />
l’échantillon.<br />
• La trajectoire sera aussi<br />
horizontale que<br />
possible.<br />
>10cm<br />
>10cm<br />
>10cm<br />
Trajectoire : centre du<br />
portique<br />
>10cm<br />
Column models<br />
Le passage doit commencer<br />
au moins 10 cm avant le<br />
portique et se terminer au<br />
moins 10 cm au-delà du<br />
portique.<br />
Hauteurs de passage:<br />
• La barre lumineuse de<br />
la colonne émettrice<br />
indique la hauteur de<br />
passage de<br />
l’échantillon.<br />
• La trajectoire sera aussi<br />
horizontale que<br />
possible.<br />
Trajectoire<br />
portique<br />
: centre du<br />
>25cm<br />
>25cm<br />
>25cm<br />
>25cm<br />
Le passage doit commencer<br />
au moins 25 cm avant le<br />
portique et se terminer au<br />
moins 25 cm au-delà du<br />
portique.<br />
F
<strong>OFV</strong>kit_InstrUse005I<strong>GB</strong>FDEv4<br />
Procédure<br />
1. Prépar<strong>at</strong>ion du test<br />
Retirer tous les objets métalliques personnels et passer le bras qui fera bouger la sphère à<br />
travers le portique. L’écran de la centrale électronique de sortie doit rester vert et aucun signal<br />
sonore d’alarme ne doit être émis.<br />
2. Activ<strong>at</strong>ion du test<br />
• introduire la carte à puce "Oper<strong>at</strong>or Level -<br />
FUNCTIONALITY VERIFICATION"<br />
<strong>OFV</strong><br />
• <strong>at</strong>tendre que l’afficheur indique le message<br />
"<strong>OFV</strong> "<br />
• retirer la carte<br />
3. Comment effectuer les passages<br />
Afficheur Sonnerie Intervention Note<br />
WAIT --<br />
Mise au point du premier<br />
passage : positionner<br />
l’échantillon devant le portique,<br />
à la position de départ du<br />
passage.<br />
PASS<br />
sonnerie<br />
constante<br />
Premier passage<br />
Effectuer le passage à la<br />
hauteur indiquée par la barre<br />
lumineuse, le long du plan<br />
médian du portique. La<br />
trajectoire sera aussi<br />
horizontale que possible.<br />
Ne ramener en arrière<br />
l’échantillon qu’après la fin<br />
de la signalis<strong>at</strong>ion sonore.<br />
WAIT --<br />
Mise au point du deuxième<br />
passage : ramener l’échantillon<br />
devant le portique, à la position<br />
de départ du passage suivant.<br />
PASS<br />
: : : :<br />
sonnerie<br />
constante<br />
:<br />
Répéter les passages à la<br />
hauteur indiquée par la barre<br />
lumineuse, jusqu’au sol.<br />
4. Fin du test<br />
Afficheur Sonnerie Intervention Note<br />
<strong>OFV</strong><br />
Résult<strong>at</strong> du test positif<br />
OK<br />
<strong>OFV</strong><br />
:<br />
sonnerie<br />
constante<br />
Effectuer les opér<strong>at</strong>ions de<br />
contrôle prévues d’ordinaire.<br />
F
<strong>OFV</strong>kit_InstrUse005I<strong>GB</strong>FDEv4<br />
Si l’on active la fonction <strong>OFV</strong>, le détecteur de métaux s’apprête à effectuer un essai avec la<br />
bille fournie dans le kit : le détecteur charge une programm<strong>at</strong>ion réalisée à l’usine et vérifie<br />
que les valeurs lues lors du passage de la bille correspondent à une table de référence<br />
mémorisée dans la centrale électronique. Cet essai permet de vérifier que tous les canaux<br />
émetteurs/récepteurs du détecteur de métaux soient étalonnés et fonctionnent correctement.<br />
L’échantillon n’a aucun rapport avec le niveau de sûreté réglé sur le détecteur. En aucun<br />
cas cet échantillon ne peut être utilisé pour vérifier le niveau du seuil d’alarme par<br />
rapport à un niveau de sûreté précis. Après l’exécution de l’essai avec un résult<strong>at</strong><br />
positif, la sélection correcte du niveau de sûreté peut être vérifiée, s’il y a lieu, en<br />
appuyant sur la touche . .<br />
Messages d’erreur<br />
Afficheur Sonnerie Intervention/Signific<strong>at</strong>ion<br />
<strong>OFV</strong><br />
NOIS<br />
<strong>OFV</strong><br />
:<br />
REP<br />
<strong>OFV</strong><br />
FAIL<br />
<strong>OFV</strong><br />
:<br />
sonnerie<br />
intermittente<br />
sonnerie<br />
intermittente<br />
Niveau de bruit électromagnétique trop élevé pour effectuer le<br />
test correctement : éliminer la source de nuisance. Le<br />
message s’affiche pendant quelques secondes, après quoi la<br />
procédure s’arrête autom<strong>at</strong>iquement.<br />
Passage de l’échantillon erroné ou manqué : répéter le<br />
passage correctement<br />
NOTA : après trois tent<strong>at</strong>ives sans succès, la procédure<br />
s’arrête (message <strong>OFV</strong> FAIL)<br />
Procédure échouée : répéter correctement le test.<br />
NOTA : sur la base de la valeur d’un paramètre de<br />
programm<strong>at</strong>ion réservé au niveau super-utilis<strong>at</strong>eur (OFB, voir<br />
le chap. Programm<strong>at</strong>ion), le comportement du détecteur de<br />
métaux est susceptible de varier :<br />
• si OFB=OUI, le détecteur déclenche une alarme<br />
irréversible en raison de son ét<strong>at</strong> d’inactivité: répéter le test<br />
dès le début, en introduisant la carte à puce : si la<br />
procédure est menée à bien correctement, le détecteur de<br />
métaux se met de nouveau en service, sinon il faut que le<br />
super-utilis<strong>at</strong>eur procède au rétablissement<br />
• si OFB=NON, le détecteur fonctionne de nouveau comme<br />
avant le test : il faut que l’opér<strong>at</strong>eur prenne note de l’échec<br />
du test de performance.<br />
WRONINSE<br />
Mauvaise insertion de la carte à puce.<br />
Insérer correctement la carte à puce.<br />
F
<strong>OFV</strong>kit_InstrUse005I<strong>GB</strong>FDEv4<br />
Betriebstest <strong>OFV</strong> auf Bedienerebene<br />
Der nachstehend beschriebene Test ist eine Spezialfunktion mit der der Bediener<br />
eine vollständige und schnelle Betriebskontrolle des Metalldetektors durchführen<br />
kann . CEIA liefert ein Set als Zubehör, das alles für die Ausführung des Tests<br />
Erforderliche enthält.<br />
Set <strong>OFV</strong><br />
Set <strong>OFV</strong> für den Test auf<br />
Bedienerebene:<br />
• Kugel aus AISI 420, ø44.45mm<br />
• Chipkarte zur Programmierung<br />
• Gebrauchsanleitung<br />
Mittels<br />
ø44.45mm<br />
Verwendetes Muster:<br />
Kugel aus AISI 420, ø44.45mm<br />
Chipkarte "Oper<strong>at</strong>or Level -<br />
FUNCTIONALITY VERIFICATION""<br />
D
<strong>OFV</strong>kit_InstrUse005I<strong>GB</strong>FDEv4<br />
Allgemeines<br />
Der Bediener muss<br />
den Test ausführen,<br />
ohne Metall-<br />
Gegenstände bei<br />
sich zu tragen!<br />
Paneelausführung<br />
Höhe des Durchgangs:<br />
• Ein Abschnitt des<br />
Leuchtbalkens des<br />
Sendepaneels leuchtet<br />
auf, um dem Bediener die<br />
Durchgangshöhe des<br />
Musterstücks anzuzeigen.<br />
• In möglichst horizontaler<br />
Richtung ausführen.<br />
>10cm<br />
Linie: Sondenzentrum<br />
>10cm<br />
>10cm<br />
>10cm<br />
Der Durchgang muss<br />
mindestens 10 cm vor dem<br />
Rahmen beginnen und<br />
frühestens 10 cm nach dem<br />
Rahmen enden.<br />
Säuleausführung<br />
Höhe des Durchgangs:<br />
• Ein Abschnitt des<br />
Leuchtbalkens der<br />
Sendesäule leuchtet auf,<br />
um dem Bediener die<br />
Durchgangshöhe des<br />
Musterstücks anzuzeigen.<br />
• In möglichst horizontaler<br />
Richtung ausführen.<br />
Linie: Sondenzentrum<br />
>25cm<br />
>25cm<br />
>25cm<br />
>25cm<br />
Der Durchgang muss<br />
mindestens 25 cm vor dem<br />
Rahmen beginnen und<br />
frühestens 25 cm nach dem<br />
Rahmen enden..<br />
D
<strong>OFV</strong>kit_InstrUse005I<strong>GB</strong>FDEv4<br />
Verfahren<br />
1. Vorbereitung des Tests<br />
Alle Metallgegenstände von der eigenen Person entfernen und ins Rahmen den Arm einführen,<br />
der das Musterstück durchführen wird. Das Display der Zentrale muss grün bleiben und die<br />
Summer darf nicht ausgelöst werden.<br />
2. Aktivierung des Tests<br />
• die Chipkarte " Oper<strong>at</strong>or Level -<br />
FUNCTIONALITY VERIFICATION eingeben<br />
<strong>OFV</strong><br />
• warten, bis das Display die Nachricht "<strong>OFV</strong>"<br />
anzeigt<br />
• die Chipkarte entfernen<br />
3. Ausführung der Durchgänge<br />
Display Summer Aktion Bemerkungen<br />
WAIT --<br />
Vorbereitung des ersten<br />
Durchgangs: das Musterstück<br />
vor die Sonde in die<br />
Startposition zum Durchgang<br />
bringen.<br />
PASS<br />
Dauerton<br />
Erster Durchgang.<br />
Den Durchgang in Höhe des<br />
leuchtenden Abschnitts des<br />
Leuchtbalkens, entlang der<br />
Mittellinie des Portals in<br />
möglichst horizontaler Richtung<br />
ausführen!<br />
Das Musterstück erst nach<br />
Abschalten der Summer<br />
zurückbringen.<br />
WAIT --<br />
Vorbereitung des zweiten<br />
Durchgangs: das Musterstück<br />
vor die Sonde in die<br />
Startposition zum Durchgang<br />
bringen.<br />
PASS<br />
: : : : :<br />
Dauerton<br />
Die Durchänge in Höhe des<br />
leuchtenden Abschnitts des<br />
Leuchtbalkens bis dem Boden<br />
wiederholen.<br />
4. Ende des Tests<br />
Display Summer Aktion Bemerkungen<br />
<strong>OFV</strong><br />
Positives Testergebnis.<br />
OK<br />
<strong>OFV</strong><br />
:<br />
Dauerton<br />
D
<strong>OFV</strong>kit_InstrUse005I<strong>GB</strong>FDEv4<br />
Wenn man die Funktion <strong>OFV</strong> aktiviert, bereitet sich der Metalldetektor auf die Durchführung<br />
des Tests mit der Musterkugel aus dem Set vor: das Peilgerät lädt eine Fabrikprogrammierung<br />
und prüft, ob die beim Durchgang der Kugel abgelesenen Werte einer Tabelle entsprechen,<br />
die in der elektronischen Steuereinheit gespeichert ist. Dieser Test kontrolliert, ob alle<br />
Übertragungs- und Empfangskanäle desl Metalldetektors geeicht sind und korrekt arbeiten.<br />
Das Musterstück h<strong>at</strong> keinen Zusammenhang mit der auf dem Peilgerät eingestellten<br />
Sicherheitsebene. Auf keinen Fall darf das Musterstück verwendet werden, um die<br />
Höhe der Alarmschwelle auf eine spezifische Sicherheitsebene hin zu prüfen. Nach<br />
positiver Ausführung des Tests kann die korrekte Wahl der Sicherheitsebene, wenn<br />
erforderlich, durch Drücken der Taste geprüft werden.<br />
Fehlermeldungen<br />
Display Summer Aktion / Meinung<br />
<strong>OFV</strong><br />
NOIS<br />
<strong>OFV</strong><br />
:<br />
REP<br />
<strong>OFV</strong><br />
FAIL<br />
<strong>OFV</strong><br />
:<br />
WRONINSE<br />
intermittierender<br />
Ton<br />
intermittierender<br />
Ton<br />
Elektromagnetisches Geräuschniveau zu hoch, um den<br />
Test korrekt auszuführen: Störfaktor beseitigen. Die<br />
Botschaft erscheint für einige Sekunden, dann stoppt der<br />
Vorgang autom<strong>at</strong>isch.<br />
Fehlerhafter oder nicht ausgeführter Durchgang:<br />
Durchgang korrekt wiederholen<br />
MERKE: nach drei vergeblichen Versuchen stoppt der<br />
Vorgang (Botschaft <strong>OFV</strong> FAIL)<br />
Vorgang fehlgeschlagen: den Test korrekt wiederholen.<br />
MERKE: je nach Wert eines<br />
Programmierungsparameters, das über der<br />
Benutzerebene festgelegt ist (OFB, siehe Kap.<br />
Programmierung) kann das Verhalten des<br />
Metalldetektors unterschiedlich sein:<br />
• wenn OFB=YES, dann tritt der Detektor in<br />
irreversiblen Alarmzustand, weil es nicht betriebsbereit<br />
ist: den Test von Anfang an wiederholen, indem man<br />
die Chipkarte eingibt: wenn dieser Vorgang positiv<br />
verläuft, ist der Metalldetektor wieder betriebsbereit,<br />
ansonsten muss die Wiederherstellung oberhalb der<br />
Benutzerebene erfolgen<br />
• wenn OFB=NO, dann tritt der Detektor in Betrieb wie<br />
vor dem Test: es ist Aufgabe des Bedieners, das<br />
Fehlschlagen des Betriebstests zu registrieren .<br />
Die Chipkarte wurde nicht korrekt eingegeben: Vorgang<br />
wiederholen und die Card richtig herum eingeben.<br />
D
<strong>OFV</strong>kit_InstrUse005I<strong>GB</strong>FDEv4<br />
Prueba de funcionalidad <strong>OFV</strong> a nivel operador<br />
La prueba descrita a continuación es una función especial que permite al operador<br />
efectuar un control funcional completo y rápido del detector de metales. CEIA<br />
suministra como accesorio un kit que comprende todo lo necesario para la<br />
realización de la prueba.<br />
Kit <strong>OFV</strong><br />
Instrumentos<br />
Kit <strong>OFV</strong> para prueba a nivel<br />
operador:<br />
• esfera en AISI 420,<br />
ø44.45mm<br />
• chip card de programación<br />
• instrucciones para el uso<br />
ø44.45mm<br />
Muestra empleada:<br />
esfera en AISI 420, ø44.45mm<br />
Chip Card "Oper<strong>at</strong>or Level -<br />
FUNCTIONALITY VERIFICATION"<br />
E
<strong>OFV</strong>kit_InstrUse005I<strong>GB</strong>FDEv4<br />
Notas generales<br />
El operador tiene<br />
que realizar la<br />
prueba sin llevar<br />
objetos metálicos!<br />
Modelos de paneles<br />
Alturas de pasaje:<br />
• Una sección de la barra<br />
luminosa se ilumina para<br />
indicar al operador la altura<br />
de tránsito de la muestra.<br />
• Mantener la trayectoria<br />
cuanto más horizontal<br />
posible.<br />
>10cm<br />
>10cm<br />
>10cm<br />
Trayectoria: centro de la<br />
sonda<br />
>10cm<br />
Modelos de columnas<br />
El pasaje tiene que empezar<br />
por lo menos 10 cm antes<br />
del portal y terminar por lo<br />
menos 10 cm más allá del<br />
portal.<br />
Alturas de pasaje:<br />
• Una sección de la barra<br />
luminosa se ilumina para<br />
indicar al operador la altura<br />
de tránsito de la muestra.<br />
• Mantener la trayectoria<br />
cuanto más horizontal<br />
posible.<br />
>25cm<br />
>25cm<br />
>25cm<br />
>25cm<br />
Trayectoria: centro de la<br />
sonda<br />
El pasaje tiene que empezar<br />
por lo menos 25cm antes del<br />
portal y terminar por lo<br />
menos 25cm más allá del<br />
portal..<br />
E
<strong>OFV</strong>kit_InstrUse005I<strong>GB</strong>FDEv4<br />
Procedimiento<br />
1. Preparación de la prueba<br />
La persona que efectuará la prueba debe eliminar todos los objetos metálicos del que es<br />
portador, y a partir de esta premisa, introducir en el pórtico el brazo que pasará la muestra. El<br />
display de la central tiene que quedar de color verde y el timbre no debe activarse.<br />
2. Activación de la prueba<br />
• introducir la chip card " Oper<strong>at</strong>or Level -<br />
FUNCTIONALITY VERIFICATION<br />
<strong>OFV</strong><br />
• esperar que el display muestre el mensaje<br />
"<strong>OFV</strong>"<br />
• extraer la card<br />
3. Ejecución de los pasajes<br />
Display Timbre Acción Notas<br />
WAIT --<br />
Preparación al primer pasaje:<br />
llevar la muestra delante de la<br />
sonda, en la posición de inicio<br />
del pasaje.<br />
PASS<br />
sonido<br />
continuo<br />
Primer pasaje.<br />
Efectuar el tránsito a la altura<br />
indicada por la barra luminosa,<br />
a lo largo del eje central del<br />
pórtico, ¡manteniendo la<br />
trayectoria cuanto más<br />
horizontal posible!<br />
Llevar hacia <strong>at</strong>rás la muestra<br />
solamente después de la<br />
desactivación del timbre.<br />
WAIT --<br />
Preparación al segundo pasaje:<br />
llevar la muestra delante de la<br />
sonda, en la posición de inicio<br />
del pasaje.<br />
: : : : :<br />
PASS<br />
sonido<br />
continuo<br />
4. Fin de la prueba<br />
Display Timbre Acción Notas<br />
<strong>OFV</strong><br />
OK<br />
<strong>OFV</strong><br />
:<br />
sonido<br />
continuo<br />
Repetir los pasajes a la<br />
altura indicada por la barra<br />
luminosa hasta el suelo.<br />
Resultado de la prueba<br />
positivo.<br />
E
<strong>OFV</strong>kit_InstrUse005I<strong>GB</strong>FDEv4<br />
Activando la función <strong>OFV</strong>, el detector de metales se prepara para la realización de la prueba<br />
con la muestra esférica presente en el kit: el detector carga una programación de fábrica y<br />
comprueba que los valores leídos al pasaje de la esfera correspondan a una tabla de<br />
referencia memorizada en la central electrónica. Esta prueba controla que todos los canales<br />
de transmisión/recepción del Detector de Metales estén calibrados y trabajen correctamente.<br />
La muestra no tiene ninguna relación con el nivel de seguridad ajustado en el detector. En<br />
ningún caso la muestra puede ser utilizada para comprobar el nivel de umbral de<br />
alarma según un Nivel de Seguridad específico. Después de la realización positiva de la<br />
prueba, la selección correcta del Nivel de Seguridad puede ser comprobada, si es<br />
necesario, pulsando la tecla . .<br />
Mensajes de error<br />
Display Timbre Acción / Significado<br />
<strong>OFV</strong><br />
NOIS<br />
<strong>OFV</strong><br />
:<br />
REP<br />
sonido<br />
intermitente<br />
Nivel de ruido electromagnético demasiado elevado para<br />
efectuar correctamente la prueba: eliminar la fuente de<br />
interferencia. El mensaje aparece durante unos<br />
segundos, pues el procedimiento se anula<br />
automáticamente.<br />
Tránsito de la muestra erróneo o no efectuado: repetir el<br />
pasaje correctamente<br />
NOTA: después de tres tent<strong>at</strong>ivas sin éxito, el<br />
procedimiento se anula (mensaje <strong>OFV</strong> FAIL)<br />
Procedimiento fallado: repetir correctamente la prueba.<br />
NOTA: en la base del valor de un parámetro de<br />
programación reservado a nivel superusuario (OFB, ver<br />
cap. Programación), el comportamiento del Detector de<br />
metales puede variar:<br />
<strong>OFV</strong><br />
FAIL<br />
<strong>OFV</strong><br />
:<br />
sonido<br />
intermitente<br />
• si OFB=YES, el detector entra en estado de alarma<br />
irreversible siendo no oper<strong>at</strong>ivo: repetir la prueba<br />
desde el inicio, introduciendo la chip card: si el<br />
procedimiento tiene éxito, el detector de metales<br />
vuelve oper<strong>at</strong>ivo, en caso contrario es necesario el<br />
restablecimiento por parte del superusuario<br />
• si OFB=NO, el detector vuelve a funcionar como<br />
antes de la prueba: es el operador quien tiene que<br />
registrar oportunamente el fracaso de la quiebra<br />
funcional.<br />
WRONINSE<br />
La chip card no ha sido introducida correctamente:<br />
repetir la operación orientándola correctamente.<br />
E
<strong>OFV</strong>kit_InstrUse005I<strong>GB</strong>FDEv4<br />
Test di funzionalità <strong>OFV</strong> a livello oper<strong>at</strong>ore<br />
Il test descritto di seguito è una funzione speciale implement<strong>at</strong>a nello 02PN20, che permette<br />
all'oper<strong>at</strong>ore di effettuare una verifica funzionale completa e veloce del metal detector.<br />
CEIA fornisce come accessorio un kit comprendente tutto il necessario per l'esecuzione del test.<br />
Kit <strong>OFV</strong><br />
Strumenti utilizz<strong>at</strong>i<br />
Kit <strong>OFV</strong> per test a livello<br />
oper<strong>at</strong>ore:<br />
• sfera in AISI 420,<br />
ø44.45mm<br />
• chip card di<br />
programmazione<br />
• istruzioni per l'uso<br />
ø44.45mm<br />
Campione utilizz<strong>at</strong>o:<br />
sfera in AISI 420, ø44.45mm<br />
Chip Card "Oper<strong>at</strong>or Level -<br />
FUNCTIONALITY VERIFICATION "<br />
I
<strong>OFV</strong>kit_InstrUse005I<strong>GB</strong>FDEv4<br />
Note generali<br />
L'oper<strong>at</strong>ore deve<br />
eseguire il test<br />
senza indossare<br />
oggetti metallici!<br />
Modelli a pannelli<br />
Altezze di passaggio:<br />
• Una sezione della barra<br />
luminosa del pannello<br />
trasmittente si illumina per<br />
indicare all’oper<strong>at</strong>ore<br />
l’altezza di transito del<br />
campione.<br />
• Mantenere la traiettoria il<br />
più possibile orizzontale.<br />
>10cm<br />
>10cm<br />
>10cm<br />
Traiettoria: centro della<br />
sonda.<br />
>10cm<br />
Il passaggio deve iniziare<br />
almeno 10 cm prima del<br />
portale e terminare almeno<br />
10 cm oltre il portale.<br />
Modelli a colonne<br />
Altezze di passaggio:<br />
• Una sezione della barra<br />
luminosa della colonna<br />
trasmittente si illumina per<br />
indicare all’oper<strong>at</strong>ore<br />
l’altezza di transito del<br />
campione.<br />
• Mantenere la traiettoria il<br />
più possibile orizzontale.<br />
>25cm<br />
>25cm<br />
>25cm<br />
>25cm<br />
Traiettoria: centro della<br />
sonda.<br />
Il passaggio deve iniziare<br />
almeno 25 cm prima del<br />
portale e terminare almeno<br />
25 cm oltre il portale<br />
I
<strong>OFV</strong>kit_InstrUse005I<strong>GB</strong>FDEv4<br />
Procedura<br />
1. Preparazione del test<br />
Rimuovere tutti gli oggetti metallici dalla propria persona e inserire nel portale il braccio<br />
che passerà il campione. Il display della centrale deve restare di colore verde e la<br />
suoneria non deve <strong>at</strong>tivarsi.<br />
2. Attivazione del test<br />
<strong>OFV</strong><br />
3. Esecuzione dei passaggi<br />
Display Suoneria Azione Note<br />
• inserire la chip card " Oper<strong>at</strong>or Level -<br />
FUNCTIONALITY VERIFICATION<br />
• <strong>at</strong>tendere che il display mostri il messaggio<br />
"<strong>OFV</strong>"<br />
• rimuovere la card<br />
WAIT --<br />
Preparazione al primo<br />
passaggio: portare il<br />
campione davanti alla sonda,<br />
nella posizione di partenza del<br />
passaggio.<br />
PASS<br />
suono<br />
continuo<br />
WAIT --<br />
Primo passaggio.<br />
Effettuare il transito all’altezza<br />
delle fotocellule, lungo la<br />
mezzeria del portale,<br />
mantenendo la traiettoria il più<br />
possibile orizzontale!<br />
Riportare indietro il campione<br />
solamente dopo la<br />
dis<strong>at</strong>tivazione della suoneria..<br />
Preparazione al secondo<br />
passaggio: portare il<br />
campione davanti alla sonda,<br />
nella posizione di partenza del<br />
passaggio successivo.<br />
PASS<br />
: : : : :<br />
suono<br />
continuo<br />
Ripetere i passaggi alle<br />
altezze indic<strong>at</strong>e dalla barra<br />
luminosa, fino al suolo.<br />
4. Fine del test<br />
Display Suoneria Azione Note<br />
Esito del test positivo.<br />
<strong>OFV</strong><br />
OK<br />
<strong>OFV</strong><br />
:<br />
suono<br />
continuo<br />
I
<strong>OFV</strong>kit_InstrUse005I<strong>GB</strong>FDEv4<br />
Attivando la funzione <strong>OFV</strong>, il metal detector si prepara all'esecuzione di un test con il<br />
campione sferico presente nel kit: il rivel<strong>at</strong>ore carica una programmazione di fabbrica e<br />
verifica che i valori letti al passaggio della sfera corrispondano ad una tabella di riferimento<br />
memorizz<strong>at</strong>a nella centrale elettronica. Questo test controlla che tutti i canali di<br />
trasmissione/ricezione del Metal Detector siano calibr<strong>at</strong>i e lavorino correttamente. Il campione<br />
non è in alcuna relazione con il livello di sicurezza impost<strong>at</strong>o sul rivel<strong>at</strong>ore. In nessun caso<br />
tale campione può essere utilizz<strong>at</strong>o per verificare il livello di soglia d'allarme secondo<br />
un Livello di Sicurezza specifico. Dopo l'esecuzione positiva del test, la selezione<br />
corretta del Livello di Sicurezza può essere verific<strong>at</strong>a, se necessario, premendo il tasto<br />
. ..<br />
Messaggi di errore<br />
Display Suoneria Azione / Signific<strong>at</strong>o<br />
<strong>OFV</strong><br />
NOIS<br />
<strong>OFV</strong><br />
:<br />
REP<br />
suono<br />
intermittente<br />
Livello di rumore elettromagnetico troppo elev<strong>at</strong>o per<br />
effettuare correttamente il test: eliminare la fonte di disturbo. Il<br />
messaggio compare per alcuni secondi, quindi la procedura<br />
abortisce autom<strong>at</strong>icamente.<br />
Transito del campione err<strong>at</strong>o o non effettu<strong>at</strong>o: ripetere il<br />
passaggio correttamente<br />
NOTA: dopo tre tent<strong>at</strong>ivi infruttuosi, la procedura abortisce<br />
(messaggio <strong>OFV</strong> FAIL)<br />
Procedura fallita: ripetere correttamente il test.<br />
<strong>OFV</strong><br />
FAIL<br />
<strong>OFV</strong><br />
:<br />
suono<br />
intermittente<br />
NOTA: in base al valore di un parametro di programmazione<br />
riserv<strong>at</strong>o a livello superutente (OFB, ved. cap.<br />
Programmazione), il comportamento del Metal detector può<br />
variare:<br />
• se OFB=YES, il rivel<strong>at</strong>ore entra in st<strong>at</strong>o di allarme<br />
irreversibile in quanto non oper<strong>at</strong>ivo: ripetere il test<br />
dall'inizio, inserendo la chip card: se la procedura ha<br />
successo, il metal detector torna oper<strong>at</strong>ivo, altrimenti è<br />
necessario il ripristino da parte del superutente<br />
• se OFB=NO, il rivel<strong>at</strong>ore torna a funzionare come prima<br />
del test: è cura dell'oper<strong>at</strong>ore registrare opportunamente il<br />
fallimento del test funzionale.<br />
WRONINSE<br />
La chip card non è st<strong>at</strong>a inserita correttamente: ripetere<br />
l’operazione orientando correttamente la card.<br />
www.ceia.net