Instrucciones de uso: Prueba de funcionamiento del ... - Revell
Instrucciones de uso: Prueba de funcionamiento del ... - Revell
Instrucciones de uso: Prueba de funcionamiento del ... - Revell

Create successful ePaper yourself
Turn your PDF publications into a flip-book with our unique Google optimized e-Paper software.
Manomètre à air comprimé et réglage <strong>de</strong> la pression <strong>de</strong> travail<br />
14. Le manomètre à air comprimé (E) affiche la pression <strong>de</strong> travail pendant le fonctionnement <strong>de</strong><br />
l’aérographe. Le dispositif d’arrêt automatique (G) arrête le compresseur lorsque la pression atteint<br />
4 bars environ et le remet en marche lorsque celle-ci est re<strong>de</strong>scendue à environ 3 bars.<br />
15. Pendant le fonctionnement, le manomètre à air comprimé affiche normalement une pression entre<br />
2,5 et 3,5 bars, en fonction du modèle d’aérographe utilisé. C’est ce que l’on appelle la « pression<br />
<strong>de</strong> travail » disponible.<br />
16. Pour les aérographes <strong>Revell</strong>, nous recommandons d’utiliser une pression <strong>de</strong> travail <strong>de</strong> 1,8 à 2,1 bars<br />
environ.<br />
17. Réduction <strong>de</strong> la pression <strong>de</strong> travail Libérez le flux d’air en actionnant la gâchette <strong>de</strong> votre aérographe.<br />
Tournez en même temps le régulateur <strong>de</strong> pression (D) dans le sens contraire <strong>de</strong>s aiguilles d’une<br />
montre, jusqu’à ce que le manomètre à air comprimé (E) affiche la pression <strong>de</strong> travail souhaitée.<br />
18. Remarque : si vous travaillez avec une pression <strong>de</strong> travail réduite, <strong>de</strong> l’air sortira en permanence du<br />
régulateur <strong>de</strong> pression. De cette manière, le dispositif d’arrêt automatique est mis hors service. Si<br />
vous fermez le régulateur <strong>de</strong> pression (D), le dispositif d’arrêt automatique (G) sera <strong>de</strong> nouveau<br />
enclenché.<br />
Consignes générales<br />
19. S’il est utilisé pendant une pério<strong>de</strong> prolongée, le compresseur peut <strong>de</strong>venir très brûlant. Il sera donc<br />
nécessaire <strong>de</strong> le manipuler avec la plus gran<strong>de</strong> précaution.<br />
20. Ne laissez pas marcher votre compresseur sans interruption plus <strong>de</strong> 60 minutes. Le moteur est<br />
protégé contre la surchauffe et arrête le compresseur automatiquement en cas <strong>de</strong> surchauffe. Dans<br />
ce cas, désactivez le compresseur. Atten<strong>de</strong>z que le compresseur ait refroidi avant <strong>de</strong> le remettre en<br />
marche.<br />
21. Travaillez toujours dans <strong>de</strong>s espaces bien aérés et évitez d’utiliser le compresseur dans un<br />
environnement humi<strong>de</strong> ou à proximité d’un point d’eau.<br />
22. Veillez à ce que le compresseur ne soit pas exposé directement au nuage <strong>de</strong> peinture.<br />
23. Ne pulvérisez jamais <strong>de</strong> substances inflammables.<br />
24. Garantie : <strong>Revell</strong> accor<strong>de</strong> une garantie d’un an sur cet appareil à partir <strong>de</strong> la date d’achat. Pour un<br />
recours à la garantie, veuillez vous adresser à votre ven<strong>de</strong>ur et lui présenter le ticket <strong>de</strong> caisse.<br />
25. Droit à la garantie : ne faites aucune réparation vous-même, sous peine d’annuler votre droit à la<br />
garantie.<br />
Remarques concernant la protection <strong>de</strong> l’environnement<br />
Lorsque l’appareil sera en fin <strong>de</strong> vie, ne le jetez pas dans un poubelle domestique<br />
normale. Remettez-le à une déchetterie spécialisée dans le recyclage <strong>de</strong>s appareils<br />
électriques et électroniques. Le symble apposé sur le produit, la notice d’instruction ou<br />
l’emballage vous rappelle cette règle. Les matériaux sont recyclables selon leur<br />
i<strong>de</strong>ntification. Cette réutilisation, valorisation <strong>de</strong>s matières ou autre forme <strong>de</strong> recyclage<br />
<strong>de</strong>s vieux appareils, vous permet d’apporter une contribution importante à la protection<br />
<strong>de</strong> notre environnement. Renseignez-vous sur l’adresse <strong>de</strong> la déchetterie compétente<br />
auprès <strong>de</strong> l’administration <strong>de</strong> votre commune.<br />
Type: NL olievrije zuigercompressor (220 - 240 V / 50 Hz / 135 W)<br />
Maximum druk: ca. 5,5 bar<br />
Lucht- / liter vermogen: ca. 23 l/min<br />
Geluidsniveau: ca. 55 db<br />
Extra’s: Manometer, mogelijkheid voor drukregeling, waterafschei<strong>de</strong>r,<br />
afschakelautomaat, draaggreep.<br />
Aansluitingen: Seriematig met aansluiting (1/4 duim) voor <strong>de</strong> slangen (38230) (met passtuk<br />
voor compressor) en 38250. Het passtuk voor <strong>de</strong> compressor maakt <strong>de</strong>el uit van<br />
<strong>de</strong> set, <strong>de</strong> slang is echter niet inbegrepen.<br />
De compressor 'standard class' is van het type olievrije zuigercompressor. Het werkt optimaal<br />
met ons spuitpistool 'starter class' samen. De compressor is i<strong>de</strong>aal voor ie<strong>de</strong>re beginnen<strong>de</strong>,<br />
ambitieuze airbrush-hobbyist.<br />
Handleiding voor <strong>de</strong> bediening:<br />
1. Pak <strong>de</strong> compressor en <strong>de</strong> waterafschei<strong>de</strong>r (B) voorzichtig uit. Verwij<strong>de</strong>r het voor het transport<br />
gebruikte materiaal en controleer <strong>de</strong> compressor op uitwendige beschadigingen.<br />
2. Monteer <strong>de</strong> waterafschei<strong>de</strong>r (B) op <strong>de</strong> compressor (zie <strong>de</strong> afbeelding).<br />
3. Sluit <strong>de</strong> luchtslang van het spuitpistool aan op <strong>de</strong> waterafschei<strong>de</strong>r (B): Bij gebruik van luchtslang<br />
38230 kunt u <strong>de</strong> slang rechtstreeks op het passtuk voor <strong>de</strong> compressor (A) op <strong>de</strong> waterafschei<strong>de</strong>r<br />
(B) aansluiten. Bij gebruik van luchtslang 38250 moet u het passtuk voor <strong>de</strong> compressor (A) van <strong>de</strong><br />
waterafschei<strong>de</strong>r (B) af draaien en <strong>de</strong> slang rechtstreeks op <strong>de</strong> 1/4 duims schroefdraad vastdraaien.<br />
4. Sluit het an<strong>de</strong>re uitein<strong>de</strong> van <strong>de</strong> luchtslang op uw spuitpistool aan.<br />
5. De compressor is nu compleet gebruiksklaar gemonteerd en klaar voor <strong>de</strong> functietest.<br />
Testen van <strong>de</strong> compressor:<br />
6. Steek <strong>de</strong> stekker van <strong>de</strong> compressor in het stopcontact.<br />
7. Schakel <strong>de</strong> compressor in (F). De compressor start en wordt automatisch uitgeschakeld wanneer het<br />
systeem luchtdicht is. Als <strong>de</strong> compressor echter na ca. 10 secon<strong>de</strong>n niet automatisch wordt uitgeschakeld<br />
of als <strong>de</strong> compressor in rusttoestand continu in- en uitgeschakeld wordt, is dit een teken<br />
dat er ergens in het apparaat sprake is van een ondichte plek. Controleer alle aansluitingen en slangkoppelingen<br />
en let op het geluid van ontsnappen<strong>de</strong> lucht. Indien nodig kunnen alle schroefdra<strong>de</strong>n<br />
met teflonband wor<strong>de</strong>n gedicht en dient u alle slangkoppelingen stevig vast te draaien.<br />
8. Nadat <strong>de</strong> compressor zichzelf automatisch heeft uitgeschakeld, geeft u <strong>de</strong> luchtstroom vrij door <strong>de</strong><br />
trekker van uw spuitpistool over te halen. Zodra <strong>de</strong> luchtstroom is vrijgegeven, zal <strong>de</strong> compressor<br />
weer starten. De compressor zal zó lang in bedrijf blijven als u het spuitpistool activeert en zich<br />
automatisch weer uitschakelen zodra u het spuitpistool niet meer gebruikt.<br />
On<strong>de</strong>rhoud en leegmaken van <strong>de</strong> waterafschei<strong>de</strong>r:<br />
9. Na gebruik van <strong>de</strong> compressor kan zich in <strong>de</strong> waterafschei<strong>de</strong>r (B) vocht ophopen.<br />
10. Schakel <strong>de</strong> compressor uit (F).<br />
11. Om <strong>de</strong> waterafschei<strong>de</strong>r (B) leeg te maken dient u eerst <strong>de</strong> drukregelaar (D) tegen <strong>de</strong> wijzers van <strong>de</strong><br />
klok in los te schroeven en weg te halen, en vervolgens het vrijkomen<strong>de</strong> vocht met behulp van een<br />
doek weg te vegen. Schakel vervolgens <strong>de</strong> compressor weer in (F).<br />
12. Het vocht wordt aan <strong>de</strong> on<strong>de</strong>rzij<strong>de</strong> van <strong>de</strong> regelaar uit het apparaat gedrukt tot er geen vocht meer<br />
uit <strong>de</strong> opening voor het aftappen van con<strong>de</strong>nswater (C) komt.<br />
13. Wanneer <strong>de</strong> waterafschei<strong>de</strong>r (B) helemaal leeg is, kunt u <strong>de</strong> drukregelaar (D) met <strong>de</strong> wijzers van <strong>de</strong><br />
klok mee weer vastschroeven.<br />
Persluchtmanometer en instellen van <strong>de</strong> arbeidsdruk:<br />
14. De persluchtmanometer (E) geeft tij<strong>de</strong>ns het airbrushen aan wat <strong>de</strong> arbeidsdruk is.<br />
De afschakelautomaat (G) schakelt <strong>de</strong> compressor af zodra een druk van ca. 4 bar wordt bereikt;<br />
wanneer <strong>de</strong> druk tot ca. 3 bar is gedaald, schakelt hij <strong>de</strong> compressor weer in.<br />
15. Tij<strong>de</strong>ns bedrijf geeft <strong>de</strong> persluchtmanometer al naar gelang het gebruikte mo<strong>de</strong>l spuitpistool normaal<br />
gesproken een druk aan tussen 2,5 en 3,5 bar. Deze druk wordt <strong>de</strong> ter beschikking staan<strong>de</strong> "arbeids<br />
druk" genoemd.<br />
16. Wij ra<strong>de</strong>n u aan om bij het werken met <strong>de</strong> spuitpistolen van <strong>Revell</strong> een arbeidsdruk van ca. 1,8 - 2,1<br />
bar aan te hou<strong>de</strong>n.<br />
17. Verlagen van <strong>de</strong> arbeidsdruk: Geef <strong>de</strong> luchtstroom vrij door <strong>de</strong> trekker van het spuitpistool te<br />
activeren. Draai tegelijkertijd <strong>de</strong> drukregelaar (D) nèt zo lang tegen <strong>de</strong> wijzers van <strong>de</strong> klok in tot <strong>de</strong><br />
persluchtmanometer (E) <strong>de</strong> gewenste arbeidsdruk aangeeft.<br />
18. Opmerking: Als u met een lagere arbeidsdruk werkt, zal er permanent lucht uit <strong>de</strong> drukregelaar (D)<br />
vrijkomen. Op die manier wordt <strong>de</strong> automatische afschakelfunctie (G) buiten bedrijf gesteld.<br />
Als u <strong>de</strong> drukregelaar (D) sluit, wordt <strong>de</strong> automatische afschakelfunctie (G) weer ingeschakeld.<br />
Algemene aanwijzingen:<br />
19. De compressor kan, wanneer hij langere tijd in gebruik is, bijzon<strong>de</strong>r heet wor<strong>de</strong>n; er dient dan uiterst<br />
voorzichtig en zorgvuldig met het apparaat te wor<strong>de</strong>n omgegaan.<br />
20. De compressor mag niet langer dan 60 minuten zon<strong>de</strong>r on<strong>de</strong>rbreking in bedrijf zijn. De motor is<br />
tegen oververhitting beschermd en schakelt <strong>de</strong> compressor ingeval van oververhitting automatisch<br />
uit. Wanneer dit gebeurt, moet u <strong>de</strong> compressor uitschakelen. Schakel <strong>de</strong> compressor pas weer in<br />
als hij is afgekoeld.<br />
21. Werk altijd op een plaats waar goed geventileerd wordt en vermijd het gebruik van <strong>de</strong> compressor in<br />
een vochtige omgeving of in <strong>de</strong> buurt van water.<br />
22. Stel <strong>de</strong> compressor niet rechtstreeks bloot aan <strong>de</strong> verfnevel.<br />
23. Gebruik <strong>de</strong> compressor nooit voor het sprayen van brandbare substanties.<br />
24. Garantie: De firma <strong>Revell</strong> biedt voor dit apparaat een garantie van één jaar vanaf <strong>de</strong> datum van<br />
aankoop. Wendt u wanneer u aanspraak maakt op <strong>de</strong> garantie tot uw <strong>de</strong>aler en toon hem <strong>de</strong><br />
kassabon.<br />
25. Aanspraak op garantie: voer nooit zelf reparaties uit. In dat geval vervalt <strong>de</strong> aanspraak op <strong>de</strong> garantie.<br />
Opmerkingen ten aanzien van het milieu:<br />
Dit product mag wanneer het onbruikbaar is gewor<strong>de</strong>n of niet meer gebruikt zal wor<strong>de</strong>n,<br />
niet via het normale huisvuil wor<strong>de</strong>n verwij<strong>de</strong>rd, maar moet naar een inzamelpunt voor<br />
het recyclen van elektrische en elektronische apparatuur wor<strong>de</strong>n gebracht. Dit wordt<br />
aangegeven door het symbool op het product, <strong>de</strong> handleiding voor het gebruik of <strong>de</strong> verpakking.<br />
De verwerkte materialen zijn herbruikbaar al naar gelang <strong>de</strong> markering. Door<br />
het apparaat of het materiaal te hergebruiken of gebruikte apparaten op an<strong>de</strong>re wijze<br />
opnieuw te gebruiken levert u een belangrijke bijdrage tot <strong>de</strong> bescherming van ons<br />
milieu. Vraag <strong>de</strong> instanties in uw gemeente om na<strong>de</strong>re informatie over <strong>de</strong> inzamelpunten.<br />
Tipo: E Compresor <strong>de</strong> émbolo exento <strong>de</strong> aceite (220 - 240 V / 50 Hz / 135 W)<br />
Presión máxima: aprox. 5,5 bar<br />
Rendimiento aire/litro : aprox. 23 l/min<br />
Generación acústica: aprox. 55 db<br />
Extras: Manómetro, regulador <strong>de</strong> presión, separador <strong>de</strong> agua, dispositivo automático<br />
<strong>de</strong> <strong>de</strong>sconexión, asa <strong>de</strong> transporte.<br />
Conexiones: De serie, con conexión (1/4 <strong>de</strong> pulgada) para los tubos flexibles 38230 (con<br />
pieza <strong>de</strong> adaptación para compresor) y 38250. La pieza <strong>de</strong> adaptación para<br />
compresor viene incluida, los tubos flexibles no están incluidos en el juego.<br />
El compresor <strong>de</strong> la 'categoría estándar' es un compresor <strong>de</strong> émbolo exento <strong>de</strong> aceite.<br />
Trabaja <strong>de</strong> manera óptima con nuestras pistolas para aerografia <strong>de</strong> la 'categoría estándar'.<br />
Resulta i<strong>de</strong>al para principiantes que quieran ir avanzando en el hobby <strong>de</strong> la aerografía.<br />
<strong>Instrucciones</strong> <strong>de</strong> <strong>uso</strong>:<br />
1. Extraiga con cuidado el compresor y el separador <strong>de</strong> agua (B) <strong>de</strong>l embalaje. Quite todas las<br />
protecciones para transporte y verifique el conjunto sobre eventuales daños externos.<br />
2. Monte el separador <strong>de</strong> agua (B) en el compresor (ver figura).<br />
3. Conecte el tubo flexible <strong>de</strong>l aire <strong>de</strong> la pistola <strong>de</strong> aerografía al separador <strong>de</strong> agua (B): En caso <strong>de</strong><br />
utilizar el tubo flexible 38230, éste pue<strong>de</strong> conectarse directamente a la pieza <strong>de</strong> adaptación para<br />
compresor (A) que hay en el separador <strong>de</strong> agua (B). En caso <strong>de</strong> utilizar el tubo flexible 38250,<br />
<strong>de</strong>berá <strong>de</strong>stornillar previamente la pieza <strong>de</strong> adaptación para compresor (A) <strong>de</strong>l separador <strong>de</strong> agua<br />
(B) y empalmar directamente el tubo flexible a la rosca <strong>de</strong> 1/4 <strong>de</strong> pulgada.<br />
4. Una el otro extremo <strong>de</strong>l tubo flexible para el aire a su pistola <strong>de</strong> aerografía.<br />
5. El compresor queda ya montado y listo para la prueba <strong>de</strong> <strong>funcionamiento</strong>.<br />
<strong>Prueba</strong> <strong>de</strong> <strong>funcionamiento</strong> <strong>de</strong>l compresor:<br />
6. Enchufe la clavija <strong>de</strong>l compresor a la toma <strong>de</strong> corriente.<br />
7. Ponga en marcha el compresor (F). El compresor arrancará y se <strong>de</strong>sconectará <strong>de</strong> manera automática,<br />
si el sistema es estanco al aire. No obstante, si en el intervalo <strong>de</strong> aproximadamente 10 segundos, el<br />
compresor no se ha <strong>de</strong>sconectado <strong>de</strong> forma automática o bien si el compresor en estado <strong>de</strong> reposo se<br />
va conectando y <strong>de</strong>sconectando continuamente, ello significará que hay una falta <strong>de</strong> estanqueidad.<br />
Compruebe todas las conexiones y todos los empalmes <strong>de</strong>l tubo flexible y preste atención al ruido<br />
que pueda producir una eventual fuga <strong>de</strong> aire. Si es el caso, estanqueice las roscas con cinta <strong>de</strong><br />
teflón y apriete todos los empalmes <strong>de</strong> tubo flexible.<br />
8. Una vez se haya <strong>de</strong>sconectado automáticamente el compresor, libere el flujo <strong>de</strong> aire, activando el<br />
disparador <strong>de</strong> su pistola <strong>de</strong> aerografía. Así que se haya liberado el flujo <strong>de</strong> aire, el compresor se<br />
volverá a poner en marcha. El compresor seguirá funcionando en tanto y cuanto siga utilizando<br />
usted la pistola <strong>de</strong> aerografía y se <strong>de</strong>sconectará automáticamente al <strong>de</strong>jar <strong>de</strong> utilizarla.<br />
Mantenimiento y vaciado <strong>de</strong>l separador <strong>de</strong> agua:<br />
9. Tras la utilización <strong>de</strong>l compresor, pue<strong>de</strong> quedar acumulada humedad en el separador <strong>de</strong> agua (B).<br />
10. Desconecte el compresor (F).<br />
11. Para vaciar el separador <strong>de</strong> agua (B), gire en primer lugar el regulador <strong>de</strong> presión (D) en sentido<br />
antihorario y vaya recogiendo con un trapo la humedad que salga. Vuelva a conectar a continuación<br />
el compresor (F).<br />
12. La humedad <strong>de</strong> la parte inferior <strong>de</strong>l regulador es expulsada hacia el exterior, hasta que <strong>de</strong>ja <strong>de</strong> salir<br />
agua <strong>de</strong> la tubuladura <strong>de</strong> salida <strong>de</strong>l agua <strong>de</strong> con<strong>de</strong>nsación (C).<br />
13. Una vez haya quedado vacío el separador <strong>de</strong> agua (B), vuelva a introducir el regulador <strong>de</strong><br />
presión (D), girándolo en sentido horario.<br />
Manómetro <strong>de</strong>l aire comprimido y ajuste <strong>de</strong> la presión <strong>de</strong> régimen:<br />
14. El manómetro <strong>de</strong>l aire comprimido (E) nos indica la presión <strong>de</strong> régimen al aerografiar. El dispositivo<br />
automático <strong>de</strong> <strong>de</strong>sconexión (G) <strong>de</strong>sconecta el compresor cuando se alcanzan aproximadamente los<br />
4 bar y lo vuelve a conectar cuando bajamos aproximadamente a los 3 bar.<br />
15. Durante la tarea, el manómetro <strong>de</strong>l aire comprimido indica normalmente un valor entre los 2,5 y los<br />
3,5 bar, en función <strong>de</strong>l respectivo mo<strong>de</strong>lo <strong>de</strong> pistola aerográfica con el que trabajemos. Eso es lo<br />
que se <strong>de</strong>nomina "presión <strong>de</strong> régimen" disponible.<br />
16. Al trabajar con pistolas para aerografía <strong>de</strong> <strong>Revell</strong>, recomendamos una presión <strong>de</strong> régimen <strong>de</strong><br />
aproximadamente, entre 1,8 - 2,1 bar.<br />
17. Reducción <strong>de</strong> la presión <strong>de</strong> régimen: Abra el caudal <strong>de</strong> aire, activando el disparador <strong>de</strong> la pistola<br />
para aerografía. Simultáneamente, vaya girando el regulador <strong>de</strong> presión (D) en sentido antihorario,<br />
hasta que el manómetro (E) <strong>de</strong>l aire comprimido indique la presión <strong>de</strong> régimen <strong>de</strong>seada.<br />
18. Advertencia: Cuando usted trabaja a presión <strong>de</strong> régimen reducida, va saliendo permanentemente<br />
aire <strong>de</strong>l regulador <strong>de</strong> presión (D). Es <strong>de</strong> esta manera como se pone fuera <strong>de</strong> servicio la función <strong>de</strong><br />
<strong>de</strong>sconexión automática (G). Cuando usted cierra el regulador <strong>de</strong> presión (D), se conecta <strong>de</strong> nuevo<br />
la función <strong>de</strong> <strong>de</strong>sconexión automática (G).<br />
<strong>Instrucciones</strong> <strong>de</strong> carácter general:<br />
19. Tras una prolongada utilización, el compresor pue<strong>de</strong> calentarse mucho; requiriéndose entonces un<br />
cuidado especial para cualquier manipulación.<br />
20. Un <strong>funcionamiento</strong> ininterrumpido <strong>de</strong>l compresor no <strong>de</strong>be sobrepasar nunca los 60 minutos. El<br />
motor está protegido contra sobrecalentamientos y en caso <strong>de</strong> sobrecalentamiento, <strong>de</strong>sconecta<br />
automáticamente el compresor. Cuando esto suceda, <strong>de</strong>sconecte el compresor. Vuélvalo a conectar<br />
tan sólo una vez se haya enfriado.<br />
21. Trabaje siempre en ámbitos bien ventilados y evite la utilización <strong>de</strong>l compresor en un entorno<br />
húmedo o en las proximida<strong>de</strong>s <strong>de</strong> agua.<br />
22. No exponga nunca el compresor a la acción directa <strong>de</strong> la niebla <strong>de</strong> pintura.<br />
23. No pulverice sobre substancias inflamables.<br />
24. Garantía: <strong>Revell</strong> conce<strong>de</strong> una garantía para este aparato <strong>de</strong> un año, tras la fecha <strong>de</strong> compra. En caso<br />
<strong>de</strong> tener que recurrir a la misma, diríjase a su distribuidor, presentándole el ticket <strong>de</strong> caja.<br />
25. Derecho <strong>de</strong> garantía: Rogamos no haga reparaciones por su cuenta. De lo contrario, per<strong>de</strong>rá su<br />
<strong>de</strong>recho a garantía.<br />
Indicaciones para la protección <strong>de</strong>l medio ambiente:<br />
Al final <strong>de</strong> su vida útil, este producto no pue<strong>de</strong> ser eliminado a los residuos domésticos<br />
normales, sino que ha <strong>de</strong> ser entregado a un punto <strong>de</strong> recogida <strong>de</strong> productos eléctricos<br />
y electrónicos para el reciclaje. El símbolo que hay en el producto, en las instrucciones<br />
<strong>de</strong> <strong>uso</strong> o en el embalaje, así nos lo indica. De acuerdo con su i<strong>de</strong>ntificación, los materiales<br />
son susceptibles <strong>de</strong> reutilización. Con el reaprovechamiento, la reutilización <strong>de</strong> las<br />
materias integrantes o con cualquier otra forma <strong>de</strong> aprovechamiento <strong>de</strong> aparatos<br />
usados, usted realiza una importante contribución a la protección <strong>de</strong> nuestro medio<br />
ambiente.<br />
Rogamos consulte a su autoridad municipal el punto <strong>de</strong> eliminación correspondiente.<br />
Anleitung<br />
Notice d’utilisation<br />
Instructions<br />
Handleiding<br />
<strong>Instrucciones</strong><br />
39137<br />
<strong>Revell</strong> GmbH & Co. KG,<br />
Henschelstraße 20 – 30,<br />
D-32257 Bün<strong>de</strong><br />
KOMPRESSOR, COMPRESSOR, COMPRESSEUR, COMPRESOR<br />
Typ: Ölfreier Kolbenkompressor<br />
(220 - 240 V/ 50 Hz /135 W)<br />
Maximaldruck: ca. 5,5 bar<br />
Luft-/Liter Leistung: ca. 23 l/min<br />
Geräuschentwicklung:ca. 55 db<br />
Extras: Manometer, Druckregler, Wasserabschei<strong>de</strong>r,<br />
Abschaltautomatik,<br />
Tragegriff.<br />
Anschlüsse: Serienmäßig mit Anschluss<br />
(1/4 Zoll) für die Schläuche<br />
38230 (mit Kompressoranpassungsstück)<br />
und 38250.<br />
Das Kompressoranpassungsstück<br />
ist enthalten, die Schläuche<br />
sind nicht im Set enthalten.<br />
39137 0389<br />
Maximaldruck<br />
Maximum pressure<br />
~5,5bar<br />
Pression maximale<br />
Maximum druk<br />
Presión máxima
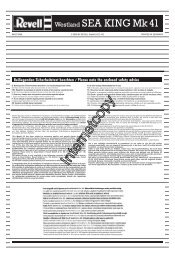
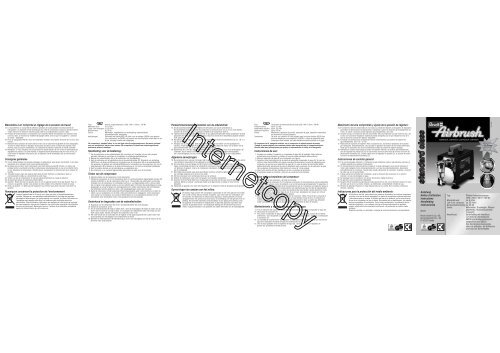
A H G<br />
B C D<br />
NL E<br />
A Passtuk voor het A Pieza <strong>de</strong> adaptación<br />
D<br />
GB F<br />
aansluiten van <strong>de</strong><br />
<strong>Revell</strong>-slang<br />
para compresor<br />
para la conexión<br />
A Kompressoran- A Compressor A Adaptateur <strong>de</strong><br />
38230 op <strong>de</strong><br />
compressor<br />
<strong>de</strong>l tubo flexible<br />
38230 <strong>de</strong> <strong>Revell</strong><br />
passungsstück adapter for the compresseur pour<br />
für <strong>de</strong>n Anschluss connector of le raccor<strong>de</strong>ment B Waterafschei<strong>de</strong>r B Separador <strong>de</strong> agua<br />
<strong>de</strong>s <strong>Revell</strong><br />
<strong>Revell</strong> hose<br />
du tuyau flexible<br />
Schlauches 38230 38230<br />
<strong>Revell</strong> 38230. C Opening voor het C Tubuladura <strong>de</strong><br />
B Wasserabschei<strong>de</strong>r B Water separator B Purgeur <strong>de</strong><br />
aftappen van<br />
con<strong>de</strong>nswater<br />
salida <strong>de</strong>l agua <strong>de</strong><br />
con<strong>de</strong>nsación<br />
con<strong>de</strong>nsation<br />
C Kon<strong>de</strong>nswasser- C Con<strong>de</strong>nsation C Tubulure d’éva- D Drukregelaar D Regulador <strong>de</strong><br />
ablassstutzen drain valve<br />
cuation <strong>de</strong> l’eau<br />
presión<br />
D Druckregler<br />
<strong>de</strong> con<strong>de</strong>nsation<br />
D Pressure regulator D Régulateur <strong>de</strong><br />
E Persluchtdrukmeter<br />
E Manómetro <strong>de</strong>l<br />
E Druckluftmanometer<br />
E Compressed air<br />
manometer<br />
pression<br />
E Manomètre à air<br />
comprimé<br />
F Schakelaar<br />
Aan / Uit<br />
aire comprimido<br />
F Interruptor <strong>de</strong><br />
conexión/<br />
F An-/Aus-Schalter F On/Off switch F Bouton G Afschakelautmaat <strong>de</strong>sconexión<br />
Marche/Arrêt<br />
G Dispositivo automá<br />
G Abschaltautomatik G Automatic switch- G Arrêt automatique H<br />
Draaggreep<br />
tico <strong>de</strong> <strong>de</strong>sconexión<br />
off system<br />
H Tragegriff H Carrying handle H Poignée <strong>de</strong><br />
transport<br />
H Asa <strong>de</strong> transporte<br />
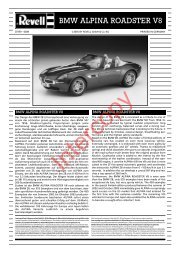
E<br />
F<br />
Typ: D Ölfreier Kolbenkompressor (220 - 240 V / 50 Hz / 135 W)<br />
Maximaldruck: ca. 5,5 bar<br />
Luft-/Liter Leistung: ca. 23 l/min<br />
Geräuschentwicklung: ca. 55 db<br />
Extras: Manometer, Druckregler, Wasserabschei<strong>de</strong>r, Abschaltautomatik, Tragegriff<br />
Anschlüsse: Serienmäßig mit Anschluss (1/4 Zoll) für die Schläuche 38230<br />
(mit Kompressoranpassungsstück) und 38250<br />
Das Kompressoranpassungsstück ist enthalten,<br />
die Schläuche sind nicht im Set enthalten<br />
Der 'standard class' Kompressor ist ein ölfreier Kolbenkompressor. Er arbeitet optimal mit<br />
unserer 'standard class' Spritzpistole zusammen. Er ist i<strong>de</strong>al für ambitionierte Einsteiger in das<br />
Airbrush-Hobby.<br />
Bedienungsanleitung:<br />
1. Packen Sie <strong>de</strong>n Kompressor und <strong>de</strong>n Wasserabschei<strong>de</strong>r (B) vorsichtig aus. Entfernen Sie die<br />
Transportmaterialien und prüfen Sie alles auf äußere Beschädigungen.<br />
2. Montieren Sie <strong>de</strong>n Wasserabschei<strong>de</strong>r (B) an <strong>de</strong>n Kompressor (siehe Abbildung).<br />
3. Schließen Sie <strong>de</strong>n Luftschlauch <strong>de</strong>r Spritzpistole an <strong>de</strong>n Wasserabschei<strong>de</strong>r (B) an:<br />
Bei Verwendung <strong>de</strong>s Luftschlauchs 38230 können Sie diesen direkt an das Kompressoranpassungsstück<br />
(A) am Wasserabschei<strong>de</strong>r (B) anschließen.<br />
Bei Verwendung <strong>de</strong>s Luftschlauchs 38250 müssen Sie das Kompressoranpassungsstück (A) vom<br />
Wasserabschei<strong>de</strong>r (B) abschrauben und <strong>de</strong>n Schlauch direkt auf das 1/4-Zoll-Gewin<strong>de</strong> schrauben.<br />
4. Verbin<strong>de</strong>n Sie das an<strong>de</strong>re En<strong>de</strong> <strong>de</strong>s Luftschlauchs mit Ihrer Spritzpistole.<br />
5. Der Kompressor ist nun fertig montiert und bereit für <strong>de</strong>n Funktionstest.<br />
Testen <strong>de</strong>s Kompressors:<br />
6. Stecken Sie <strong>de</strong>n Netzstecker <strong>de</strong>s Kompressors in eine Steckdose.<br />
7. Schalten Sie <strong>de</strong>n Kompressor ein (F). Der Kompressor läuft an und schaltet automatisch ab, wenn<br />
das System luftdicht ist. Wenn sich <strong>de</strong>r Kompressor nach ca. 10 Sekun<strong>de</strong>n jedoch nicht automatisch<br />
abschaltet o<strong>de</strong>r wenn sich <strong>de</strong>r Kompressor im Ruhezustand dauernd ein- und ausschaltet, <strong>de</strong>utet<br />
dies auf eine Undichtigkeit hin. Prüfen Sie alle Anschlüsse und Schlauchverbindungen und achten<br />
Sie auf das Geräusch entweichen<strong>de</strong>r Luft. Dichten Sie gegebenenfalls undichte Gewin<strong>de</strong> mit<br />
Teflonband ab und ziehen Sie alle Schlauchverbindungen fest.<br />
8. Nach<strong>de</strong>m sich <strong>de</strong>r Kompressor automatisch abgeschaltet hat, geben Sie <strong>de</strong>n Luftstrom frei, in<strong>de</strong>m<br />
Sie <strong>de</strong>n Auslöser Ihrer Spritzpistole betätigen. Sobald <strong>de</strong>r Luftstrom freigegeben ist, läuft <strong>de</strong>r<br />
Kompressor wie<strong>de</strong>r an. Der Kompressor läuft so lange, wie Sie die Spritzpistole verwen<strong>de</strong>n und<br />
schaltet sich bei Nichtbenutzung <strong>de</strong>r Spritzpistole automatisch ab.<br />
Wartung und Leerung <strong>de</strong>s Wasserabschei<strong>de</strong>rs:<br />
9. Nach Benutzung <strong>de</strong>s Kompressors kann sich Feuchtigkeit im Wasserabschei<strong>de</strong>r (B) ansammeln.<br />
10. Schalten Sie <strong>de</strong>n Kompressor aus (F).<br />
11. Um <strong>de</strong>n Wasserabschei<strong>de</strong>r (B) zu entleeren, drehen Sie zunächst <strong>de</strong>n Druckregler (D) entgegen <strong>de</strong>m<br />
Uhrzeigersinn heraus und nehmen Sie die austreten<strong>de</strong> Feuchtigkeit mit einem Tuch auf. Schalten Sie<br />
<strong>de</strong>n Kompressor anschließend wie<strong>de</strong>r ein (F).<br />
12. Die Feuchtigkeit wird aus <strong>de</strong>r Unterseite <strong>de</strong>s Reglers herausgedrückt, bis keine Feuchtigkeit mehr<br />
aus <strong>de</strong>m Kon<strong>de</strong>nswasserablassstutzen (C) austritt.<br />
13. Wenn <strong>de</strong>r Wasserabschei<strong>de</strong>r (B) entleert ist, drehen Sie <strong>de</strong>n Druckregler (D) im Uhrzeigersinn<br />
wie<strong>de</strong>r hinein.<br />
Druckluftmanometer und Einstellung <strong>de</strong>s Arbeitsdrucks:<br />
14. Das Druckluftmanometer (E) zeigt <strong>de</strong>n Arbeitsdruck beim Airbrushen an.<br />
Die Abschaltautomatik (G) schaltet <strong>de</strong>n Kompressor bei Erreichen von ca. 4 bar ab und bei Absenkung<br />
auf ca. 3 bar wie<strong>de</strong>r ein.<br />
15. Im Betrieb zeigt das Druckluftmanometer normalerweise zwischen 2,5 und 3,5 bar an, abhängig<br />
von <strong>de</strong>m jeweiligen Spritzpistolen-Mo<strong>de</strong>ll. Dies wird als zur Verfügung stehen<strong>de</strong>r "Arbeitsdruck"<br />
bezeichnet.<br />
16. Wir empfehlen beim Arbeiten mit <strong>de</strong>n <strong>Revell</strong> Spritzpistolen einen Arbeitsdruck von ca. 1,8 - 2,1 bar.<br />
17. Verringerung <strong>de</strong>s Arbeitsdrucks: Geben Sie <strong>de</strong>n Luftstrom frei, in<strong>de</strong>m Sie <strong>de</strong>n Auslöser an <strong>de</strong>r<br />
Spritzpistole betätigen. Drehen Sie gleichzeitig <strong>de</strong>n Druckregler (D) entgegen <strong>de</strong>m Uhrzeigersinn, bis<br />
das Druckluftmanometer (E) <strong>de</strong>n gewünschten Arbeitsdruck anzeigt.<br />
18. Hinweis: Wenn Sie mit verringertem Arbeitsdruck arbeiten, tritt aus <strong>de</strong>m Druckregler (D) permanent<br />
Luft aus. Auf diese Weise wird die automatische Abschaltfunktion (G) außer Betrieb gesetzt.<br />
Wenn Sie <strong>de</strong>n Druckregler (D) schließen, wird die automatische Abschaltfunktion (G) wie<strong>de</strong>r eingeschaltet.<br />
Allgemeine Hinweise:<br />
19. Der Kompressor kann bei längerem Gebrauch sehr heiß wer<strong>de</strong>n; seine<br />
Handhabung erfor<strong>de</strong>rt dann beson<strong>de</strong>re Sorgfalt.<br />
20. Die ununterbrochene Laufzeit <strong>de</strong>s Kompressors soll 60 Minuten nicht überschreiten.<br />
Der Motor ist vor Überhitzung geschützt und schaltet <strong>de</strong>n Kompressor bei Überhitzung<br />
automatisch ab. Wenn dies geschieht, schalten Sie <strong>de</strong>n Kompressor bitte aus.<br />
Schalten Sie ihn erst wie<strong>de</strong>r ein, wenn er abgekühlt ist.<br />
21. Arbeiten Sie immer in gut belüfteten Bereichen und vermei<strong>de</strong>n Sie <strong>de</strong>n Einsatz<br />
<strong>de</strong>s Kompressors in feuchter Umgebung o<strong>de</strong>r in Wassernähe.<br />
22. Setzen Sie <strong>de</strong>n Kompressor nicht <strong>de</strong>m unmittelbaren Farbnebel aus.<br />
23. Versprühen Sie bitte niemals brennbare Substanzen.<br />
24. Garantie: Auf dieses Gerät gewährt die Firma <strong>Revell</strong> eine Garantie von einem Jahr ab Kaufdatum.<br />
Bitte wen<strong>de</strong>n Sie sich im Garantiefall unter Vorlage <strong>de</strong>s Kassenbons an Ihren Händler.<br />
25. Garantieanspruch: Bitte führen Sie keine Selbstreparaturen durch. An<strong>de</strong>rnfalls entfällt <strong>de</strong>r<br />
Garantieanspruch.<br />
Hinweise zum Umweltschutz:<br />
Dieses Produkt darf am En<strong>de</strong> seiner Lebensdauer nicht über <strong>de</strong>n normalen Haushaltsabfall<br />
entsorgt wer<strong>de</strong>n, son<strong>de</strong>rn muss an einem Sammelpunkt für das Recycling von<br />
elektrischen und elektronischen Geräten abgegeben wer<strong>de</strong>n. Das Symbol auf <strong>de</strong>m<br />
Produkt, <strong>de</strong>r Gebrauchsanleitung o<strong>de</strong>r <strong>de</strong>r Verpackung weist darauf hin. Die Werkstoffe<br />
sind gemäß Ihrer Kennzeichnung wie<strong>de</strong>rverwertbar.<br />
Mit <strong>de</strong>r Wie<strong>de</strong>rverwendung, <strong>de</strong>r stofflichen Verwertung o<strong>de</strong>r an<strong>de</strong>ren Formen <strong>de</strong>r Verwertung<br />
von Altgeräten leisten Sie einen wichtigen Beitrag zum Schutze unserer Umwelt.<br />
Bitte erfragen Sie bei <strong>de</strong>r Gemein<strong>de</strong>verwaltung die zuständige Entsorgungsstelle.<br />
Type: GB Oil-free piston compressor (220 - 240 V / 50 Hz / 135 W)<br />
Maximum pressure: approx. 5.5 bar<br />
Output in litres of air: approx. 23 l/min<br />
Noise level: approx. 55 db<br />
Extras: Manometer, pressure regulator, water separator, automatic switch-off system,<br />
carrying handle.<br />
Connectors: Fitted as standard with the connector (1/4 inch) for hoses 38230 (with<br />
compressor adapter) and 38250. The compressor adapter is inclu<strong>de</strong>d, but the<br />
hoses are not inclu<strong>de</strong>d in the set.<br />
The 'standard class' compressor is an oil-free piston compressor. It works best with our<br />
'standard class' spray-gun. It is i<strong>de</strong>al for ambitious beginners.<br />
Instructions for use:<br />
1. Carefully unpack the compressor and water separator (B). Remove the transport material and check<br />
everything for external damage.<br />
2. Attach the water separator (B) to the compressor (see illustration).<br />
3. Connect the air hose of the spray-gun to the water separator (B): If using air hose 38230, you can<br />
connect this directly to the compressor adapter (A) on the water separator (B). If using air hose<br />
38250, you must unscrew the compressor adapter (A) from the water separator (B) and screw the<br />
hose directly onto the 1/4 inch thread.<br />
4. Connect the other end of the air hose to your spray-gun.<br />
5. The compressor is now assembled and ready for the function test.<br />
Testing the compressor:<br />
6. Plug the mains plug of the compressor into a power point.<br />
7. Switch on the compressor (F). The compressor starts up and automatically switches off, if the<br />
system is airtight. If the compressor does not automatically switch off after approx. 10 seconds, or<br />
if the compressor switches on and off constantly while in a resting state, this indicates a leak. Check<br />
all connectors and hose connections and listen out for the sound of escaping air. Seal all leaky<br />
threads with Teflon tape and pull all hose connections tight.<br />
8. After the compressor has automatically switched off, release the air flow by pressing the trigger on<br />
your spray-gun. As soon as the air flow has been released, the compressor starts up again. The<br />
compressor continues to run for as long as you use the spray-gun, and if the spray-gun is not used<br />
for a certain period of time, it automatically switches off.<br />
Servicing and emptying the water separator:<br />
9. After using the compressor, moisture can collect in the water separator (B).<br />
10. Switch off the compressor (F).<br />
11. To empty the water separator (B), unscrew the pressure regulator (D) anticlockwise and use a cloth<br />
to absorb the moisture that comes out. Then switch the compressor (F) on again.<br />
12. The moisture will be pressed out from un<strong>de</strong>rneath the regulator until no more moisture comes out<br />
of the con<strong>de</strong>nsation drain valve (C).<br />
13. When the water separator (B) is empty, screw the press regulator (D) back on<br />
clockwise.<br />
Compressed air manometer and setting the operating pressure:<br />
14. The compressed air manometer (E) displays the operating pressure during airbrushing. The<br />
automatic switch-off system (G) switches off the compressor when the pressure reaches approx.<br />
4 bar and switches it back on again when the pressure drops to approx. 3 bar.<br />
15. While running, the compressed air manometer normally displays pressure at between 2.5 and 3.5<br />
bar, <strong>de</strong>pending on the mo<strong>de</strong>l of spray-gun. This is <strong>de</strong>scribed as the available “operating pressure”.<br />
16. When working with <strong>Revell</strong> spray-guns, we recommend an operating pressure of approx. 1.8 – 2.1 bar.<br />
17. Reducing the operating pressure: Release the air flow by pressing the trigger on your spray-gun.<br />
At the same time, unscrew the pressure regulator (D) anticlockwise until the compressed air<br />
manometer (E) displays the <strong>de</strong>sired operating pressure.<br />
18. Tip: If you are working with reduced operating pressure, air constantly escapes from the pressure<br />
regulator. In this way, the automatic switch-off system (G) is put out of action. If you close the<br />
pressure regulator (D), the automatic switch-off system (G) switches back on.<br />
General notes:<br />
19. If used for a long period of time, the compressor can become very hot; in such cases, special care<br />
must be taken when handling the compressor.<br />
20. The uninterrupted operating time of the compressor must not exceed 60 minutes. The motor is<br />
protected from overheating. In the event of overheating, it automatically turns off the compressor.<br />
If this happens, please switch off the compressor. Do not switch it back on until it has cooled down.<br />
21. Always work in well ventilated areas and avoid using the compressor in a humid environment or<br />
near water.<br />
22. Do not expose the compressor to the direct spray.<br />
23. Never spray it with flammable substances.<br />
24. Guarantee: <strong>Revell</strong>’s guarantee on this piece of equipment is valid for one year from the purchase<br />
date. Should you need to invoke the guarantee, please take the compressor and your receipt to your<br />
local <strong>de</strong>aler.<br />
25. Right to claim un<strong>de</strong>r the guarantee: Please do not carry out any repairs yourself. If you do, your right<br />
to claim un<strong>de</strong>r the guarantee shall cease to apply.<br />
Notes on environmental protection:<br />
At the end of its useful life, this product must not be disposed of with normal household<br />
waste. It must be han<strong>de</strong>d over at a collection point for the recycling of electric and<br />
electronic equipment. This is indicated by the symbol on the product, instructions for<br />
use or packaging. The materials are recyclable as labelled. You make an important<br />
contribution to the protection of our environment through the recycling, material<br />
recycling or other forms of recycling of old equipment.<br />
Please contact your local authority for <strong>de</strong>tails on your local disposal centre.<br />
Type : F Compresseur à piston sans huile (220 - 240 V / 50 Hz / 135 W)<br />
Pression maxi : env. 5,5 bars<br />
Débit d’air : 23 l/min env.<br />
Niveau sonore : 55 db env.<br />
Options : manomètre, régulateur <strong>de</strong> pression, purgeur <strong>de</strong> con<strong>de</strong>nsation, dispositif d’arrêt<br />
automatique, poignée <strong>de</strong> transport.<br />
Raccor<strong>de</strong>ments : <strong>de</strong> série avec raccord (1/4’’) pour les tuyaux flexibles 38230 (avec adaptateur<br />
<strong>de</strong> compresseur) et 38250. L’adaptateur <strong>de</strong> compresseur est fourni, les tuyaux<br />
flexibles ne sont pas fournis.<br />
Le « standard class » est un compresseur à piston sans huile. Il fonctionne parfaitement bien<br />
en association avec notre aérographe « standard class ». C’est un appareil idéal pour les débutants<br />
ambitieux en aérographie.<br />
Notice d’utilisation<br />
1. Sortez le compresseur et le purgeur (B) avec précaution <strong>de</strong> l’emballage. Retirez les matériaux <strong>de</strong><br />
transport et vérifiez que les pièces ne présentent aucun dommage apparent.<br />
2. Installez le purgeur (B) sur le compresseur (voir illustration).<br />
3. Raccor<strong>de</strong>r le tuyau à air <strong>de</strong> l’aérographe au purgeur <strong>de</strong> con<strong>de</strong>nsation (B) : - si vous utilisez le<br />
tuyau 38230, vous pouvez le raccor<strong>de</strong>r directement à l’adaptateur (A) se trouvant sur le purgeur<br />
<strong>de</strong> con<strong>de</strong>nsation (B) ; - si vous utilisez le tuyau 38250, vous <strong>de</strong>vez dévisser l’adaptateur <strong>de</strong><br />
compresseur (A) <strong>de</strong> purgeur (B) et visser le tuyau directement sur le filetage 1/4".<br />
4. Raccor<strong>de</strong>z l’autre bout du tuyau à air à votre aérographe.<br />
5. Le compresseur est maintenant complètement monté et prêt pour le test <strong>de</strong> fonctionnement.<br />
Test <strong>de</strong> fonctionnement du compresseur<br />
6. Branchez la prise mâle du compresseur sur une prise <strong>de</strong> courant.<br />
7. Mettez le compresseur en marche (F). Le compresseur démarre et s’arrête automatiquement si le<br />
système est étanche à l’air. Si toutefois le compresseur ne s’arrête pas automatiquement au bout <strong>de</strong><br />
10 secon<strong>de</strong>s environ ou si le compresseur en position <strong>de</strong> repos n’arrête pas <strong>de</strong> se mettre en route et<br />
<strong>de</strong> s’arrêter, ceci voudra dire qu’il y a une fuite. Contrôlez tous les raccor<strong>de</strong>ments et les raccords <strong>de</strong><br />
tuyaux et vérifiez si on peut entendre un bruit d’air qui s’échappe. Calfeutrez les filetages présentant<br />
éventuellement <strong>de</strong>s défauts d’étanchéité avec une ban<strong>de</strong> <strong>de</strong> téflon et serrez à fond tous les raccords<br />
<strong>de</strong> tuyaux.<br />
8. Lorsque le compresseur s’est arrêté automatiquement, libérez le flux d’air en actionnant la gâchette<br />
<strong>de</strong> votre aérographe. Dès que le flux d’air est libéré, le compresseur se remet en marche. Il fonctionne<br />
tant que vous utilisez votre aérographe et s’arrête automatiquement lorsque vous ne l’utilisez pas.<br />
Entretien et vidage du purgeur <strong>de</strong> con<strong>de</strong>nsation.<br />
9. Après une utilisation du compresseur, l’humidité peut s’accumuler dans le purgeur (B).<br />
10. Arrêtez le compresseur (F).<br />
11. Pour vi<strong>de</strong>r le purgeur (B), dévissez d’abord le régulateur <strong>de</strong> pression (D) dans le sens contraire <strong>de</strong>s<br />
aiguilles d’une montre et épongez l’humidité qui s’échappe avec un chiffon. Remettez ensuite le<br />
compresseur en marche (F).<br />
12. L’humidité est sortie par pression au niveau inférieur du régulateur jusqu’à ce qu’aucune humidité<br />
ne sorte plus <strong>de</strong> la tubulure d’évacuation <strong>de</strong> l’eau <strong>de</strong> con<strong>de</strong>nsation (C).<br />
13. Lorsque le purgeur (B) est vi<strong>de</strong>, revissez le régulateur <strong>de</strong> pression (D) en le tournant dans le sens<br />
<strong>de</strong>s aiguilles d’une montre.