R-STW - Dusar
R-STW - Dusar
R-STW - Dusar

You also want an ePaper? Increase the reach of your titles
YUMPU automatically turns print PDFs into web optimized ePapers that Google loves.
GB<br />
F<br />
I<br />
NL<br />
E<br />
PL<br />
ASSEMBLY INSTRUCTIONS<br />
INSTRUCTIONS DE MONTAGE<br />
ISTRUZIONI DI MONTAGGIO<br />
MONTAGEVOORSCHRIFTEN<br />
INSTRUCCIONES DE MONTAJE<br />
INSTRUKCJA MONTAŻU<br />
MONTAGEANLEITUNG<br />
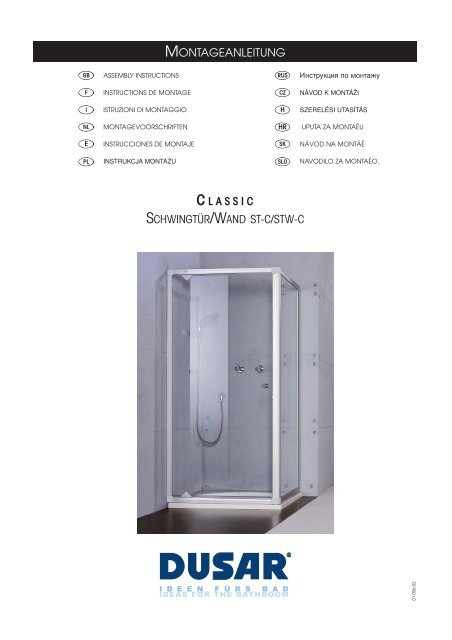
C L A S S I C<br />
RUS<br />
SCHWINGTÜR/WAND ST-C/<strong>STW</strong>-C<br />
I D E E N F Ü R S B A D<br />
IDEAS FOR THE BATHROOM<br />
CZ<br />
H<br />
HR<br />
SK<br />
SLO<br />
���������� �� �������<br />
NÁVOD K MONTÁŽI<br />
SZERELÉSI UTASÍTÁS<br />
UPUTA ZA MONTAÉU<br />
NÁVOD NA MONTÁÉ<br />
NAVODILO ZA MONTAÉO.<br />
01.006.02
D GB<br />
F<br />
WICHTIGE HINWEISE!<br />
• Vor der Montage bitte Montageanleitung<br />
genaustens durchlesen und Produkt auf evtl.<br />
Transportschäden überprüfen, da für Schäden an<br />
bereits montierten Produkten keine Haftung übernommen<br />
werden kann.<br />
• Für durch unsachgemäßen Transport und<br />
unsachgemäße Lagerung entstandene Schäden<br />
wird keine Haftung übernommen. Lagerungshinweise<br />
auf Verpackung beachten!<br />
• Prüfen Sie vor dem Einbau, ob Typ, Maß und<br />
Farbe übereinstimmen.<br />
• Auf Verschleißteile besteht nach Ablauf der<br />
gesetzlichen Garantiezeit kein Garantieanspruch.<br />
• Zum Reinigen verwenden Sie bitte nur vom<br />
Handel empfohlene Pflegemittel (keine Scheuer-<br />
oder Lösungsmittel).<br />
• Die Duschabtrennung darf nur für den vorgeschriebenen<br />
Zweck verwendet werden, andernfalls<br />
erlischt der Produkthaftungsanspruch.<br />
• Benutzen Sie die Duschabtrennung erst 24<br />
Stunden nach dem Abdichten!<br />
• Empfehlung: Die Montage der Duschabtrennung<br />
sollte von 2 Personen durchgeführt werden.<br />
• Änderungen der Konstruktion vorbehalten.<br />
IMPORTANT ROCOMMENDATIONS!<br />
• Read the assembly instructions very carefully<br />
before assembly and check the product to see if it<br />
has been damaged during transport or is<br />
defective, as we cannot assume any liability for<br />
damage toproducts which have already been<br />
assembled.<br />
• We shall not be liable for damage arising as a<br />
result of improper transport or storage. Read the<br />
storage instructions on the packaging!<br />
• Before installing the product, check to make sure<br />
the type, dimensions and colour all conform to<br />
each other.<br />
• There shall be no warranty claim on parts subject<br />
to wear and tear after the statutory warranty<br />
period has expired.<br />
• Use only the cleaning agents recommended by<br />
retailers to clean the parts (no abrasives or<br />
solvents).<br />
• The shower may only be used for the stipulated<br />
purpose, otherwise all product liability will lapse!<br />
• After the sealing procedure please wait 24 hours<br />
before the first use of the shower.<br />
• Recommendation: The assembly of the shower<br />
should be executed by two persons.<br />
• We retain the right to change the design.<br />
I NL<br />
E<br />
AVVISI IMPORTANTI!<br />
• Prima del montaggio leggere attentamente le<br />
istruzioni di montaggio ed accertarsi che il<br />
prodotto non abbia subito danni durante il<br />
trasporto. Qualsivoglia danno riscontrato sul<br />
prodotto già montato è escluso dalla garanzia.<br />
• La garanzia non si applica qualora i danni siano<br />
stati causati da trasporto o immagazzinamento<br />
inopportuni. Seguire le indicazioni<br />
d'immagazzinamento indicate sull'imballo!<br />
• Prima del montaggio controllare se tipo, misura e<br />
colore del prodotto corrispondono a quelli<br />
indicati sull'imballo.<br />
• La garanzia sui pezzi sottoposti ad usura decade<br />
al termine del periodo di garanzia previsto dalla<br />
legge.<br />
• Per la pulizia utilizzare esclusivamente detergenti<br />
consigliati (evitare polveri abrasive e solventi).<br />
• La cabina per doccia deve essere usata soltanto<br />
per lo scopo indicato, altrimenti si annulla il<br />
diritto di garanzia di produzione.<br />
• Non adoperi la cabina per doccia prima di aver<br />
fatto trascorrere 24 ore dall'averla resa ermetica.<br />
• Raccomandazione: È meglio che il montaggio<br />
sia eseguito da due persone.<br />
• Il produttore si riserva eventuali modifiche di<br />
costruzione.<br />
BELANGRIJKE RICHTLIJNEN!<br />
• Lees vóór de montage de montage-instructies<br />
nauwkeurig door en controleer het product op evt.<br />
transportschade resp. fouten omdat voor schade<br />
aan reeds gemonteerde producten geen<br />
aansprakelijkheid kan worden aanvaard.<br />
• Voor door ondeskundig transport en<br />
ondeskundige opslag ontstane schade wordt<br />
geen aansprakelijkheid geaccepteerd. Let op de<br />
opslagaanwijzingen op de verpakking!<br />
• Controleer vóór de montage of het type, de maat<br />
en de kleur overeenstemmen.<br />
• Voor slijtende onderdelen bestaat na afloop van<br />
de wettelijke garantietijd geen aanspraak op<br />
garantie.<br />
• Gebruik voor het schoonmaken uitsluitend door<br />
de sanitairspeciaalzaak aanbevolen<br />
onderhoudsmiddelen (geen schuur- of<br />
oplosmiddelen).<br />
• De douche-cabine mag alleen gebruikt worden<br />
waarvoor hij is bedoeld. Bij oneigenlijk gebruik<br />
vervalt elke produktaansprakelijkheid.<br />
• Gebruik de douche-cabine pas 24 uur na het<br />
afdichten.<br />
• Aanbeveling: De montage kan het beste met<br />
twee personen uitgevoerd worden.<br />
• Wijzigingen van de constructie worden<br />
voorbehouden.<br />
Seite<br />
2<br />
RECOMMANDATIONS IMPORTANTES!<br />
• Avant le montage, veuillez lire attentivement les<br />
instructions de montage et vérifiez si le produit<br />
n'a pas été endommagé pendant le transport ou<br />
si le produit n'a pas de défauts. Aucune<br />
responsabilité ne sera assumée sur les pièces<br />
déjà montées.<br />
• Aucune responsabilité ne sera assumée pour des<br />
dommages survenus lors d'un transport ou<br />
stockage incorrect. Veuillez tenir compte des<br />
recommandations de stockage notées sur<br />
l'emballage!<br />
• Veuillez vérifier, avant le montage, si type,<br />
dimension et couleur correspondent.<br />
• Les pièces d'usure ne sont plus sous garantie<br />
après expiration du délai de garantie.<br />
• Pour le nettoyage, veuillez utiliser des produits<br />
d'entretien recommandés dans le commerce<br />
(pas de récurants ou solvants).<br />
• La cabine de douche doit seulement être utilisée<br />
à la fin décrite ci-dessus, dans le cas contraire,<br />
toutes prestations de garantie seront annulées!<br />
• Après avoir étanché la cabine de douche,<br />
attendre 24 heures avant la première utilisation.<br />
• Recommandation: Le montage de la cabine de<br />
douche devrait être effectué par deux personnes.<br />
• Sous réserve de modification de la construction.<br />
¡INDICACIONES IMPORTANTES!<br />
• Antes del montaje, sírvase leer las instrucciones<br />
de montaje detenidamente y verifique si el<br />
producto presenta defectos o daños ocasionados<br />
durante el transporte, dado que no asumimos la<br />
responsabilidad por daños en productos ya<br />
montados.<br />
• No asumimos la responsabilidad por daños<br />
ocasionados a raíz de transporte y<br />
almacenamiento incorrectos. Observe las<br />
advertencias de almacenamiento que se<br />
encuentran en el embalaje.<br />
• Antes del montaje, verifique si el tipo, el tamaño<br />
y el color coinciden.<br />
• Al terminarse el plazo legal de garantía, ya no se<br />
ofrece garantía por las piezas de desgaste.<br />
• Para la limpieza utilice solamente productos<br />
recomendados por el comercio (no use<br />
productos abrasivos o solventes).<br />
• La ducha solamente se puede usar para el<br />
destino modificado, de otro modo terminaria<br />
nuestra garantia por el producto.<br />
• Use la cabina de la ducha 24 horas despues de<br />
haber la impermeabilizadas.<br />
• Recomendación: El montaje se debe llevar<br />
adelante con la ayuda de una seg unda persona.<br />
• Nos reservamos el derecho a introducir<br />
modificaciones en la construcción.
PL<br />
WAŻNE WSKAZÓWKI !<br />
• Przed montażem należy bardzo uważnie i<br />
dokładnie przeczytać instrukcję montażu i<br />
sprawdzić czy produkt nie ma wad i nie<br />
został uszkodzony podczas transportu,<br />
ponieważ nie przejmujemy<br />
odpowiedzialności za usterki już<br />
zamontowanych produktów.<br />
• Nie przejmujemy odpowiedzialności za<br />
szkody powstałe w czasie transportu lub<br />
niewłaściwego składowania.<br />
• Należy przestrzegać wskazówek dot.<br />
składowania, które znajdują się na<br />
opakowaniu!<br />
• Należy przestrzegać warunków gwarancji.<br />
• Po upływie regularnego okresu<br />
gwarancyjnego przy częściach<br />
podlegających szybkiemu zużyciu nie ma<br />
prawa gwarancji.<br />
• Do czyszczenia należy stosować środki<br />
czyszczące zalecane przez handel (nie<br />
stosować środków szorujących lub<br />
zawierających rozpuszczalniki).<br />
• Kabina natryskowa może być użytkowana<br />
tylko zgodnie z przeznaczeniem, w<br />
przeciwnym wypadku prawo do reklamacji<br />
wygasa.<br />
• Kabinę natryskową można używać dopiero w<br />
24 godziny po zakończeniu procesu<br />
uszczelniania!<br />
• Zalecenie: Montaż kabiny powinien być<br />
przeprowadzany przez 2 osoby.<br />
• Zastrzegamy sobie prawo zmian<br />
konstrukcyjnych.<br />
HR<br />
VAŽNE UPUTE !<br />
• Prije montaže molimo da pažljivo pročitate<br />
upute za montažu i da pregledate proizvod<br />
radi eventualnih oštećenja pri transportu ili<br />
grešaka, jer se ne preuzima jamstvo za<br />
oštećenja kod već montiranih proizvoda.<br />
• Jamstvo se ne preuzima za nestručan<br />
transport i nestručno skladištenje. Obratite<br />
pažnju na upute za skladištenje na<br />
ambalaži!<br />
• Provjerite prije montaže dali odgovaraju<br />
tip, mjera i boja.<br />
• Garancija na potrošne djelove ne postoji<br />
nakon isteka zakonskog roka.<br />
• Za čišćenje molimo da koristite samo od<br />
trgovine preporučena sredstva za čišćenje<br />
(ne sredstva za ribanje ili otapala).<br />
• Tuö kabinu smije se samo u propisanu svrhu<br />
koristiti, inace se ukida pravo jamstva na<br />
proizvod.<br />
• Koristite tuö kabinu tek 24 sata nakon brtvljenja !<br />
• Preporuka: Montaûu tuö kabine trebale bi<br />
izvröiti 2 osobe.<br />
• Promjene konstrukcije se pridržava.<br />
CZ<br />
DŮLEŽITÉ POKYNY!<br />
• Před montáží si pročtěte prosím co<br />
nejpečlivěji Návod k montáži a<br />
přezkoušejte výrobek na event. dopravní<br />
poškození resp. na vady, jelikož za škody<br />
na výrobcích, které již byly smontovány,<br />
nemůžeme převzít žádnou záruku.<br />
• Za škody vzniklé neodbornou dopravou a<br />
neodborným skladováním nepřejímáme<br />
žádnou záruku. Dbejte pokynů pro<br />
skladování na obalu!<br />
• Před zabudováním přezkoušejte, zda<br />
souhlasí typ, rozměr a barva.<br />
• Na rychle opotřebitelné součásti není po<br />
uplynutí zákonné záruční doby nárok na<br />
záruku.<br />
• K čistění používejte prosím jen obchodem<br />
doporučené ošetřovací prostředky (žádné<br />
prostředky na drhnutí nebo rozpouštědla).<br />
• Sprchovací kabina smí být používána jen pro<br />
předepsaný účel, jinak zaniká nárok na<br />
povinné ručení.<br />
• Sprchovací kabinu používejte teprve za 24<br />
hodin po utěsnění!<br />
• Doporučení: Montáž sprchovací kabiny by<br />
měla být provedena 2 osobami.<br />
• Vyhražujeme si změny konstrukce.<br />
SK<br />
DÔLEŹITÉ UPOZORNENIE !<br />
• Pred montážou si riadne prečítajte návod<br />
na montáž a prekontrolujte produkt na evtl.<br />
škody, spôsobené pri transporte, popr. na<br />
chyby. Za škody, zistené už pri<br />
namontovaných produktoch nemôže byť<br />
prebraté ručenie.<br />
• Za škody, vzniknuté neodbornou<br />
prepravou alebo neodborným<br />
skladovaním sa nepreberá ručenie. Dbajte<br />
na pokyny o skladovaní na obale!<br />
• Skontrolujte ešte pred montážou, či sa<br />
zhodujú typ, rozmery a farba.<br />
• Na súčiastky podliehajúcim rýchlemu<br />
opotrebeniu nie je po uplynutí zákonnej<br />
garančnej lehoty nárok na záruku.<br />
• Na čistenie používajte len obchodom<br />
doporučené čistiace prostriedky (žiadne<br />
prostriedky na drhnutie alebo rozpúšťadlá).<br />
• Oddelovacia cast sprchy sa môěe pouěívat<br />
len k predpísanému úcelu, inak zaniká<br />
nárok na záruku vżrobku.<br />
• Pouěite oddelovaciu cast sprchy najskôr za<br />
24 hod. po utesnení !<br />
• Doporucenie: Montáě oddelovacej casti<br />
sprchy by mali prevádzat dve osoby.<br />
• Zmeny konštrukcie vyhradené.<br />
Seite<br />
3<br />
H<br />
FONTOS TUDNIVALÓK!<br />
• A szerelés előtt kérjük olvassa át<br />
gondosan a szerelési u tasítást, és<br />
ellenőrizze, nincsen-e esetleges szállítási<br />
kár, ill. hiba a terméken, mert a már<br />
összeszerelt termékeken levő károkért<br />
nem vállalhatunk felelősséget.<br />
• A szakszerűtlen szállítás és szakszerűtlen<br />
tárolás következtében keletkezett károkért<br />
nem vállalunk felelősséget. Vegye<br />
figyelembe a csomagoláson levő tárolási<br />
tudnivalókat!<br />
• Ellenőrizze a beépítés előtt, hogy<br />
megegyezik-e a típus, a méret és a szín.<br />
• A kopóalkatrészekre nem áll fenn jótállási<br />
igény a törvényes. szavatossági idő<br />
lejártával.<br />
• Tisztításra csak a kereskedelemben<br />
ajánlott ápolószereket használja (ne<br />
használjon súroló- vagy oldószert).<br />
• A zuhanyozófülkét csak az előírt célra szabad<br />
felhasználni, különben megszűnik a termék<br />
utáni felelősségi kárigény.<br />
• A zuhanyozófülkét csak 24 órával a tömítés<br />
után használja!<br />
• Ajánlas: A zuhanyozófülke szerelését 2<br />
személy végezze.<br />
• Szerkezeti változtatások jogát fenntartjuk<br />
magunknak!<br />
SLO<br />
VAŽNA OPOZORILA!<br />
• Pred montažo natančno preberite navodilo<br />
za montažo in pregledajte izdelek zaradi<br />
napak oziroma eventualno škodo ki<br />
nastane zaradi prevoza, ker za škodo že<br />
montiranih izdelkov ne prevzamemo<br />
odgovornost.<br />
• Za škodo ki nastane zaradi neprimernega<br />
transporta ali pa nepravilnega skladiščenja<br />
ne prevzamemo odgovornost. Upoštevajte<br />
opozorila za skladiščenje na ambalaži!<br />
• Preverite pred vgradnjo če se ujemajo tip,<br />
mera in barva.<br />
• Po isteku zakonite garancijske dobe ne<br />
obstaja pravica garancije na dele ki se<br />
obrabijo.<br />
• Pri čiščenju uporabljajte samo trgovsko<br />
priporočena čistilna sredstva (nikakršna<br />
sredstva za ribanje ali pa z rastopilom)<br />
• Pröna stena se sme uporabljati samo za<br />
predpisane namene,sicer preneha pravica<br />
jamstva za izdelke.<br />
• Uporabljajte pröno steno öele 24 ur po<br />
zatesnitvi !<br />
• Priporocilo: Montaěa pröne stene naj<br />
izpeljeta 2 osebi.<br />
• Pridržana je pravica spremembe<br />
konstrukcije.
RUS<br />
������ ��������!<br />
• ����� �������� ��������, ����������,<br />
����� ����������� ���������� ��<br />
������� � ��������� ������� ��<br />
��������� �����������, �����������<br />
��� ���������, ��� ��� �� �����������<br />
�� ��� �������������� ��������<br />
����������� ��������������� ��<br />
�������.<br />
• �� �����������, ������� �������� �<br />
����� � ������������ ���������� ���<br />
������������ ���������, �����������<br />
��������������� �� �������.<br />
���������� ��������� �������� ��<br />
��������, ����������� �� ��������!<br />
• ����� �������� ���������<br />
��������������� ���������� ����,<br />
�������� � �����.<br />
• �� ������������ ������ �� ���������<br />
����� ��������, ����������������<br />
�������, ����������� ���������������<br />
�� �������.<br />
• ��� ������ ������� ������<br />
������������ ������ ����� �������� ���<br />
����� �� ����������������<br />
����������, ������� �������������<br />
��������� (�� ��������� �������� �<br />
���������� ������������ ���<br />
������������).<br />
• ������� ������ ������������ ������ ��<br />
���������������� ����������, �.�. �<br />
������ ������ �����������<br />
��������������� ���������������.<br />
• ������� ������� ������������ �� ������,<br />
��� ����� 24 ���� ����� ���������<br />
����������.<br />
• ������������: ������ ������� ������<br />
��������� ������.<br />
• ����������� ����� �� ��������<br />
��������� � �����������.<br />
Seite<br />
4
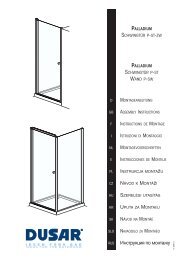
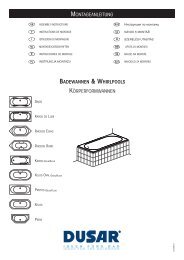
Ersatzteilauftrag Spare parts order Commande de pieces de rechange<br />
C L A S S I C S C H W I N G T Ü R / W A N D S T- C / S T W - C<br />
Nr. Bezeichnung Artikel-Nr Stück<br />
No. Designation Article No. Pieces<br />
No. Désignation Article No Pièces<br />
1b. Rosette 3 - 0000851 11x<br />
1a. 3,5x9,5DIN7982 4 - 0000013 11x<br />
1c. Abdeckkappe 3 - 0000850 11x<br />
2. 4,8x9,5 DIN7981 4 - 0000091 4x<br />
3. 4x40 DIN7996 4 - 0000062 8x<br />
4. ø 6 mm 4 - 0000601 8x<br />
5. 5x40 DIN7996 4 - 0000111 3x<br />
6. ø 8 mm 4 - 0000602 3x<br />
7. Abdeckkappe 11mm 3 - 0001712 4x<br />
8. PVC-Leiste 1x<br />
9.2<br />
KUNDENDIENST-TEL. 0 26 39 / 921 - 349 MONTAG BIS FREITAG VON 8.00 - 18.00 UHR<br />
KUNDENDIENST-FAX. 0 26 39 / 921 - 175 E-MAIL. kundendienst@dusar.de<br />
14 - 0005003 1x<br />
9. Griff 5tlg.<br />
9.1 9<br />
PVC-Scheibe<br />
9.2 9.1<br />
PVC-Distanzstück<br />
9<br />
D Bewahren Sie die Montageanleitung sorgfältig<br />
auf. Bei Ersatzteil- und Verschleißteilbestellung<br />
(siehe Tabelle) bitte an den Kundenservice<br />
wenden [Verschleißteilbezeichnung: ***].<br />
GB Please keep the assembly instructions in a safe<br />
place. If you wish to order spare parts and<br />
parts subject to wear (see table) please contact<br />
your after-sales service.<br />
[Designation of part subject to wear: ***].<br />
F Conserver soigneusement la notice de montage.<br />
Pour toute commande de pièces de rechange<br />
et de pièces d'usure (voir tableau), veuillez<br />
vous adresser à notre service après-vente.<br />
[Désignation des pièces d'usure : ***].<br />
I Conservare con cura le istruzioni di montaggio.<br />
Per l’ordinazione di pezzi di ricambio<br />
e soggetti ad usura (v. tabella) rivolgersi<br />
al Servizio Clienti [Denominazione pezzo<br />
soggetto ad usura: ***].<br />
NL Bewaar de montagehandleiding zorg vuldig.<br />
Voor het bestellen van reserve- of slijtageonderdelen<br />
(zie tabel) contact opnemen met de<br />
klantenservice<br />
[Aanduiding slijtageonderdelen: ***].<br />
E Conserve las instrucciones de montaje cuidadosamente.<br />
En caso de solicitar piezas de<br />
repuesto y de desgaste (véase tabla), diríjase<br />
al servicio postventa<br />
[Denominación de piezas de desgaste: ***].<br />
P Instrukcję obsługi należy starannie przechowywać.<br />
Zamówienia części zamiennych<br />
i zużywalnych (patrz tabelka) prosimy kierować do<br />
serwisu klienta [nazwa części zużywalnej: ***].<br />
RUS ���������� �� ������� ������ ���������<br />
� �������� �����. ��� ������ ���������<br />
� �������� ������������ �������<br />
(��. �������) ������� ���������� � �����<br />
������������ �������� [�����������<br />
�������� ������������ ������: ***].<br />
CZ Návod na montáž pečlivě uschovejte. Při<br />
objednávání náhradních dílů a dílů podléhajících<br />
opotřebení (viz tabulka) se prosím obracejte<br />
na servisní službu.<br />
[Označení dílu podléhajícího opotřebení: ***].<br />
H Gondosan őrizze meg a szerelési<br />
utasítást! Pótalkatrészek és a gyorsan kopó<br />
alkatrészek rendelésénél (lásd a táblázatot)<br />
forduljon a vevőszolgálathoz<br />
[Gyorsan kopó alkatrész megjelölése: ***].<br />
HR Brižljivo pohranite upute za montažu.<br />
Kod narudžbe rezervnih i potrošnih dijelova<br />
(vidi tabelu) molimo obratite se servisnoj službi<br />
[Oznaka potrošnog dijela: ***].<br />
SK Návod na montáž starostlivo uschovajte.<br />
Pri objednávkach náhradných dielov a dielov<br />
podliehajúcich opotrebeniu (viď tabuľku) sa<br />
prosím obráťte na servisnú službu. [Označenie<br />
dielu podliehajúceho opotrebeniu: ***].<br />
SLO Skrbno shranite navodilo za uporabo. Prosimo,<br />
da se pri naročilu nadomestnih delov in delov<br />
ki se obrabljajo (glej tabelo) obrnete se na<br />
servisno službo;<br />
[Oznaka dela, ki se obrablja: ***].<br />
11 - 0000243 - 951
A<br />
B<br />
E<br />
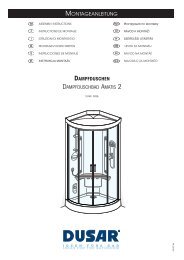
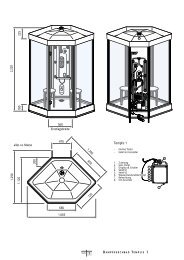
MONTAGEANLEITUNG ASSEMBLY INSTRUCTIONS ������ä��ü �� ����ÄÜ�<br />
9<br />
9.1<br />
9.2<br />
9.1<br />
9<br />
C<br />
Seite<br />
6<br />
D<br />
• Ansicht von innen!<br />
• View from inside<br />
• ��� �������!<br />
F
D<br />
Montage mit Seitenwand<br />
1. Nehmen Sie die Ausgleichsprofile aus den Rahmenprofilen der<br />
Glasschwingtür heraus (Abb. A).<br />
2. Das linke Ausgleichsprofil mit einer Wasserwaage an der Wand ausrichten<br />
und durch die Ausstanzungen im Profil die Bohrlöcher an der<br />
Wand anzeichnen. Anmerkung: Bei linksseitiger Montage der<br />
Seitenwand verfahren Sie bitte spiegelbildlich zu (Abb. A). Achten<br />
Sie bitte darauf, daß das Profil vom äußeren Wannenrand 12 mm<br />
nach innen gesetzt wird.<br />
3. Mit einem 6 mm Steinbohrer bohren, Dübel Nr. 4 einsetzen und das<br />
Ausgleichsprofil mit Schraube Nr. 3 an der Wand verschrauben<br />
(Abb. A).<br />
4. Das rechte Ausgleichsprofil schrauben Sie mit den Schrauben Nr. 2<br />
auf das innere Seitenwandprofil (Abb. A). Achtung! Das Ausgleichsprofil<br />
muß mit unterer Abdeckkappe bündig abschließen.<br />
5. Nehmen Sie jetzt das Wandausgleichsprofil aus dem Rahmenprofil<br />
der Seitenwand heraus und richten es 12 mm vom Duschwannenrand<br />
nach innen mit einer Wasserwaage an der Wand aus. Bohrlöcher<br />
anzeichnen und mit einem 8 mm Steinbohrer bohren. Dübel<br />
Nr. 6 einsetzen und das Profil mit Schrauben Nr. 5 an der Wand befe<br />
stigen (Abb. A).<br />
6. Schieben Sie die Seitenwand mit dem Ausgleichsprofil in das<br />
Rahmenprofil der Tür.<br />
7. Schieben Sie nun die Glasschwingtür auf das an der Wand befestigte<br />
Ausgleichsprofil auf.<br />
8. Schieben Sie die Seitenwand auf das Wandausgleichsprofil und in<br />
das Rahmenprofil der Glasschwingtür.<br />
9. Mit einem 2,8 mm Bohrer verbohren Sie das Rahmenprofil der<br />
Glasschwingtür und Ausgleichsprofil von innen (Abb. A).<br />
Verschrauben Sie Seitenwand und Glasschwingtür miteinander<br />
(Schraube Nr. 1a, Rosette Nr. 1b, Abdeckkappe Nr. 1c; Abb. A).<br />
10. Richten Sie die Glasschwingtür mit einer Wasserwaage aus, und verbohren<br />
und verschrauben sie mit dem Wandausgleichsprofil (Bohrer<br />
2,8 mm, Schraube Nr. 1, Rosette, Abdeckkappe; Abb. A).<br />
Hinweis: Tür nur im geschlossenen Zustand verbohren und verschrauben.<br />
11. Richten Sie die Seitenwand aus, und verbohren und verschrauben<br />
sie mit dem Wandausgleichsprofil (Bohrer 2,8 mm, Schraube Nr. 1a,<br />
Rosette Nr. 1b, Abdeckkappe Nr. 1c, ; Abb. D).<br />
12. Verschrauben Sie den Griff Nr. 9 (Abb. E).<br />
13. Die Tür läßt sich mit Hilfe der Schrauben des unteren und oberen<br />
Lagerbockes ausrichten (Schraube lösen, einstellen, Schraube wie<br />
der anziehen). Anschließend Abdeckkappe Nr. 7 aufstecken<br />
(Abb. B).<br />
14. Abschließend dichten Sie bitte Ihre Duschkabine einschließlich der<br />
Kunststoffkappen von außen gegen Wand und Duschwanne ab.<br />
Bitte beachten Sie, daß dabei alle Stellen absolut trocken sein müssen.<br />
Das Silikon mit feuchtem Finger gut verstreichen. Dazu<br />
geben sie dem Wasser etwas Spülmittel bei (Abb. F).<br />
MONTAGEANLEITUNG<br />
Seite<br />
7<br />
ø 2,8 mm<br />
ø 6+8 mm Stein<br />
Montage zwischen zwei Wänden<br />
(z.B. Tür mit Linksanschlag)<br />
1. Nehmen Sie die Ausgleichsprofile aus den Rahmenprofilen der<br />
Glasschwingtür heraus.<br />
2. Richten Sie die beiden Profile mit einer Wasserwaage an der Wand<br />
aus. Zeichnen Sie durch die Ausstanzungen die Bohrlöcher an, und<br />
bohren Sie mit einem 6 mm Steinbohrer. Dübel Nr. 4 setzen.<br />
3. Schrauben Sie das linke Ausgleichsprofil mit den Schrauben Nr. 3 an<br />
die Wand. Ziehen Sie nun das vordere PVC-Profil Nr. 8 aus dem<br />
Rahmenprofil heraus (Abb. C). Rechtes Ausgleichsprofil in das<br />
Rahmenprofil einsetzen und die koplette Glasschwingtür auf die<br />
Duschtasse aufsetzen und auf das bereits montierte<br />
Ausgleichsprofil schieben.<br />
Hinweis: Bei Rechtsanschlag verfahren Sie bitte spiegel bildlich.<br />
4. Durch die Ausstanzungen im Rahmenprofil verschrauben Sie Ihre<br />
Dusche mit den Wänden (Schraube Nr. 3). PVC-Leiste Nr. 8 wieder<br />
lagerichtig einklipsen (Abb. C).<br />
5. Richten Sie nun Ihre Dusche mit einer Wasserwaage zwischen den<br />
Profilen aus.<br />
6. Verbohren Sie jetzt die Rahmenprofile von innen mit den Ausgleichsprofilen<br />
(Bohrer 2,8mm), und verschrauben sie mit den Schrauben<br />
Nr. 1a Schraube, Rosette Nr. 1b, Abdeckkappe Nr. 1c).<br />
7. Verschrauben Sie den Griff Nr. 9 (Abb. E).<br />
8. Die Tür läßt sich mit Hilfe der Schrauben des unteren und oberen<br />
Lagerbockes ausrichten (Schraube lösen, einstellen, Schraube wie<br />
der anziehen). Anschließend Abdeckkappe Nr. 7 aufstecken<br />
(Abb. B).<br />
9. Abschließend dichten Sie bitte Ihre Duschkabine einschließlich der<br />
Kunststoffkappen von außen mit Silikon gegen Wand und<br />
Duschwanne ab. Bitte beachten Sie, daß dabei alle Stellen absolut<br />
trocken sein müssen. Das Silikon mit feuchtem Finger gut verstrei<br />
chen. Dazu geben sie dem Wasser etwas Spülmittel bei (Abb. E).
GB<br />
Assembly with side panel<br />
1. Take the compensating profiles out of the frame profiles of the glass<br />
swing door (Fig. A).<br />
2. Align the left-hand compensating profile with the wall using a spirit<br />
level and mark the holes to be drilled in the wall through the holes<br />
punched in the profile. Note: If the side panel is being mounted on<br />
the left-hand side, please proceed as a mirror image to (Fig. A).<br />
Please make sure that the profile is positioned 12 mm inwards from<br />
the outer bath rim.<br />
3. Drill the hole using a 6 mm stone drill bit, push in plug No. 4 and<br />
screw the compensating profile to the wall using screw No. 3 (Fig.<br />
A).<br />
4. Screw the right-hand compensating profile to the inner side panel<br />
profile using screws No. 2 (Fig. A). Caution! The compensating profile<br />
must be flush with the lower cap.<br />
5. Now take the wall compensating profile out of the frame profile of<br />
the side panel and align it with the wall 12 mm inwards from the rim<br />
of the shower tray using a spirit level. Mark the holes and drill them<br />
using an 8 mm stone drill bit. Push in plug No. 6 and screw the profile<br />
to the wall with screws No. 5 (Fig. A).<br />
6. Push the side panel with the compensating profile into the frame<br />
profile of the door.<br />
7. Now push the glass swing door onto the compensating profile<br />
attached to the wall.<br />
8. Push the side panel onto the wall compensating profile and into the<br />
frame profile of the glass swing door.<br />
9. Use a 2.8 mm bit to drill holes in the frame profile of the glass swing<br />
door and in the compensating profile from the inside (Fig. A). Screw<br />
the side panel and the glass swing door together (screw No. 1a,<br />
round plate No. 1b, cap No. 1c; Fig. A).<br />
10. Align the glass swing door using a spirit level, and drill holes and<br />
fasten it to the wall compensating profile (bit 2.8 mm, screw No. 1,<br />
round plate, cap; Fig. A). Note: Only drill and screw the door when it<br />
is closed.<br />
11. Align the side panel, and drill holes and screw it to the wall<br />
compensating profile (bit 2.8 mm, screw No. 1a, round plate No. 1b,<br />
cap No. 1c, ; Fig. D).<br />
12. Screw on the handle No. 9 (Fig. E).<br />
13. The door can be aligned with the help of the screws on the lower<br />
and upper bearing blocks (loosen screw, adjust, tighten screw<br />
again). Then push on cap No. 7 (Fig. B).<br />
14. Finally, please seal your shower cabinet, including the plastic caps,<br />
from the outside against the wall and the shower tray. Please note<br />
that all parts must by absolutely dry when doing this. Smooth the<br />
silicone with wet fingers. Add some washing-up liquid to the water<br />
(Fig. F).<br />
ASSEMBLY INSTRUCTIONS<br />
Seite<br />
8<br />
ø 2,8 mm<br />
ø 6+8 mm Stone<br />
Assembly between two walls<br />
(e.g. door opening to the left)<br />
1. Take the compensating profiles out of the frame profiles of the glass<br />
swing door.<br />
2. Align the two profiles with the wall using a spirit level. Mark the holes<br />
to be drilled through the punched holes, and drill the holes using a<br />
6 mm stone drill bit. Push in plug No. 4.<br />
3. Screw the left-hand compensating profile to the wall with screws<br />
No. 3. Now pull the front PVC profile No. 8 out of the frame profile<br />
(Fig. C). Push the right-hand compensating profile into the frame<br />
profile and place the entire glass swing door on the shower tray and<br />
push it onto the already assembled compensating profile.<br />
Note: For a door opening to the right, please proceed as a mirror<br />
image.<br />
4. Screw your shower unit to the walls through the punched holes in<br />
the frame profile (screw No. 3). Clip the PVC strip No. 8 back into<br />
the correct position (Fig. C).<br />
5. Now align your shower between the profiles using a spirit level.<br />
6. Now drill holes from the inside in the frame profiles and in the<br />
compensating profiles (bit 2.8 mm), and screw them together with<br />
screws No. 1a screw, round plate No. 1b, cap No. 1c).<br />
7. Screw on the handle No. 9 (Fig. E).<br />
8. The door can be aligned with the help of the screws on the lower<br />
and upper bearing blocks (loosen screw, adjust, tighten screw<br />
again). Then push on cap No. 7 (Fig. B).<br />
9. Finally, please seal your shower cabinet, including the plastic caps,<br />
from the outside against the wall and the shower tray using silicone.<br />
Please note that all parts must by absolutely dry when doing this.<br />
Smooth the silicone with wet fingers. Add some washing-up liquid to<br />
the water (Fig. E).
F<br />
Montage avec paroi latérale<br />
1. Sortir les profilés de compensation des profilés d’encadrement de la<br />
porte en verre pivotante (fig. A).<br />
2. A l’aide d’un niveau, caler le profilé de compensation de gauche<br />
au niveau du mur et tracer les trous de perçage sur le mur à travers<br />
les perforations du profilé. Remarque : en cas de montage à gauche<br />
de la paroi latérale, procéder de manière symétrique<br />
(fig. A). Veiller à ce que le profilé soit situé à 12 mm vers l’intérieur<br />
par rapport au bord extérieur du receveur de douches.<br />
3. Percer les trous à l’aide d’un foret à pierre de 6 mm, mettre en<br />
place les chevilles n° 4 et visser le profilé de compensation au mur<br />
à l’aide des vis n° 3 (fig. A).<br />
4. Visser le profilé de compensation de droite à l’aide des vis n° 2 sur<br />
le profilé de paroi latérale intérieur (fig. A). Attention ! Le profilé de<br />
compensation doit arriver au ras du capuchon inférieur.<br />
5. Retirer maintenant le profilé de compensation du profilé d’encadrement<br />
de la paroi latérale et, à l’aide d’un niveau, l’ajuster au mur à<br />
12 mm vers l’intérieur par rapport au bord extérieur du receveur de<br />
douches. Tracer les trous de perçage et les percer à l’aide d’un<br />
foret à pierre de 8 mm. Mettre en place les chevilles n°6 et fixer le<br />
profilé au mur à l’aide des vis n° 5 (fig. A).<br />
6. Emmancher la paroi latérale avec le profilé de compensation dans<br />
le profilé d’encadrement de la porte.<br />
7. Emmancher maintenant la porte pivotante en verre sur le profilé de<br />
compensation fixé au mur.<br />
8. Emmancher la paroi latérale sur le profilé de compensation mural et<br />
dans le profilé d’encadrement de la porte pivotante en verre.<br />
9. A l’aide d’un foret de 2,8 mm, percer de l’intérieur le profilé d’encadrement<br />
de la porte pivotante en verre et le profilé de compensation<br />
(fig. A). Visser ensemble la paroi latérale et la porte pivotante en<br />
verre (vis n° 1a, rosette n° 1b, capuchon n° 1c ; fig. A).<br />
10. Ajuster la porte pivotante en verre à l’aide d’un niveau, puis la percer<br />
et la visser sur le profilé de compensation mural (foret de<br />
2,8 mm, vis n° 1, rosette, capuchon ; fig. A). Remarque : le perçage<br />
et le vissage de la porte doivent uniquement être réalisés lorsque la<br />
porte est fermée.<br />
11. Ajuster la paroi latérale, la percer et la visser avec le profilé de compensation<br />
mural (foret de 2,8 mm, vis n° 1a, rosette n° 1b, capuchon<br />
n° 1c ; fig. D).<br />
12. Visser la poignée n° 9 (fig. E).<br />
13. Il est possible de régler la porte à l’aide des vis du palier inférieur et<br />
supérieur (desserrer la vis, régler la porte, resserrer la vis). Mettre<br />
ensuite en place le capuchon n° 7 (fig. B).<br />
14. Pour finir, réaliser de l’extérieur l’étanchéité de votre cabine de douche,<br />
y compris des capuchons en plastique, par rapport au mur et<br />
au receveur de douches. Il convient de veiller à ce que tous les<br />
endroits soient parfaitement secs. Lisser le silicone avec un doigt<br />
trempé dans de l’eau additionnée d’un peu de liquide à vaisselle<br />
(fig. F).<br />
INSTRUCTIONS DE MONTAGE<br />
Seite<br />
9<br />
ø 2,8 mm<br />
ø 6+8 mm pierre<br />
Montage entre deux murs<br />
(p. ex. porte avec fermeture à gauche)<br />
1. Sortir les profilés de compensation des profilés d’encadrement de la<br />
porte en verre pivotante.<br />
2. A l’aide d’un niveau, ajuster les deux profilés au niveau du mur.<br />
A travers les perforations, tracer les trous de perçage et les percer<br />
à l’aide d’un foret de 6 mm. Mettre en place les chevilles n° 4.<br />
3. Visser le profilé de compensation de gauche au mur à l’aide des<br />
vis n° 3. Retirer maintenant le profilé avant en PCV n° 8 du profilé<br />
d’encadrement (fig. C). Mettre en place le profilé de compensa -<br />
tion de droite dans le profilé d’encadrement et poser la porte pivotante<br />
en verre complète sur le receveur de douches, puis l’emmancher<br />
sur le profilé de compensation déjà monté.<br />
Remarque : pour une porte avec fermeture à droite, procéder de<br />
manière symétrique.<br />
4. A travers les perforations dans le profilé d’encadrement, visser votre<br />
douche sur les parois (vis n° 3). Reclipser la baguette en PVC<br />
n° 8 à la bonne position (fig. C).<br />
5. Ajuster maintenant votre douche entre les profilés à l’aide d’un<br />
niveau.<br />
6. Percer maintenant les profilés d’encadrement de l’intérieur avec les<br />
profilés de compensation (foret de 2,8 mm) et les visser à l’aide des<br />
vis (vis n° 1a, rosette n° 1b, capuchon n° 1c).<br />
7. Visser la poignée n° 9 (fig. E).<br />
8. Il est possible de régler la porte à l’aide des vis du palier inférieur et<br />
supérieur (desserrer la vis, régler la porte, resserrer la vis). Mettre<br />
ensuite en place le capuchon n° 7 (fig. B).<br />
9. Pour finir, à l’aide de silicone, réaliser de l’extérieur l’étanchéité de<br />
votre cabine de douche, y compris des capuchons en plastique,<br />
par rapport au mur et au receveur de douches. Il convient de veiller<br />
à ce que tous les endroits soient parfaitement secs. Lisser le silicone<br />
avec un doigt trempé dans de l’eau additionnée d’un peu de<br />
liquide à vaisselle (fig. E).
RUS<br />
MONTAGEANLEITUNG ASSEMBLY ������ä��ü INSTRUCTIONS �� ����ÄÜ�������ä��ü<br />
�� ����ÄÜ�<br />
� Ö � � ü C L A S S I C<br />
äÄ���Ä � ���������� ��Ö���/��Ö�ä�� ST-C/<strong>STW</strong>-C<br />
������ ��·��� � ·������ �������<br />
1. ������ ����������� ������� �� �������� ���� (���� Ä).<br />
2. ���������� ����� ����������� ������� � �����, ���������� ��<br />
������ � �������� ����� ��������� �� ����� ����� ���·���� �<br />
�������. ����������. ��� ������������� ��������� ·�������<br />
������ ������������ � ���������� ���·������� (���� Ä).<br />
�·������ �������� �� ��, ��� ������� ������ ·��� �������<br />
������ �� 12 �� �� ������� ������ �������.<br />
3. ����������� ��������� 6-�� ������� ��� ��·�� �� ·�����,<br />
�������� ��·��� № 4 � ���������� ����������� ������� � �����<br />
�������� № 3 (���� Ä).<br />
4. ������ ����������� ������� ���������� ������� № 2 �<br />
����������� ������� ·������� (���� Ä). ��������! �����������<br />
������� ���·������ �������� ��������� � ����������<br />
���������.<br />
5. ������ ������ ����������� ������� �� ������� ���� ·�������<br />
� ���������� ��� � ����� � ������� ������, �������� �� 12 ��<br />
������ �� ���� �������� �������. �������� ����� ���������<br />
��������� � ����������� ��������� 8-�� ������� ��� ��·�� ��<br />
·�����. �������� ��·��� № 6 � ��������� ������� �� �����<br />
������� № 5 (���� Ä).<br />
6. �������� ·������� � ����������� �������� � ������� ����<br />
�����.<br />
7. ���������� ������ ���������� ���������� ����� �<br />
������������� �� ����� ������������ �������.<br />
8. ���������� ·������ ������ � ������������� �� �����<br />
������������ ������� � � ������� ���� ����������<br />
���������� �����.<br />
9. ��������� 2,8-�� ������, ����������� ��������� ������� �<br />
������� ���� � ����������� �������. ����� ��������� ·������<br />
������ � ���������� ���������� ����� � ������� �������<br />
(����� № 1�, ������� № 1b, �������� № 1�; ���� Ä).<br />
10. ���������� ���������� ���������� ����� �� ������,<br />
����������� ��������� � �������� �� � ����������� ��������<br />
�� ����� � ������� ������� (2,8-�� ������, ����� № 1,<br />
�������, ��������; ���� Ä).<br />
����������: ������������ ��������� � ���������� �����<br />
�������� ������ � �������� ���������.<br />
11. ���������� �� ������ ·������ ������, ����������� ��������� �<br />
�������� �� �������� � ����������� �������� � ����� (2,8-��<br />
������, ����� № 1�, ������� № 1b, �������� № 1�; ���� D).<br />
12. ���������� ������� ����� № 9 (���� Ö).<br />
13. ����� ����� ������������ � ������� ������� � ��������<br />
���������� ���������� (����·��� ����, ��������� �����,<br />
�������� ����). ����� ���������� �������� № 7 (���� �).<br />
14. ����� ����� ���� ��·��� �� ������ � ������� ��������,<br />
������� �������� �� ��������, ��������������� �������<br />
���������. �·������ �������� �� ��, ��� ��� ������������ ���<br />
����� ������ ·��� �·������� ������. �������� ����� �������<br />
�������. � ���� ����� ��·����� � ���� ������� �������<br />
�������� (���� F).<br />
Seite<br />
10<br />
������ ����� ���� ����<br />
(��������, ��� ����� � ������������� ��������)<br />
1. ������ ����������� ������� �� �������� ���� ����������<br />
���������� �����.<br />
2. ���������� �·� ������� � ����� � ������� ������. ��������<br />
����� ���·���� ����� ��������� � ����������� ��������� 6-��<br />
������� ��� ��·�� �� ·�����. �������� ��·��� № 4.<br />
3. ��������� ����� ����������� ������� �� ����� �������� № 3.<br />
������ ������ �������� ���-������� № 8 �� ������� ����<br />
(���� �). �������� ������ ����������� ������� � ������� ����<br />
� ���������� ���������� ���������� ����� � �·��� �� �������<br />
������ � �������� �� � ��� ������������� ������������<br />
�������<br />
��������. ��� �������������� ������� ������ ������������ �<br />
���������� ���·�������.<br />
4. ����� ���·���� � ������� ���� ���������� ������� ��·���<br />
�������� � ������ (����� № 3). �������� ���-������� № 8 ��<br />
����� (���� �).<br />
5. ���������� ������ ���� ������� ��·��� � ������� ������<br />
����� ��������.<br />
6. ����������� ��������� ������� � �������� ���� ������ �<br />
������������ ��������� (2,8-�� ������) � ���������<br />
���������� �������� (����� № 1�, ������� № 1b, �������� №<br />
1�).<br />
7. ��������� ������� ����� № 9 (���� Ö).<br />
8. ����� ����� ������������ � ������� ������� � ��������<br />
���������� ���������� (����·��� ����, ��������� �����,<br />
�������� ����). ����� ���������� �������� № 7 (���� �).<br />
9. ����� ����� ���� ��·��� �� ������ � ������� ��������,<br />
������� �������� �� ��������, ��������������� �������<br />
���������. �·������ �������� �� ��, ��� ��� ������������ ���<br />
����� ������ ·��� �·������� ������. �������� ����� �������<br />
�������. � ���� ����� ��·����� � ���� ������� �������<br />
�������� ���� (Ö).<br />
ø 2,8 mm<br />
�a���� ø 6+8 mm
I D E E N F Ü R S B A D<br />
IDEAS FOR THE BATHROOM<br />
DUSAR GmbH, Buchenstraße 1, 56584 Anhausen<br />
07<br />
EN 14428<br />
Duschabtrennung aus Einscheibensicherheitsglas<br />
oder Kunststoffglas<br />
Reinigbarkeit: Bestanden<br />
Brucheigenschaften: Bestanden<br />
Dauerhaftigkeit: Bestanden<br />
Diese Duschabtrennung entspricht den Bestimmungen der EG-Richtlinien<br />
93/68/EWG und 89/106/EWG.<br />
Das Produkt ist mit einer Produkt-ID-Nr. versehen,<br />
entweder:<br />
Das <strong>Dusar</strong>-Emblem ist zweigeteilt. Hinter dem Deckel befindet sich die<br />
Produkt-ID-Nr.<br />
oder<br />
Auf dem Rahmen des Produktes, sowie in der Montageanleitung befindet<br />
sich die Produkt-ID-Nr.<br />
Bei Rückfragen geben Sie bitte diese Nummer immer an.<br />
Einer der führenden Hersteller von Duschabtrennungen, Duschwannen, Badezubehör, Badewannen,<br />
Whirlpools und Vordächern.<br />
DUSAR GMBH • BUCHENSTRAßE 1 • 56584 ANHAUSEN • TEL +49 (0) 2639 / 921-0 • FAX +49 (0) 2639 / 921-170<br />
INTERNET: www.dusar.de • E-MAIL: info@dusar.de<br />
311 - 0000243 - 951