
You also want an ePaper? Increase the reach of your titles
YUMPU automatically turns print PDFs into web optimized ePapers that Google loves.
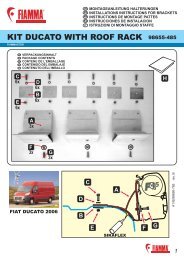
DEENMONTAGEANLEITUNGINSTALLATION INSTRUCTIONDE1. Die Montage soll von fachkundigem Personal durchgeführt werden.2. Suchen Sie zur Anbringung der Markise die Stellen mit denWandverstärkungen aus.3. Wählen Sie gemäß des Dachprofils Ihres Fahrzeugs die passendeHalterung aus.4. Markieren Sie außen am Fahrzeug die Befestigungspunkte derHalterungen (Abb. A). Um die Zugkraft der Gelenkarme aufzufangen,müssen die Adapterplatten genau da montiert werden, wo die AufschriftSUPPORT auf der Kassette geklebt ist. Darauf achten, dass die Plattengleich weit entfernt voneinander angebracht werden (d).Die Markisenkassette muß waagerecht montiert werden.5. Vergewissern Sie sich vor dem Bohren der Montagelöcher,dass im Inneren des Fahrzeugs an den vorgesehenen Stellen keineHindernisse, insbesondere Gas- oder Stromleitung, liegen.6. Ziehen Sie die Blockierschrauben der Halterung nicht zu fest an (Abb. B)7. Positionieren Sie die Markise auf die Halterungen und befestigen Siediese wie auf der Abbildung beschrieben (Abb. C).EN1. The installation must be carried out by qualified persons.2. Check the wall of the vehicle and verify the position of the reinforcedpoints or request this information from the seller of your vehicle.3. After confirming the correct reinforced points, choose the appropriatebrackets.4. Mark the fastening points on the outside wall of the vehicle (FIG. A),keep-ing in mind to receive the pulling force of the retractable arms, thebrackets need to be fixed exactly behind the stickers SUPPORT whichare on the awning. It is necessary that the brackets are fixed equidistantfrom one another (d). Make sure that the awning is installed horizontally.5. Before drilling, make sure that there are no obstacles on the inside(e.g. Electric cables, gas pipes etc).6. Fasten the brackets, but be careful not to over tighten the lock nuts ofthe bracket plates (FIG. B).7. Place the awning on the brackets and fasten it as per illustration (FIG.C).®® 3