Mindray M7 Quick Reference Guide
Mindray M7 Quick Reference Guide
Mindray M7 Quick Reference Guide

Create successful ePaper yourself
Turn your PDF publications into a flip-book with our unique Google optimized e-Paper software.
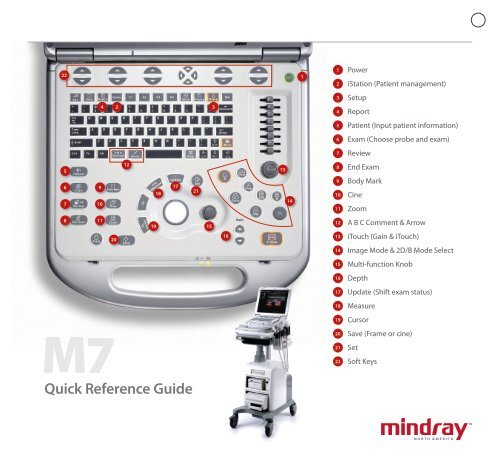
<strong>Quick</strong> <strong>Reference</strong> <strong>Guide</strong><strong>M7</strong>P/N: 046-003456-00 Rev AGetting StartedNew Patient1. Press [Patient], fill in basic patient information.2. Press [Exam].3. Move [Trackball] to choose probe and exam mode.ScanningB Mode1. Press [B] to enter B mode.2. Rotate [Gain & iTouch] knob to adjust gain.CDFI/Power Mode1. Press [Color] to enter Color mode.2. Move [Trackball] to change the position of ROI.3. Press [Set], and then move [Trackball] to change the size of ROI, press [Set].PW/CW Mode1. Press [PW] to enter PW mode.2. Move [Trackball] to change the position of sample volume.3. Use related [Function Key] to change the size and angle of sample volume, press[Update] or [PW] to get the Pulse Wave Doppler.Image AdjustmentThe [Soft Key] is corresponding to the soft menu. Use left/right keys to switch themodes, use up/down keys to choose parameters and turn pages up or down.The parameters in B mode: Frequency, iBeam, Focus Position, iClear, ExFOV, LineDensity, Gray Map, Focus Number, Colorize, FOV, iTouch, Persistence, L/R Flip, ColorizeMap, Dynamic Range, Acoustic Power, IP, U/D Flip, Magnify, FOV position.The parameters in Color mode: Scale, Flow State, WF, Invert, Packet Size, Frequency,Priority, Baseline, Line Density, Dual Live, Color IP, Map, B/C Wide, Focus Position,Acoustic Power.Special Imaging Mode (Optional)3D/4D1. Select the volume probe and choose the exam mode. Press [3D/4D] key on thecontrol panel or click [3D/4D] in the soft menu of B mode to enter.2. Move [Trackball] and press [Set] to adjust the ROI and curve VOI.3. Press [Update] to enter the 4D image real-time status.<strong>Mindray</strong> DS USA, Inc. 800 MacArthur Blvd., Mahwah, NJ 07430 Tel: 1.800.288.2121 or 201.995.8000 www.na.mindray.comFree Xros M mode (Anatomical M mode)1. Under B mode, click [Free Xros M] on the screen to enter.2. Move [Trackball] to set the position of the sample line, and rotate [Multi-functionalKnob] to change the angle of the sample line.Tissue Doppler Imaging1. Under B mode with phased array probe, click [TDI] on the screen to enter TDI mode.2. Move [Trackball] to change the position and size of the ROI.3. Press [M] to enter TVM mode; press [PW] to enter TVD mode; press [Power] toenter TEI mode.Measurement1. Press [Freeze] to freeze the image before the measurement.2. Press [Measure] to enter the application measurement status.3. Move [Trackball] to choose the measurement tool, and then go to the desiredposition to measure.Post ScanningComments and Body MarksComment1. Press [Comment] to choose the comment setting position and then add thecomment to the image.Body Mark1. Press [Body Mark] and rotate it to choose the desired one.2. Move [Trackball] to place the probe marker, and rotate the [Multi-functional Knob]to adjust the orientation of the probe.Save Images or Cine1. Press [Save] to save a single-frame image or cine to the system.2. Press [Review] or select an exam of a patient in the [iStation] screen, and click[Review] to see the image of cine.Report and Print1. Press [Report], move the cursor to the comment text box and type the text.2. Click [Image select] on the report page to add images, and then click [Print View]to preview the report, click [Print] to print the report out.End ExamPress [End Exam] to end one examination. You may start a new exam by repeatingthe instructions above.Image ManagementImage Transfer1. Press [iStation] to enter the image management system and choose the images.2. Click [Send to] to send the images to USB, DICOM, etc.Note: For detailed information, please refer to the operation manual.