

BlackandDecker Perceuse- Kd352 - Type 1 - Instruction Manual
BlackandDecker Perceuse- Kd352 - Type 1 - Instruction Manual
BlackandDecker Perceuse- Kd352 - Type 1 - Instruction Manual

Create successful ePaper yourself
Turn your PDF publications into a flip-book with our unique Google optimized e-Paper software.
ENGLISH<br />
This guarantee is offered as an extra benefit and is<br />
additional to the customers statutory rights.<br />
AFTER SALES SERVICE FOR THE BLACK & DECKER<br />
PRODUCT (UK, AUSTRALIA AND NEW ZEALAND ONLY)<br />
Black & Decker offers a nationwide after sales service<br />
through our company operated service centres and<br />
concessionaries on the Channel Islands and Isle of Man.<br />
It is our aim to offer excellent service, fast repairs,<br />
extensive parts availability and full accessory support.<br />
The use of other than genuine Black & Decker<br />
accessories and parts may damage or reduce the<br />
performance of your Black & Decker product and may<br />
also endanger the user. The terms and conditions of<br />
the warranty may also be effected.<br />
THE AFTER SALES SERVICE POLICY<br />
(UK, AUSTRALIA AND NEW ZEALAND ONLY)<br />
It is our aim that all Black & Decker customers should be<br />
totally satisfied with their Black & Decker product and<br />
after sales service, but if help or advice is needed<br />
please contact the local Black & Decker service centre<br />
manager who will be happy to help. Full details of our<br />
unique after sales service can be obtained from any of<br />
our Black & Decker service centres.<br />
ACCESSORIES<br />
The performance of any power tool is dependant upon<br />
the accessory used. Black & Decker accessories are<br />
engineered to high quality standards and are designed<br />
to enhance the performance of your tool. Buying a<br />
Black & Decker accessory will ensure that you get the<br />
very best from your Black & Decker tool.<br />
TECHNICAL DATA<br />
The level of sound pressure of the tool is in accordance<br />
with EEC legislation. It is recommended that you take<br />
appropriate measures for the protection of your hearing<br />
if the sound level seems uncomfortable. This normally<br />
equates to a sound pressure in excess of 85dB (A).<br />
Note: This user manual also covers catalogue numbers<br />
ending with a letter suffix. Refer to your carton for<br />
details of your product.<br />
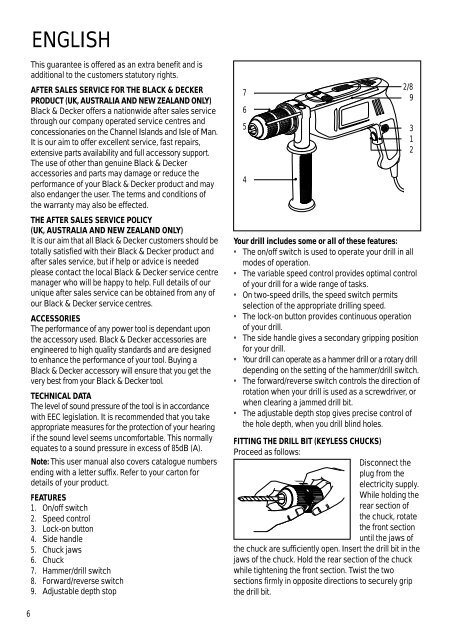
FEATURES<br />
1. On/off switch<br />
2. Speed control<br />
3. Lock-on button<br />
4. Side handle<br />
5. Chuck jaws<br />
6. Chuck<br />
7. Hammer/drill switch<br />
8. Forward/reverse switch<br />
9. Adjustable depth stop<br />
7<br />
6<br />
5<br />
4<br />
•<br />
•<br />
•<br />
•<br />
• •<br />
2/8<br />
9<br />
Your drill includes some or all of these features:<br />
• The on/off switch is used to operate your drill in all<br />
modes of operation.<br />
• The variable speed control provides optimal control<br />
of your drill for a wide range of tasks.<br />
• On two-speed drills, the speed switch permits<br />
selection of the appropriate drilling speed.<br />
• The lock-on button provides continuous operation<br />
of your drill.<br />
• The side handle gives a secondary gripping position<br />
for your drill.<br />
• Your drill can operate as a hammer drill or a rotary drill<br />
depending on the setting of the hammer/drill switch.<br />
• The forward/reverse switch controls the direction of<br />
rotation when your drill is used as a screwdriver, or<br />
when clearing a jammed drill bit.<br />
• The adjustable depth stop gives precise control of<br />
the hole depth, when you drill blind holes.<br />
FITTING THE DRILL BIT (KEYLESS CHUCKS)<br />
Proceed as follows:<br />
Disconnect the<br />
plug from the<br />
electricity supply.<br />
While holding the<br />
rear section of<br />
the chuck, rotate<br />
the front section<br />
until the jaws of<br />
the chuck are sufficiently open. Insert the drill bit in the<br />
jaws of the chuck. Hold the rear section of the chuck<br />
while tightening the front section. Twist the two<br />
sections firmly in opposite directions to securely grip<br />
the drill bit.<br />
•<br />
•<br />
3<br />
1<br />
2<br />
6


