

BlackandDecker Perceuse- Kd455cre - Type 1 - Instruction Manual
BlackandDecker Perceuse- Kd455cre - Type 1 - Instruction Manual
BlackandDecker Perceuse- Kd455cre - Type 1 - Instruction Manual

You also want an ePaper? Increase the reach of your titles
YUMPU automatically turns print PDFs into web optimized ePapers that Google loves.
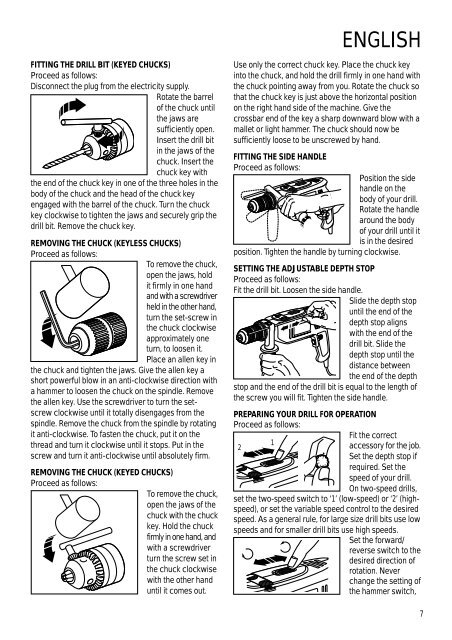
FITTING THE DRILL BIT (KEYED CHUCKS)<br />
Proceed as follows:<br />
Disconnect the plug from the electricity supply.<br />
Rotate the barrel<br />
of the chuck until<br />
the jaws are<br />
sufficiently open.<br />
Insert the drill bit<br />
in the jaws of the<br />
chuck. Insert the<br />
chuck key with<br />
the end of the chuck key in one of the three holes in the<br />
body of the chuck and the head of the chuck key<br />
engaged with the barrel of the chuck. Turn the chuck<br />
key clockwise to tighten the jaws and securely grip the<br />
drill bit. Remove the chuck key.<br />
REMOVING THE CHUCK (KEYLESS CHUCKS)<br />
Proceed as follows:<br />
To remove the chuck,<br />
open the jaws, hold<br />
it firmly in one hand<br />
and with a screwdriver<br />
held in the other hand,<br />
turn the set-screw in<br />
the chuck clockwise<br />
approximately one<br />
turn, to loosen it.<br />
Place an allen key in<br />
the chuck and tighten the jaws. Give the allen key a<br />
short powerful blow in an anti-clockwise direction with<br />
a hammer to loosen the chuck on the spindle. Remove<br />
the allen key. Use the screwdriver to turn the setscrew<br />
clockwise until it totally disengages from the<br />
spindle. Remove the chuck from the spindle by rotating<br />
it anti-clockwise. To fasten the chuck, put it on the<br />
thread and turn it clockwise until it stops. Put in the<br />
screw and turn it anti-clockwise until absolutely firm.<br />
REMOVING THE CHUCK (KEYED CHUCKS)<br />
Proceed as follows:<br />
To remove the chuck,<br />
open the jaws of the<br />
chuck with the chuck<br />
key. Hold the chuck<br />
firmly in one hand, and<br />
with a screwdriver<br />
turn the screw set in<br />
the chuck clockwise<br />
with the other hand<br />
until it comes out.<br />
ENGLISH<br />
Use only the correct chuck key. Place the chuck key<br />
into the chuck, and hold the drill firmly in one hand with<br />
the chuck pointing away from you. Rotate the chuck so<br />
that the chuck key is just above the horizontal position<br />
on the right hand side of the machine. Give the<br />
crossbar end of the key a sharp downward blow with a<br />
mallet or light hammer. The chuck should now be<br />
sufficiently loose to be unscrewed by hand.<br />
FITTING THE SIDE HANDLE<br />
Proceed as follows:<br />
Position the side<br />
handle on the<br />
body of your drill.<br />
Rotate the handle<br />
around the body<br />
of your drill until it<br />
is in the desired<br />
position. Tighten the handle by turning clockwise.<br />
SETTING THE ADJUSTABLE DEPTH STOP<br />
Proceed as follows:<br />
Fit the drill bit. Loosen the side handle.<br />
Slide the depth stop<br />
until the end of the<br />
depth stop aligns<br />
with the end of the<br />
drill bit. Slide the<br />
depth stop until the<br />
distance between<br />
the end of the depth<br />
stop and the end of the drill bit is equal to the length of<br />
the screw you will fit. Tighten the side handle.<br />
PREPARING YOUR DRILL FOR OPERATION<br />
Proceed as follows:<br />
Fit the correct<br />
1<br />
2<br />
accessory for the job.<br />
Set the depth stop if<br />
required. Set the<br />
speed of your drill.<br />
On two-speed drills,<br />
set the two-speed switch to ‘1’ (low-speed) or ‘2’ (highspeed),<br />
or set the variable speed control to the desired<br />
speed. As a general rule, for large size drill bits use low<br />
speeds and for smaller drill bits use high speeds.<br />
Set the forward/<br />
reverse switch to the<br />
desired direction of<br />
rotation. Never<br />
change the setting of<br />
the hammer switch,<br />
7


