

Toyota USB & iPod interface kit - PZ473-00266-00 - USB & iPod interface kit (English, French, German, Dutch, Italian) - mode d'emploi
Toyota USB & iPod interface kit - PZ473-00266-00 - USB & iPod interface kit (English, French, German, Dutch, Italian) - mode d'emploi
Toyota USB & iPod interface kit - PZ473-00266-00 - USB & iPod interface kit (English, French, German, Dutch, Italian) - mode d'emploi

You also want an ePaper? Increase the reach of your titles
YUMPU automatically turns print PDFs into web optimized ePapers that Google loves.
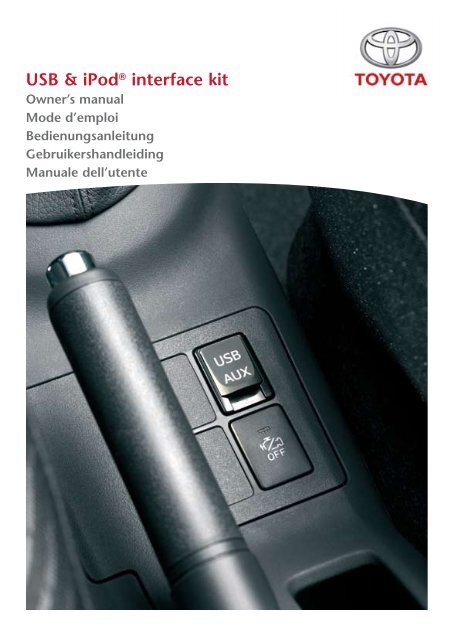
<strong>USB</strong> & <strong>iPod</strong> ® <strong>interface</strong> <strong>kit</strong><br />
Owner’s manual<br />
Mode d’emploi<br />
Bedienungsanleitung<br />
Gebruikershandleiding<br />
Manuale dell’utente
A OPERATING INSTRUCTIONS ........................................................................................ Page 3<br />
B MODE D’EMPLOI .............................................................................................................. Page 35<br />
C BEDIENUNGSANLEITUNG ............................................................................................. Seite 69<br />
D BEDIENINGSHANDLEIDING ......................................................................................... Pagina 103<br />
E ISTRUZIONI PER L’USO ................................................................................................... Pagina 137<br />
m<br />
Read this manual thoroughly before using the <strong>USB</strong> & <strong>iPod</strong> integration <strong>kit</strong>.<br />
Always keep this owner’s manual in the vehicle.<br />
Lisez ce manuel dans son intégralité avant d’utiliser le <strong>USB</strong> & <strong>iPod</strong> integration <strong>kit</strong>.<br />
Conservez toujours ce <strong>mode</strong> <strong>d'emploi</strong> dans le véhicule.<br />
Lesen Sie diese Anleitung vor Benutzung der <strong>USB</strong> & <strong>iPod</strong> integration <strong>kit</strong> gründlich.<br />
Bewahren Sie diese Anleitung immer im Fahrzeug auf.<br />
Lees deze handleiding grondig voordat u de <strong>USB</strong> & <strong>iPod</strong> integration <strong>kit</strong> gebruikt.<br />
Bewaar deze gebruikshandleiding altijd in uw voertuig.<br />
Leggere con attenzione e per intero questo manuale prima di utilizzare il <strong>USB</strong> & <strong>iPod</strong><br />
integration <strong>kit</strong>. Tenere sempre nel veicolo il presente manuale d’uso.<br />
<strong>USB</strong> & <strong>iPod</strong> ® integration <strong>kit</strong>
<strong>USB</strong> & <strong>iPod</strong> ® integration <strong>kit</strong>
Table of Contents<br />
1. Introduction......................................................................................................... 7<br />
2. Safety Information............................................................................................... 8<br />
2.1. Safety Symbols......................................................................................................... 8<br />
2.2. Caution.................................................................................................................... 9<br />
3. Immunity.............................................................................................................. 11<br />
4. Important Information........................................................................................ 12<br />
5. Quick Function overview...................................................................................... 13<br />
6. Operating Instructions <strong>USB</strong> Mass Storage Device................................................ 14<br />
6.1. Radio Image............................................................................................................. 14<br />
6.2. Connecting.............................................................................................................. 14<br />
6.3. Power On/Off.......................................................................................................... 15<br />
6.4. Volume Up/Down.................................................................................................... 15<br />
6.5. Selecting <strong>USB</strong> Mode................................................................................................. 15<br />
6.6. Equalizing within <strong>USB</strong> Mode.................................................................................... 15<br />
6.7. Sorting <strong>USB</strong> ............................................................................................................. 16<br />
6.8. Folder Selection........................................................................................................ 17<br />
6.9. File Selection............................................................................................................ 18<br />
6.10. Search in File............................................................................................................ 18<br />
6.11. File Repeat............................................................................................................... 18<br />
6.12. Folder Repeat........................................................................................................... 18<br />
6.13. Random Play ........................................................................................................... 19<br />
6.14. Scan......................................................................................................................... 19<br />
6.15. Display Data ............................................................................................................ 20<br />
7. Operating Instructions <strong>iPod</strong> Device..................................................................... 22<br />
7.1. Radio Image............................................................................................................. 22<br />
7.2. Connecting.............................................................................................................. 22<br />
7.3. Power On/Off.......................................................................................................... 23<br />
7.4. Volume Up/Down.................................................................................................... 23<br />
7.5. Selecting <strong>iPod</strong> Mode................................................................................................ 23<br />
7.6. Equalizing within <strong>iPod</strong> Mode.................................................................................... 23<br />
7.7. Sorting <strong>iPod</strong>............................................................................................................. 24<br />
7.8. Playlist Concept........................................................................................................ 24<br />
7.9. Playlist/Album Selection........................................................................................... 25<br />
7.10. Title Selection........................................................................................................... 26<br />
7.11. Search in Title........................................................................................................... 26<br />
A<br />
<strong>USB</strong> & <strong>iPod</strong> ® integration <strong>kit</strong>
7.12. Title Repeat.............................................................................................................. 26<br />
7.13. Random Play ........................................................................................................... 27<br />
7.14. Display Data ............................................................................................................ 27<br />
7.15. Scan......................................................................................................................... 29<br />
8. Steering Wheel Remote Control.......................................................................... 30<br />
8.1. Mode Selection........................................................................................................ 30<br />
8.2. Volume.................................................................................................................... 30<br />
8.3. File/Title Switching................................................................................................... 30<br />
8.4. Folder/Playlist/Album Switching............................................................................... 30<br />
9. Troubleshooting................................................................................................... 31<br />
10. Resetting ............................................................................................................. 32<br />
11. Specifications....................................................................................................... 33<br />
11.1. <strong>USB</strong> ......................................................................................................................... 33<br />
11.2. <strong>iPod</strong>/iPhone............................................................................................................. 34<br />
<strong>USB</strong> & <strong>iPod</strong> ® integration <strong>kit</strong> A
Recommendation<br />
Please read this manual to get the full benefit of the system.<br />
We suggest that you keep this manual in the car. It will be easier for you to find the information<br />
in case of an emergency.<br />
Your local authorised retailer will be pleased to clarify any queries you may have with the system<br />
or its operation if you cannot find the information you need in this manual or in the chapter<br />
“Troubleshooting”.<br />
<strong>Toyota</strong> recommends that only parts and accessories that have been tested and approved by<br />
<strong>Toyota</strong> in terms of safety, function and suitability should be used.<br />
These operating instructions are designed to ensure that you can operate the <strong>USB</strong> & <strong>iPod</strong> ®<br />
integration <strong>kit</strong> safely and easily.<br />
These operating instructions describe the functions of the <strong>USB</strong> & <strong>iPod</strong> ® integration <strong>kit</strong>.<br />
ù<br />
A<br />
<strong>USB</strong> & <strong>iPod</strong> ® integration <strong>kit</strong>
<strong>USB</strong> & <strong>iPod</strong> ® integration <strong>kit</strong> A
1. Introduction<br />
Thank you for purchasing our product.<br />
Please read these instructions carefully to use the product properly. Be especially sure to read<br />
“Safety Information” (page 8) before use.<br />
These Operating Instructions should be retained for future reference.<br />
A<br />
<strong>USB</strong> & <strong>iPod</strong> ® integration <strong>kit</strong>
2. Safety Information<br />
• Read the operating instructions for the unit and all other components of your car audio system<br />
carefully before using the system. They contain instructions about how to use the system in<br />
a safe and effective manner. <strong>Toyota</strong> Motor Europe NV/SA assumes no responsibility for any<br />
problems resulting from failure to observe the instructions given in this manual.<br />
• This manual uses pictographs to show you how to use the product safely and to alert you to<br />
potential dangers resulting from incorrect connections and operations. The meanings of the<br />
pictographs are explained below. It is important that you fully understand the meanings of the<br />
pictographs in order to use this manual and the system properly.<br />
2.1. Safety Symbols<br />
m<br />
Warning:<br />
When this symbol appears in front of a text you must follow these<br />
recommendations to avoid irreparable damage to your car, system or connected devices<br />
or to avoid accidents with injuries or death as a result.<br />
ò<br />
Caution: When this symbol appears in front of a text you must be very careful and follow<br />
the recommendations to avoid damage to your car, system or connected devices or to avoid<br />
injuries.<br />
Disposal: When this symbol appears in front of a text, you are recommended or warned to<br />
follow the legislators’ rules for disposal of electrical equipment.<br />
ó Note: A simple recommendation for your convenience and for optimal working of your<br />
system.<br />
<strong>USB</strong> & <strong>iPod</strong> ® integration <strong>kit</strong> A
2.2. Caution<br />
m<br />
Observe the following warning when using this unit!<br />
• The driver should neither watch the display nor operate the system while driving.<br />
Watching the display or operating the system will distract the driver from looking ahead of the<br />
vehicle and can cause accidents. Always stop the vehicle in a safe location and use the parking<br />
brake before watching the display or operating the system. It may cause trouble.<br />
• Do not disassemble or modify the unit.<br />
Do not disassemble, modify the unit or attempt to repair the product yourself. If the product<br />
needs to be repaired, consult your Authorised Retailer.<br />
• Do not use the unit when it is out of order.<br />
If the unit is out of order (no power, no sound) or in an abnormal state (contains foreign<br />
objects, has been exposed to water, is emitting smoke, or odour), turn it off immediately and<br />
consult your Authorised Retailer.<br />
• Please refer to your Authorised Retailer for fuse replacement.<br />
When the fuse blows, eliminate the cause and have it replaced with the fuse prescribed for this<br />
unit by a qualified service engineer. Incorrect replacement of the fuse may lead to smoke, fire,<br />
and damage to this product.<br />
Take the following care when using this unit!<br />
• Keep the sound volume at an appropriate level.<br />
Keep the volume level low enough to be aware of road and traffic conditions while driving.<br />
• Do not use this adapter in other vehicles or out of your car.<br />
Failure to observe this may cause smoke, fire, electrical shock, injury, or other problems.<br />
• Do not operate the unit for a prolonged period with the engine turned off.<br />
This will drain the battery.<br />
• Do not expose the adapter or the <strong>USB</strong> mass storage device/<strong>iPod</strong> to direct sunlight<br />
or excessive heat.<br />
A rise in the interior temperature of the units may lead to smoke, fire, or other damage to the<br />
units.<br />
• Do not use the product where it is exposed to water, moisture, or dust.<br />
Exposure of the adapter, <strong>USB</strong> mass storage device or the <strong>iPod</strong> player to water, moisture, or dust<br />
may lead to smoke, fire, or other damage to the units.<br />
Make especially sure that the units do not get wet in car washes or on rainy days.<br />
A<br />
<strong>USB</strong> & <strong>iPod</strong> ® integration <strong>kit</strong>
• Installation: Before installing or extending the system yourself, please read the installation<br />
instructions carefully.<br />
• Fix the <strong>USB</strong> mass storage device/<strong>iPod</strong> player securely when using this unit.<br />
Do not let the <strong>USB</strong> mass storage device/<strong>iPod</strong> fall onto the floor, where it may become jammed<br />
under the brake or accelerator pedal.<br />
• For details about <strong>USB</strong> mass storage devices or <strong>iPod</strong> players, refer to their<br />
respective user manuals.<br />
10 <strong>USB</strong> & <strong>iPod</strong> ® integration <strong>kit</strong> A
3. Immunity<br />
• If any loss is caused by fire, earthquake, action by a third party, or other accidents, or the user’s<br />
intentional or accidental misuse, incorrect use, or use under abnormal condition, repairs of the<br />
product will in principle be charged to the user.<br />
• <strong>Toyota</strong> Motor Europe NV/SA is not liable for any incidental loss caused by the use or non-use of<br />
this product, such as loss of business profits, or change or loss of data on memory.<br />
• <strong>Toyota</strong> Motor Europe NV/SA accepts no responsibility for lost data on the <strong>USB</strong> mass storage<br />
device or <strong>iPod</strong> even if the data is lost while using the unit.<br />
A<br />
<strong>USB</strong> & <strong>iPod</strong> ® integration <strong>kit</strong> 11
4. Important Information<br />
This unit is designed to control and listen to music Files on <strong>USB</strong> mass storage devices and on an<br />
<strong>iPod</strong> through a genuine head unit.<br />
• <strong>iPod</strong> is a trademark of Apple Inc., registered in the U.S. and other countries.<br />
• Operation may vary depending on the software version of <strong>USB</strong> mass storage device and <strong>iPod</strong>.<br />
• Operation may vary depending on the head unit to which it is connected.<br />
• Contact your authorized retailer to find out if your head unit is compatible with the <strong>USB</strong> & <strong>iPod</strong><br />
Integration <strong>kit</strong>.<br />
12 <strong>USB</strong> & <strong>iPod</strong> ® integration <strong>kit</strong> A
5. Quick Function overview<br />
Button/Key Action <strong>USB</strong> Mass Storage<br />
Device<br />
TRACK UP/<br />
DOWN<br />
DISC UP/<br />
DOWN<br />
RPT<br />
RND<br />
SCN<br />
TEXT/<br />
DISP<br />
CHANGE DISCS<br />
SELECT<br />
<strong>iPod</strong><br />
Short press File next/previous Title next/previous<br />
Long press Fast FW/REW Fast FW/REW<br />
Short press Folder next/previous Playlist/Album next/<br />
previous<br />
Short press Repeat File Repeat Title<br />
Long press Repeat Folder Activate Album Sorting<br />
Short press<br />
Long press<br />
Short press<br />
Long press<br />
Short press<br />
Long press<br />
Short press<br />
Short press<br />
Random play within<br />
current Folder<br />
Random play all <strong>USB</strong><br />
memory<br />
Scan first 10 sec of Files in<br />
current Folder<br />
Scan first 10 sec of first File<br />
of each Folder<br />
Switch to next display<br />
page<br />
Switch to next digits of<br />
displayed data<br />
Open page with keys for<br />
direct Folder selection<br />
Open page with keys for<br />
direct File selection<br />
Random play within<br />
current Playlist/Album<br />
Random play all <strong>iPod</strong><br />
memory<br />
Not available<br />
Not available<br />
Switch to next display<br />
page<br />
Switch to next digits of<br />
displayed data<br />
Open page with keys<br />
for direct Playlist/Album<br />
selection<br />
Open page with keys for<br />
direct Title selection<br />
A<br />
<strong>USB</strong> & <strong>iPod</strong> ® integration <strong>kit</strong> 13
6. Operating Instructions <strong>USB</strong> Mass Storage<br />
Device<br />
6.1. Radio Image<br />
A diagram of the radio design with reference to the button functions can be found in the vehicle<br />
owner’s manual in the section related to audio operation.<br />
6.2. Connecting<br />
Connecting <strong>USB</strong> mass storage device<br />
Specifications of <strong>USB</strong> mass storage devices may be changed by manufacturers. Therefore <strong>USB</strong> mass<br />
storage devices may not operate normally depending on the change made to the specifications.<br />
Before connecting the <strong>USB</strong> mass storage device please check if your <strong>USB</strong> mass storage device<br />
complies with the requirements for the <strong>USB</strong> & <strong>iPod</strong> integration <strong>kit</strong> (page 22) .<br />
Plug the <strong>USB</strong> connector in the <strong>USB</strong>/AUX jack located in the center console or dashboard.<br />
When the ignition is set to ACC or ON, the <strong>USB</strong> mass storage device will be activated<br />
automatically.<br />
While the <strong>USB</strong> mass storage device is connected to this unit, its battery will be charged<br />
automatically.<br />
When the ignition is switched to OFF the <strong>USB</strong> mass storage device will no longer be charged.<br />
Turn the <strong>USB</strong> mass storage device off manually in order to prevent the battery from draining.<br />
The <strong>USB</strong> & <strong>iPod</strong> integration <strong>kit</strong> supports <strong>USB</strong> mass storage devices that conform to <strong>USB</strong> 2.0<br />
standard specification and corresponding File systems FAT32 and FAT16 (Windows). It supports<br />
MP3 and WMA Files.<br />
ó Note: For information related to the <strong>USB</strong> mass storage device, please refer to its manual.<br />
ó Note: Using an unsupported <strong>USB</strong> mass storage device can result in abnormal operation.<br />
Disconnecting <strong>USB</strong> mass storage devices<br />
The <strong>USB</strong> mass storage device can be disconnected from its unit at any time.<br />
14 <strong>USB</strong> & <strong>iPod</strong> ® integration <strong>kit</strong> A
6.3. Power On/Off<br />
Press [PWR-VOL] knob to switch the power on.<br />
Press [PWR-VOL] again to switch the power off.<br />
6.4. Volume Up/Down<br />
Turn [VOLUME] clockwise to increase the volume.<br />
Turn [VOLUME] counter clockwise to decrease the volume.<br />
6.5. Selecting <strong>USB</strong> Mode<br />
Press [DISC] on the head unit to select <strong>USB</strong> <strong>mode</strong>.<br />
Each time [DISC] is pressed, the <strong>mode</strong>s change as follows:<br />
Internal CD “ external CDCH (= <strong>USB</strong>) “ internal CD.<br />
ó Note: As the <strong>USB</strong> mass storage device is connected through the external CD changer<br />
integration <strong>kit</strong>, the radio will indicate the external CD Changer <strong>mode</strong>.<br />
6.6. Equalizing within <strong>USB</strong> Mode<br />
Bass/Treble/Fader/Balance can be adjusted specifically for <strong>USB</strong> <strong>mode</strong>. When you switch from <strong>USB</strong><br />
to radio or CD <strong>mode</strong>, the audio settings will be changed to the setting of each <strong>mode</strong> specifically.<br />
The audio settings for each <strong>mode</strong> will be stored in the memory of the head unit and will be applied<br />
automatically when a certain <strong>mode</strong> is selected.<br />
Display radio with touch screen<br />
Press the [AUDIO CONTROL] key to select the Audio control screen.<br />
Radio<br />
Press the [Tune] knob to select the desired item. Each time Tune Dial is pressed the selectable items<br />
change as follows:<br />
BAS (Bass) “ TRE (Treble) “ FAD (Fader) “ BAL (Balance)<br />
Pressing Tune Dial again releases Audio Control. By rotating the [Tune] knob to the left/right the<br />
selected item can be adjusted.<br />
ó Note: Also the EQ settings on the <strong>USB</strong> mass storage device may affect the sound. To adjust<br />
the <strong>iPod</strong> EQ settings, please refer to its User manual.<br />
A<br />
<strong>USB</strong> & <strong>iPod</strong> ® integration <strong>kit</strong> 15
6.7. Sorting <strong>USB</strong><br />
The <strong>USB</strong> & <strong>iPod</strong> integration <strong>kit</strong> can play music titles on the <strong>USB</strong> mass storage device which are<br />
organized in Folders and Files.<br />
Once the <strong>USB</strong> mass storage device is connected; all the Folders in the Device are scanned, and a<br />
number will be given in the order in which the Folders have been stored on the <strong>USB</strong> mass storage<br />
device. MP3 and WMA Files will not be distiguinshed and they will be ordered and numbered<br />
sequentially.<br />
ó Note: The Folders and Files will be played in the order they have been copied to the<br />
<strong>USB</strong> Mass Storage Device. It might happen that the Folders and Files will NOT be ordered<br />
alphabetically, and may have a different order than in a computer environment.<br />
ó Note: We advise you to pre-arrange the order of the Folders and Files via your computer<br />
before you connect the device.<br />
ó Note: We strongly recommend making safety copies or your Files/Data. <strong>Toyota</strong> Motor Europe<br />
NV/SA will not be responsible in case of lost or damaged data.<br />
Folders will be arranged according to following logic:<br />
Root Folder<br />
C<br />
D<br />
C1.mp3<br />
D1.mp3<br />
C2.mp3<br />
D2.mp3<br />
C3.mp3<br />
D3.mp3<br />
Folder N<br />
1 (Root<br />
Folder)<br />
2 (C)<br />
R1.mp3<br />
R2.mp3<br />
R3.mp3<br />
C1.mp3<br />
C2.mp3<br />
C3.mp3<br />
B<br />
R1.mp3<br />
R2.mp3<br />
R3.mp3<br />
B1.mp3<br />
B2.mp3<br />
B3.mp3<br />
E<br />
A<br />
E1.mp3<br />
E2.mp3<br />
E3.mp3<br />
A1.mp3<br />
A2.mp3<br />
A3.mp3<br />
3 (D)<br />
4 (B)<br />
5 (E)<br />
D1.mp3<br />
D2.mp3<br />
D3.mp3<br />
B1.mp3<br />
B2.mp3<br />
B3.mp3<br />
E1.mp3<br />
E2.mp3<br />
E3.mp3<br />
F<br />
F1.mp3<br />
F2.mp3<br />
F3.mp3<br />
6 (A)<br />
7 (F)<br />
A1.mp3<br />
A2.mp3<br />
A3.mp3<br />
F1.mp3<br />
F2.mp3<br />
F3.mp3<br />
16 <strong>USB</strong> & <strong>iPod</strong> ® integration <strong>kit</strong> A
ó Note: Folder name and File name will be displayed on the radio display. We recommend to<br />
arrange your Folders by artist or album and your File names by song/title name.<br />
6.8. Folder Selection<br />
Direct Folder Selection<br />
ó Note: Direct Folder selection buttons are only available on radios with touch screen displays.<br />
Press [CHANGE DISCS], then press one of the keys [1] to [6].<br />
(Display layout or features might change depending on<br />
head unit <strong>mode</strong>l. Check the vehicle manual for details.)<br />
Disc up/down Folder Selection<br />
Press [DISC ^] to switch to the next Folder.<br />
ó Note: When the very last Folder has been reached, the next press will lead you back to<br />
the very first Folder.<br />
Press [DISC v] to switch to the previous Folder.<br />
ó Note: When the very first Folder has been reached, the next press will lead you to the very<br />
last Folder.<br />
ó Note: For the AVN head units this function is only available via steering wheel switches.<br />
Please check section 8.4<br />
A<br />
<strong>USB</strong> & <strong>iPod</strong> ® integration <strong>kit</strong> 17
6.9. File Selection<br />
Shortly press [TRACK ^] to jump to the next File.<br />
ó Note: When you get to last track, you will skip to the first track of the next Folder, except if<br />
Random and/or Repeat are active. (please note that this behaviour is different from <strong>iPod</strong>).<br />
Shortly press [TRACK v] to jump to the beginning of the current title; press again to jump to the<br />
previous title.<br />
ó Note: When this button is pressed again after having reached the first title of a Folder, you<br />
will skip to the beginning of the last track of the previous Folder, except if Random and/or<br />
Repeat are active. (Please note that this behaviour is different from <strong>iPod</strong>).<br />
ó Note: Number of Files within a Folder is unlimited.<br />
ó Note: Files within a Folder are numbered from 1 to 99, due to display limitations.<br />
If the Track number exceeds 99 the numbering starts from Track 1 again.<br />
6.10. Search in File<br />
Long press [TRACK v] to rewind within the current File.<br />
When the beginning of the File is reached, the File will start playing from the beginning.<br />
Long press [TRACK ^]to move fast forward within the current File.<br />
When the end of the File is reached, the next music File will start playing.<br />
6.11. File Repeat<br />
Shortly press [RPT] to activate the repeat function. The currently selected File will then be repeated<br />
continuously. (RPT) will appear on the display.<br />
To de-activate the repeat function, press [RPT] again or select another music File by pressing<br />
[TRACK ^] or [TRACK v].<br />
6.12. Folder Repeat<br />
Long press [RPT] to activate the Folder repeat function. The currently selected Folder will then be<br />
repeated continuously. (D_RPT) will appear on the display.<br />
To de-activate the repeat function, press [RPT] again or select another Folder by pressing [DISC ^]<br />
or [DISC v].<br />
18 <strong>USB</strong> & <strong>iPod</strong> ® integration <strong>kit</strong> A
6.13. Random Play<br />
Random Play within a Folder<br />
Briefly press [RAND] to activate random playback of all the music Files within the selected Folder.<br />
To de-activate random playback function, briefly press [RAND] again.<br />
By pressing [TRACK ^] while in random playback, the next randomly selected File will start to play.<br />
By pressing [TRACK v] while in random playback, the previously played File will be played again.<br />
ó Note: If the Folder repeat function is not activated while in random playback, then the next<br />
Folder will be played in random order when all the Files of the current Folder have been<br />
played.<br />
Random Play of all <strong>USB</strong> Memory<br />
Long press [RAND] to activate the random playback over all music Files stored on the <strong>USB</strong> mass<br />
storage device.<br />
To de-activate random playback function, briefly press [RAND] again.<br />
By pressing [TRACK ^] while in random playback, the next randomly selected File will start to play.<br />
By pressing [TRACK v] while in random playback, the previously played File will be played again.<br />
By pressing [DISC^]/[DISC v] while in random playback this function will be de-activated.<br />
6.14. Scan<br />
Scan Files within a Folder<br />
Briefly press [SCAN] to activate scanning of all Files in the selected Folder. All music Files will be<br />
played for 10 seconds. When all Files of the Folder have been scanned, the scan function will stop<br />
and the first scanned File will start to play.<br />
To de-activate the scan function, briefly press [SCAN] again. Then the currently scanned File will<br />
continue to play.<br />
Scan Folders<br />
Long press [SCAN] to activate scanning of all Folders. The first music File of each Folder will be<br />
played for 10 seconds.<br />
When all Folders have been scanned, the scan function will stop and the first scanned File will start<br />
to play.<br />
To de-activate the Folder scan function, press [SCAN] again; the actual scanned Folder will<br />
continue to play.<br />
ó Note: The Scan function is not available for <strong>iPod</strong>.<br />
A<br />
<strong>USB</strong> & <strong>iPod</strong> ® integration <strong>kit</strong> 19
6.15. Display Data<br />
When pressing [DISP]/[TEXT] briefly you can switch between pages with different types of<br />
information that are shown in a certain order depending on the display type.<br />
Displays not supporting CD Text:<br />
Folder number & File number “ elapsed Playtime “ Folder number & File number.<br />
Displays supporting CD Text:<br />
Folder number & File number “ elapsed Playtime “ Folder name “ File name “ Folder number<br />
& File number.<br />
When long pressing [DISP]/[[TEXT] you can switch to additional information in the same page.<br />
A beep sound is emitted. 5 sec after leaving the button untouched, the display will return to its<br />
original condition.<br />
Displays with Touch Screen<br />
When pressing [TEXT] you can switch between pages with different type of information.<br />
When pressing [CHANGE DISCS] you can switch to the page with direct select keys for Folders.<br />
(Display layout or features might change depending on<br />
head unit <strong>mode</strong>l. Check the vehicle manual for details.)<br />
20 <strong>USB</strong> & <strong>iPod</strong> ® integration <strong>kit</strong> A
When pressing [SELECT] next to the Track name you can switch to the page with direct select keys<br />
for Files. Use the left side up and down buttons on the display to scroll within the list.<br />
The displayed music Files can be selected directly by pushing the indicated area of the display.<br />
(Display layout or features might change depending on<br />
head unit <strong>mode</strong>l. Check the vehicle manual for details.)<br />
Display Limitiations<br />
Due to limitations on the display, the Folders are separated into pages and numbered by module 6<br />
from 1 to 6. The indication of numbers 7 and onwards cannot be displayed on the head unit,<br />
therefore the numbering of the next Folders will restart from 1 to 6. The Folder name, however,<br />
will indicate the current Folder.<br />
Similarly, Files are numbered by module 99. This means the first 99 Files are numbered from 1 to<br />
99, File 1<strong>00</strong> will be displayed as number 1 again.<br />
A<br />
<strong>USB</strong> & <strong>iPod</strong> ® integration <strong>kit</strong> 21
7. Operating Instructions <strong>iPod</strong> Device<br />
7.1. Radio Image<br />
A diagram of the radio design with reference to the button functions can be found in the vehicle<br />
owner’s manual in the section related to audio operation.<br />
7.2. Connecting<br />
Connecting <strong>iPod</strong><br />
Plug the <strong>iPod</strong> device by dedicated <strong>USB</strong> conversion cable to the <strong>USB</strong> connector in the <strong>USB</strong>/AUX jack<br />
located in the center cosole or dashboard.<br />
When the ignition is set to ACC or ON, the <strong>iPod</strong> will be activated automatically. A check mark will<br />
appear on the <strong>iPod</strong>’s. The <strong>iPod</strong> is ready to be used.<br />
While the <strong>iPod</strong> is connected to this unit, the <strong>iPod</strong> itself cannot be turned on or off; the battery of<br />
the <strong>iPod</strong> will be charged automatically.<br />
When the <strong>iPod</strong> is connected while playing, the song will be paused.<br />
When the ignition is switched to OFF the <strong>iPod</strong> will not be switched OFF. Please check the device<br />
onwers manual how to activate the sleep <strong>mode</strong> after non operation. With the ignition set to off,<br />
the <strong>iPod</strong> will not be charged.<br />
The <strong>USB</strong> & <strong>iPod</strong> integration <strong>kit</strong> unit corresponds to <strong>USB</strong> standard “<strong>USB</strong> 2.0 FS (12 MBPS)” and<br />
therefore supports the following <strong>iPod</strong> <strong>mode</strong>ls: <strong>iPod</strong> Nano (as from firmware Version 1.021.01 or<br />
later), <strong>iPod</strong> Nano G2 (as from firmware Version 1.02 or later), <strong>iPod</strong> Generation 5 (as from firmware<br />
Version 1.021.01 or later). Firmware version 1.<strong>00</strong> or older are not compatible.<br />
ó Note: For information related to the <strong>iPod</strong> player, please visit the Apple website.<br />
Disconnecting <strong>iPod</strong><br />
The <strong>iPod</strong> can be disconnected from its unit at any time.<br />
22 <strong>USB</strong> & <strong>iPod</strong> ® integration <strong>kit</strong> A
7.3. Power On/Off<br />
Press [PWR-VOL] knob to switch the power on.<br />
Press [PWR-VOL] again to switch the power off.<br />
7.4. Volume Up/Down<br />
Turn [VOLUME] clockwise to increase the volume.<br />
Turn [VOLUME] counter clockwise to decrease the volume.<br />
7.5. Selecting <strong>iPod</strong> Mode<br />
Press [DISC] on the head unit to select <strong>iPod</strong> <strong>mode</strong>. Each time [DISC] is pressed, the <strong>mode</strong>s change<br />
as follows:<br />
Internal CD “ external CDCH (=<strong>iPod</strong>) “ internal CD.<br />
ó Note: As the <strong>iPod</strong> Device is connected through the external CD changer integration <strong>kit</strong>, the<br />
radio will indicate the external CD Changer <strong>mode</strong>.<br />
7.6. Equalizing within <strong>iPod</strong> Mode<br />
Bass/Treble/Fader/Balance can be adjusted specifically for <strong>iPod</strong> <strong>mode</strong>. When you switch from <strong>iPod</strong><br />
to radio or CD <strong>mode</strong>, the audio settings will be changed to the setting of each <strong>mode</strong> specially.<br />
The audio settings for each <strong>mode</strong> will be stored in the memory of the head unit and will be applied<br />
automatically when a certain <strong>mode</strong> is selected.<br />
Display radio with touch screen<br />
Press the [AUDIO CONTROL] key to select the Audio control screen.<br />
Radio<br />
Press the [Tune] knob to select the desired item. Each time Tune Dial is pressed the selectable items<br />
change as follows: BAS (Bass) “ TRE (Treble) “ FAD (Fader) “ BAL (Balance).<br />
Pressing Tune Dial again releases Audio Control.<br />
By rotating the [Tune] knob to the left/right the selected item can be adjusted.<br />
ó Note: Also the EQ settings on the <strong>iPod</strong> will affect the sound. To adjust the <strong>iPod</strong> EQ settings,<br />
please refer to the <strong>iPod</strong> User manual.<br />
A<br />
<strong>USB</strong> & <strong>iPod</strong> ® integration <strong>kit</strong> 23
7.7. Sorting <strong>iPod</strong><br />
The <strong>iPod</strong> adapter can play music Titles of the <strong>iPod</strong> which are organized in Playlists or by albums.<br />
The <strong>USB</strong> & <strong>iPod</strong> integration <strong>kit</strong> does not support the functions selected by artist or by genre.<br />
Playlist or Album Sorting Selection<br />
As default behaviour the <strong>iPod</strong> will be sorted by Playlists.<br />
To switch to album sorting, long press [RPT] button until (D_RPT) appears on the display.<br />
Press [RPT] button again to return to Playlist sorting.<br />
ó Note: Albums will be sorted in the same order as on the <strong>iPod</strong> player.<br />
7.8. Playlist Concept<br />
The <strong>iPod</strong> adapter can play music Titles on the <strong>iPod</strong> which are organized in Playlists.<br />
We recommend that you organise the <strong>iPod</strong> content in Playlists using iTunes.<br />
The Playlists will be equal to and listed in the same order as on the <strong>iPod</strong> and on the head unit,<br />
except for the first one.<br />
The first Playlist can include a different content:<br />
After the <strong>iPod</strong> is connected Playlist 1 contains the last selected Playlist before connecting to the<br />
head unit.<br />
After the first Playlist change by Disc up, the unit will display again Playlist number 1 and the first<br />
Playlist will contain all music Titles on the <strong>iPod</strong>.<br />
After the second Disc up, the unit will go to Playlist 2.<br />
ó Note: When a Playlist is empty, music contents of the previous playlist will be transferred to<br />
the empty Playlist.<br />
ó Note: When changing to an empty Playlist, the current playing song will continue playing.<br />
ó Note: The number of Playlists is unlimited.<br />
24 <strong>USB</strong> & <strong>iPod</strong> ® integration <strong>kit</strong> A
7.9. Playlist/Album Selection<br />
Direct Playlist/Album Selection<br />
ó Note: Direct Playlist/Album selection buttons are only available on radios with touch screen<br />
displays.<br />
Press [CHANGE DISCS], then press one of the keys [1] to [6].<br />
(Display layout or features might change depending on<br />
head unit <strong>mode</strong>l. Check the vehicle manual for details.)<br />
Disc up/down Playlist/Album Selection.<br />
Please sort first by Playlist or Album.<br />
Press [DISC ^] to switch to the next Playlist/Album.<br />
ó Note: When the very last Playlist/Album has been reached, the next press will lead you back<br />
to the very first Playlist/Album.<br />
Press [DISC v] to switch to the previous Playlist/Album.<br />
ó Note: When the very first Playlist/Album has been reached, the next press will lead you to the<br />
very last Playlist/Album.<br />
ó Note: For the AVN head units this function is only available via steering wheel switches.<br />
Please check section 8.4<br />
A<br />
<strong>USB</strong> & <strong>iPod</strong> ® integration <strong>kit</strong> 25
7.10. Title Selection<br />
Shortly press [TRACK ^] to jump to the next music Title.<br />
ó Note: When you get to last track, you will skip to first track within the same Playlist/Album by<br />
pressing this button again.<br />
ó Note: To go to the first track of the next playlist, please press [DISC ^].<br />
Shortly press [TRACK v] to jump to the beginning of the current Title; press again to jump to<br />
the previous Title.<br />
ó Note: When this button is pressed again after having reached the first Title of a Playlist/<br />
Album, you will skip to the beginning of the last track of the same Playlist/Album.<br />
ó Note: To go to the previous playlist, please press [DISC v].<br />
ó Note: Number of Titles within a Playlist is unlimited.<br />
ó Note: Music Titles within a Playlist are numbered from 1 to 99, due to display limitations.<br />
If the Track number exceeds 99 the numbering starts from Track 1 again.<br />
7.11. Search in Title<br />
Long press [TRACK v] to rewind within the current Title.<br />
When the beginning of the Title is reached, the Title will start playing from the beginning.<br />
Long press[TRACK ^] to move fast forward within the current Title.<br />
When the end of the Title is reached, the next music Title will start playing.<br />
7.12. Title Repeat<br />
Shortly press [RPT] to activate the repeat function. The currently selected Title will then be<br />
repeated continuously. (RPT) will appear on the display.<br />
To de-activate the repeat function, press [RPT] again or select another music Title by pressing<br />
[TRACK ^] or [TRACK v].<br />
26 <strong>USB</strong> & <strong>iPod</strong> ® integration <strong>kit</strong> A
7.13. Random Play<br />
Random Play within a Playlist<br />
Briefly press [RAND] to activate random playback of all the music Titles within the selected Playlist.<br />
To de-activate random playback function, briefly press [RAND] again.<br />
By pressing [TRACK ^] while in random playback, the next randomly selected Title will start to play.<br />
By pressing [TRACK v] while in random playback, the previously played Title will be played again.<br />
ó Note: If Random has been activated on the <strong>iPod</strong> before being connected, Randomplay will<br />
be maintained after connection. Also a Random activated while being connected will be<br />
maintained after disconnection.<br />
Random Play within an Album<br />
First select the album sorting by activating (D_RPT), then briefly press [RAND] to activate random<br />
play of all the music Titles within the selected Album.<br />
Random Play of all <strong>iPod</strong> content<br />
Long press [RAND] to activate the random playback over all music Titles stored on the <strong>iPod</strong><br />
(random playback of Playlist 1).<br />
To de-activate random playback function, briefly press [RAND] again.<br />
By pressing [TRACK ^] while in random playback, the next randomly selected Title will start to play.<br />
By pressing [TRACK v] while in random playback, the previously played music Title will be played<br />
again.<br />
By pressing [DISC ^]/[DISC v] while in random playback this function will be de-activated.<br />
ó Note: If the disc random function is activated from the radio, this function will be retained<br />
after the <strong>iPod</strong> is disconnected.<br />
7.14. Display Data<br />
When pressing [DISP]/[TEXT] briefly you can switch between pages with different types of<br />
information that are shown in a certain order depending on the display type:<br />
Displays not supporting CD Text:<br />
Playlist number/Album & Title number “ elapsed Playtime “ Playlist/Album number &<br />
Title number.<br />
Displays supporting CD Text:<br />
Playlist/Album number & Title number “ elapsed Playtime “ Playlist/Album name “ Title name<br />
“ Playlist/Album number & Title number.<br />
A<br />
<strong>USB</strong> & <strong>iPod</strong> ® integration <strong>kit</strong> 27
When long pressing [DISP]/[[TEXT] you can switch to additional information in the same page.<br />
A beep sound is emitted. 5 sec after leaving the button untouched, the display will return to its<br />
original condition.<br />
Displays with Touch Screen<br />
When pressing [TEXT] you can switch between pages with different type of information.<br />
When pressing [CHANGE DISCS] you can switch to the page with direct select keys for Playlists/<br />
Albums.<br />
(Display layout or features might change depending on<br />
head unit <strong>mode</strong>l. Check the vehicle manual for details.)<br />
28 <strong>USB</strong> & <strong>iPod</strong> ® integration <strong>kit</strong> A
When pressing [SELECT] next to the Track name you can switch to the page with direct select keys<br />
for Titles. Use the left side up and down buttons on the display to scroll within the list.<br />
The displayed music Titles can be selected directly by pushing the indicated area of the display.<br />
(Display layout or features might change depending on<br />
head unit <strong>mode</strong>l. Check the vehicle manual for details.)<br />
Display Limitiations<br />
Due to limitations on the display, the Playlists/Albums are separated into pages and numbered by<br />
module 6 from 1 to 6. The indication of numbers 7 and onwards cannot be displayed on the head<br />
unit, therefore the numbering of next Playlists/Albums will restart from 1 to 6. The Playlist/Album<br />
name, however, will indicate the actual Playlist/Album.<br />
7.15. Scan<br />
Allthough [SCN] buttons might appear, this function is not available for <strong>iPod</strong>.<br />
A<br />
<strong>USB</strong> & <strong>iPod</strong> ® integration <strong>kit</strong> 29
8. Steering Wheel Remote Control<br />
8.1. Mode Selection<br />
Each time the [MODE] button is pressed the audio unit changes to FM-AM-CD <strong>mode</strong>s as follows:<br />
FM1 “ FM2 “ FM3 “ CD/DVD “ <strong>USB</strong>/iPOD “ Bluetooth “ AUX “ AM “ DAB “ FM1<br />
8.2. Volume<br />
Press or turn [VOL +] to increase the volume.<br />
Press or turn [VOL -] to decrease the volume.<br />
8.3. File/Title Switching<br />
Press button [^] to switch to the next File/Title.<br />
Press [v] to switch to the beginning of the current File/Title; press again to switch to the previous<br />
File/Title.<br />
8.4. Folder/Playlist/Album Switching<br />
Long press button [^] to switch to the next Folder/Playlist/Album.<br />
Press [v] to switch to the previous Folder/Playlist/Album.<br />
ó Note: In case of <strong>iPod</strong>, first the Playlist or Album sorting needs to be selected on the Head<br />
Unit.<br />
30 <strong>USB</strong> & <strong>iPod</strong> ® integration <strong>kit</strong> A
9. Troubleshooting<br />
If you suspect something is wrong, check the points described below.<br />
Problem<br />
Titles are not shown.<br />
SCAN button does not<br />
respond.<br />
Some songs cannot be<br />
found.<br />
<strong>USB</strong> mass storage device/<br />
<strong>iPod</strong> doesn’t operate<br />
correctly.<br />
<strong>USB</strong> mass storage<br />
device/<strong>iPod</strong> does not<br />
operate correctly after<br />
reconnecting.<br />
Possible solution/explanation<br />
Press TEXT.<br />
Check with your authorized retailer if your radio unit supports<br />
CD-text on external CD-changer.<br />
SCAN function is only available for <strong>USB</strong> mass storage devices,<br />
it does not work on <strong>iPod</strong>, although the SCN button might be<br />
displayed.<br />
In the case of <strong>USB</strong> mass storage devices it is necessary to follow<br />
the instructions described in the ‘Folder Sorting’ section.<br />
Some MP3 devices may store the songs in their specific<br />
formats or not in the mass storage volume. Please check with<br />
the manufacturer.<br />
The integration <strong>kit</strong> only supports MP3 and WMA Files.<br />
In the case of <strong>iPod</strong>, we recommend that you organise its content<br />
into Playlists using iTunes. All songs are anyway in Playlist 1.<br />
Disconnect the cable from the <strong>USB</strong>/AUX Jack. Once <strong>USB</strong> mass<br />
storage device/<strong>iPod</strong> main menu is displayed, connect the cable<br />
again. (see Resetting section).<br />
Check specification for compatibility<br />
<strong>USB</strong> mass storage device/<strong>iPod</strong> has not detected the disconnection.<br />
Reset the <strong>USB</strong> mass storage device/<strong>iPod</strong> (see their manual).<br />
Due to the specificity of card readers hardware and<br />
implementation, we cannot fully guarantee the compatibility with<br />
all these devices. Same feature is applicable to other electronic<br />
devices using external memories.<br />
Check specification for compatibility<br />
In the case of <strong>iPod</strong>, be sure that you are using the latest iTunes version and <strong>iPod</strong> is uploaded with<br />
the latest firmware from Apple webpage.<br />
If the suggestions described do not solve the problem, it is recommended that you take the car to<br />
your nearest authorised retailer.<br />
For any question related to the <strong>USB</strong> mass storage device or <strong>iPod</strong> itself, please refer to its user<br />
manual or to the manufacturer’s webpage.<br />
A<br />
<strong>USB</strong> & <strong>iPod</strong> ® integration <strong>kit</strong> 31
10. Resetting<br />
Under special conditions software glitches may occasionally occur and your <strong>USB</strong> mass storage<br />
device or <strong>iPod</strong> may lock up. There are several steps to reset the Integration <strong>kit</strong> and Media Devices<br />
without affecting their contents and settings:<br />
Switch the radio OFF/ON.<br />
If the problem is not solved:<br />
Disconnect and reconnect <strong>USB</strong> mass storage device/<strong>iPod</strong> from the <strong>USB</strong>/AUX jack. Check that the<br />
plug is in perfect condition.<br />
If the problem is not solved, disconnect the <strong>USB</strong> mass storage device/<strong>iPod</strong> and:<br />
Turn the ignition key to OFF during one minute and switch again to on. Reconnect the <strong>iPod</strong>.<br />
If the problem is not solved, disconnect <strong>USB</strong> mass storage device/<strong>iPod</strong>, turn ignition to OFF and<br />
Reset your <strong>USB</strong> mass storage device/<strong>iPod</strong>. (Refer to their user manual).<br />
32 <strong>USB</strong> & <strong>iPod</strong> ® integration <strong>kit</strong> A
11. Specifications<br />
<strong>USB</strong> & <strong>iPod</strong> Integration <strong>kit</strong> ECU:<br />
Power supply: DC 13.2 V (10.5 V - 16 V)<br />
Max. current consumption:<br />
Max. standby current:<br />
Dimensions ECU:<br />
Weight ECU:<br />
Max. Audio output:<br />
Max. Audio output impedance:<br />
11.1. <strong>USB</strong><br />
< 1 A<br />
< 1 mA<br />
125.5 mm (W) x 37.5 mm (H) x 117.5 mm (D)<br />
0.36 kg<br />
2 VRMS<br />
220 Ohms<br />
<strong>USB</strong> spec: <strong>USB</strong> 2.0 FS (12 MBPS), Mass Storage class (BOT method)<br />
(*in case of doubts contact your retailer or device manufacturer to check compliance with <strong>USB</strong><br />
storage mass class)<br />
Max current supply: 5<strong>00</strong> mA (*Most external hard drives consumption is over this value)<br />
Number of File and Folder:<br />
• Total number of Folders in device: MAX 999<br />
• Total number of Files in device: MAX 65,025<br />
• Total number of Files in a Folder: MAX 255<br />
• Levels of Folder: 8 Levels<br />
MP3<br />
• MPEG1 AUDIO LAYER II, III (VBR is supported.)<br />
Bit rate: 32 - 320 kbps s<strong>amp</strong>ling frequency: 44.1/48/32 kHz<br />
• MPEG2 AUDIO LAYER II, III (VBR is supported.)<br />
Bit rate: 32 - 160 kbps s<strong>amp</strong>ling frequency: 22.05/24/16 kHz<br />
• MPEG 2.5 (VBR is supported.)<br />
Bit rate: 32 - 160 kbps s<strong>amp</strong>ling frequency:11.025/12/8 kHz<br />
WMA<br />
• Ver9 (standard, VBR) HIGH PROFILE<br />
Bit rate: 32 - 320 kbps, s<strong>amp</strong>ling freq: 44.1 k/48 k/32 kHz<br />
• Device charging is supported up to max current supply<br />
A<br />
<strong>USB</strong> & <strong>iPod</strong> ® integration <strong>kit</strong> 33
11.2. <strong>iPod</strong>/iPhone<br />
Supported <strong>iPod</strong>/iPhone:<br />
• Nano (as from firmware Version 1.021.01)<br />
• Nano G2 (as from firmware Version 1.02)<br />
• Generation 5 (as from firmware Version 1.021.01)<br />
• iPhone (as from firmware Version 1.021.01)<br />
Firmware version 1.<strong>00</strong> or older are not compatible.<br />
Number of track and list<br />
• Total number of lists in device: MAX 9,999<br />
• Total number of tracks in device: MAX 65,535<br />
• Total number of tracks in list: MAX 65,535<br />
PODCAST and PODBOOKS supported<br />
Playlists, Album, Songs supported (artist and genre are not supported)<br />
Device charging is supported<br />
Sales agency: <strong>Toyota</strong> Motor Europe N.V./S.A.<br />
After-sales service: <strong>Toyota</strong> Motor Europe N.V./S.A.<br />
Manufacturer: Panasonic Automotive Systems Europe GmbH.<br />
34 <strong>USB</strong> & <strong>iPod</strong> ® integration <strong>kit</strong> A
Table des matières<br />
1. Introduction......................................................................................................... 39<br />
2. Informations de sécurité...................................................................................... 40<br />
2.1. Symboles de sécurité................................................................................................ 40<br />
2.2. Attention.................................................................................................................. 41<br />
3. Immunité.............................................................................................................. 43<br />
4. Informations importantes................................................................................... 44<br />
5. Présentation rapide des fonctions....................................................................... 45<br />
6. Instructions d’utilisation du périphérique de stockage de masse <strong>USB</strong>............... 46<br />
6.1. Illustration de la radio............................................................................................... 46<br />
6.2. Raccordement.......................................................................................................... 46<br />
6.3. Mise sous/hors tension............................................................................................. 47<br />
6.4. Augmentation/diminution du volume...................................................................... 47<br />
6.5. Sélection du <strong>mode</strong> <strong>USB</strong>............................................................................................ 47<br />
6.6. Egalisateur en <strong>mode</strong> <strong>USB</strong>.......................................................................................... 47<br />
6.7. Tri <strong>USB</strong> .................................................................................................................... 48<br />
6.8. Sélection de Dossier................................................................................................. 49<br />
6.9. Sélection de Fichier.................................................................................................. 50<br />
6.10. Recherche dans un Fichier........................................................................................ 50<br />
6.11. Répétition de Fichier................................................................................................. 50<br />
6.12. Répétition de Dossier............................................................................................... 51<br />
6.13. Lecture aléatoire ...................................................................................................... 51<br />
6.14. Balayage.................................................................................................................. 51<br />
6.15. Affichage des données ............................................................................................ 52<br />
7. Instructions d’utilisation de l’<strong>iPod</strong>...................................................................... 55<br />
7.1. Illustration de la radio............................................................................................... 55<br />
7.2. Raccordement.......................................................................................................... 55<br />
7.3. Mise sous/hors tension............................................................................................. 56<br />
7.4. Augmentation/diminution du volume...................................................................... 56<br />
7.5. Sélection du <strong>mode</strong> <strong>iPod</strong>........................................................................................... 56<br />
7.6. Egalisateur en <strong>mode</strong> <strong>iPod</strong>......................................................................................... 56<br />
7.7. Tri de l’<strong>iPod</strong>.............................................................................................................. 57<br />
7.8. Concept des listes de lecture.................................................................................... 57<br />
7.9. Sélection de liste de lecture/album........................................................................... 58<br />
7.10. Sélection de titre...................................................................................................... 59<br />
7.11. Recherche dans le titre............................................................................................. 59<br />
B<br />
<strong>USB</strong> & <strong>iPod</strong> ® integration <strong>kit</strong> 35
7.12. Répétition de titre.................................................................................................... 59<br />
7.13. Lecture aléatoire ...................................................................................................... 60<br />
7.14. Affichage des données ............................................................................................ 60<br />
7.15. Balayage.................................................................................................................. 62<br />
8. Télécommande au volant..................................................................................... 63<br />
8.1. Sélection du <strong>mode</strong>................................................................................................... 63<br />
8.2. Volume.................................................................................................................... 63<br />
8.3. Basculement entre les fichiers/titres.......................................................................... 63<br />
8.4. Basculement entre les dossiers/listes de lecture/albums............................................ 63<br />
9. Dépannage........................................................................................................... 64<br />
10. Réinitialisation .................................................................................................... 66<br />
11. Caractéristiques................................................................................................... 67<br />
11.1. <strong>USB</strong> ......................................................................................................................... 67<br />
11.2. <strong>iPod</strong>/iPhone............................................................................................................. 68<br />
36 <strong>USB</strong> & <strong>iPod</strong> ® integration <strong>kit</strong> B
Recommandation<br />
Pour profiter pleinement du système, lisez attentivement ce manuel.<br />
Il est conseillé de conserver ce manuel dans le véhicule afin de trouver aisément les informations<br />
nécessaires en cas d’urgence.<br />
Votre revendeur agréé local sera prêt à répondre à toute question relative au système d’alarme<br />
ou à son utilisation si vous ne trouvez pas les informations dont vous avez besoin dans ce<br />
manuel ou au chapitre « Dépannage ».<br />
<strong>Toyota</strong> recommande d’utiliser exclusivement des pièces et accessoires qui ont été testés et agréés<br />
par <strong>Toyota</strong> au niveau de leur sécurité, de leurs fonctions et de leur adéquation à l’usage prévu.<br />
Ce <strong>mode</strong> d’emploi est conçu pour vous permettre d’utiliser le <strong>kit</strong> d’intégration <strong>USB</strong> et <strong>iPod</strong> ®<br />
aisément et en toute sécurité.<br />
Il décrit les fonctions du <strong>kit</strong> d’intégration <strong>USB</strong> et <strong>iPod</strong> ® .<br />
ù<br />
B<br />
<strong>USB</strong> & <strong>iPod</strong> ® integration <strong>kit</strong> 37
38 <strong>USB</strong> & <strong>iPod</strong> ® integration <strong>kit</strong> B
1. Introduction<br />
Nous vous remercions d’avoir acheté notre produit.<br />
Pour une utilisation adéquate du produit, veuillez lire attentivement les présentes instructions.<br />
N’oubliez pas de lire les « Informations de sécurité » (page 40) avant toute utilisation.<br />
Ce Mode d’emploi doit être conservé pour toute référence ultérieure.<br />
B<br />
<strong>USB</strong> & <strong>iPod</strong> ® integration <strong>kit</strong> 39
2. Informations de sécurité<br />
• Lisez attentivement les manuels d’instruction de l’appareil et des autres éléments de<br />
votre système audio avant de l’utiliser. Ils contiennent des instructions utiles pour utiliser<br />
efficacement le système en toute sécurité. <strong>Toyota</strong> Motor Europe NV/SA décline toute<br />
responsabilité en cas de problème résultant de la non-observation des instructions données<br />
dans ce manuel.<br />
• Le présent manuel utilise des pictogrammes pour vous montrer comment utiliser le produit en<br />
toute sécurité et pour vous avertir des dangers potentiels résultant de connexions et opérations<br />
inadéquates. La signification des pictogrammes est expliquée ci-dessous. Il est important que<br />
vous compreniez parfaitement la signification des pictogrammes afin d’utiliser correctement ce<br />
manuel ainsi que le système.<br />
2.1. Symboles de sécurité<br />
m<br />
Avertissement<br />
: Quand ce symbole précède un texte, respectez les recommandations<br />
qu’il contient pour éviter d’endommager irrémédiablement votre véhicule, système<br />
ou appareils raccordés, voire éviter des accidents occasionnant des blessures graves ou<br />
mortelles.<br />
ò<br />
Attention : Quand ce symbole précède un texte, respectez les recommandations qu’il<br />
contient et faites preuve de prudence pour éviter d’endommager votre véhicule, votre<br />
système ou les appareils raccordés, voire de provoquer des blessures.<br />
Mise au rebut : La présence de ce symbole devant un texte recommande ou prévient que<br />
vous devez respecter la réglementation en vigueur sur la mise au rebut des appareils<br />
électriques.<br />
ó Remarque : Signale la présence d’une simple recommandation destinée à vous faciliter la<br />
tâche ou à optimiser le fonctionnement de votre système.<br />
40 <strong>USB</strong> & <strong>iPod</strong> ® integration <strong>kit</strong> B
2.2. Attention<br />
m<br />
Lors de l’utilisation de cet appareil, respectez la mise en garde ci-dessous !<br />
• Lorsqu’il conduit, le conducteur ne doit jamais regarder l’écran ou manipuler<br />
le système.<br />
Regarder l’écran ou manipuler le système distrait le conducteur qui ne regarde pas devant lui<br />
et risque de provoquer un accident. Arrêtez toujours le véhicule dans un endroit sûr et utilisez<br />
le frein à main avant de regarder l’écran ou de manipuler le système. Il risque de provoquer des<br />
problèmes.<br />
• Vous ne devez ni démonter, ni modifier l’appareil.<br />
Ne démontez pas l’appareil, ne le modifiez pas et ne tentez pas de le réparer vous-même.<br />
Si le produit doit être réparé, consultez votre Revendeur Agréé.<br />
• N’utilisez pas l’appareil lorsqu’il est hors d’usage.<br />
Si l’appareil est hors d’usage (pas d’alimentation, pas de son) ou s’il n’est pas dans son état<br />
normal (contient des corps étrangers, a été exposé à l’eau, émet de la fumée ou une odeur),<br />
mettez-le immédiatement hors tension et consultez votre Revendeur Agréé.<br />
• Veuillez consulter votre revendeur agréé pour le remplacement d’un fusible.<br />
Si le fusible saute, retirez-le et faites-le remplacer par un fusible prévu pour cet appareil par un<br />
technicien qualifié. Un placement incorrect du fusible risque de provoquer de la fumée ou un<br />
incendie et d’endommager le produit.<br />
Lors de l’utilisation de cet appareil, respectez les précautions suivantes !<br />
• Maintenez le volume du son à un niveau approprié.<br />
Maintenez le volume à un niveau suffisamment faible pour vous rendre compte de l’état des<br />
routes et de la circulation lorsque vous conduisez.<br />
• N’utilisez pas cet adaptateur dans d’autres véhicules ou en dehors de votre<br />
voiture.<br />
Si vous n’observez pas cette précaution, cela risque de provoquer de la fumée, un incendie,<br />
l’électrocution, des blessures ou d’autres problèmes.<br />
• N’utilisez pas l’appareil pendant une durée prolongée lorsque le moteur est<br />
coupé.<br />
Cela risquerait de mettre la batterie à plat.<br />
• N’exposez ni l’adaptateur, ni le périphérique de stockage de masse <strong>USB</strong>/<strong>iPod</strong> à<br />
la lumière directe du soleil ou à une chaleur excessive.<br />
Toute augmentation de la température intérieure des appareils risque de provoquer de<br />
la fumée, un incendie ou d’autres dégâts aux appareils.<br />
B<br />
<strong>USB</strong> & <strong>iPod</strong> ® integration <strong>kit</strong> 41
• N’utilisez pas le produit dans un endroit où il est exposé à l’eau, à l’humidité ou à<br />
la poussière.<br />
Exposer l’adaptateur, le périphérique de stockage de masse <strong>USB</strong> ou le lecteur <strong>iPod</strong> à de l’eau,<br />
de l’humidité ou de la poussière risque de provoquer de la fumée, un incendie ou d’autres<br />
dégâts aux appareils.<br />
Veillez particulièrement à ce que l’appareil ne soit pas mouillé lors du lavage de la voiture ou<br />
par temps de pluie.<br />
• Installation : Avant d’installer ou de compléter le système vous-même, lisez attentivement les<br />
instructions d’installation.<br />
• Fixez fermement le périphérique de stockage de masse <strong>USB</strong>/lecteur <strong>iPod</strong> lorsque<br />
vous utilisez l’appareil.<br />
Ne laissez pas tomber le périphérique de stockage de masse <strong>USB</strong>/lecteur <strong>iPod</strong> sur le sol, car il<br />
risque d’être bloqué sous les pédales de frein ou d’accélérateur.<br />
• Pour plus d’informations sur les périphériques de stockage de masse <strong>USB</strong> ou les<br />
lecteurs <strong>iPod</strong>, consultez leur <strong>mode</strong> d’emploi respectif.<br />
42 <strong>USB</strong> & <strong>iPod</strong> ® integration <strong>kit</strong> B
3. Immunité<br />
• En cas de dommage causé par le feu, un tremblement de terre, l’action de tiers ou d’autres<br />
accidents, ou en cas de mauvaise utilisation intentionnelle ou accidentelle, d’utilisation<br />
incorrecte ou encore d’utilisation dans des conditions anormales, la réparation du produit est<br />
en principe à charge de l’utilisateur.<br />
• <strong>Toyota</strong> Motor Europe NV/SA n’est pas responsable des pertes indirectes résultant de l’utilisation<br />
ou de la non-utilisation de ce produit, par exemple des pertes de bénéfices ou encore des<br />
modifications ou pertes de données en mémoire.<br />
• <strong>Toyota</strong> Motor Europe NV/SA décline toute responsabilité en cas de perte de données se<br />
trouvant sur le périphérique de stockage de masse ou l’<strong>iPod</strong>, même si celles-ci ont été perdues<br />
durant l’utilisation de l’appareil.<br />
B<br />
<strong>USB</strong> & <strong>iPod</strong> ® integration <strong>kit</strong> 43
4. Informations importantes<br />
Cet appareil est conçu pour contrôler et écouter des Fichiers (Files) audio sur des périphériques de<br />
stockage de masse <strong>USB</strong> ou sur un <strong>iPod</strong> grâce à une unité principale originale.<br />
• <strong>iPod</strong> est une marque de Apple Inc., déposée aux Etats-Unis et dans d’autres pays.<br />
• Le fonctionnement peut varier en fonction de la version logicielle du périphérique de stockage<br />
de masse <strong>USB</strong> et de l’<strong>iPod</strong>.<br />
• Le fonctionnement peut varier en fonction de l’unité principale à laquelle il est connecté.<br />
• Contactez votre revendeur agréé pour savoir si votre unité principale est compatible avec le <strong>kit</strong><br />
d’intégration <strong>USB</strong> & <strong>iPod</strong>.<br />
44 <strong>USB</strong> & <strong>iPod</strong> ® integration <strong>kit</strong> B
5. Présentation rapide des fonctions<br />
Touche<br />
TRACK UP/<br />
DOWN<br />
DISC UP/<br />
DOWN<br />
RPT<br />
RND<br />
SCN<br />
TEXT/<br />
DISP<br />
CHANGE DISCS<br />
SELECT<br />
Action<br />
Appui bref<br />
Périphérique de<br />
stockage de masse <strong>USB</strong><br />
Fichier suivant/précédent<br />
(File next/previous)<br />
<strong>iPod</strong><br />
Titre suivant/précédent<br />
(Title next/previous)<br />
Appui long Avance/recul rapide Avance/recul rapide<br />
Appui bref Dossier suivant/précédent Liste de lecture/Album<br />
(Folder next/previous) suivant(e)/précédent(e)<br />
(Playlist/Album next/<br />
previous)<br />
Appui bref Répétition de Fichier Répétition de titre<br />
Appui long Répétition de Dossier Activation du tri de<br />
l’album<br />
Appui bref<br />
Appui long<br />
Appui bref<br />
Appui long<br />
Appui bref<br />
Appui long<br />
Appui bref<br />
Appui bref<br />
Lecture aléatoire dans le<br />
Dossier en cours<br />
Lecture aléatoire toute la<br />
mémoire <strong>USB</strong><br />
Balayage des 10 premières<br />
secondes des Fichiers du<br />
Dossier en cours<br />
Balayage des 10 premières<br />
secondes du premier<br />
Fichier de chaque Dossier<br />
Basculement vers la page<br />
d’affichage suivante<br />
Basculement vers les<br />
chiffres suivants des<br />
données affichées<br />
Ouverture de page avec<br />
les touches de sélection<br />
directe de Dossier<br />
Ouverture de page avec<br />
les touches de sélection<br />
directe de Fichier<br />
Lecture aléatoire dans la<br />
liste de lecture/l’album en<br />
cours<br />
Lecture aléatoire toute la<br />
mémoire de l’<strong>iPod</strong><br />
Non disponible<br />
Non disponible<br />
Basculement vers la page<br />
d’affichage suivante<br />
Basculement vers les<br />
chiffres suivants des<br />
données affichées<br />
Ouverture de page avec<br />
les touches de sélection<br />
directe de liste de lecture/<br />
album<br />
Ouverture de page avec<br />
les touches de sélection<br />
directe de titre<br />
B<br />
<strong>USB</strong> & <strong>iPod</strong> ® integration <strong>kit</strong> 45
6. Instructions d’utilisation du périphérique<br />
de stockage de masse <strong>USB</strong><br />
6.1. Illustration de la radio<br />
Vous trouverez un schéma de la radio comportant des références aux fonctions des touches dans le<br />
guide d’utilisation du véhicule, à la section relative à la fonction audio.<br />
6.2. Raccordement<br />
Raccordement du périphérique de stockage de masse <strong>USB</strong><br />
Les caractéristiques des périphériques de stockage de masse <strong>USB</strong> peuvent varier selon les fabricants.<br />
Les périphériques de stockage de masse <strong>USB</strong> peuvent donc ne pas fonctionner normalement selon<br />
les modifications apportées aux caractéristiques.<br />
Avant de raccorder le périphérique de stockage de masse <strong>USB</strong>, vérifiez s’il répond aux exigences du<br />
<strong>kit</strong> d’intégration <strong>USB</strong> et <strong>iPod</strong> (page 55).<br />
Raccordez le connecteur <strong>USB</strong> à la prise <strong>USB</strong>/AUX située dans la console centrale ou le tableau de bord.<br />
Lorsque le démarreur est réglé sur ACC ou ON, le périphérique de stockage de masse <strong>USB</strong> est<br />
automatiquement activé.<br />
Pendant que le périphérique de stockage de masse <strong>USB</strong> est raccordé à l’appareil, la batterie est<br />
chargée automatiquement.<br />
Lorsque le démarreur est réglé sur OFF, le périphérique de stockage de masse <strong>USB</strong> n’est plus chargé.<br />
Mettez le périphérique de stockage de masse <strong>USB</strong> hors tension manuellement pour éviter de<br />
décharger la batterie.<br />
Le <strong>kit</strong> d’intégration <strong>USB</strong> et <strong>iPod</strong> prend en charge des périphériques de stockage de masse<br />
<strong>USB</strong> conformes à la norme <strong>USB</strong> 2.0 et aux systèmes de Fichiers FAT32 et FAT16 (Windows)<br />
correspondants. Il prend en charge les Fichiers MP3 et WMA.<br />
ó Remarque : Pour plus d’informations sur le périphérique de stockage de masse <strong>USB</strong>,<br />
consultez le manuel qui l’accompagne.<br />
ó Remarque : L’utilisation d’un périphérique de stockage de masse <strong>USB</strong> non pris en charge<br />
peut entraîner un fonctionnement anormal.<br />
46 <strong>USB</strong> & <strong>iPod</strong> ® integration <strong>kit</strong> B
Débranchement des périphériques de stockage de masse <strong>USB</strong><br />
Le périphérique de stockage de masse <strong>USB</strong> peut être débranché de l’appareil à tout moment.<br />
6.3. Mise sous/hors tension<br />
Appuyez sur la touche [PWR-VOL] pour mettre l’appareil sous tension.<br />
Appuyez à nouveau sur la touche [PWR-VOL] pour mettre l’appareil hors tension.<br />
6.4. Augmentation/diminution du volume<br />
Tournez [VOLUME] vers la droite pour augmenter le volume.<br />
Tournez [VOLUME] vers la gauche pour diminuer le volume.<br />
6.5. Sélection du <strong>mode</strong> <strong>USB</strong><br />
Appuyez sur [DISC] sur l’unité principale pour sélectionner le <strong>mode</strong> <strong>USB</strong>.<br />
Chaque fois que vous appuyez sur [DISC], les <strong>mode</strong>s changent comme suit :<br />
CD interne “ CDCH externe (= <strong>USB</strong>) “ CD interne<br />
ó Remarque : Tant que le périphérique de stockage de masse <strong>USB</strong> est raccordé via le <strong>kit</strong><br />
d’intégration de changeur CD externe, la radio indique le <strong>mode</strong> Changeur CD externe.<br />
6.6. Egalisateur en <strong>mode</strong> <strong>USB</strong><br />
Les graves, les aigus, le répartiteur et la balance peuvent être réglés spécialement pour le <strong>mode</strong><br />
<strong>USB</strong>. Lorsque vous basculez du système <strong>USB</strong> vers les <strong>mode</strong>s radio ou CD, les réglages audio sont<br />
adaptés en fonction de chaque <strong>mode</strong>. Les réglages audio de chaque <strong>mode</strong> sont enregistrés dans la<br />
mémoire de l’unité principale et sont appliqués automatiquement lorsqu’un <strong>mode</strong> est sélectionné.<br />
Affichage de la radio avec l’écran tactile<br />
Appuyez sur la touche [AUDIO CONTROL] pour sélectionner l’écran de contrôle Audio.<br />
Autoradio<br />
Appuyez sur le bouton [Tune] pour sélectionner le réglage souhaité. A chaque pression de la<br />
molette de syntonisation, les réglages se succèdent comme suit :<br />
BAS (Graves) “ TRE (Aigus) “ FAD (Répartiteur) “ BAL (Balance)<br />
Une nouvelle de pression de la molette de syntonisation (Tune Dial) vous permet de quitter le<br />
<strong>mode</strong> de réglage du son (Audio Control). Vous pouvez ajuster le réglage sélectionné en tournant le<br />
bouton [Tune] vers la gauche/droite.<br />
ó Remarque : Les paramètres EQ sur le périphérique de stockage de masse <strong>USB</strong> peuvent aussi<br />
affecter le son. Pour régler les paramètres <strong>iPod</strong> EQ, veuillez consulter son <strong>mode</strong> d’emploi.<br />
B<br />
<strong>USB</strong> & <strong>iPod</strong> ® integration <strong>kit</strong> 47
6.7. Tri <strong>USB</strong><br />
Le <strong>kit</strong> d’intégration <strong>USB</strong> et <strong>iPod</strong> peut lire des titres de musique sur le périphérique de stockage de<br />
masse <strong>USB</strong> qui sont classés dans des Dossiers (Folders) et des Fichiers (Files).<br />
Une fois que le périphérique de stockage de masse <strong>USB</strong> est raccordé, tous les Dossiers du<br />
périphérique (Device) sont balayés et un numéro est attribué selon l’ordre dans lequel les Dossiers<br />
ont été stockés sur le périphérique de stockage de masse <strong>USB</strong>. Les Fichiers MP3 et WMA ne sont<br />
pas différenciés et sont donc classés et numérotés séquentiellement.<br />
ó Remarque : Les Dossiers et les Fichiers sont lus selon l’ordre dans lequel ils ont été copiés sur le<br />
périphérique de stockage de masse <strong>USB</strong>. Il se peut que les Dossiers et les Fichiers ne soient PAS<br />
classés alphabétiquement et qu’ils possèdent un ordre différent de celui utilisé sur l’ordinateur.<br />
ó Remarque : Nous vous conseillons de classer préalablement les Dossiers (Folders) et les<br />
Fichiers (Files) via l’ordinateur avant de raccorder le périphérique.<br />
ó Remarque : Nous vous recommandons vivement d’effectuer des copies de sauvegarde de<br />
vos Fichiers/données (Files/Data). <strong>Toyota</strong> Motor Europe NV/SA ne pourra pas être tenu pour<br />
responsable en cas de perte ou d’endommagement des données.<br />
Les Dossiers sont classés selon la logique suivante :<br />
Dossier racine (Root Folder)<br />
C<br />
D<br />
C1.mp3<br />
D1.mp3<br />
C2.mp3<br />
D2.mp3<br />
C3.mp3<br />
D3.mp3<br />
Dossier N<br />
1 (Racine<br />
Dossier)<br />
2 (C)<br />
R1.mp3<br />
R2.mp3<br />
R3.mp3<br />
C1.mp3<br />
C2.mp3<br />
C3.mp3<br />
B<br />
R1.mp3<br />
R2.mp3<br />
R3.mp3<br />
B1.mp3<br />
B2.mp3<br />
B3.mp3<br />
E<br />
A<br />
E1.mp3<br />
E2.mp3<br />
E3.mp3<br />
A1.mp3<br />
A2.mp3<br />
A3.mp3<br />
3 (D)<br />
4 (B)<br />
5 (E)<br />
D1.mp3<br />
D2.mp3<br />
D3.mp3<br />
B1.mp3<br />
B2.mp3<br />
B3.mp3<br />
E1.mp3<br />
E2.mp3<br />
E3.mp3<br />
F<br />
F1.mp3<br />
F2.mp3<br />
F3.mp3<br />
48 <strong>USB</strong> & <strong>iPod</strong> ® integration <strong>kit</strong> B<br />
6 (A)<br />
7 (F)<br />
A1.mp3<br />
A2.mp3<br />
A3.mp3<br />
F1.mp3<br />
F2.mp3<br />
F3.mp3
ó Remarque : Le nom de Dossier et le nom de Fichier apparaîtront sur l’affichage de la radio.<br />
Nous vous conseillons de classer les Dossiers par artiste ou album et les noms de Fichier par<br />
nom de morceau/titre.<br />
6.8. Sélection de Dossier<br />
Sélection directe de Dossier<br />
ó Remarque : Les touches de sélection directe de Dossier (Direct Folder selection) ne sont<br />
disponibles que sur les autoradios équipés d’écrans tactiles.<br />
Appuyez sur [CHANGE DISCS], puis sur une des touches [1] à [6].<br />
(La disposition de l’affichage ou les fonctions peuvent<br />
varier selon le modèle d’unité principale. Pour plus de<br />
détails, consultez le manuel du véhicule.)<br />
Sélection de Dossier Disc up / down<br />
Appuyez sur [DISC ^] pour passer au Dossier suivant (next Folder).<br />
ó Remarque : Une fois le dernier Dossier atteint, un appui supplémentaire vous ramène au<br />
premier Dossier (previous Folder).<br />
Appuyez sur [DISC v] pour passer au Dossier précédent.<br />
B<br />
<strong>USB</strong> & <strong>iPod</strong> ® integration <strong>kit</strong> 49
ó Remarque : Une fois le premier Dossier (Folder) atteint, un appui supplémentaire vous<br />
ramène au dernier Dossier.<br />
ó Remarque : Sur les unités principales AVN, cette fonction n’est disponible que via les<br />
commutateurs au volant. Consultez la section 8.4.<br />
6.9. Sélection de Fichier<br />
Appuyez brièvement sur [TRACK ^] pour passer au Fichier (File) suivant.<br />
ó Remarque : Une fois la dernière plage atteinte, vous passez à la première plage du Dossier<br />
suivant, sauf si la lecture aléatoire (Random) et/ou répétitive (Repeat) est activée. (Notez que<br />
ce comportement diffère de l’<strong>iPod</strong>.)<br />
Appuyez brièvement sur [TRACK v] pour passer au début du titre en cours ; appuyez à nouveau<br />
pour passer au titre précédent.<br />
ó Remarque : Si vous appuyez à nouveau sur cette touche après avoir atteint le premier titre<br />
d’un Dossier, vous passez au début de la dernière plage du Dossier précédent, sauf si la lecture<br />
aléatoire et/ou répétitive est activée. (Notez que ce comportement diffère de l’<strong>iPod</strong>.)<br />
ó Remarque : Un Dossier peut contenir un nombre illimité de Fichiers.<br />
ó Remarque : Les Fichiers d’un Dossier sont numérotés de 1 à 99, pour des raisons de limite<br />
d’affichage. Si le numéro de la plage (Track) est supérieur à 99, la numérotation reprend à<br />
la plage 1.<br />
6.10. Recherche dans un Fichier<br />
Appuyez longtemps sur [TRACK v] pour revenir en arrière dans le Fichier (File) en cours.<br />
Lorsque le début du Fichier est atteint, la lecture démarre depuis le début.<br />
Appuyez longtemps sur [TRACK ^] pour avancer rapidement dans le Fichier actuel.<br />
Lorsque la fin du Fichier est atteinte, la lecture du Fichier de musique suivant commence.<br />
6.11. Répétition de Fichier<br />
Appuyez brièvement sur [RPT] pour activer la fonction de répétition. Le Fichier actuellement<br />
sélectionné est alors répété en permanence. L’indication (RPT) s’affiche à l’écran.<br />
Pour désactiver la fonction de répétition, appuyez à nouveau sur [RPT] ou sélectionnez un autre<br />
Fichier de musique en appuyant sur [TRACK ^] ou [TRACK v].<br />
50 <strong>USB</strong> & <strong>iPod</strong> ® integration <strong>kit</strong> B
6.12. Répétition de Dossier<br />
Appuyez longtemps sur [RPT] pour activer la fonction de répétition de Dossier (Folder repeat<br />
function). Le Dossier actuellement sélectionné est alors répété en permanence. L’indication (D_RPT)<br />
s’affiche à l’écran.<br />
Pour désactiver la fonction de répétition, appuyez à nouveau sur [RPT] ou sélectionnez un autre<br />
Dossier en appuyant sur [DISC ^] ou [DISC v].<br />
6.13. Lecture aléatoire<br />
Lecture aléatoire (Random Play) d’un Dossier<br />
Appuyez brièvement sur [RAND] pour activer la lecture aléatoire de tous les Fichiers (Files) de<br />
musique du Dossier (Folder) sélectionné.<br />
Pour désactiver la fonction de lecture aléatoire, appuyez à nouveau brièvement sur [RAND].<br />
Si vous appuyez sur [TRACK ^] durant la lecture aléatoire, la lecture du prochain Fichier sélectionné<br />
de façon aléatoire débute. Si vous appuyez sur [TRACK v] durant la lecture aléatoire, le Fichier lu<br />
précédemment est à nouveau lu.<br />
ó Remarque : Si la fonction de répétition de Dossier n’est pas activée durant la lecture aléatoire,<br />
le Dossier suivant est lu de façon aléatoire lorsque tous les Fichiers du Dossier en cours ont été<br />
lus.<br />
Lecture aléatoire de toute la mémoire <strong>USB</strong><br />
Appuyez longtemps sur [RAND] pour activer la lecture aléatoire de tous les Fichiers de musique<br />
stockés sur le périphérique de stockage de masse <strong>USB</strong>.<br />
Pour désactiver la fonction de lecture aléatoire, appuyez à nouveau brièvement sur [RAND].<br />
Si vous appuyez sur [TRACK ^] durant la lecture aléatoire, la lecture du prochain Fichier sélectionné<br />
de façon aléatoire débute. Si vous appuyez sur [TRACK v] durant la lecture aléatoire, le Fichier lu<br />
précédemment est à nouveau lu.<br />
Si vous appuyez sur [DISC^]/[DISC v] durant la lecture aléatoire, cette fonction est désactivée.<br />
6.14. Balayage<br />
Balayage des Fichiers (Scan Files) d’un Dossier<br />
Appuyez brièvement sur [SCAN] pour activer le balayage de tous les Fichiers du Dossier<br />
sélectionné. Tous les Fichiers de musique sont lus pendant 10 secondes. Lorsque tous les Fichiers<br />
du Dossier ont été balayés, la fonction de balayage s’arrête et la lecture du premier Fichier balayé<br />
débute.<br />
Pour désactiver la fonction de balayage, appuyez à nouveau brièvement sur [SCAN]. La lecture du<br />
Fichier actuellement balayé se poursuit.<br />
B<br />
<strong>USB</strong> & <strong>iPod</strong> ® integration <strong>kit</strong> 51
Balayage de Dossiers (Scan Folders)<br />
Appuyez longtemps sur [SCAN] pour activer le balayage de tous les Dossiers. Le premier Fichier de<br />
musique de chaque Dossier est lu pendant 10 secondes.<br />
Lorsque tous les Dossiers ont été balayés, la fonction de balayage s’arrête et la lecture du premier<br />
Fichier balayé débute.<br />
Pour désactiver la fonction de balayage des Dossiers (Folder Scan function), appuyez à nouveau sur<br />
[SCAN] ; la lecture du Dossier actuellement balayé se poursuit.<br />
ó Remarque : La fonction de balayage n’est pas disponible avec l’<strong>iPod</strong>.<br />
6.15. Affichage des données<br />
Si vous appuyez brièvement sur [DISP]/[[TEXT], vous pouvez basculer entre des pages comportant<br />
différents types d’informations qui sont affichées dans un certain ordre en fonction du type d’affichage.<br />
Affichages ne prenant pas en charge CD Text :<br />
Numéro de Dossier & Numéro de Fichier “ Temps de lecture écoulé (elapsed Playtime) “ Numéro<br />
de Dossier & Numéro de Fichier (Folder number & File number).<br />
Affichages prenant en charge CD Text :<br />
Numéro de Dossier & Numéro de Fichier “ Temps de lecture écoulé “ Nom de Dossier “ Nom<br />
de Fichier “ Numéro de Dossier & Numéro de Fichier.<br />
Si vous appuyez longtemps sur [DISP]/[[TEXT], vous pouvez basculer vers des informations<br />
supplémentaires dans la même page.<br />
Un bip retentit. Lorsque la touche demeure inactive pendant 5 sec, l’écran retrouve son apparence<br />
originale.<br />
Affichages avec écran tactile<br />
En appuyant sur [TEXT], vous pouvez basculer entre des pages comportant différents types<br />
d’informations.<br />
En appuyant sur [CHANGE DISCS], vous pouvez basculer vers la page des touches de sélection<br />
directe de Dossier (Folder).<br />
52 <strong>USB</strong> & <strong>iPod</strong> ® integration <strong>kit</strong> B
(La disposition de l’affichage ou les fonctions peuvent<br />
varier selon le modèle d’unité principale. Pour plus de<br />
détails, consultez le manuel du véhicule.)<br />
En appuyant sur [SELECT] à côté du nom de la plage (Track name), vous pouvez basculer vers la<br />
page des touches de sélection directe de Fichier. Utilisez les touches latérales gauche vers le haut et<br />
le bas de l’écran pour parcourir la liste.<br />
Les Fichiers (Files) de musique affichés peuvent être sélectionnés directement en appuyant sur la<br />
zone indiquée de l’écran.<br />
(La disposition de l’affichage ou les fonctions peuvent<br />
varier selon le modèle d’unité principale. Pour plus de<br />
détails, consultez le manuel du véhicule.)<br />
B<br />
<strong>USB</strong> & <strong>iPod</strong> ® integration <strong>kit</strong> 53
Limites de l’affichage (Limitations)<br />
En raison des restrictions de l’écran, les Dossiers sont divisés en pages et numérotés par module de<br />
1 à 6. Les chiffres 7 et suivants ne peuvent pas être affichés sur l’unité principale, par conséquent<br />
la numérotation des Dossiers suivants reprend de 1 à 6. Toutefois, le nom du Dossier indique le<br />
Dossier en cours.<br />
Similairement, les Fichiers sont numérotés par module jusqu’à 99. Cela signifie que les 99 premiers<br />
Fichiers sont numérotés de 1 à 99, puis le Fichier 1<strong>00</strong> recommence à 1.<br />
54 <strong>USB</strong> & <strong>iPod</strong> ® integration <strong>kit</strong> B
7. Instructions d’utilisation de l’<strong>iPod</strong><br />
7.1. Illustration de la radio<br />
Vous trouverez un schéma de la radio comportant des références aux fonctions des touches dans le<br />
guide d’utilisation du véhicule, à la section relative à la fonction audio.<br />
7.2. Raccordement<br />
Connexion de l’<strong>iPod</strong><br />
Raccordez l’<strong>iPod</strong> via le câble de conversion <strong>USB</strong> dédié au connecteur <strong>USB</strong> de la prise <strong>USB</strong>/AUX<br />
située dans la console centrale ou le tableau de bord.<br />
Lorsque le démarreur est réglé sur ACC ou ON, l’<strong>iPod</strong> est automatiquement activé. Un repère<br />
apparaît sur l’<strong>iPod</strong> pour indiquer qu’il est prêt à être utilisé.<br />
Lorsque l’<strong>iPod</strong> est connecté à cet appareil, l’<strong>iPod</strong> lui-même ne peut pas être activé ou désactivé ; la<br />
batterie de l’<strong>iPod</strong> sera chargée automatiquement.<br />
Lorsque l’<strong>iPod</strong> est connecté durant la lecture, le morceau est interrompu.<br />
Lorsque le démarreur est réglé sur OFF, l’<strong>iPod</strong> ne s’éteint pas. Vérifiez le <strong>mode</strong> d’emploi de<br />
l’appareil pour savoir comment activer le <strong>mode</strong> de veille au terme d’une période de non-utilisation.<br />
Lorsque le démarreur est en position OFF, l’<strong>iPod</strong> n’est pas chargé.<br />
Le <strong>kit</strong> d’intégration <strong>USB</strong> et <strong>iPod</strong> correspond à la norme <strong>USB</strong> « <strong>USB</strong> 2.0 FS (12 MBPS) » et<br />
prend donc en charge les modèles d’<strong>iPod</strong> suivants : <strong>iPod</strong> Nano (à partir de la version 1.021.01<br />
ou ultérieure du micrologiciel), <strong>iPod</strong> Nano G2 (à partir de la version1.02 ou ultérieure du<br />
micrologiciel), <strong>iPod</strong> Generation 5 (à partir de la version 1.021.01 ou ultérieure du micrologiciel).<br />
La version 1.<strong>00</strong> ou antérieure du micrologiciel n’est pas compatible.<br />
ó Remarque : Pour des informations relatives au lecteur <strong>iPod</strong>, veuillez visiter le site Web Apple.<br />
Déconnexion de l’<strong>iPod</strong><br />
L’<strong>iPod</strong> peut être déconnecté de son appareil à tout moment.<br />
B<br />
<strong>USB</strong> & <strong>iPod</strong> ® integration <strong>kit</strong> 55
7.3. Mise sous/hors tension<br />
Appuyez sur la touche [PWR-VOL] pour mettre l’appareil sous tension.<br />
Appuyez à nouveau sur la touche [PWR-VOL] pour mettre l’appareil hors tension.<br />
7.4. Augmentation/diminution du volume<br />
Tournez [VOLUME] vers la droite pour augmenter le volume.<br />
Tournez [VOLUME] vers la gauche pour diminuer le volume.<br />
7.5. Sélection du <strong>mode</strong> <strong>iPod</strong><br />
Appuyez sur [DISC] sur l’unité principale pour sélectionner le <strong>mode</strong> <strong>iPod</strong>. Chaque fois que vous<br />
appuyez sur [DISC], les <strong>mode</strong>s changent comme suit :<br />
CD interne “ CDCH externe (= <strong>iPod</strong>) “ CD interne<br />
ó Remarque : Tant que l’<strong>iPod</strong> (Device) est raccordé via le <strong>kit</strong> d’intégration de changeur CD<br />
externe, la radio indique le <strong>mode</strong> Changeur CD externe.<br />
7.6. Egalisateur en <strong>mode</strong> <strong>iPod</strong><br />
Les graves, les aigus, le répartiteur et la balance (Bass/Treble/Fader/Balance) peuvent être réglés<br />
spécialement pour le <strong>mode</strong> <strong>iPod</strong>. Lorsque vous basculez de l’<strong>iPod</strong> vers les <strong>mode</strong>s radio ou CD, les<br />
paramètres audio sont adaptés en fonction de chaque <strong>mode</strong>.<br />
Les réglages audio de chaque <strong>mode</strong> sont enregistrés dans la mémoire de l’unité principale et sont<br />
appliqués automatiquement lorsqu’un <strong>mode</strong> est sélectionné.<br />
Affichage de la radio avec l’écran tactile<br />
Appuyez sur la touche [AUDIO CONTROL] pour sélectionner l’écran de contrôle Audio.<br />
Radio<br />
Appuyez sur le bouton [Tune] pour sélectionner le réglage souhaité. A chaque pression de la<br />
molette de syntonisation, les réglages se succèdent comme suit : BAS (Graves) “ TRE (Aigus) “<br />
FAD (Répartiteur) “ BAL (Balance).<br />
Une nouvelle de pression de la molette de syntonisation (Tune Dial) vous permet de quitter le<br />
<strong>mode</strong> de réglage du son (Audio Control).<br />
Vous pouvez ajuster le réglage sélectionné en tournant le bouton [Tune] vers la gauche/droite.<br />
ó Remarque : Les paramètres EQ de l’<strong>iPod</strong> affectent également le son. Pour régler les<br />
paramètres EQ de l’<strong>iPod</strong>, veuillez consulter le <strong>mode</strong> d’emploi de l’<strong>iPod</strong>.<br />
56 <strong>USB</strong> & <strong>iPod</strong> ® integration <strong>kit</strong> B
7.7. Tri de l’<strong>iPod</strong><br />
L’adaptateur <strong>iPod</strong> peut également lire des titres (Titles) audio de l’<strong>iPod</strong> organisés en listes de lecture<br />
(Playlists) ou en albums. Le <strong>kit</strong> d’intégration <strong>USB</strong> et <strong>iPod</strong> ne prend pas en charge les fonctions<br />
sélectionnées par artiste ou par genre.<br />
Sélection du tri par liste de lecture ou album<br />
Par défaut, l’<strong>iPod</strong> est trié par listes de lecture (Playlists).<br />
Pour basculer vers le tri par album, appuyez longtemps sur [RPT] jusqu’à ce que (D_RPT) s’affiche.<br />
Appuyez à nouveau sur [RPT] pour revenir au tri par liste de lecture.<br />
ó Remarque : Les Albums sont triés dans le même ordre que sur le lecteur <strong>iPod</strong>.<br />
7.8. Concept des listes de lecture<br />
L’adaptateur <strong>iPod</strong> peut lire des titres audio de l’<strong>iPod</strong> organisés en listes de lecture.<br />
Nous recommandons d’organiser le contenu de l’<strong>iPod</strong> en listes de lecture à l’aide de iTunes.<br />
Les listes de lecture sont similaires et répertoriées dans le même ordre sur l’<strong>iPod</strong> et l’unité<br />
principale, excepté pour la première.<br />
La première liste de lecture peut inclure un contenu différent :<br />
Après connexion de l’<strong>iPod</strong>, la liste de lecture 1 contient la dernière liste de lecture sélectionnée<br />
avant connexion à l’unité principale.<br />
Après la première modification d’une liste de lecture par Disc up, l’appareil affiche de nouveau<br />
la liste de lecture numéro 1 et la première liste de lecture contient tous les titres de musique<br />
de l’<strong>iPod</strong>.<br />
Après le deuxième Disc up, l’appareil passe à la liste de lecture 2.<br />
ó Remarque : Lorsqu’une liste de lecture est vide, le contenu musical de la liste précédente est<br />
transféré vers la liste de lecture vide.<br />
ó Remarque : Lorsque vous passez à une liste de lecture vide, la lecture du morceau en cours<br />
se poursuit.<br />
ó Remarque : Le nombre de listes de lecture est illimité.<br />
B<br />
<strong>USB</strong> & <strong>iPod</strong> ® integration <strong>kit</strong> 57
7.9. Sélection de liste de lecture/album<br />
Sélection directe de liste de lecture/album<br />
ó Remarque : Les touches de sélection directe de liste de lecture/album (Direct Playlist/Album<br />
selection) ne sont disponibles que sur les autoradios équipés d’écrans tactiles.<br />
Appuyez sur [CHANGE DISCS], puis sur une des touches [1] à [6].<br />
(La disposition de l’affichage ou les fonctions peuvent<br />
varier selon le modèle d’unité principale. Pour plus de<br />
détails, consultez le manuel du véhicule.)<br />
Sélection de liste de lecture/album Disc up/down<br />
Triez d’abord par liste de lecture (Playlist) ou par Album.<br />
Appuyez sur [DISC ^] pour passer à la liste de lecture ou à l’album suivant.<br />
ó Remarque : Une fois la dernière liste de lecture ou album atteint, un appui supplémentaire<br />
vous ramène à la première liste ou au premier album.<br />
Appuyez sur [DISC v] pour passer à la liste de lecture ou à l’album précédent.<br />
ó Remarque : Une fois la première liste de lecture ou le premier album atteint, un appui<br />
supplémentaire vous ramène à la dernière liste ou au dernier album.<br />
58 <strong>USB</strong> & <strong>iPod</strong> ® integration <strong>kit</strong> B
ó Remarque : Sur les unités principales AVN, cette fonction n’est disponible que via les<br />
commutateurs au volant.<br />
Consultez la section 8.4.<br />
7.10. Sélection de titre<br />
Appuyez brièvement sur [TRACK ^] pour passer au titre (Title) de musique suivant.<br />
ó Remarque : Une fois la dernière plage atteinte, vous passez à la première plage de la même<br />
liste de lecture ou du même album en appuyant à nouveau sur cette touche.<br />
ó Remarque : Pour passer à la première plage de la liste de lecture suivante, appuyez sur<br />
[DISC ^].<br />
Appuyez brièvement sur [TRACK v] pour passer au début du titre (Title) en cours ; appuyez à<br />
nouveau pour passer au titre précédent.<br />
ó Remarque : Si vous appuyez à nouveau sur cette touche après avoir atteint le premier titre<br />
d’une liste de lecture ou d’un album, vous passez au début de la dernière plage de la même<br />
liste de lecture (Playlist) ou du même Album.<br />
ó Remarque : Pour passer à la liste de lecture précédente, appuyez sur [DISC v].<br />
ó Remarque : Une liste de lecture peut contenir un nombre illimité de titres.<br />
ó Remarque : Les titres de musique d’une liste de lecture sont numérotés de 1 à 99, pour des<br />
raisons de limite d’affichage.<br />
Si le numéro de la plage est supérieur à 99, la numérotation reprend à la plage 1.<br />
7.11. Recherche dans le titre<br />
Appuyez longtemps sur [TRACK v] pour revenir en arrière dans le titre en cours.<br />
Lorsque le début du titre est atteint, la lecture démarre depuis le début du titre.<br />
Appuyez longtemps sur [TRACK ^] pour avancer rapidement dans le titre en cours.<br />
Lorsque la fin du titre est atteinte, la lecture du titre de musique suivant commence.<br />
7.12. Répétition de titre<br />
Appuyez brièvement sur [RPT] pour activer la fonction de répétition. Le titre actuellement<br />
sélectionné est alors répété en permanence. L’indication (RPT) s’affiche à l’écran.<br />
Pour désactiver la fonction de répétition, appuyez à nouveau sur [RPT] ou sélectionnez un autre<br />
titre de musique en appuyant sur [TRACK ^] ou [TRACK v].<br />
B<br />
<strong>USB</strong> & <strong>iPod</strong> ® integration <strong>kit</strong> 59
7.13. Lecture aléatoire<br />
Lecture aléatoire (Random Play) d’une liste de lecture (Playlist)<br />
Appuyez brièvement sur [RAND] pour activer la lecture aléatoire de tous les titres de musique dans<br />
la liste de lecture sélectionnée.<br />
Pour désactiver la fonction de lecture aléatoire, appuyez à nouveau brièvement sur [RAND].<br />
Si vous appuyez sur [TRACK ^] durant la lecture aléatoire, la lecture du prochain titre sélectionné<br />
de façon aléatoire débute. Si vous appuyez sur [TRACK v] durant la lecture aléatoire, le titre lu<br />
précédemment est à nouveau lu.<br />
ó Remarque : Si la lecture aléatoire a été activée sur l’<strong>iPod</strong> avant que celui-ci ne soit connecté,<br />
elle est conservée après connexion. Une lecture aléatoire activée durant la connexion est<br />
également conservée après la déconnexion.<br />
Lecture aléatoire (Random Play) dans un Album<br />
Sélectionnez d’abord le tri d’album en activant (D_RPT), puis appuyez brièvement sur [RAND] pour<br />
activer la lecture aléatoire de tous les titres de musique dans l’album sélectionné.<br />
Lecture aléatoire de tout le contenu de l’<strong>iPod</strong><br />
Appuyez longtemps sur [RAND] pour activer la lecture aléatoire de tous les titres (Titles) de<br />
musique enregistrés sur l’<strong>iPod</strong> (lecture aléatoire de la liste de lecture 1).<br />
Pour désactiver la fonction de lecture aléatoire, appuyez à nouveau brièvement sur [RAND].<br />
Si vous appuyez sur [TRACK ^] durant la lecture aléatoire, la lecture du prochain titre sélectionné<br />
de façon aléatoire débute.<br />
Si vous appuyez sur [TRACK v] durant la lecture aléatoire, le titre de musique lu précédemment est<br />
à nouveau lu.<br />
Si vous appuyez sur [DISC^]/[DISC v] durant la lecture aléatoire, cette fonction est désactivée.<br />
ó Remarque : Si la fonction de lecture aléatoire de disque est activée à partir de la radio, elle<br />
est conservée après le débranchement de l’<strong>iPod</strong>.<br />
7.14. Affichage des données<br />
Si vous appuyez brièvement sur [DISP]/[[TEXT], vous pouvez basculer entre des pages comportant<br />
différents types d’informations qui sont affichées dans un certain ordre en fonction du type<br />
d’affichage :<br />
Affichages ne prenant pas en charge CD Text :<br />
Numéro de liste de lecture/album et numéro de titre “ Temps de lecture écoulé (elapsed Playtime)<br />
“ Liste de lecture/numéro d’album et numéro de titre.<br />
60 <strong>USB</strong> & <strong>iPod</strong> ® integration <strong>kit</strong> B
Affichages prenant en charge CD Text :<br />
Liste de lecture/numéro d’album et numéro de titre “ Temps de lecture écoulé “ Liste de lecture/<br />
nom d’album “ Nom du titre “ Liste de lecture/numéro d’album et numéro de titre.<br />
Si vous appuyez longtemps sur [DISP]/[[TEXT], vous pouvez basculer vers des informations<br />
supplémentaires dans la même page.<br />
Un bip retentit. Lorsque la touche demeure inactive pendant 5 sec, l’écran retrouve son apparence<br />
originale.<br />
Affichages avec écran tactile<br />
En appuyant sur [TEXT], vous pouvez basculer entre des pages comportant différents types<br />
d’informations.<br />
En appuyant sur [CHANGE DISCS], vous pouvez basculer vers la page des touches de sélection<br />
directe de listes de lecture/albums (Playlist/Albums).<br />
(La disposition de l’affichage ou les fonctions peuvent<br />
varier selon le modèle d’unité principale. Pour plus de<br />
détails, consultez le manuel du véhicule.)<br />
B<br />
<strong>USB</strong> & <strong>iPod</strong> ® integration <strong>kit</strong> 61
En appuyant sur [SELECT] à côté du nom de la plage (Track), vous pouvez basculer vers la page des<br />
touches de sélection directe de titre (Titles). Utilisez les touches latérales gauche vers le haut et le<br />
bas de l’écran pour parcourir la liste.<br />
Les titres de musique affichés peuvent être sélectionnés directement en appuyant sur la zone<br />
indiquée de l’écran.<br />
(La disposition de l’affichage ou les fonctions peuvent<br />
varier selon le modèle d’unité principale. Pour plus de<br />
détails, consultez le manuel du véhicule.)<br />
Limites de l’affichage<br />
En raison des restrictions de l’écran, les listes de lecture/albums (Playlists/Albums) sont divisés en<br />
pages et numérotés par module 6 de 1 à 6. Les chiffres 7 et suivants ne peuvent pas être affichés<br />
sur l’unité principale, par conséquent la numérotation des listes de lecture/albums suivants reprend<br />
de 1 à 6. Toutefois, le nom de la liste de lecture/album indique la liste de lecture/album réel.<br />
7.15. Balayage<br />
Bien que les touches [SCN] peuvent apparaître, cette fonction n’est pas disponible pour l’<strong>iPod</strong>.<br />
62 <strong>USB</strong> & <strong>iPod</strong> ® integration <strong>kit</strong> B
8. Télécommande au volant<br />
8.1. Sélection du <strong>mode</strong><br />
Chaque fois que vous appuyez sur la touche [MODE], l’unité audio bascule entre les <strong>mode</strong>s FM-<br />
AM-CD comme suit :<br />
FM1 “ FM2 “ FM3 “ CD/DVD “ <strong>USB</strong>/iPOD “ Bluetooth “ AUX “ AM “ DAB “ FM1<br />
8.2. Volume<br />
Appuyez sur la touche [VOL +] ou faites-la tourner pour augmenter le volume.<br />
Appuyez sur la touche [VOL -] ou faites-la tourner pour diminuer le volume.<br />
8.3. Basculement entre les fichiers/titres<br />
Appuyez sur la touche [^] pour passer au Fichier/titre suivant (File/Title).<br />
Appuyez sur [v] pour passer au début du Fichier/titre en cours ; appuyez à nouveau pour passer au<br />
Fichier/titre précédent.<br />
8.4. Basculement entre les dossiers/listes<br />
de lecture/albums<br />
Appuyez longtemps sur la touche [^] pour passer au Dossier/liste de lecture/album (Folder/Playlist/<br />
Album) suivant.<br />
Appuyez sur [v] pour passer au Dossier/liste de lecture/album précédent.<br />
ó Remarque : Dans le cas de l’<strong>iPod</strong>, vous devez d’abord sélectionner le tri de liste de lecture ou<br />
d’album sur l’unité principale.<br />
B<br />
<strong>USB</strong> & <strong>iPod</strong> ® integration <strong>kit</strong> 63
9. Dépannage<br />
Si vous suspectez quelque chose d’anormal, vérifiez les points décrits ci-dessous.<br />
Problème<br />
Les titres ne sont pas<br />
affichés.<br />
La touche SCAN ne réagit<br />
pas.<br />
Certains morceaux sont<br />
introuvables.<br />
Le périphérique de<br />
stockage de masse <strong>USB</strong>/<br />
l’<strong>iPod</strong> ne fonctionne pas<br />
correctement.<br />
Le périphérique de<br />
stockage de masse<br />
<strong>USB</strong>/l’<strong>iPod</strong> ne fonctionne<br />
pas correctement après le<br />
rebranchement.<br />
Solution / explication possible<br />
Appuyez sur TEXT.<br />
Vérifiez auprès de votre revendeur agréé si votre unité radio prend<br />
en charge CD-text sur le changeur CD externe.<br />
La fonction SCAN n’est disponible qu’avec les périphériques de<br />
stockage de masse <strong>USB</strong>. Elle ne fonctionne pas sur l’<strong>iPod</strong>, même si<br />
la touche SCAN s’affiche.<br />
Dans le cas des périphériques de stockage de masse <strong>USB</strong>, vous<br />
devez suivre les instructions décrites à la section « Tri de Dossier ».<br />
Certains périphériques MP3 peuvent stocker les chansons dans leur<br />
format spécifique et non dans le volume de stockage de masse.<br />
Vérifiez auprès du fabricant.<br />
Le <strong>kit</strong> d’intégration ne prend en charge que des Fichiers MP3<br />
et WMA.<br />
Dans le cas de l’<strong>iPod</strong>, nous vous recommandons d’organiser le<br />
contenu dans des listes de lecture à l’aide de iTunes. Tous les<br />
morceaux se trouvent dans la Liste de lecture 1.<br />
Débranchez le câble de la prise <strong>USB</strong>/AUX. Une fois que le<br />
menu principal du périphérique de stockage de masse <strong>USB</strong>/<br />
<strong>iPod</strong> est affiché, connectez à nouveau le câble. (Voir la section<br />
Réinitialisation.)<br />
Vérifiez la compatibilité dans les caractéristiques.<br />
Le périphérique de stockage de masse <strong>USB</strong>/l’<strong>iPod</strong> n’a pas détecté<br />
le débranchement.<br />
Réinitialisez le périphérique de stockage de masse <strong>USB</strong>/l’<strong>iPod</strong> (voir<br />
le manuel qui l’accompagne).<br />
En raison des spécificités matérielles des lecteurs de carte et de<br />
leur mise en oeuvre, nous ne pouvons pas garantir la compatibilité<br />
totale avec l’ensemble de ces périphériques. Cela s’applique aussi à<br />
d’autres appareils électroniques utilisant des mémoires externes.<br />
Vérifiez la compatibilité dans les caractéristiques.<br />
Dans le cas de l’<strong>iPod</strong>, veillez à utiliser la dernière version de iTunes et à ce que <strong>iPod</strong> soit téléchargé<br />
avec le dernier micrologiciel depuis la page Web Apple.<br />
64 <strong>USB</strong> & <strong>iPod</strong> ® integration <strong>kit</strong> B
Si les suggestions décrites ne vous permettent pas de résoudre le problème, nous vous conseillons<br />
de confier le véhicule à votre revendeur agréé le plus proche.<br />
Pour toute question relative au périphérique de stockage de masse <strong>USB</strong> ou à l’<strong>iPod</strong> lui-même,<br />
veuillez vous référer au manuel de l’utilisateur ou à la page Web du fabricant.<br />
B<br />
<strong>USB</strong> & <strong>iPod</strong> ® integration <strong>kit</strong> 65
10. Réinitialisation<br />
Dans des conditions spéciales, des problèmes logiciels peuvent se produire occasionnellement<br />
et votre périphérique de stockage de masse <strong>USB</strong> ou votre <strong>iPod</strong> peut se verrouiller. Il y a plusieurs<br />
étapes pour réinitialiser le <strong>kit</strong> d’intégration (Integration <strong>kit</strong>) et les périphériques multimédia<br />
(Media Devices) sans affecter leur contenu et les paramètres :<br />
Mettez la radio HORS/SOUS tension.<br />
Si le problème n’est pas résolu :<br />
Débranchez et rebranchez le périphérique de stockage de masse <strong>USB</strong>/l’<strong>iPod</strong> de la prise <strong>USB</strong>/AUX.<br />
Vérifiez si la prise est en parfait état.<br />
Si le problème persiste, débranchez le périphérique de stockage de masse <strong>USB</strong>/l’<strong>iPod</strong> et :<br />
Mettez la clé du démarreur sur OFF pendant une minute puis mettez-la à nouveau sur ON.<br />
Reconnectez l’<strong>iPod</strong>.<br />
Si le problème persiste, débranchez le périphérique de stockage de masse <strong>USB</strong>/l’<strong>iPod</strong>, mettez la clé<br />
du démarreur sur OFF et réinitialisez votre périphérique de stockage de masse <strong>USB</strong>/<strong>iPod</strong>.<br />
(Reportez-vous au manuel d’utilisateur respectif.)<br />
66 <strong>USB</strong> & <strong>iPod</strong> ® integration <strong>kit</strong> B
11. Caractéristiques<br />
ECU du <strong>kit</strong> d’intégration <strong>USB</strong> et <strong>iPod</strong> :<br />
Alimentation : 13,2 V CC (10,5 - V16 V)<br />
Consommation électrique max. :<br />
Courant maximal en veille :<br />
Dimensions de l’ECU :<br />
Poids de l’ECU :<br />
Puissance de sortie audio max. :<br />
Impédance de sortie audio max. :<br />
11.1. <strong>USB</strong><br />
< 1 A<br />
< 1 mA<br />
125,5 mm (L) x 37,5 mm (H) x 117,5 mm (P)<br />
0,36 kg<br />
2 VRMS<br />
220 ohms<br />
Spécifications <strong>USB</strong> : <strong>USB</strong> 2.0 FS (12 MBPS), classe de stockage de masse (Mass Storage class)<br />
(méthode BOT)<br />
(*En cas de doute, contactez votre revendeur ou le fabricant du périphérique pour confirmer la<br />
compatibilité avec la classe de stockage de masse).<br />
Intensité max. du courant : 5<strong>00</strong> mA (*La consommation de la plupart des disques durs externes est<br />
supérieure à cette valeur).<br />
Nombre de Fichiers (File) et de Dossiers (Folder):<br />
• Nombre total de Dossiers dans le périphérique : MAX 999<br />
• Nombre total de Fichiers dans le périphérique : MAX 65 025<br />
• Nombre total de Fichiers dans un Dossier : MAX 255<br />
• Niveaux de Dossier : 8 niveaux<br />
MP3<br />
• COUCHE AUDIO MPEG1 II, III (VBR est pris en charge.)<br />
Débit binaire : 32 - 320 kbp/s, fréquence d’échantillonnage : 44,1/48/32 kHz<br />
• COUCHE AUDIO MPEG2 II, III (VBR est pris en charge.)<br />
Débit binaire : 32 - 160 kbp/s, fréquence d’échantillonnage : 22,05/24/16 kHz<br />
• MPEG 2.5 (VBR est pris en charge.)<br />
Débit binaire : 32 - 160 kbp/s, fréquence d’échantillonnage : 11,025/12/8 kHz<br />
WMA<br />
• Ver9 (standard, VBR) HIGH PROFILE<br />
Débit binaire : 32 - 320 kbp/s, fréquence d’échantillonnage : 44,1 k/48 k/32 kHz<br />
• La charge du périphérique est prise en charge jusqu’à l’intensité max. du courant<br />
B<br />
<strong>USB</strong> & <strong>iPod</strong> ® integration <strong>kit</strong> 67
11.2. <strong>iPod</strong>/iPhone<br />
<strong>iPod</strong>/iPhone pris en charge :<br />
• Nano (à partir de la version 1.021.01 du micrologiciel)<br />
• Nano G2 (à partir de la version 1.02 du micrologiciel)<br />
• Generation 5 (à partir de la version 1.021.01 du micrologiciel)<br />
• iPhone (à partir de la version 1.021.01 du micrologiciel)<br />
La version 1.<strong>00</strong> ou antérieure du micrologiciel n’est pas compatible.<br />
Nombre de plages et de listes<br />
• Nombre total de listes dans le périphérique : MAX 9 999<br />
• Nombre total de plages dans le périphérique : MAX 65 535<br />
• Nombre total de plages dans la liste : MAX 65 535<br />
PODCAST et PODBOOKS pris en charge<br />
Listes de lecture, albums et morceaux de musique pris en charge (artiste et genre non pris en<br />
charge)<br />
La charge du périphérique est prise en charge<br />
Agence commerciale : <strong>Toyota</strong> Motor Europe N.V./S.A.<br />
Service après-vente : <strong>Toyota</strong> Motor Europe N.V./S.A.<br />
Fabricant : Panasonic Automotive Systems Europe GmbH.<br />
68 <strong>USB</strong> & <strong>iPod</strong> ® integration <strong>kit</strong> B
Inhalt<br />
1. Einleitung............................................................................................................. 73<br />
2. Sicherheitsinformationen.................................................................................... 74<br />
2.1. Sicherheitssymbole................................................................................................... 74<br />
2.2. Achtung:.................................................................................................................. 75<br />
3. Haftungsausschluss.............................................................................................. 77<br />
4. Wichtige Informationen...................................................................................... 78<br />
5. Kurze Funktionsübersicht.................................................................................... 79<br />
6. Bedienungsanleitung <strong>USB</strong>-Massenspeicher.......................................................... 80<br />
6.1. Abbildung des Radios............................................................................................... 80<br />
6.2. Anschließen............................................................................................................. 80<br />
6.3. Ein-/Ausschalten....................................................................................................... 81<br />
6.4. Regeln der Lautstärke............................................................................................... 81<br />
6.5. Auswahl des <strong>USB</strong>-Modus.......................................................................................... 81<br />
6.6. Tonabgleich im <strong>USB</strong>-Modus..................................................................................... 81<br />
6.7. <strong>USB</strong> -Sortierung........................................................................................................ 82<br />
6.8. Ordnerauswahl......................................................................................................... 83<br />
6.9. Dateiauswahl............................................................................................................ 84<br />
6.10. Suche in Datei.......................................................................................................... 84<br />
6.11. Datei wiederholen.................................................................................................... 84<br />
6.12. Ordner wiederholen................................................................................................. 85<br />
6.13. Zufallswiedergabe ................................................................................................... 85<br />
6.14. Scan-Funktion.......................................................................................................... 85<br />
6.15. Display-Daten ......................................................................................................... 86<br />
7. Bedienungsanleitung <strong>iPod</strong>................................................................................... 89<br />
7.1. Abbildung des Radios............................................................................................... 89<br />
7.2. Anschließen............................................................................................................. 89<br />
7.3. Ein-/Ausschalten....................................................................................................... 90<br />
7.4. Regeln der Lautstärke............................................................................................... 90<br />
7.5. Auswahl des <strong>iPod</strong>-Modus......................................................................................... 90<br />
7.6. Tonabgleich im <strong>iPod</strong>-Modus..................................................................................... 90<br />
7.7. <strong>iPod</strong>-Sortierung........................................................................................................ 91<br />
7.8. Wiedergabelistenkonzept......................................................................................... 91<br />
7.9. Auswahl Wiedergabeliste/Album.............................................................................. 92<br />
7.10. Titelauswahl............................................................................................................. 93<br />
7.11. Suche im Titel.......................................................................................................... 93<br />
C<br />
<strong>USB</strong> & <strong>iPod</strong> ® integration <strong>kit</strong> 69
7.12. Titel wiederholen...................................................................................................... 93<br />
7.13. Zufallswiedergabe ................................................................................................... 94<br />
7.14. Display-Daten ......................................................................................................... 94<br />
7.15. Scan-Funktion.......................................................................................................... 96<br />
8. Lenkrad-Fernbedienung....................................................................................... 97<br />
8.1. Modusauswahl......................................................................................................... 97<br />
8.2. Lautstärke................................................................................................................ 97<br />
8.3. Datei/Titel wechseln................................................................................................. 97<br />
8.4. Ordner/Wiedergabeliste/Album wechseln................................................................. 97<br />
9. Fehlerbehebung................................................................................................... 98<br />
10. Reset .................................................................................................................... 99<br />
11. Technische Daten................................................................................................. 1<strong>00</strong><br />
11.1. <strong>USB</strong> ......................................................................................................................... 1<strong>00</strong><br />
11.2. <strong>iPod</strong>/iPhone............................................................................................................. 101<br />
70 <strong>USB</strong> & <strong>iPod</strong> ® integration <strong>kit</strong> C
Empfehlung<br />
Bitte lesen Sie diese Anleitung, damit Sie das System optimal nutzen können.<br />
Wir empfehlen, diese Bedienungsanleitung im Fahrzeug aufzubewahren. Sie finden dann bei<br />
Bedarf die nötigen Informationen leichter.<br />
Ihr örtlicher autorisierter Händler beantwortet gerne alle Fragen, die Sie zu dem System oder<br />
dessen Betrieb haben, wenn Sie die benötigte Information nicht in dieser Bedienungsanleitung<br />
oder im Abschnitt “Fehlerbehebung“ finden.<br />
<strong>Toyota</strong> empfiehlt, nur Teile und Zubehör zu verwenden, die hinsichtlich Sicherheit, Funktion<br />
und Eignung von <strong>Toyota</strong> geprüft und zugelassen wurden.<br />
Diese Bedienungsanweisungen sind so gestaltet, dass Sie Ihr <strong>USB</strong> & <strong>iPod</strong> ® Integrations-Kit sicher<br />
und leicht bedienen können.<br />
Diese Bedienungsanleitung beschreibt die Funktionen des <strong>USB</strong> & <strong>iPod</strong> ® Integrations-Kits. ù<br />
C<br />
<strong>USB</strong> & <strong>iPod</strong> ® integration <strong>kit</strong> 71
72 <strong>USB</strong> & <strong>iPod</strong> ® integration <strong>kit</strong> C
1. Einleitung<br />
Vielen Dank für den Kauf unseres Produkts.<br />
Bitte lesen Sie diese Anweisungen sorgfältig, um das Produkt sachgemäß zu benutzen. Lesen Sie<br />
vor allem die “Sicherheitsinformationen” (Seite 74) vor der Benutzung unbedingt gründlich durch.<br />
Diese Bedienungsanleitung sollte für etwaiges Nachschlagen aufbewahrt werden.<br />
C<br />
<strong>USB</strong> & <strong>iPod</strong> ® integration <strong>kit</strong> 73
2. Sicherheitsinformationen<br />
• Lesen Sie die Bedienungsanleitungen für das Gerät und alle anderen Komponenten Ihres<br />
Fahrzeug-Audiosystems, bevor Sie das System benutzen. Sie enthalten Anweisungen zur<br />
sicheren und effektiven Benutzung des Systems. <strong>Toyota</strong> Motor Europe NV/SA übernimmt<br />
keinerlei Haftung für etwaige Probleme, die durch Nichtbefolgung der in diesem Handbuch<br />
enthaltenen Anweisungen auftreten.<br />
• In dieser Anleitung werden Piktogramme verwendet, um Ihnen zu zeigen, wie man das<br />
Produkt sicher benutzt und Sie auf potentielle Gefahren hinzuweisen, die aus unkorrekten<br />
Anschlüssen und falscher Bedienung resultieren. Die Bedeutung der Piktogramme wird<br />
nachfolgend erläutert. Es ist wichtig, dass Sie die Bedeutung der Piktogramme verstehen, um<br />
diese Anleitung und das System richtig zu verwenden.<br />
2.1. Sicherheitssymbole<br />
m<br />
Warnung:<br />
Wenn dieses Symbol vor einem Text erscheint, müssen Sie diese Anweisungen<br />
befolgen, um irreparable Schäden an Fahrzeug, System oder angeschlossenen Geräten zu<br />
vermeiden oder Unfälle mit Verletzungs- oder Todesfolge auszuschließen.<br />
ò<br />
Vorsicht: Wenn dieses Symbol vor einem Text erscheint, müssen Sie sehr vorsichtig sein<br />
und diese Anweisungen befolgen, um Schäden an Fahrzeug, System oder angeschlossenen<br />
Geräten bzw. Verletzungen zu vermeiden.<br />
Entsorgung: Wenn dieses Symbol vor einem Text erscheint, werden Sie darauf aufmerksam<br />
gemacht, dass Sie die gesetzlichen Bestimmungen zur Entsorgung elektrischer Geräte<br />
beachten müssen.<br />
ó Hinweis: Eine einfache Empfehlung, um Ihnen die Bedienung zu erleichtern und für den<br />
optimalen Betrieb Ihres Systems.<br />
74 <strong>USB</strong> & <strong>iPod</strong> ® integration <strong>kit</strong> C
2.2. Achtung:<br />
m<br />
Beachten Sie bei der Benutzung dieses Gerätes folgende Vorsichtsmaßnahme!<br />
• Der Fahrer darf beim Fahren weder auf das Display schauen, noch das System<br />
bedienen.<br />
Durch Betrachten des Displays oder Bedienung des Systems wird der Fahrer davon abgehalten,<br />
das Verkehrsgeschehen zu beobachten, was zu Unfällen führen kann. Bevor das Display<br />
betrachtet oder das System bedient wird, muss das Fahrzeug an sicherer Stelle angehalten und<br />
die Feststellbremse betätigt werden. Andernfalls kann es zu Problemen kommen.<br />
• Die Einheit nicht zerlegen oder modifizieren.<br />
Die Einheit nicht zerlegen oder modifizieren und nicht versuchen, das Produkt selbst zu<br />
reparieren. Wenn das Produkt repariert werden muss, wenden Sie sich an den Vertragshändler.<br />
• Gerät nicht benutzen, wenn es nicht funktioniert.<br />
Wenn das Gerät nicht funktioniert (keine Stromversorgung, kein Ton) oder in abnormem<br />
Zustand ist (enthält Fremdkörper, kam mit Wasser in Berührung, Rauch- oder Geruchsbildung),<br />
stellen Sie es sofort ab und wenden Sie sich an den Vertragshändler.<br />
• Bitte wenden Sie sich an den Vertragshändler, wenn Sicherungen ersetzt werden<br />
müssen.<br />
Wenn die Sicherung durchbrennt, beseitigen Sie die Ursache und lassen Sie von einem<br />
qualifizierten Servicetechniker eine für diese Einheit vorgeschriebene Sicherung einsetzen.<br />
Unkorrektes Wechseln der Sicherung kann zu Rauchentwicklung, Feuer und Beschädigung<br />
dieses Produkts führen.<br />
Beachten Sie bei der Benutzung dieses Gerätes folgende Vorsichtsmaßnahme!<br />
• Halten Sie die Lautstärke auf einem angemessenen Niveau.<br />
Halten Sie die Lautstärke so niedrig, dass Sie ohne weiteres am Verkehrsgeschehen teilnehmen<br />
können.<br />
• Diesen Adapter nicht in anderen Fahrzeugs oder außerhalb Ihres Fahrzeugs<br />
benutzen.<br />
Wenn dies nicht beachtet wird, kann es zu Rauchentwicklung, Feuer, elektrischen Schlägen,<br />
Verletzungen oder anderen Problemen kommen.<br />
• Die Einheit nicht über längere Zeit bei abgestelltem Motor betreiben.<br />
Dadurch wird die Batterie entladen.<br />
• Den <strong>USB</strong>-Massenspeicher/<strong>iPod</strong> nicht direkter Sonneneinstrahlung oder<br />
übermäßiger Hitze aussetzen.<br />
Ein Ansteigen der Innentemperatur der Einheiten kann zu Rauchentwicklung, Feuer oder<br />
anderen Schäden an der Einheit führen.<br />
C<br />
<strong>USB</strong> & <strong>iPod</strong> ® integration <strong>kit</strong> 75
• Das Produkt nicht benutzen, wenn es mit Wasser, Feuchtigkeit oder Staub in<br />
Berührung kam.<br />
Wenn Adapter, <strong>USB</strong>-Massenspeicher oder <strong>iPod</strong> mit Wasser, Feuchtigkeit oder Staub in<br />
Berührung kommen, kann es zu Rauchentwicklung, Feuer oder anderen Schäden an den<br />
Einheiten kommen.<br />
Achten Sie besonders darauf, dass die Einheit in Waschanlagen oder bei Regenwetter nicht nass<br />
werden.<br />
• Einbau: Vor Installation oder Erweiterung des Systems bitte die Einbauanweisungen sorgfältig<br />
lesen.<br />
• <strong>USB</strong>-Massenspeicher/<strong>iPod</strong> bei Benutzung dieser Einheit sicher befestigen.<br />
Lassen Sie den <strong>USB</strong>-Massenspeicher/<strong>iPod</strong> nicht auf den Boden fallen, wo er unter dem Bremsoder<br />
Gaspedal eingeklemmt werden könnte.<br />
• Einzelheiten über <strong>USB</strong>-Massenspeicher oder <strong>iPod</strong>s erfahren Sie in den betreffenden<br />
Bedienungsanleitungen.<br />
76 <strong>USB</strong> & <strong>iPod</strong> ® integration <strong>kit</strong> C
3. Haftungsausschluss<br />
• Sollte es zu Schäden durch Feuer, Erdbeben, Handlungen Dritter oder sonstige Unfälle,<br />
durch vorsätzlichen oder fahrlässigen Missbrauch durch den Benutzer, durch unsachgemäße<br />
Benutzung oder Benutzung unter abnormen Bedingungen kommen, werden Reparaturen des<br />
Produkts grundsätzlich dem Benutzer in Rechnung gestellt.<br />
• <strong>Toyota</strong> Motor Europe NV/SA haftet nicht für Folgeschäden, die durch Benutzung oder<br />
Nichtbenutzung dieses Produkts entstehen, etwa für entgangene geschäftliche Gewinne oder<br />
Veränderung oder Verlust gespeicherter Daten.<br />
• <strong>Toyota</strong> Motor Europe NV/SA übernimmt keinerlei Haftung für Datenverluste auf <strong>USB</strong>-<br />
Massenspeicher oder <strong>iPod</strong>, auch wenn die Daten während der Benutzung der Einheit verloren<br />
gehen.<br />
C<br />
<strong>USB</strong> & <strong>iPod</strong> ® integration <strong>kit</strong> 77
4. Wichtige Informationen<br />
Diese Gerät dient zur Steuerung und zur Wiedergabe von Musikdateien (music Files) auf <strong>USB</strong>-<br />
Massenspeichern und <strong>iPod</strong> über eine Original-Haupteinheit.<br />
• <strong>iPod</strong> ist ein Markenzeichen der Apple Inc., eingetragen in den USA und anderen Ländern.<br />
• Die Bedienung richtet sich nach der Softwareversion von <strong>USB</strong>-Massenspeicher und <strong>iPod</strong>.<br />
• Die Bedienung kann je nach angeschlossener Haupteinheit unterschiedlich erfolgen.<br />
• Wenden Sie sich an Ihren Vertragshändler, um zu erfahren, ob Ihre Haupteinheit mit dem<br />
<strong>USB</strong> & <strong>iPod</strong> Integrations-Kit kompatibel ist.<br />
78 <strong>USB</strong> & <strong>iPod</strong> ® integration <strong>kit</strong> C
5. Kurze Funktionsübersicht<br />
Taste Aktion <strong>USB</strong>-Massenspeicher <strong>iPod</strong><br />
TRACK UP/<br />
DOWN<br />
DISC UP/<br />
DOWN<br />
RPT<br />
RND<br />
SCN<br />
TEXT/<br />
DISP<br />
CHANGE DISCS<br />
SELECT<br />
Kurz drücken<br />
Nächste/vorherige Datei<br />
(File next/previous)<br />
Nächster/vorheriger Titel<br />
(Title next/previous)<br />
Lange drücken Vor-/Zurückspulen Vor-/Zurückspulen<br />
Kurz drücken Nächster/vorheriger Nächste(s)/vorherige(s)<br />
Ordner<br />
Wiedergabeliste/Album<br />
(Folder next/previous) (Playlist/Album next/<br />
previous)<br />
Kurz drücken Datei wiederholen Titel wiederholen<br />
Lange drücken Ordner wiederholen Albumsortierung<br />
aktivieren<br />
Kurz drücken<br />
Lange drücken<br />
Kurz drücken<br />
Lange drücken<br />
Kurz drücken<br />
Lange drücken<br />
Kurz drücken<br />
Kurz drücken<br />
Zufallswiedergabe im<br />
aktuellen Ordner<br />
Zufallswiedergabe des<br />
gesamten <strong>USB</strong>-Speichers<br />
Erste 10 Sekunden der<br />
Dateien im aktuellen<br />
Ordner scannen<br />
Erste 10 Sekunden der<br />
ersten Datei in jedem<br />
Ordner scannen<br />
Zu nächsten Anzeigeseite<br />
wechseln<br />
Zu den nächsten Zeichen<br />
der angezeigten Daten<br />
wechseln<br />
Seite mit Tasten für die<br />
direkte Ordnerauswahl<br />
öffnen<br />
Seite mit Tasten für die<br />
direkte Dateiauswahl<br />
öffnen<br />
Zufallswiedergabe<br />
in der/im aktuellen<br />
Wiedergabeliste/Album<br />
Zufallswiedergabe des<br />
gesamten <strong>iPod</strong>-Speichers<br />
Nicht verfügbar<br />
Nicht verfügbar<br />
Zu nächsten Anzeigeseite<br />
wechseln<br />
Zu den nächsten Zeichen<br />
der angezeigten Daten<br />
wechseln<br />
Seite mit Tasten für die<br />
direkte Wiedergabelisten/<br />
Albumauswahl öffnen<br />
Seite mit Tasten für die<br />
direkte Titelauswahl öffnen<br />
C<br />
<strong>USB</strong> & <strong>iPod</strong> ® integration <strong>kit</strong> 79
6. Bedienungsanleitung <strong>USB</strong>-Massenspeicher<br />
6.1. Abbildung des Radios<br />
Ein Diagramm des Radios mit Angabe der Tastenfunktionen finden Sie in der Betriebsanleitung des<br />
Fahrzeugs im Abschnitt über Audiobetrieb.<br />
6.2. Anschließen<br />
Anschließen des <strong>USB</strong>-Massenspeichers<br />
Die technischen Daten von <strong>USB</strong>-Massenspeichern können von den Herstellern geändert werden.<br />
Abhängig von Änderungen, die an den Spezifikationen vorgenommen wurden, arbeiten <strong>USB</strong>-<br />
Massenspeicher daher nicht unbedingt normal.<br />
Überprüfen Sie vor dem Anschließen des <strong>USB</strong>-Massenspeichergerätes bitte, ob es den<br />
Anforderungen für das <strong>USB</strong> & <strong>iPod</strong> Integrations-Kit (Seite 89) entspricht .<br />
Stecken Sie den <strong>USB</strong>-Stecker in die Buchse <strong>USB</strong>/AUX in der Mittelkonsole oder im Armaturenbrett.<br />
Wenn die Zündung auf ACC oder ON gestellt wird, wird der <strong>USB</strong>-Massenspeicher automatisch<br />
aktiviert.<br />
Wenn der <strong>USB</strong>-Massenspeicher an diese Einheit angeschlossen ist, wird seine Batterie automatisch<br />
geladen.<br />
Sobald die Zündung abgeschaltet wird, wird der <strong>USB</strong>-Massenspeicher nicht mehr geladen.<br />
Schalten Sie den <strong>USB</strong>-Massenspeicher manuell ab, um ein Entladen der Batterie zu vermeiden.<br />
Das <strong>USB</strong> & <strong>iPod</strong> Integrations-Kit unterstützt <strong>USB</strong>-Massenspeicher, die den <strong>USB</strong> 2.0 Standard<br />
erfüllen, sowie die entsprechenden Dateisysteme FAT32 und FAT16 (Windows). Es unterstützt<br />
MP3- und WMA-Dateien.<br />
ó Hinweis: Informationen zum <strong>USB</strong>-Massenspeicher finden Sie in der betreffenden<br />
Betriebsanleitung.<br />
ó Hinweis: Die Benutzung eines nicht unterstützten <strong>USB</strong>-Massenspeichers kann zu Störungen<br />
im Betrieb führen.<br />
Entfernen des <strong>USB</strong>-Massenspeichers<br />
Der <strong>USB</strong>-Massenspeicher kann jederzeit von der Einheit entfernt werden.<br />
80 <strong>USB</strong> & <strong>iPod</strong> ® integration <strong>kit</strong> C
6.3. Ein-/Ausschalten<br />
Drücken Sie zum Einschalten die Taste [PWR-VOL].<br />
Drücken Sie zum Ausschalten erneut die Taste [PWR-VOL].<br />
6.4. Regeln der Lautstärke<br />
Drehen Sie [VOLUME] im Uhrzeigersinn, um die Lautstärke zu erhöhen.<br />
Drehen Sie [VOLUME] gegen den Uhrzeigersinn, um die Lautstärke zu verringern.<br />
6.5. Auswahl des <strong>USB</strong>-Modus<br />
Drücken Sie zur Auswahl des <strong>USB</strong>-Modus [DISC] auf der Haupteinheit.<br />
Bei jedem Drücken von [DISC] ändert sich der Modus wie folgt:<br />
Interne CD “ externe CDCH (= <strong>USB</strong>) “ interne CD.<br />
ó Hinweis: Wenn der <strong>USB</strong>-Massenspeicher über das Integrations-Kit für den externen CD-<br />
Wechsler angeschlossen ist, zeigt das Radio den Modus “externer CD-Wechsler” an.<br />
6.6. Tonabgleich im <strong>USB</strong>-Modus<br />
Bässe/Höhen/Überblendregelung/Balance lassen sich speziell für den <strong>USB</strong>-Modus einstellen. Wenn<br />
Sie von <strong>USB</strong> auf Radio- oder CD-Modus wechseln, werden die Audioeinstellungen speziell auf die<br />
Einstellungen des jeweiligen Modus umgestellt. Die Audioeinstellungen für die einzelnen Modi<br />
werden im Speicher der Haupteinheit abgelegt und automatisch aufgerufen, sobald ein bestimmter<br />
Modus gewählt wurde.<br />
Display-Radio mit Touch-Screen<br />
Drücken Sie zur Auswahl des Audio-Kontrollbildschirms die Taste [AUDIO CONTROL].<br />
Radio<br />
Drücken Sie den [Tune] Knopf zur Auswahl der gewünschten Funktion. Bei jedem Drücken des<br />
Tune-Reglers wechseln die wählbaren Funktionen wie folgt:<br />
BAS (Bässe) “ TRE (Höhen) “ FAD (Überblendregler) “ BAL (Balance)<br />
Durch erneutes Drücken des Tune-Reglers (Tune Dial) wird die Audioeinstellung (Audio Control)<br />
beendet. Durch Drehen des [Tune] Knopfs nach links/rechts kann der gewünschte Punkt eingestellt<br />
werden.<br />
ó Hinweis: Auch die EQ-Einstellungen des <strong>USB</strong>-Massenspeichers können die Wiedergabe<br />
beeinflussen. Angaben zum Regeln der <strong>iPod</strong> EQ-Einstellungen finden Sie in der betreffenden<br />
Anleitung.<br />
C<br />
<strong>USB</strong> & <strong>iPod</strong> ® integration <strong>kit</strong> 81
6.7. <strong>USB</strong> -Sortierung<br />
Mit dem <strong>USB</strong> & <strong>iPod</strong> Integrations-Kit können Musiktitel auf dem <strong>USB</strong>-Massenspeicher<br />
wiedergegeben werden, die in Ordnern (Folders) und Dateien (Files) organisiert sind.<br />
Sobald der <strong>USB</strong>-Massenspeicher angeschlossen ist, werden alle Ordner im Gerät (Device)<br />
durchsucht und entsprechend der Reihenfolge der Speicherung der Ordner im <strong>USB</strong>-<br />
Massenspeicher werden Nummern zugewiesen. Es erfolgt keine Unterscheidung zwischen MP3-<br />
und WMA-Dateien, sie werden sequentiell geordnet und nummeriert.<br />
ó Hinweis: Ordner und Dateien werden in der Reihenfolge wiedergegeben, in der sie auf<br />
den <strong>USB</strong> Massenspeicher kopiert wurden. Unter Umständen werden Ordner und Dateien<br />
NICHT alphabetisch sortiert und können eine andere Reihenfolge haben als in einer<br />
Computerumgebung.<br />
ó Hinweis: Wir empfehlen Ihnen, die Ordner (Folders) und Dateien (Files) mit Hilfe des<br />
Computers zu ordnen, bevor Sie das Gerät anschließen.<br />
ó Hinweis: Wir empfehlen Ihnen dringend, Sicherungskopien Ihrer Daten (Data) herzustellen.<br />
<strong>Toyota</strong> Motor Europe NV/SA übernimmt keinerlei Haftung für verlorene oder beschädigte Daten.<br />
Ordner werden nach folgender Logik geordnet:<br />
Root-Ordner (Root Folder)<br />
C<br />
D<br />
Ordner Nr.<br />
1 (Root-<br />
Ordner)<br />
R1.mp3<br />
R2.mp3<br />
R3.mp3<br />
C1.mp3<br />
C2.mp3<br />
C3.mp3<br />
D1.mp3<br />
D2.mp3<br />
D3.mp3<br />
2 (C)<br />
C1.mp3<br />
C2.mp3<br />
C3.mp3<br />
B<br />
R1.mp3<br />
R2.mp3<br />
R3.mp3<br />
B1.mp3<br />
B2.mp3<br />
B3.mp3<br />
E<br />
A<br />
E1.mp3<br />
E2.mp3<br />
E3.mp3<br />
A1.mp3<br />
A2.mp3<br />
A3.mp3<br />
3 (D)<br />
4 (B)<br />
5 (E)<br />
D1.mp3<br />
D2.mp3<br />
D3.mp3<br />
B1.mp3<br />
B2.mp3<br />
B3.mp3<br />
E1.mp3<br />
E2.mp3<br />
E3.mp3<br />
F<br />
F1.mp3<br />
F2.mp3<br />
F3.mp3<br />
82 <strong>USB</strong> & <strong>iPod</strong> ® integration <strong>kit</strong> C<br />
6 (A)<br />
7 (F)<br />
A1.mp3<br />
A2.mp3<br />
A3.mp3<br />
F1.mp3<br />
F2.mp3<br />
F3.mp3
ó Hinweis: Der Name des Ordners und der Dateiname erscheinen auf dem Radio-Display.<br />
Wir empfehlen, die Ordner nach Künstler oder Album und die Dateinamen nach Titelnamen<br />
zu ordnen.<br />
6.8. Ordnerauswahl<br />
Direkte Ordnerauswahl<br />
ó Hinweis: Tasten für die direkte Ordnerauswahl (Direct Folder selection) stehen nur bei Radios<br />
mit Touch-Screen-Display zur Verfügung.<br />
Drücken Sie [CHANGE DISCS], dann eine der Tasten [1] bis [6].<br />
(Display-Aufbau oder Funktionen können je nach<br />
Haupteinheit unterschiedlich sein. Einzelheiten siehe<br />
Fahrzeughandbuch.)<br />
Ordnerauswahl mit Disc aufwärts/abwärts<br />
Drücken Sie [DISC ^], um zum nächsten Ordner (next Folder) zu wechseln.<br />
ó Hinweis: Sobald der letzte Ordner erreicht ist, gelangen Sie mit dem nächsten Tastendruck<br />
wieder zum ersten Ordner (previous Folder).<br />
Drücken Sie [DISC v], um zum vorherigen Ordner zu wechseln.<br />
C<br />
<strong>USB</strong> & <strong>iPod</strong> ® integration <strong>kit</strong> 83
ó Hinweis: Sobald der erste Ordner erreicht ist, gelangen Sie mit dem nächsten Tastendruck<br />
wieder zum letzten Ordner.<br />
ó Hinweis: Bei AVN-Haupteinheiten ist diese Funktion nur über Lenkradschalter verfügbar.<br />
Siehe Abschnitt 8.4.<br />
6.9. Dateiauswahl<br />
Drücken Sie kurz auf [TRACK ^], um zur nächsten Datei (File) zu springen.<br />
ó Hinweis: Nachdem Sie den letzten Titel erreicht haben, gelangen Sie zum ersten Titel des<br />
nächsten Ordners (Folder), es sei denn, die Zufalls- (Random) und/oder Wiederholungsfunktion<br />
(Repeat) ist aktiv. (Bitte beachten Sie, dass sich dies beim <strong>iPod</strong> anders verhält).<br />
Drücken Sie kurz [TRACK v], um zum Anfang des aktuellen Titels zu springen, erneut drücken, um<br />
zum vorherigen Titel zu springen.<br />
ó Hinweis: Wenn diese Taste erneut gedrückt wird, nachdem der erste Titel eines Ordners<br />
erreicht ist, springt man zum Anfang des letzten Titels des vorherigen Ordners, es sei denn,<br />
die Zufalls- (Random) und/oder Wiederholungsfunktion (Repeat) ist aktiv. (Bitte beachten Sie,<br />
dass sich dies beim <strong>iPod</strong> anders verhält).<br />
ó Hinweis: Die Anzahl der Dateien innerhalb eines Ordners ist unbegrenzt.<br />
ó Hinweis: Aufgrund der Einschränkungen des Displays werden die Dateien innerhalb eines<br />
Ordners von 1 bis 99 durchnummeriert.<br />
Wenn die Anzahl der Titel (Track) 99 übersteigt, beginnt die Nummerierung wieder bei Titel 1.<br />
6.10. Suche in Datei<br />
[TRACK v] lange drücken, um innerhalb der aktuellen Datei (File) “zurückzuspulen”.<br />
Wenn der Anfang der Datei erreicht ist, wird die Datei von Anfang an abgespielt.<br />
[TRACK ^] lange drücken, um innerhalb der aktuellen Datei (File) “vorzuspulen”.<br />
Wenn das Ende der Datei erreicht ist, beginnt die Wiedergabe der nächsten Datei.<br />
6.11. Datei wiederholen<br />
[RPT] kurz drücken, um die Wiederholfunktion zu aktivieren. Die derzeit gewählte Datei wird dann<br />
ständig wiederholt. (RPT) erscheint auf dem Display.<br />
Um die Wiederholfunktion zu deaktivieren, [RPT] erneut drücken oder mit [TRACK ^] oder<br />
[TRACK v] eine andere Datei wählen.<br />
84 <strong>USB</strong> & <strong>iPod</strong> ® integration <strong>kit</strong> C
6.12. Ordner wiederholen<br />
[RPT] lange drücken, um die Ordner-Wiederholfunktion (Folder repeat function) zu aktivieren. Der<br />
derzeit gewählte Ordner (Folder) wird dann ständig wiederholt. (D_RPT) erscheint auf dem Display.<br />
Um die Wiederholfunktion zu deaktivieren, [RPT] erneut drücken oder mit [DISC ^] oder [DISC v]<br />
einen anderen Ordner wählen.<br />
6.13. Zufallswiedergabe<br />
Zufallswiedergabe (Random Play) innerhalb eines Ordners<br />
Kurz [RAND] drücken, um die Zufallswiedergabe aller Musikdateien (music Files) im ausgewählten<br />
Ordner (Folder) zu aktivieren.<br />
Zum Deaktivieren der Zufallswiedergabefunktion [RAND] erneut kurz drücken.<br />
Durch Drücken von [TRACK ^] im Zufallswiedergabemodus wird die Wiedergabe der nächsten<br />
zufällig ausgewählten Datei gestartet. Durch Drücken von [TRACK v] im Zufallswiedergabemodus<br />
wird die zuvor abgespielte Datei erneut wiedergegeben.<br />
ó Hinweis: Wenn die Ordnerwiederholungsfunktion im Zufallswiedergabemodus nicht aktiviert<br />
ist, wird der nächste Ordner in zufälliger Reihenfolge wiedergegeben, wenn alle Dateien des<br />
aktuellen Ordners abgespielt sind.<br />
Zufällige Wiedergabe des gesamten <strong>USB</strong>-Speichers<br />
[RAND] lange drücken, um die Zufallswiedergabe aller im <strong>USB</strong>-Massenspeicher abgelegten<br />
Musikdateien zu aktivieren.<br />
Zum Deaktivieren der Zufallswiedergabefunktion [RAND] erneut kurz drücken.<br />
Durch Drücken von [TRACK ^] im Zufallswiedergabemodus wird die Wiedergabe der nächsten<br />
zufällig ausgewählten Datei gestartet. Durch Drücken von [TRACK v] im Zufallswiedergabemodus<br />
wird die zuvor abgespielte Datei erneut wiedergegeben.<br />
Durch Drücken von [DISC^]/[DISC v] im Zufallswiedergabemodus wird diese Funktion deaktiviert.<br />
6.14. Scan-Funktion<br />
Scannen von Dateien (Scan Files) innerhalb eines Ordners<br />
[SCAN] kurz drücken, um das Scannen aller Dateien im ausgewählten Ordner zu aktivieren. Alle<br />
Musikdateien werden für 10 Sekunden angespielt. Wenn alle Dateien im Ordner gescannt sind,<br />
stoppt die Scan-Funktion und die erste gescannte Datei wird wiedergegeben.<br />
Zum Deaktivieren der Scan-Funktion [SCAN] erneut kurz drücken. Daraufhin wird die derzeit<br />
gescannte Datei weiter abgespielt.<br />
C<br />
<strong>USB</strong> & <strong>iPod</strong> ® integration <strong>kit</strong> 85
Scannen von Ordnern (Scan Folders)<br />
[SCAN] lange drücken, um das Scannen aller Ordner (Folder) zu aktivieren. Die erste Musikdatei<br />
(music File) jedes Ordners wird 10 Sekunden lang angespielt.<br />
Wenn alle Ordner gescannt sind, stoppt die Scan-Funktion und die erste gescannte Datei wird<br />
wiedergegeben.<br />
Zum Deaktivieren der Ordner-Scan-Funktion (Folder Scan function) [SCAN] erneut drücken; der<br />
zurzeit gescannte Ordner wird weiter abgespielt.<br />
ó Hinweis: Die Scan-Funktion steht für <strong>iPod</strong> nicht zur Verfügung.<br />
6.15. Display-Daten<br />
Durch kurzes Drücken von [DISP]/[TEXT] kann man zwischen Seiten mit verschiedenen Informationen<br />
wechseln, die abhängig vom Display-Typ in einer bestimmten Reihenfolge gezeigt werden.<br />
Displays, die CD-Text nicht unterstützen:<br />
Ordnernummer & Dateinummer “ abgelaufene Wiedergabezeit (elapsed Playtime) “<br />
Ordnernummer & Dateinummer (Folder number & File number).<br />
Displays, die CD-Text unterstützen:<br />
Ordnernummer & Dateinummer “ abgelaufene Wiedergabezeit (elapsed Playtime) “<br />
Ordnername (Folder name) “ Dateiname (File name) “ Ordnernummer & Dateinummer.<br />
Durch langes Drücken von [DISP]/[[TEXT] können Sie auf zusätzliche Informationen auf derselben<br />
Seite wechseln.<br />
Ein Piepton ist zu hören. 5 Sekunden nach dem Loslassen der Taste wechselt das Display wieder in<br />
den ursprünglichen Zustand.<br />
86 <strong>USB</strong> & <strong>iPod</strong> ® integration <strong>kit</strong> C
Displays mit Touch-Screen<br />
Durch Drücken von [TEXT] können Sie zwischen Seiten mit verschiedenen Arten von Informationen<br />
wechseln.<br />
Durch Drücken von [CHANGE DISCS] können Sie zur Seite mit Direktauswahltasten für Ordner<br />
(Folder) wechseln.<br />
(Display-Aufbau oder Funktionen können je nach<br />
Haupteinheit unterschiedlich sein. Einzelheiten siehe<br />
Fahrzeughandbuch.)<br />
C<br />
<strong>USB</strong> & <strong>iPod</strong> ® integration <strong>kit</strong> 87
Durch Drücken von [SELECT] neben dem Titelnamen (Track name) können Sie zur Seite mit<br />
Direktauswahltasten für Dateien wechseln. Mit den Auf- und Abwärtstasten links auf dem Display<br />
können Sie innerhalb der Liste navigieren.<br />
Die angezeigten Musikdateien (music Files) können durch Drücken des angegebenen Bereichs des<br />
Displays direkt angewählt werden.<br />
(Display-Aufbau oder Funktionen können je nach<br />
Haupteinheit unterschiedlich sein. Einzelheiten siehe<br />
Fahrzeughandbuch.)<br />
Einschränkungen (Limitations) des Displays<br />
Aufgrund von Einschränkungen des Displays werden die Ordner in Seiten unterteilt und nach<br />
Modulen von 1 bis 6 nummeriert. Die Angabe der Zahlen ab 7 kann auf der Haupteinheit nicht<br />
angezeigt werden, daher erfolgt die Nummerierung der nächsten Ordner wieder mit 1 bis 6.<br />
Im Ordnernamen wird jedoch der aktuelle Ordner angegeben.<br />
Auf die gleiche Weise werden die Dateien bis 99 nummeriert. Das heißt, dass die ersten 99 Dateien<br />
von 1 bis 99 nummeriert werden und Datei 1<strong>00</strong> wieder die Nummer 1 trägt.<br />
88 <strong>USB</strong> & <strong>iPod</strong> ® integration <strong>kit</strong> C
7. Bedienungsanleitung <strong>iPod</strong><br />
7.1. Abbildung des Radios<br />
Ein Diagramm des Radios mit Angabe der Tastenfunktionen finden Sie in der Betriebsanleitung des<br />
Fahrzeugs im Abschnitt über Audiobetrieb.<br />
7.2. Anschließen<br />
Anschließen des <strong>iPod</strong><br />
Schließen Sie den <strong>iPod</strong> mit dem speziellen <strong>USB</strong>-Kabel an die Buchse <strong>USB</strong>/AUX in der Mittelkonsole<br />
oder im Armaturenbrett an.<br />
Wenn die Zündung auf ACC oder ON gestellt wird, wird der <strong>iPod</strong> automatisch aktiviert. Auf dem<br />
Display des <strong>iPod</strong> erscheint ein Häkchen. Der <strong>iPod</strong> ist betriebsbereit.<br />
Solange der <strong>iPod</strong> an diese Einheit angeschlossen ist, kann er nicht ein- oder ausgeschaltet werden;<br />
die Batterie des <strong>iPod</strong> wird automatisch geladen.<br />
Wenn der <strong>iPod</strong> während der Wiedergabe angeschlossen ist, wird die Wiedergabe unterbrochen<br />
(Pause).<br />
Wenn die Zündung abgeschaltet wird, wird der <strong>iPod</strong> nicht abgeschaltet. Bitte sehen Sie in der<br />
Bedienungsanleitung des Gerätes nach, wie der Schlafmodus nach Betriebsunterbrechung zu<br />
aktivieren ist. Bei abgeschalteter Zündung wird der <strong>iPod</strong> nicht geladen.<br />
Das <strong>USB</strong> & <strong>iPod</strong> Integrations-Kit erfüllt den <strong>USB</strong>-Standard “<strong>USB</strong> 2.0 FS (12 MBPS)” und<br />
unterstützt daher folgende <strong>iPod</strong>-Modelle: <strong>iPod</strong> Nano (ab Firmware-Version 1.021.01), <strong>iPod</strong><br />
Nano G2 (ab Firmware-Version 1.02), <strong>iPod</strong> Generation 5 (ab Firmware-Version 1.021.01).<br />
Firmware‐Version 1.<strong>00</strong> oder älter sind nicht kompatibel.<br />
ó Hinweis: Informationen über den <strong>iPod</strong> finden Sie auf der Apple-Website.<br />
Entfernen des <strong>iPod</strong><br />
Der <strong>iPod</strong> kann jederzeit aus der Einheit entfernt werden.<br />
C<br />
<strong>USB</strong> & <strong>iPod</strong> ® integration <strong>kit</strong> 89
7.3. Ein-/Ausschalten<br />
Drücken Sie zum Einschalten die Taste [PWR-VOL].<br />
Drücken Sie zum Ausschalten erneut die Taste [PWR-VOL].<br />
7.4. Regeln der Lautstärke<br />
Drehen Sie [VOLUME] im Uhrzeigersinn, um die Lautstärke zu erhöhen.<br />
Drehen Sie [VOLUME] gegen den Uhrzeigersinn, um die Lautstärke zu verringern.<br />
7.5. Auswahl des <strong>iPod</strong>-Modus<br />
Drücken Sie zur Auswahl des <strong>iPod</strong>-Modus [DISC] auf der Haupteinheit. Bei jedem Drücken von<br />
[DISC] ändert sich der Modus wie folgt:<br />
Interne CD “ externe CDCH (= <strong>iPod</strong>) “ interne CD.<br />
ó Hinweis: Wenn der <strong>iPod</strong> (Device) über das Integrations-Kit für den externen CD-Wechsler<br />
angeschlossen ist, zeigt das Radio den Modus “externer CD-Wechsler” an.<br />
7.6. Tonabgleich im <strong>iPod</strong>-Modus<br />
Bässe/Höhen/Überblendregelung/Balance (Bass/Treble/Fader/Balance) lassen sich speziell für<br />
den <strong>iPod</strong>-Modus einstellen. Wenn Sie von <strong>iPod</strong> auf Radio- oder CD-Modus wechseln, werden die<br />
Audioeinstellungen speziell auf die Einstellungen des jeweiligen Modus umgestellt.<br />
Die Audioeinstellungen für die einzelnen Modi werden im Speicher der Haupteinheit abgelegt und<br />
automatisch aufgerufen, sobald ein bestimmter Modus gewählt wurde.<br />
Display-Radio mit Touch-Screen<br />
Drücken Sie zur Auswahl des Audio-Kontrollbildschirms die Taste [AUDIO CONTROL].<br />
Radio<br />
Drücken Sie den [Tune] Knopf zur Auswahl der gewünschten Funktion. Bei jedem Drücken<br />
des Tune-Reglers wechseln die wählbaren Funktionen wie folgt: BAS (Bässe) “ TRE (Höhen) “<br />
FAD (Überblendregler) “ BAL (Balance).<br />
Durch erneutes Drücken des Tune-Reglers (Tune Dial) wird die Audioeinstellung (Audio Control)<br />
beendet.<br />
Durch Drehen des [Tune] Knopfs nach links/rechts kann der ausgewählte Punkt eingestellt werden.<br />
ó Hinweis: Auch die EQ-Einstellungen am <strong>iPod</strong> beeinflussen die Wiedergabe. Angaben zum<br />
Regeln der <strong>iPod</strong> EQ-Einstellungen finden Sie in der Bedienungsanleitung des <strong>iPod</strong>.<br />
90 <strong>USB</strong> & <strong>iPod</strong> ® integration <strong>kit</strong> C
7.7. <strong>iPod</strong>-Sortierung<br />
Der <strong>iPod</strong>-Adapter kann Titel (Title) vom <strong>iPod</strong> wiedergeben, die nach Wiedergabelisten (Playlist)<br />
oder Alben geordnet sind. Das <strong>USB</strong> & <strong>iPod</strong> Integrations-Kit unterstützt nicht die Auswahl nach<br />
Interpret oder Genre.<br />
Sortierung nach Wiedergabelisten oder Album<br />
Normalerweise erfolgt die <strong>iPod</strong>-Auswahl nach Wiedergabelisten (Playlist).<br />
Um zur Albumsortierung zu wechseln, die Taste [RPT] lange drücken, bis (D_RPT) auf dem Display<br />
erscheint.<br />
Die Taste [RPT] erneut drücken, um zur Wiedergabelistensortierung zurückzukehren.<br />
ó Hinweis: Alben (Albums) werden in der gleichen Reihenfolge sortiert, wie auf dem <strong>iPod</strong>.<br />
7.8. Wiedergabelistenkonzept<br />
Der <strong>iPod</strong>-Adapter kann Titel vom <strong>iPod</strong> wiedergeben, die nach Wiedergabelisten geordnet sind.<br />
Wir empfehlen Ihnen, den Inhalt des <strong>iPod</strong> mit iTunes in Wiedergabelisten zu ordnen.<br />
Die Wiedergabelisten werden, mit Ausnahme der ersten, im <strong>iPod</strong> und in der Haupteinheit auf die<br />
gleiche Weise geordnet und aufgelistet.<br />
Die erste Wiedergabeliste kann einen anderen Inhalt enthalten:<br />
Nachdem der <strong>iPod</strong> angeschlossen wurde, enthält Wiedergabeliste 1 die Wiedergabeliste, die vor<br />
dem Anschließen an die Haupteinheit zuletzt ausgewählt war.<br />
Nach dem Ändern der ersten Wiedergabeliste mit Disc up zeigt das Gerät wieder die<br />
Wiedergabeliste Nummer 1 an, die alle Titel auf dem <strong>iPod</strong> enthält.<br />
Nach dem zweiten Disc up wechselt das Gerät zu Wiedergabeliste 2.<br />
ó Hinweis: Wenn eine Wiedergabeliste leer ist, werden Musikinhalte von der vorherigen<br />
Wiedergabeliste auf die leere Wiedergabeliste übertragen.<br />
ó Hinweis: Beim Wechsel auf eine leere Wiedergabeliste wird der zurzeit wiedergegebene Titel<br />
weiter abgespielt.<br />
ó Hinweis: Die Anzahl der Wiedergabelisten ist unbegrenzt.<br />
C<br />
<strong>USB</strong> & <strong>iPod</strong> ® integration <strong>kit</strong> 91
7.9. Auswahl Wiedergabeliste/Album<br />
Direkte Auswahl Wiedergabeliste/Album<br />
ó Hinweis: Tasten für die direkte Auswahl von Wiedergabeliste/Album (Direct Playlist/Album<br />
selection) stehen nur bei Radios mit Touch-Screen-Display zur Verfügung.<br />
Drücken Sie [CHANGE DISCS], dann eine der Tasten [1] bis [6].<br />
(Display-Aufbau oder Funktionen können je nach<br />
Haupteinheit unterschiedlich sein. Einzelheiten siehe<br />
Fahrzeughandbuch.)<br />
Auswahl Wiedergabeliste/Album mit Disc aufwärts/abwärts.<br />
Bitte sortieren Sie zuerst nach Wiedergabeliste (Playlist) oder Album.<br />
Drücken Sie [DISC ^], um zur/zum nächsten Wiedergabeliste/Album zu wechseln.<br />
ó Hinweis: Sobald die/das letzte Wiedergabeliste/Album erreicht ist, gelangen Sie mit dem<br />
nächsten Tastendruck wieder zur/zum ersten Wiedergabeliste/Album.<br />
Drücken Sie [DISC v], um zur/zum vorherigen Wiedergabeliste/Album zu wechseln.<br />
ó Hinweis: Sobald die/das erste Wiedergabeliste/Album erreicht ist, gelangen Sie mit dem<br />
nächsten Tastendruck wieder zur/zum letzten Wiedergabeliste/Album.<br />
ó Hinweis: Bei AVN-Haupteinheiten ist diese Funktion nur über Lenkradschalter verfügbar.<br />
Siehe Abschnitt 8.4.<br />
92 <strong>USB</strong> & <strong>iPod</strong> ® integration <strong>kit</strong> C
7.10. Titelauswahl<br />
Drücken Sie kurz auf [TRACK ^], um zum nächsten Titel (Title) zu springen.<br />
ó Hinweis: Wenn Sie zum letzten Titel gelangen, springen Sie durch erneutes Drücken dieser<br />
Taste zum ersten Titel innerhalb derselben Wiedergabeliste/desselben Albums.<br />
ó Hinweis: Um zum ersten Titel der nächsten Wiedergabeliste zu gelangen, drücken Sie bitte<br />
[DISC ^].<br />
Drücken Sie kurz [TRACK v], um zum Anfang des aktuellen Titels zu springen, erneut drücken, um<br />
zum vorherigen Titel zu springen.<br />
ó Hinweis: Wenn diese Taste erneut gedrückt wird, nachdem Sie den ersten Titel einer<br />
Wiedergabeliste/eines Albums erreicht haben, gelangen Sie zum Anfang des letzten Titels<br />
derselben Wiedergabeliste/desselben Albums (Playlist/Album).<br />
ó Hinweis: Um zur vorherigen Wiedergabeliste zu wechseln, drücken Sie bitte [DISC v].<br />
ó Hinweis: Die Anzahl der Titel innerhalb einer Wiedergabeliste ist unbegrenzt.<br />
ó Hinweis: Aufgrund der Einschränkungen des Displays werden die Titel innerhalb einer<br />
Wiedergabeliste von 1 bis 99 durchnummeriert.<br />
Wenn die Anzahl der Titel 99 übersteigt, beginnt die Nummerierung wieder bei Titel 1.<br />
7.11. Suche im Titel<br />
[TRACK v] lange drücken, um innerhalb des aktuellen Titels “zurückzuspulen”.<br />
Wenn der Anfang des Titels erreicht ist, wird der Titel von Anfang an abgespielt.<br />
[TRACK ^] lange drücken, um innerhalb des aktuellen Titels “vorzuspulen”.<br />
Wenn das Ende des Titels erreicht ist, beginnt die Wiedergabe des nächsten Titels.<br />
7.12. Titel wiederholen<br />
[RPT] kurz drücken, um die Wiederholfunktion zu aktivieren. Der derzeit gewählte Titel wird dann<br />
ständig wiederholt. (RPT) erscheint auf dem Display.<br />
Um die Wiederholfunktion zu deaktivieren, [RPT] erneut drücken oder mit [TRACK ^] oder<br />
[TRACK v] einen anderen Titel wählen.<br />
C<br />
<strong>USB</strong> & <strong>iPod</strong> ® integration <strong>kit</strong> 93
7.13. Zufallswiedergabe<br />
Zufallswiedergabe (Random Play) innerhalb einer Wiedergabeliste (Playlist)<br />
Kurz [RAND] drücken, um die Zufallswiedergabe aller Musikdateien in der ausgewählten<br />
Wiedergabeliste zu aktivieren.<br />
Zum Deaktivieren der Zufallswiedergabefunktion [RAND] erneut kurz drücken.<br />
Durch Drücken von [TRACK ^] im Zufallswiedergabemodus wird die Wiedergabe des nächsten<br />
zufällig ausgewählten Titels gestartet. Durch Drücken von [TRACK v] im Zufallswiedergabemodus<br />
wird der zuvor abgespielte Titel erneut wiedergegeben.<br />
ó Hinweis: Wurde die Zufallswiedergabe vor dem Anschließen am <strong>iPod</strong> aktiviert, bleibt sie<br />
nach dem Anschließen aktiviert. Wird die Zufallswiedergabe aktiviert, während der <strong>iPod</strong><br />
angeschlossen ist, bleibt sie aktiviert, nach dem der <strong>iPod</strong> entfernt wird.<br />
Zufallswiedergabe (Random Play) innerhalb eines Albums<br />
Wählen Sie zuerst die Albumsortierung, indem Sie (D_RPT) aktivieren, drücken Sie dann kurz<br />
[RAND], um die Zufallswiedergabe aller Titel innerhalb des ausgewählten Albums zu aktivieren.<br />
Zufällige Wiedergabe des gesamten Inhalts des <strong>iPod</strong><br />
[RAND] lange drücken, um die Zufallswiedergabe aller im <strong>iPod</strong> abgelegten Musikdateien (music<br />
Titles) zu aktivieren (Zufallswiedergabe von Wiedergabeliste 1).<br />
Zum Deaktivieren der Zufallswiedergabefunktion [RAND] erneut kurz drücken.<br />
Durch Drücken von [TRACK ^] im Zufallswiedergabemodus wird die Wiedergabe des nächsten<br />
zufällig ausgewählten Titels gestartet.<br />
Durch Drücken von [TRACK v] im Zufallswiedergabemodus wird der zuvor abgespielte Titel erneut<br />
wiedergegeben.<br />
Durch Drücken von [DISC^]/[DISC v] im Zufallswiedergabemodus wird diese Funktion deaktiviert.<br />
ó Hinweis: Wenn die Disc-Zufallswiedergabefunktion vom Radio aus aktiviert wird, bleibt diese<br />
Funktion bestehen, nachdem der <strong>iPod</strong> entfernt wurde.<br />
7.14. Display-Daten<br />
Durch kurzes Drücken von [DISP]/[TEXT] kann man zwischen Seiten mit verschiedenen Informationen<br />
wechseln, die abhängig vom Display-Typ in einer bestimmten Reihenfolge gezeigt werden.<br />
Displays, die CD-Text nicht unterstützen:<br />
Wiedergabelistennummer/Album & Titelnummer “ abgelaufene Wiedergabezeit “<br />
Wiedergabelistennummer/Album & Titelnummer.<br />
Displays, die CD-Text unterstützen:<br />
Wiedergabelistennummer/Album & Titelnummer “ abgelaufene Wiedergabezeit “<br />
Name der Wiedergabeliste/des Albums “ Titelbezeichnung “ Wiedergabelistennummer/<br />
Album & Titelnummer.<br />
94 <strong>USB</strong> & <strong>iPod</strong> ® integration <strong>kit</strong> C
Durch langes Drücken von [DISP]/[[TEXT] können Sie auf zusätzliche Informationen auf derselben<br />
Seite wechseln.<br />
Ein Piepton ist zu hören. 5 Sekunden nach dem Loslassen der Taste wechselt das Display wieder in<br />
den ursprünglichen Zustand.<br />
Displays mit Touch-Screen<br />
Durch Drücken von [TEXT] können Sie zwischen Seiten mit verschiedenen Arten von Informationen<br />
wechseln.<br />
Durch Drücken von [CHANGE DISCS] können Sie zur Seite mit Direktauswahltasten für<br />
Wiedergabelisten/Alben (Playlists/Albums) wechseln.<br />
(Display-Aufbau oder Funktionen können je nach<br />
Haupteinheit unterschiedlich sein. Einzelheiten siehe<br />
Fahrzeughandbuch.)<br />
C<br />
<strong>USB</strong> & <strong>iPod</strong> ® integration <strong>kit</strong> 95
Durch Drücken von [SELECT] neben dem Titelnamen (Track name) können Sie zur Seite mit<br />
Direktauswahltasten für Titel (Title) wechseln. Mit den Auf- und Abwärtstasten links auf dem<br />
Display können Sie innerhalb der Liste navigieren.<br />
Die angezeigten Titel können durch Drücken des angegebenen Bereichs des Displays direkt<br />
angewählt werden.<br />
(Display-Aufbau oder Funktionen können je nach<br />
Haupteinheit unterschiedlich sein. Einzelheiten siehe<br />
Fahrzeughandbuch.)<br />
Einschränkungen des Displays<br />
Aufgrund von Einschränkungen des Displays werden die Wiedergabelisten/Alben (Playlists/Albums)<br />
in Seiten unterteilt und nach Modulen von 1 bis 6 nummeriert. Die Angabe der Zahlen ab 7 kann<br />
auf der Haupteinheit nicht angezeigt werden, daher erfolgt die Nummerierung der nächsten<br />
Wiedergabelisten/Alben wieder mit 1 bis 6. Im Namen der Wiedergabeliste/des Albums wird<br />
jedoch die/das aktuelle Wiedergabeliste/Album angegeben.<br />
7.15. Scan-Funktion<br />
Die [SCN] Tasten können zwar erscheinen, diese Funktion steht jedoch für <strong>iPod</strong> nicht zur<br />
Verfügung.<br />
96 <strong>USB</strong> & <strong>iPod</strong> ® integration <strong>kit</strong> C
8. Lenkrad-Fernbedienung<br />
8.1. Modusauswahl<br />
Bei jedem Drücken der [MODE] Taste wechselt die Audioeinheit wie folgt durch die Modi FM-AM-CD:<br />
FM1 “ FM2 “ FM3 “ CD/DVD “ <strong>USB</strong>/iPOD “ Bluetooth “ AUX “ AM “ DAB “ FM1<br />
8.2. Lautstärke<br />
[VOL +] drücken oder drehen, um die Lautstärke zu erhöhen.<br />
[VOL -] drücken oder drehen, um die Lautstärke zu verringern.<br />
8.3. Datei/Titel wechseln<br />
Drücken Sie die Taste [^], um zur/zum nächsten Datei/Titel (File/Title) zu wechseln.<br />
Drücken Sie [v], um zum Anfang der/des aktuellen Datei/Titels zu springen, erneut drücken, um<br />
zur/zum vorherigen Datei/Titel zu springen.<br />
8.4. Ordner/Wiedergabeliste/Album<br />
wechseln<br />
Drücken Sie lange Taste [^], um zum/zur/zum nächsten Ordner/Wiedergabeliste/Album (Folder/<br />
Playlist/Album) zu wechseln.<br />
Drücken Sie [v], um zum/zur/zum vorherigen Ordner/Wiedergabeliste/Album zu wechseln.<br />
ó Hinweis: Bei Verwendung des <strong>iPod</strong> muss zunächst die Wiedergabelisten- oder<br />
Albumsortierung an der Haupteinheit gewählt werden.<br />
C<br />
<strong>USB</strong> & <strong>iPod</strong> ® integration <strong>kit</strong> 97
9. Fehlerbehebung<br />
Wenn Sie eine Störung vermuten, überprüfen Sie die nachfolgend beschriebenen Punkte.<br />
Problem<br />
Titel werden nicht<br />
angezeigt.<br />
SCAN-Taste reagiert nicht.<br />
Einige Titel werden nicht<br />
gefunden.<br />
<strong>USB</strong>-Massenspeicher/<strong>iPod</strong><br />
funktioniert nicht korrekt.<br />
<strong>USB</strong>-Massenspeicher/<strong>iPod</strong><br />
funktioniert nach dem<br />
erneuten Anschließen nicht<br />
korrekt.<br />
Mögliche Lösung/Erklärung<br />
Drücken Sie TEXT.<br />
Klären Sie mit Ihrem Vertragshändler, ob Ihre Radioeinheit<br />
CD-Text auf externem CD-Wechsler unterstützt.<br />
Die SCAN-Funktion ist nur für <strong>USB</strong>-Massenspeicher verfügbar, sie<br />
funktioniert beim <strong>iPod</strong> nicht, auch wenn die SCN-Taste eventuell<br />
angezeigt wird.<br />
Bei <strong>USB</strong>-Massenspeichern müssen die Anweisungen im Abschnitt<br />
“Ordnersortierung“ befolgt werden.<br />
Einige MP3-Geräte speichern die Titel in eigenen Formaten oder<br />
nicht im Massenspeicher-Volume. Bitte informieren Sie sich beim<br />
Hersteller.<br />
Das Integrations-Kit unterstützt nur MP3- und WMA-Dateien.<br />
Bei Verwendung des <strong>iPod</strong> empfehlen wir, dessen Inhalt mit<br />
iTunes in Wiedergabelisten zu ordnen. Alle Titel befinden sich<br />
grundsätzlich in Wiedergabeliste 1.<br />
Trennen Sie das Kabel von der <strong>USB</strong>/AUX-Buchse. Sobald das<br />
Hauptmenü für <strong>USB</strong>-Massenspeicher/<strong>iPod</strong> erscheint, schließen Sie<br />
das Kabel wieder an. (siehe Abschnitt Reset).<br />
Überprüfen Sie die Spezifikation auf Kompatibilität.<br />
<strong>USB</strong>-Massenspeicher/<strong>iPod</strong> hat den Trennvorgang nicht erkannt.<br />
Führen Sie ein Reset des <strong>USB</strong>-Massenspeichers/<strong>iPod</strong> durch (siehe<br />
entsprechende Anleitung).<br />
Aufgrund der besonderen Beschaffenheit der Hardware und<br />
Implementierung von Kartenlesern können wir die Kompatibilität<br />
mit all diesen Geräten nicht in vollem Umfang garantieren. Dies<br />
gilt auch für andere elektronische Geräte mit externem Speicher.<br />
Überprüfen Sie die Spezifikation auf Kompatibilität.<br />
Vergewissern Sie sich bei Verwendung des <strong>iPod</strong>, dass Sie die neueste Version von iTunes verwenden<br />
und dass die neueste Firmware-Version von der Apple-Website auf den <strong>iPod</strong> geladen ist.<br />
Lässt sich das Problem mittels der beschriebenen Vorschläge nicht lösen, empfehlen wir, sich mit<br />
dem Fahrzeug zum Vertragshändler zu begeben.<br />
Bei Fragen zum <strong>USB</strong>-Massenspeicher oder zum <strong>iPod</strong> verweisen wir auf die betreffende<br />
Bedienungsanleitung oder die Website des Herstellers.<br />
98 <strong>USB</strong> & <strong>iPod</strong> ® integration <strong>kit</strong> C
10. Reset<br />
Unter bestimmten Bedingungen können gelegentlich Softwarefehler auftreten, sodass Ihr<br />
<strong>USB</strong>-Massenspeicher oder <strong>iPod</strong> sich aufhängen kann. Mit verschiedenen Schritten lassen sich<br />
Integrations-Kit (Integration <strong>kit</strong>) und Mediengeräte (Media Devices) zurückstellen, ohne dass ihr<br />
Inhalt und ihre Einstellungen beeinträchtigt werden:<br />
Schalten Sie das Radio aus und ein.<br />
Wenn das Problem nicht gelöst wird:<br />
Trennen Sie den <strong>USB</strong>-Massenspeicher/<strong>iPod</strong> von der <strong>USB</strong>/AUX-Buchse und schließen Sie ihn<br />
wieder an. Vergewissern Sie sich, dass der Stecker in einwandfreiem Zustand ist.<br />
Wenn das Problem nicht gelöst wird, entfernen Sie den <strong>USB</strong>-Massenspeicher/<strong>iPod</strong> und:<br />
Drehen Sie den Zündschlüssel eine Minute lang auf OFF und schalten Sie die Zündung wieder ein.<br />
Schließen Sie den <strong>iPod</strong> wieder an.<br />
Wenn das Problem nicht gelöst wird, entfernen Sie den <strong>USB</strong>-Massenspeicher/<strong>iPod</strong>, schalten<br />
Sie die Zündung aus und führen Sie ein Reset Ihres <strong>USB</strong>-Massenspeichers/<strong>iPod</strong> durch. (Siehe<br />
entsprechende Bedienungsanleitung)<br />
C<br />
<strong>USB</strong> & <strong>iPod</strong> ® integration <strong>kit</strong> 99
11. Technische Daten<br />
<strong>USB</strong> & <strong>iPod</strong> Integrations-Kit ECU:<br />
Stromversorgung: Gleichstrom 13,2 V (10,5 V - 16 V)<br />
Max. Leistungsaufnahme:<br />
Max. Leistungsaufnahme im Standby-Betrieb:<br />
Maße ECU:<br />
Gewicht ECU:<br />
Max. Audioausgang:<br />
Max. Audioausgangsimpedanz:<br />
11.1. <strong>USB</strong><br />
< 1 A<br />
< 1 mA<br />
125,5 mm (B) x 37,5 mm (H) x 117,5 mm (T)<br />
0,36 kg<br />
2 VRMS<br />
220 Ohm<br />
<strong>USB</strong>-Spezifikation: <strong>USB</strong> 2.0 FS (12 MBPS), Massenspeicherklasse (Mass Storage class) (BOT-Methode)<br />
(*wenn Zweifel bestehen, wenden Sie sich an Ihren Händler oder den Gerätehersteller, um die<br />
Kompatibilität mit der <strong>USB</strong>-Massenspeicherklasse zu überprüfen)<br />
Max. Stromzufuhr: 5<strong>00</strong> mA (*Der Verbrauch der meisten externen Festplatten liegt über diesem<br />
Wert)<br />
Anzahl Dateien (Files) und Ordner (Folder):<br />
• Gesamtzahl der Ordner im Gerät: MAX 999<br />
• Gesamtzahl der Dateien im Gerät: MAX 65.025<br />
• Gesamtzahl der Dateien in einem Ordner: MAX 255<br />
• Ordnerebenen: 8 Ebenen<br />
MP3<br />
• MPEG1 AUDIO LAYER II, III (VBR wird unterstützt.)<br />
Bitrate: 32 - 320 kbps S<strong>amp</strong>ling-Frequenz: 44,1/48/32 kHz<br />
• MPEG2 AUDIO LAYER II, III (VBR wird unterstützt.)<br />
Bitrate: 32 - 160 kbps S<strong>amp</strong>ling-Frequenz: 22,05/24/16 kHz<br />
• MPEG 2.5 (VBR wird unterstützt.)<br />
Bit-Rate: 32 - 160 kbps S<strong>amp</strong>ling-Frequenz: 11,025/12/8 kHz<br />
WMA<br />
• Ver9 (Standard, VBR) HIGH PROFILE<br />
Bit-Rate: 32 - 320 kbps, S<strong>amp</strong>ling-Frequenz: 44,1 k/48 k/32 kHz<br />
• Laden des Geräts wird bis zur maximalen Stromzufuhr unterstützt<br />
1<strong>00</strong> <strong>USB</strong> & <strong>iPod</strong> ® integration <strong>kit</strong> C
11.2. <strong>iPod</strong>/iPhone<br />
Unterstützte <strong>iPod</strong>/iPhone:<br />
• Nano (ab Firmware-Version 1.021.01)<br />
• Nano G2 (ab Firmware-Version 1.02)<br />
• Generation 5 (ab Firmware-Version 1.021.01)<br />
• iPhone (ab Firmware-Version 1.021.01)<br />
Firmware-Version 1.<strong>00</strong> oder älter sind nicht kompatibel.<br />
Anzahl Titel und Wiedergabelisten<br />
• Gesamtzahl der Wiedergabelisten im Gerät: MAX 9.999<br />
• Gesamtzahl der Titel im Gerät: MAX 65.535<br />
• Gesamtzahl der Titel in einer Wiedergabeliste: MAX 65.535<br />
PODCAST und PODBOOKS unterstützt<br />
Wiedergabeliste (Playlists), Album, Titel (Songs) unterstützt (Interpret und Genre werden nicht<br />
unterstützt)<br />
Laden des Geräts wird unterstützt<br />
Verkaufsagentur: <strong>Toyota</strong> Motor Europe N.V./S.A.<br />
Kundendienst: <strong>Toyota</strong> Motor Europe N.V./S.A.<br />
Hersteller: Panasonic Automotive Systems Europe GmbH.<br />
C<br />
<strong>USB</strong> & <strong>iPod</strong> ® integration <strong>kit</strong> 101
102 <strong>USB</strong> & <strong>iPod</strong> ® integration <strong>kit</strong> C
Inhoudsopgave<br />
1. Inleiding............................................................................................................... 107<br />
2. Veiligheidsinformatie........................................................................................... 108<br />
2.1. Veiligheidssymbolen................................................................................................. 108<br />
2.2. Voorzichtig............................................................................................................... 109<br />
3. Vrijstelling van aansprakelijkheid....................................................................... 111<br />
4. Belangrijke informatie......................................................................................... 112<br />
5. Kort functieoverzicht........................................................................................... 113<br />
6. Bedieningsinstructies voor <strong>USB</strong>-apparaat voor massaopslag.............................. 114<br />
6.1. Radio afbeelding...................................................................................................... 114<br />
6.2. Aansluiten................................................................................................................ 114<br />
6.3. In/uitschakelen......................................................................................................... 115<br />
6.4. Volume verhogen/verlagen...................................................................................... 115<br />
6.5. Selecteren van de <strong>USB</strong>-modus.................................................................................. 115<br />
6.6. Geluidsinstellingen in de <strong>USB</strong>-modus....................................................................... 115<br />
6.7. <strong>USB</strong> sorteren ........................................................................................................... 116<br />
6.8. Map selecteren......................................................................................................... 117<br />
6.9. Bestand selecteren................................................................................................... 118<br />
6.10. Zoeken in Bestand.................................................................................................... 118<br />
6.11. Bestand herhalen..................................................................................................... 118<br />
6.12. Map herhalen........................................................................................................... 119<br />
6.13. In willekeurige volgorde afspelen (Random Play/shuffle) .......................................... 119<br />
6.14. Scannen................................................................................................................... 119<br />
6.15. Gegevens weergeven .............................................................................................. 120<br />
7. Bedieningsinstructies voor <strong>iPod</strong>-apparaat........................................................... 123<br />
7.1. Radioafbeelding....................................................................................................... 123<br />
7.2. Aansluiten................................................................................................................ 123<br />
7.3. In/uitschakelen......................................................................................................... 124<br />
7.4. Volume verhogen/verlagen...................................................................................... 124<br />
7.5. Selecteren van de <strong>iPod</strong>-modus................................................................................. 124<br />
7.6. Geluidsinstellingen in de <strong>iPod</strong>-modus....................................................................... 124<br />
7.7. <strong>iPod</strong> sorteren............................................................................................................ 125<br />
7.8. Concept Afspeellijst.................................................................................................. 125<br />
7.9. Afspeellijst/Album selecteren.................................................................................... 126<br />
7.10. Nummer selecteren.................................................................................................. 127<br />
7.11. Zoeken in nummer................................................................................................... 127<br />
D<br />
<strong>USB</strong> & <strong>iPod</strong> ® integration <strong>kit</strong> 103
7.12. Titel herhalen........................................................................................................... 127<br />
7.13. In willekeurige volgorde afspelen (Random Play/shuffle)........................................... 128<br />
7.14. Gegevens weergeven .............................................................................................. 128<br />
7.15. Scannen................................................................................................................... 130<br />
8. Afstandsbediening op stuurwiel.......................................................................... 131<br />
8.1. Modus selecteren..................................................................................................... 131<br />
8.2. Geluidssterkte.......................................................................................................... 131<br />
8.3. Naar Bestand/Nummer switchen.............................................................................. 131<br />
8.4. Veranderen van Map/Afspeellijst/Album.................................................................... 131<br />
9. Problemen oplossen............................................................................................. 132<br />
10. Resetten .............................................................................................................. 133<br />
11. Specificaties.......................................................................................................... 134<br />
11.1. <strong>USB</strong> ......................................................................................................................... 134<br />
11.2. <strong>iPod</strong>/iPhone............................................................................................................. 135<br />
104 <strong>USB</strong> & <strong>iPod</strong> ® integration <strong>kit</strong> D
Aanbeveling<br />
Neem deze handleiding door om het maximum uit dit systeem te halen.<br />
We raden u aan om deze handleiding in de auto te bewaren. U zult dan in geval van nood<br />
sneller en gemakkelijker de nodige informatie terugvinden.<br />
Uw plaatselijke erkende handelaar zal u graag helpen met de vragen die u zou kunnen hebben<br />
over het systeem of de werking ervan als u de informatie die u zoekt niet kunt vinden in deze<br />
handleiding of in het hoofdstuk “Problemen oplossen”.<br />
<strong>Toyota</strong> raadt aan om alleen onderdelen en accessoires te gebruiken die getest en goedgekeurd<br />
werden door <strong>Toyota</strong> op het vlak van veiligheid, werking en geschiktheid voor het beoogde doel.<br />
Het is de bedoeling van deze bedieningsinstructies dat u de <strong>USB</strong>- & <strong>iPod</strong> ® -integratie<strong>kit</strong> veilig en<br />
vlot kunt bedienen.<br />
In deze bedieningsinstructies worden de functies van de <strong>USB</strong> & <strong>iPod</strong> ® -integratie<strong>kit</strong><br />
beschreven.<br />
ù<br />
D<br />
<strong>USB</strong> & <strong>iPod</strong> ® integration <strong>kit</strong> 105
106 <strong>USB</strong> & <strong>iPod</strong> ® integration <strong>kit</strong> D
1. Inleiding<br />
Dank u voor uw aankoop.<br />
Gelieve deze instructies aandachtig te lezen zodat u het product op de juiste manier kunt<br />
gebruiken. Gelieve absoluut “Veiligheidsinformatie” (pagina 108) te lezen vooraleer u de <strong>kit</strong><br />
gebruikt.<br />
Deze Gebruiksinstructies moeten worden bijgehouden voor later.<br />
D<br />
<strong>USB</strong> & <strong>iPod</strong> ® integration <strong>kit</strong> 107
2. Veiligheidsinformatie<br />
• Lees de gebruiksaanwijzing van de adapter en alle andere onderdelen van de geluidsinstallatie<br />
van uw wagen alvorens het systeem te gebruiken. Ze bevatten instructies over hoe u het<br />
systeem op een veilige en doeltreffende manier dient te gebruiken. <strong>Toyota</strong> Motor Europe NV/SA<br />
aanvaardt geen enkele aansprakelijkheid voor eventuele problemen die voortvloeien uit het niet<br />
naleven van de in deze handleiding gegeven instructies.<br />
• Deze handleiding maakt gebruik van pictogrammen om u te tonen hoe u het product veilig<br />
kunt gebruiken en om u te waarschuwen voor mogelijke gevaren die resulteren uit foutieve<br />
aansluitingen en bedieningen. De betekenis van die pictogrammen wordt hieronder uitgelegd.<br />
Het is belangrijk dat u precies weet wat al die pictogrammen betekenen om deze handleiding<br />
en het systeem correct te kunnen gebruiken.<br />
2.1. Veiligheidssymbolen<br />
m<br />
Waarschuwing:<br />
Als dit symbool voor een tekstfragment staat, moet u deze<br />
aanbevelingen volgen. Zo vermijdt u onherstelbare schade aan uw wagen, systeem of<br />
aangesloten apparatuur of ongevallen met lichamelijke letsels of de dood tot gevolg.<br />
ò<br />
Opgelet: Wanneer dit symbool voor een tekst staat, moet u heel voorzichtig zijn en de<br />
aanbevelingen volgen om schade aan uw auto, systeem of aangesloten apparatuur te<br />
vermijden of letsels te voorkomen.<br />
Afdanken: Na dit symbool staan aanbevelingen of waarschuwingen i.v.m. de wettelijke<br />
regelingen voor het afdanken van elektrische toestellen.<br />
ó Opmerking: Een eenvoudige aanbeveling voor uw gemak en voor een optimale werking van<br />
uw systeem.<br />
108 <strong>USB</strong> & <strong>iPod</strong> ® integration <strong>kit</strong> D
2.2. Voorzichtig<br />
m<br />
Neem volgende waarschuwing in acht bij het gebruiken van dit apparaat!<br />
• De bestuurder mag niet naar het display kijken noch het systeem bedienen tijdens<br />
het rijden.<br />
Het kijken naar het display of het bedienen van het systeem kan ervoor zorgen dat de<br />
bestuurder de weg uit het oog verliest en een ongeval veroorzaakt. Parkeer de wagen altijd op<br />
een veilige plaats en trek de handrem aan alvorens naar het display te kijken of het systeem te<br />
bedienen. Anders kunnen er problemen ontstaan.<br />
• Het apparaat niet uit elkaar nemen of wijzigen.<br />
U mag het apparaat nooit zelf uit elkaar nemen, wijzigen of trachten te herstellen. Als het<br />
product reparatie vereist, dient u contact op te nemen met uw Erkende Verdeler.<br />
• Gebruik het apparaat niet wanneer het defect is.<br />
Als het apparaat defect is (geen voeding, geen klank) of een abnormale toestand vertoont<br />
(vreemde voorwerpen bevat, werd blootgesteld aan water, rook of geur verspreidt), dient u<br />
hem onmiddellijk uit te schakelen en contact op te nemen met uw Erkende Verdeler.<br />
• Raadpleeg uw erkende verdeler voor het vervangen van de zekering.<br />
Wanneer de zekering doorsmelt, dient u de oorzaak te elimineren en ze door een<br />
gekwalificeerde onderhoudstechnicus te laten vervangen door een voor dit apparaat<br />
voorgeschreven zekering. Een verkeerde installatie van de zekering kan rookontwikkeling,<br />
brand en schade aan het product veroorzaken.<br />
Neem volgende voorzorgen bij het gebruiken van deze <strong>kit</strong>!<br />
• Houd het geluidsvolume op een gepast niveau.<br />
Houd het geluidsvolume laag genoeg om de verkeersgeluiden te kunnen horen tijdens het rijden.<br />
• Gebruik dit apparaat niet in andere voertuigen of buiten uw wagen.<br />
Het niet naleven van dit voorschrift kan leiden tot rookontwikkeling, brand, elektrische<br />
schokken, letsels of andere problemen.<br />
• Gebruik de <strong>kit</strong> niet te lang met uitgeschakelde motor.<br />
Dit ontlaadt de accu.<br />
• Stel de adapter of het <strong>USB</strong>-apparaat voor massaopslag/de <strong>iPod</strong> niet bloot aan<br />
direct zonlicht of buitengewone hitte.<br />
Verhoging van de inwendige temperatuur van de apparaten kan leiden tot rookontwikkeling,<br />
brand of schade aan de apparaten leiden.<br />
D<br />
<strong>USB</strong> & <strong>iPod</strong> ® integration <strong>kit</strong> 109
• Gebruik het product nooit op plaatsen waar ze blootstaan aan water, vocht of stof.<br />
Blootstelling van de adapter, het <strong>USB</strong>-apparaat voor massaopslag of de <strong>iPod</strong>-speler aan water,<br />
vocht of stof kan leiden tot rookontwikkeling, brand of andere schade aan de apparaten.<br />
Zorg er in het bijzonder voor dat de eenheden niet nat worden in een carwash of tijdens<br />
regenachtige dagen.<br />
• Installatie: alvorens het systeem zelf te installeren of uit te breiden, dient u de installatieinstructies<br />
zorgvuldig te lezen.<br />
• Zet het <strong>USB</strong>-apparaat voor massaopslag/de <strong>iPod</strong>-speler goed vast als u het/hem<br />
gebruikt.<br />
Zorg ervoor dat het <strong>USB</strong>-apparaat voor massaopslag/de <strong>iPod</strong> niet op de vloer van uw wagen<br />
terechtkomt, waar het/hij onder de pedalen geblokkeerd zou kunnen raken.<br />
• Bijzonderheden over <strong>USB</strong>-apparaten voor massaopslag of <strong>iPod</strong>-spelers vindt u in<br />
hun respectievelijke handleidingen.<br />
110 <strong>USB</strong> & <strong>iPod</strong> ® integration <strong>kit</strong> D
3. Vrijstelling van aansprakelijkheid<br />
• Reparaties van schade veroorzaakt door brand, aardbevingen, handelingen van derden of<br />
andere ongevallen, of een onopzettelijk of toevallig verkeerd gebruik, een foutief gebruik, of<br />
een gebruik onder normale omstandigheden, zijn in principe ten laste van de gebruiker.<br />
• <strong>Toyota</strong> Motor Europe NV/SA kan niet aansprakelijk worden gesteld voor incidentele schade<br />
veroorzaakt door het gebruik of het niet-gebruiken van dit product, zoals derving van<br />
bedrijfswinsten of verandering of verlies van gegevens in een geheugen.<br />
• <strong>Toyota</strong> Motor Europe NV/SA aanvaardt geen verantwoordelijkheid voor verlorengegane<br />
gegevens op het <strong>USB</strong>-apparaat voor massaopslag of de <strong>iPod</strong>, zelfs niet wanneer de gegevens<br />
verloren gaan bij het gebruiken van de adapter.<br />
D<br />
<strong>USB</strong> & <strong>iPod</strong> ® integration <strong>kit</strong> 111
4. Belangrijke informatie<br />
Deze adapter is bestemd voor het beheren en beluisteren van muziekbestanden (music Files) op<br />
<strong>USB</strong>-apparaten voor massaopslag of een <strong>iPod</strong> via een originele hoofdeenheid.<br />
• <strong>iPod</strong> is een handelsmerk van Apple Inc., geregistreerd in de Verenigde Staten en andere landen.<br />
• De bedieningswijze kan verschillen naargelang de softwareversie van het <strong>USB</strong>-apparaat voor<br />
massaopslag en de <strong>iPod</strong>.<br />
• De bediening kan verschillen naar gelang van de hoofdeenheid waar de adapter op wordt<br />
aangesloten.<br />
• Neem contact op met uw erkende verdeler om na te vragen of uw hoofdeenheid compatibel is<br />
met de <strong>USB</strong>- & <strong>iPod</strong>-integratie<strong>kit</strong>.<br />
112 <strong>USB</strong> & <strong>iPod</strong> ® integration <strong>kit</strong> D
5. Kort functieoverzicht<br />
Knop/toets Actie <strong>USB</strong>-apparaat voor<br />
massaopslag<br />
Volgende/<br />
vorige track<br />
(TRACK UP/<br />
DOWN)<br />
DISC UP/<br />
DOWN<br />
RPT<br />
RND<br />
SCN<br />
TEXT/<br />
DISP<br />
DISC<br />
VERWISSELEN<br />
(CHANGE DISCS)<br />
SELECTEREN<br />
(SELECT)<br />
Kort indrukken<br />
Volgend/vorig Bestand<br />
(File next/previous)<br />
<strong>iPod</strong><br />
Volgend/vorig nummer<br />
(Title next/previous)<br />
Lang indrukken Snel vooruit/achteruit Snel vooruit/achteruit<br />
Kort indrukken<br />
Volgende/vorige Map<br />
(Folder next/previous)<br />
Afspeellijst/Volgend/vorig<br />
Album (Playlist/Album<br />
next/previous)<br />
Kort indrukken Bestand herhalen Titel herhalen<br />
Lang indrukken Map herhalen Albumsortering<br />
activeren<br />
Kort indrukken Nummers van huidige Nummers van huidige<br />
Map in willekeurige Afspeellijst/huidig Album<br />
volgorde afspelen<br />
in willekeurige volgorde<br />
afspelen<br />
Lang indrukken<br />
Kort indrukken<br />
Lang indrukken<br />
Kort indrukken<br />
Lang indrukken<br />
Kort indrukken<br />
Kort indrukken<br />
Volledig <strong>USB</strong>-geheugen<br />
in willekeurige volgorde<br />
afspelen<br />
Eerste 10 sec. van<br />
Bestanden in huidige Map<br />
scannen<br />
Eerste 10 sec. van eerste<br />
Bestand van elke Map<br />
scannen<br />
Naar volgende<br />
displaypagina gaan<br />
Naar volgende digits of<br />
weergegeven data gaan<br />
Pagina met toetsen voor<br />
rechtstreeks selecteren<br />
Map openen<br />
Pagina met toetsen voor<br />
rechtstreeks selecteren van<br />
Bestand openen<br />
Volledig <strong>iPod</strong>-geheugen<br />
in willekeurige volgorde<br />
afspelen<br />
Niet beschikbaar<br />
Niet beschikbaar<br />
Naar volgende<br />
displaypagina gaan<br />
Naar volgende digits of<br />
weergegeven data gaan<br />
Pagina met toetsen voor<br />
rechtstreeks uit Afspeellijst/<br />
Album selecteren openen<br />
Pagina met toetsen voor<br />
rechtstreeks selecteren van<br />
nummer openen<br />
D<br />
<strong>USB</strong> & <strong>iPod</strong> ® integration <strong>kit</strong> 113
6. Bedieningsinstructies voor <strong>USB</strong>-apparaat<br />
voor massaopslag<br />
6.1. Radio afbeelding<br />
Een schema van het radiobedieningspaneel met verwijzing naar de toetsfuncties kunt u vinden in<br />
de handleiding van uw wagen in het hoofdstuk met betrekking tot de audiobediening.<br />
6.2. Aansluiten<br />
Aansluiten van <strong>USB</strong>-apparaat voor massaopslag<br />
Specificaties van <strong>USB</strong>-apparaten voor massaopslag kunnen worden gewijzigd door de fabrikanten.<br />
Het is dus mogelijk dat <strong>USB</strong>-apparaten voor massaopslag niet normaal werken naargelang de<br />
wijziging die in de specificaties aangebracht werd. Vooraleer u het <strong>USB</strong>-apparaat voor massaopslag<br />
aansluit, moet u controleren of het <strong>USB</strong>-apparaat voor massaopslag aan de vereisten van de <strong>USB</strong>-<br />
& <strong>iPod</strong>-integratie<strong>kit</strong> beantwoordt (pagina 123).<br />
Steek de <strong>USB</strong>-connector in de <strong>USB</strong>/AUX-aansluiting op de middenconsole of het dashboard.<br />
Zodra de contactsleutel in de stand ACC of ON wordt gedraaid, wordt het <strong>USB</strong>-apparaat voor<br />
massaopslag automatisch ingeschakeld.<br />
Zo lang het <strong>USB</strong>-apparaat voor massaopslag op deze eenheid aangesloten is, wordt zijn accu<br />
automatisch geladen.<br />
Als het contact AFgezet wordt, zal het <strong>USB</strong>-apparaat voor massaopslag niet langer worden geladen.<br />
Zet het <strong>USB</strong>-apparaat voor massaopslag manueel af om te voorkomen dat de accu ontladen wordt.<br />
De <strong>USB</strong>- & <strong>iPod</strong>-integratie<strong>kit</strong> ondersteunt <strong>USB</strong>-apparaten voor massaopslag die aan de standaardspecificatie<br />
voor <strong>USB</strong> 2.0 en de overeenkomstige bestandensystemen FAT32 en FAT16 (Windows)<br />
voldoen. Hij ondersteunt MP3- en WMA-Bestanden.<br />
ó Opmerking: Informatie in verband met het <strong>USB</strong>-apparaat voor massaopslag vindt u in deze<br />
handleiding.<br />
ó Opmerking: Gebruik van een <strong>USB</strong>-apparaat voor massaopslag dat niet ondersteund wordt,<br />
kan tot abnormale werking leiden.<br />
Verwijderen van <strong>USB</strong>-apparaten voor massaopslag<br />
Het <strong>USB</strong>-apparaat voor massaopslag kan op elk ogenblik van zijn eenheid worden verwijderd.<br />
114 <strong>USB</strong> & <strong>iPod</strong> ® integration <strong>kit</strong> D
6.3. In/uitschakelen<br />
Druk op de knop [PWR-VOL] om de adapter in te schakelen.<br />
Druk opnieuw op de knop [PWR-VOL] om de adapter uit te schakelen.<br />
6.4. Volume verhogen/verlagen<br />
Draai [VOLUME] naar rechts om het volume te verhogen.<br />
Draai [VOLUME] naar links om het volume te verlagen.<br />
6.5. Selecteren van de <strong>USB</strong>-modus<br />
Druk op [DISC] op de hoofdeenheid om de <strong>USB</strong>-modus te selecteren.<br />
Telkens wanneer u op [DISC] drukt, verandert de modus, en wel als volgt:<br />
Interne CD “ externe CDCH (= <strong>USB</strong>) “ interne CD.<br />
ó Opmerking: Aangezien het <strong>USB</strong>-apparaat voor massaopslag via de integratie<strong>kit</strong> van de<br />
externe CD-wisselaar wordt aangesloten, zal de radio de modus externe CD-wisselaar<br />
aangeven.<br />
6.6. Geluidsinstellingen in de <strong>USB</strong>-modus<br />
Bassen/Hoge tonen/In-uitvloeien/Balans (Bass/Treble/Fader/Balance) kunnen specifiek worden<br />
geregeld voor <strong>USB</strong>-modus. Wanneer u omschakelt van <strong>USB</strong> naar radio of CD-modus worden de<br />
audio-instellingen veranderd in de specifieke instellingen voor elke modus. De audio-instellingen<br />
voor elke modus worden opgeslagen in het geheugen van het hoofdtoestel en worden<br />
automatisch toegepast wanneer een bepaalde modus wordt gekozen.<br />
Radio weergeven met aanraakscherm<br />
Druk op de toets [AUDIO CONTROL] om het scherm “audiobediening” (Audio control) te<br />
selecteren.<br />
Radio<br />
Druk op de knop [Tune] om het gewenste item te selecteren. Telkens Tune Dial wordt ingedrukt,<br />
veranderen de selecteerbare items als volgt:<br />
BAS (bassen) “ TRE (hoge tonen) “ FAD (in/uitvloeien) “ BAL (balans)<br />
Druk op Tune Dial om audiobediening opnieuw te activeren. Draai de knop [Tune] naar links/rechts<br />
om het geselecteerde item te regelen.<br />
ó Opmerking: Ook de geluidsinstellingen op het <strong>USB</strong>-apparaat voor massaopslag kunnen de<br />
klank beïnvloeden. Om het geluid in te stellen via de <strong>iPod</strong>, verwijzen wij u naar de betreffende<br />
Gebruikshandleiding.<br />
D<br />
<strong>USB</strong> & <strong>iPod</strong> ® integration <strong>kit</strong> 115
6.7. <strong>USB</strong> sorteren<br />
De <strong>USB</strong>- & <strong>iPod</strong>-integratie<strong>kit</strong> kan muzieknummers op het <strong>USB</strong>-apparaat voor massaopslag weergeven<br />
die in Mappen (Folders) en Bestanden (Files) ondergebracht zijn.<br />
Zodra het <strong>USB</strong>-apparaat voor massaopslag aangesloten is, worden alle Mappen op het apparaat<br />
(Device) gescand en wordt een nummer toegekend in de volgorde waarin de Mappen op het<br />
<strong>USB</strong>-apparaat voor massaopslag opgeslagen zijn. Er wordt geen onderscheid gemaakt tussen<br />
MP3- en WMA-Bestanden. Ze worden na elkaar gerangschikt en genummerd.<br />
ó Opmerking: De Mappen en Bestanden worden afgespeeld in de volgorde waarin ze op<br />
het <strong>USB</strong>-apparaat voor massaopslag werden gekopieerd. Het is mogelijk dat de Mappen en<br />
Bestanden NIET alfabetisch gerangschikt worden en in een andere volgorde staan dan in een<br />
computeromgeving.<br />
ó Opmerking: Wij raden u aan om de volgorde van de Mappen en Bestanden vooraf via uw<br />
computer te bepalen vooraleer u het apparaat aansluit.<br />
ó Opmerking: Wij raden u ten zeerste aan om veiligheidskopieën te maken van uw Bestanden/<br />
Gegevens (Files/Data). <strong>Toyota</strong> Motor Europe NV/SA is niet verantwoordelijk in geval van<br />
verloren of beschadigde gegevens.<br />
De Mappen worden volgens deze logica geordend:<br />
Map N<br />
Hoofdmap (Root Folder)<br />
1 (Hoofd<br />
R1.mp3<br />
C<br />
D<br />
map)<br />
R2.mp3<br />
R3.mp3<br />
C1.mp3<br />
D1.mp3<br />
C2.mp3<br />
D2.mp3<br />
2 (C)<br />
C1.mp3<br />
C3.mp3<br />
D3.mp3<br />
C2.mp3<br />
C3.mp3<br />
B<br />
E<br />
3 (D)<br />
D1.mp3<br />
D2.mp3<br />
B1.mp3<br />
E1.mp3<br />
D3.mp3<br />
B2.mp3<br />
B3.mp3<br />
E2.mp3<br />
E3.mp3<br />
4 (B)<br />
B1.mp3<br />
B2.mp3<br />
R1.mp3<br />
R2.mp3<br />
R3.mp3<br />
A<br />
A1.mp3<br />
5 (E)<br />
B3.mp3<br />
E1.mp3<br />
A2.mp3<br />
E2.mp3<br />
A3.mp3<br />
E3.mp3<br />
F<br />
6 (A)<br />
A1.mp3<br />
F1.mp3<br />
F2.mp3<br />
A2.mp3<br />
A3.mp3<br />
F3.mp3<br />
7 (F)<br />
F1.mp3<br />
F2.mp3<br />
F3.mp3<br />
116 <strong>USB</strong> & <strong>iPod</strong> ® integration <strong>kit</strong> D
ó Opmerking: De Mapnaam en de Bestandsnaam zullen op het display van de radio<br />
verschijnen. We raden u aan om uw Mappen (Folders) op artiest of Album en uw<br />
Bestandsnamen (Files) op de naam van het nummer/de titel te sorteren.<br />
6.8. Map selecteren<br />
Rechtstreeks selecteren van Mappen<br />
ó Opmerking: Alleen radio’s met aanraakscherm bevatten knoppen voor het rechtstreeks<br />
selecteren van Mappen (Direct Folder selection).<br />
Druk op [CHANGE DISCS], vervolgens op een van de toetsen [1] tot [6].<br />
(Lay-out van het display en functies kunnen verschillen<br />
naargelang het <strong>mode</strong>l van de hoofdeenheid. Meer<br />
bijzonderheden vindt u in de handleiding van het voertuig.)<br />
Selecteren van Mappen met Disc Up/Disc Down<br />
Druk op [DISC ^] om de volgende Map op te roepen.<br />
ó Opmerking: Als u de allerlaatste Map bereikt hebt, keert u de volgende keer dat u drukt naar<br />
de allereerste Map terug.<br />
Druk op [DISC v] om de vorige Map op te roepen.<br />
D<br />
<strong>USB</strong> & <strong>iPod</strong> ® integration <strong>kit</strong> 117
ó Opmerking: Als u de allereerste Map (Folder) bereikt hebt, keert u de volgende keer dat u<br />
drukt naar de allerlaatste Map terug.<br />
ó Opmerking: Voor de AVN-hoofdeenheden is deze functie enkel via stuurschakelaars<br />
beschikbaar. Gelieve punt 8.4 er op na te slaan.<br />
6.9. Bestand selecteren<br />
Druk eventjes op [TRACK ^] om het volgende Bestand (File) op te roepen.<br />
ó Opmerking: Als u de laatste track bereikt, gaat u eerst naar de eerste track van de volgende<br />
Map, behalve als Random (shuffle) of Repeat (herhalen) geactiveerd is. (gelieve op te merken<br />
dat deze manier van werken verschilt van die van de <strong>iPod</strong>).<br />
Druk kort op [TRACK v] om naar het begin van het huidige nummer te gaan; druk nog eens om<br />
naar het vorige nummer te gaan.<br />
ó Opmerking: Als u opnieuw op deze knop drukt nadat u het eerste nummer van een Map<br />
bereikt hebt, gaat u naar het begin van de laatste track van de vorige Map, behalve als<br />
Random (shuffle) en/of Repeat (herhalen) geactiveerd is. (Gelieve op te merken dat deze<br />
manier van werken verschilt van die van de <strong>iPod</strong>).<br />
ó Opmerking: Het aantal Bestanden binnen een Map is onbeperkt.<br />
ó Opmerking: Bestanden binnen een Map worden genummerd van 1 tot 99, vanwege weergavebeperkingen.<br />
Als het tracknummer groter is dan 99, begint de nummering opnieuw met track 1.<br />
6.10. Zoeken in Bestand<br />
Houd de knop [TRACK ^] ingedrukt om binnen het huidige Bestand terug te spoelen.<br />
Wanneer het begin van het Bestand is bereikt, begint het Bestand vanaf het begin te spelen.<br />
Houd de knop [TRACK ^] ingedrukt om binnen het weergegeven Bestand snel vooruit te spoelen.<br />
Als het einde van het Bestand bereikt is, begint het volgende Muziekbestand te spelen.<br />
6.11. Bestand herhalen<br />
Druk eventjes op [RPT] (repeat) om de herhaalfunctie te activeren. Het op dat ogenblik<br />
geselecteerde Bestand wordt dan doorlopend herhaald. Op het display verschijnt (RPT).<br />
Om de herhaalfunctie uit te schakelen, drukt u opnieuw op [RPT] of selecteert u een ander Bestand<br />
door op [TRACK ^] of [TRACK v] te drukken.<br />
118 <strong>USB</strong> & <strong>iPod</strong> ® integration <strong>kit</strong> D
6.12. Map herhalen<br />
Druk lang op [RPT] (repeat) om de herhaalfunctie voor de Map (Folder repeat function) te<br />
activeren. De op dat ogenblik geselecteerde Map wordt doorlopend herhaald. Op het display<br />
verschijnt (D_RPT). Om de herhaalfunctie te deactiveren, drukt u opnieuw op [RPT] of selecteert u<br />
een andere Map door op [DISC ^] of [DISC v] te drukken.<br />
6.13. In willekeurige volgorde afspelen<br />
(Random Play/shuffle)<br />
Nummers van een Map in willekeurige volgorde afspelen<br />
Druk kort op [RAND] om alle muziekbestanden (Music Files) van de geselecteerde Map (Folder) in<br />
willekeurige volgorde af te spelen (shuffle).<br />
Om de shuffle-functie uit te schakelen, drukt u opnieuw kort op [RAND].<br />
Wanneer u op [TRACK ^] drukt tijdens shuffle-weergave, wordt het volgende willekeurig<br />
geselecteerde Bestand afgespeeld. Wanneer u op [TRACK v] drukt tijdens shuffle-weergave, wordt<br />
het vorige weergegeven Bestand (File) opnieuw afgespeeld.<br />
ó Opmerking: Als de Mapherhaalfunctie niet geactiveerd wordt in shuffle-weergave, worden<br />
de nummers van de volgende Map in willekeurige volgorde weergegeven zodra alle nummers<br />
van de actieve Map afgespeeld werden.<br />
Volledig <strong>USB</strong>-geheugen in willekeurige volgorde afspelen<br />
Druk lang op [RAND] om de shuffle-functie te activeren voor alle Muziekbestanden die zich op het<br />
<strong>USB</strong>-apparaat voor massaopslag bevinden.<br />
Om de shuffle-functie uit te schakelen, drukt u opnieuw kort op [RAND]. Wanneer u op [TRACK ^]<br />
drukt tijdens shuffle-weergave, wordt het volgende willekeurig geselecteerde Bestand afgespeeld.<br />
Wanneer u op [TRACK v] drukt tijdens shuffle-weergave, wordt het vorige weergegeven Bestand<br />
opnieuw afgespeeld. Als u op [DISC^]/[DISC v] drukt terwijl de shuffle-functie geactiveerd is, wordt<br />
deze functie gedeactiveerd.<br />
6.14. Scannen<br />
Bestanden van een Map scannen (Scan Files)<br />
Druk eventjes op [SCAN] om het scannen van alle Bestanden van de geselecteerde Map te<br />
activeren. De eerste 10 seconden van alle Muziekbestanden wordt weergegeven. Wanneer alle<br />
Bestanden van de Map werden gescand, stopt de scan-functie bij het eerst gescande Bestand,<br />
waarna de weergave van dat nummer wordt gestart.<br />
Om de scan-functie uit te schakelen, drukt u opnieuw kort op [SCAN]. Het Bestand dat op dat<br />
ogenblik werd gescand, blijft dan spelen.<br />
D<br />
<strong>USB</strong> & <strong>iPod</strong> ® integration <strong>kit</strong> 119
Mappen scannen (Scan Folders)<br />
Druk lang op [SCAN] om het scannen van alle Mappen (Folders) te activeren. Het eerste<br />
Muziekbestand van elke Map zal gedurende 10 seconden worden afgespeeld.<br />
Wanneer alle Bestanden werden gescand, stopt de scan-functie bij het eerst gescande Bestand (File),<br />
waarna de weergave van dat nummer wordt gestart.<br />
Om de scanfunctie voor de Map (Folder Scan function) te deactiveren drukt u opnieuw op [SCAN];<br />
de op dat ogenblik gescande Map zal verder worden afgespeeld.<br />
ó Opmerking: De Scanfunctie is niet beschikbaar voor <strong>iPod</strong>.<br />
6.15. Gegevens weergeven<br />
Wanneer u eventjes op [DISP]/[[TEXT] drukt, kunt u omschakelen tussen pagina’s met verschillende<br />
soorten informatie die in een bepaalde volgorde worden weergegeven afhankelijk van het displaytype:<br />
Displays zonder CD-tekst-ondersteuning:<br />
Mapnummer & Bestandsnummer “ verstreken Afspeeltijd (elapsed Playtime) “ Mapnummer &<br />
Bestandsnummer.<br />
Displays met CD-tekst-ondersteuning:<br />
Mapnummer & Bestandsnummer “ verstreken Afspeeltijd “ Mapnaam “ Bestandsnaam “<br />
Mapnummer & Bestandsnummer.<br />
Door lang op [DISP]/[[TEXT] te drukken, kunt u extra informatie binnen dezelfde pagina oproepen. U hoort<br />
een pieptoon. 5 sec. na het loslaten van de knop, keert het display terug naar zijn uitgangstoestand.<br />
Displays met aanraakscherm<br />
Door op [TEXT] te drukken kunt u omschakelen tussen pagina’s met verschillende soorten informatie:<br />
Als u op [CHANGE DISCS] drukt, kunt u naar de pagina met toetsen voor rechtstreeks selecteren van<br />
Mappen gaan.<br />
120 <strong>USB</strong> & <strong>iPod</strong> ® integration <strong>kit</strong> D
(Lay-out van het display en functies kunnen verschillen<br />
naargelang het <strong>mode</strong>l van de hoofdeenheid. Meer<br />
bijzonderheden vindt u in de handleiding van het voertuig.)<br />
Als u naast de Tracknaam op [SELECT] drukt, kunt u naar de pagina met toetsen voor rechtstreeks<br />
selecteren van Bestanden (Files) gaan. Gebruik de omhoog- en omlaagknoppen links op het<br />
display om de lijst te overlopen. De afgebeelde muziekbestanden kunnen rechtstreeks worden<br />
geselecteerd door op de aangegeven zone van het display te drukken.<br />
(Lay-out van het display en functies kunnen verschillen<br />
naargelang het <strong>mode</strong>l van de hoofdeenheid. Meer<br />
bijzonderheden vindt u in de handleiding van het voertuig.)<br />
D<br />
<strong>USB</strong> & <strong>iPod</strong> ® integration <strong>kit</strong> 121
Weergavebeperkingen (Display Limitations)<br />
Vanwege weergavebeperkingen worden de Mappen (Folders) op afzonderlijke pagina’s<br />
weergegeven en per module van 6 van 1 tot 6 genummerd. De aanduiding van nummer 7<br />
en volgende kan niet op de hoofdeenheid worden weergegeven, zodat de nummering van de<br />
volgende Mappen opnieuw van 1 tot 6 zal beginnen. De Mapnaam daarentegen geeft de huidige<br />
Map aan.<br />
Op dezelfde wijze worden Bestanden per module van 99 genummerd. Dit betekent dat de eerste<br />
99 Bestanden van 1 tot 99 genummerd worden, Bestand 1<strong>00</strong> wordt als opnieuw als nummer 1<br />
weergegeven.<br />
122 <strong>USB</strong> & <strong>iPod</strong> ® integration <strong>kit</strong> D
7. Bedieningsinstructies voor <strong>iPod</strong>-apparaat<br />
7.1. Radioafbeelding<br />
Voor een schema van het radiobedieningspaneel met verwijzing naar de toetsfuncties kunt u in de<br />
handleiding van uw wagen terecht, in het hoofdstuk over de audiobediening.<br />
7.2. Aansluiten<br />
Aansluiten van de <strong>iPod</strong><br />
Sluit het <strong>iPod</strong>-apparaat met de daartoe bestemde <strong>USB</strong>-conversiekabel op de <strong>USB</strong>-connector in de<br />
<strong>USB</strong>/AUX-aansluiting op de middenconsole of het dashboard aan.<br />
Zodra de contactsleutel in de stand ACC of ON wordt gedraaid, wordt de <strong>iPod</strong> automatisch<br />
ingeschakeld. Op de <strong>iPod</strong> verschijnt een vinkje. De <strong>iPod</strong> is klaar voor gebruik.<br />
Terwijl de <strong>iPod</strong> op deze eenheid aangesloten wordt, kan de <strong>iPod</strong> zelf niet aan- of uitgezet worden;<br />
de accu van de <strong>iPod</strong> wordt automatisch geladen.<br />
Wanneer de <strong>iPod</strong> is aangesloten terwijl hij speelt, wordt de weergave gepauzeerd.<br />
Wanneer de contactsleutel in de stand OFF wordt gedraaid, zal de <strong>iPod</strong> niet worden uitgeschakeld.<br />
Gelieve de handleiding van het apparaat er op na te slaan voor het activeren van de slaapmodus<br />
na niet-functioneren. Met de contactsleutel in de stand OFF wordt de batterij van de <strong>iPod</strong> niet<br />
opgeladen.<br />
De <strong>USB</strong>- & <strong>iPod</strong>-integratie<strong>kit</strong>eenheid beantwoordt aan de <strong>USB</strong>-standaard “<strong>USB</strong> 2.0 FS (12 MBPS)”<br />
en ondersteunt dus volgende <strong>iPod</strong>-modules: <strong>iPod</strong> Nano (vanaf firmware versie 1.021.01 of hoger),<br />
<strong>iPod</strong> Nano G2 (vanaf firmware versie 1.02 of hoger), <strong>iPod</strong> Generation 5 (vanaf firmware<br />
versie 1.021.01 of hoger). Firmware versie 1.<strong>00</strong> of hoger is niet compatibel.<br />
ó Opmerking: Voor informatie in verband met de <strong>iPod</strong>-speler verwijzen wij u naar de Applewebsite.<br />
Loskoppelen van de <strong>iPod</strong><br />
De <strong>iPod</strong> kan op ieder ogenblik van zijn eenheid worden losgekoppeld.<br />
D<br />
<strong>USB</strong> & <strong>iPod</strong> ® integration <strong>kit</strong> 123
7.3. In/uitschakelen<br />
Druk op de knop [PWR-VOL] om de adapter in te schakelen.<br />
Druk opnieuw op de knop [PWR-VOL] om de adapter uit te schakelen.<br />
7.4. Volume verhogen/verlagen<br />
Draai [VOLUME] naar rechts om het volume te verhogen.<br />
Draai [VOLUME] naar links om het volume te verlagen.<br />
7.5. Selecteren van de <strong>iPod</strong>-modus<br />
Druk op [DISC] op de hoofdeenheid om de <strong>iPod</strong>-modus te selecteren. Telkens wanneer u op [DISC]<br />
drukt, verandert de modus, en wel als volgt:<br />
Interne CD “ externe CDCH (= <strong>iPod</strong>) “ interne CD.<br />
ó Opmerking: Aangezien het <strong>iPod</strong>-Apparaat (<strong>iPod</strong> Device) via de integratie<strong>kit</strong> van de externe<br />
CD-wisselaar wordt aangesloten, zal de radio de modus externe CD-wisselaar aangeven.<br />
7.6. Geluidsinstellingen in de <strong>iPod</strong>-modus<br />
Bassen/Hoge tonen/In-uitvloeien/Balans (Bass/Treble/Fader/Balance) kunnen specifiek worden<br />
geregeld voor <strong>iPod</strong>-modus. Wanneer u omschakelt van <strong>iPod</strong> naar radio of CD-modus, worden de<br />
audio-instellingen in de specifieke instellingen voor elke modus veranderd.<br />
De audio-instellingen voor elke modus worden opgeslagen in het geheugen van het hoofdtoestel<br />
en worden automatisch toegepast wanneer een bepaalde modus wordt gekozen.<br />
Radio met aanraakscherm weergeven<br />
Druk op de toets [AUDIO CONTROL] om het scherm “Audiobediening” (Audio control) te<br />
selecteren.<br />
Radio<br />
Druk op de knop [Tune] om het gewenste item te selecteren. Telkens Tune Dial wordt ingedrukt,<br />
veranderen de selecteerbare items als volgt: BAS (bassen) “ TRE (hoge tonen) “<br />
FAD (in/uitvloeien) “ BAL (balans).<br />
Druk op Tune Dial om Audiobediening opnieuw te activeren.<br />
Draai de knop [Tune] naar links/rechts om het geselecteerde item te regelen.<br />
ó Opmerking: De geluidsinstellingen op de <strong>iPod</strong> hebben eveneens een invloed op de klank.<br />
Om het geluid in te stellen via de <strong>iPod</strong>, verwijzen wij u naar de handleiding bij de <strong>iPod</strong>.<br />
124 <strong>USB</strong> & <strong>iPod</strong> ® integration <strong>kit</strong> D
7.7. <strong>iPod</strong> sorteren<br />
De <strong>iPod</strong>-adapter kan nummers (Titles) van de <strong>iPod</strong> weergeven die in Afspeellijsten (Playlists) of per<br />
Album gerangschikt zijn. De <strong>USB</strong>- & <strong>iPod</strong>-integratie<strong>kit</strong> biedt geen ondersteuning voor de per artiest<br />
of genre geselecteerde functies.<br />
Sortering per Afspeellijst of Album selecteren<br />
Standaard is de <strong>iPod</strong> per Afspeellijst gesorteerd.<br />
Om op sortering per Album over te gaan drukt u lang op de knop [RPT] tot op het display (D_RPT)<br />
verschijnt.<br />
Druk nogmaals op de knop [RPT] om naar sortering per Afspeellijst terug te keren.<br />
ó Opmerking: De Albums worden in dezelfde volgorde gerangschikt als op de <strong>iPod</strong>-speler.<br />
7.8. Concept Afspeellijst<br />
De <strong>iPod</strong>-adapter kan nummers op de <strong>iPod</strong> weergeven die in Afspeellijsten gerangschikt zijn.<br />
Wij raden u aan om de inhoud van de <strong>iPod</strong> met behulp van iTunes in Afspeellijsten te rangschikken.<br />
De Afspeellijsten zullen identiek zijn aan deze op de <strong>iPod</strong> en de hoofdeenheid en in dezelfde<br />
volgorde staan, met uitzondering van de eerste.<br />
De inhoud van de eerste Afspeellijst kan verschillend zijn:<br />
Nadat de <strong>iPod</strong> aangesloten werd, bevat Afspeellijst 1 de Afspeellijst die het laatst geselecteerd werd<br />
vooraleer de hoofdeenheid aangesloten werd.<br />
Nadat een Afspeellijst met Disc up gewijzigd werd, zal het toestel opnieuw Afspeellijst nummer 1<br />
weergeven en zal de eerste Afspeellijst alle muziektitels op de <strong>iPod</strong> bevatten.<br />
Na de tweede Disc up, zal het toestel naar Afspeellijst 2 gaan.<br />
ó Opmerking: Wanneer een Afspeellijst leeg is, zal de muziekinhoud van de vorige Afspeellijst<br />
naar de lege Afspeellijst worden overgezet.<br />
ó Opmerking: Wanneer naar een lege Afspeellijst overgegaan wordt, zal het nummer dat op<br />
dat ogenblik afgespeeld wordt, blijven spelen.<br />
ó Opmerking: Het aantal Afspeellijsten is onbeperkt.<br />
D<br />
<strong>USB</strong> & <strong>iPod</strong> ® integration <strong>kit</strong> 125
7.9. Afspeellijst/Album selecteren<br />
Afspeellijst/Album rechtstreeks selecteren<br />
ó Opmerking: Alleen radio’s met aanraakscherm bevatten knoppen voor het rechtstreeks<br />
selecteren van Afspeellijsten/Albums (Direct Playlist/Album selection).<br />
Druk op [CHANGE DISCS], vervolgens op een van de toetsen [1] tot [6].<br />
(Lay-out van het display en functies kunnen verschillen<br />
naargelang het <strong>mode</strong>l van de hoofdeenheid. Meer<br />
bijzonderheden vindt u in de handleiding van het voertuig.)<br />
Selecteren van Afspeellijsten/Albums met Disc Up/Disc Down<br />
Gelieve eerst op Afspeellijst of Album te sorteren.<br />
Druk op [DISC ^] om de volgende Afspeellijst/het volgende Album op te roepen.<br />
ó Opmerking: Als u de allerlaatste Afspeellijst/het allerlaatste Album bereikt hebt, keert u de<br />
volgende keer dat u drukt naar de allereerste Afspeellijst/het allereerste Album terug.<br />
Druk op [DISC v] om de vorige Afspeellijst/het vorige Album op te roepen.<br />
ó Opmerking: Als u de allereerste Afspeellijst/het allerlaatste Album bereikt hebt, keert u de<br />
volgende keer dat u drukt naar de allereerste Afspeellijst/het allereerste Album terug.<br />
ó Opmerking: Voor de AVN-hoofdeenheden is deze functie enkel via stuurschakelaars<br />
beschikbaar. Gelieve punt 8.4 er op na te slaan<br />
126 <strong>USB</strong> & <strong>iPod</strong> ® integration <strong>kit</strong> D
7.10. Nummer selecteren<br />
Druk eventjes op [TRACK ^] om het volgende nummer (Title) op te roepen.<br />
ó Opmerking: Als u bij de laatste track komt, slaat u de eerste track binnen dezelfde Afspeellijst<br />
(Playlist)/hetzelfde Album over door opnieuw op deze knop te drukken.<br />
ó Opmerking: Om naar de eerste track van de volgende Afspeellijst te gaan drukt u op<br />
[DISC ^].<br />
Druk kort op [TRACK v] om naar het begin van het huidige nummer te gaan; druk nog eens om<br />
naar het vorige nummer te gaan.<br />
ó Opmerking: Als u opnieuw op deze knop drukt nadat u het eerste nummer van een<br />
Afspeellijst/Album bereikt hebt, gaat u naar het begin van de laatste track van dezelfde<br />
Afspeellijst/hetzelfde Album.<br />
ó Opmerking: Om naar de vorige Afspeellijst te gaan drukt u op [DISC v].<br />
ó Opmerking: Het aantal nummers binnen een Afspeellijst is onbeperkt.<br />
ó Opmerking: Nummers binnen een Afspeellijst worden genummerd van 1 tot 99, vanwege<br />
weergavebeperkingen.<br />
Als het tracknummer groter is dan 99, begint de nummering opnieuw met track 1.<br />
7.11. Zoeken in nummer<br />
Druk lang op [TRACK v] om binnen het huidige nummer terug te spoelen.<br />
Wanneer het begin van het nummer bereikt is, begint het nummer vanaf het begin te spelen.<br />
Druk lang op [TRACK ^] om binnen het huidige nummer snel vooruit te spoelen.<br />
Als het einde van het nummer bereikt is, begint het volgende nummer te spelen.<br />
7.12. Titel herhalen<br />
Druk even op [RPT] (repeat) om de herhaalfunctie te activeren. Het op dat ogenblik geselecteerde<br />
nummer wordt dan doorlopend herhaald. Op het display verschijnt (RPT).<br />
Om de herhaalfunctie uit te schakelen, drukt u opnieuw op [RPT] of selecteert u een ander<br />
nummer door op [TRACK ^] of [TRACK v] te drukken.<br />
D<br />
<strong>USB</strong> & <strong>iPod</strong> ® integration <strong>kit</strong> 127
7.13. In willekeurige volgorde afspelen<br />
(Random Play/shuffle)<br />
Nummers binnen een Afspeellijst in willekeurige volgorde afspelen (shuffle)<br />
Druk kort op [RAND] om alle muzieknummers binnen de geselecteerde Afspeellijst (Playlist) in<br />
willekeurige volgorde af te spelen (shuffle). Om de shuffle-functie uit te schakelen, drukt u opnieuw<br />
kort op [RAND].<br />
Wanneer u op [TRACK ^] drukt tijdens shuffle-weergave, wordt het volgende willekeurig<br />
geselecteerde nummer weergegeven. Wanneer u op [TRACK v] drukt tijdens shuffle-weergave,<br />
wordt het vorige weergegeven nummer opnieuw weergegeven.<br />
ó Opmerking: Als de Shuffle-functie werd geactiveerd op de <strong>iPod</strong> alvorens hij werd<br />
aangesloten, blijft de functie actief na het aansluiten. Wanneer de Shuffle-functie wordt<br />
geactiveerd bij aangesloten <strong>iPod</strong>, blijft ze actief na het loskoppelen van de <strong>iPod</strong>.<br />
Willekeurig afspelen binnen een Album<br />
Selecteer eerst de Albumsortering door (D_RPT) te activeren. Druk dan kort op [RAND] om het<br />
willekeurig afspelen van alle muzieknummers binnen het geselecteerde Album te activeren.<br />
Alle inhoud van de <strong>iPod</strong> in willekeurige volgorde afspelen (Random Play)<br />
Druk lang op [RAND] om de shuffle-functie te activeren voor alle nummers die zich op de <strong>iPod</strong><br />
bevinden (shuffle-weergave van Afspeellijst 1).<br />
Om de shuffle-functie te deactiveren, drukt u opnieuw kort op [RAND].<br />
Wanneer u op [TRACK ^] drukt tijdens shuffle-weergave, wordt het volgende willekeurig<br />
geselecteerde nummer weergegeven.<br />
Wanneer u op [TRACK v] drukt tijdens shuffle-weergave, wordt het vorige weergegeven nummer<br />
opnieuw afgespeeld.<br />
Als u op [DISC^]/[DISC v] drukt terwijl de shuffle-functie geactiveerd is, wordt deze functie<br />
gedeactiveerd.<br />
ó Opmerking: Als de functie voor willekeurig afspelen van op de radio geactiveerd wordt, zal<br />
deze geactiveerd blijven nadat de <strong>iPod</strong> losgekoppeld werd.<br />
7.14. Gegevens weergeven<br />
Wanneer u eventjes op [DISP]/[[TEXT] drukt, kunt u switchen tussen pagina’s met verschillende<br />
soorten informatie die in een bepaalde volgorde worden weergegeven afhankelijk van het<br />
displaytype:<br />
Displays zonder CD-tekst-ondersteuning:<br />
Nummer Afspeellijst/Album & titelnummer “ verstreken Afspeeltijd (elapsed Playtime) “ Nummer<br />
Afspeellijst/Album & Titelnummer.<br />
128 <strong>USB</strong> & <strong>iPod</strong> ® integration <strong>kit</strong> D
Displays met CD-tekst-ondersteuning:<br />
Nummer Afspeellijst/Album & titelnummer “ verstreken Afspeeltijd (elapsed Playtime) “ Nummer<br />
Afspeellijst/Album & titelnummer “ Naam nummer “ Nummer Afspeellijst/Album & titelnummer.<br />
Door lang op [DISP]/[[TEXT] te drukken, kunt u naar extra informatie binnen dezelfde pagina<br />
switchen. U hoort een pieptoon. 5 sec. na het loslaten van de knop, keert het display terug naar<br />
zijn uitgangstoestand.<br />
Displays met aanraakscherm<br />
Door op [TEXT] te drukken kunt u tussen pagina’s met verschillende soorten informatie switchen:<br />
Als u op [CHANGE DISCS] drukt, kunt u naar de pagina met toetsen voor rechtstreeks selecteren<br />
van Afspeellijsten/Albums (Playlists/Albums) switchen.<br />
(Lay-out van het display en functies kunnen verschillen<br />
naargelang het <strong>mode</strong>l van de hoofdeenheid. Meer<br />
bijzonderheden vindt u in de handleiding van het voertuig.)<br />
D<br />
<strong>USB</strong> & <strong>iPod</strong> ® integration <strong>kit</strong> 129
Als u naast de Tracknaam op [SELECT] drukt, kunt u naar de pagina met toetsen voor rechtstreeks<br />
selecteren van Nummers (Titles) switchen. Gebruik de omhoog- en omlaagknoppen links op het<br />
display om de lijst te overlopen.<br />
De afgebeelde Nummers kunnen rechtstreeks worden geselecteerd door te drukken op de<br />
aangegeven zone van het display.<br />
(Lay-out van het display en functies kunnen verschillen<br />
naargelang het <strong>mode</strong>l van de hoofdeenheid. Meer<br />
bijzonderheden vindt u in de handleiding van het voertuig.)<br />
Weergavebeperkingen<br />
Vanwege weergavebeperkingen worden de Afspeelllijsten/Albums (Playlists/Albums) op<br />
afzonderlijke pagina’s weergegeven en per module van 6 van 1 tot 6 genummerd. De aanduiding<br />
van nummer 7 en volgende kan niet op de hoofdeenheid worden weergegeven, zodat de<br />
nummering van de volgende Afspeellijsten/Albums opnieuw van 1 tot 6 zal beginnen. De naam<br />
van de Afspeellijst/het Album daarentegen geeft de huidige Afspeellijst/het huidige Album aan.<br />
7.15. Scannen<br />
Hoewel [SCN]-knoppen kunnen verschijnen, is deze functie niet beschikbaar voor <strong>iPod</strong>.<br />
130 <strong>USB</strong> & <strong>iPod</strong> ® integration <strong>kit</strong> D
8. Afstandsbediening op stuurwiel<br />
8.1. Modus selecteren<br />
Telkens wanneer u op de knop [MODE] drukt, verandert het audiosysteem van modus als volgt in<br />
de volgorde FM-AM-CD.<br />
FM1 “ FM2 “ FM3 “ CD/DVD “ <strong>USB</strong>/iPOD “ Bluetooth “ AUX “ AM “ DAB “ FM1<br />
8.2. Geluidssterkte<br />
Druk op of draai aan [VOL +] om het volume te verhogen.<br />
Druk op of draai aan [VOL –] om het volume te verlagen.<br />
8.3. Naar Bestand/Nummer switchen<br />
Druk op [^] om naar het volgende Bestand/Nummer (File/Title) te switchen.<br />
Druk op [v] om naar het begin van het huidige Bestand/Nummer te switchen; druk nog eens om<br />
naar het vorige Bestand/Nummer te switchen.<br />
8.4. Veranderen van Map/Afspeellijst/Album<br />
Druk lang op de knop [^] om naar de (het) volgende Map/Afspeellijst/Album (Folder/Playlist/<br />
Album) te gaan.<br />
Druk op [v] om naar de (het) vorige Map/Afspeellijst/Album te gaan.<br />
ó Opmerking: In het geval van een <strong>iPod</strong> moet u eerst de Afspeellijst- of Albumsortering op de<br />
hoofdeenheid selecteren.<br />
D<br />
<strong>USB</strong> & <strong>iPod</strong> ® integration <strong>kit</strong> 131
9. Problemen oplossen<br />
Als u vermoedt dar er iets verkeerd is, dient u de hieronder beschreven punten te controleren.<br />
Probleem<br />
Er worden geen Nummers<br />
getoond.<br />
SCAN-knop reageert niet.<br />
Sommige Nummers zijn<br />
onvindbaar.<br />
<strong>USB</strong>-apparaat voor<br />
massaopslag/<strong>iPod</strong> werkt<br />
niet goed.<br />
<strong>USB</strong>-apparaat voor<br />
massaopslag/<strong>iPod</strong> werkt<br />
niet goed nadat het/hij<br />
opnieuw aangesloten werd.<br />
Mogelijke oplossing / verklaring<br />
Druk op TEXT.<br />
Vraag bij uw erkende verdeler na of uw radioeenheid<br />
ondersteuning biedt voor CD-tekst op een externe CD-wisselaar.<br />
SCAN-functie is enkel voor <strong>USB</strong>-apparaten voor massaopslag<br />
beschikbaar, ze werkt niet met <strong>iPod</strong>, hoewel de SCN-knop<br />
misschien weergegeven wordt.<br />
In het geval van <strong>USB</strong>-apparaten voor massaopslag moet u de<br />
onder het punt “Sorteren Map” beschreven instructies volgen.<br />
Een aantal MP3-apparaten slaat de Nummers mogelijk in hun<br />
specifieke formaat op of niet met dezelfde grootte als apparaten<br />
voor massaopslag. Gelieve dit bij de fabrikant na te vragen.<br />
De integratie<strong>kit</strong> ondersteunt MP3- en WMA-Bestanden.<br />
In het geval van <strong>iPod</strong> raden wij aan om de inhoud ervan met<br />
behulp van iTunes in Afspeellijsten te ordenen. Alle Nummers<br />
bevinden zich sowieso in Afspeellijst 1.<br />
Maak de kabel van de <strong>USB</strong>/AUX-aansluiting los. Zodra het<br />
hoofdmenu van het <strong>USB</strong>-apparaat voor massaopslag/de <strong>iPod</strong><br />
wordt weergegeven, koppelt u hem weer aan. (zie punt Resetten).<br />
Kijk de specificatie na op compatibiliteit.<br />
<strong>USB</strong>-apparaat voor massaopslag/<strong>iPod</strong> heeft de loskoppeling<br />
niet gedetecteerd. Het <strong>USB</strong>-apparaat voor massaopslag/de <strong>iPod</strong><br />
resetten (zie respectievelijke handleiding)<br />
Gezien de specifieke eigenschappen van kaartenlezers op het<br />
gebied van hardware en implementatie kunnen we geen volledige<br />
garantie bieden voor wat betreft compatibiliteit met al deze<br />
apparaten. Dit geldt ook voor andere elektronische apparaten die<br />
met externe geheugens werken.<br />
Kijk de specificatie na op compatibiliteit.<br />
Vergewis u er in het geval van een <strong>iPod</strong> van dat u de laatste versie van iTunes hebt en dat uw <strong>iPod</strong><br />
de meest recente firmware van Apple bevat.<br />
Als de voorgestelde oplossingen het probleem niet verhelpen, is het raadzaam met uw wagen naar<br />
de dichtstbijzijnde erkende verdeler te gaan.<br />
Voor vragen in verband met de <strong>iPod</strong> zelf, verwijzen wij u naar de <strong>iPod</strong>-handleiding of de website<br />
van de fabrikant.<br />
132 <strong>USB</strong> & <strong>iPod</strong> ® integration <strong>kit</strong> D
10. Resetten<br />
Onder speciale omstandigheden kunnen zich softwarestoringen voordoen, waardoor uw <strong>USB</strong>apparaat<br />
voor massaopslag of <strong>iPod</strong> kan blokkeren. Om de Integratie<strong>kit</strong> (Integration <strong>kit</strong>) en Mediaapparatuur<br />
(Media Devices) te resetten zonder de inhoud en instellingen ervan te beïnvloeden,<br />
moet u verschillende stappen volgen:<br />
Zet de radio UIT/AAN.<br />
Als dit het probleem niet oplost:<br />
verwijder het <strong>USB</strong>-apparaat voor massaopslag/de <strong>iPod</strong> uit de <strong>USB</strong>/AUX-aansluiting en steek het/<br />
hem er op nieuw in. Ga na of de stekker geen schade vertoont.<br />
Als dit het probleem niet oplost, verwijdert u het <strong>USB</strong>-apparaat voor massaopslag/de <strong>iPod</strong> en:<br />
zet het contact AF gedurende een minuut en zet het weer aan. Sluit de <strong>iPod</strong> opnieuw aan.<br />
Als dit het probleem niet oplost, verwijdert u het <strong>USB</strong>-apparaat voor massaopslag, zet u het<br />
contact AF en reset u uw <strong>USB</strong>-apparaat voor massaopslag/<strong>iPod</strong>. (Kijk in de respectievelijke<br />
gebruikshandleiding).<br />
D<br />
<strong>USB</strong> & <strong>iPod</strong> ® integration <strong>kit</strong> 133
11. Specificaties<br />
ECU <strong>USB</strong>- & <strong>iPod</strong>-integratie<strong>kit</strong>:<br />
Voeding: DC 13,2 V (10,5 V - 16 V)<br />
Max. stroomverbruik:<br />
Max. standbystroom:<br />
Afmetingen ECU:<br />
Gewicht ECU:<br />
Max. Audio-uitgangsspanning:<br />
Max. Audio-uitgangsimpedantie:<br />
11.1. <strong>USB</strong><br />
< 1 A<br />
< 1 mA<br />
125,5 mm (B) x 37,5 mm (H) x 117,5 mm (D)<br />
0,36 kg<br />
2 VRMS<br />
220 Ohm<br />
<strong>USB</strong>-spec.: <strong>USB</strong> 2.0 FS (12 MBPS), Massaopslagklasse (Mass Storage class) (BOT-methode)<br />
(*in geval van twijfel neemt u contact op met uw verdeler of de fabrikant van het apparaat om de<br />
compatibiliteit met de <strong>USB</strong>-massaopslagklasse na te vragen)<br />
Max. stroomtoevoer: 5<strong>00</strong> mA (*De meeste externe harde schijven verbruiken meer dan deze waarde)<br />
Aantal Bestanden (Files) en Mappen (Folders):<br />
• Totaal aantal Mappen op apparaat: MAX 999<br />
• Totaal aantal Bestanden op apparaat: MAX 65.025<br />
• Totaal aantal Bestanden in een Map: MAX 255<br />
• Maponderverdelingen: 8 onderverdelingen<br />
MP3<br />
• MPEG1 AUDIO LAYER II, III (VBR wordt ondersteund<br />
Bit-snelheid: 32 - 320 kbps bemonsteringsfrequentie: 44,1/48/32 kHz<br />
• MPEG2 AUDIO LAYER II, III (VBR wordt ondersteund<br />
Bit-snelheid: 32 - 160 kbps bemonsteringsfrequentie: 22,05/24/16 kHz<br />
• MPEG 2.5 (VBR wordt ondersteund.)<br />
Bit-snelheid: 32 - 160 kbps bemonsteringsfrequentie: 11,025/12/8 kHz<br />
WMA<br />
• Ver9 (standaard, VBR) HIGH PROFILE<br />
Bit-snelheid: 32 - 320 kbps, bemonsteringsfrequentie: 44,1 k/48 k/32 kHz<br />
• Laden van apparaat wordt tot max. stroomtoevoer ondersteund<br />
134 <strong>USB</strong> & <strong>iPod</strong> ® integration <strong>kit</strong> D
11.2. <strong>iPod</strong>/iPhone<br />
Ondersteunde <strong>iPod</strong>/iPhone:<br />
• Nano (vanaf firmware versie 1.021.01)<br />
• Nano G2 (vanaf firmware versie 1.02)<br />
• Generation 5 (vanaf firmware versie 1.021.01)<br />
• iPhone (vanaf firmware versie 1.021.01)<br />
Firmware versie 1.<strong>00</strong> of hoger is niet compatibel.<br />
nummer van de track en de lijst<br />
• Totaal aantal lijsten op apparaat: MAX 9.999<br />
• Totaal aantal tracks op apparaat: MAX 65.535<br />
• Totaal aantal tracks in lijst: MAX 65.535<br />
PODCAST en PODBOOKS ondersteund<br />
Ondersteunde Afspeellijsten (Playlists), Albums, Nummers (Songs) (artiest en genre worden niet<br />
ondersteund)<br />
Laden van apparaat wordt ondersteund<br />
Verkoper: <strong>Toyota</strong> Motor Europe N.V./S.A.<br />
Dienst-na-verkoop: <strong>Toyota</strong> Motor Europe N.V./S.A.<br />
Fabrikant: Panasonic Automotive Systems Europe GmbH.<br />
D<br />
<strong>USB</strong> & <strong>iPod</strong> ® integration <strong>kit</strong> 135
136 <strong>USB</strong> & <strong>iPod</strong> ® integration <strong>kit</strong> D
Indice<br />
1. Introduzione......................................................................................................... 141<br />
2. Informazioni di sicurezza..................................................................................... 142<br />
2.1. Simboli di sicurezza.................................................................................................. 142<br />
2.2. Attenzione:............................................................................................................... 143<br />
3. Esenzioni.............................................................................................................. 145<br />
4. Informazioni importanti...................................................................................... 146<br />
5. Panoramica rapida delle funzioni........................................................................ 147<br />
6. Istruzioni d’uso del dispositivo di archiviazione di massa <strong>USB</strong>........................... 148<br />
6.1. Schema della radio................................................................................................... 148<br />
6.2. Collegamento.......................................................................................................... 148<br />
6.3. Accensione/Spegnimento......................................................................................... 149<br />
6.4. Aumento/Diminuzione volume................................................................................ 149<br />
6.5. Selezione della modalità <strong>USB</strong>.................................................................................... 149<br />
6.6. Ordinamento dei contenuti del dispositivo <strong>USB</strong>........................................................ 149<br />
6.7. Ordinamento <strong>USB</strong> ................................................................................................... 150<br />
6.8. Selezione Cartelle..................................................................................................... 151<br />
6.9. Selezione File............................................................................................................ 152<br />
6.10. Ricerca nei File.......................................................................................................... 152<br />
6.11. Ripetere File............................................................................................................. 152<br />
6.12. Ripetere Cartella....................................................................................................... 153<br />
6.13. Riproduzione random .............................................................................................. 153<br />
6.14. Scansione................................................................................................................. 153<br />
6.15. Dati display ............................................................................................................. 154<br />
7. Istruzioni d’uso del dispositivo <strong>iPod</strong>.................................................................... 157<br />
7.1. Schema della radio................................................................................................... 157<br />
7.2. Collegamento.......................................................................................................... 157<br />
7.3. Accensione/Spegnimento......................................................................................... 158<br />
7.4. Aumento/Diminuzione volume................................................................................ 158<br />
7.5. Selezione della modalità <strong>iPod</strong>................................................................................... 158<br />
7.6. Ordinamento dei contenuti dell’<strong>iPod</strong>........................................................................ 158<br />
7.7. Ordinamento <strong>iPod</strong>................................................................................................... 159<br />
7.8. La logica della Playlist............................................................................................... 159<br />
7.9. Selezione Playlist/Album........................................................................................... 160<br />
7.10. Selezione titoli.......................................................................................................... 161<br />
7.11. Ricerca nei titoli........................................................................................................ 161<br />
E<br />
<strong>USB</strong> & <strong>iPod</strong> ® integration <strong>kit</strong> 137
7.12. Ripetere titolo.......................................................................................................... 161<br />
7.13. Riproduzione random .............................................................................................. 162<br />
7.14. Dati display ............................................................................................................. 162<br />
7.15. Scansione................................................................................................................. 164<br />
8. Comandi al volante.............................................................................................. 165<br />
8.1. Selezione modalità................................................................................................... 165<br />
8.2. Volume.................................................................................................................... 165<br />
8.3. Cambio File/Titolo.................................................................................................... 165<br />
8.4. Cambio Cartella/Playlist/Album................................................................................ 165<br />
9. Diagnostica.......................................................................................................... 166<br />
10. Azzeramento ....................................................................................................... 167<br />
11. Specifiche............................................................................................................. 168<br />
11.1. <strong>USB</strong> ......................................................................................................................... 168<br />
11.2. <strong>iPod</strong>/iPhone............................................................................................................. 169<br />
138 <strong>USB</strong> & <strong>iPod</strong> ® integration <strong>kit</strong> E
Raccomandazioni<br />
Leggere attentamente questo manuale per poter fruire appieno delle caratteristiche del sistema.<br />
Si consiglia di conservare il presente manuale all’interno della vettura. In questo modo in caso di<br />
emergenza sarà più semplice recuperare le informazioni necessarie.<br />
Il vostro concessionario autorizzato di zona sarà lieto di chiarire qualsiasi dubbio relativo al<br />
sistema o al suo funzionamento nel caso non sia possibile reperire le informazioni necessarie nel<br />
presente manuale o nel capitolo “Diagnostica”.<br />
<strong>Toyota</strong> raccomanda di utilizzare esclusivamente ricambi testati e approvati da <strong>Toyota</strong> in termini<br />
di sicurezza, funzionalità e idoneità.<br />
Queste istruzioni per l’uso sono concepite per garantire un facile e sicuro utilizzo del <strong>kit</strong> di<br />
integrazione per <strong>USB</strong> & <strong>iPod</strong> ® .<br />
Queste istruzioni per l’uso descrivono le funzionalità del <strong>kit</strong> di integrazione<br />
per <strong>USB</strong> & <strong>iPod</strong> ® .<br />
ù<br />
E<br />
<strong>USB</strong> & <strong>iPod</strong> ® integration <strong>kit</strong> 139
140 <strong>USB</strong> & <strong>iPod</strong> ® integration <strong>kit</strong> E
1. Introduzione<br />
La ringraziamo per aver acquistato il nostro prodotto.<br />
Per un corretto utilizzo del prodotto leggere attentamente le istruzioni. Prima dell’uso assicurarsi di<br />
leggere le “Informazioni di sicurezza” (pagina 142).<br />
Conservare queste Istruzioni per l’uso per future necessità.<br />
E<br />
<strong>USB</strong> & <strong>iPod</strong> ® integration <strong>kit</strong> 141
2. Informazioni di sicurezza<br />
• Prima di utilizzare il sistema, leggere attentamente i manuali d’uso dell’unità e di tutte le altre<br />
componenti del sistema audio della vettura. In essi sono infatti contenute istruzioni necessarie<br />
per un uso efficace ed in sicurezza dell’intero sistema. <strong>Toyota</strong> Motor Europe NV/SA declina<br />
qualsiasi responsabilità per problemi derivanti dalla mancata osservanza delle istruzioni presenti<br />
in questo manuale.<br />
• In questo manuale vengono utilizzati alcuni pittogrammi che illustrano come utilizzare il<br />
prodotto in sicurezza o che segnalano potenziali pericoli derivanti da connessioni o operazioni<br />
errate. I significati dei pittogrammi vengono illustrati a continuazione. Comprendere a pieno il<br />
significato dei pittogrammi è fondamentale per utilizzare questo manuale e l’intero sistema in<br />
maniera corretta.<br />
2.1. Simboli di sicurezza<br />
m<br />
Avvertenza:<br />
Quando di fianco al testo appare questo simbolo viene segnalata la<br />
necessità di seguire le raccomandazioni indicate per evitare danni irreparabili alla vettura,<br />
al sistema o ai dispositivi collegati, o per evitare incidenti e possibili lesioni o morte.<br />
ò<br />
Attenzione: Quando di fianco al testo appare questo simbolo viene segnalata la necessità<br />
di prestare estrema attenzione e seguire le raccomandazioni indicate per evitare danni alla<br />
vettura, al sistema o ai dispositivi collegati, o per evitare lesioni personali.<br />
Smaltimento: Questo simbolo a fianco del testo raccomanda o avverte di seguire le leggi<br />
vigenti sullo smaltimento di attrezzature elettriche.<br />
ó Nota: Una semplice raccomandazione per vostra convenienza e per un funzionamento<br />
ottimale del sistema.<br />
142 <strong>USB</strong> & <strong>iPod</strong> ® integration <strong>kit</strong> E
2.2. Attenzione<br />
m<br />
Rispettare le avvertenze seguenti per l’utilizzo di questa unità!<br />
• Il conducente non deve osservare il display né operare sul sistema mentre si trova<br />
alla guida.<br />
Osservare il display o operare sul sistema distoglie l’attenzione del conducente dalla strada e<br />
può pertanto essere causa di incidenti. Per evitare possibili incidenti, fermare sempre il veicolo<br />
in un’area sicura e inserire il freno di stazionamento prima di concentrarsi sul display o operare<br />
sul sistema.<br />
• Non smontare né modificare l’unità.<br />
Non smontare o modificare l’unità né tentare di riparare il prodotto autonomamente. Se il<br />
prodotto necessitasse di riparazioni, rivolgersi al proprio Concessionario Autorizzato.<br />
• Non utilizzare l’unità se fuori uso.<br />
Se l’unità è fuori uso (corrente e suono assenti) o si trova in uno stato di anomalia (contiene<br />
corpi estranei, è stata a contatto con dell’acqua, emette fumo o odore), spegnerla<br />
immediatamente e rivolgersi al proprio Concessionario Autorizzato.<br />
• Per la sostituzione del fusibile rivolgersi al concessionario autorizzato.<br />
Quando si fonde il fusibile, eliminare la causa del guasto e sostituirlo con il fusibile indicato da<br />
un responsabile di assistenza qualificato per questa unità. Una sostituzione errata del fusibile<br />
può causare fumo, incendi e danneggiamenti al prodotto.<br />
Per l’utilizzo di questa unità rispettare le precauzioni seguenti!<br />
• Mantenere il volume dell’audio ad un livello adeguato.<br />
Mantenere il volume ad un livello sufficientemente basso da consentire di prestare la dovuta<br />
attenzione alle condizioni della strada e del traffico durante la guida.<br />
• Non utilizzare questo adattatore in altri veicoli o all’esterno della vettura.<br />
La mancata osservanza di questa prescrizione può essere causa di fumo, incendi, scosse<br />
elettriche, lesioni personali o altri inconvenienti.<br />
• Non azionare l’unità per un periodo prolungato di tempo a motore spento.<br />
Ciò esaurirebbe la batteria.<br />
• Non esporre l’adattatore o il dispositivo di archiviazione di massa <strong>USB</strong>/<strong>iPod</strong> alla<br />
luce solare diretta o a calore eccessivo.<br />
Un aumento della temperatura interna delle unità può causare fumo, incendi o altri<br />
danneggiamenti alle unità stesse.<br />
E<br />
<strong>USB</strong> & <strong>iPod</strong> ® integration <strong>kit</strong> 143
• Non utilizzare il prodotto in luoghi in cui possa essere esposto all’acqua,<br />
all’umidità o alla polvere.<br />
L’esposizione dell’adattatore, del dispositivo di archiviazione di massa <strong>USB</strong> o del lettore <strong>iPod</strong><br />
all’acqua, all’umidità o alla polvere può causare fumo, incendi o altri danneggiamenti alle<br />
unità.<br />
Prestare particolare attenzione per impedire che le unità non si bagnino nei transiti<br />
all’autolavaggio o in caso di pioggia.<br />
• Installazione: Prima di installare o <strong>amp</strong>liare autonomamente il sistema, leggere attentamente<br />
le istruzioni di installazione.<br />
• Assicurare saldamente il dispositivo di archiviazione di massa <strong>USB</strong>/<strong>iPod</strong> durante<br />
l’utilizzo di questa unità.<br />
Prestare attenzione a non far scivolare il dispositivo di archiviazione di massa <strong>USB</strong>/<strong>iPod</strong> sul<br />
pavimento in quanto potrebbe rimanere incastrato sotto il pedale del freno o dell’acceleratore.<br />
• Per ulteriori informazioni relative ai dispositivi di archiviazione di massa <strong>USB</strong> o ai<br />
lettori <strong>iPod</strong> consultare i relativi manuali d’uso.<br />
144 <strong>USB</strong> & <strong>iPod</strong> ® integration <strong>kit</strong> E
3. Esenzioni<br />
• Se una qualsiasi perdita è provocata da incendio, terremoto, azione da parte di terzi o altri<br />
incidenti o uso improprio deliberato o accidentale da parte dell’utente, da uso errato, o da uso<br />
in condizioni anormali, la riparazione del prodotto sarà addebitata all’utente.<br />
• <strong>Toyota</strong> Motor Europe NV/SA non potrà essere ritenuta responsabile per qualsiasi perdita<br />
accidentale causata dall’utilizzo o dal mancato utilizzo di questo prodotto, quali ad esempio<br />
perdite di profitti o modifiche o perdite di dati memorizzati.<br />
• <strong>Toyota</strong> Motor Europe NV/SA declina qualsiasi responsabilità per la perdita di dati memorizzati<br />
nel dispositivo di archiviazione di massa <strong>USB</strong> o nell’<strong>iPod</strong> anche quando tale perdita avvenga<br />
durante l’utilizzo dell’unità.<br />
E<br />
<strong>USB</strong> & <strong>iPod</strong> ® integration <strong>kit</strong> 145
4. Informazioni importanti<br />
Questa unità è stata progettata per gestire e ascoltare File musicali da dispositivi di archiviazione di<br />
massa <strong>USB</strong> e da <strong>iPod</strong> tramite un’autoradio originale.<br />
• <strong>iPod</strong> è un marchio Apple Inc., depositato in U.S.A. ed altri paesi.<br />
• Il funzionamento può variare a seconda della versione del software del dispositivo di<br />
archiviazione di massa <strong>USB</strong> e dell’<strong>iPod</strong>.<br />
• Il funzionamento può variare in base all’autoradio alla quale il dispositivo è collegato.<br />
• Contattare il concessionario autorizzato per verificare se l’autoradio della vettura è compatibile<br />
con il Kit di integrazione per <strong>USB</strong> & <strong>iPod</strong>.<br />
146 <strong>USB</strong> & <strong>iPod</strong> ® integration <strong>kit</strong> E
5. Panoramica rapida delle funzioni<br />
Pulsante/Tasto Azione Dispositivo di<br />
archiviazione di massa<br />
<strong>USB</strong><br />
TRACK UP/<br />
DOWN<br />
Pressione breve<br />
Pressione<br />
prolungata<br />
File seguente/precedente<br />
(File next/previous)<br />
FFW/REW<br />
<strong>iPod</strong><br />
Titolo seguente/precedente<br />
(Title next/previous)<br />
FFW/REW<br />
DISC UP/<br />
DOWN<br />
RPT<br />
Pressione breve<br />
Cartella seguente/<br />
precedente (Folder next/<br />
previous)<br />
Playlist/Album seguente/<br />
precedente (Playlist/Album<br />
next/previous)<br />
Pressione breve Ripetere File Ripetere titolo<br />
Pressione Ripetere Cartella<br />
Attivazione<br />
prolungata<br />
ordinamento Album<br />
RND<br />
Pressione breve<br />
Pressione<br />
prolungata<br />
Riproduzione random della<br />
Cartella corrente<br />
Riproduzione random<br />
dell’intera memoria <strong>USB</strong><br />
Riproduzione random di<br />
Playlist/Album corrente<br />
Riproduzione random<br />
dell’intera memoria <strong>iPod</strong><br />
SCN<br />
Pressione breve<br />
Pressione<br />
prolungata<br />
Ascolto dei primi 10 sec<br />
dei File della Cartella<br />
corrente<br />
Ascolto dei primi 10 sec<br />
dei File di ogni Cartella<br />
Non disponibile<br />
Non disponibile<br />
TEXT/<br />
DISP<br />
Pressione breve<br />
Pressione<br />
prolungata<br />
Passa alla pagina di display<br />
seguente<br />
Passa alle cifre successive<br />
dei dati visualizzati<br />
Passa alla pagina di display<br />
seguente<br />
Passa alle cifre successive<br />
dei dati visualizzati<br />
CHANGE DISCS<br />
Pressione breve<br />
Apre la pagina con i tasti<br />
per la selezione diretta<br />
della Cartella<br />
Apre la pagina con i tasti<br />
per la selezione diretta di<br />
Playlist/Album<br />
SELECT<br />
Pressione breve<br />
Apre la pagina con i tasti<br />
per la selezione diretta dei<br />
File<br />
Apre la pagina con i tasti<br />
per la selezione diretta dei<br />
titoli<br />
E<br />
<strong>USB</strong> & <strong>iPod</strong> ® integration <strong>kit</strong> 147
6. Istruzioni d’uso del dispositivo di<br />
archiviazione di massa <strong>USB</strong><br />
6.1. Schema della radio<br />
All’interno del manuale d’uso nella sezione dedicata alle funzioni audio è possibile reperire uno<br />
schema della radio con i riferimenti alle funzioni dei pulsanti.<br />
6.2. Collegamento<br />
Collegamento del dispositivo di archiviazione di massa <strong>USB</strong><br />
Le specifiche relative ai dispositivi di archiviazione di massa <strong>USB</strong> possono subire variazioni da parte dei<br />
produttori. Pertanto i dispositivi di archiviazione di massa <strong>USB</strong> possono non funzionare normalmente<br />
a causa delle modifiche apportate alle specifiche. Prima di collegare il dispositivo di archiviazione di<br />
massa <strong>USB</strong> accertarsi che esso risponda ai requisiti del <strong>kit</strong> di integrazione per<br />
<strong>USB</strong> & <strong>iPod</strong> (pagina 157).<br />
Inserire il connettore <strong>USB</strong> nella presa jack <strong>USB</strong>/AUX posizionata nella consolle centrale o sul cruscotto.<br />
Quando l’accensione si trova su ACC o ON, il dispositivo di archiviazione di massa <strong>USB</strong> viene<br />
attivato automaticamente.<br />
Fin quando il dispositivo di archiviazione di massa <strong>USB</strong> resta collegato all’unità la batteria viene<br />
caricata automaticamente.<br />
Quando l’accensione viene portata su OFF, la carica del dispositivo di archiviazione di massa <strong>USB</strong><br />
viene interrotta. Spegnere manualmente il dispositivo di archiviazione di massa <strong>USB</strong> per evitare che<br />
la batteria si esaurisca.<br />
Il <strong>kit</strong> di integrazione per <strong>USB</strong> & <strong>iPod</strong> supporta dispositivi di archiviazione di massa <strong>USB</strong> conformi alla<br />
norma <strong>USB</strong> 2.0 ed ai relativi ai File system FAT32 e FAT16 (Windows). Supporta File MP3 e WMA.<br />
ó Nota: Per ulteriori informazioni relative al dispositivo di archiviazione di massa <strong>USB</strong>, consultare<br />
il manuale dedicato.<br />
ó Nota: L’utilizzo di un dispositivo di archiviazione di massa <strong>USB</strong> non supportato può<br />
comportare anomalie di funzionamento.<br />
148 <strong>USB</strong> & <strong>iPod</strong> ® integration <strong>kit</strong> E
Scollegare i dispositivi di archiviazione di massa <strong>USB</strong><br />
Il dispositivo di archiviazione di massa <strong>USB</strong> può essere scollegato dall’unità in qualsiasi momento.<br />
6.3. Accensione/Spegnimento<br />
Per l’accensione premere la manopola [PWR-VOL].<br />
Per lo spegnimento premere nuovamente la manopola [PWR-VOL].<br />
6.4. Aumento/Diminuzione volume<br />
Per aumentare il volume ruotare la manopola [VOLUME] in senso orario.<br />
Per diminuire il volume ruotare la manopola [VOLUME] in senso antiorario.<br />
6.5. Selezione della modalità <strong>USB</strong><br />
Per selezionare la modalità <strong>USB</strong> premere il tasto [DISC] dell’autoradio.<br />
Ogni volta che si preme [DISC], le modalità cambiano nel modo seguente:<br />
CD interno “ CDCH (= <strong>USB</strong>) esterno “ CD interno.<br />
ó Nota: Quando il dispositivo di archiviazione di massa <strong>USB</strong> è collegato per mezzo del <strong>kit</strong> di<br />
integrazione del caricatore CD esterno, la radio segnalerà la modalità Caricatore CD esterno.<br />
6.6. Ordinamento dei contenuti del<br />
dispositivo <strong>USB</strong><br />
Bassi/Acuti/Dissolvenza/Bilanciamento possono essere regolati specificamente per la modalità <strong>USB</strong>.<br />
Passando dalla modalità <strong>USB</strong> alla modalità radio o CD, le impostazioni audio si regolano su quelle<br />
specifiche per ogni modalità. Le impostazioni audio di ciascuna modalità vengono conservate nella<br />
memoria dell’autoradio e applicate automaticamente ogni volta che si seleziona una nuova modalità.<br />
Display radio con touch screen<br />
Per selezionare la schermata di comando dell’audio (Audio control) premere il tasto [AUDIO CONTROL].<br />
Radio<br />
Per selezionare la voce desiderata premere la manopola [Tune]. Ogni volta che si preme il selettore<br />
Tune le voci selezionabili cambiano nel modo seguente:<br />
BAS (Bassi) “ TRE (Acuti) “ FAD (Dissolvenza) “ BAL (Bilanciamento)<br />
Premendo nuovamente il selettore Tune (Tune Dial) si sblocca il comando dell’audio. Ruotando la<br />
manopola [Tune] verso destra/sinistra si regola la voce selezionata.<br />
ó Nota: Il suono può essere influenzato anche dalle impostazioni EQ del dispositivo di archiviazione<br />
di massa <strong>USB</strong>. Per la regolazione delle impostazioni EQ dell’<strong>iPod</strong>, consultare il manuale dedicato.<br />
E<br />
<strong>USB</strong> & <strong>iPod</strong> ® integration <strong>kit</strong> 149
6.7. Ordinamento <strong>USB</strong><br />
Il <strong>kit</strong> di integrazione <strong>USB</strong> & <strong>iPod</strong> può riprodurre titoli musicali del dispositivo di archiviazione di<br />
massa <strong>USB</strong> se organizzati in Cartelle (Folders) e File.<br />
Una volta collegato il dispositivo di archiviazione di massa <strong>USB</strong>, tutte le Cartelle in esso contenute<br />
vengono scansite e classificate con un numero crescente corrispondente all’ordine di registrazione<br />
delle Cartelle sul dispositivo stesso. I File MP3 e WMA non verranno distinti in alcun modo e<br />
saranno ordinati e numerati in maniera sequenziale.<br />
ó Nota: La Cartelle ed i File verranno riprodotti nello stesso ordine in cui sono stati copiati sul<br />
dispositivo di archiviazione di massa <strong>USB</strong>. Può succedere che Cartelle e File NON vengano elencati<br />
in ordine alfabetico e che la loro disposizione differisca da quella ottenuta tramite il computer.<br />
ó Nota: Si consiglia di organizzare preventivamente l’ordine delle Cartelle e dei File tramite<br />
computer prima di collegare il dispositivo.<br />
ó Nota: Si raccomanda caldamente di eseguire copie di sicurezza di tutti i File/Dati (Files/Data).<br />
<strong>Toyota</strong> Motor Europe NV/SA non potrà essere ritenuta responsabile in caso di danneggiamenti<br />
o perdita di dati.<br />
Le Cartelle verranno organizzate in base alla logica seguente:<br />
Cartella Principale (Root Folder)<br />
C<br />
D<br />
C1.mp3<br />
D1.mp3<br />
C2.mp3<br />
D2.mp3<br />
C3.mp3<br />
D3.mp3<br />
N. Cartella<br />
1 (Cartella<br />
Principale)<br />
2 (C)<br />
R1.mp3<br />
R2.mp3<br />
R3.mp3<br />
C1.mp3<br />
C2.mp3<br />
C3.mp3<br />
B<br />
R1.mp3<br />
R2.mp3<br />
R3.mp3<br />
B1.mp3<br />
B2.mp3<br />
B3.mp3<br />
E<br />
A<br />
E1.mp3<br />
E2.mp3<br />
E3.mp3<br />
A1.mp3<br />
A2.mp3<br />
A3.mp3<br />
3 (D)<br />
4 (B)<br />
5 (E)<br />
D1.mp3<br />
D2.mp3<br />
D3.mp3<br />
B1.mp3<br />
B2.mp3<br />
B3.mp3<br />
E1.mp3<br />
E2.mp3<br />
E3.mp3<br />
F<br />
F1.mp3<br />
F2.mp3<br />
F3.mp3<br />
6 (A)<br />
7 (F)<br />
A1.mp3<br />
A2.mp3<br />
A3.mp3<br />
F1.mp3<br />
F2.mp3<br />
F3.mp3<br />
150 <strong>USB</strong> & <strong>iPod</strong> ® integration <strong>kit</strong> E
ó Nota: Il nome della Cartella e il nome del File saranno visualizzati sul display della radio.<br />
Raccomandiamo di organizzare le vostre Cartelle per nome dell’artista o per titolo (Title)<br />
dell’album e i vostri File per titolo della canzone.<br />
6.8. Selezione Cartelle<br />
Selezione diretta Cartelle<br />
ó Nota: I tasti di selezione diretta delle Cartelle (Direct Folder selection) sono disponibili<br />
esclusivamente su radio dotate di display touch screen.<br />
Premere [CHANGE DISCS] e successivamente uno dei tasti da [1] a [6].<br />
(La visualizzazione o le caratteristiche del display<br />
potrebbero cambiare in base al <strong>mode</strong>llo dell’autoradio.<br />
Consultare il manuale della vettura per ulteriori dettagli.)<br />
Selezione Cartelle con tasto Disc up/down<br />
Premere [DISC ^] per passare alla Cartella successiva.<br />
ó Nota: Una volta raggiunta l’ultima Cartella disponibile, un’ulteriore pressione del tasto riporta<br />
alla prima Cartella dell’elenco.<br />
Premere [DISC v] per passare alla Cartella precedente.<br />
E<br />
<strong>USB</strong> & <strong>iPod</strong> ® integration <strong>kit</strong> 151
ó Nota: Una volta raggiunta la prima Cartella (Folder) disponibile, un’ulteriore pressione del<br />
tasto riporta all’ultima Cartella dell’elenco.<br />
ó Nota: Per autoradio AVN questa funzione è disponibile esclusivamente tramite i comandi a<br />
volante. Consultare la sezione 8.4.<br />
6.9. Selezione File<br />
Premere brevemente [TRACK ^] per passare al File successivo.<br />
ó Nota: Una volta raggiunta l’ultima traccia, si passa alla prima traccia della Cartella seguente a<br />
meno che le funzioni Random e/o Ripeti (Repeat) non siano attive. (questa funzione non è invece<br />
valida per l’<strong>iPod</strong>).<br />
Premere brevemente il pulsante [TRACK v] per passare all’inizio del titolo corrente; premerlo ancora<br />
per passare al titolo precedente.<br />
ó Nota: Se, dopo aver raggiunto il primo titolo di una Cartella, si preme nuovamente il<br />
pulsante, il sistema passa all’inizio dell’ultima traccia della Cartella precedente a meno che le<br />
funzioni Random e/o Ripeti non siano attive. (questa funzione non è invece valida per l’<strong>iPod</strong>).<br />
ó Nota: Il numero di File che possono essere contenuti all’interno di una Cartella è illimitato.<br />
ó Nota: All’interno della stessa Cartella tuttavia i File vengono numerati da 1 a 99 a causa di<br />
limitazioni del display. Se il numero della traccia dovesse essere superiore a 99 la numerazione<br />
riprenderebbe dalla Traccia 1.<br />
6.10. Ricerca nei File<br />
Premere a lungo [TRACK v] per spostarsi all’indietro nel File corrente.<br />
Una volta raggiunto l’inizio del File, la riproduzione riprende dall’inizio del File.<br />
Premere a lungo [TRACK ^] per spostarsi in avanti lungo il File corrente.<br />
Una volta raggiunta la fine del File, la riproduzione riprende dall’inizio del File successivo.<br />
6.11. Ripetere File<br />
Premere brevemente [RPT] per attivare la funzione di ripetizione. Il File selezionato al momento<br />
dell’attivazione viene ripetuto a ciclo continuo. Sul display viene visualizzato il messaggio (RPT).<br />
Per disattivare la funzione di ripetizione, premere nuovamente [RPT] o selezionare un altro File<br />
musicale agendo sui tasti [TRACK ^] o [TRACK v].<br />
152 <strong>USB</strong> & <strong>iPod</strong> ® integration <strong>kit</strong> E
6.12. Ripetere Cartella<br />
Premere a lungo [RPT] per attivare la funzione di ripetizione della Cartella (Folder repeat function).<br />
La Cartella selezionata al momento dell’attivazione viene ripetuta a ciclo continuo. Sul display viene<br />
visualizzato il messaggio (D_RPT).<br />
Per disattivare la funzione di ripetizione, premere nuovamente [RPT] o selezionare un’altra Cartella<br />
agendo sui tasti [DISC ^] o [DISC v].<br />
6.13. Riproduzione random<br />
Riproduzione random (Random Play) all’interno di una Cartella<br />
Premere brevemente [RAND] per attivare la riproduzione random di tutti i File contenuti nella<br />
Cartella selezionata.<br />
Per disattivare la funzione di riproduzione random, premere di nuovo [RAND] brevemente.<br />
Premendo [TRACK ^] durante la riproduzione random, si avvia la riproduzione del File successivo<br />
selezionato in modalità random. Premendo [TRACK v] durante la riproduzione random, si<br />
riproduce nuovamente il File precedentemente selezionato in modalità random.<br />
ó Nota: Se la funzione di ripetizione della Cartella non è attiva durante la riproduzione random,<br />
al termine dell’esecuzione di tutti i File in essa contenuti, il sistema passerà a riprodurre in<br />
ordine random anche la Cartella successiva.<br />
Riproduzione random dell’intera memoria <strong>USB</strong><br />
Premere a lungo [RAND] per attivare la riproduzione random di tutti i File musicali conservati nel<br />
dispositivo di archiviazione di massa <strong>USB</strong>.<br />
Per disattivare la funzione di riproduzione random, premere di nuovo [RAND] brevemente.Premendo<br />
[TRACK ^] durante la riproduzione random, si avvia la riproduzione del File successivo selezionato in<br />
modalità random. Premendo [TRACK v] durante la riproduzione random, si riproduce nuovamente<br />
l’ultimo File eseguito. Premere [DISC^]/[DISC v] durante la riproduzione random disattiva la<br />
funzione.<br />
6.14. Scansione<br />
Scansione dei File (Scan Files) all’interno di una Cartella<br />
Premere brevemente [SCAN] per attivare la scansione di tutti i File contenuti nella Cartella<br />
selezionata. Tutti i File musicali verranno riprodotti per 10 secondi. Una volta che siano stati scansiti<br />
tutti i File della Cartella, la funzione di scansione si arresta ed inizia la regolare riproduzione del primo<br />
File scansito.<br />
Per disattivare la funzione di scansione, premere di nuovo [SCAN] brevemente. Il File<br />
correntemente in scansione viene riprodotto regolarmente.<br />
E<br />
<strong>USB</strong> & <strong>iPod</strong> ® integration <strong>kit</strong> 153
Scansione Cartelle (Scan Folders)<br />
Premere a lungo [SCAN] per attivare la scansione di tutte le Cartelle (Folders). Il primo File musicale<br />
di ciascuna Cartella verrà riprodotto per 10 secondi.<br />
Una volta che siano state scansite tutte le Cartelle, la funzione di scansione si arresta ed inizia la<br />
regolare riproduzione del primo File scansito.<br />
Per disattivare la funzione di scansione delle Cartelle (Folder scan function), premere di nuovo<br />
[SCAN]; la Cartella in scansione verrà riprodotta regolarmente.<br />
ó Nota: Funzione Scansione non disponibile per <strong>iPod</strong>.<br />
6.15. Dati display<br />
Premendo brevemente [DISP]/[TEXT] è possibile scorrere pagine contenenti informazioni differenti<br />
e visualizzate in un determinato ordine in base al tipo di display.<br />
Display che non supportano il CD-Text:<br />
Numero Cartella & Numero File “ Tempo di riproduzione trascorso (elapsed Playtime) “ Numero<br />
Cartella & Numero File.<br />
Display che supportano il CD-Text:<br />
Numero Cartella e Numero File “ Tempo di riproduzione trascorso “ Nome Cartella “ Nome File<br />
“ Numero Cartella & Numero File.<br />
Premendo a lungo il tasto [DISP]/[[TEXT] è possibile passare alla visualizzazione di ulteriori<br />
informazioni nella stessa pagina.<br />
Viene emesso un bip. 5 sec dopo aver premuto il pulsante, il display ritorna alle condizioni<br />
originarie.<br />
Display con touch screen<br />
Premendo [TEXT] è possibile passare alla visualizzazione di pagine contenenti diversi tipi di<br />
informazioni.<br />
Premendo [CHANGE DISCS] è possibile passare alla pagina contenente i tasti di selezione diretta<br />
per le Cartelle.<br />
154 <strong>USB</strong> & <strong>iPod</strong> ® integration <strong>kit</strong> E
(La visualizzazione o le caratteristiche del display<br />
potrebbero cambiare in base al <strong>mode</strong>llo dell’autoradio.<br />
Consultare il manuale della vettura per ulteriori dettagli.)<br />
Premendo [SELECT] a fianco del nome della traccia è possibile passare alla pagina contenente tasti<br />
di selezione diretta per i File. Per scorrere lungo le voci dell’elenco utilizzare i tasti Su e Giù sul lato<br />
sinistro del display.<br />
I File musicali visualizzati possono essere selezionati direttamente premendo l’area del display<br />
indicata.<br />
(La visualizzazione o le caratteristiche del display<br />
potrebbero cambiare in base al <strong>mode</strong>llo dell’autoradio.<br />
Consultare il manuale della vettura per ulteriori dettagli.)<br />
E<br />
<strong>USB</strong> & <strong>iPod</strong> ® integration <strong>kit</strong> 155
Limitazioni del display<br />
A causa delle limitazioni del display, le Cartelle sono suddivise in pagine e numerate in base ad<br />
un modulo da 6 elementi in ordine crescente da 1 a 6. L’indicazione dei numeri da 7 in su non<br />
può essere visualizzata sull’autoradio e pertanto la numerazione delle Cartelle successive all’ottava<br />
ricomincerà da 1 fino ad arrivare ad 6. Il nome della Cartella segnalerà, ad ogni modo, la Cartella<br />
corrente.<br />
Allo stesso modo, la numerazione dei File segue moduli da 99, ossia i primi 99 File vengono<br />
numerati da 1 a 99 mentre il File numero 1<strong>00</strong> viene visualizzato nuovamente come numero 1.<br />
156 <strong>USB</strong> & <strong>iPod</strong> ® integration <strong>kit</strong> E
7. Istruzioni d’uso del dispositivo <strong>iPod</strong><br />
7.1. Schema della radio<br />
All’interno del manuale d’uso nella sezione dedicata alle funzioni audio è possibile reperire uno<br />
schema della radio con i riferimenti alle funzioni dei pulsanti.<br />
7.2. Collegamento<br />
Collegamento dell’<strong>iPod</strong><br />
Utilizzando il cavo adattatore <strong>USB</strong>, collegare il dispositivo <strong>iPod</strong> al connettore <strong>USB</strong> nella presa jack<br />
<strong>USB</strong>/AUX posizionata nella consolle centrale o sul cruscotto.<br />
Quando l’accensione si trova su ACC o ON, l’<strong>iPod</strong> viene attivato automaticamente. Un<br />
contrassegno di controllo apparirà sull’<strong>iPod</strong>. L’<strong>iPod</strong> è pronto all’uso.<br />
Fin quando è collegato a questa unità, l’<strong>iPod</strong> non può essere acceso né spento mentre la batteria<br />
viene messa automaticamente sotto carica.<br />
Quando l’<strong>iPod</strong> viene collegato durante la riproduzione, la canzone in esecuzione viene messa in<br />
pausa.<br />
Quando l’accensione viene messa in posizione OFF, l’<strong>iPod</strong> non viene spento. Consultare il manuale<br />
utente del dispositivo per verificare come attivare la modalità di sospensione (Sleep) dopo un<br />
periodo di inattività. Con l’accensione disinserita, l’<strong>iPod</strong> non si carica.<br />
Il <strong>kit</strong> di integrazione per <strong>USB</strong> & <strong>iPod</strong> risponde alla normativa “<strong>USB</strong> 2.0 FS (12 MBPS)” e pertanto<br />
supporta i seguenti <strong>mode</strong>lli di <strong>iPod</strong>: <strong>iPod</strong> Nano (a partire dalla versione firmware 1.021.01<br />
e successivi), <strong>iPod</strong> Nano G2 (a partire dalla versione firmware 1.02 o successivi), <strong>iPod</strong> di 5°<br />
generazione (a partire dalla versione firmware 1.021.01 o successivi). La versione firmware 1.<strong>00</strong> o<br />
le precedenti non sono compatibili.<br />
ó Nota: Per ulteriori informazioni relative al lettore <strong>iPod</strong>, consultare il sito web della Apple.<br />
Scollegare l’<strong>iPod</strong><br />
L’<strong>iPod</strong> può essere scollegato dall’unità in qualsiasi momento.<br />
E<br />
<strong>USB</strong> & <strong>iPod</strong> ® integration <strong>kit</strong> 157
7.3. Accensione/Spegnimento<br />
Per l’accensione premere la manopola [PWR-VOL].<br />
Per lo spegnimento premere nuovamente la manopola [PWR-VOL].<br />
7.4. Aumento/Diminuzione volume<br />
Per aumentare il volume ruotare la manopola [VOLUME] in senso orario.<br />
Per diminuire il volume ruotare la manopola [VOLUME] in senso antiorario.<br />
7.5. Selezione della modalità <strong>iPod</strong><br />
Per selezionare la modalità <strong>iPod</strong> premere il tasto [DISC] dell’autoradio. Ogni volta che si preme<br />
[DISC], le modalità cambiano nel modo seguente:<br />
CD interno “ CDCH (= <strong>iPod</strong>) esterno “ CD interno.<br />
ó Nota: Quando il dispositivo <strong>iPod</strong> (<strong>iPod</strong> Device) è collegato per mezzo del <strong>kit</strong> di integrazione<br />
del caricatore CD esterno, la radio segnalerà la modalità Caricatore CD esterno.<br />
7.6. Ordinamento dei contenuti dell’<strong>iPod</strong><br />
Bassi/Acuti/Dissolvenza/Bilanciamento (Bass/Treble/Fader/Balance) possono essere regolati<br />
specificamente per la modalità <strong>iPod</strong>. Passando dalla modalità <strong>iPod</strong> alla modalità radio o CD, le<br />
impostazioni audio si regolano su quelle specifiche per ogni modalità.<br />
Le impostazioni audio di ciascuna modalità vengono conservate nella memoria dell’autoradio e<br />
applicate automaticamente ogni volta che si seleziona una determinata modalità.<br />
Display radio con touch screen<br />
Per selezionare la schermata di comando dell’audio (Audio control) premere il tasto [AUDIO<br />
CONTROL].<br />
Radio<br />
Per selezionare la voce desiderata premere la manopola [Tune]. Ogni volta che si preme il selettore<br />
Tune (Tune Dial) le voci selezionabili cambiano nel modo seguente: BAS (Bassi) “ TRE (Acuti) “<br />
FAD (Dissolvenza) “ BAL (Bilanciamento).<br />
Premendo nuovamente il selettore Tune si sblocca il comando dell’audio.<br />
Ruotando la manopola [Tune] verso destra/sinistra si regola la voce selezionata.<br />
ó Nota: Il suono può essere influenzato anche dalle impostazioni EQ dell’<strong>iPod</strong>. Per la<br />
regolazione delle impostazioni EQ dell’<strong>iPod</strong>, consultare il relativo manuale d’uso.<br />
158 <strong>USB</strong> & <strong>iPod</strong> ® integration <strong>kit</strong> E
7.7. Ordinamento <strong>iPod</strong><br />
L’adattatore per <strong>iPod</strong> può riprodurre titoli (Titles) musicali presenti all’interno dell’<strong>iPod</strong> se<br />
organizzati in Playlist o Album. Il <strong>kit</strong> di integrazione per <strong>USB</strong> & <strong>iPod</strong> non supporta le funzioni di<br />
selezione per artista e genere.<br />
Selezione ordinamento per Playlist o Album<br />
L’impostazione di default dell’<strong>iPod</strong> prevede l’ordinamento per Playlist.<br />
Per passare all’ordinamento per Album, tenere premuto il tasto [RPT] fino a quando (D_RPT) non<br />
appare sul display.<br />
Premere nuovamente il pulsante [RPT] per ritornare all’ordinamento per Playlist.<br />
ó Nota: Gli Album (Albums) verranno ordinati secondo l’ordine con il quale sono ordinati<br />
all’interno dell’<strong>iPod</strong>.<br />
7.8. La logica della Playlist<br />
L’adattatore per <strong>iPod</strong> può riprodurre titoli musicali presenti all’interno dell’<strong>iPod</strong> che siano<br />
organizzati per Playlist.<br />
Si raccomanda di utilizzare iTunes per organizzare il contenuto dell’<strong>iPod</strong> in Playlist.<br />
Ad eccezione della prima, le Playlist saranno identiche e ordinate allo stesso modo sia sull’<strong>iPod</strong> che<br />
sull’autoradio.<br />
La prima Playlist può avere contenuti differenti:<br />
Dopo il collegamento dell’<strong>iPod</strong>, la Playlist 1 contiene l’ultima Playlist selezionata prima del<br />
collegamento all’autoradio.<br />
Dopo il primo cambio di Playlist con Disc up, il dispositivo visualizzerà nuovamente la Playlist 1 e la<br />
prima Playlist conterrà tutti i Titoli musicali sull’<strong>iPod</strong>.<br />
Dopo il secondo Disc up, il dispositivo va alla Playlist 2.<br />
ó Nota: Se la Playlist è vuota, i contenuti musicali della Playlist precedente vengono trasferiti alla<br />
Playlist vuota.<br />
ó Nota: Se si passa ad una Playlist vuota, la canzone in riproduzione non viene interrotta.<br />
ó Nota: Il numero di Playlist è illimitato.<br />
E<br />
<strong>USB</strong> & <strong>iPod</strong> ® integration <strong>kit</strong> 159
7.9. Selezione Playlist/Album<br />
Selezione diretta Playlist/Album<br />
ó Nota: I tasti di selezione diretta per Playlist/Album (Direct Playlist/Album selection) sono<br />
disponibili esclusivamente su radio dotate di display touch screen.<br />
Premere [CHANGE DISCS] e successivamente uno dei tasti da [1] a [6].<br />
(La visualizzazione o le caratteristiche del display<br />
potrebbero cambiare in base al <strong>mode</strong>llo dell’autoradio.<br />
Consultare il manuale della vettura per ulteriori dettagli.)<br />
Selezione Playlist/Album con tasto Disc up/down<br />
Ordinare prima per Playlist o Album.<br />
Premere [DISC ^] per passare alla Playlist/Album seguente.<br />
ó Nota: Una volta raggiunta l’ultima Playlist/Album disponibile, un’ulteriore pressione del tasto<br />
riporta alla prima/Album in elenco.<br />
Premere [DISC v] per passare alla Playlist/Album precedente.<br />
ó Nota: Una volta raggiunta la prima Playlist/Album disponibile, un’ulteriore pressione del tasto<br />
riporta all’ultima Playlist/Album in elenco.<br />
ó Nota: Per autoradio AVN questa funzione è disponibile esclusivamente tramite i comandi a<br />
volante. Consultare la sezione 8.4.<br />
160 <strong>USB</strong> & <strong>iPod</strong> ® integration <strong>kit</strong> E
7.10. Selezione titoli<br />
Premere brevemente [TRACK ^] per passare al titolo (Title) musicale successivo.<br />
ó Nota: Una volta raggiunta l’ultima traccia, è possibile passare alla prima traccia della stessa<br />
Playlist/Album premendo di nuovo lo stesso pulsante.<br />
ó Nota: Premere [DISC ^] per passare alla prima traccia della Playlist seguente.<br />
Premere brevemente [TRACK v] per passare all’inizio del titolo corrente; premere nuovamente per<br />
passare al titolo precedente.<br />
ó Nota: Se, dopo aver raggiunto il primo titolo di una Playlist/Album, si preme nuovamente il<br />
pulsante, si passa all’inizio dell’ultima traccia della stessa Playlist/Album.<br />
ó Nota: Premere [DISC v] per passare alla Playlist precedente.<br />
ó Nota: Il numero di titoli che possono essere contenuti all’interno di una Playlist è illimitato.<br />
ó Nota: All’interno della stessa Playlist i titoli musicali vengono numerati da 1 a 99 a causa delle<br />
limitazioni del display. Se il numero della traccia dovesse essere superiore a 99 la numerazione<br />
riprenderebbe dalla Traccia 1.<br />
7.11. Ricerca nei titoli<br />
Premere a lungo [TRACK v] per spostarsi all’indietro lungo il titolo corrente.<br />
Una volta raggiunto l’inizio del titolo, la riproduzione riprende dall’inizio del titolo stesso.<br />
Premere a lungo [TRACK ^] per spostarsi in avanti lungo il titolo corrente.<br />
Una volta raggiunta la fine del titolo, la riproduzione riprende dall’inizio del titolo successivo.<br />
7.12. Ripetere titolo<br />
Premere brevemente [RPT] per attivare la funzione di ripetizione. Il titolo selezionato al momento<br />
dell’attivazione viene ripetuto a ciclo continuo. Sul display viene visualizzato il messaggio (RPT).<br />
Per disattivare la funzione di ripetizione, premere nuovamente [RPT] o selezionare un altro titolo<br />
musicale agendo sui tasti [TRACK ^] o [TRACK v].<br />
E<br />
<strong>USB</strong> & <strong>iPod</strong> ® integration <strong>kit</strong> 161
7.13. Riproduzione random<br />
Riproduzione random (Random Play) all’interno di una Playlist<br />
Premere brevemente [RAND] per attivare la riproduzione random di tutti i titoli (Titles) musicali<br />
contenuti nella Playlist selezionata.<br />
Per disattivare la funzione di riproduzione random, premere di nuovo [RAND] brevemente.<br />
Premendo [TRACK ^] durante la riproduzione random, si avvia la riproduzione del titolo successivo<br />
selezionato in modalità random. Premendo [TRACK v] durante la riproduzione random, si<br />
riproduce nuovamente il titolo precedentemente selezionato in modalità random.<br />
ó Nota: Se, prima del collegamento, sull’<strong>iPod</strong> è stata attivata la funzione random, la stessa<br />
funzione rimarrà attiva anche dopo il collegamento. Allo stesso modo, se viene attivata<br />
durante il collegamento, la funzione random rimane attiva anche dopo la disconnessione.<br />
Riproduzione random all’interno di un Album<br />
Per prima cosa selezionare l’ordinamento per Album attivando (D_RPT) quindi premere<br />
brevemente [RAND] per avviare la riproduzione random di tutti i titoli musicali contenuti<br />
nell’Album selezionato.<br />
Riproduzione random dell’intero contenuto dell’<strong>iPod</strong><br />
Premere a lungo [RAND] per attivare la riproduzione random di tutti i titoli musicali conservati<br />
nell’<strong>iPod</strong> (riproduzione random della Playlist 1).<br />
Per disattivare la funzione di riproduzione random, premere di nuovo [RAND] brevemente.<br />
Premendo [TRACK ^] durante la riproduzione random, si avvia la riproduzione del titolo successivo<br />
selezionato in modalità random.<br />
Premendo [TRACK v] durante la riproduzione random, si riproduce nuovamente il Titolo<br />
precedentemente selezionato in modalità random.<br />
Premere [DISC^]/[DISC v] durante la riproduzione random disattiva la funzione.<br />
ó Nota: Se selezionata dalla radio, la funzione di riproduzione random del disco viene<br />
mantenuta anche dopo la disconnessione dell’<strong>iPod</strong>.<br />
7.14. Dati display<br />
Premendo brevemente [DISP]/[TEXT] è possibile scorrere pagine contenenti informazioni differenti<br />
e visualizzate in un determinato ordine in base al tipo di display:<br />
Display che non supportano il CD-Text:<br />
Numero Playlist/Album & Numero Titolo “ Tempo di riproduzione trascorso (elapsed Playtime) “<br />
Numero Playlist/Album & Numero Titolo.<br />
162 <strong>USB</strong> & <strong>iPod</strong> ® integration <strong>kit</strong> E
Display che supportano il CD-Text:<br />
Numero Playlist/Album & Numero Titolo “ Tempo di riproduzione trascorso “ Nome Playlist/<br />
Album “ Nome titolo “ Numero Playlist/Album & Numero Titolo.<br />
Premendo a lungo il tasto [DISP]/[[TEXT] è possibile passare alla visualizzazione di ulteriori<br />
informazioni nella stessa pagina. Viene emesso un bip. 5 sec dopo aver premuto il pulsante, il<br />
display ritorna alle condizioni originarie.<br />
Display con touch screen<br />
Premendo [TEXT] è possibile passare alla visualizzazione di pagine contenenti diversi tipi di<br />
informazioni.<br />
Premendo [CHANGE DISCS] è possibile passare alla pagina contenente tasti di selezione diretta per<br />
Playlist/Album.<br />
(La visualizzazione o le caratteristiche del display<br />
potrebbero cambiare in base al <strong>mode</strong>llo dell’autoradio.<br />
Consultare il manuale della vettura per ulteriori dettagli.)<br />
E<br />
<strong>USB</strong> & <strong>iPod</strong> ® integration <strong>kit</strong> 163
Premendo [SELECT] a fianco del nome della Traccia (Track) è possibile passare alla pagina<br />
contenente tasti di selezione diretta per i titoli (Titles). Per scorrere lungo le voci dell’elenco<br />
utilizzare i tasti Su e Giù sul lato sinistro del display. I titoli musicali visualizzati possono essere<br />
selezionati direttamente premendo l’area del display indicata.<br />
(La visualizzazione o le caratteristiche del display<br />
potrebbero cambiare in base al <strong>mode</strong>llo dell’autoradio.<br />
Consultare il manuale della vettura per ulteriori dettagli.)<br />
Limitazioni del display<br />
A causa delle limitazioni del display, Playlist e Album sono suddivisi in pagine e numerati in base<br />
a moduli da 6 elementi in ordine crescente da 1 a 6. L’indicazione dei numeri da 7 in su non può<br />
essere visualizzata dall’autoradio e pertanto la numerazione di Playlist/Album successivi all’ottavo<br />
ricomincerà da 1 fino ad arrivare ad 6. Il nome della Playlist/Album indicherà, ad ogni modo, la<br />
Playlist/Album corrente.<br />
7.15. Scansione<br />
Nonostante la possibilità che appaiano i pulsanti [SCN], la funzione di scansione non è disponibile<br />
per <strong>iPod</strong>.<br />
164 <strong>USB</strong> & <strong>iPod</strong> ® integration <strong>kit</strong> E
8. Comandi al volante<br />
8.1. Selezione modalità<br />
Ogni volta che si preme il pulsante [MODE], l’unità audio modifica le modalità FM-AM-CD nel<br />
modo seguente:<br />
FM1 “ FM2 “ FM3 “ CD/DVD “ <strong>USB</strong>/iPOD “ Bluetooth “ AUX “ AM “ DAB “ FM1<br />
8.2. Volume<br />
Premere o ruotare [VOL +] per aumentare il volume.<br />
Premere o ruotare [VOL -] per diminuire il volume.<br />
8.3. Cambio File/Titolo<br />
Premere il pulsante [^] per passare al File/titolo (File/Title) successivo.<br />
Premere [v] per passare all’inizio del File/titolo corrente; premerlo nuovamente per passare al<br />
File/titolo precedente.<br />
8.4. Cambio Cartella/Playlist/Album<br />
Tenere premuto il pulsante [^] per passare a Cartella (Folder), Playlist o Album successivi.<br />
Premere [v] per passare a Cartella, Playlist o Album precedenti.<br />
ó Nota: Nel caso dell’<strong>iPod</strong>, prima di tutto è necessario selezionare sull’autoradio l’ordinamento<br />
per Playlist o Album.<br />
E<br />
<strong>USB</strong> & <strong>iPod</strong> ® integration <strong>kit</strong> 165
9. Diagnostica<br />
Se si sospetta un malfunzionamento, controllare i punti descritti a seguire.<br />
Problema<br />
I titoli non vengono<br />
visualizzati.<br />
Il pulsante SCAN non<br />
risponde.<br />
Alcune canzoni risultano<br />
irreperibili.<br />
Il dispositivo di<br />
archiviazione di massa<br />
<strong>USB</strong>/<strong>iPod</strong> non funziona in<br />
modo corretto.<br />
Il dispositivo di<br />
archiviazione di massa<br />
<strong>USB</strong>/<strong>iPod</strong> non funziona<br />
in modo corretto dopo la<br />
riconnessione.<br />
Possibile soluzione/causa<br />
Premere TEXT.<br />
Verificare presso il concessionario autorizzato se l’unità radio<br />
supporta CD-text su Caricatore CD esterno.<br />
La funzione SCAN è disponibile solamente su dispositivi di<br />
archiviazione di massa <strong>USB</strong> e pertanto non è valida per l’<strong>iPod</strong><br />
anche se è possibile che venga visualizzato il pulsante SCN.<br />
Nel caso dei dispositivi di archiviazione di massa <strong>USB</strong> seguire le<br />
istruzioni elencate nella sezione “Ordinamento Cartelle”.<br />
Alcuni dispositivi per MP3 archiviano le canzoni secondo i<br />
loro formati specifici o in collocazioni differenti dal volume di<br />
archiviazione di massa. Verificare presso il produttore.<br />
Il <strong>kit</strong> di integrazione supporta esclusivamente File MP3 e WMA.<br />
Nel caso dell’<strong>iPod</strong>, si raccomanda di utilizzare iTunes per<br />
organizzare il contenuto in Playlist. Tutte le canzoni memorizzate si<br />
trovano comunque nella Playlist 1.<br />
Scollegare il cavo dalla presa jack <strong>USB</strong>/AUX. Una volta visualizzato<br />
il menù principale del dispositivo di archiviazione di massa <strong>USB</strong>/<br />
<strong>iPod</strong>, ricollegare il cavo. (consultare la sezione Azzeramento)<br />
Verificare la compatibilità nelle specifiche.<br />
Il dispositivo di archiviazione di massa <strong>USB</strong>/<strong>iPod</strong> non ha rilevato<br />
la disconnessione. Azzerare il dispositivo di archiviazione di massa<br />
<strong>USB</strong>/<strong>iPod</strong> (consultare i manuali dedicati).<br />
A causa della specificità dell’hardware dei vari lettori di card e della<br />
relativa implementazione, non possiamo garantire la compatibilità<br />
con tutti i dispositivi. Lo stesso vale per altri dispositivi elettronici<br />
che utilizzino memorie esterne.<br />
Verificare la compatibilità nelle specifiche.<br />
Nel caso dell’<strong>iPod</strong>, si raccomanda di utilizzare l’ultima versione disponibile di iTunes e di caricare<br />
sull’<strong>iPod</strong> l’ultima versione del firmware dalla pagina web Apple.<br />
Se i suggerimenti proposti non risolvono il problema, si raccomanda di portare la vettura al<br />
concessionario autorizzato più vicino.<br />
Per qualsiasi domanda relativa al dispositivo di archiviazione di massa <strong>USB</strong> o allo stesso <strong>iPod</strong>,<br />
consultare il manuale d’uso o la pagina web del produttore.<br />
166 <strong>USB</strong> & <strong>iPod</strong> ® integration <strong>kit</strong> E
10. Azzeramento<br />
In condizioni particolari il software può presentare piccoli problemi tecnici che comportano<br />
un blocco del dispositivo di archiviazione di massa o dell’<strong>iPod</strong>. Esistono svariati passaggi che<br />
consentono di azzerare il Kit di integrazione (Integration <strong>kit</strong>) ed i Dispositivi Multimediali<br />
(Media Devices) senza alterarne contenuti ed impostazioni:<br />
Spegnere e accendere la radio.<br />
Se il problema persiste:<br />
Scollegare e ricollegare il dispositivo di archiviazione di massa <strong>USB</strong>/<strong>iPod</strong> dalla presa jack <strong>USB</strong>/AUX.<br />
Assicurarsi che la spina sia in condizioni perfette.<br />
Se il problema persiste, scollegare il dispositivo di archiviazione di massa <strong>USB</strong> o l’<strong>iPod</strong> e:<br />
Portare la chiave di accensione su OFF e dopo un minuto riportarla su ON. Ricollegare l’<strong>iPod</strong>.<br />
Se il problema persiste, scollegare il dispositivo di archiviazione di massa <strong>USB</strong> o l’<strong>iPod</strong>, disinserire<br />
l’accensione e azzerare il dispositivo di archiviazione di massa <strong>USB</strong>/<strong>iPod</strong>. (Consultare i relativi<br />
manuali d’uso).<br />
E<br />
<strong>USB</strong> & <strong>iPod</strong> ® integration <strong>kit</strong> 167
11. Specifiche<br />
Centralina ECU del <strong>kit</strong> di Integrazione <strong>USB</strong> & <strong>iPod</strong>:<br />
Alimentazione elettrica: DC 13,2 V (10,5 V - 16 V)<br />
Assorbimento di corrente max.:<br />
Corrente di standby max.:<br />
Dimensioni ECU:<br />
Peso ECU:<br />
Uscita audio max.:<br />
Massima impedenza di uscita:<br />
11.1. <strong>USB</strong><br />
< 1 A<br />
< 1 mA<br />
125,5 mm (L) x 37,5 mm (A) x 117,5 mm (P)<br />
0,36 kg<br />
2 VRMS<br />
220 Ohm<br />
Specifiche <strong>USB</strong>: <strong>USB</strong> 2.0 FS (12 MBPS), Mass Storage class (metodo BOT)<br />
(*in caso di dubbi contattare il concessionario o il produttore del dispositivo per verificare la<br />
rispondenza alla Mass Storage Class dell’<strong>USB</strong>)<br />
Alimentazione max.: 5<strong>00</strong> mA (*I consumi della maggior parte degli hard drive esterni superano<br />
questo valore)<br />
Numero di File e Cartella:<br />
• Numero di Cartelle totali disponibili nel dispositivo: MAX. 999<br />
• Numero di File totali ammessi nel dispositivo: MAX. 65.025<br />
• Numero di File totali ammessi per una Cartella: MAX. 255<br />
• Livelli della Cartella: 8 Livelli<br />
MP3<br />
• MPEG1 AUDIO LAYER II, III (VBR supportata).<br />
Bit rate: 32 - 320 kbps frequenza di c<strong>amp</strong>ionamento: 44,1/48/32 kHz<br />
• MPEG1 AUDIO LAYER II, III (VBR supportata).<br />
Bit rate: 32 - 160 kbps frequenza di c<strong>amp</strong>ionamento: 22,05/24/16 kHz<br />
• MPEG 2.5 (VBR supportata).<br />
Bit rate: 32 - 160 kbps frequenza di c<strong>amp</strong>ionamento:11,025/12/8 kHz<br />
WMA<br />
• Ver9 (standard, VBR) HIGH PROFILE<br />
Bit rate: 32 - 320 kbps freq. di c<strong>amp</strong>ionamento: 44,1 k/48 k/32 kHz<br />
• La carica del dispositivo viene supportata fino all’alimentazione massima<br />
168 <strong>USB</strong> & <strong>iPod</strong> ® integration <strong>kit</strong> E
11.2. <strong>iPod</strong>/iPhone<br />
<strong>iPod</strong>/iPhone supportati:<br />
• Nano (a partire dalla versione firmware 1.021.01)<br />
• Nano G2 (a partire dalla versione firmware 1.02)<br />
• 5° Generazione (a partire dalla versione firmware 1.021.01)<br />
• iPhone (a partire dalla versione firmware 1.021.01)<br />
La versione firmware 1.<strong>00</strong> o le precedenti non sono compatibili.<br />
Numero di traccia e elenco<br />
• Numero di elenchi totali ammessi nel dispositivo: MAX. 9.999<br />
• Numero di tracce totali ammesse nel dispositivo: MAX. 65.535<br />
• Numero di tracce totali ammesse in elenco: MAX. 65.535<br />
PODCAST e PODBOOKS supportati<br />
Playlist, Album e Canzoni (Songs) supportati (artista e genere non supportati)<br />
Carica del dispositivo supportata<br />
Agenzia di vendita: <strong>Toyota</strong> Motor Europe N.V./S.A.<br />
Servizio di assistenza post-vendita: <strong>Toyota</strong> Motor Europe N.V./S.A.<br />
Produttore: Panasonic Automotive Systems Europe GmbH.<br />
E<br />
<strong>USB</strong> & <strong>iPod</strong> ® integration <strong>kit</strong> 169
170 <strong>USB</strong> & <strong>iPod</strong> ® integration <strong>kit</strong> E
www.toyota-europe.com<br />
PZ420-<strong><strong>00</strong>266</strong>-ME<br />
Publication no. AOM <strong>00</strong>0 222-0<br />
Printed in Belgium (September 2<strong>00</strong>8)


