

BlackandDecker Friteuse- Ef2750 - Type 1 - Instruction Manual
BlackandDecker Friteuse- Ef2750 - Type 1 - Instruction Manual
BlackandDecker Friteuse- Ef2750 - Type 1 - Instruction Manual

You also want an ePaper? Increase the reach of your titles
YUMPU automatically turns print PDFs into web optimized ePapers that Google loves.
www.blackanddecker.ae<br />
EF2750
ENGLISH<br />
8<br />
10<br />
7<br />
9<br />
11<br />
2<br />
3<br />
4<br />
12<br />
5 6<br />
1<br />
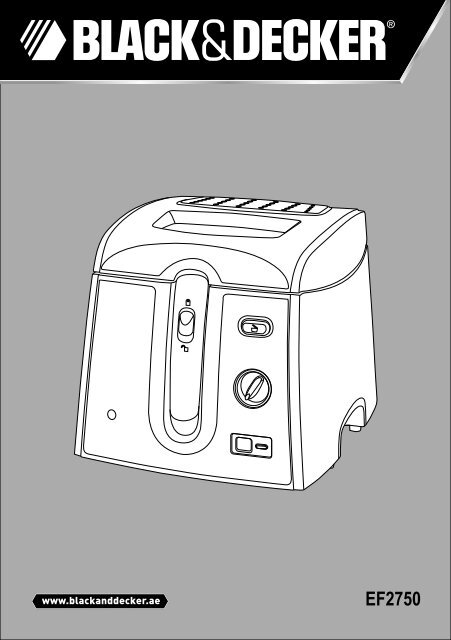
Parts Identification<br />
1. Lid<br />
2. Lid release button<br />
3. On/Off - Temperature dial<br />
4. Temperature indicator<br />
5. Timer<br />
6. Timer set button<br />
7. Basket handle<br />
8. Handle release button<br />
9. Cooking bowl<br />
10. Basket<br />
11. Viewing window<br />
12. Filter cover<br />
2
ENGLISH<br />
Intended use<br />
Your Black & Decker Deep Fryer has been<br />
designed for cooking ingredients as listed in the<br />
Frying Guide in this manual. This product is<br />
intended for household use only.<br />
Read this entire manual carefully<br />
before using the appliance.<br />
Safety instructions<br />
Warning! When using mains-powered<br />
appliances, basic safety precautions, including<br />
the following, should always be followed to<br />
reduce the risk of fire, electric shock, personal<br />
injury and material damage.<br />
• The intended use is described in this manual.<br />
The use of any accessory or attachment or<br />
the performance of any operation with this<br />
appliance other than those recommended in<br />
this instruction manual may present a risk of<br />
personal injury.<br />
• Retain this manual for future reference.<br />
• Always route the cord carefully to avoid a<br />
tripping hazard.<br />
• Never operate an appliance directly below<br />
the socket-outlet it is connected to.<br />
Using your appliance<br />
• Make sure that the appliance is switched off<br />
before connecting to or disconnecting from<br />
the power supply.<br />
• Always take care when using the appliance.<br />
• Never pull the power supply cord to<br />
disconnect the plug from the socket.<br />
• Keep the power supply cord away from heat,<br />
oil and sharp edges.<br />
• Surfaces may be hot during use and during<br />
the cool down period.<br />
• Do not operate or place any part of this<br />
appliance on or near any hot surface, such as<br />
gas or electric burner or in a heated oven.<br />
• When using an extension cord with your<br />
appliance, make sure the extension cord is<br />
correctly wire & rated for its use.<br />
Safety of others<br />
• Do not allow the cord set to hang over bench<br />
tops.<br />
• This appliance is not intended for use by<br />
persons (including children) with reduced<br />
physical, sensory or mental capabilities, or<br />
lack of experience and knowledge, unless<br />
they have been given supervision or<br />
instruction concerning use of the appliance by<br />
a person responsible for their safety.<br />
• Do not allow children or any person unfamiliar<br />
with these instructions to use the appliance.<br />
• Do not allow children or animals to come near<br />
the work area or to touch the appliance or<br />
power supply cord. Close supervision is<br />
necessary when the appliance is used near<br />
children.<br />
• Never leave the appliance unattended when<br />
in use.<br />
After use<br />
• Switch off and remove the plug from the<br />
socket before leaving the appliance<br />
unattended and before changing, cleaning or<br />
inspecting any parts of the appliance.<br />
3
ENGLISH<br />
• When not in use, the appliance should be<br />
stored in a dry place. Children should not<br />
have access to stored appliances.<br />
Inspection and repairs<br />
• Before use, check the appliance for<br />
damaged or defective parts. Check for<br />
breakage of parts, damage to switches and<br />
any other conditions that may affect its<br />
operation.<br />
• Do not use the appliance if any part is<br />
damaged or defective.<br />
• Have any damaged or defective parts<br />
repaired or replaced by an authorised repair<br />
agent.<br />
• Before use, check the power supply cord for<br />
signs of damage, ageing and wear.<br />
• Do not use the appliance if the power supply<br />
cord or mains plug is damaged or defective.<br />
• If the power supply cord or mains plug is<br />
damaged or defective it must be repaired by<br />
an authorised repair agent in order to avoid a<br />
hazard. Do not cut the power supply cord<br />
and do not attempt to repair it yourself.<br />
• Never attempt to remove or replace any<br />
parts other than those specified in this<br />
manual.<br />
• Do not attempt to repair the appliance. Take<br />
it to your nearest Black & Decker-owned or<br />
authorised Service Centre for repair.<br />
Electrical safety<br />
• This product must be earthed. Always check<br />
that the power supply corresponds to the<br />
voltage on the rating plate.<br />
• Power plugs must match the outlet. Never<br />
modify the plug in any way. Do not use any<br />
adapter plugs with earthed (Class 1)<br />
appliances. Unmodified plugs and matching<br />
outlets will reduce the risk of electric shock.<br />
Extension cables & Class 1<br />
product<br />
• A 3-core cable must be used as your<br />
appliance is earthed and of Class 1<br />
construction.<br />
• Up to 30m (100ft) can be used without loss of<br />
power.<br />
• If the supply cord is damaged, it must be<br />
replaced by the manufacturer or an<br />
authorized Black & Decker Service Center in<br />
order to avoid a hazard.<br />
Mains plug replacement<br />
If a new mains plug needs to be fitted:<br />
• Safely dispose of the old plug<br />
• Connect the brown lead to the live terminal of<br />
the new plug<br />
• Connect the blue lead to the neutral terminal<br />
• If the product is class I (earthed), connect the<br />
green/yellow lead to the earth terminal.<br />
Note: If your product is class II double insulated<br />
(only 2 wires in the cord set), no connection is to<br />
be made to the earth terminal.<br />
Follow the fitting instructions supplied with good<br />
quality plugs<br />
Any replacement fuse must be of the same<br />
rating as the original fuse supplied with the<br />
product.<br />
Warning! The above section on mains plug<br />
replacement is for authorized service centre<br />
personals.<br />
4
ENGLISH<br />
Additional safety instructions<br />
for deep fryers<br />
• Do not immerse the appliance, cord set or<br />
plug in liquids<br />
• Never add water or ice to oil<br />
• Do not use solid fats<br />
• Extra care is required when cooking frozen<br />
food<br />
• Only use good quality cooking oil in this fryer<br />
• Always close the lid before lowering the<br />
basket into the hot oil<br />
• Care should be taken when opening the fryer<br />
as hot steam may escape on opening.<br />
• Hot steam may escape from the filter cover<br />
vents during use<br />
• Take care when opening the Fryer lid as hot<br />
steam may escape<br />
• Do not touch hot surfaces such as the bowl,<br />
lid and main body during use or the<br />
cool-down period. Always use the handles or<br />
knobs provided.<br />
• Allow Fryer & oil to cool before carrying or<br />
emptying.<br />
• Surfaces may be hot during use and during<br />
the cool down period.<br />
• Always leave sufficient space around the<br />
fryer for ventilation.<br />
Assembly<br />
This appliance is supplied fully assembled &<br />
only requires parts to be cleaned & oil adding to<br />
the cooking bowl before use.<br />
Lid<br />
• To open the lid (1), press the lid release<br />
button (2).<br />
• Once open, the lid can be removed by<br />
releasing the clips and then lifting it vertically<br />
from the appliance.<br />
• To re-fit the lid, insert the 2 posts into the slot<br />
in the appliance. Close the lid, ensuring it<br />
locks in place.<br />
Basket<br />
• Raise the basket handle (7) until it locks in<br />
the horizontal position.<br />
• Press the lid release button (2) & allow the<br />
lid (1) to open.<br />
• Lift the basket (10) from the Fryer.<br />
• To re-fit the basket, insert the rib on the<br />
basket into the slot in the appliance and<br />
lower into position.<br />
• Close the lid, & press the handle release<br />
button (8). Slowly lower the handle to the<br />
vertical position.<br />
Cooking bowl<br />
• Press the lid release button (2) & allow the<br />
lid (1) to open.<br />
• Lift the basket (10) from the Fryer.<br />
• Grip the bowl (9) at either side & lift it from<br />
the cavity.<br />
• To re-fit, place it back in the cavity, ensuring<br />
the mark on the bowl is matching with mark<br />
on the unit and it is correctly seated. Re-fit<br />
the basket, lower it & close the lid.<br />
5
ENGLISH<br />
Use<br />
Adding oil<br />
• Raise the basket handle (7) until it locks in<br />
the horizontal position.<br />
• Press the lid release button (2) & allow the<br />
lid to open.<br />
• Lift the basket (10) from the Fryer.<br />
• Remove the cooking bowl (9).<br />
• Check the element for signs of damage or<br />
debris to prolong the life of the appliance &<br />
improve efficiency.<br />
Note: The bowl should only be removed while<br />
the product is cool.<br />
• Place the cooking bowl back in the appliance<br />
making sure it is seated correctly.<br />
Note: If the cooking bowl is not seated correctly<br />
the fryer will not function.<br />
• Pour good quality cooking oil into the<br />
cooking bowl. Always make sure the oil level<br />
is between the maximum & minimum marks<br />
on the cooking bowl. (Approx 1.65 liters)<br />
Note: Cook only in the bowl supplied.<br />
• Fit the basket into the appliance. Close the<br />
lid & press handle release button to lower<br />
the handle to the vertical position.<br />
Cooking<br />
• Connect the appliance to a suitable electrical<br />
supply.<br />
• Rotate the temperature control (3) to the<br />
required setting, the temperature indicator<br />
lamp (4) will light up to indicate the appliance<br />
is on and the oil is being heated.<br />
• The temperature indicator lamp (4) will go out<br />
the oil is at the selected temperature.<br />
• Preheating the empty basket in this way will<br />
help prevent food sticking to it.<br />
• Raise the handle (7) to the carrying position.<br />
• Press the lid release button (2) & allow the lid<br />
to open.<br />
• Remove the basket & close the lid. Place the<br />
basket on a worktop, using clean cloth or<br />
paper towels to prevent marking the work<br />
surface.<br />
• Place the prepared ingredients in the basket<br />
(10), then open the Fryer lid & fit the basket<br />
to the appliance, slowly lowering into the oil.<br />
Note: Excess moisture should be removed from<br />
ingredients with a clean cloth or paper towels<br />
before frying.<br />
Note: Do not over fill the basket.<br />
• Carefully close the lid, making sure it latches<br />
in position.<br />
• While holding the handle, press the handle<br />
button (8). Slowly lower the handle to the<br />
vertical position.<br />
Note: The temperature indicator lamp (4) will<br />
cycle on and off during cooking. Keep lid (1)<br />
closed during cooking.<br />
• Set the timer by pressing the timer set button<br />
(6) until the required number of minutes is<br />
reached. (The timer increases in increments<br />
of 1 minute up to a maximum of 30 minutes)<br />
When the timer has finished a series of<br />
beeps will be heard, The beeping will be<br />
repeated after 1 minute and can be cancelled<br />
by pressing the timer set button (6).<br />
6
ENGLISH<br />
• Use the Frying Guide as a guide to<br />
determine food quantities, temperature<br />
settings and cooking times.<br />
• The cooking progress can be checked by<br />
looking through the viewing window (11).<br />
Note: Hot steam may escape from the filter<br />
vents and lid during cooking.<br />
• When cooking is completed, rotate the<br />
temperature dial (3) to the off position, the<br />
on/off indicator lamp (4) will go out.<br />
Disconnect the appliance from the electrical<br />
supply.<br />
• Raise the basket handle (10) until it locks in<br />
the horizontal position. Press the lid release<br />
button (2) to open the Fryer & remove the<br />
basket, shaking it so any excess oil falls back<br />
into the cooking bowl.<br />
Note: The basket can be positioned onto the<br />
side of the cooking bowl to drain excess oil from<br />
the food.<br />
Frying guide<br />
This frying time given in this chart is only a guide<br />
and should be adjusted according to the quantity<br />
fried.<br />
Food Oil Temp Max. Weight Approx.<br />
(ºC) (Grams) Frying Time<br />
(Minutes)<br />
Shrimp 130 250 3 – 5<br />
Onion Rings 140 150 3 – 4<br />
Mushrooms 140 300 6 – 8<br />
Fish Fillet 150 250 5 – 6<br />
Fish Fillet in Batter 150 400 6 – 8<br />
Fish Cakes or Balls 150 400 7 – 10<br />
Sliced Meat 170 400 7 – 10<br />
Steak 170 400 7 – 10<br />
Chicken Strips 180 400 6 – 10<br />
French Fries 190 500 9 – 12<br />
Practical advice<br />
Oils and fats<br />
• Always use oil that can withstand high<br />
temperature.<br />
• Do not mix different types of oil or fat.<br />
• Change the oil or fat when it becomes brown<br />
after cooking.<br />
Preparing the food<br />
• Whatever the recipe used, the food must be<br />
perfectly dry: this will avoid overflowing and<br />
make the oil or fat last longer.<br />
• When preparing potato-based food (chips,<br />
crisps, etc.), cut them up and then wash them<br />
in cold water to remove the starch. Dry them<br />
carefully. This will stop them sticking<br />
together.<br />
Cooking<br />
• Do not overfill the basket. This will cause the<br />
oil temperature dropping and make the food<br />
greasy.<br />
• Do not keep the oil at high temperature for<br />
long periods. This will deteriorate the oil.<br />
• Set the temperature controller to the lowest<br />
temperature while waiting between two<br />
batches.<br />
• Do not leave the cooked food in the basket in<br />
the draining position too long. The vapors<br />
could cause the food to lose its crispness and<br />
go soft.<br />
• Frozen food can be cooked in the basket<br />
without being defrosted.<br />
After cooking<br />
• Change the fat or oil regularly, after<br />
approximately 10 batches.<br />
7
ENGLISH<br />
Maintenance<br />
Your Black & Decker tool has been designed to<br />
operate over a long period of time with a<br />
minimum of maintenance. Continuous<br />
satisfactory operation depends upon proper<br />
care and regular cleaning.<br />
Warning! Before performing any maintenance<br />
or cleaning of the Fryer, disconnect the<br />
appliance from the power supply.<br />
Emptying the Fryer<br />
When the Fryer is cool, pour the old oil from the<br />
coking bowl (9) into a suitable container. Always<br />
follow local regulations concerning the disposal<br />
of used cooking oil.<br />
Replacing the Filter<br />
The filter is fitted to reduce frying odours and<br />
should always be in place when using the Fryer.<br />
Over time, the filters will become less effective<br />
& will need to be replaced.<br />
To replace the filters, remove the filter cover<br />
(12) from the lid. The filter material can now be<br />
removed. Fit the new filter material, making sure<br />
the white filter is down, and the wire mesh is on<br />
top.<br />
B&D recommend replacing the filter after every<br />
50 - 60 uses.<br />
Cleaning<br />
The main housing should be cleaned with a<br />
clean damp cloth only.<br />
Lid & Basket:<br />
basket in warm soapy water. Rinse with clean<br />
water and dry thoroughly with a dry soft cloth.<br />
Cleaning the bowl<br />
Unplug the Fryer & allow the oil to cool to room<br />
temperature. Remove the lid (1), basket (10)<br />
and the cooking bowl (9) from the unit. Pour out<br />
the cool oil and filter it in to a suitable container<br />
using a sieve to filter out food particles from the<br />
oil.<br />
Wipe the oil off with an absorbing paper. Wash<br />
the lid & basket in warm soapy water. Rinse with<br />
clean water and dry thoroughly with a dry soft<br />
cloth.<br />
Note: Do not use abrasives or chemical<br />
cleaners on any part of this appliance.<br />
Do not allow the filters to get wet.<br />
Do not wash any part of this appliance in a<br />
dishwasher.<br />
Always follow local regulations concerning the<br />
disposal of used cooking oil. Ventilation slot<br />
should be cleaned occasionally with a clean, dry<br />
paint brush.<br />
Technical data<br />
Voltage<br />
Supply<br />
Power input<br />
Cable length<br />
Container size<br />
Weight<br />
EF2750<br />
220 – 240 Volts<br />
50/60 Hz<br />
1800 W<br />
0.77 m<br />
2.5 litre<br />
2.8 kg<br />
Remove the lid & basket from the appliance.<br />
Remove the filter from the lid. Wash the lid &<br />
8
ENGLISH<br />
Protecting the environment<br />
Separate collection. This product must not<br />
be disposed of with normal household<br />
waste.<br />
Should you find one day that your Black &<br />
Decker product needs replacement, or if it is of<br />
no further use to you, do not dispose of it with<br />
other household waste. Make this product<br />
available for separate collection.<br />
• Black & Decker provides a facility for<br />
recycling Black & Decker products once they<br />
have reached the end of their working life.<br />
This service is provided free of charge. To<br />
take advantage of this service please return<br />
your product to any authorised repair agent<br />
who will collect them on our behalf.<br />
• You can check the location of your nearest<br />
authorised repair agent by contacting your<br />
local Black & Decker office at the address<br />
indicated in this manual. Alternatively, a list of<br />
authorized Black & Decker repair agents and<br />
full details of our after-sales service and<br />
contact are available on the Internet at:<br />
www.2helpU.com.<br />
Warranty<br />
Black & Decker is confident of the quality of its<br />
products and offers an outstanding warranty.<br />
This warranty statement is in addition to and in<br />
no way prejudices your statutory rights.<br />
The warranty is valid within the territories of the<br />
Member States of the European Union and the<br />
European Free Trade Area.<br />
If a Black & Decker product becomes defective<br />
due to faulty materials, workmanship or lack of<br />
conformity, within 24 months from the date of<br />
purchase, Black & Decker warranty to replace<br />
defective parts, repair products subjected to fair<br />
wear and tear or replace such products to ensure<br />
minimum inconvenience to the customer unless:<br />
The product has been used for trade,<br />
professional or hire purposes;<br />
The product has been subjected to misuse<br />
or neglect;<br />
The product has sustained damage<br />
through foreign objects, substances or<br />
accidents;<br />
Repairs have been attempted by persons<br />
other than authorised repair agents or<br />
Black & Decker service staff.<br />
To claim on the warranty, you will need to submit<br />
proof of purchase to the seller or an authorised<br />
repair agent. You can check the location of your<br />
nearest authorised repair agent by contacting<br />
your local Black & Decker office at the address<br />
indicated in this manual.<br />
Alternatively, a list of authorised Black & Decker<br />
repair agents and full details of our after-sales<br />
service and contacts are available on the Internet<br />
at: www.2helpU.com.<br />
9
FRANÇAIS<br />
8<br />
10<br />
7<br />
9<br />
11<br />
2<br />
3<br />
4<br />
12<br />
5 6<br />
1<br />
Identification des pièces<br />
1. Couvercle<br />
2. Bouton de déverrouillage du couvercle<br />
3. Marche/Arrêt – Cadran du thermostat<br />
4. Témoin lumineux de température<br />
5. Minuteur<br />
6. Bouton de réglage de la minuterie<br />
7. Poignée du panier<br />
8. Bouton de déverrouillage de la poignée<br />
9. Cuve de cuisson<br />
10. Panier<br />
11. Hublot de contrôle<br />
12. Couvercle du filtre<br />
10
FRANÇAIS<br />
Utilisation prévue<br />
Votre friteuse Black & Decker a été conçue pour<br />
cuire des aliments dont la liste figure sur le<br />
Guide de cuisson dans ce manuel. Cet appareil<br />
est uniquement destiné à un usage domestique<br />
à l’intérieur.<br />
Lisez ce manuel attentivement avant<br />
d’utiliser l’appareil.<br />
Consignes de sécurité<br />
Avertissement! Lorsqu’on utilise un appareil<br />
électrique, il faut toujours respecter certaines<br />
règles de sécurité fondamentales, notamment<br />
les suivantes, afin de prévenir les risques<br />
d’incendie, de décharges électriques, de<br />
blessures corporelles et de dommages<br />
matériels.<br />
• Ce manuel décrit la manière d’utiliser cet<br />
appareil. L’utilisation d’un accessoire ou<br />
d’une fixation, ou l’utilisation de cet appareil<br />
à d’autres fins que celles recommandées<br />
dans ce manuel d’instruction peut présenter<br />
un risque de blessures corporelles.<br />
• Conservez ce manuel pour un usage<br />
ultérieur.<br />
• Toujours positionner le cordon d’alimentation<br />
avec soin afin d’éviter les risques de chute.<br />
• Ne jamais faire fonctionner un appareil<br />
directement en-dessous de la prise sur<br />
laquelle il est branché.<br />
Utilisation de votre appareil<br />
• S’assurer que l’appareil est éteint avant de le<br />
brancher ou de le débrancher de<br />
l’alimentation secteur.<br />
• Prendre toutes les précautions nécessaires<br />
pendant l’utilisation de l’appareil.<br />
• Ne jamais tirer sur le cordon d’alimentation<br />
pour débrancher la fiche de la prise.<br />
• Garder le cordon d’alimentation éloigné de<br />
toute source de chaleur, de zones<br />
graisseuses ou de bords tranchants.<br />
• Les surfaces de l’appareil peuvent être<br />
brûlantes pendant le fonctionnement et<br />
pendant le temps de refroidissement.<br />
• Ne pas faire fonctionner l’appareil et ne pas le<br />
placer sur ou à proximité de surfaces<br />
chaudes, tel un brûleur à gaz ou électrique,<br />
ou un four chauffant.<br />
• Lorsque vous utilisez une rallonge avec votre<br />
appareil, assurez-vous que la rallonge soit<br />
bien branchée et adaptée à cet usage.<br />
Sécurité d’autrui<br />
• Ne pas laisser pendre le cordon<br />
d’alimentation sur le rebord d’un plan de<br />
travail.<br />
• Cet appareil ne doit pas être utilisé par des<br />
personnes (y compris les enfants) ayant des<br />
déficiences physiques, sensorielles ou<br />
mentales. Cette consigne s’applique aussi<br />
aux personnes manquant d’expérience ou de<br />
connaissances du matériel, à moins que<br />
celles-ci n’aient reçu les instructions<br />
appropriées ou ne soient encadrées par une<br />
personne responsable de leur sécurité pour<br />
utiliser l’appareil.<br />
• Ne jamais laisser les enfants ni les personnes<br />
non familiarisées avec ces instructions utiliser<br />
l’appareil.<br />
• Ne pas laisser les enfants ni les animaux<br />
s’approcher de la zone de travail, ni toucher<br />
l’appareil ou le cordon d’alimentation. Rester<br />
vigilant lorsque l’appareil fonctionne à<br />
proximité d’enfants.<br />
• Ne jamais laisser l’appareil sans surveillance<br />
pendant son fonctionnement.<br />
Après utilisation<br />
• Eteindre et retirer la fiche de la prise avant de<br />
laisser l’appareil sans surveillance et avant de<br />
changer, nettoyer ou inspecter les éléments<br />
de l’appareil.<br />
11
FRANÇAIS<br />
• Lorsque l’appareil n’est pas utilisé, rangez-le<br />
dans un endroit sec. Les enfants ne doivent<br />
pas avoir accès aux appareils rangés.<br />
Inspection et réparations<br />
• Avant l’utilisation, vérifier l’état de l’appareil<br />
et des pièces. Vérifier la présence de pièces<br />
cassées, interrupteurs endommagés ou<br />
toute autre anomalie susceptibles de nuire<br />
au bon fonctionnement de l’appareil.<br />
• Ne pas utiliser l’appareil si un élément est<br />
endommagé ou défectueux.<br />
• Faire réparer ou remplacer toute pièce<br />
endommagée ou défectueuse par un<br />
réparateur agréé.<br />
• Avant l’utilisation, vérifier l’état du cordon<br />
d’alimentation pour des signes de<br />
dommages, de vieillissement ou d’usure.<br />
• Ne pas utiliser l’appareil si le cordon<br />
d’alimentation ou la fiche secteur sont<br />
endommagés ou défectueux.<br />
• Si le cordon d’alimentation ou la fiche<br />
secteur sont endommagés ou défectueux, ils<br />
doivent être réparés par un réparateur agréé<br />
pour éviter les risques d’accident. Ne pas<br />
couper le cordon d’alimentation et ne pas<br />
essayez de le réparer soi-même.<br />
• Ne jamais tenter d’enlever ou de remplacer<br />
des pièces autres que celles citées dans ce<br />
manuel.<br />
• Ne pas tenter de réparer l’appareil. Porter<br />
l’appareil en réparation au Service<br />
après-vente Black & Decker le plus proche<br />
ou un réparateur agréé.<br />
Sécurité électrique<br />
• Cet appareil doit être mis à la terre. Toujours<br />
vérifier que la tension électrique correspond<br />
à celle indiquée sur la plaque signalétique.<br />
• Les fiches électriques doivent correspondre<br />
aux prises de courant. Ne jamais modifier la<br />
fiche en aucune façon. Ne pas utiliser<br />
d’adaptateur avec des appareils mis à la<br />
terre (Classe 1). L’utilisation de fiches<br />
inchangées avec des prises correspondantes<br />
réduit le risque de chocs électriques.<br />
Rallonges et appareils de<br />
classe 1<br />
• Utiliser un cordon à 3 fils car votre appareil<br />
est mis à la terre et de fabrication classe 1.<br />
• Une longueur allant jusqu’à 30m (100pieds)<br />
peut être utilisée sans perte de puissance.<br />
• Si le cordon d’alimentation est endommagé,<br />
il doit être remplacé par le fabricant ou un<br />
Centre de Service agréé Black & Decker afin<br />
d’éviter tout danger.<br />
Remplacement de la fiche<br />
électrique<br />
En cas d’installation d’une nouvelle fiche:<br />
• Jetez l’ancienne fiche avec prudence<br />
• Connectez le fil marron sur la borne sous<br />
tension de la nouvelle fiche<br />
• Connectez le fil bleu sur la borne neutre<br />
• Si l’appareil est de classe I (mis à la terre),<br />
connectez le fil vert/jaune sur la borne terre.<br />
Remarque: Si votre appareil est de classe II<br />
double isolation (seulement 2 fils dans le<br />
cordon), aucune connexion n’est à faire sur la<br />
borne terre. Suivez les instructions de montage<br />
fournies avec les fiches de bonne qualité. Tout<br />
fusible remplacé doit être du même calibre que<br />
le fusible d’origine fourni avec l’appareil.<br />
Avertissement! La section ci-dessus sur le<br />
remplacement de la fiche concerne le personnel<br />
des centres de service agréés.<br />
12
FRANÇAIS<br />
<strong>Instruction</strong>s de sécurité<br />
supplémentaires pour les<br />
friteuses<br />
• Ne pas plonger l’appareil, le cordon ou la<br />
prise dans un liquide<br />
• Ne jamais ajouter de l’eau ou de la glace<br />
dans l’huile<br />
• Ne pas utiliser de matières grasses solides<br />
• Faire très attention lors de la cuisson<br />
d’aliments surgelés<br />
• Utiliser uniquement une huile de bonne<br />
qualité dans cette friteuse<br />
• Toujours fermer le couvercle avant<br />
d’abaisser le panier dans l’huile chaude<br />
• Faire attention lors de l’ouverture de la<br />
friteuse car de la vapeur brûlante peut sortir.<br />
• De la vapeur brûlante peut sortir par les<br />
orifices du couvercle du filtre pendant le<br />
fonctionnement de la friteuse.<br />
• Faire attention lors de l’ouverture du<br />
couvercle de la friteuse, de la vapeur<br />
brûlante peut sortir.<br />
• Ne pas toucher les surfaces chaudes,<br />
comme la cuve, le couvercle et le corps<br />
principal de la friteuse pendant le<br />
fonctionnement ou la période de<br />
refroidissement. Toujours utiliser les<br />
poignées ou les boutons prévus à cet effet.<br />
• Laisser refroidir la friteuse et l’huile avant de<br />
la transporter ou de la vider.<br />
• Les surfaces peuvent être brûlantes pendant<br />
le fonctionnement et pendant la période de<br />
refroidissement de la friteuse.<br />
• Toujours laisser un espace suffisant autour<br />
de la friteuse pour la ventilation.<br />
Assemblage<br />
Cet appareil est livré entièrement monté et il est<br />
seulement nécessaire de nettoyer les éléments<br />
et d’ajouter de l’huile dans la cuve avant son<br />
utilisation.<br />
Couvercle<br />
• Pour ouvrir le couvercle (1), appuyez sur le<br />
bouton de déverrouillage du couvercle (2).<br />
• Une fois ouvert, le couvercle peut être retiré<br />
en débloquant les pinces puis tiré vers le<br />
haut<br />
• Pour remettre le couvercle, insérer les 2<br />
pattes dans la fente de l’appareil. Fermer le<br />
couvercle et s’assurer qu’il se verrouille en<br />
place.<br />
Panier<br />
• Relever la poignée du panier (7) jusqu’à ce<br />
qu’elle se verrouille en position horizontale.<br />
• Appuyer sur le bouton de déverrouillage du<br />
couvercle (2) et laisser le couvercle (1)<br />
s’ouvrir.<br />
• Soulever le panier (10) hors de la friteuse.<br />
• Pour remettre le panier, insérer la nervure du<br />
panier dans la fente de l’appareil et<br />
l’abaisser pour le mettre en place.<br />
• Fermer le couvercle et appuyer sur le bouton<br />
de déverrouillage de la poignée (8). Abaisser<br />
lentement la poignée en position verticale.<br />
Cuve de cuisson<br />
• Appuyer sur le bouton de déverrouillage du<br />
couvercle (2) et laisser le couvercle (1)<br />
s’ouvrir.<br />
• Soulever le panier (10) hors de la friteuse.<br />
• Tenir la cuve (9) de chaque côté et la<br />
soulever hors de la cavité.<br />
• Pour la réinstaller, l’insérer dans la cavité, en<br />
veillant à ce que le repère sur la cuve<br />
coïncide avec le repère sur l’appareil et<br />
qu’elle soit correctement positionnée.<br />
Remettre le panier, l’abaisser et fermer le<br />
couvercle.<br />
13
FRANÇAIS<br />
Utilisation<br />
Ajouter de l’huile<br />
• Relever la poignée du panier (7) jusqu’à ce<br />
qu’elle se verrouille en position horizontale.<br />
• Appuyer sur le bouton de déverrouillage du<br />
couvercle (2) et laisser le couvercle (1)<br />
s’ouvrir.<br />
• Soulever le panier (10) hors de la friteuse.<br />
• Retirer la cuve de cuisson (9).<br />
• Vérifier l’élément pour des signes de<br />
dommage ou de casse afin de prolonger le<br />
temps de vie de l’appareil et améliorer son<br />
efficacité.<br />
Remarque: La cuve ne doit être retirée que<br />
lorsque l’appareil est froid.<br />
• Replacer la cuve de cuisson dans l’appareil<br />
en s’assurant qu’elle est correctement<br />
positionnée.<br />
Remarque: Si la cuve de cuisson n’est pas<br />
correctement placée, la friteuse ne fonctionnera<br />
pas.<br />
• Verser une huile de bonne qualité dans la<br />
cuve de cuisson. S’assurer que le niveau<br />
d’huile se situe entre les repères maximum<br />
et minimum de la cuve de cuisson. (Environ<br />
1,65 litre)<br />
Remarque: Frire uniquement dans la cuve<br />
fournie.<br />
• Mettre le panier dans l’appareil. Fermer le<br />
couvercle et appuyer sur le bouton de<br />
déverrouillage de la poignée en positon<br />
verticale.<br />
Cuisson<br />
• Brancher l’appareil à une prise électrique<br />
adaptée.<br />
• Tourner le cadran du thermostat (3) sur la<br />
température souhaitée, le témoin lumineux<br />
de température (4) s’allume pour indiquer<br />
que l’appareil est en fonctionnement et que<br />
l’huile est en phase de chauffage.<br />
14<br />
• Le témoin lumineux de température (4)<br />
s’éteint lorsque l’huile a atteint la température<br />
souhaitée.<br />
• Le fait de préchauffer ainsi le panier vide<br />
permet d’éviter aux aliments de coller au<br />
panier.<br />
• Soulever la poignée (7) en position de<br />
transport.<br />
• Appuyer sur le bouton de déverrouillage du<br />
couvercle (2) et le laisser s’ouvrir.<br />
• Retirer le panier et fermer le couvercle.<br />
Poser le panier sur le plan de travail, utiliser<br />
un torchon propre ou du papier absorbant<br />
pour éviter de faire des marques sur le plan<br />
de travail.<br />
• Placer les aliments préparés dans le panier<br />
(10), puis ouvrir le couvercle de la friteuse et<br />
insérer le panier dans l’appareil en<br />
l’abaissant lentement dans l’huile.<br />
Remarque: Essuyer les aliments avec un<br />
torchon propre ou du papier absorbant pour<br />
enlever l’excès d’humidité avant de les frire.<br />
Remarque: Ne pas surcharger le panier.<br />
• Fermer soigneusement le couvercle, en<br />
veillant à le verrouiller en place.<br />
• Tout en maintenant la poignée, appuyer sur<br />
le bouton de déverrouillage de la poignée (8).<br />
Abaisser lentement la poignée en position<br />
verticale.<br />
Remarque: Le témoin lumineux de température<br />
(4) s’allumera et s’éteindra pendant la cuisson.<br />
Garder le couvercle (1) fermé pendant la<br />
cuisson.<br />
• Régler la minuterie en appuyant sur le<br />
bouton de réglage de la minuterie (6) jusqu’à<br />
atteindre le nombre de minutes souhaité (la<br />
minuterie augmente le temps par intervalles<br />
de 1 minute jusqu’à 30 minutes). Lorsque le<br />
temps est écoulé la minuterie émettra une<br />
série de bips, Le bip se répète après 1<br />
minute et peut être annulé en appuyant sur le<br />
bouton de réglage de la minuterie (6).
FRANÇAIS<br />
• Utiliser le Guide de cuisson à titre<br />
d’indication pour déterminer la quantité des<br />
aliments, les températures et les temps de<br />
cuisson.<br />
• La progression de la cuisson peut être suivie<br />
en regardant par le hublot de contrôle (11).<br />
Remarque: De la vapeur brûlante peut<br />
s’échapper par les orifices du filtre et du<br />
couvercle pendant la cuisson.<br />
• Lorsque la cuisson est terminée, tourner le<br />
cadran du thermostat (3) sur la position arrêt,<br />
le témoin lumineux de température (4)<br />
s’éteindra. Débrancher l’appareil de<br />
l’alimentation secteur.<br />
• Soulever la poignée du panier (10) jusqu’à<br />
son verrouillage en position horizontale.<br />
Appuyer sur le bouton de déverrouillage du<br />
couvercle (2) pour ouvrir la friteuse et<br />
enlever le panier en le secouant pour faire<br />
tomber l’excès d’huile dans la cuve de<br />
cuisson.<br />
Remarque: Le panier peut être accroché sur le<br />
côté de la cuve de cuisson pour laisser l’excès<br />
d’huile s’égoutter des aliments.<br />
Guide de cuisson<br />
Les temps de cuisson donnés dans ce tableau<br />
sont approximatifs et doivent être adaptés en<br />
fonction de la quantité des aliments à frire.<br />
Aliment Température Poids Temps de<br />
de l’huile maximum cuisson moyen<br />
(ºC) (grammes) (Minutes)<br />
Crevettes 130 250 3 – 5<br />
Rondelles d’oignon 140 150 3 – 4<br />
Champignons 140 300 6 – 8<br />
Filets de poisson 150 250 5 – 6<br />
Filets de poisson panés 150 400 6 – 8<br />
Beignets ou boulettes<br />
de poisson 150 400 7 – 10<br />
Viande en tranches 170 400 7 – 10<br />
Steak 170 400 7 – 10<br />
Lanières de poulet 180 400 6 – 10<br />
Frites 190 500 9 – 12<br />
Conseils pratiques<br />
Huiles et graisses<br />
• Toujours utiliser une huile pouvant résister à<br />
des températures élevées.<br />
• Ne pas mélanger différents types d’huile ou<br />
de graisse.<br />
• Changer l’huile ou la graisse lorsqu’elle<br />
devient brune après la cuisson.<br />
Préparation des aliments<br />
• Quelle que soit la recette utilisée, les aliments<br />
doivent être parfaitement séchés: cela évite<br />
les projections d’huile et permet à l’huile ou à<br />
la graisse de durer plus longtemps.<br />
• Pour les préparations à base de pomme de<br />
terre (frites, chips, etc.), laver les pommes de<br />
terre à l’eau froide après les avoir coupées<br />
pour éliminer l’amidon. Séchez-les<br />
soigneusement. Cela permet d’empêcher<br />
qu’elles collent entre elles.<br />
Cuisson<br />
• Ne pas surcharger le panier. Cela entrainerait<br />
une baisse soudaine de la température de<br />
l’huile et donc une friture top grasse.<br />
• Ne pas garder l’huile à haute température<br />
pendant de longues périodes. Cela<br />
détériorerait l’huile.<br />
• Régler le thermostat sur la plus basse<br />
température entre deux cuissons.<br />
• Ne pas laisser égoutter les aliments cuits trop<br />
longtemps dans le panier. Les aliments<br />
perdraient leur croustillant et se ramolliraient<br />
à cause des vapeurs.<br />
• Les aliments surgelés peuvent être cuits dans<br />
le panier sans décongélation préalable.<br />
Après la cuisson<br />
• Changer la graisse ou l’huile régulièrement,<br />
après 10 utilisations environ.<br />
15
FRANÇAIS<br />
Entretien<br />
Votre appareil Black & Decker a été conçu pour<br />
fonctionner pendant longtemps avec un<br />
minimum d’entretien. Un fonctionnement<br />
satisfaisant dans la durée dépend du soin<br />
apporté et d’un nettoyage régulier.<br />
Avertissement! Avant d’effectuer toute<br />
opération d’entretien ou de nettoyage,<br />
débrancher la friteuse de l’alimentation secteur.<br />
Vider la friteuse<br />
Lorsque la friteuse est froide, vider l’huile<br />
usagée de la cuve de cuisson (9) dans un<br />
récipient adapté. Toujours suivre la<br />
réglementation locale en matière d’élimination<br />
des huiles de cuisson usagées.<br />
Remplacer le filtre<br />
Le filtre est conçu pour réduire les odeurs de<br />
friture et doit toujours être installé dans la<br />
friteuse avant toute utilisation.<br />
Avec le temps, les filtres perdent de leur<br />
efficacité et doivent être remplacés.<br />
Pour remplacer les filtres, retirer le couvercle du<br />
filtre (12) du couvercle. Le filtre peut alors être<br />
enlevé. Mettre un nouveau filtre, en veillant à<br />
placer le côté blanc du filtre en dessous et le<br />
treillis métallique dessus. B&D recommande de<br />
remplacer le filtre après 50 à 60 utilisations.<br />
Nettoyage<br />
Nettoyer le corps principal de l’appareil<br />
uniquement avec un chiffon humide.<br />
Couvercle et panier:<br />
Enlever le couvercle et le panier de l’appareil.<br />
Enlever le filtre du couvercle. Laver le couvercle<br />
et le panier à l’eau chaude savonneuse. Rincer<br />
à l’eau claire et sécher soigneusement avec un<br />
chiffon doux.<br />
Nettoyage de la cuve<br />
Débrancher la friteuse et laisser l’huile refroidir à<br />
température ambiante. Enlever le couvercle (1),<br />
le panier (10) et la cuve de cuisson (9) de<br />
l’appareil. Vider l’huile froide et la filtrer dans un<br />
récipient approprié en utilisant un tamis pour<br />
filtrer les particules alimentaires présentes dans<br />
l’huile.<br />
Essuyer les dépôts huileux avec du papier<br />
absorbant. Laver le couvercle dans de l’eau<br />
chaude savonneuse. Rincer à l’eau claire et<br />
sécher soigneusement avec un chiffon doux.<br />
Remarque: Ne pas utiliser de produits abrasifs<br />
ou de nettoyants chimiques sur aucune partie de<br />
l’appareil.<br />
Ne pas laisser les filtres se mouiller.<br />
Ne laver aucune partie de l’appareil dans un<br />
lave-vaisselle.<br />
Toujours suivre la réglementation locale<br />
concernant l’élimination d’huiles de cuisson<br />
usagées. Les orifices de ventilation doivent être<br />
nettoyés de temps en temps avec un pinceau<br />
propre et sec.<br />
Données techniques<br />
Tension<br />
Courant d’alimentation<br />
Puissance nominale<br />
Longueur du cordon<br />
Capacité de la cuve<br />
Poids<br />
EF2750<br />
220 – 240 Volts<br />
50/60 Hz<br />
1800 W<br />
0,77 m<br />
2,5 litres<br />
2,8 kg<br />
16
FRANÇAIS<br />
Protection de l'environnement<br />
Collecte séparée. Ce produit ne doit<br />
pas être jeté avec les déchets<br />
domestiques normaux.<br />
Si vous décidez de remplacer ce produit Black &<br />
Decker, ou si vous n'en avez plus l'utilité, ne le<br />
jetez pas avec vos déchets domestiques<br />
Rendez-le disponible pour une collecte séparée.<br />
• Black & Decker fournit un dispositif<br />
permettant de collecter et de recycler les<br />
produits Black & Decker lorsqu'ils ont atteint<br />
la fin de leur cycle de vie. Pour pouvoir<br />
profiter de ce service, veuillez retourner votre<br />
produit à un réparateur agréé qui se chargera<br />
de le collecter pour nous.<br />
• Pour connaître l'adresse du réparateur agréé<br />
le plus proche de chez vous, contactez le<br />
bureau Black & Decker à l'adresse indiquée<br />
dans ce manuel. Vous pourrez aussi trouvez<br />
un liste des réparateurs agréés de Black &<br />
Decker et de plus amples détails sur notre<br />
service après-vente sur le site Internet à<br />
l'adresse suivante : www.2helpU.com<br />
Garantie<br />
Black & Decker est confiant dans la qualité de<br />
ses produits et vous offre une garantie très<br />
étendue.<br />
Ce certificat de garantie est un document<br />
supplémentaire et ne peut en aucun cas se<br />
substituer à vos droits légaux.<br />
La garantie est valable sur tout le territoire des<br />
Etats Membres de l'Union Européenne et de la<br />
Zone de Libre Echange Européenne.<br />
Si un produit Black & Decker s'avère défectueux<br />
en raison de matériaux en mauvaises conditions,<br />
d'une erreur humaine, ou d'un manque de<br />
conformité dans les 24 mois suivant la date<br />
d'achat, Black & Decker garantit le remplacement<br />
des pièces défectueuses, la réparation des<br />
produits usés ou cassés ou remplace ces<br />
produits à la convenance du client, sauf dans les<br />
circonstances suivantes :<br />
Le produit a été utilisé dans un but<br />
commercial, professionnel, ou a été loué.<br />
Le produit a été mal utilisé ou avec<br />
négligence.<br />
Le produit a subi des dommages à cause<br />
d'objets étrangers, de substances ou à<br />
cause d'accidents.<br />
Des réparations ont été tentées par des<br />
techniciens ne faisant pas partie du<br />
service technique de Black & Decker.<br />
Pour avoir recours à la garantie, il est nécessaire<br />
de fournir une preuve d'achat au vendeur ou à un<br />
réparateur agréé. Pour connaître l'adresse du<br />
réparateur agréé le plus proche de chez vous,<br />
contactez le bureau Black & Decker à l'adresse<br />
indiquée dans ce manuel.<br />
Vous pourrez aussi trouver une liste des<br />
réparateurs agréés de Black & Decker et de plus<br />
amples détails sur notre service après-vente sur<br />
le site Internet à l'adresse suivante :<br />
www.2helpU.com<br />
17
ARABIC<br />
¿Éª°†dG<br />
Ékfɪ°V ¢Vô©Jh É¡JÉéàæe IOƒL ‘ ôµjO ófBG ÓHك ãJق<br />
jƒWل LC’Gل.<br />
»àdG Mقbƒك EGلى áaÉ°VE’ÉH ¿ƒµj Gòg ¿Éª°†dG ¿É«H<br />
¿ƒfÉقdG É¡ëæÁ îjل ’h ÉMل …CÉH É¡H GƒMC’Gل. øe<br />
OÉ–’G ‘ AÉ°†YC’G hódGل º«dÉbCG ‘ ¿Éª°†dG …öùj<br />
.á«HhQhC’G IôلهG IQÉéàdG áق£æeh »HhQhC’G<br />
‘ Ö«Y ÖÑ°ùH ôµjO ófBG ÓHك èàæe ‘ Nلل OƒLh ádÉM ‘<br />
óYم hCG áYÉæ°üdG hCG OGƒŸG aGƒàdGق ÓNل ,ÒjÉ©ŸG e 24<br />
ÓHك øª°†J ,AGöûdG ïjQÉJ øe Gkô¡°T GóÑà°SGل ôµjO ófBG<br />
cBÉàdGل IÉYGôe e äÉéàæŸG ìÓ°UEGh áÑ«©ŸG AGõLC’G<br />
ÑdGhلى GóÑà°SGل hCG »©«Ñ£dG ògه bCGل ¿Éª°†d äÉéàæŸG<br />
dل©ª»ل êÉYREG Ée لم:<br />
hCG á«æ¡e hCG ájQÉŒ ¢VGôZCG ‘ èàæŸG Góîà°SGم ºàj<br />
;ÒLCÉJ ¢VGôZCG<br />
Góîà°S’Gم Aƒ°ùd èàæŸG ¢Vô©àj ɪgE’Gل; hCG<br />
áÑjôZ OGƒe hCG AÉ«°TCG áé«àf dلàلف èàæŸG ¢Vô©àj<br />
;çOGƒM hCG<br />
ÒZ ¢UÉî°TCG ᣰSGƒH èàæŸG ìÓ°UEG محádhÉ ºàj<br />
HÉàdG áfÉ«°üdG jôaق hCG øjóªà©ŸG áfÉ«°üdG AÓch<br />
.ôµjO ófBG ÓHك ácöûd<br />
ËóقJ EGلى êÉà– ±ƒ°S ,¿Éª°†dG ÖLƒÃ áÑdÉ£e Ëóقàd<br />
dO»ل FÉÑلd AGöûdG ch»ل hCG æµÁhك .óªà©ŸG áfÉ«°üdG<br />
Yلى ±ô©àdG ch»ل ÜôbCG bƒe ÓNل øe óªà©e áfÉ«°U<br />
¿Gƒæ©dG ‘ ëŸGل« ôµjO ófBG ÓHك Öàµe Yلى É°üJ’Gل<br />
dódG»ل. Gòg ‘ í°VƒŸG<br />
øjóªà©ŸG áfÉ«°üdG AÓcƒH áªFÉb óLƒJ dPك, øe k’óHh<br />
äÉeóÿ áلeɵdG UÉØàdGh°»ل ôµjO ófBG ÓHك ácöûd Ú©HÉàdG<br />
âfÎfE’G Yلى ÉæH á°UÉÿG É°üJ’Gل FÉ°Shhل «ÑdG ó©H Ée<br />
.www.2helpU.com :ÊhεdE’G bƒŸG Yلى<br />
Gòg øe ¢üلîàdG óYم jلõم üØæŸG°ل. ª÷G<br />
.ájOÉ©dG á«dõæŸG áeɪقdG e èàæŸG<br />
áÄ«ÑdG ájɪM<br />
ôµjO ófBG ÓHك èàæe GóÑà°SGل ÉjC’Gم øe ƒjم ‘ õdم GPEG<br />
e ¬æe ¢üلîàJ Óa ,¬eóîà°ùJ ó©J لم GPEG hCG Hك, ¢UÉÿG<br />
èàæŸG Gòg áMÉJEG øe ócCÉJ Hل ,iôNC’G á«dõæŸG áeɪقdG<br />
ªéلd üØæŸG°ل.<br />
ôjhóJ IOÉYE’ aôeق ôµjO ófBG ÓHك ácöT ôaƒJ •<br />
ájÉ¡f EGلى É¡dƒ°Uh Oôéà ôµjO ófBG ÓHك äÉéàæe<br />
óYhم ÉgôªY dل©ªل. É¡à«MÓ°U ËóقJ ºàjh ògه<br />
ògه øe IOÉØà°SÓd .ÉkfÉ› áeóÿG Lôjى ,áeóÿG<br />
±ƒ°S …òdGh óªà©e áfÉ«°U ch»ل …CG EGلى èàæŸG IOÉYEG<br />
.ÉæY áHÉ«f äÉéàæŸG ªL QhóHه ƒàjلى<br />
óªà©e áfÉ«°U ch»ل ÜôbCG bƒe Yلى ±ô©àdG æµÁك •<br />
ÓNل øe É°üJ’Gل Yلى ÓHك Öàµe ëŸGل« ôµjO ófBG<br />
‘ ¿Gƒæ©dG dódG»ل. Gòg ‘ í°VƒŸG dPك, øe k’óHh<br />
Ú©HÉàdG øjóªà©ŸG áfÉ«°üdG AÓcƒH áªFÉb óLƒJ<br />
Ée äÉeóÿ áلeɵdG UÉØàdGh°»ل ôµjO ófBG ÓHك ácöûd<br />
âfÎfE’G Yلى ÉæH á°UÉÿG É°üJ’Gل FÉ°Shhل «ÑdG ó©H<br />
.www.2helpU.com :ÊhεdE’G bƒŸG Yلى<br />
18
ARABIC<br />
.áaÉL áªYÉf ¢Tɪb á©£b<br />
»¡£dG AÉYh æJ»ف<br />
OÈj àMى âjõdG ôJGhك AÉHô¡µdG Qó°üe øY IÓقŸG üaG°ل<br />
(10) áل°ùdGh (1) AÉ£¨dG RCGل .áaô¨dG IQGôM áLQO iƒà°ùŸ<br />
‘ OQÉÑdG âjõdG Ö°üH ºb .IóMƒdG øe (9) »¡£dG AÉYhh<br />
ÓNل Ö°SÉæe AÉYh ¢üلîàلd IÉØ°üe ÉjÉقH øe É©£dGم<br />
.¬H IOƒLƒŸG<br />
AÉ£¨dG ùZG°ل ûæJ°»ف. ¥Qh Góîà°SÉHم âjõdG ôKCG í°ùeG<br />
áل°ùdGh dPك ó©H ɪ¡Ø£°ûH ºb ºK ,IƒZôdG Òãc ÅaGO AÉe ‘<br />
áªYÉf ¢Tɪb á©£b Góîà°SÉHم kGó«L ɪ¡Ø«ØŒh f»ف AÉÃ<br />
.áaÉL<br />
ájhɪ«µdG äÉØæŸG hCG ᣰTɵdG OGƒŸG óîà°ùJم ’ :áMÓe<br />
.RÉ¡÷G Gòg ‘ AõL …CG e<br />
.ÎلØdG EGلى AÉŸG ƒ°UƒHل íª°ùJ ’<br />
.¥ÉÑWC’G ádÉ°ùZ ‘ RÉ¡÷G Gòg øe AõL …CG ù¨J°ل ’<br />
âjR øe ¢üلîàdÉH á°UÉÿG á«لëŸG íFGƒلdG ÉkªFGO ÑJG<br />
óîà°ùŸGم. »¡£dG æJ»ف »¨Ñæj ÉàfÉHم ájƒ¡àdG äÉëàa<br />
.áØ«f áaÉL IÉ°Tôa Góîà°SÉHم<br />
á«æØdG äÉfÉ«ÑdG<br />
EF2750<br />
âdƒa 240-220 ó¡÷G<br />
õJôg 60/50 OOÎdG<br />
äGh 1800 ábÉ£dG<br />
77^0 م<br />
ƒWل ùdG°لك Îd 2^5 AÉYƒdG ºéM<br />
ºéc 2^8 ¿RƒdG<br />
áfÉ«°üdG<br />
øe áلjƒW IÎØd dلûà°¨»ل ôµjO ófBG ÓHك IGOCG º«ª°üJ ”<br />
bCÉHhل âbƒdG bƒàjف .áfÉ«°üdG øe Qób ªYل µ°ûHل RÉ¡÷G<br />
Yلى QGôªà°SÉH »°Vôe Góîà°S’Gم æàdGh»ف ºFÓŸG<br />
.…QhódG<br />
hCG ¬Ø«æJ Ñbل AÉHô¡µdG Qó°üe øY RÉ¡÷G üaG°ل !ôjò–<br />
.¬d áfÉ«°U ájCG AGôLEG<br />
IÓقŸG jôØJغ<br />
(9) »¡£dG AÉYh øe âjõdG Öµ°ùH ºb ,IÓقŸG OÈJ ÉeóæY<br />
á°UÉÿG á«لëŸG íFGƒلdG ÉkªFGO ÑJG .ºFÓe AÉYh ‘<br />
¢üلîàdÉH óîà°ùŸGم. »¡£dG âjR øe<br />
ÎلØdG GóÑà°SGل<br />
ÎلØdG Gòg Ö«côJ ºàj àdقل»ل dGقل« øe áã©ÑæŸG íFGhôdG<br />
.IÓقŸG Góîà°SGم óæY ¬fɵe ‘ ¿ƒµj ¿CG Öéjh<br />
.¬dGóÑà°SG òÄæ«M Ú©àjh ÎلØdG á«dÉ©a Jقل ,âbƒdG QhôÃh<br />
,AÉ£¨dG øe (12) ÎلØdG AÉ£Z ádGREÉH ºb ,ÎلØdG GóÑà°S’hل<br />
e ójó÷G ÎلØdG Ö«cÎH ºb .ÎلØdG ádGREG æµÁك òÄæ«Mh<br />
áµÑ°ûdGh Ø°SC’Gل á«MÉf ¢†«HC’G ÎلØdG ¿CG øe ócCÉàdG<br />
᫵ل°ùdG YC’Gلى. á«MÉf<br />
ÓHك »°UƒJ ÎلØdG Ò«¨àH ôµjO ófBG EGلى 50 øe ó©H 60<br />
Góîà°SGم.<br />
æàdG»ف<br />
á©£b Góîà°SÉHم »°ù«FôdG …hÉلهG AÉYƒdG æJ»ف »¨Ñæj<br />
.áØ«f Ñeللá ¢Tɪb<br />
áل°ùdGh AÉ£¨dG<br />
.AÉ£¨dG øe ÎلØdG RCGل .IóMƒdG øe áل°ùdGh AÉ£¨dG ádGREÉH ºb<br />
ºb ºK ,IƒZôdG Òãc ÅaGO AÉe ‘ áل°ùdGh AÉ£¨dG ùZG°ل<br />
dPك ó©H ɪ¡Ø£°ûH f»ف AÉà Góîà°SÉHم kGó«L ɪ¡Ø«ØŒh<br />
19
ARABIC<br />
á«لªY íFÉ°üf<br />
øª°ùdGh âjõdG<br />
äÉLQO –ªل É¡æµÁ »àdG äƒjõdG k ɪFGO óîà°SGم •<br />
.á«dÉ©dG IQGôلهG<br />
.øª°ùdG hCG âjõdG øe مخàلáØ kÉYGƒfCG êõ“ ’ •<br />
»æÑdG ¿ƒلdG EGلى ¬dƒ– óæY øª°ùdG hCG âjõdG Ò«¨àH ºb •<br />
.»¡£dG ó©H<br />
É©£dGم OGóYEG<br />
• Öéj É©£dGم ¿ƒµj ¿CG É©£dGم áØ°Uh âfÉc ɪ¡e kÉaÉL<br />
Ióe ádÉWEGh óFGõdG aóàdGق Öæéàd dPhك ,É¡eóîà°ùJ »àdG<br />
.øª°ùdG hCG âjõdG Góîà°SGم<br />
• óæY É©£dGم OGóYEG µ°ûHل …ƒàëj …òdG Yلى »°SÉ°SCG<br />
àHق£» ºb ,(ïdG...ÉWÉ£ÑdG HÉ°UCG hCG íFGöT) ÉWÉ£ÑdG<br />
ºb .É¡æe É°ûædG ádGRE’ OQÉH AÉà k’hCG É¡ل°ùZh ÉWÉ£ÑdG<br />
É¡bÉ°üàdG óYم øª°†J dòHhك .¢UôëH É¡Ø«ØéàH<br />
.»¡£dG óæY É¡°†©ÑH<br />
»¡£dG<br />
• ’ CÓ“ áل°ùdG óلهG ¥ƒa ŸG©قƒل dPك ÖÑ°ùàj å«M ‘<br />
.âjõdÉH ΩÉ©£dG Ñ°ûJh âjõdG IQGôM áLQO •ƒÑg<br />
å«M áلjƒW IóŸ á©ØJôe âjõdG IQGôM áLQO ÎJك ’ •<br />
.âjõdG IOƒL ¢†ØN EGلى dPك …ODƒj<br />
áLQO bCGل Yلى IQGôلهG áLQO ‘ ºµëàdG ¢Uôb §Ñ°VG •<br />
äÉfƒµe áYƒª› cل ÚH QÉàf’G IÎa AÉæKCG IQGôM<br />
.É¡àaÉ°VEG ºàj<br />
IóŸ á«Ø°üàdG °VƒH áل°ùdG ‘ ó©ŸG É©£dGم ÎJك ’ •<br />
¬à°TÉ°ûg É©£dGم óقØj ¿CG EGلى QÉîÑdG …ODƒj ób .áلjƒW<br />
.kÉjôW íÑ°üjh<br />
¿hO áل°ùdG ‘ IöTÉÑe óªéŸG É©£dGم »¡W øµÁ •<br />
.¬Ñjhòàd áLÉلهG<br />
»¡£dG ó©H<br />
Ée ó©H áªàæe IQƒ°üH øª°ùdG hCG âjõdG Ò«¨àH ºb •<br />
Üôقj É©£dGم. øe äÉ©aO öûY øe<br />
äÉfƒµŸG ᫪c áaô©Ÿ dك ó°Tôªc dGقل« dO»ل óîà°SGم •<br />
IQGôلهG áLQO §Ñ°Vh dGقل«. Ióe ójó–h áÑ°SÉæŸG<br />
IòaÉf ÈY ôædG jôWق øY »¡£dG Ò°S á©HÉàe æµÁك •<br />
.(11) IógÉ°ûŸG<br />
äÉëàa øe »¡£dG AÉæKCG øNÉ°S QÉîH Üöùàj ób :áMÓe<br />
.AÉ£¨dG hCG ÎلØdG<br />
áLQO ‘ ºµëàdG ¢Uôb QOG ,»¡£dG øe AÉ¡àf’G óæY •<br />
,(OFF) ûàdG°¨»ل ±ÉقjEG °Vh EGلى (3) IQGôلهG<br />
.(4) ±ÉقjE’G/ل«¨°ûàdG öTDƒe ìÉÑ°üe ÅØ£æj ±ƒ°Sh<br />
.AÉHô¡µdG Qó°üe øY RÉ¡÷G üaG°ل<br />
• aQG áل°ùdG ój àMى (10) É¡لØb ºàj aCGق«. °Vh ‘<br />
êôNCG .IÓقŸG íàa ºà«d (2) AÉ£¨dG ôjô– QR §¨°VG<br />
âjõdG É¡æe §bÉ°ùà«d Égõ¡H ºbh IÓقŸG øe áل°ùdG<br />
.iôNCG Iôe »¡£dG AÉYh EGلى óFGõdG<br />
»¡£dG AÉYh ÖfÉL Yلى áل°ùdG °Vh øµÁ :áMÓe<br />
.óFGõdG âjõdG øe É©£dGم á«Ø°üàd<br />
dO»ل dGقل«<br />
hó÷Gل Gòg ‘ IQƒcòŸG »¡£dG äÉbhCG aق§ ±ó¡J EGلى<br />
.É¡«لb ܃ل£ŸG ᪩WC’G ᫪c ahق É¡£Ñ°V jhلõم OÉ°TQE’G<br />
dGقل« âbh übCG°ى ¿Rh<br />
IQGôM áLQO É©£dGم »ÑjôقàdG (FÉbOق)<br />
(GôLم) âjõdG (مr) EGلى 3 250 130 ¿É«HhQ 5<br />
MلقäÉ üH°ل EGلى 3 150 140 4<br />
EGلى 6 300 140 ô£a 8<br />
ª°Sك íFGöT EGلى 5 250 150 6<br />
á£لN e ª°Sك íFGöT<br />
EGلى 6 8<br />
400 150 áل«ÑàJ ŸGقل»äÉ ª°ùdGك äGôc hCG £b EGلى 7 400 150 10<br />
íFGöT لهº EGلى 7 400 170 10<br />
à°S»ك EGلى 7 400 170 10<br />
EGلى 6 400 180 êÉLO £b 10<br />
eقل»á ÉWÉ£H EGلى 9 500 190 12<br />
20
ARABIC<br />
.áHƒل£ŸG IQGôلهG áLQO<br />
á«لªY øª°†J Ñ°ùŸGق Úî°ùàdG âjõلd ò¡Hه Ñbل á«Ø«µdG<br />
.áل°ùdÉH ᪩WC’G ¥É°üàdG óYم ᪩WC’G áaÉ°VEG<br />
• aQG EGلى (7) ó«dG Gلهªل. °Vh<br />
.íàØæ«d AÉ£¨dG ôJGhك (2) AÉ£¨dG ôjô– QR Yلى §¨°VG •<br />
ádhÉW ¥ƒa áل°ùdG °V .AÉ£¨dG ZCGhلق áل°ùdG êôNCG •<br />
•ƒa hCG áØ«f á°ûªbCG ΩGóîà°SG IÉYGôe e ïÑ£ŸG<br />
.ádhÉ£dG í£°S ¥ƒa äÉeÓY …CG ôJك ó©dم á«bQh<br />
íàaG ºK ,(10) áل°ùdG NGOل IõgÉ÷G äÉfƒµŸG °V •<br />
‘ A§ÑH É¡©°VƒH ºbh áل°ùdG Ö«cÎH ºbh IÓقŸG AÉ£Z<br />
.âjõdG<br />
á°ûªbCG ᪩WC’G øe IóFGõdG áHƒWôdG ádGREÉH ºb :áMÓe<br />
.øNÉ°ùdG âjõdG ¤EG É¡àaÉ°VEG πÑb á«bQh •ƒa hCG áØ«f<br />
.É¡d Ö°SÉæŸG óلهG RhÉéàj Éà áل°ùdG áÄÑ©àH ºقJ ’ :áMÓe<br />
.¬©bƒe ‘ ¬à«ÑãJ øe ócCÉàdG e ¢UôëH AÉ£¨dG ZCGلق •<br />
¢†ØîH ºb .(8) ó«dG QR §¨°VG ,ó«dÉH É°ùeE’Gك AÉæKCG •<br />
.»°SCGôdG °VƒdG EGلى A§ÑH ó«dG<br />
öTDƒe ìÉÑ°üe A»°†j ±ƒ°S ,»¡£dG Ióe AÉæKCG :áMÓe<br />
¥ÓZEG øe ócCÉJ .ôNB’ ÚM øe ÅØ£æjh IQGôلهG áLQO<br />
.»¡£dG AÉæKCG kGó«L AÉ£¨dG<br />
âbDƒŸG §Ñ°V QR Yلى §¨°†dG jôWق øY âbDƒŸG §Ñ°VG •<br />
IOÉjR øµÁ) .áHƒل£ŸG FÉbódGق OóY EGلى k’ƒ°Uh (6)<br />
áق«bO ÚKÓK àMhى IóMGh áق«bO øe FÉbódGق OóY<br />
ª°ùà°S ,OóëŸG â«bƒàdG AÉ¡àfG óæYh übCG°ى) óëc<br />
Gòg Qôµàj ±ƒ°Sh ,á«dÉààŸG äGQÉØ°üdG øe áYƒª›<br />
áق«bO ó©H 䃰üdG DhɨdEGه øµÁh IóMGh Yلى §¨°†dÉH<br />
.(6) âbDƒŸG §Ñ°V QR<br />
Góîà°S’Gم<br />
• aQG áل°ùdG ój àMى (7) É¡لØb ºàj aCGق«. °Vh ‘<br />
.íàØ«d (1) AÉ£¨dG ôJGhك (2) AÉ£¨dG ôjô– QR §¨°VG •<br />
.IÓقŸG øe (10) áل°ùdG êôNCG •<br />
.(9) »¡£dG AÉYh êôNCG •<br />
• –قق óYم øe Jلف äÉeÓY …CG OƒLh ádÉWE’ öùc hCG<br />
.¬JAÉØc õjõ©Jh RÉ¡÷G ôªY<br />
.kGOQÉH èàæŸG ¿Éc GPEG ’EG AÉYƒdG ádGREÉH ºقJ ’ :áMÓe<br />
ócCÉàdG e RÉ¡÷G NGOل iôNCG Iôe »¡£dG AÉYh óYCG •<br />
.º«ل°S µ°ûHل ¬©°Vh øe<br />
GPEG :áMÓe لم º«ل°ùdG ¬©°Vh »¡£dG AÉYh òîàj Jقƒم ød<br />
.É¡àØ«XƒH IÓقŸG<br />
.»¡£dG AÉYh NGOل IOƒ÷G ‹ÉY »¡W âjR Ö°üH ºb •<br />
óلهG »àeÓY ÚH âjõdG iƒà°ùe ¿CG øe kɪFGO ócCÉJh<br />
kÉÑjôقJ) .AÉYƒdÉH ÚJOƒLƒŸG fOC’Gى óلهGh YC’Gلى<br />
(Îd 1^65<br />
.RÉ¡÷ÉH aôŸGق »¡£dG AÉYh ’EG óîà°ùJم ’ :áMÓe<br />
§¨°VGh AÉ£¨dG ZCGلق .RÉ¡÷G NGOل AÉYƒdG Ö«cÎH ºb •<br />
.»°SCGôdG iƒà°ùŸG EGلى ó«dG ¢†Øÿ ó«dG ôjô– QR Yلى<br />
»¡£dG<br />
.Ö°SÉæe AÉHô¡c Qó°üà RÉ¡÷G UƒàH°»ل ºb •<br />
• ºb IQGôلهG áLQO ‘ ºµëàdG ¢Uôb IQGOEÉH EGلى (3)<br />
öTDƒe ìÉÑ°üe A»°†j ±ƒ°S .áHƒل£ŸG IQGôلهG áLQO<br />
¿CGh RÉ¡÷G ûJ°¨»ل AóH EGلى IQÉ°TEÓd (4) IQGôلهG áLQO<br />
.¬æ«î°ùJ …ôéj âjõdG<br />
• ±ƒ°S ƒ°Uhل Oôéà ìÉÑ°üŸG ÅØ£æj EGلى âjõdG<br />
21
ARABIC<br />
æJ»ف Ñbل »¡£dG AÉYƒd âjõdG áaÉ°VEGh AGõL’G ¢†©H<br />
Góîà°S’Gم.<br />
AÉ£¨dG<br />
.(2) AÉ£¨dG ôjô– QR §¨°VG ,(1) AÉ£¨dG íàØd •<br />
• ó©Hh jôWق øY ¬àdGREG øµÁ AÉ£¨dG íàa aك HÉ°ûŸGك<br />
.RÉ¡÷G êQÉN kÉ«°SCGQ ªMل¬ ºK øeh<br />
iôéŸG ‘ ÚàeÉYódG NOCGل ,AÉ£¨dG Ö«côJ IOÉYE’h •<br />
.RÉ¡÷ÉH IOƒLƒŸG<br />
áل°ùdG<br />
• aQG áل°ùdG ój àMى (7) É¡لØb ºàj aCGق«. °Vh ‘<br />
.íàØæ«d (1) AÉ£¨dG ôJGhك (2) AÉ£¨dG ôjô– QR §¨°VG •<br />
.IÓقŸG øe (10) áل°ùdG êôNCG •<br />
‘ áل°ùdÉH OƒLƒŸG dG†°ل NOCGل ,áل°ùdG Ö«côJ IOÉYE’ •<br />
¬©°Vh EGلى k’ƒ°Uh ¬°†ØNGh RÉ¡÷ÉH OƒLƒŸG iôéŸG<br />
.Ö°SÉæŸG<br />
¢†ØîH ºbh ,(8) ó«dG Qô– QR §¨°VGh AÉ£¨dG ZCGلق •<br />
.»°SCGôdG °VƒdG EGلى k’ƒ°Uh A§ÑH ó«dG<br />
»¡£dG AÉYh<br />
.íàØæ«d (1) AÉ£¨dG ôJGhك (2) AÉ£¨dG ôjô– QR §¨°VG •<br />
.IÓقŸG øe (10) áل°ùdG êôNCG •<br />
øe ¬LôNCGh ¬«ÑfÉL øe ÖfÉL …CG øe AÉYƒdG ùeG°ك •<br />
.RÉ¡÷G<br />
e RÉ¡÷G EGلى iôNCG Iôe óYCGه ,AÉYƒdG Ö«côJ IOÉYE’h •<br />
e AÉYƒdG Yلى IOƒLƒŸG áeÓ©dG aGƒJق øe ócCÉàdG<br />
°Vh øe ócCÉàdGh IóMƒdG Yلى IOƒLƒŸG áeÓ©dG<br />
ºK É¡°†ØNGh áل°ùdG Ö«côJ óYCG .í«ë°U µ°ûHل AÉYƒdG<br />
.AÉ£¨dG ZCGلق<br />
IÓقªلd á«aÉ°VE’G áeÓ°ùdG äɪ«ل©J<br />
• ’ ôª¨J ùdG°لك hCG RÉ¡÷G ¢ùHÉقdG hCG FGƒ°ùdGل. ‘<br />
.âjõdG Yلى èلãdG hCG AÉŸG áaÉ°VEG øe QòMG •<br />
.Öل°üdG øª°ùdG óîà°ùJم ’ •<br />
᪩WC’G »¡W óæY QòلهG øe ójõŸG »NƒJ »¨Ñæj •<br />
.IóªéŸG<br />
• »¨Ñæj ògه e IÓقŸG aق§ QÉ°üàb’G Yلى Góîà°SGم<br />
.IOƒ÷G ‹ÉY »¡W âjR<br />
âjõdG ‘ áل°ùdG ¢†ØN Ñbل kGó«L AÉ£¨dG Zلق Öéj •<br />
.øNÉ°ùdG<br />
Üöùàj ób å«M ;IÓقŸG íàa óæY QòلهG »NƒJ »¨Ñæj •<br />
.íàØdG óæY øNÉ°S QÉîH É¡æe<br />
IÉØ°üŸG AÉ£Z äÉëàa øe øNÉ°ùdG QÉîÑdG Üöùàj ób •<br />
Góîà°S’Gم. AÉæKCG<br />
Üöùàj ób å«M IÓقŸG AÉ£Z íàa óæY kÉ°üjôM øc •<br />
.øNÉ°S QÉîH É¡æe<br />
AÉ£¨dGh AÉYƒdG ãeل ,áæNÉ°ùdG í£°SC’G ¢ùªلJ ’ •<br />
.ójÈàdG IÎa hCG Góîà°S’Gم AÉæKCG »°ù«FôdG µ«¡dGhل<br />
.¢†HÉقŸG Góîà°SGم Yلى ÉkªFGO ¢UôMG<br />
hCG Gلهªل Ñbل ¿GOÈj àMى âjõdGh IÓقŸG ôJGك •<br />
jôØàdGغ.<br />
• øµÁ Góîà°S’Gم AÉæKCG áæNÉ°S í£°SC’G ¿ƒµJ ¿CG<br />
.ójÈàdG IÎa AÉæKCGh<br />
.ájƒ¡àلd IÓقŸG ƒMل Ék«aÉc É kZGôa ÉkªFGO ôJGك •<br />
«ªéàdG<br />
ƒg Yل»ك Ée cل eɵdÉHل, kÉ©ª› RÉ¡÷G Gòg üj°لك<br />
22
ARABIC<br />
Iõ¡LC’G ¢ùHGƒb e ÅjÉ¡e …CG Góîà°SGم dòcك ôëj<br />
hC’Gلى). áLQódG øe) á°VQDƒŸG á«FÉHô¡µdG IôFGódG äGP<br />
É¡àÑ°SÉæeh ádó©ŸG ÒZ á«ل°UC’G ¢ùHGƒقdG Góîà°SGم<br />
áeó°üd ¢Vô©àdG مخôWÉ øe jقلل AÉHô¡µdG òØæŸ<br />
.á«FÉHô¡c<br />
hC’Gلى áLQódG èàæeh ójóªàdG äÓHÉc<br />
øeh ¢VQDƒe RÉ¡÷G ¿C’ A3 HقلÖ HÉcل Góîà°SGم Öéj •<br />
hC’Gلى. áLQódG<br />
• øµÁ üj°ل ¿CG ƒWل HɵdGل EGلى óbم) 100) Îe 30<br />
.ábÉ£لd óقa ¿hO<br />
¬dGóÑà°SG Öéj ,AÉHô¡µdG UƒJ°»ل S°لك Jلف ádÉM ‘ •<br />
øe óªà©e áeóN õcôe …CG hCG «æ°üàdG á¡L Ñbل øe<br />
.ôWÉîŸG Öæéàd ôµjO ófBG ÓHك<br />
¢ù«FôdG QÉ«àdG ¢ùHÉb GóÑà°SGل<br />
:ójóL ¢ùHÉb Ö«côJ EGلى áLÉلهG ádÉM ‘<br />
.ËóقdG ¢ùHÉقdG øe øeBG µ°ûHل ¢üqلîJ •<br />
¢ùHÉقdG ‘ UƒŸG°ل §ÿG EGلى »æÑdG ùdG°لك UƒàH°»ل ºb •<br />
.ójó÷G<br />
.ójÉëŸG »FÉHô¡µdG §ÿG EGلى ¥QRC’G ùdG°لك UƒàH°»ل ºb •<br />
ôØ°UC’G/ö†NC’G §ÿG UƒàH°»ل ºb I æ°üdGف ádÉM ‘ •<br />
.»°VQC’G §ÿG EGلى<br />
æ°üdGف øe äÉéàæŸG ádÉM ‘ :áMÓe õ©Hل II YÉ°†eف<br />
AGôLE’ »YGO ’ ,(§jöûdG ‘ aق§ ¿É«FÉHô¡c ¿Éµل°S)<br />
.»°VQC’G §ÿG EGلى UƒJ°»ل<br />
.IOƒ÷G äGP ¢ùHÉقŸG e áقaôŸG Ö«cÎdG äGOÉ°TQEG ÑqJG<br />
¢ùHÉقdG ‘ É¡eGóîà°SG ºàj áلjóH ᪰UÉa ájCG ¿ƒµJ ¿CG Öéj<br />
.èàæªلd á«ل°UC’G ᪰UÉØdG æ°Uف ¢ùØf øe<br />
á«FÉHô¡µdG ájò¨àdG ¢ùHÉb GóÑà°SÉHل àŸG©لق Aõ÷G !ôjò–<br />
.óªà©ŸG äÉeóÿG õcôe »ØXƒŸ ¬Lƒe<br />
øY kGó«©H ±ÉL ¿Éµe ‘ RÉ¡÷ÉH ®ÉØàM’G »¨Ñæj •<br />
hÉæàeل ÉØWC’Gل óYم óæY Góîà°S’Gم.<br />
í«ل°üàdGh áæjÉ©ŸG<br />
Ö«Y hCG Jلف …CG OƒLh óYم øe Góîà°S’Gم Ñbل ócCÉJ •<br />
…CÉH öùc OƒLh óYم øe dòcك –قق .RÉ¡÷G AGõLCÉH<br />
Éeh ûàdG°¨»ل í«JÉØà Jلف hCG RÉ¡÷G AGõLCG øe AõL<br />
EGلى dPك Yلى ôKDƒJ ¿CG É¡fCÉ°T øe »àdG QƒeC’G øe ªYل<br />
.RÉ¡÷G<br />
• ôëj Góîà°SGم ÉMل ‘ RÉ¡÷G Jلف hCG Ö«Y …CG OƒLh<br />
.¬FGõLCG øe AõL …CÉH<br />
hCG áÑ«©ŸG AGõLC’G GóÑà°SGل hCG í«ل°üàH íª°ùJ ’ •<br />
.óªà©e í«ل°üJ ch»ل Ñbل øe ’EG áØdÉàdG<br />
• ócCÉJ Ñbل Góîà°S’Gم óYم øe Jلف …CG OƒLh cBÉJل hCG<br />
.AÉHô¡µdG UƒJ°»ل ùH°لك<br />
Ö«Y hCG Jلف OƒLh ÉMل ‘ RÉ¡÷G Góîà°SGم ôëj •<br />
.»°ù«FôdG ¢ùHÉقdÉH hCG AÉHô¡µdG UƒJ°»ل ùH°لك<br />
¢ùHÉقdG hCG AÉHô¡µdG UƒJ°»ل S°لك GóÑà°SGل Öéj •<br />
í«ل°üJ ch»ل ÓNل øe Ö«©ŸG hCG dÉàdGف »°ù«FôdG<br />
S°لك £b ÖæŒ .ôWÉîŸG Öæéàd óªà©e UƒJ°»ل<br />
hCG AÉHô¡µdG محádhÉ ¬ë«ل°üJ ùØæH°ك.<br />
RÉ¡÷G AGõLCG øe …CG GóÑà°SGل hCG ádGREG –hÉل ’ •<br />
Jلك ±ÓîH dódG»ل. Gòg ‘ IOóëŸG AGõLC’G<br />
ÜôbCG EGلى RÉ¡÷ÉH ¬LƒJ .RÉ¡÷G í«ل°üJ –hÉل ’ •<br />
.ôµjO ófBG ÓHك Ñbل øe óªà©e hCG ‡لƒك áeóN õcôe<br />
á«FÉHô¡µdG áeÓ°ùdG<br />
• Öéj aGƒJق øe kɪFGO ócCÉJ .èàæŸG Gòg ¢†jQCÉJ S°لك<br />
áMƒلH ÚÑŸG »FÉHô¡µdG ó¡÷G e UƒàdG°»ل<br />
æ°üàdG»ف.<br />
òØæŸ áÑ°SÉæe »FÉHô¡µdG ùdG°لك ¢ùHÉb ¿ƒµj ¿CG Öéj •<br />
ɪc .¿Éc µ°Tل …CÉH ¢ùHÉقdG jó©Jل ôëj .AÉHô¡µdG<br />
23
ARABIC<br />
âjõdG hCG IQGôلهG øY UƒàdG°»ل S°لك OÉ©HEG Yلى ¢UôMG •<br />
.IOÉلهG ±GôWC’G hCG<br />
RÉ¡éلd á«LQÉÿG í£°SC’G IQGôM áLQO ¿ƒµJ ób •<br />
Góîà°S’Gم AÉæKCG á©ØJôe ójÈJه. IÎa AÉæKCGh<br />
¥ƒa ¬FGõLCG øe AõL …CG °Vh hCG RÉ¡÷G ûJ°¨»ل ôëj •<br />
ÜôقdÉH hCG ãeل øNÉ°S í£°S …CG øe ª©jل …òdG óbƒŸG<br />
.IQGôلهG ØJôe ¿ôa NGOل hCG AÉHô¡µdG hCG RɨdG ᣰSGƒH<br />
• óæY Góîà°SGم áل°Uh aGƒJق øe ócCÉJ ,á«FÉHô¡c Jلك<br />
.RÉ¡÷G e áل°UƒdG<br />
øjôNB’G áeÓ°S<br />
.ä’hÉ£dG ¢ShDhôH ùdG°لك J©لق óYم Yلى ¢UôMG •<br />
• لم ògه ºª°üoJ Góîà°SÓdم IGOC’G ¢UÉî°TC’G ᣰSGƒH<br />
äGQóقdG ¢üقf øe ¿ƒfÉ©j øjòdG ÉØWC’Gل) dPك ‘ ÉÃ)<br />
IÈÿG ¢üقf hCG ájQƒ©°ûdG hCG á«fóÑdG hCG dG©قل»á<br />
ûàd°¨»ل áeRÓdG áaô©ŸGh Ée ,RÉ¡÷G Gòg لم dPك øµj<br />
.º¡àeÓ°S øY hDƒ°ùŸGل ¢üî°ûdG ±GöTEG â–<br />
• ’ íª°ùJ ÉØWCÓdل Yلى ¢üî°T …CG hCG ò¡Hه ájGQO ÒZ<br />
.RÉ¡÷G Góîà°SÉHم äɪ«ل©àdG<br />
áق£æe øe ÜGÎb’ÉH äÉfGƒ«لهG hCG ÉØWCÓdل íª°ùJ ’ •<br />
AÉæKCG AÉHô¡µdG UƒJ°»ل S°لك hCG RÉ¡÷G ¢ùŸ hCG ª©dGل<br />
ûàdG°¨»ل. ¢UôلهG øe ójõŸG AGóHEG Öéj Góîà°SGم óæY<br />
ÜôقdÉH RÉ¡÷G ÉØWC’Gل. øe<br />
• ’ ÎJك ûàdG°¨»ل. AÉæKCG áHÉbQ ¿hO kGóHCG RÉ¡÷G<br />
Góîà°S’Gم ó©H<br />
AÉHô¡µdG òØæe øe ¢ùHÉقdG üaGh°ل RÉ¡÷G ûJ°¨»ل bhCGف •<br />
hCG Ò«¨J hCG æJ»ف Ñbhل RÉ¡÷G Góîà°SGم óYم óæY<br />
.¬FGõLCG øe AõL …CG ¢üëa<br />
Oƒ°üقŸG Góîà°S’Gم<br />
ôµjO ófBG ÓHك øe áق«ª©dG IÓقŸG ògه º«ª°üJ ”<br />
‘ OQGƒdG dGقل« dO»ل ‘ áæ«ÑŸG ᪩WC’G »¡£d kÉ°ü«°üN<br />
dódG»ل. Gòg èàæŸG Gòg مخü°ü¢ Góîà°SÓdم aق§. ‹õæŸG<br />
dódG»ل Gòg CGôbG dÉHغ ¢UôëH kÓeÉc Ñbل<br />
.RÉ¡÷G Góîà°SGم<br />
áeÓ°ùdG äɪ«ل©J<br />
!ôjò– Góîà°SGم óæY Ó°SCÉHك IOhõŸG Iõ¡LC’G UƒJ°»ل<br />
‘ ÉÃ á«°SÉ°SC’G áeÓ°ùdG ÒHGóJ ´ÉÑJG Öéj ,á«FÉHô¡c<br />
dPك äɪ«ل©àdG óëلd á«dÉàdG Gلهjôق ôWÉîŸ ¢Vô©àdG øe<br />
hCG á«°üî°ûdG äÉHÉ°UE’G hCG á«FÉHô¡µdG äÉeó°üdG hCG<br />
.ájôgƒ÷G QGöVC’G<br />
Gòg øe Oƒ°üقŸG Góîà°S’Gم Yلى dódG»ل Gòg …ƒàëj •<br />
hCG äÉقaôe hCG äÉقëلe …CG Góîà°SGم …ODƒj óbh .RÉ¡÷G<br />
Gòg ‘ IOóëŸG Jلك ±ÓîH iôNCG äÉ«لªY …CG AGOCG<br />
.á«°üî°ûdG äÉHÉ°UEÓd ¢Vô©àdG مخôWÉ EGلى dódG»ل<br />
.kÓÑقà°ùe ¬«dEG ´ƒLôلd dódG»ل Gò¡H ßØàMG •<br />
ôWÉîŸ kÉjOÉØJ ¢UôëH AÉHô¡µdG UƒJ°»ل S°لك Qôe •<br />
.ôNBG ¢VôZ …CÉH àdG©لق<br />
¬H UƒŸG°ل AÉHô¡µdG òØæe Ø°SCGل RÉ¡÷G ûJ°¨»ل ÖæŒ •<br />
.IöTÉÑe<br />
RÉ¡÷G Góîà°SGم<br />
òØæà UƒJ°»ل¬ Ñbل RÉ¡÷G ûJ°¨»ل ±ÉقjEG øe ócCÉJ •<br />
.¬æY üa°ل¬ hCG AÉHô¡µdG<br />
.RÉ¡÷G Góîà°SGم óæY kGQòM øc •<br />
¢ùHÉقdG üa°ل ±ó¡H UƒàdG°»ل S°لك ó°T ÖæŒ •<br />
.AÉHô¡µdG òØæe øe »FÉHô¡µdG<br />
24
ARABIC<br />
٨<br />
١٠<br />
٧<br />
٩<br />
١١<br />
٤<br />
٣<br />
٢<br />
١٢<br />
٥ ٦<br />
١<br />
RÉ¡÷G AGõLCG<br />
áل°ùdG ¢†Ñقe 7<br />
¢†ÑقŸG ôjô– QR 8<br />
»¡£dG AÉYh 9<br />
áل°ùdG 10<br />
IógÉ°ûªلd IòaÉf 11<br />
ÎلØdG AÉ£Z 12<br />
AÉ£¨dG 1<br />
AÉ£¨dG ôjô– QR 2<br />
IQGôلهG §Ñ°V ¢Uôb – jE’GقûàdG/±É°¨»ل ìÉàØe 3<br />
IQGôلهG öTDƒe 4<br />
âbDƒe 5<br />
âbDƒŸG §Ñ°V QR 6<br />
25
N a m e s & A d d r e s s e s f o r B l a c k & D e c k e r S e r v i c e C o n c e s s i o n a r i e s<br />
ALGERIA: SARL Outillage Corporation, After Sale Service Center-08, Rue Mohamed Boudiaf - Cheraga, Algiers, Algeria, Tel:<br />
+213 21 375131, Fax: +213-0-369667. AZERBAIJAN: Kontakt - NN LLC, M.Qashqay 43, Baku, Azerbaijan Az1000. Tel:<br />
+994 12 4082050, Fax: +994 12 4117090. BAHRAIN: Alfouz Services Co. WLL., P.O. Box 26562, Tubli, Manama, Tel: +973-17783562/<br />
17879987, Fax: +973-17783479. Kewalram & Sons Co. WLL P.O. Box 84, Manama, Kingdom of Bahrain, Tel: +973-17213110/ 17210617/<br />
17210619, Fax: +973-17213211/ 17210627. BANGLADESH: Ultra Corporation, 8, Kushol Centre, Uttara, Dhaka 1230. Tel:<br />
+880-2-8922144, Fax: +880-2-8951339. EGYPT: Anasia Egypt for Trading S.A.E, P.O. Box 2443, 9, Mostafa Refaat Street,<br />
Sheraton Heliopolis 11361, Cairo, Tel: +202-22684159, Fax: +202-22684169. ETHIOPIA: Seif Sherif Trade PLC -Arada Sub City,<br />
Kebele 01-02, Global Insurance Bldg., 2nd Flr. Room 43, P.O.Box 2525, Addis Ababa, Ethiopia, Tel: 00-251-11-1563968/ 1563969, Fax:<br />
00-251-11-1558009. INDIA: Gryphon Appliances Ltd., D-6/4, Okhla Industrial Area, Phase-I, New Delhi-110020, Tel: +91-11-46731111,<br />
Fax: +91-11-46731111. JORDAN: Bashiti Hardware, 93 King Abdullah 2nd St., Opp ELBA House, P.O. Box 3005, Tel: +962-6-5349098<br />
ext.11, Fax: +962-6-5330731. KENYA: Leading Concepts, P.O. Box: 40877-00100, Nairobi, Kenya. Tel: +254 20 690 5000, Fax:<br />
+254 20 690 5111. KUWAIT: Al Omar Technical Co., P.O. Box 4062, Safat 13041, Kuwait, Tel: 00965-24848595/ 24840039, Fax:<br />
00965-24845652. The Sultan Centre, P.O. Box 26567-13126 Safat, Kuwait, Tel: 00965-24343155 Etn. 432, Fax: 00965-24319071.<br />
LEBANON: Aces Service Centre, P.O. Box 90-102, Nahr El Mot, Seaside Highway, Pharaon Building, Beirut. Tel: 00961-1-898989, Fax:<br />
00961-1-245880. LIBYA: Homeworld Co., Building No.5, Senidal St., Amr Ibn Elaas Road, Benghazi, Libya. Tel: 00218-61-9094183.<br />
Service Center1 - Benghazi: Tel: +218-061-3383994, Fax: +218-092-7640688, Service Center2 - Tripoli: Tel: +218-021-3606430, Fax:<br />
+218-092-6514813. MALTA: John G Cassar Ltd. 36-Victory Street, Qormi QRM 06, Malta. Tel: +356-21493251, Fax: +356-21483231.<br />
MAURITIUS: J.M. Goupille & Co. Ltd., Rogers Industrial Park 1, Riche Terre, Mauritius, Tel: +230 206 9450/ +230 207 1700, Fax:<br />
+230 206 9474/ +230 248 3188. MOROCCO: UATS 26 Rue Ennarjisse, Hay Erraihan, Beausejour - Hay Hassani-Casablanca, Morocco.<br />
Tel: +212 522945114, Fax: +212 522942442. NEPAL: Universal Electrocom, Tripureshwor, Kathmandu, Nepal. Tel:+977-1-4265191.<br />
NIGERIA: Dana Electronics Ltd. (Lagos) 116/ 120, Apapa Oshodi Express Way, Isolo, Lagos, Nigeria. Tel: +234-17431818/<br />
+234-8037767774/ +234-8057445477. (Abuja) 18, A.E. Ekukinam Street, Off Obsfemi Awolowo Road, Utako, Abuja, Nigeria. Tel:<br />
+234-8032276101/ +234-8037767774. (Kano) 9A - Mai Malari Road, Bompai, Kano, Nigeria. Tel: +234-8053294947/ +234-8037767774.<br />
OMAN: Oman Marketing & Service Co. (Omasco), P.O. Box 2734, Behind Honda Showroom, Wattayah, Oman, Tel: +968-24560232/<br />
24560255, Fax: +968-24560993. Oman Marketing & Service Co. (Omasco), Al Ohi, Sohar, Oman, Tel: +968-26846379, Fax:<br />
+968-26846379. Oman Marketing & Service Co. (Omasco) - Sanaya, Salalah, Oman, Tel: 00968-23212290, Fax: +968-23210936.<br />
PAKISTAN: Ammar Service & Spares - 60-Bank Arcade, Serai Road, Karachi, Pakistan, Tel: 0092-21-32426905, Fax: 0092-21-32427214.<br />
PHILIPPINES: 476 J. P. Rizal St., cor Kakarong St. Brgy Olympia, Makati City, Tel: +632 403-5698. QATAR: Al Muftah Service Centre -<br />
Al Wakrah Road, P.O. Box 875, Doha, Qatar. Tel: 00974-4650880/ 4650110/ 4446868, Fax: 00974-4441415/ 4662599. SAUDI ARABIA:<br />
(Al Khobar) Al-Suwaiket Catering & Trading Co., P.O.Box 4228, King A.Aziz Street, Al Khobar, Tel: +966-3-8591088, Fax:<br />
+966-3-8595648. Fawaz Ebrahim Al Zayani Trading Est. P.O. Box 76026, Al Khobar #31952, Tel: +966-3-8140914, Fax: +966-3-8140824.<br />
(Jeddah) Banaja Trading Co. Ltd, P.O. Box 366, Jeddah-21411, Tel: +966-2-6511111, Fax: +966-2-6503668. (Riyadh) Banaja Trading Co.<br />
Ltd, P.O. Box 566, Riyadh-11421, Tel: 00966-1-4124444, Fax: +966-1-4033378. SOUTH AFRICA: Trevco Power Tool Service 14<br />
Steenbok Street, Koedoespoort, 0186, Pretoria, South Africa, Tel: +27-86-1873826, Fax: +27-86-5001771. SRI LANKA: Delmege<br />
Construction Products (Pvt) Ltd., No 101 Vinayalankara Mawatha, Colombo-10, Sri Lanka, Tel: +94-11-2693361-7, Service hotline:<br />
+94-77-2211111. TUNISIA: Société Tunisienne De Manutention - Rue de la Physique, Nouvelle Zone Industrielle de Ben Arous-2013<br />
Tunisie, Tel: +216-71-386102/ 380620, Fax: +216-71380412 ext 216. UGANDA: Anisuma Investment and Services Ltd., J R complex,<br />
Ware House No.5, Plot No 101, 3rd Street Industrial Area, Jinja Road, Kampala, Tel: +256-414237106. UAE: (Abu Dhabi)<br />
Light House Electrical, P.O. Box 120, Abu Dhabi, Tel: +971-2-6726131, Fax: +971-2-6720667. (Al Ain) Zillion Equipment and Spare Parts<br />
Trading LLC, P.O. Box 19740, Opp. Bin Sadal/Trimix Redymix Sanaiya, Al Ain. Tel: +971-3-7216690, Fax:+971-3-7216103 (Dubai)<br />
Black & Decker (Overseas) GmbH, P.O. Box 5420, Dubai, Tel: +971-4-8127400/ 8127406, Fax: +971-4-2822765. (Musaffah) Light House<br />
Electrical, P.O. Box 120, Abu Dhabi, Tel: +971-2-5548315, Fax: +971-2-5540461. (Sharjah) Mc Coy Middle East LLC, P.O. Box 25793,<br />
Sharjah, Tel: +971-6-5395931, Fax: +971-6-5395932. (Ras Al Khaimah) Mc Coy Middle East LLC, P.O.Box 10584, Ras Al Khaimah, Tel:<br />
+971-7-2277095, Fax: +971-7-2277096. YEMEN: (Aden) Muala St., Tel: +967 2 222670, Fax: +967 2 222670. (Sana'a) Middle East Trad.<br />
Co. Ltd., P.O. Box 12363, Hayel Street, Sana'a. Tel: +967-1-204201, Fax: +967-1-204204. (Taiz) Middle East Trading Co. (METCO),<br />
5th Flr.Hayel Saeed Anam Bldg, Al-Mugamma St. Taiz, Yemen, Tel: +967-4-213455, Fax: +967-4-219869.
«ùßr<br />
WARRANTY REGISTRATION CARD<br />
YOUR NAME/<br />
≈ßr Ë ´Mu«Ê «∞∂Uzl<br />
¢U¸¥a «∞Ad«¡<br />
«∞d±e «∞∂d¥bÍ<br />
YOUR ADDRESS<br />
«∞FMu«Ê<br />
POSTCODE<br />
DATE OF PURCHASE<br />
DEALER'S NAME & ADDRESS/<br />
PRODUCT MODEL NO. EF2750


