

Makita Visseuse à chocs 18 V Li-Ion 170 Nm (Produit seul) - DTD153Z - Notice
Makita Visseuse à chocs 18 V Li-Ion 170 Nm (Produit seul) - DTD153Z - Notice
Makita Visseuse à chocs 18 V Li-Ion 170 Nm (Produit seul) - DTD153Z - Notice

You also want an ePaper? Increase the reach of your titles
YUMPU automatically turns print PDFs into web optimized ePapers that Google loves.
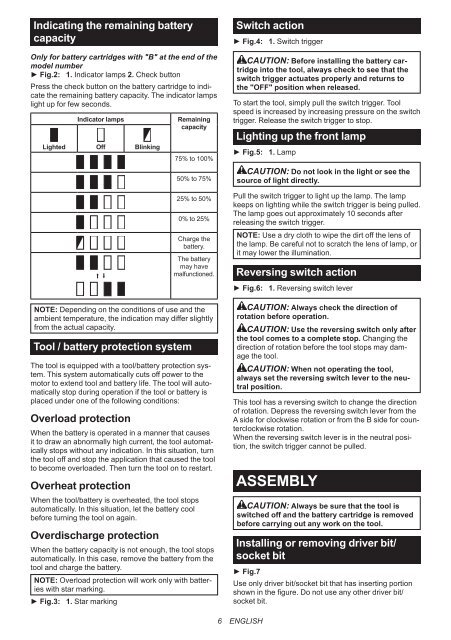
Indicating the remaining battery<br />
capacity<br />
Only for battery cartridges with "B" at the end of the<br />
model number<br />
► Fig.2: 1. Indicator lamps 2. Check button<br />
Press the check button on the battery cartridge to indicate<br />
the remaining battery capacity. The indicator lamps<br />
light up for few seconds.<br />
Indicator lamps<br />
<strong>Li</strong>ghted Off Blinking<br />
Remaining<br />
capacity<br />
75% to 100%<br />
50% to 75%<br />
25% to 50%<br />
0% to 25%<br />
Charge the<br />
battery.<br />
The battery<br />
may have<br />
malfunctioned.<br />
NOTE: Depending on the conditions of use and the<br />
ambient temperature, the indication may differ slightly<br />
from the actual capacity.<br />
Tool / battery protection system<br />
The tool is equipped with a tool/battery protection system.<br />
This system automatically cuts off power to the<br />
motor to extend tool and battery life. The tool will automatically<br />
stop during operation if the tool or battery is<br />
placed under one of the following conditions:<br />
Overload protection<br />
When the battery is operated in a manner that causes<br />
it to draw an abnormally high current, the tool automatically<br />
stops without any indication. In this situation, turn<br />
the tool off and stop the application that caused the tool<br />
to become overloaded. Then turn the tool on to restart.<br />
Overheat protection<br />
When the tool/battery is overheated, the tool stops<br />
automatically. In this situation, let the battery cool<br />
before turning the tool on again.<br />
Overdischarge protection<br />
When the battery capacity is not enough, the tool stops<br />
automatically. In this case, remove the battery from the<br />
tool and charge the battery.<br />
NOTE: Overload protection will work only with batteries<br />
with star marking.<br />
► Fig.3: 1. Star marking<br />
Switch action<br />
► Fig.4: 1. Switch trigger<br />
CAUTION: Before installing the battery cartridge<br />
into the tool, always check to see that the<br />
switch trigger actuates properly and returns to<br />
the "OFF" position when released.<br />
To start the tool, simply pull the switch trigger. Tool<br />
speed is increased by increasing pressure on the switch<br />
trigger. Release the switch trigger to stop.<br />
<strong>Li</strong>ghting up the front lamp<br />
► Fig.5: 1. Lamp<br />
CAUTION: Do not look in the light or see the<br />
source of light directly.<br />
Pull the switch trigger to light up the lamp. The lamp<br />
keeps on lighting while the switch trigger is being pulled.<br />
The lamp goes out approximately 10 seconds after<br />
releasing the switch trigger.<br />
NOTE: Use a dry cloth to wipe the dirt off the lens of<br />
the lamp. Be careful not to scratch the lens of lamp, or<br />
it may lower the illumination.<br />
Reversing switch action<br />
► Fig.6: 1. Reversing switch lever<br />
CAUTION: Always check the direction of<br />
rotation before operation.<br />
CAUTION: Use the reversing switch only after<br />
the tool comes to a complete stop. Changing the<br />
direction of rotation before the tool stops may damage<br />
the tool.<br />
CAUTION: When not operating the tool,<br />
always set the reversing switch lever to the neutral<br />
position.<br />
This tool has a reversing switch to change the direction<br />
of rotation. Depress the reversing switch lever from the<br />
A side for clockwise rotation or from the B side for counterclockwise<br />
rotation.<br />
When the reversing switch lever is in the neutral position,<br />
the switch trigger cannot be pulled.<br />
ASSEMBLY<br />
CAUTION: Always be sure that the tool is<br />
switched off and the battery cartridge is removed<br />
before carrying out any work on the tool.<br />
Installing or removing driver bit/<br />
socket bit<br />
► Fig.7<br />
Use only driver bit/socket bit that has inserting portion<br />
shown in the figure. Do not use any other driver bit/<br />
socket bit.<br />
6 ENGLISH


