

Sony KDL-49WD754 - KDL-49WD754 Mode d'emploi Grec
Sony KDL-49WD754 - KDL-49WD754 Mode d'emploi Grec
Sony KDL-49WD754 - KDL-49WD754 Mode d'emploi Grec

Create successful ePaper yourself
Turn your PDF publications into a flip-book with our unique Google optimized e-Paper software.
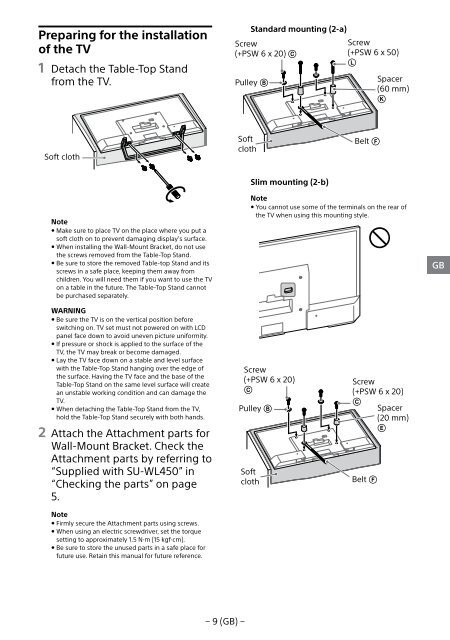
Preparing for the installation<br />
of the TV<br />
1 Detach the Table-Top Stand<br />
from the TV.<br />
Standard mounting (2-a)<br />
Screw<br />
(+PSW 6 x 20) <br />
Pulley <br />
Screw<br />
(+PSW 6 x 50)<br />
<br />
Spacer<br />
(60 mm)<br />
<br />
Soft cloth<br />
Soft<br />
cloth<br />
Belt <br />
Slim mounting (2-b)<br />
Note<br />
ˎˎMake sure to place TV on the place where you put a<br />
soft cloth on to prevent damaging display’s surface.<br />
ˎˎWhen installing the Wall-Mount Bracket, do not use<br />
the screws removed from the Table-Top Stand.<br />
ˎˎBe sure to store the removed Table-top Stand and its<br />
screws in a safe place, keeping them away from<br />
children. You will need them if you want to use the TV<br />
on a table in the future. The Table-Top Stand cannot<br />
be purchased separately.<br />
Note<br />
ˎˎYou cannot use some of the terminals on the rear of<br />
the TV when using this mounting style.<br />
GB<br />
WARNING<br />
ˎˎBe sure the TV is on the vertical position before<br />
switching on. TV set must not powered on with LCD<br />
panel face down to avoid uneven picture uniformity.<br />
ˎˎIf pressure or shock is applied to the surface of the<br />
TV, the TV may break or become damaged.<br />
ˎˎLay the TV face down on a stable and level surface<br />
with the Table-Top Stand hanging over the edge of<br />
the surface. Having the TV face and the base of the<br />
Table-Top Stand on the same level surface will create<br />
an unstable working condition and can damage the<br />
TV.<br />
ˎˎWhen detaching the Table-Top Stand from the TV,<br />
hold the Table-Top Stand securely with both hands.<br />
2 Attach the Attachment parts for<br />
Wall-Mount Bracket. Check the<br />
Attachment parts by referring to<br />
“Supplied with SU-WL450” in<br />
“Checking the parts” on page<br />
5.<br />
Note<br />
ˎˎFirmly secure the Attachment parts using screws.<br />
ˎˎWhen using an electric screwdriver, set the torque<br />
setting to approximately 1.5 N·m {15 kgf·cm}.<br />
ˎˎBe sure to store the unused parts in a safe place for<br />
future use. Retain this manual for future reference.<br />
Screw<br />
(+PSW 6 x 20)<br />
<br />
Pulley <br />
Soft<br />
cloth<br />
Screw<br />
(+PSW 6 x 20)<br />
<br />
Spacer<br />
(20 mm)<br />
<br />
Belt <br />
− 9 (GB) −


