

Sony KDL-49WD754 - KDL-49WD754 Mode d'emploi
Sony KDL-49WD754 - KDL-49WD754 Mode d'emploi
Sony KDL-49WD754 - KDL-49WD754 Mode d'emploi

You also want an ePaper? Increase the reach of your titles
YUMPU automatically turns print PDFs into web optimized ePapers that Google loves.
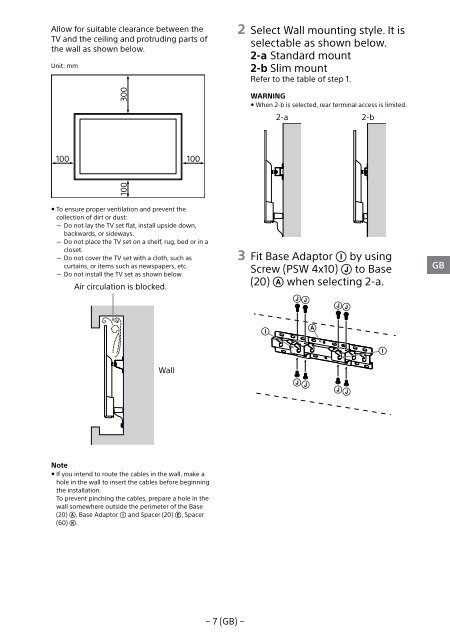
Allow for suitable clearance between the<br />
TV and the ceiling and protruding parts of<br />
the wall as shown below.<br />
Unit: mm<br />
2 Select Wall mounting style. It is<br />
selectable as shown below.<br />
2-a Standard mount<br />
2-b Slim mount<br />
Refer to the table of step 1.<br />
300<br />
WARNING<br />
ˎˎWhen 2-b is selected, rear terminal access is limited.<br />
2-a 2-b<br />
100 100<br />
100<br />
ˎˎTo ensure proper ventilation and prevent the<br />
collection of dirt or dust:<br />
ˋˋDo not lay the TV set flat, install upside down,<br />
backwards, or sideways.<br />
ˋˋDo not place the TV set on a shelf, rug, bed or in a<br />
closet.<br />
ˋˋDo not cover the TV set with a cloth, such as<br />
curtains, or items such as newspapers, etc.<br />
ˋˋDo not install the TV set as shown below.<br />
Air circulation is blocked.<br />
3 Fit Base Adaptor by using<br />
Screw (PSW 4x10) to Base<br />
(20) when selecting 2-a.<br />
<br />
<br />
GB<br />
<br />
<br />
<br />
Wall<br />
<br />
<br />
Note<br />
ˎˎIf you intend to route the cables in the wall, make a<br />
hole in the wall to insert the cables before beginning<br />
the installation.<br />
To prevent pinching the cables, prepare a hole in the<br />
wall somewhere outside the perimeter of the Base<br />
(20) , Base Adaptor and Spacer (20) , Spacer<br />
(60) .<br />
− 7 (GB) −


