
Create successful ePaper yourself
Turn your PDF publications into a flip-book with our unique Google optimized e-Paper software.
THIS UNIT CANNOT BE USED FOR TEXTURED PAINTS. USE OF THESE MATERIALS WILL CAUSE<br />
PREMATURE WEAR, WHICH WILL VOID THE GUARANTEE. TO OBTAIN THE BEST RESULTS<br />
FROM YOUR SPRAY KIT PLEASE READ THE INSTRUCTIONS CAREFULLY BEFORE USE.<br />
IDEAL VISCOSITY<br />
Water based <strong>paint</strong>s 25-50 seconds Varnishes No Dilution<br />
and emulsions Aluminium Paints No Dilution<br />
Oil Based Paints 45 -50 seconds Wood Stains No Dilution<br />
Wood preservatives No Dilution Automotive Paint Manufacturers Ratio<br />
Primers 45 -50 seconds<br />
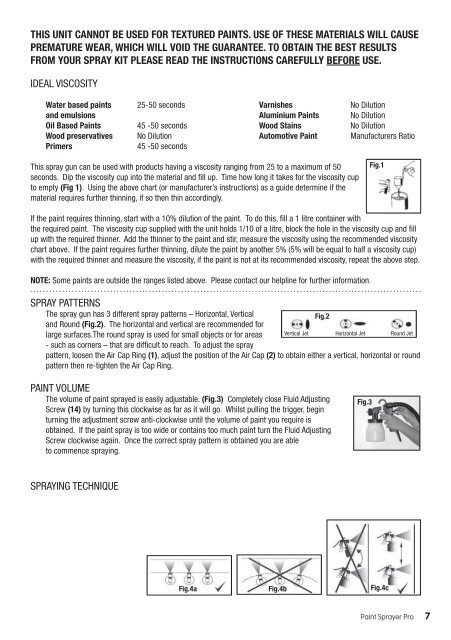
This spray gun can be used with <strong>pro</strong>ducts having a viscosity ranging from 25 to a maximum of 50<br />
seconds. Dip the viscosity cup into the material and fi ll up. Time how long it takes for the viscosity cup<br />
to empty (Fig 1). Using the above chart (or manufacturer’s instructions) as a guide determine if the<br />
material requires further thinning, if so then thin accordingly.<br />
If the <strong>paint</strong> requires thinning, start with a 10% dilution of the <strong>paint</strong>. To do this, fi ll a 1 litre container with<br />
the required <strong>paint</strong>. The viscosity cup supplied with the unit holds 1/10 of a litre, block the hole in the viscosity cup and fi ll<br />
up with the required thinner. Add the thinner to the <strong>paint</strong> and stir, measure the viscosity using the recommended viscosity<br />
chart above. If the <strong>paint</strong> requires further thinning, dilute the <strong>paint</strong> by another 5% (5% will be equal to half a viscosity cup)<br />
with the required thinner and measure the viscosity, if the <strong>paint</strong> is not at its recommended viscosity, repeat the above step.<br />
NOTE: Some <strong>paint</strong>s are outside the ranges listed above. Please contact our helpline for further information.<br />
SPRAY PATTERNS<br />
The spray gun has 3 different spray patterns – Horizontal, Vertical<br />
Fig.2<br />
and Round (Fig.2). The horizontal and vertical are recommended for<br />
large surfaces.The round spray is used for small objects or for areas Vertical Jet Horizontal Jet Round Jet<br />
- such as corners – that are diffi cult to reach. To adjust the spray<br />
pattern, loosen the Air Cap Ring (1), adjust the position of the Air Cap (2) to obtain either a vertical, horizontal or round<br />
pattern then re-tighten the Air Cap Ring.<br />
PAINT VOLUME<br />
The volume of <strong>paint</strong> sprayed is easily adjustable. (Fig.3) Completely close Fluid Adjusting<br />
Screw (14) by turning this clockwise as far as it will go. Whilst pulling the trigger, begin<br />
turning the adjustment screw anti-clockwise until the volume of <strong>paint</strong> you require is<br />
obtained. If the <strong>paint</strong> spray is too wide or contains too much <strong>paint</strong> turn the Fluid Adjusting<br />
Screw clockwise again. Once the correct spray pattern is obtained you are able<br />
to commence spraying.<br />
SPRAYING TECHNIQUE<br />
Fig.3<br />
Fig.1<br />
Fig.4a Fig.4b Fig.4c<br />
Paint Sprayer Pro 7<br />
PSP_INS.indd 7 10/3/09 12:14:04