CO2 bemestingsinstallatie Exclusive 2.000 g - Dennerle
CO2 bemestingsinstallatie Exclusive 2.000 g - Dennerle
CO2 bemestingsinstallatie Exclusive 2.000 g - Dennerle

Create successful ePaper yourself
Turn your PDF publications into a flip-book with our unique Google optimized e-Paper software.
Classic-Line<br />
<strong>CO2</strong> fertilizer system <strong>Exclusive</strong> <strong>2.000</strong> g<br />
Complete set with reusable <strong>2.000</strong> g <strong>CO2</strong> cylinder.<br />
For <strong>CO2</strong> fertilization of aquaria up to 5.000 litres.<br />
- Instructions for use: please read carefully and keep in a safe place. -<br />
GB<br />
Congratulations on purchasing this high-quality <strong>CO2</strong> fertilizer system from DENNERLE.<br />
If used properly and treated with due care, this set will provide a simple, convenient and reliable means of supplying your aquarium with <strong>CO2</strong>, the most important<br />
fertilizer for aquarium plants - thus ensuring magnificent plant growth. <strong>CO2</strong> also serves to establish an ideal pH value for fish and plants, in the slightly<br />
acidic to neutral range. DENNERLE wishes you hours of fun with your aquarium!<br />
Safety rules for carbon dioxide (<strong>CO2</strong>) cylinders<br />
• Use only to supply <strong>CO2</strong> to aquaria.<br />
• <strong>CO2</strong> cylinders are highly pressurized. The following instructions should therefore be observed:<br />
• Do not throw <strong>CO2</strong> cylinders. Store in cool conditions. Protect from sunlight and temperatures of over 50 °C.<br />
• Use only when fitted with suitable pressure reducers for reusable <strong>CO2</strong> cylinders with W21.8 x 1/14" connecting thread, e.g. DENNERLE pressure<br />
reducer models Profi 2000, Compact, Professional and <strong>Exclusive</strong>.<br />
• Cylinders must always be in an upright position when supplying <strong>CO2</strong>. Secure cylinders to prevent them from falling over.<br />
• Do not open <strong>CO2</strong> cylinders by force.<br />
• Do not empty <strong>CO2</strong> cylinders completely. Refill only at authorised <strong>CO2</strong> filling stations. Please note: Tare weight without cage. Remove cage before<br />
refilling.<br />
• <strong>CO2</strong> gas is heavier than air and has a suffocating effect in high concentrations.<br />
• Therefore, avoid breathing in <strong>CO2</strong> gas.<br />
• Keep out of reach of children.<br />
• Store <strong>CO2</strong> cylinders in well ventilated areas and not in cellars.<br />
• Please note the following when transporting individual cylinders in vehicles: Secure to prevent from sliding and rolling around, as the valve may<br />
otherwise incur damage and <strong>CO2</strong> gas may escape. Ensure adequate ventilation by means of an open window, by switching on the blower, etc.<br />
How the <strong>CO2</strong> fertilizer system<br />
<strong>Exclusive</strong> works<br />
The <strong>CO2</strong> pressure reducer <strong>Exclusive</strong> reduces the cylinder pressure to an<br />
operating pressure which the user can set in line with practical requirements.<br />
The precision-mechanism needle valve enables highly exact and<br />
convenient <strong>CO2</strong> dosage. <strong>CO2</strong> dosage is controlled with the <strong>CO2</strong> bubble<br />
counter Exact.<br />
The <strong>CO2</strong> is transported to the aquarium via the special leak-proof<br />
Softflex <strong>CO2</strong> hose. The <strong>CO2</strong> Cyclo Turbo XL ensures highly effective<br />
dissolving of the <strong>CO2</strong> in the aquarium water. A special <strong>CO2</strong> check valve<br />
protects the valuable pressure reducer from any backflowing water. The<br />
<strong>CO2</strong> content in the aquarium water can be read directly by means of the<br />
<strong>CO2</strong> long-term test Correct.<br />
The reusable <strong>2.000</strong> g <strong>CO2</strong> cylinder is particularly practical, supplying<br />
even large aquaria with <strong>CO2</strong> over a long period before it needs replacing.<br />
�<br />
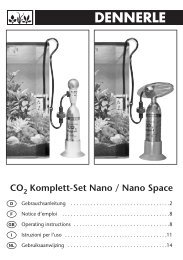
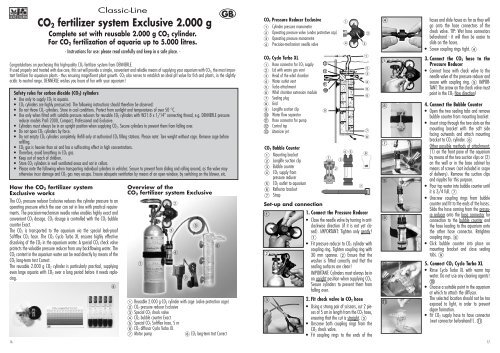
Overview of the<br />
<strong>CO2</strong> fertilizer system <strong>Exclusive</strong><br />
�<br />
�<br />
�<br />
�<br />
� Reusable <strong>2.000</strong> g <strong>CO2</strong> cylinder with cage (valve protection cage)<br />
� <strong>CO2</strong> pressure reducer <strong>Exclusive</strong><br />
� Special <strong>CO2</strong> check valve<br />
� <strong>CO2</strong> bubble counter Exact<br />
� Special <strong>CO2</strong> Softflex hose, 5 m<br />
� <strong>CO2</strong> diffusor Cyclo Turbo XL<br />
� Motor pump � <strong>CO2</strong> long-term test Correct<br />
�<br />
�<br />
�<br />
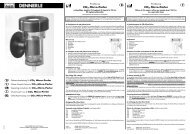
<strong>CO2</strong> Pressure Reducer <strong>Exclusive</strong><br />
� Cylinder pressure manometre<br />
� Operating pressure valve (under protective cap)<br />
� Operating pressure manometre<br />
� Precision-mechanism needle valve<br />
<strong>CO2</strong> Cyclo Turbo XL<br />
� Hose connector for <strong>CO2</strong> supply<br />
� Lid with waste gas vent<br />
� Head of the whirl chamber<br />
� Water outlet vent<br />
� Turbo attachment<br />
� Whirl chamber extension module<br />
� Sealing plug<br />
� Grid<br />
� Longlife suction clip<br />
� Water flow separator<br />
� Hose connector for pump<br />
� Control tap<br />
� Atomizer jet<br />
<strong>CO2</strong> Bubble Counter<br />
� Mounting bracket<br />
� Longlife suction clip<br />
� Bubble counter<br />
� <strong>CO2</strong> supply from<br />
pressure reducer<br />
� <strong>CO2</strong> outlet to aquarium<br />
� Reflector bracket<br />
� Strap<br />
Set-up and connection<br />
�<br />
�<br />
�<br />
13<br />
12<br />
11<br />
10<br />
�<br />
�<br />
�<br />
�<br />
�<br />
�<br />
�<br />
�<br />
�<br />
1. Connect the Pressure Reducer<br />
• Close the needle valve by turning in anticlockwise<br />
direction (if it is not yet closed).<br />
IMPORTANT: Tighten only gently!<br />
�<br />
• Fit pressure reducer to <strong>CO2</strong> cylinder with<br />
coupling ring. Tighten coupling ring with<br />
30 mm spanner. � Ensure that the<br />
washer is fitted correctly and that the<br />
sealing surfaces are clean!<br />
IMPORTANT: Cylinders must always be in<br />
an upright position when supplying <strong>CO2</strong>.<br />
Secure cylinders to prevent them from<br />
falling over.<br />
2. Fit check valve in <strong>CO2</strong> hose<br />
• Using a strong pair of scissors, cut 2 pieces<br />
of 5 cm in length from the <strong>CO2</strong> hose,<br />
ensuring that the cut is straight. �<br />
• Unscrew both coupling rings from the<br />
<strong>CO2</strong> check valve.<br />
• Fit coupling rings to the ends of the<br />
�<br />
�<br />
�<br />
�<br />
�<br />
�<br />
�<br />
�<br />
hoses and slide hoses as far as they will<br />
go onto the hose connectors of the<br />
check valve. TIP: Wet hose connectors<br />
beforehand - it will then be easier to<br />
slide on the hoses.<br />
• Screw coupling rings tight. �<br />
3. Connect the <strong>CO2</strong> hose to the<br />
Pressure Reducer<br />
• Connect hose with check valve to the<br />
needle valve of the pressure reducer and<br />
secure with coupling ring. � IMPOR-<br />
TANT: The arrow on the check valve must<br />
point in the <strong>CO2</strong> flow direction!<br />
4. Connect the Bubble Counter<br />
• Open the two sealing tabs and remove<br />
bubble counter from mounting bracket.<br />
• Insert strap through the two slots on the<br />
mounting bracket with the soft side<br />
facing outwards and attach mounting<br />
bracket to <strong>CO2</strong> cylinder. �<br />
Other possible methods of attachment:<br />
(1) on the front pane of the aquarium<br />
by means of the two suction clips or (2)<br />
on the wall or in the base cabinet by<br />
means of screws (not included in scope<br />
of delivery). Remove the suction clips<br />
and nipples for this purpose.<br />
• Pour tap water into bubble counter until<br />
it is 3/4 full. �<br />
• Unscrew coupling rings from bubble<br />
counter and fit to the ends of the hoses.<br />
Slide the hose coming from the pressure<br />
reducer onto the hose connector for<br />
connection to the bubble counter and<br />
the hose leading to the aquarium onto<br />
the other hose connector. Retighten<br />
coupling rings. �<br />
• Click bubble counter into place on<br />
mounting bracket and close sealing<br />
tabs. �<br />
5. Connect <strong>CO2</strong> Cyclo Turbo XL<br />
• Rinse Cyclo Turbo XL with warm tap<br />
water. Do not use any cleaning agents!<br />
�<br />
• Choose a suitable point in the aquarium<br />
at which to attach the diffusor.<br />
The selected location should not be too<br />
exposed to light, in order to prevent<br />
algae formation.<br />
• Fit <strong>CO2</strong> supply hose to hose connector<br />
(wet connector beforehand!). �<br />
16 17<br />
�<br />
�<br />
�<br />
�<br />
�<br />
� � �<br />
�<br />
�<br />
�