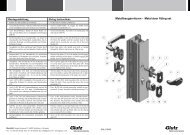
Drücker mit Gegenmutter und Schild (PDF) - Glutz
Drücker mit Gegenmutter und Schild (PDF) - Glutz
Drücker mit Gegenmutter und Schild (PDF) - Glutz

Create successful ePaper yourself
Turn your PDF publications into a flip-book with our unique Google optimized e-Paper software.
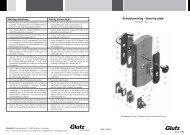
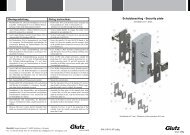
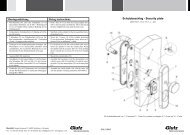
Montageanleitung Fixing instructions<br />
• Fetten der Gleitlager-Führung (1). • Lubricate friction bearing (1).<br />
• <strong>Drücker</strong> (2) in Führungshülse (3) von<br />
<strong>Schild</strong> (4) stecken.<br />
<strong>Glutz</strong> AG, Segetzstrasse 13, 4502 Solothurn, Schweiz<br />
Tel. +41 32 625 65 20, Fax +41 32 625 65 35<br />
info@glutz.com, www.glutz.com<br />
• Insert handle (2) in the guide (3) of<br />
the escutcheon (4).<br />
• 6-Kt.-Mutter (5) auf Gewinde von • Screw on the thread of the handle (2)<br />
<strong>Drücker</strong> (2) zwei Umgänge aufschrauben.<br />
the hexagon nut (5) with 2 turns.<br />
• Ein Tropfen anaeroben Einkompo- • Apply one drop of anaerobic singlenenten-Klebstoff,<br />
auf Gewinde (6) package system on the thread (6) of<br />
von Mutter (5) aufbringen.<br />
the hexagon nut (5).<br />
• 6-Kt.-Mutter (5) weiter anziehen, bis • Screw on the hexagon nut (5) until<br />
<strong>Drücker</strong> (2) spielfrei, aber nicht ge- the handle (2) is set mobile, but not<br />
klemmt, in Führungshülse (3) sitzt. squeezed, in the guide (3).<br />
• Einige Minuten trocknen lassen. • Dry up some minutes.<br />
MA 10002<br />
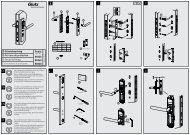
<strong>Drücker</strong> - lever handles
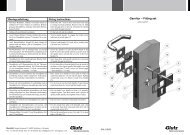
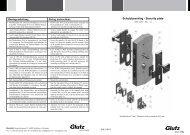
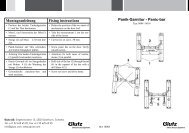
Mode d`emploi Istruzioni di montaggio<br />
• Graisser le guide à glissement (1). • Ingrassare la guida con cuscinetto a<br />
strisciamento (1).<br />
• Insérer la poignée (2) dans le guide<br />
(3) de l’entrée (4).<br />
<strong>Glutz</strong> AG, Segetzstrasse 13, 4502 Solothurn, Schweiz<br />
Tel. +41 32 625 65 20, Fax +41 32 625 65 35<br />
info@glutz.com, www.glutz.com<br />
• Inserire la maniglia (2) nella guida (3)<br />
della placca (4) .<br />
• Visser par 2 tours l’écrou hexagonale • Avvitare per due giri il dado esagona-<br />
(5) sur le filet de la poignée (2). le (5) sul filetto della maniglia (2).<br />
• Appliquer une goutte de colle anaéro- • Applicare una goccia di adesivo anbic<br />
sur le filet (6) de l’écrou (5). aerobico monocomponente sul filetto<br />
(6) del dado (5).<br />
• Visser l’écrou hexagonal (5) jusqu’à • Avvitare ulteriormente il dado esagoce<br />
que la poignée (2) reste mobile, nale (5) fino a quando la maniglia (2)<br />
mais pas serrée, dans le guide (3). siede nella guida (3) senza gioco, ma<br />
non bloccata.<br />
• Laisser sécher quelques minutes. • Lasciare asciugare per alcuni minuti.<br />
MA 10002<br />
Poignées - Maniglia