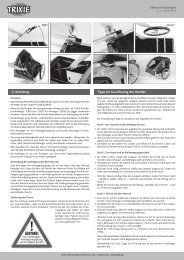
Bedienungsanleitung - Trixie
Bedienungsanleitung - Trixie
Bedienungsanleitung - Trixie

Create successful ePaper yourself
Turn your PDF publications into a flip-book with our unique Google optimized e-Paper software.
4<br />
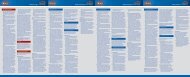
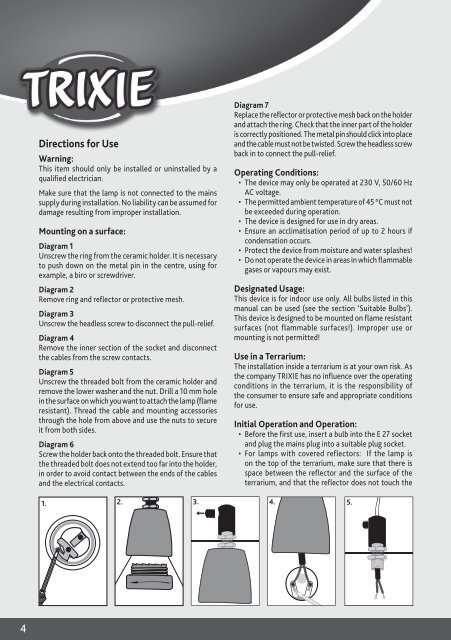
Directions for Use<br />
Warning:<br />
This item should only be installed or uninstalled by a<br />
qualified electrician.<br />
Make sure that the lamp is not connected to the mains<br />
supply during installation. No liability can be assumed for<br />
damage resulting from improper installation.<br />
Mounting on a surface:<br />
Diagram 1<br />
Unscrew the ring from the ceramic holder. It is necessary<br />
to push down on the metal pin in the centre, using for<br />
example, a biro or screwdriver.<br />
Diagram 2<br />
Remove ring and reflector or protective mesh.<br />
Diagram 3<br />
Unscrew the headless screw to disconnect the pull-relief.<br />
Diagram 4<br />
Remove the inner section of the socket and disconnect<br />
the cables from the screw contacts.<br />
Diagram 5<br />
Unscrew the threaded bolt from the ceramic holder and<br />
remove the lower washer and the nut. Drill a 10 mm hole<br />
in the surface on which you want to attach the lamp (flame<br />
resistant). Thread the cable and mounting accessories<br />
through the hole from above and use the nuts to secure<br />
it from both sides.<br />
Diagram 6<br />
Screw the holder back onto the threaded bolt. Ensure that<br />
the threaded bolt does not extend too far into the holder,<br />
in order to avoid contact between the ends of the cables<br />
and the electrical contacts.<br />
Diagram 7<br />
Replace the reflector or protective mesh back on the holder<br />
and attach the ring. Check that the inner part of the holder<br />
is correctly positioned. The metal pin should click into place<br />
and the cable must not be twisted. Screw the headless screw<br />
back in to connect the pull-relief.<br />
Operating Conditions:<br />
• The device may only be operated at 230 V, 50/60 Hz<br />
AC voltage.<br />
• The permitted ambient temperature of 45 °C must not<br />
be exceeded during operation.<br />
• The device is designed for use in dry areas.<br />
• Ensure an acclimatisation period of up to 2 hours if<br />
condensation occurs.<br />
• Protect the device from moisture and water splashes!<br />
• Do not operate the device in areas in which flammable<br />
gases or vapours may exist.<br />
Designated Usage:<br />
This device is for indoor use only. All bulbs listed in this<br />
manual can be used (see the section ‘Suitable Bulbs’).<br />
This device is designed to be mounted on flame resistant<br />
surfaces (not flammable surfaces!). Improper use or<br />
mounting is not permitted!<br />
Use in a Terrarium:<br />
The installation inside a terrarium is at your own risk. As<br />
the company TRIXIE has no influence over the operating<br />
conditions in the terrarium, it is the responsibility of<br />
the consumer to ensure safe and appropriate conditions<br />
for use.<br />
Initial Operation and Operation:<br />
• Before the first use, insert a bulb into the E 27 socket<br />
and plug the mains plug into a suitable plug socket.<br />
• For lamps with covered reflectors: If the lamp is<br />
on the top of the terrarium, make sure that there is<br />
space between the reflector and the surface of the<br />
terrarium, and that the reflector does not touch the<br />
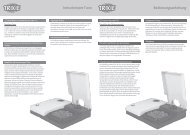
1. 2. 3.<br />
4. 5.