Installation Guide AME 335, AME 435 - Intellisys
Installation Guide AME 335, AME 435 - Intellisys
Installation Guide AME 335, AME 435 - Intellisys

You also want an ePaper? Increase the reach of your titles
YUMPU automatically turns print PDFs into web optimized ePapers that Google loves.
<strong>Installation</strong> <strong>Guide</strong> <strong>AME</strong> <strong>335</strong>, <strong>AME</strong> <strong>435</strong><br />
lAnGUAGE<br />
ENGLISH<br />
safety note<br />
To avoid injury and damage to persons<br />
and devices, it is absolutely necessary<br />
these instructions are carefully read<br />
and observed prior to assembly and<br />
commissioning.<br />
Necessary assembly, start-up, and<br />
maintenance work must be performed<br />
only by qualified, trained and authorised<br />
personnel.<br />
Prior to assembly and maintenance work<br />
on the actuator, the system must be:<br />
- depressurised<br />
- cooled down<br />
- emptied<br />
- cleaned<br />
Please comply with the instructions of the<br />
system manufacturer or system operator.<br />
Do not remove the cover<br />
before the power supply is fully<br />
switched off.<br />
Disposal instruction<br />
This product should be<br />
dismantled and its<br />
components sorted, if<br />
possible, in various groups<br />
before recycling or disposal.<br />
Always follow the local disposal<br />
regulations.<br />
Mounting and installation ❶<br />
Wiring ❷<br />
Do not touch anything on the PCB!<br />
Switch off the power line before wiring<br />
the actuator! Lethal voltage!<br />
Wire the actuator according to the wiring<br />
diagram.<br />
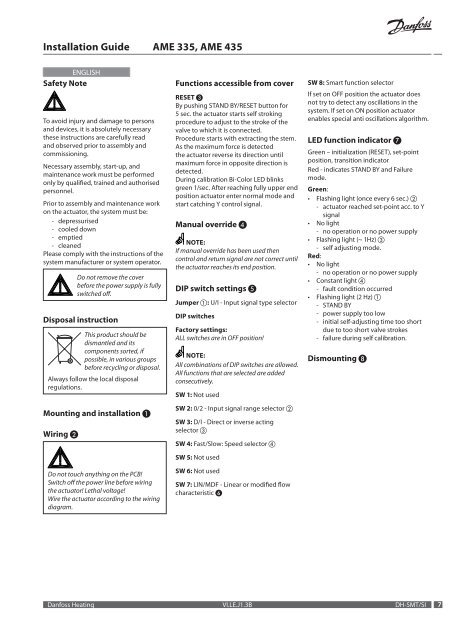
Functions accessible from cover<br />
REsET ❸<br />
By pushing STAND BY/RESET button for<br />
5 sec. the actuator starts self stroking<br />
procedure to adjust to the stroke of the<br />
valve to which it is connected.<br />
Procedure starts with extracting the stem.<br />
As the maximum force is detected<br />
the actuator reverse its direction until<br />
maximum force in opposite direction is<br />
detected.<br />
During calibration Bi-Color LED blinks<br />
green 1/sec. After reaching fully upper end<br />
position actuator enter normal mode and<br />
start catching Y control signal.<br />
Manual override ❹<br />
nOTE:<br />
If manual override has been used then<br />
control and return signal are not correct until<br />
the actuator reaches its end position.<br />
DIP switch settings ❺<br />
Jumper ①: U/I - Input signal type selector<br />
DIP switches<br />
Factory settings:<br />
ALL switches are in OFF position!<br />
nOTE:<br />
All combinations of DIP switches are allowed.<br />
All functions that are selected are added<br />
consecutively.<br />
sW 1: Not used<br />
sW 2: 0/2 - Input signal range selector ②<br />
sW 3: D/I - Direct or inverse acting<br />
selector ③<br />
sW 4: Fast/Slow: Speed selector ④<br />
sW 5: Not used<br />
sW 6: Not used<br />
sW 7: LIN/MDF - Linear or modified flow<br />
characteristic ❻<br />
sW 8: Smart function selector<br />
If set on OFF position the actuator does<br />
not try to detect any oscillations in the<br />
system. If set on ON position actuator<br />
enables special anti oscillations algorithm.<br />
lED function indicator ❼<br />
Green – initialization (RESET), set-point<br />
position, transition indicator<br />
Red - indicates STAND BY and Failure<br />
mode.<br />
Green:<br />
• Flashing light (once every 6 sec.) ②<br />
- actuator reached set-point acc. to Y<br />
signal<br />
• No light<br />
- no operation or no power supply<br />
• Flashing light (~ 1Hz) ③<br />
- self adjusting mode.<br />
Red:<br />
• No light<br />
- no operation or no power supply<br />
• Constant light ④<br />
- fault condition occurred<br />
• Flashing light (2 Hz) ①<br />
- STAND BY<br />
- power supply too low<br />
- initial self-adjusting time too short<br />
due to too short valve strokes<br />
- failure during self calibration.<br />
Dismounting ❽<br />
Danfoss Heating VI.LE.J1.3B DH-SMT/SI<br />
7