CD/USB receiver Pioneer DEH-2100UB - 130 ? ??
CD/USB receiver Pioneer DEH-2100UB - 130 ? ??
CD/USB receiver Pioneer DEH-2100UB - 130 ? ??

Create successful ePaper yourself
Turn your PDF publications into a flip-book with our unique Google optimized e-Paper software.
<strong>CD</strong> RDS RECEIVER<br />
REPRODUCTOR DE <strong>CD</strong> CON RECEPTOR RDS<br />
<strong>CD</strong> RDS-EMPFÄNGER<br />
AUTORADIO <strong>CD</strong> RDS<br />
SINTOLETTORE <strong>CD</strong> RDS<br />
<strong>CD</strong> RDS-ONTVANGER<br />
<strong>CD</strong> RDS ПРИЕМНИК<br />
<strong>DEH</strong>-2120UB<br />
<strong>DEH</strong>-<strong>2100UB</strong><br />
Printed in China<br />
Imprimé en Chine<br />
EW<br />
Installation Manual<br />
Manual de instalación<br />
Installationsanleitung<br />
Manuel d’installation<br />
Manuale d’installazione<br />
Installatiehandleiding<br />
Руководство по установке<br />
<br />
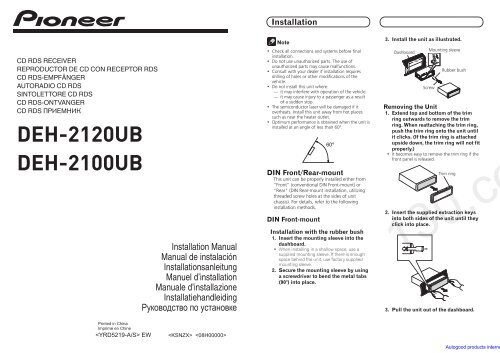
Installation English<br />
Note<br />
• Check all connections and systems before final<br />
installation.<br />
• Do not use unauthorized parts. The use of<br />
unauthorized parts may cause malfunctions.<br />
• Consult with your dealer if installation requires<br />
drilling of holes or other modifications of the<br />
vehicle.<br />
• Do not install this unit where:<br />
— it may interfere with operation of the vehicle.<br />
— it may cause injury to a passenger as a result<br />
of a sudden stop.<br />
• The semiconductor laser will be damaged if it<br />
overheats. Install this unit away from hot places<br />
such as near the heater outlet.<br />
• Optimum performance is obtained when the unit is<br />
installed at an angle of less than 60°.<br />
DIN Front/Rear-mount<br />
This unit can be properly installed either from<br />
"Front" (conventional DIN Front-mount) or<br />
"Rear" (DIN Rear-mount installation, utilizing<br />
threaded screw holes at the sides of unit<br />
chassis). For details, refer to the following<br />
installation methods.<br />
DIN Front-mount<br />
Installation with the rubber bush<br />
1. Insert the mounting sleeve into the<br />
dashboard.<br />
• When installing in a shallow space, use a<br />
supplied mounting sleeve. If there is enough<br />
space behind the unit, use factory supplied<br />
mounting sleeve.<br />
2. Secure the mounting sleeve by using<br />
a screwdriver to bend the metal tabs<br />
(90°) into place.<br />
3. Install the unit as illustrated.<br />
Dashboard<br />
Mounting sleeve<br />
Screw<br />
Rubber bush<br />
Removing the Unit<br />
1. Extend top and bottom of the trim<br />
ring outwards to remove the trim<br />
ring. When reattaching the trim ring,<br />
push the trim ring onto the unit until<br />
it clicks. (If the trim ring is attached<br />
upside down, the trim ring will not fit<br />
properly.)<br />
• It becomes easy to remove the trim ring if the<br />
front panel is released.<br />
Trim ring<br />
2. Insert the supplied extraction keys<br />
into both sides of the unit until they<br />
click into place.<br />
3. Pull the unit out of the dashboard.<br />
DIN Rear-mount<br />
1. Extend top and bottom of the trim<br />
ring outwards to remove the trim<br />
ring. When reattaching the trim ring,<br />
push the trim ring onto the unit until<br />
it clicks. (If the trim ring is attached<br />
upside down, the trim ring will not fit<br />
properly.)<br />
• It becomes easy to remove the trim ring if the<br />
front panel is released.<br />
Trim ring<br />
2. Determine the appropriate position<br />
where the holes on the bracket and<br />
the side of the unit match.<br />
3. Tighten two screws on each side.<br />
• Use either truss screws (5 mm × 8 mm)<br />
or flush surface screws (5 mm × 9 mm),<br />
depending on the shape of screw holes in the<br />
bracket.<br />
Screw<br />
<strong>130</strong>.com.ua<br />
Autogood products internet store http://<strong>130</strong>.com.ua<br />
Factory radio mounting bracket<br />
Dashboard or Console