manuale d' uso e manutenzione e lista parti di ricambio - Falconlift
manuale d' uso e manutenzione e lista parti di ricambio - Falconlift
manuale d' uso e manutenzione e lista parti di ricambio - Falconlift

Create successful ePaper yourself
Turn your PDF publications into a flip-book with our unique Google optimized e-Paper software.
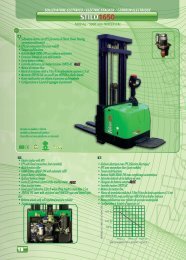
Manuale d’ <strong>uso</strong> e Manutenzione e <strong>lista</strong> <strong>parti</strong> <strong>di</strong> ricaMbio<br />
operating and Maintenance Manual and parts list<br />
Manuel d’utilisation et liste des pieces detachees<br />
Live A W RLD in GREEN<br />
the italian brand<br />
iso9001<br />
iso14001
Creare la prima pagina con la nuova grafica Falcon 2011 e la foto dei nuovi tpl elettrici e con le tre<br />
traduzioni <strong>manuale</strong> <strong>d'</strong>isruzioni e <strong>lista</strong> <strong>parti</strong> <strong>di</strong> <strong>ricambio</strong>.<br />
Istruzioni originali<br />
Note: Do not use the powered pallet truck before rea<strong>di</strong>ng and understan<strong>di</strong>ng these operation instructions.<br />
Index<br />
Foreword<br />
1. Operation Safety Regulations<br />
2. Technical Specifications<br />
3. Maintaining, Charging and Replacing the Battery<br />
4. Operation instructions<br />
5 Maintenance of the powered pallet truck<br />
6. Troubleshooting chart<br />
7. Circuit <strong>di</strong>agram<br />
8. Spare parts catalogue.<br />
Foreword<br />
Welcome to use this powered pallet truck. For your safety and correct operation, please carefully read this<br />
instruction book and warnings on the powered pallet truck before using it.<br />
These Operation Instructions of the powered pallet truck are e<strong>di</strong>ted for you to completely acquire and<br />
master the safety operation of the powered pallet truck.<br />
Safety specifications and special notices are marked with the following signs:<br />
1. Safety specification must be observed before use to avoid personal injury.<br />
2. Notice must be observed before use to avoid equipment damage.<br />
3. General notice and specification before use.<br />
The majority of this powered pallet truck consists of steel, it can be completely recycled. Waste material in<br />
conjunction with repairs, maintenance, cleaning or scrapping, must be collected and <strong>di</strong>sposed of in an environmentfriendly<br />
way and in accordance with the <strong>di</strong>rectives of respective countries. Such work must be carried out in areas<br />
intended for this purpose. Recyclable material should be taken care of by specialized authorities. Environmentally<br />
hazardous waste, such as oil filters, batteries and electronics, will have a negative effect on the environment, or health,<br />
if handled incorrectly.<br />
The information reported herein are based on data available at the time of printing. Our products are constantly<br />
being developed and renewed. Therefore, we reserve the right to mo<strong>di</strong>fy our own products at any moment without prior<br />
notice and liability in any sanction. As a result, it is suggested to always verify possible updates and changes.<br />
1. Operation Safety Regulations<br />
1.1 The Operator Requirements<br />
The powered pallet truck must be operated by a trained person who can demonstrate moving and operating<br />
the powered pallet truck to the user and can instruct vividly the user how to operate it.<br />
ISTRUZIONI ORIGINALI<br />
ORIGINAL<br />
INSTRUCTION MANUAL<br />
TRADUCTION MANUEL D’INSTRUCTIONS
1.2 Rights, Obligations and Responsibilities of the Operator<br />
The operator must fully understand his rights and obligations and have received the training of the powered<br />
pallet truck operation. At the same time, the operator must master the related descriptions in the Operation<br />
Instructions. In the operation of walking control truck, the operator should wear safety boots.<br />
1.3 Forbidden use by unauthorized persons<br />
During operation, the operator must be responsible for the powered pallet truck and prevent unauthorized<br />
persons in driving or operating the truck. The powered pallet truck is strictly forbidden to lift or carry<br />
persons.<br />
1.4 Failure and fault<br />
In case of any failure or fault, please notify the administrator imme<strong>di</strong>ately. In case that the powered pallet<br />
truck cannot work safely (such as wheel worn-out or brake fault), please stop using it until they are properly<br />
repaired.<br />
1.5 Repair<br />
Without professional training and specific authorization, the operator is forbidden to repair or change any<br />
part of the powered pallet truck. Any change of installation position of switches and safety devices is strictly<br />
forbidden by the operator to avoid efficiency decrease of the powered pallet truck.<br />
All spare parts from original manufacturer are qualified by Quality Assurance Authorities. To ensure the safety<br />
and reliability of truck operation, only spare parts from manufacturer can be applied. The parts replaced, inclu<strong>di</strong>ng oils<br />
and fuels, must be <strong>di</strong>sposed accor<strong>di</strong>ng to related environmental protection regulations.<br />
1.6 Danger area<br />
Danger area refers to the area where the powered pallet truck or its lifting device (such as fork or<br />
attachment) is working or lifting, which brings potential dangerous factors to persons or the area for load<br />
transportation. Generally, the range of danger area extends to the point of load lowering or truck attachment<br />
lowering.<br />
Unauthorized persons must be kept away from danger area. For any circumstance with potential danger to persons,<br />
the operator must give warning notice. If someone still stays in the danger area while being requested to leave, the<br />
operator must stop the powered pallet truck imme<strong>di</strong>ately.<br />
1.7 Working in hazardous environments<br />
A powered pallet truck operating in an area where there is a risk, or in any other high-risk area, should be<br />
specially equipped for the purpose.<br />
The powered pallet truck is not normally equipped for these situations.<br />
1.8 Safety devices and warning signs<br />
Enough importance should be attached to safety devices, warning signs and warning notices introduced<br />
above in Operation Instructions.<br />
1.9 Driving in public areas<br />
The powered pallet truck should not be driven on public roads outside a specific area.<br />
1.10 Distance between vehicles<br />
Remember that the vehicle in front of you may brake suddenly therefore keep a reasonable <strong>di</strong>stance.<br />
1.11 Passengers<br />
Passengers should not ride on the powered pallet truck unless otherwise in<strong>di</strong>cated on it.<br />
1.12 Use in elevator and operation on loa<strong>di</strong>ng platform<br />
The powered pallet truck may only be driven into an elevator and operate on loa<strong>di</strong>ng platform if it has been<br />
authorized. The elevator and loa<strong>di</strong>ng platform with enough load capacity without affecting powered pallet<br />
truck operation can be used for transportation of powered pallet truck under the permission of the its user.<br />
The operator must confirm this point before entering elevator or loa<strong>di</strong>ng platform. The cargo should be<br />
placed in the front side at a proper position when the powered pallet truck enters elevator to avoid touch to<br />
the walls of elevator. In case of simultaneous use of elevator by the powered pallet truck and passengers,<br />
passengers must enter the elevator after proper parking of the powered pallet truck and walk out of the<br />
elevator before moving it.<br />
1.13 Operation in narrow aisles and working areas<br />
In <strong>parti</strong>cular circumstances when the powered pallet truck is passing a narrow aisle, unauthorized persons<br />
ISTRUZIONI ORIGINALI<br />
ORIGINAL<br />
INSTRUCTION MANUAL<br />
TRADUCTION MANUEL D’INSTRUCTIONS
must leave away from the working area and cargo must be placed in a special vessel.<br />
1.14 Operation management<br />
Driving speed must be applicable for local con<strong>di</strong>tions. Low speed is requested for curve driving, narrow<br />
aisle passing, swing door passing or driving in blocked field. The operator must be capable to measure the<br />
braking <strong>di</strong>stance to front truck by sight and control his powered pallet truck continuously. Sudden brake<br />
(except in emergency), quick U-turn and overtaking in a blocked field are prohibited. Operating with body<br />
reaching out of powered pallet truck and carrying persons is strictly forbidden.<br />
1.15 Visibility<br />
The operator must focus on the driving <strong>di</strong>rection to ensure clear sight for the road con<strong>di</strong>tions ahead. In case<br />
the carried cargo interrupts the sight, reverse driving is requested. If it doesn’t help in this way, there must<br />
be another person walking ahead of the powered pallet truck to give guidance and warning.<br />
1.16 Passing a slope<br />
The permitted slope in a narrow aisle for the powered pallet truck passing must be clean and anti-slip.<br />
Driving on slops stipulated in technical specifications (instructions manual) is permitted. The carried cargo<br />
must face to upward <strong>di</strong>rection of slope. U-turning or parking the powered pallet truck on a slope is<br />
prohibited. On passing a slope, driving is requested at low speed. At the same time, the operator must be<br />
always prepared to brake and stop.<br />
1.17 Floor Load<br />
It is advisable to carefully check notices and <strong>di</strong>rections about the maximum floor load or maximum wheel<br />
pressure to ensure that this is not exceeded.<br />
1.18 Transports<br />
The powered pallet truck should always be driven with the height of forks to the lowest position except<br />
when placing or removing a load. Stan<strong>di</strong>ng on or sitting on the truck had better be driven in the opposite<br />
<strong>di</strong>rection of the forks when possible. This will allow better visibility and maneuverability. Driving with the<br />
forks pointing forward may cause the truck to maneuver unexpectedly.<br />
1.19 Load characteristics<br />
The cargo should be carried correctly, safely and reliably. Carrying a cargo with stacking-height excee<strong>di</strong>ng<br />
top of truck or protection shield is strictly forbidden.<br />
1.20 Truck on another vehicle’s loa<strong>di</strong>ng platform or on a gangway<br />
Before the powered pallet truck is driven from a loa<strong>di</strong>ng bay and onto the platform of a lorry or a wagon,<br />
you should always check the maximum load capacity of the gangway. There should also be devices that<br />
prevent the gangway from sli<strong>di</strong>ng. The driver also should remember to check the maximum load capacity of<br />
the vehicle that you intend to drive onto. There should also be devices (e.g. brake blocks) that prevent the<br />
vehicle from moving.<br />
1.21 Parking<br />
The powered pallet truck should not be left unattended other than in specified parking areas. The powered<br />
pallet truck should always be parked on a level surface. The forks must be lowered to their lowest position.<br />
Always turn the ignition to the “OFF” position. Unauthorized personnel should not use the powered pallet<br />
truck. Always remove the ignition key from the electrical lock when leaving the powered pallet truck.<br />
If the powered pallet truck is left unused for a prolonged period without being recharged (e.g. between two shifts),<br />
the battery plug should be <strong>di</strong>sconnected.<br />
1.22 Signalling<br />
It is advisable to use the signal horn to attract attention.<br />
1.23 Protective shoes<br />
Protective shoes should be worn when working with truck accor<strong>di</strong>ng to EU standards EN-345:1-S1.<br />
1.24 Ad<strong>di</strong>tional units / Trailers<br />
Authorized representative should be contacted if, after delivery, the powered pallet truck is equipped with<br />
ad<strong>di</strong>tional units, tows hitch equipment for trailers or other accessories which could influence the stability or<br />
braking capacity of the truck.<br />
2. Technical Specifications<br />
ISTRUZIONI ORIGINALI<br />
ORIGINAL<br />
INSTRUCTION MANUAL<br />
TRADUCTION MANUEL D’INSTRUCTIONS
aking capacity of the truck.<br />
2. Technical Specifications<br />
2.1 Main Purpose and Application<br />
This powered pallet truck is specially designed for conveyance on level roads. With compact structure, this<br />
powered pallet truck is quite applicable for plants, workshops, wharfs and small warehouses. At the same<br />
time, it can be used to load/unload cargos on trucks and the Load capacity is marked on the powered pallet<br />
truck data plate.<br />
2.2 Technical Features<br />
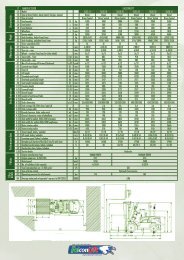
2.2.1 Specification Sheets<br />
Inserire le schede tecniche del commisionatore in oggetto<br />
1.1 COSTRUTTORE / MANUFACTURER / CONSTRUCTEUR FALCONLIFT<br />
2.2.2 Technical data-Standard version<br />
Description 1.2 of Modello/Model the technical designation/Désignation data accor<strong>di</strong>ng du constructeur to VDI 2198. Technical mo<strong>di</strong>fications and ad<strong>di</strong>tions FLDINO25 reserved.<br />
2.2.3 EN standards<br />
1.3 Alimentazione/Power supply/Mode de translation Elettrico/Electric/Electrique<br />
Duration of 1.4noise Tipo <strong>di</strong> guida/Type level must of control/ be Mode < de 70dB(A); conduite Refers to ISO4871 Standard<br />
Su pedana/Rider/Sur platforme<br />
Noise surroun<strong>di</strong>ng 1.5 Portata/Load capacity/ the truck Capacité is nominale evaluated as average complying with standard rules. QNoise kg on traveling, 2500lifting<br />
and<br />
1.6 Baricentro del carico/Load centre/Centre de gravité de la charge nominale c mm 600<br />
racing is measured by hearing.<br />
1.8 Distanza del carico/Load <strong>di</strong>stance/Déport avant de la charge x mm 973<br />
Electromagnetic 1.9 Interasse/Wheelbase/Empattement Compatibility (EMC)<br />
y mm 1520<br />
Manufacturer 2.1 Peso confirms proprio/Service the weight/Poids tests à vide of electromagnetic emission, immunological interference kg and 543 electrostatic<br />
Caratteristiche/<br />
Characteristics/<br />
Caractéristiques<br />
elimination 2.2are<br />
conducteur-côté evaluated charge complying with EN12895 and other standards included. kg<br />
Any changes 2.3<br />
Pressione sugli assali, senza carico lato guida-lato carico/Axle loa<strong>di</strong>ng, unladen front-rear/Charge par essieu à vide côté<br />
conducteur-côté in parts charge of the electrical system can be performed on written approval by the kg manufacturer.<br />
2.2.4 Application 3.1 Gommatura/Tyres/Equipement Con<strong>di</strong>tions roues<br />
Poliuretano/Polyurethane/<br />
Polyuréthane<br />
Surroun<strong>di</strong>ng 3.2 temperature<br />
Dimensioni ruote - lato guida/ Tyre size – front /Dimensions des roues côté conducteur mm Ø 248*75<br />
3.3 Dimensioni ruote - lato carico/ Tyre size – rear / Dimensions des roues côté charge mm Ø 80*80<br />
Operation range: 5℃~40℃<br />
3.4 Ruote pivottanti/Castor wheels/Roue pivotante mm Ø 115*55<br />
During continuous operation of the powered pallet truck under con<strong>di</strong>tions below 5 ℃ or in low<br />
3.5<br />
Numero ruote (x= trazione) lato guida-lato carico / Wheels – number (x= <strong>di</strong>ve wheel) front-rear / Roues, nombre (x = roue<br />
motrice) côté conducteur-côté charge<br />
1x +2 +4<br />
temperature 3.6 and Carreggiata high anteriore/Track humi<strong>di</strong>ty, width-front special / Voie - côté protections conducteur should be taken for some certain b10 mm instruments. 575<br />
2.2.5 Illustration 3.7 Carreggiata of posteriore/Track Labels and width rear/Voie Data - Plate côté charge on the Powered pallet Truck<br />
b11 mm 355<br />
Mettere le 4.2 immagini Altezza montante a abbassato/Lowered pag 6 e 7 del mast height/Hauteur catalogo du WWP mât abaissé Le immagin con la scritta descrittiva<br />
h1 mm<br />
Es<br />
Pesi/<br />
Weight/ Poids<br />
Ruote e gommature/ Wheels types<br />
Roues et bandages<br />
Dimensioni base/ Basic <strong>di</strong>mensions/ Dimensions<br />
Raise Button<br />
Horn button<br />
Forward<br />
4.33<br />
Backward<br />
Pressione sugli assali, con carico lato guida-lato carico/Axle loa<strong>di</strong>ng, laden front-rear / Charge par essieu avec charge côté<br />
4.3 Alzata libera/ Free Lift/Levée libre h2 mm<br />
4.4 Altezza <strong>di</strong> sollevamento/Lift height/Hauteur de levée h3 mm 125<br />
4.5 Altezza montante sfilato/Extended mast height/Hauteur hors tout mât déployé h4 mm<br />
4.9<br />
Altezza timone in posizione <strong>di</strong> guida min. - max./Tiller height in drive position min. - max. / Hauteur du timon en position de<br />
conduite min. - max.<br />
h14 mm 1425<br />
4.15 Altezza forche abbassate/Lowered forks height/Hauteur sur fourches, en position basse h13 mm 85<br />
4.19 Lunghezza totale/Overall lenght/Longueur totale hors tout l1 mm 1910 (Piegato/Folded/Plié)/ 2325<br />
4.20 Lunghezza compreso spessore forche/Lenght to front face of forks/Longueur de la <strong>parti</strong>e motrice, jusqu‘à la face avant des fourches l2 mm 760<br />
4.21 Larghezza totale/Overall width/Largeur totale du châssis b1 mm 780<br />
4.22 Dimensioni forche/Forks <strong>di</strong>mensions/Dimensions des fourches s/e/l mm 55*185*1150<br />
4.25 Scartamento esterno forche/Width over forks/Ecartement extérieur des fourches b5 mm 540<br />
4.32 Luce libera a metà passo/Ground clearance at the centre of wheelbase/Garde au sol au milieu de l‘empattement m2 mm 30<br />
Larghezza corsia <strong>di</strong> lavoro con pallet 1000x1200 trasversale/Aisle width for pallet 1000x1200 crossways/Largeur d‘allée pour<br />
palette 1000 x 1200 en largeur<br />
4.34<br />
Larghezza corsia <strong>di</strong> lavoro con pallet 800x1200 longitu<strong>di</strong>nale/Aisle width for pallets 800x1200 lengthways/Largeur d‘allée<br />
pour palette 800 x 1200 en longueur<br />
Ast mm 2460<br />
Ast mm 2310<br />
4.35 Raggio <strong>di</strong> volta/Outer turning ra<strong>di</strong>us/Rayon de giration Wa mm 1725<br />
4.36 Angolo <strong>di</strong> curvatura b13 °<br />
Please understand the meaning of data plates before use.<br />
5.1 Velocità <strong>di</strong> traslazione con senza carico / Travel speed, laden-unladen / Vitesse de translation avec-sans charge km/h 5/7<br />
In case of quality problems or purchase of spare parts, please in<strong>di</strong>cate the series No. and part code on the data plate.<br />
Prestazioni/<br />
Performance data/<br />
Performances<br />
5.2 Velocità <strong>di</strong> sollevamento con - senza carico / Lift speed, laden-unladen / Vitesse de levée avec-sans charge mm/s 0.056/ 0.06<br />
5.3 Velocità <strong>di</strong> <strong>di</strong>scesa con-senza carico / Lowering speed, laden-unladen / Vitesse de descente avec-sans charge mm/s 0.057/ 0.059<br />
3. Maintaining, Charging and Replacing the Battery<br />
5.8 Pendenza massima superabile con-senza carico / Max. grea<strong>di</strong>bility, laden-unladen / Rampe maximum avec-sans charge<br />
3.1 Maintenance<br />
% 5/7<br />
The various 5.10 Rechargeable Freno <strong>di</strong> esercizio/Service brake/Frein sealed de Lead service<br />
Elettromagnetico/ Electromagnetic/<br />
Acid battery (VRLA) is used in this pallet truck which Electromagnétique needs less<br />
maintenance. 6.1 Motore <strong>di</strong> traslazione, potenza s2 60min/Drive motor hourly rating s2/Moteur de translation, puissance s2 = 60 mn kw 1.5 AC<br />
3.2 Battery 6.2 Charging<br />
Motore <strong>di</strong> sollevamento,potenza s3 15%/Lift motor rating at s3 15%/Moteur de levée, puissance s3 = 15% kw 2 DC<br />
This powered 6.3<br />
Batteria secondo DIN 43531/35/36 A,B,C,non / Battery equipment acc. to DIN 43531/35/36 A,B,C,non / Batterie selon la<br />
norme pallet DIN 43531/35/36/ is equipped A,B,C,nonwith<br />
a specific charger to charge the battery.<br />
DIN 43535-1998<br />
Before 6.4 connecting Voltaggio e capacità to nominale charge della the batteria battery, k5/Battery voltage make and sure nominal capacity the battery k5/Tension de charger, la batterie et capacité emergency nominale K5 switch V/Ah and electric 24V/315Ah lock switch<br />
at off position. 6.5<br />
Peso batteria/Battery weight/Poids de la batterie<br />
kg<br />
210<br />
Dimensioni Please cassone charge batteria/Battery the battery box size/ Dimensions in a com<strong>parti</strong>ment dry and batterie air-circulated environment and keep mm away from 760*210*556 fire source.<br />
Under truck 8.1operation, Tipo <strong>di</strong> comando the <strong>di</strong> marcia/Type battery of drive charging control/Commande should de vitesse be performed no less than once per month.<br />
CURTIS 1230-2402<br />
8.4<br />
Soglia rumore secondo EN 12053, orecchio operatore/Average noise peak at operator’s ear acc. to EN 12053/Niveau sonore<br />
The battery of moyen, the mesuré powered à l‘oreille du cariste pallet selon EN12053<br />
dB(A)
2.2.1 Specification Sheets<br />
2.1 Main Inserire Purpose le schede and tecniche Application del commisionatore in oggetto<br />
2.2.2 This powered Technical pallet data-Standard truck is specially versiondesigned<br />
for conveyance on level roads. With compact structure, this<br />
powered Description pallet of the truck technical is quite data applicable accor<strong>di</strong>ng for to plants, VDI 2198. workshops, Technical wharfs mo<strong>di</strong>fications and small and warehouses. ad<strong>di</strong>tions reserved. At the same<br />
2.2.3 time, EN it can standards be used to load/unload cargos on trucks and the Load capacity is marked on the powered pallet<br />
Duration truck data of plate. noise level must be < 70dB(A); Refers to ISO4871 Standard<br />
2.2 Noise Technical surroun<strong>di</strong>ng Features the truck is evaluated as average complying with standard rules. Noise on traveling, lifting and<br />
racing 2.2.1 Specification is measured by Sheets hearing.<br />
Electromagnetic Inserire le schede Compatibility tecniche (EMC) del commisionatore in oggetto<br />
Manufacturer 2.2.2 Technical confirms data-Standard the tests version of electromagnetic emission, immunological interference and electrostatic<br />
elimination Description are of the evaluated technical complying data accor<strong>di</strong>ng with EN12895 to VDI 2198. and other Technical standards mo<strong>di</strong>fications included. and ad<strong>di</strong>tions reserved.<br />
2.2.3 Any EN changes standards in parts of the electrical system can be performed on written approval by the manufacturer.<br />
Duration 2.2.4 Application of noise Con<strong>di</strong>tions<br />
level must be < 70dB(A); Refers to ISO4871 Standard<br />
Surroun<strong>di</strong>ng Noise surroun<strong>di</strong>ng temperature the truck is evaluated as average complying with standard rules. Noise on traveling, lifting and<br />
racing Operation is measured range: 5℃~40℃ by hearing.<br />
Electromagnetic During continuous Compatibility operation (EMC) of the powered pallet truck under con<strong>di</strong>tions below 5 ℃ or in low<br />
temperature Manufacturer and confirms high humi<strong>di</strong>ty, the tests special of electromagnetic protections should emission, be taken immunological for some certain interference instruments. and electrostatic<br />
2.2.5 elimination Illustration are evaluated of Labels complying and Data Plate with EN12895 on the Powered and other pallet standards Truck included.<br />
Mettere Any changes le immagini in parts a pag of the 6 electrical e 7 del catalogo system can WWP be performed Le immagin on written con la approval scritta descrittiva by the manufacturer.<br />
Es 2.2.4 Application Con<strong>di</strong>tions<br />
Surroun<strong>di</strong>ng temperature<br />
Operation range: 5℃~40℃<br />
During continuous operation of the powered pallet truck under con<strong>di</strong>tions below 5 ℃ or in low<br />
temperature and high humi<strong>di</strong>ty, special protections should be taken for some certain instruments.<br />
2.2.5 Illustration of Labels and Data Plate on the Powered pallet Truck<br />
Mettere le immagini a pag 6 e 7 del catalogo WWP Le immagin con la scritta descrittiva<br />
Raise Es Button<br />
Horn button<br />
Forward<br />
Backward<br />
Please understand the meaning of data plates before use.<br />
Raise In case Button of quality problems or purchase of spare parts, please in<strong>di</strong>cate the series No. and part code on the data plate.<br />
Horn button<br />
Forward<br />
3. Maintaining, Charging and Replacing the Battery<br />
Backward 3.1 Maintenance<br />
The various Rechargeable sealed Lead Acid battery (VRLA) is used in this pallet truck which needs less<br />
maintenance.<br />
3.2 Please Battery understand Chargingthe<br />
meaning of data plates before use.<br />
This In case powered of quality pallet problems is equipped or purchase with of a spare specific parts, charger please in<strong>di</strong>cate to charge the the series battery. No. and part code on the data plate.<br />
Before connecting to charge the battery, make sure the battery charger, emergency switch and electric lock switch<br />
at off position. Please charge 3. the Maintaining, battery in a dry Charging and air-circulated and Replacing environment the Battery and keep away from fire source.<br />
Under 3.1 Maintenance truck operation, the battery charging should be performed no less than once per month.<br />
The various battery Rechargeable of the powered sealed pallet Lead truck Acid should battery be (VRLA) charged is duly used and in this regularly. pallet truck When which the capacity needs less is<br />
maintenance.<br />
3.2 Battery Charging<br />
This powered pallet is equipped with a specific charger to charge the battery.<br />
Before connecting to charge the battery, make sure the battery charger, emergency switch and electric lock switch<br />
at off position. Please charge 6 the battery in a dry and air-circulated environment and keep 7 away from fire source.<br />
Under truck operation, the battery charging should be performed no less than once per month.<br />
The battery of the powered pallet truck should be charged duly and regularly. When the capacity is<br />
6<br />
ISTRUZIONI ORIGINALI<br />
ORIGINAL<br />
INSTRUCTION MANUAL<br />
TRADUCTION MANUEL D’INSTRUCTIONS
consumed, the alarm will start flashing on the battery capacity meter during operation. At this stage, please<br />
charge the battery imme<strong>di</strong>ately.<br />
Fully automatic charge: fully automatic and smart charger is applied for the powered pallet truck. When the<br />
plug on connecting plate of the powered pallet truck is pulled out and connected to the power, the charger<br />
in<strong>di</strong>cator lights in red. The charger will adjust the current accor<strong>di</strong>ng to residual capacity of the battery<br />
automatically, which ensures the course of charge in the best state. After charging the battery, the charger<br />
in<strong>di</strong>cator lights green and the charging course stops with power off automatically. The charging course<br />
generally lasts 7-8 hours.<br />
Press emergency parking switch to off position<br />
Open the cover of battery case<br />
Take out the connector plug of battery on the truck<br />
Now, open all the water fee<strong>di</strong>ng cock caps<br />
Connect the output plug of the charger with the connector (input) plug of battery and then turn on the<br />
switch of the charger.<br />
It is prohibited to charge the battery before it is used up. Otherwise, the battery could be damaged.<br />
During the charging course of battery, all water fee<strong>di</strong>ng cock caps of each battery cell must be opened to maintain<br />
air circulation con<strong>di</strong>tions. Before charging, make sure no metal objects on the battery and check if there is any obvious<br />
fault on joints of all the cables and the plugs. All safety instructions, inclu<strong>di</strong>ng supply rules and charging preparation<br />
procedures, should be strictly observed.<br />
3.2.1 Initial charging<br />
1. If the electrolyte of the battery has <strong>di</strong>minished or poured out, acids should be poured in, which consist of<br />
exclusive sulfuric acid and water of lead acids. The specific gravity of the added electrolyte should be<br />
1.280+0.005 at normal temperature of 25 o C. Pour the configured electrolyte into the battery with fluid level<br />
15-20mm higher than the protective slice.<br />
Only when the cell temperature drops below 35 o C, it can be connected to DC and charged.<br />
2. Initial charges are conducted in two stages: A. When the terminal voltage of the cells is less than 2.4V, the<br />
current should be 0.5Am. B. When its voltage rises to 2.4V, the current should be converted into stage 2,<br />
0.25A. Continue to charge until air bubbles come out from the electrolyte. Make sure to keep the cell voltage<br />
under constant current-steady for 3 hours. When the electrolyte density reaches 1.280+0.005, it will remain<br />
unchanged within 3 hours. At this moment, the total quantity of electric charge should be 4-5 times the rated<br />
capacity and the charging time will be 70 hours.<br />
3.2.2 Balance charging<br />
When in use, no uniformity of voltage capacity, electrolyte and concentration may occur. Through balanced<br />
charging, such no uniformity can be eliminated and all cells can be of uniform con<strong>di</strong>tions.<br />
On the following con<strong>di</strong>tion, balance charging should be used:<br />
1) Cells whose <strong>di</strong>scharging voltages are usually below the final voltage (1.7V/cell).<br />
2) Cells with heavy <strong>di</strong>scharging current (e.g. the driving motor and lifting motor operate synchronously).<br />
3) Battery has not been timely recharged after <strong>di</strong>scharged.<br />
4) Under charged battery or battery not used for a long time.<br />
Steps for balance charge:<br />
1) Charging with current of 0.1I5A.<br />
2) When the voltage reaches 2.5V and the air bubbles come out from the electrolyte, keep charging with<br />
the current of 0.05 I5A.<br />
3) When the battery is fully charged, stop charging for half an hour. Then keep on charging with the<br />
current of 0.025 I5A for 1 hour.<br />
4) After stop charging for half an hour, keep charging with the current of 0.025 I5A for 1 hour again.<br />
5) Repeat step 4 unless the air bubbles come out from the electrolyte as soon as the charger is connected to<br />
the power supply.<br />
Balance charging is essential monthly for the battery in use.<br />
3.3 Battery in<strong>di</strong>cator<br />
Battery capacity meter: Discharging status of battery is in<strong>di</strong>cated on battery capacity meter with ten<br />
ISTRUZIONI ORIGINALI<br />
ORIGINAL<br />
INSTRUCTION MANUAL<br />
TRADUCTION MANUEL D’INSTRUCTIONS
in<strong>di</strong>cator bars for each 10% increase. With the consumption of battery capacity, the lighting bars will<br />
descend downwards from the top. The mark of “Alarm” will appear when residual capacity of standard<br />
battery at 30%. Now, the battery is ready for charging.<br />
The mark of “Alarm” and a flash “Stop” keeps flashing will appear when residual capacity of standard<br />
battery at 20%. Now, the lifting function of the powered pallet truck is automatically cut off and locked.<br />
Mettere le immagini a pag 8 e 9 del catalogo WWP le immagini con la scritta descrittiva<br />
battery sufficient<br />
ecc<br />
If the battery capacity meter in<strong>di</strong>cates capacity insufficient soon after lifting system works, the lifting function will<br />
be resumed only after recharging the battery to at least 70% of the capacity.<br />
4 Operation instructions<br />
4.1 Starting up of Truck<br />
The operator must confirm no persons staying in the danger area before starting and operating the truck or lifting<br />
cargos.<br />
Routine Checking before Starting up<br />
Check if any external truck defects (especially wheels and pallets)<br />
Check if battery fixed firmly and cable connected properly<br />
Truck starting up<br />
Rotate and turn on emergency parking switch 8<br />
Insert key into electric lock switch and turn right to position “I”<br />
Battery capacity meter in<strong>di</strong>cates the current capacity<br />
Check the function of horn<br />
Check the braking function of control handle<br />
Now, the preparation before starting up of the truck is completed.<br />
4.2 The Truck Operation<br />
4.2.1 Operation of Starting up, Driving and Parking<br />
Enough caution must be attached for starting up and driving of the truck, especially when the person body reaching<br />
out of the truck. Make sure that during driving, it is prohibited to carry any other person.<br />
Emergency parking<br />
When parking urgently, press emergency parking switch and then all electric control functions are cut off.<br />
Forced braking<br />
If you are forced to stop, release the control handle and then the truck is automatically braked (emergency<br />
stop). The control handle will turn into the above braking range (see the picture) nserire la #igura a pag. del ti$one<br />
In case of slow turning of control handle into braking range, be sure to find out the fault and repair it. If necessary,<br />
please replace the gas spring of the handle.<br />
Starting up<br />
The in<strong>di</strong>cator battery bars case for must each be covered 10% increase. and checked With to be the reliable consumption before starting of battery up the truck. capacity, the lighting bars will<br />
Starting descend up downwards the truck from the top. The mark of “Alarm” will appear when residual capacity of standard<br />
The battery driving at speed 30%. Now, is controlled the battery by the is ready controller. for charging.<br />
The Move mark the of control “Alarm” handle and into a flash driving “Stop” range keeps flashing will appear when residual capacity of standard<br />
battery Adjust at the 20%. controller Now, the to lifting the <strong>di</strong>rection function required of the powered and the truck pallet is truck moving is automatically towards the cut selected off and <strong>di</strong>rection. locked.<br />
Driving<br />
Mettere Swing le the immagini control handle a pag leftwards 8 e 9 del catalogo or rightwards WWP to le drive. immagini con la scritta descrittiva<br />
Driving battery on sufficient a Slope<br />
ecc<br />
If the battery capacity meter in<strong>di</strong>cates capacity insufficient soon after lifting system works, the lifting function will<br />
be resumed only after recharging the battery to at least 70% of the capacity.<br />
4 Operation instructions<br />
4.1 Starting up of Truck<br />
The operator must confirm no persons staying in the danger area before starting and operating the truck or lifting<br />
cargos.<br />
Routine Checking before Starting up<br />
Check if any external truck defects (especially wheels and pallets)<br />
Check if battery fixed firmly and cable connected properly<br />
Truck starting up<br />
Rotate and turn on emergency parking switch<br />
ISTRUZIONI ORIGINALI<br />
ORIGINAL<br />
INSTRUCTION MANUAL<br />
TRADUCTION MANUEL D’INSTRUCTIONS
If the battery capacity meter in<strong>di</strong>cates capacity insufficient soon after lifting system works, the lifting function will<br />
be resumed only after recharging the battery to at least 70% of the capacity.<br />
4 Operation instructions<br />
4.1 Starting up of Truck<br />
The operator must confirm no persons staying in the danger area before starting and operating the truck or lifting<br />
cargos.<br />
Routine Checking before Starting up<br />
Check if any external truck defects (especially wheels and pallets)<br />
in<strong>di</strong>cator bars for each 10% increase. With the consumption of battery capacity, the lighting bars will<br />
Check if battery fixed firmly and cable connected properly<br />
descend downwards from the top. The mark of “Alarm” will appear when residual capacity of standard<br />
Truck starting up<br />
battery at 30%. Now, the battery is ready for charging.<br />
Rotate and turn on emergency parking switch<br />
The mark of “Alarm” and a flash “Stop” keeps flashing will appear when residual capacity of standard<br />
Insert key into electric lock switch and turn right to position “I”<br />
battery at 20%. Now, the lifting function of the powered pallet truck is automatically cut off and locked.<br />
Battery capacity meter in<strong>di</strong>cates the current capacity<br />
Check the function of horn<br />
Mettere le immagini a pag 8 e 9 del catalogo WWP le immagini con la scritta descrittiva<br />
Check the braking function of control handle<br />
battery sufficient<br />
Now, the preparation before starting up of the truck is completed.<br />
ecc<br />
4.2 The Truck Operation<br />
4.2.1 If the battery capacity meter in<strong>di</strong>cates capacity insufficient soon after lifting system works, the lifting function will<br />
Operation of Starting up, Driving and Parking<br />
be resumed only after recharging the battery to at least 70% of the capacity.<br />
Enough caution must be attached for starting up and driving of the truck, especially when the person body reaching<br />
4 Operation instructions<br />
out of the truck. Make sure that during driving, it is prohibited to carry any other person.<br />
4.1 Starting up of Truck<br />
Emergency parking<br />
The operator must confirm no persons staying in the danger area before starting and operating the truck or lifting<br />
When parking urgently, press emergency parking switch and then all electric control functions are cut off.<br />
cargos.<br />
Forced braking<br />
Routine Checking before Starting up<br />
If you are forced to stop, release the control handle and then the truck is automatically braked (emergency<br />
Check if any external truck defects (especially wheels and pallets)<br />
stop). The control handle will turn into the above braking range (see the picture) nserire la #igura a pag. del ti$one<br />
Check if battery fixed firmly and cable connected properly<br />
In case of slow turning of control handle into braking range, be sure to find out the fault and repair it. If necessary,<br />
Truck starting up<br />
please replace the gas spring of the handle.<br />
Rotate and turn on emergency parking switch<br />
Starting up<br />
Insert key into electric lock switch and turn right to position “I”<br />
The battery case must be covered and checked to be reliable before starting up the truck.<br />
Battery capacity meter in<strong>di</strong>cates the current capacity<br />
Starting up the truck<br />
Check the function of horn<br />
The driving speed is controlled by the controller.<br />
Check the braking function of control handle<br />
Move the control handle into driving range<br />
Now, the preparation before starting up of the truck is completed.<br />
Adjust the controller to the <strong>di</strong>rection required and the truck is moving towards the selected <strong>di</strong>rection.<br />
4.2 The Truck Operation<br />
Driving<br />
4.2.1 Operation of Starting up, Driving and Parking<br />
Swing the control handle leftwards or rightwards to drive.<br />
Enough caution must be attached for starting up and driving of the truck, especially when the person body reaching<br />
Driving on a Slope<br />
out of the truck. Make sure that during driving, it is prohibited to carry any other person.<br />
Emergency parking<br />
When parking urgently, press emergency parking switch and then all electric control functions are cut off.<br />
Forced braking<br />
If you are forced to stop, release the control handle and then the truck is automatically braked (emergency<br />
stop). The control handle will turn into the above braking range (see the picture) nserire la #igura a pag. del ti$one<br />
In case of slow turning of control handle into braking range, be sure to find out the fault and repair it. If necessary,<br />
please replace the gas spring of the handle.<br />
Starting up<br />
The battery case must be covered and checked to be reliable before starting up the truck.<br />
Starting up the truck<br />
The driving speed is controlled by the controller. 5<br />
Move the control handle into driving range<br />
Adjust the controller to the <strong>di</strong>rection required and the truck is moving towards the selected <strong>di</strong>rection.<br />
Driving<br />
Swing the control handle leftwards or rightwards to drive.<br />
Driving on a Slope<br />
ISTRUZIONI ORIGINALI<br />
ORIGINAL<br />
INSTRUCTION MANUAL<br />
TRADUCTION MANUEL D’INSTRUCTIONS
The cargo carried must face to upward <strong>di</strong>rection of the slope. Make sure to take safety measures to the downward<br />
slip <strong>di</strong>rection of the truck: When the control button at “0” position, please pull the handle backwards imme<strong>di</strong>ately and<br />
release it accor<strong>di</strong>ng to actual requirement to enable the electromagnetic brake to work automatically and control the<br />
speed and the <strong>di</strong>rection of the truck (for downward slip).<br />
Braking<br />
The operator must fully understand the braking performance is subject to the road con<strong>di</strong>tions. But there are three<br />
braking types for the truck:<br />
Electromagnetic braking (control handle)<br />
Reverse current braking (controller)<br />
Sensor braking (release braking)<br />
Electromagnetic braking<br />
In emergency situations, the truck must be stopped by electromagnetic braking (control handle) only.<br />
Turn the control handle upwards or downwards to braking range, the driving motor is stopped mechanically.<br />
After releasing the control handle, it will turn into braking range automatically.<br />
After parking of the powered pallet truck, the electromagnetic braking takes the function of park braking.<br />
Reversing current braking<br />
In case of control system or driving power malfunction, it is possible to use reverse braking.<br />
Rotate the controller against the <strong>di</strong>rection of driving until the truck is stopped.<br />
Then release the controller.<br />
Inertia braking<br />
After releasing the controller, it returns back to “0” position and the powered pallet truckt is stopped by<br />
motor inertia. Noting that the ratio of speed reduction is subject to the position of controller.<br />
If inertia braking is removed by maintenance staff and the controller is set at “0” position, the truck can be<br />
stopped only by electromagnetic braking and reverse current braking.<br />
4.2.2 Operation of cargo loa<strong>di</strong>ng/unloa<strong>di</strong>ng<br />
Before loa<strong>di</strong>ng the cargo, the operator must check to confirm the cargo is properly placed on the pallet and the<br />
weight of cargo within the load capacity of the truck. Remember that carrying a cargo in full load for a long time is<br />
prohibited.<br />
The forks should extend to the bottom of the cargo completely.<br />
The operation of “Up” or “Down” button will lead to lifting or lowering at a fixed speed.<br />
Lifting of forks<br />
Press “Raise button” until required height is achieved.<br />
Lowering of forks<br />
Press “Lower button” to lower the forks to required height.<br />
ISTRUZIONI ORIGINALI<br />
ORIGINAL<br />
INSTRUCTION MANUAL<br />
TRADUCTION MANUEL D’INSTRUCTIONS
5 Maintenance of the Truck<br />
5.1 Safety Operation and Environmental Protection<br />
The instructions in the section of “Maintenance and Ispection” should be performed based on the time<br />
interval specified in Maintenance List.<br />
Any part on the truck, especially the safety device, can not be changed without permission. Noting that changing<br />
the operation speed of the truck is strictly forbidden. In ad<strong>di</strong>tion, all spare parts from the original manufacturer<br />
are qualified by Quality Assurance Authorities. To ensure the safety and the reliability of truck operation,<br />
only spare parts from the manufacturer can be applied. Also, the parts replaced, inclu<strong>di</strong>ng oils and fuels,<br />
must be <strong>di</strong>sposed accor<strong>di</strong>ng to related environmental protection regulations.<br />
5.2 Safety Rules for Maintaining the Pallet Truck<br />
Maintenance staff: Repair and Maintenance of the truck should only be performed by qualified<br />
professionals trained by the manufacturer.<br />
Lifting of the powered pallet truck: For the lifting of the powered pallet truck, the hoisting equipment<br />
should be safe and reliable (especially the hoisting position). When the powered pallet truck is lifted,<br />
necessary measures should be taken to avoid slipping and turning over of the powered pallet truck (wedge<br />
block or wood block can be applied). The powered pallet truck can be lifted by hoisting equipment only<br />
when the forks are fixed and connecting cable with enough strength is applied.<br />
Cleaning operation: Using flammable fluids is strictly forbidden in cleaning the powered pallet truck.<br />
Before cleaning work starts, safety measures must be taken to avoid sparkling (e.g. caused by short circuit).<br />
Any operation of battery should be performed after cutting off the power of the battery. All electric elements<br />
and electronic assemblies can only be cleaned by gentle wind blower, compressed air or in conductive and<br />
anti-static brush.<br />
If the powered pallet truck is cleaned by water jet cleaner or high pressure cleaner, all electric elements and<br />
electronic assemblies should be covered in advance to avoid humi<strong>di</strong>ty which will cause function fault. Noting that<br />
cleaning by using steam nozzle is prohibited.<br />
Operation of electrical system: Operation of electrical system of the powered pallet truck should be<br />
performed by trained professionals only. Before any operation of electrical system, protection measures to<br />
avoid electric shock should be properly taken. During operation of battery, separate the socket of battery<br />
apart to cut off the power of the powered pallet truck.<br />
Operation of wel<strong>di</strong>ng: To avoid damage of electric and electronic assemblies, the assemblies should be<br />
removed away from the truck before wel<strong>di</strong>ng.<br />
Installation: After repairing or replacing the hydraulic components, the electric elements and the electronic<br />
assemblies, please install and confirm that all components are at original positions.<br />
Wheels: The quality of wheels affects greatly the stability and the driving performance of the powered pallet<br />
truck. Any change of wheels should be <strong>di</strong>scussed with and approved by the manufacturer. During<br />
replacement of wheels, the powered pallet truck must be kept horizontally as original state (wheels must be<br />
replaced by pairs, e.g. both left and right).<br />
Lifting chains: Without lubrication, the lifting chains will be soon worn out. The time interval in the<br />
Maintenance Manual is applicable for normal operating con<strong>di</strong>tions. In case of poor operating con<strong>di</strong>tions<br />
(dust, temperature), it is necessary to feed lubrication regularly.<br />
Hydraulic oil pipe: The oil pipe should be replaced every six years. Together with replacement of the<br />
hydraulic assembly, the oil pipe of hydraulic system should be replaced.<br />
5.3 Maintenance and Inspection<br />
Complete and professional maintenance is an important part for safety operation of the powered pallet<br />
truck. Any negligence of maintenance of stipulated time interval will cause failure of the powered pallet<br />
truck and potential danger to persons and equipment.<br />
The maintenance cycle stated in the Instructions Manual refers to the normal con<strong>di</strong>tions with single shift<br />
operation. Under dusty con<strong>di</strong>tions, temperatures varying greatly or under multiple operating shifts, the maintenance<br />
cycle should be shortened.<br />
Please perform accor<strong>di</strong>ng to the below maintenance list in compliance with each maintenance cycle as<br />
specified in the following:<br />
ISTRUZIONI ORIGINALI<br />
ORIGINAL<br />
INSTRUCTION MANUAL<br />
TRADUCTION MANUEL D’INSTRUCTIONS
Preventive maintenance schedule<br />
O= check, revise, adjust<br />
Battery X= replace<br />
Checking<br />
item<br />
Battery<br />
Controller<br />
Checking<br />
item<br />
Controller<br />
Service<br />
Required<br />
Electrolyte<br />
level<br />
Electrolyte<br />
proportion<br />
Battery<br />
quantity<br />
Terminal<br />
looseness<br />
Looseness of<br />
connecting<br />
wire<br />
Cleanness of<br />
the battery<br />
surface<br />
If there is tool<br />
on the battery<br />
The tightness<br />
of air cup<br />
Far away<br />
from firing<br />
Service<br />
Required<br />
Check<br />
connector for<br />
worn<br />
Check<br />
contactor for<br />
running<br />
Check<br />
inching<br />
switch for<br />
running<br />
Check the<br />
connection<br />
among motor,<br />
battery and<br />
power unit<br />
Daily<br />
(8 hrs)<br />
Weekly<br />
(50 hrs)<br />
Montly<br />
(200 hrs)<br />
Trimonthly<br />
(600 hrs)<br />
Semiannually<br />
(1200 hrs)<br />
O O O O<br />
O O O O<br />
O O O O O<br />
O O O O O<br />
O O O O O<br />
O O O O<br />
O O O O O<br />
O O O O<br />
O O O O O<br />
Daily<br />
(8 hrs)<br />
Weekly<br />
(50 hrs)<br />
Montly<br />
(200 hrs)<br />
Trimonthly<br />
(600 hrs)<br />
Semiannually<br />
(1200 hrs)<br />
O O<br />
O O<br />
O O<br />
O O<br />
ISTRUZIONI ORIGINALI<br />
ORIGINAL<br />
INSTRUCTION MANUAL<br />
TRADUCTION MANUEL D’INSTRUCTIONS
Motor<br />
Checking<br />
item<br />
Motor<br />
Transmission<br />
Checking<br />
item<br />
Transmission<br />
box<br />
Steering assy<br />
Service<br />
Required<br />
Clean the<br />
foreign body<br />
on the motor<br />
Clean or<br />
replace the<br />
bearing<br />
Check the<br />
carbon brush<br />
and<br />
commutator<br />
for worm, if<br />
spring is<br />
normal<br />
If the<br />
connection is<br />
correct and<br />
firm<br />
Brush carbon<br />
powder on<br />
shift plate<br />
and shift<br />
device<br />
Service<br />
Required<br />
Abnormal<br />
noise<br />
Check oil<br />
leakage<br />
Daily<br />
(8 hrs)<br />
Daily<br />
(8 hrs)<br />
Weekly<br />
(50 hrs)<br />
Montly<br />
(200 hrs)<br />
Weekly<br />
(50 hrs)<br />
Trimonthly<br />
(600 hrs)<br />
Semiannually<br />
(1200 hrs)<br />
O O O<br />
O O O<br />
O O O<br />
Montly<br />
(200 hrs)<br />
O<br />
O O<br />
Trimonthly<br />
(600 hrs)<br />
Semiannually<br />
(1200 hrs)<br />
O O O O O<br />
O O O O O<br />
Replace oil X<br />
Lubrification<br />
rollers<br />
Whether<br />
steering<br />
agility<br />
Abnormal<br />
noise<br />
O O O O<br />
O O O O O<br />
O O O O O<br />
Rotate handle O O O O O<br />
ISTRUZIONI ORIGINALI<br />
ORIGINAL<br />
INSTRUCTION MANUAL<br />
TRADUCTION MANUEL D’INSTRUCTIONS
Wheel (drive unit, balance wheel and supporting wheel<br />
Checking<br />
item<br />
Drive unit,<br />
balance wheel<br />
and<br />
supporting<br />
wheel<br />
Brake system<br />
Checking<br />
item<br />
Brake<br />
microswitch<br />
Brake drum<br />
Hydraulic system<br />
Checking<br />
item<br />
Hydraulic<br />
reservoir<br />
Service<br />
Required<br />
Wearing or<br />
crack<br />
Daily<br />
(8 hrs)<br />
Weekly<br />
(50 hrs)<br />
Montly<br />
(200 hrs)<br />
Trimonthly<br />
(600 hrs)<br />
Semiannually<br />
(1200 hrs)<br />
O O O O O<br />
Tighten bolt O O O O<br />
Whether<br />
there is rope<br />
on the wheel<br />
Service<br />
Required<br />
Check the<br />
brake state<br />
when the<br />
handle on<br />
vertical or<br />
level position<br />
Whether the<br />
micro switch<br />
loosen<br />
O O O O O<br />
Daily<br />
(8 hrs)<br />
Weekly<br />
(50 hrs)<br />
Montly<br />
(200 hrs)<br />
Trimonthly<br />
(600 hrs)<br />
Semiannually<br />
(1200 hrs)<br />
O O O O O<br />
O O O<br />
Tighteness O O O<br />
Wearing O O<br />
Clearance<br />
between<br />
drum and<br />
shoes<br />
Wheather<br />
brake agility<br />
Service<br />
Required<br />
Check for oil<br />
level, change<br />
oil<br />
Clean suction<br />
strainer<br />
Drain for<br />
foreign<br />
matter<br />
O O<br />
O O O O O<br />
Daily<br />
(8 hrs)<br />
Weekly<br />
(50 hrs)<br />
Montly<br />
(200 hrs)<br />
Trimonthly<br />
(600 hrs)<br />
Semiannually<br />
(1200 hrs)<br />
O O O O X<br />
O<br />
O<br />
ISTRUZIONI ORIGINALI<br />
ORIGINAL<br />
INSTRUCTION MANUAL<br />
TRADUCTION MANUEL D’INSTRUCTIONS
Hose, piping.<br />
Hose reel and<br />
swivel joint<br />
Hydraulic<br />
pump<br />
Check for oil<br />
leaks,<br />
looseness,<br />
collapse,<br />
deformation<br />
and damage<br />
O O O<br />
Replace hoses X<br />
1-2 years<br />
Check<br />
hydraulic<br />
pump for oil<br />
leaks or noise<br />
Check pump<br />
drive gear for<br />
wear<br />
O O O O O<br />
X O O O<br />
5.4 Operation Specifications of Repair and Maintenance<br />
5.4.1 Preparation of truck to be repaired or maintained<br />
Prepare all necessary safety measures to avoid possible accident during the course of repair and<br />
maintenance by completing the following preparations:<br />
Parking the truck safely<br />
Press emergency parking switch and cut off the power of the battery.<br />
5.4.2 Inspection of the hydraulic oil capacity<br />
Preparation of the powered pallet truck to be repaired or maintained.<br />
Remove the six screws.<br />
Open the cover board (1) .<br />
Check the capacity of the hydraulic oil in the oil tank.<br />
The installation procedures are done in contrary sequence.<br />
During inspection of the hydraulic oil capacity, the forks and the carriage must be lowered to the minimum<br />
height.<br />
5.4.3 Inspection of the electric fuse<br />
Preparation of truck to be repaired or maintained.<br />
Open the left shields<br />
Consult the chart to check the current rating of all fuses and replace them if necessary.<br />
Code Protection Purpose Value<br />
FU Main circuit fuse 150A<br />
FU1 Traveling control fuse 10A<br />
FU2 Lifting control fuse 70A<br />
5.4.4 Using the powered pallet truck after maintenance<br />
Complete the following operations before using the powered pallet truck:<br />
Clean the powered pallet truck<br />
Check the braking function<br />
Check the function of the emergency parking switch<br />
Check the function of the horn<br />
5.5 Storage of the Powered Pallet Truck<br />
In case of storage duration of the powered pallet truck over 2 months, it should be parked in an anti-freezing<br />
and dry place. Before storage, all necessary measures should be taken properly. During and after storage,<br />
ISTRUZIONI ORIGINALI<br />
ORIGINAL<br />
INSTRUCTION MANUAL<br />
TRADUCTION MANUEL D’INSTRUCTIONS
the following measures should be taken:<br />
During storage, the powered pallet truck should be raised to keep the wheels apart from ground completely. In this<br />
case, the wheels and bearings inside wheels are protected from damage.<br />
In case of storage duration of the truck over 6 months, please contact the maintenance service of the<br />
manufacture for other ad<strong>di</strong>tional measures.<br />
5.5.1 Operations to be done before storage<br />
Clean the powered pallet truck thoroughly<br />
Check the braking function<br />
Check the hydraulic oil capacity, feed it up if necessary<br />
Apply oil or grease to all parts for protection<br />
Consult detailed Lubrication List to feed lubrication to the truck<br />
Recharge the battery<br />
Cut off and clean the battery and apply grease to battery electrodes<br />
Besides the above, the instructions provided by the battery supplier are also to be observed.<br />
5.5.2 Measures to be taken during storage<br />
Every two months: charge the battery<br />
Operation of battery of the powered pallet truck:<br />
It is important to recharge the battery regularly. Otherwise, complete consumption of battery will cause<br />
automatic <strong>di</strong>scharge and even damage the battery.<br />
5.5.3 Re-commissioning<br />
Clean the powered pallet truck thoroughly<br />
Consult detailed Lubrication List to feed lubrication to the truck<br />
Clean the battery, apply grease to electrode bolt and connect the battery<br />
Recharge the battery<br />
Check if any moisture in the gear oil, replace it if required<br />
Check if any moisture in the hydraulic oil, replace it if required<br />
Start the pallet truck<br />
Operation of battery of the pallet truck<br />
In case of fault of the electrical system, brush all exposed electrical connections with contact cleaner.<br />
Repeat this step to eliminate the oxide layer on the connecting parts of the operating controller.<br />
Electromagnetic braking test should be imme<strong>di</strong>ately performed after re-commissioning.<br />
5.5.4 Faults Diagnosis<br />
In this section, we will introduce how to find out and handle some of the simple faults to the user as<br />
specified in the following sheet:<br />
mettere pag 16 17 18 19 wwp<br />
Le pag. 20-23a seconda del modello del commissionatore .<br />
Es wp10-20= enzo 20<br />
If there is any fault can not be eliminated through the above treatment, please notify the after-sales service of the<br />
manufacturer for trained professionals’ <strong>di</strong>sposal.<br />
ISTRUZIONI ORIGINALI<br />
ORIGINAL<br />
INSTRUCTION MANUAL<br />
TRADUCTION MANUEL D’INSTRUCTIONS
16<br />
ISTRUZIONI ORIGINALI<br />
ORIGINAL<br />
INSTRUCTION MANUAL<br />
TRADUCTION MANUEL D’INSTRUCTIONS
17<br />
ISTRUZIONI ORIGINALI<br />
ORIGINAL<br />
INSTRUCTION MANUAL<br />
TRADUCTION MANUEL D’INSTRUCTIONS
18<br />
ISTRUZIONI ORIGINALI<br />
ORIGINAL<br />
INSTRUCTION MANUAL<br />
TRADUCTION MANUEL D’INSTRUCTIONS
the following measures should be taken:<br />
During storage, the powered pallet truck should be raised to keep the wheels apart from ground completely. In this<br />
case, the wheels and bearings inside wheels are protected from damage.<br />
In case of storage duration of the truck over 6 months, please contact the maintenance service of the<br />
manufacture for other ad<strong>di</strong>tional measures.<br />
5.5.1 Operations to be done before storage<br />
Clean the powered pallet truck thoroughly<br />
Check the braking function<br />
Check the hydraulic oil capacity, feed it up if necessary<br />
Apply oil or grease to all parts for protection<br />
Consult detailed Lubrication List to feed lubrication to the truck<br />
Recharge the battery<br />
Cut off and clean the battery and apply grease to battery electrodes<br />
Besides the above, the instructions provided by the battery supplier are also to be observed.<br />
5.5.2 Measures to be taken during storage<br />
Every two months: charge the battery<br />
Operation of battery of the powered pallet truck:<br />
It is important to recharge the battery regularly. Otherwise, complete consumption of battery will cause<br />
automatic <strong>di</strong>scharge and even damage the battery.<br />
5.5.3 Re-commissioning<br />
Clean the powered pallet truck thoroughly<br />
Consult detailed Lubrication List to feed lubrication to the truck<br />
Clean the battery, apply grease to electrode bolt and connect the battery<br />
Recharge the battery<br />
Check if any moisture in the gear oil, replace it if required<br />
Check if any moisture in the hydraulic oil, replace it if required<br />
Start the pallet truck<br />
Operation of battery of the pallet truck<br />
In case of fault of the electrical system, brush all exposed electrical connections with contact cleaner.<br />
Repeat this step to eliminate the oxide layer on the connecting parts of the operating controller.<br />
Electromagnetic braking test should be imme<strong>di</strong>ately performed after re-commissioning.<br />
5.5.4 Faults Diagnosis<br />
In this section, we will introduce how to find out and handle some of the simple faults to the user as<br />
specified in the following sheet:<br />
mettere pag 16 17 18 19 wwp<br />
Le pag. 20-23a seconda del modello del commissionatore .<br />
Es wp10-20= enzo 20<br />
If there is any fault can not be eliminated through the above treatment, please notify the after-sales service of the<br />
manufacturer for trained professionals’ <strong>di</strong>sposal.<br />
19<br />
ISTRUZIONI ORIGINALI<br />
ORIGINAL<br />
INSTRUCTION MANUAL<br />
TRADUCTION MANUEL D’INSTRUCTIONS
Circuit <strong>di</strong>agram for WP60-13<br />
23<br />
ISTRUZIONI ORIGINALI<br />
ORIGINAL<br />
INSTRUCTION MANUAL<br />
TRADUCTION MANUEL D’INSTRUCTIONS
Traduzione Italiano<br />
Attenzione: Non utilizzare il transpallet elettrico prima <strong>di</strong> avere letto e capito questo man<br />
In<strong>di</strong>ce<br />
Introduzione<br />
1. Sicurezza durante l'<strong>uso</strong><br />
2. Specifiche tecniche<br />
3. Manutenzione, ricarica e sostituzione della batteria<br />
4. Istruzioni per il funzionamento<br />
5. Manutenzione del transpallet elettrico<br />
6. Problemi e soluzioni<br />
7. Schema elettrico<br />
8. Lista dei ricambi<br />
Introduzione<br />
FalconLift ringrazia per aver scelto questo transpallet elettrico. Per la vostra sicurezza e per il corretto<br />
funzionamento, si prega <strong>di</strong> leggere attentamente il <strong>manuale</strong> sottostante e i segnali <strong>di</strong> avviso prima dell'<strong>uso</strong>.<br />
Il <strong>manuale</strong> <strong>di</strong> istruzioni è stato creato per darvi una perfetta conoscenza e padronanza nell'usare il<br />
transpallet elettrico.<br />
Le istruzioni <strong>di</strong> sicurezza e gli avvisi sono caratterizzati dai seguenti simboli:<br />
1. Le istruzioni <strong>di</strong> sicurezza devono essere osservate per evitare ferite involontarie.<br />
2. L'avviso deve essere osservato per evitare <strong>di</strong> danneggiare il materiale.<br />
3. Avvisi generali e caratteristiche prima dell'<strong>uso</strong>.<br />
Questo transpallet elettrico è composto in gran parte <strong>d'</strong>acciaio, può essere completamente riciclato. I ricambi non<br />
utilizzati dopo la riparazione, la <strong>manutenzione</strong>, la pulizia o dopo la <strong>di</strong>struzione, devono essere raccolti e depositati in<br />
modo da rispettare l'ambiente secondo le <strong>di</strong>rettive del proprio paese. Il materiale deve essere depositato in zone adeguate.<br />
Il materiale riciclabile deve essere preso in carico dalle autorità pubbliche. L'abbandono nell'ambiente <strong>di</strong> filtri olio, <strong>di</strong><br />
batterie o componenti elettronici possono danneggiare l'ambiente e la salute.<br />
Tutte le informazioni riportate in questo <strong>manuale</strong> si riferiscono ai dati <strong>di</strong>sponibili al momento della stampa.<br />
L'Azienda si riserva il <strong>di</strong>ritto <strong>di</strong> mo<strong>di</strong>ficare i propri prodotti in qualsiasi momento senza preavviso o rischio si sanzioni.<br />
Si consiglia inoltre <strong>di</strong> rivolgersi all'Azienda per informarsi su eventuali aggiornamenti.<br />
1. Sicurezza durante l'<strong>uso</strong><br />
1.1 Presenza dell'operatore<br />
Questo transpallet elettrico deve essere utilizzato da una persona competente che può mostrare<br />
perfettamente agli utilizzatori il funzionamento del transpallet elettrico.<br />
1.2 Diritti, doveri e responsabilità dell'operatore<br />
L'operatore deve capire pienamente i suoi <strong>di</strong>ritti ed i suoi doveri e deve aver ricevuto una formazione sul<br />
funzionamento del transpallet elettrico. Allo stesso tempo, l'operatore deve conoscere le caratteristiche<br />
riportate in questo <strong>manuale</strong> <strong>di</strong> istruzioni. Durante il funzionamento, l'operatore deve indossare le scarpe<br />
antinfortunistiche.<br />
1.3 Vietato l'<strong>uso</strong> alle persone non autorizzate<br />
Durante il funzionamento, l'operatore deve essere responsabile del transpallet elettrico e deve impe<strong>di</strong>re l'<strong>uso</strong><br />
del transpallet alle persone non autorizzate. E' severamente proibito sollevare o portare persone con il<br />
transpallet elettrico.<br />
1.4 Avaria o <strong>di</strong>fetti<br />
Traduzione delle istruzioni originali
In caso <strong>di</strong> avaria o <strong>di</strong>fetti, si prega <strong>di</strong> avvertire il fornitore. Se il transpallet elettrico non funziona<br />
normalmente (per esempio ruote o freni usati), si prega <strong>di</strong> non usarlo fino alla sua riparazione.<br />
1.5 Riparazione<br />
Senza una formazione professionale o una specifica autorizzazione, l'operatore non deve riparare o sostituire<br />
i ricambi del transpallet elettrico. L'operatore non può assolutamente cambiare la posizione <strong>d'</strong>installazione<br />
dei coman<strong>di</strong> o i <strong>di</strong>spositivi <strong>di</strong> sicurezza perché può creare una per<strong>di</strong>ta <strong>di</strong> efficacia del transpallet elettrico.<br />
I ricambi originali del costruttore sono certificati dal Quality Assurance Authorities. Per garantire il<br />
funzionamento sicuro ed affidabile del transpallet si devono utilizzare i ricambi del costruttore. I ricambi sostituiti, oli<br />
compresi, devono essere smaltiti secondo le legislazioni per la protezione dell'ambiente.<br />
1.6 Zona <strong>di</strong> pericolo<br />
La zona <strong>di</strong> pericolo si riferisce all'area dove il transpallet elettrico o il suo <strong>di</strong>spositivo <strong>di</strong> sollevamento (come<br />
le forche o gli accessori) sono in funzione e possono <strong>di</strong>ventare un potenziale fattore <strong>di</strong> pericolo per le<br />
persone o all'area per il trasporto dei carichi. Generalmente, la zona <strong>di</strong> pericolo include anche l'area dove il<br />
carico o gli accessori del transpallet vengono abbassati.<br />
Le persone non autorizzate devono allontanarsi delle zone <strong>di</strong> pericolo. In caso <strong>di</strong> pericolo, l'operatore deve avvertire.<br />
Se qualcuno è ancora nella zona <strong>di</strong> pericolo nonostante l'avviso <strong>di</strong> evacuazione, l'operatore deve imme<strong>di</strong>atamente<br />
fermare il transpallet elettrico.<br />
1.7 Lavorare in zone pericolose<br />
Quando il transpallet elettrico è utilizzato in un luogo pericoloso, deve essere appositamente attrezzato.<br />
In genere il transpallet elettrico non è attrezzato per questo tipo <strong>di</strong> situazione.<br />
1.8 Dispositivo <strong>di</strong> sicurezza e segnale <strong>di</strong> pericolo<br />
Si prega <strong>di</strong> prestare attenzione ai <strong>di</strong>spositivi <strong>di</strong> sicurezza, ai segnali <strong>di</strong> allarme ed agli avvisi introdotti in<br />
questo Manuale Operativo.<br />
1.9 Uso in luoghi pubblici<br />
Il transpallet elettrico non deve essere utilizzato su strade pubbliche salvo su zone specifiche.<br />
1.10 Distanza <strong>di</strong> sicurezza tra i veicoli<br />
Si prega <strong>di</strong> ricordarsi che il veicolo che si trova davanti a sé può frenare all'improvviso, quin<strong>di</strong> mantenere la<br />
<strong>di</strong>stanza <strong>di</strong> sicurezza.<br />
1.11 Passeggeri<br />
I passeggeri non devono salire sul transpallet elettrico, salvo in<strong>di</strong>cazione contraria.<br />
1.12 Uso in un ascensore o su una piattaforma elevatrice<br />
Il transpallet elettrico può essere utilizzato in un ascensore o su una piattaforma elevatrice solo se<br />
autorizzato. L'ascensore o la piattaforma elevatrice devono avere una capacità <strong>di</strong> carico sufficiente per<br />
trasportare il transpallet elettrico, sempre con la supervisione dell'operatore del transpallet elettrico.<br />
L'operatore deve assicurarsi <strong>di</strong> questo prima <strong>di</strong> entrare nell'ascensore o salire sulla piattaforma elevatrice. Il<br />
carico deve essere sistemato correttamente per evitare che tocchi le pareti dell'ascensore. Se delle persone<br />
devono utilizzare l'ascensore insieme al transpallet elettrico, queste devono salire dopo che il transpallet<br />
elettrico sia stato parcheggiato adeguatamente nell'ascensore, e devono uscire prima del transpallet elettrico.<br />
1.13 Corridoi stretti e zone <strong>di</strong> lavori<br />
In situazioni <strong>parti</strong>colari, come quando il transpallet elettrico si trova in un corridoio stretto, le persone non<br />
autorizzate devono allontanarsi dalla zona <strong>di</strong> lavori ed il carico deve essere piazzato correttamente.<br />
1.14 Modalità <strong>d'</strong>impiego<br />
La velocità <strong>di</strong> marcia deve essere commisurata alle con<strong>di</strong>zioni del luogo. Si consiglia <strong>di</strong> procedere a bassa<br />
velocità nelle curve, nei corridoi stretti e nelle vicinanze <strong>di</strong> porte automatiche o nelle vie ingombre.<br />
L’operatore deve essere capace <strong>di</strong> calcolare con esattezza lo spazio occorrente per una frenatura d’arresto<br />
regolare. Evitare frenate brusche (tranne in caso <strong>di</strong> emergenza), inversioni <strong>di</strong> marcia veloci o sorpassi in vie<br />
ingombre. E’ severamente proibito sporgersi dal transpallet o trasportare persone.<br />
1.15 Visibilità<br />
L'operatore deve guardare nella <strong>di</strong>rezione <strong>di</strong> marcia per poter vedere i segnali stradali. Se il carico impe<strong>di</strong>sce<br />
la visibilità, si consiglia <strong>di</strong> procedere a marcia in<strong>di</strong>etro. Se non è sufficiente, si consiglia <strong>di</strong> ricorrere all'ausilio<br />
<strong>di</strong> un incaricato che segnali la presenza <strong>di</strong> eventuali ostacoli.<br />
Traduzione delle istruzioni originali
1.16 Circolazione su tratti in pendenza<br />
Prima <strong>di</strong> manovrare il transpallet elettrico su tratti in pendenza assicurarsi che il manto stradale sia pulito e<br />
non scivoloso. Il carico deve essere sempre rivolto verso il pen<strong>di</strong>o. Le inversioni <strong>di</strong> marcia e le soste sui tratti<br />
in pendenza sono proibite. Si deve marciare a bassa velocità sui tratti in pendenza, sia in salita sia in <strong>di</strong>scesa.<br />
L’operatore deve essere pronto a frenare in ogni momento.<br />
1.17 Limite <strong>di</strong> carico<br />
Osservare attentamente e seguire tutte le segnalazioni <strong>di</strong> sicurezza presenti sul transpallet elettrico. Non<br />
sovraccaricare il carrello oltre i limiti <strong>di</strong> portata e non superare la pressione delle gomme in<strong>di</strong>cati sulle<br />
apposite targhette.<br />
1.18 Trasporti<br />
Il transpallet elettrico deve essere guidato con le forche all’altezza minima <strong>di</strong> 300 mm tranne quando si<br />
devono sistemare o portare i carichi. E’ meglio guidare il transpallet elettrico a marcia in<strong>di</strong>etro quando<br />
possibile. In questo modo la visibilità e la manovrabilità sono migliori. Quando si guida il transpallet<br />
elettrico con le forche in avanti, le manovre sono più incerte.<br />
1.19 Caratteristiche <strong>di</strong> carico<br />
Il carico deve essere correttamente messo sulle forche, affinché sia sicuro e affidabile. I carichi più alti del<br />
transpallet elettrico sono proibiti.<br />
1.20 Transpallet elettrico su una piattaforma <strong>di</strong> carico <strong>di</strong> un altro veicolo o su una passerella <strong>di</strong> raccordo<br />
Prima che il transpallet elettrico sia portato su una banchina <strong>di</strong> carico o sulla piattaforma <strong>di</strong> un camion o <strong>di</strong><br />
un vagone, conviene verificar sempre la capacità <strong>di</strong> carico massimo della passerella <strong>di</strong> intercomunicazione.<br />
Dovete trovare dei <strong>di</strong>spositivi <strong>di</strong> sicurezza per impe<strong>di</strong>re lo scivolo del transpallet elettrico . L'autista deve<br />
anche ricordarsi della capacità <strong>di</strong> carico massimo del suo veicolo nel quale lo transpallet elettrico viene<br />
trasportato. Anche cui dovete trovare dei <strong>di</strong>spositivi (come dei cunei) per bloccare lo transpallet elettrico.<br />
1.21 Parcheggio<br />
Il transpallet elettrico non deve essere lasciato incusto<strong>di</strong>to al <strong>di</strong> fuori delle aree <strong>di</strong> parcheggio previste. Deve<br />
sempre essere parcheggiato su una superficie piana. Le forche devono essere nella posizione più bassa, in<br />
modo che nessuno possa inciamparvi accidentalmente. Il transpallet elettrico deve sempre essere spento. Le<br />
persone non autorizzate non devono mai utilizzare il transpallet elettrico. Assicurarsi <strong>di</strong> togliere ogni volta la<br />
chiave <strong>di</strong> avviamento.<br />
Se il transpallet elettrico è lasciato inutilizzato per un lungo periodo senza essere ricaricato, si consiglia <strong>di</strong> staccare<br />
la batteria.<br />
1.22 Segnalazione<br />
Utilizzare sempre i <strong>di</strong>spositivi <strong>di</strong> segnalazione per attirare l'attenzione.<br />
1.23 Scarpe antinfortunistiche<br />
Le scarpe antinfortunistiche devono sempre essere indossate quando si utilizza il transpallet elettrico,<br />
secondo la norma EU EN-345:1-S1.<br />
1.24 Accessori/Rimorchi<br />
Dopo la consegna, dovete contattare l'Azienda se volete aggiungere un rimorchio o un accessorio che<br />
potrebbe influire sulla capacità <strong>di</strong> frenatura o sulla stabilità del transpallet elettrico.<br />
2. Specifiche tecniche<br />
2.1 Applicazione<br />
Il transpallet elettrico è stato creato appositamente per essere usato su tutti i tipi <strong>di</strong> pavimentazione. Grazie<br />
alla sua struttura compatta, questo transpallet elettrico viene utilizzato negli stabilimenti, nelle officine, nelle<br />
banchine e nei piccoli magazzini. Può anche essere utilizzato per caricare/scaricare merci dai camion e la<br />
capacità <strong>di</strong> carico è riportata sulla targhetta del transpallet elettrico.<br />
2.2 Caratteristiche tecniche<br />
2.2.1 Scheda tecnica<br />
Inserire le schede tecniche del transpallet elettrico in oggetto<br />
2.2.2 Scheda tecnica per transpallet elettrico standard<br />
Questa scheda tecnica è in accordo con la norma VDI 2198. L'Azienda si riserva il <strong>di</strong>ritto <strong>di</strong> cambiamenti<br />
Traduzione delle istruzioni originali
2.2.1 Scheda tecnica<br />
Inserire le schede tecniche del transpallet elettrico in oggetto<br />
2.2.2 Scheda tecnica per transpallet elettrico standard<br />
Questa scheda tecnica è in accordo con la norma VDI 2198. L'Azienda si riserva il <strong>di</strong>ritto <strong>di</strong> cambiamenti<br />
Caratteristiche/<br />
Characteristics/<br />
Caractéristiques<br />
Pesi/<br />
Weight/ Poids<br />
Ruote e gommature/ Wheels types<br />
Roues et bandages<br />
Dimensioni base/ Basic <strong>di</strong>mensions/ Dimensions<br />
Prestazioni/<br />
Performance data/<br />
Performances<br />
Dati motore/<br />
Elecric motor/<br />
Moteurs<br />
Varie/<br />
Other<br />
Autres<br />
1.1 COSTRUTTORE / MANUFACTURER / CONSTRUCTEUR FALCONLIFT<br />
1.2 Modello/Model designation/Désignation du constructeur FLDINO25<br />
1.3 Alimentazione/Power supply/Mode de translation Elettrico/Electric/Electrique<br />
1.4 Tipo <strong>di</strong> guida/Type of control/ Mode de conduite Su pedana/Rider/Sur platforme<br />
1.5 Portata/Load capacity/ Capacité nominale Q kg 2500<br />
1.6 Baricentro del carico/Load centre/Centre de gravité de la charge nominale c mm 600<br />
1.8 Distanza del carico/Load <strong>di</strong>stance/Déport avant de la charge x mm 973<br />
1.9 Interasse/Wheelbase/Empattement y mm 1520<br />
2.1 Peso proprio/Service weight/Poids à vide kg 543<br />
2.2<br />
Pressione sugli assali, con carico lato guida-lato carico/Axle loa<strong>di</strong>ng, laden front-rear / Charge par essieu avec charge côté<br />
kg<br />
conducteur-côté charge<br />
2.3<br />
Pressione sugli assali, senza carico lato guida-lato carico/Axle loa<strong>di</strong>ng, unladen front-rear/Charge par essieu à vide côté<br />
conducteur-côté charge<br />
kg<br />
3.1 Gommatura/Tyres/Equipement roues<br />
Poliuretano/Polyurethane/<br />
Polyuréthane<br />
3.2 Dimensioni ruote - lato guida/ Tyre size – front /Dimensions des roues côté conducteur mm Ø 248*75<br />
3.3 Dimensioni ruote - lato carico/ Tyre size – rear / Dimensions des roues côté charge mm Ø 80*80<br />
3.4 Ruote pivottanti/Castor wheels/Roue pivotante mm Ø 115*55<br />
3.5<br />
Numero ruote (x= trazione) lato guida-lato carico / Wheels – number (x= <strong>di</strong>ve wheel) front-rear / Roues, nombre (x = roue<br />
motrice) côté conducteur-côté charge<br />
1x +2 +4<br />
3.6 Carreggiata anteriore/Track width-front / Voie - côté conducteur b10 mm 575<br />
3.7 Carreggiata posteriore/Track width rear/Voie - côté charge b11 mm 355<br />
4.2 Altezza montante abbassato/Lowered mast height/Hauteur du mât abaissé h1 mm<br />
4.3 Alzata libera/ Free Lift/Levée libre h2 mm<br />
4.4 Altezza <strong>di</strong> sollevamento/Lift height/Hauteur de levée h3 mm 125<br />
4.5 Altezza montante sfilato/Extended mast height/Hauteur hors tout mât déployé h4 mm<br />
4.9<br />
Altezza timone in posizione <strong>di</strong> guida min. - max./Tiller height in drive position min. - max. / Hauteur du timon en position de<br />
conduite min. - max.<br />
h14 mm 1425<br />
4.15 Altezza forche abbassate/Lowered forks height/Hauteur sur fourches, en position basse h13 mm 85<br />
4.19 Lunghezza totale/Overall lenght/Longueur totale hors tout l1 mm 1910 (Piegato/Folded/Plié)/ 2325<br />
4.20 Lunghezza compreso spessore forche/Lenght to front face of forks/Longueur de la <strong>parti</strong>e motrice, jusqu‘à la face avant des fourches l2 mm 760<br />
4.21 Larghezza totale/Overall width/Largeur totale du châssis b1 mm 780<br />
4.22 Dimensioni forche/Forks <strong>di</strong>mensions/Dimensions des fourches s/e/l mm 55*185*1150<br />
4.25 Scartamento esterno forche/Width over forks/Ecartement extérieur des fourches b5 mm 540<br />
4.32 Luce libera a metà passo/Ground clearance at the centre of wheelbase/Garde au sol au milieu de l‘empattement m2 mm 30<br />
4.33<br />
Larghezza corsia <strong>di</strong> lavoro con pallet 1000x1200 trasversale/Aisle width for pallet 1000x1200 crossways/Largeur d‘allée pour<br />
palette 1000 x 1200 en largeur<br />
4.34<br />
Larghezza corsia <strong>di</strong> lavoro con pallet 800x1200 longitu<strong>di</strong>nale/Aisle width for pallets 800x1200 lengthways/Largeur d‘allée<br />
pour palette 800 x 1200 en longueur<br />
Ast mm 2460<br />
Ast mm 2310<br />
4.35 Raggio <strong>di</strong> volta/Outer turning ra<strong>di</strong>us/Rayon de giration Wa mm 1725<br />
4.36 Angolo <strong>di</strong> curvatura b13 °<br />
5.1 Velocità <strong>di</strong> traslazione con senza carico / Travel speed, laden-unladen / Vitesse de translation avec-sans charge km/h 5/7<br />
5.2 Velocità <strong>di</strong> sollevamento con - senza carico / Lift speed, laden-unladen / Vitesse de levée avec-sans charge mm/s 0.056/ 0.06<br />
5.3 Velocità <strong>di</strong> <strong>di</strong>scesa con-senza carico / Lowering speed, laden-unladen / Vitesse de descente avec-sans charge mm/s 0.057/ 0.059<br />
5.8 Pendenza massima superabile con-senza carico / Max. grea<strong>di</strong>bility, laden-unladen / Rampe maximum avec-sans charge % 5/7<br />
5.10 Freno <strong>di</strong> esercizio/Service brake/Frein de service<br />
Elettromagnetico/ Electromagnetic/<br />
Electromagnétique<br />
6.1 Motore <strong>di</strong> traslazione, potenza s2 60min/Drive motor hourly rating s2/Moteur de translation, puissance s2 = 60 mn kw 1.5 AC<br />
6.2 Motore <strong>di</strong> sollevamento,potenza s3 15%/Lift motor rating at s3 15%/Moteur de levée, puissance s3 = 15% kw 2 DC<br />
6.3<br />
Batteria secondo DIN 43531/35/36 A,B,C,non / Battery equipment acc. to DIN 43531/35/36 A,B,C,non / Batterie selon la<br />
norme DIN 43531/35/36/ A,B,C,non<br />
DIN 43535-1998<br />
6.4 Voltaggio e capacità nominale della batteria k5/Battery voltage and nominal capacity k5/Tension de la batterie et capacité nominale K5 V/Ah 24V/315Ah<br />
6.5<br />
Peso batteria/Battery weight/Poids de la batterie<br />
Dimensioni cassone batteria/Battery box size/ Dimensions com<strong>parti</strong>ment batterie<br />
kg<br />
mm<br />
210<br />
760*210*556<br />
8.1 Tipo <strong>di</strong> comando <strong>di</strong> marcia/Type of drive control/Commande de vitesse CURTIS 1230-2402<br />
8.4<br />
Soglia rumore secondo EN 12053, orecchio operatore/Average noise peak at operator’s ear acc. to EN 12053/Niveau sonore<br />
moyen, mesuré à l‘oreille du cariste selon EN12053<br />
dB(A)
tecnici o <strong>di</strong> miglioramenti.<br />
2.2.3 Norma Europea<br />
Il livello <strong>di</strong> rumore continuo deve essere
● Inserire la spina <strong>di</strong> uscita del caricatore con la spina del connettore (ingresso) della batteria e<br />
accendere l'interruttore del caricatore.<br />
E' proibito ricaricare la batteria quando non è completamente scarica.<br />
Durante la ricarica, i tappi degli elementi della batteria devono essere aperti per far circolare l'aria. Prima <strong>di</strong><br />
ricaricarla, assicurarsi che non ci siano degli oggetti metallici sulla batteria e che i giunti dei cavi e delle prese non siano<br />
danneggiati. Tutte le misure <strong>di</strong> sicurezza, incluse le regole fornite e le procedure per la ricarica, devono essere<br />
rigorosamente osservate.<br />
3.2.1 Prima ricarica<br />
1) Se l'elettrolito della batteria è <strong>di</strong>minuito o è stato tolto, bisogna degli aci<strong>di</strong> dentro la batteria che si<br />
compongono <strong>di</strong> acido solforico e <strong>di</strong> acqua <strong>di</strong> aci<strong>di</strong> piombosi. Il peso specifico dell'elettrolito aggiunto deve<br />
essere <strong>di</strong> 1.280 ± 0.005 alla temperatura ambiente <strong>di</strong> 25°C. Versare l'elettrolito composto nella batteria, con<br />
15-20mm in più rispetto al livello limite.<br />
Solo quando la temperatura degli elementi è sotto i 35°C, può essere connessa alla corrente continua e caricata.<br />
2) Le ricariche iniziali si effettuano in 2 tappe: A) Quando il voltaggio finale degli elementi è inferiore a 2.4V,<br />
la corrente deve essere a 0.5Am; B) Quando la tensione si alza a 2.4V, la corrente deve essere convertita alla<br />
seconda fase, 0.25A. Continuare a caricare fino alla fuoriuscita <strong>di</strong> bolle <strong>d'</strong>aria dall'elettrolito. Assicurarsi che<br />
il voltaggio degli elementi rimanga costante per 3 ore. Quando la densità dell'elettrolito raggiunge 1.280 ±<br />
0.005, deve rimanere invariata per 3 ore. A questo punto, la quantità totale della carica elettrica deve essere<br />
4/5volte la capacità normale, e la carica deve durare 70 ore.<br />
3.2.2 Ricarica <strong>di</strong> equalizzazione<br />
Durante l'<strong>uso</strong>, se la capacità non è omogenea vuol <strong>di</strong>re che manca l'elettrolito. Si può eliminare questo<br />
problema grazie alla ricarica <strong>di</strong> equalizzazione, per ottenere la stabilità degli elementi.<br />
Si può utilizzare la ricarica <strong>di</strong> equalizzazione nelle seguenti con<strong>di</strong>zioni:<br />
1) Il voltaggio <strong>di</strong> scarica degli elementi è inferiore al valore finale (1.7V/per elemento).<br />
2) Gli elementi hanno un tasso elevato <strong>di</strong> scarica (es. quando il motore <strong>di</strong> guida e il motore <strong>di</strong> sollevamento<br />
lavorano in sincronia).<br />
3) La batteria non è stata regolarmente ricaricata dopo la scarica.<br />
4) La batteria è stata scaricata a fondo o non è stata utilizzata per un lungo periodo.<br />
Fasi per la ricarica <strong>di</strong> equalizzazione<br />
1) Caricare con la corrente con valore 0.1 I5A.<br />
2) Quando la tensione raggiunge 2.5V e le bolle <strong>d'</strong>aria fuoriescono dall'elettrolito, continuare la ricarica con la<br />
corrente a 0.05I5A.<br />
3) Quando la batteria è completamente ricaricata, interrompere la ricarica per una mezz'ora. Poi, riprendere<br />
la ricarica con corrente a 0.025I5A per 1ora.<br />
4) Dopo l'interruzione <strong>di</strong> mezz'ora, continuare la ricarica per un'altra ora con corrente a 0.025 I5A.<br />
5) Ripetere la fase 4 tranne se delle bolle <strong>d'</strong>aria fuoriescono dall'elettrolito quando il caricabatteria viene<br />
collegato alla corrente.<br />
E' importante effettuare la ricarica <strong>di</strong> equalizzazione una volta al mese per le batterie in <strong>uso</strong><br />
3.3 In<strong>di</strong>catore batteria<br />
In<strong>di</strong>catore <strong>di</strong> capacità della batteria: lo stato <strong>di</strong> carica della batteria è in<strong>di</strong>cato dall'in<strong>di</strong>catore <strong>di</strong> scarica<br />
batteria con <strong>di</strong>eci segmenti che corrispondono ciascuno a 10% <strong>d'</strong>incremento. Quando la batteria si scarica, i<br />
segmenti luminosi si spengono gradualmente. Il segnale “ALARM” e la spia lampeggiante“STOP” appaiono<br />
quando la capacità residua della batteria è inferiore o uguale al 20%.A questo punto la funzione <strong>di</strong><br />
sollevamento del transpallet elettrico viene automaticamente staccata e bloccata.<br />
Mettere le immagini a pag 8 e 9 del catalogo WWP le immagini con la scritta descrittiva<br />
battery sufficient<br />
Capacità sufficiente Ricarica richiesta capacità insufficiente<br />
Se, subito dopo aver azionato il sistema <strong>di</strong> sollevamento, l'in<strong>di</strong>catore batteria segnala che la capacità è insufficiente,<br />
la funzione <strong>di</strong> sollevamento ritornerà attiva solo dopo aver ricaricato almeno al 70% la batteria.<br />
4 Funzionamento<br />
4.1 Messa in moto<br />
Traduzione delle istruzioni originali
● Inserire la spina <strong>di</strong> uscita del caricatore con la spina del connettore (ingresso) della batteria e<br />
accendere l'interruttore del caricatore.<br />
E' proibito ricaricare la batteria quando non è completamente scarica.<br />
Durante la ricarica, i tappi degli elementi della batteria devono essere aperti per far circolare l'aria. Prima <strong>di</strong><br />
ricaricarla, assicurarsi che non ci siano degli oggetti metallici sulla batteria e che i giunti dei cavi e delle prese non siano<br />
danneggiati. Tutte le misure <strong>di</strong> sicurezza, incluse le regole fornite e le procedure per la ricarica, devono essere<br />
rigorosamente osservate.<br />
3.2.1 Prima ricarica<br />
1) Se l'elettrolito della batteria è <strong>di</strong>minuito o è stato tolto, bisogna degli aci<strong>di</strong> dentro la batteria che si<br />
compongono <strong>di</strong> acido solforico e <strong>di</strong> acqua <strong>di</strong> aci<strong>di</strong> piombosi. Il peso specifico dell'elettrolito aggiunto deve<br />
essere <strong>di</strong> 1.280 ± 0.005 alla temperatura ambiente <strong>di</strong> 25°C. Versare CAPACITA' l'elettrolito composto SUFFICIENTE nella batteria, con<br />
15-20mm in più rispetto al livello limite.<br />
Solo quando la temperatura degli elementi è sotto i 35°C, può essere connessa alla corrente continua e caricata.<br />
2) Le ricariche iniziali si effettuano in 2 tappe: A) Quando il voltaggio finale degli elementi è inferiore a 2.4V,<br />
la corrente deve essere a 0.5Am; B) Quando la tensione si alza a 2.4V, la corrente deve essere convertita alla<br />
seconda fase, 0.25A. Continuare a caricare fino alla fuoriuscita <strong>di</strong> bolle <strong>d'</strong>aria dall'elettrolito. Assicurarsi che<br />
il voltaggio degli elementi rimanga costante per 3 ore. Quando la densità dell'elettrolito raggiunge 1.280 ±<br />
0.005, deve rimanere invariata per 3 ore. A questo punto, la quantità totale della carica elettrica deve essere<br />
4/5volte la capacità normale, e la carica deve durare 70 ore.<br />
3.2.2 Ricarica <strong>di</strong> equalizzazione<br />
Durante l'<strong>uso</strong>, se la capacità non è omogenea vuol <strong>di</strong>re che manca l'elettrolito. Si può eliminare questo<br />
problema grazie alla ricarica <strong>di</strong> equalizzazione, per ottenere la stabilità degli elementi.<br />
Si può utilizzare la ricarica <strong>di</strong> equalizzazione nelle seguenti con<strong>di</strong>zioni:<br />
1) Il voltaggio <strong>di</strong> scarica degli elementi è inferiore al valore finale (1.7V/per elemento).<br />
RICARICA RICHIESTA<br />
2) Gli elementi hanno un tasso elevato <strong>di</strong> scarica (es. quando il motore <strong>di</strong> guida e il motore <strong>di</strong> sollevamento<br />
lavorano in sincronia).<br />
3) La batteria non è stata regolarmente ricaricata dopo la scarica.<br />
4) La batteria è stata scaricata a fondo o non è stata utilizzata per un lungo periodo.<br />
Fasi per la ricarica <strong>di</strong> equalizzazione<br />
1) Caricare con la corrente con valore 0.1 I5A.<br />
2) Quando la tensione raggiunge 2.5V e le bolle <strong>d'</strong>aria fuoriescono dall'elettrolito, continuare la ricarica con la<br />
corrente a 0.05I5A.<br />
3) Quando la batteria è completamente ricaricata, interrompere la ricarica per una mezz'ora. Poi, riprendere<br />
la ricarica con corrente a 0.025I5A per 1ora.<br />
4) Dopo l'interruzione <strong>di</strong> mezz'ora, continuare la ricarica per un'altra ora con corrente a 0.025 I5A.<br />
5) Ripetere la fase 4 tranne se delle bolle <strong>d'</strong>aria fuoriescono dall'elettrolito quando il caricabatteria viene<br />
CAPACITA' INSUFFICIENTE<br />
collegato alla corrente.<br />
E' importante effettuare la ricarica <strong>di</strong> equalizzazione una volta al mese per le batterie in <strong>uso</strong><br />
3.3 In<strong>di</strong>catore batteria<br />
In<strong>di</strong>catore <strong>di</strong> capacità della batteria: lo stato <strong>di</strong> carica della batteria è in<strong>di</strong>cato dall'in<strong>di</strong>catore <strong>di</strong> scarica<br />
batteria con <strong>di</strong>eci segmenti che corrispondono ciascuno a 10% <strong>d'</strong>incremento. Quando la batteria si scarica, i<br />
segmenti luminosi si spengono gradualmente. Il segnale “ALARM” e la spia lampeggiante“STOP” appaiono<br />
quando la capacità residua della batteria è inferiore o uguale al 20%.A questo punto la funzione <strong>di</strong><br />
sollevamento del transpallet elettrico viene automaticamente staccata e bloccata.<br />
Mettere le immagini a pag 8 e 9 del catalogo WWP le immagini con la scritta descrittiva<br />
battery sufficient<br />
Capacità sufficiente Ricarica richiesta capacità insufficiente<br />
Se, subito dopo aver azionato il sistema <strong>di</strong> sollevamento, l'in<strong>di</strong>catore batteria segnala che la capacità è insufficiente,<br />
la funzione <strong>di</strong> sollevamento ritornerà attiva solo dopo aver ricaricato almeno al 70% la batteria.<br />
4 Funzionamento<br />
4.1 Messa in moto<br />
Traduzione delle istruzioni originali
Se, subito dopo aver azionato il sistema <strong>di</strong> sollevamento, l'in<strong>di</strong>catore batteria segnala che la capacità è insufficiente,<br />
la funzione <strong>di</strong> sollevamento ritornerà attiva solo dopo aver ricaricato almeno al 70% la batteria.<br />
4 Funzionamento<br />
4.1 Messa in moto<br />
L'operatore deve assicurarsi che non vi siano persone nella zona <strong>di</strong> lavoro durante la messa in moto del<br />
transpallet elettrico e durante il suo funzionamento o quando sta caricando della merce.<br />
Controlli quoti<strong>di</strong>ani prima <strong>di</strong> ogni messa in moto<br />
● Verificare lo stato generale del transpallet elettrico (<strong>parti</strong>colarmente le forche e le ruote)<br />
● Verificare il fissaggio della batteria e la connessione dei cavi.<br />
Messa in moto<br />
● Ruotare e premere il pulsante <strong>di</strong> emergenza<br />
● Inserire la chiave nell'interruttore e girarla sulla posizione “I”<br />
● L'in<strong>di</strong>catore della batteria in<strong>di</strong>ca la capacità attuale<br />
● Verificare il funzionamento dell'avvisatore acustico<br />
● Verificare il funzionamento del sistema <strong>di</strong> frenatura del timone<br />
A questo punto i controlli precedenti la messa in moto sono completati.<br />
4.2 Funzionamento del transpallet elettrico<br />
4.2.1 Messa in moto, guida e parcheggio<br />
Prestare la massima attenzione durante la messa in moto e il funzionamento del transpallet elettrico, soprattutto<br />
quando le <strong>parti</strong> del corpo sporgono dalla sagoma del transpallet elettrico. E' severamente proibito far salire delle persone<br />
sul transpallet elettrico durante la guida.<br />
Pulsante <strong>d'</strong>arresto (emergenza)<br />
In caso <strong>di</strong> emergenza premere il pulsante <strong>di</strong> arresto e tutte le funzioni del sistema elettrico saranno interrotte.<br />
Frenatura forzata<br />
In caso <strong>di</strong> emergenza, rilasciare il timone e il transpallet elettrico si fermerà automaticamente.(arresto<br />
<strong>d'</strong>emergenza). Il timone ritornerà automaticamente nella posizione <strong>di</strong> frenatura (vedere la figura) Inserire la<br />
fig. a pag 5 del timone<br />
Se il timone impegna troppo tempo per ritornare nella posizione <strong>di</strong> frenatura, bisogna trovare e riparare il <strong>di</strong>fetto.<br />
Sostituire la molla a gas, se è necessario.<br />
Messa in moto<br />
Il cofano della batteria deve essere chi<strong>uso</strong> e fissato correttamente FRENO ATTIVO prima della messa in moto.<br />
La velocità è controllata dal timone.<br />
● Mettere il timone nella posizione <strong>di</strong> guida<br />
● Spostare il timone nella <strong>di</strong>rezione <strong>di</strong> marcia desiderata e il transpallet si muoverà in quella <strong>di</strong>rezione.<br />
FRENO DISATTIVATO<br />
Guida<br />
Girare il timone a destra o a sinistra per guidare.<br />
Guida in pendenza<br />
Il carico deve essere sempre rivolto verso il pen<strong>di</strong>o. Prendere le dovute precauzioni per non far scivolare il<br />
transpallet elettrico verso il basso: quando il pulsante è su “O”, tirare imme<strong>di</strong>atamente FRENO ATTIVO<br />
in<strong>di</strong>etro il timone e rilasciarlo<br />
secondo le necessità del momento per inserire il freno elettromagnetico e controllare la velocità e la <strong>di</strong>rezione del<br />
transpallet elettrico (per gli slittamenti verso il basso).<br />
5<br />
Traduzione delle istruzioni originali
<strong>d'</strong>emergenza). Il timone ritornerà automaticamente nella posizione <strong>di</strong> frenatura (vedere la figura) Inserire la<br />
fig. a pag 5 del timone<br />
Se il timone impegna troppo tempo per ritornare nella posizione <strong>di</strong> frenatura, bisogna trovare e riparare il <strong>di</strong>fetto.<br />
Sostituire la molla a gas, se è necessario.<br />
Messa in moto<br />
Il cofano della batteria deve essere chi<strong>uso</strong> e fissato correttamente prima della messa in moto.<br />
La velocità è controllata dal timone.<br />
● Mettere il timone nella posizione <strong>di</strong> guida<br />
● Spostare il timone nella <strong>di</strong>rezione <strong>di</strong> marcia desiderata e il transpallet si muoverà in quella <strong>di</strong>rezione.<br />
Guida<br />
Girare il timone a destra o a sinistra per guidare.<br />
Guida in pendenza<br />
Il carico deve essere sempre rivolto verso il pen<strong>di</strong>o. Prendere le dovute precauzioni per non far scivolare il<br />
transpallet elettrico verso il basso: quando il pulsante è su “O”, tirare imme<strong>di</strong>atamente in<strong>di</strong>etro il timone e rilasciarlo<br />
secondo le necessità del momento per inserire il freno elettromagnetico e controllare la velocità e la <strong>di</strong>rezione del<br />
transpallet elettrico (per gli slittamenti verso il basso).<br />
Traduzione delle istruzioni originali
Meto<strong>di</strong> <strong>di</strong> frenatura<br />
L'operatore deve capire che il sistema <strong>di</strong> frenatura è soggetto alle con<strong>di</strong>zioni della strada.<br />
Ci sono tre tipi <strong>di</strong> frenatura:<br />
● elettromagnetica (timone)<br />
● da inversione <strong>di</strong> marcia (sistema <strong>di</strong> controllo)<br />
● da sensore del freno(freno <strong>di</strong> rilascio)<br />
Frenatura elettromagnetica<br />
In casi <strong>di</strong> emergenza, il transpallet elettrico deve essere frenato solamente con la frenatura elettromagnetica<br />
(timone).<br />
● Il motore guida si ferma meccanicamente spostando il timone su o giù nella posizione <strong>di</strong> frenatura.<br />
Il timone ritorna automaticamente nella posizione <strong>di</strong> frenatura quando viene rilasciato.<br />
Quando parcheggiate il transpallet elettrico, il freno elettromagnetico serve da freno a mano.<br />
Frenatura da inversione <strong>di</strong> marcia<br />
In caso in cui siano fuori <strong>uso</strong> il sistema <strong>di</strong> controllo o l'unità motrice, è possibile frenare facendo l'inversione <strong>di</strong><br />
marcia.<br />
● Ruotare il timone dalla parte contraria del senso <strong>di</strong> marcia fino all'arresto del carrello.<br />
● Poi rilasciare il timone.<br />
Frenatura da sensore del freno<br />
● Quando viene rilasciato, il timone ritorna nella posizione “0” ed il transpallet elettrico è frenato<br />
dall'inerzia del motore.<br />
Il rapporto <strong>di</strong> riduzione della velocità è legato alla posizione del timone.<br />
Se il freno da rilascio è tolto dal personale <strong>di</strong> <strong>manutenzione</strong> e se il timone è nella posizione “0”, il transpallet<br />
elettrico può essere fermato solo dal freno elettromagnetico o dal freno <strong>di</strong> inversione marcia.<br />
4.2.2 Movimentazione merce carico/scarico<br />
Prima <strong>di</strong> movimentare la merce, l'operatore deve controllare che la capacità <strong>di</strong> sollevamento non venga<br />
superata e che il peso sia ben <strong>di</strong>stribuito sulle forche. E' sconsigliato prolungare la durata <strong>di</strong> sollevamento in<br />
carica massima.<br />
● Le forche devono essere inserite fino in fondo al carico.<br />
● I pulsanti “UP” e “DOWN”permettono <strong>di</strong> sollevare o abbassare a una velocità fissa.<br />
Sollevamento delle forche<br />
● Premere il pulsante “Raise Button” (bottone <strong>di</strong> sollevamento) fino all'altezza desiderata.<br />
Abbassamento delle forche<br />
● Premere il pulsante “Lower Button” (bottone <strong>di</strong> abbassamento) fino all'altezza desiderata.<br />
5. Manutenzione<br />
5.1 Sicurezza e protezione dell'ambiente<br />
Le istruzioni del capitolo «Manutenzione e ispezione» devono essere applicate secondo il programma<br />
specificato nella <strong>lista</strong> <strong>di</strong> <strong>manutenzione</strong><br />
Qualsiasi parte del transpallet elettrico soprattutto i <strong>di</strong>spositivi <strong>di</strong> sicurezza non devono essere cambiati senza<br />
autorizzazione. E' rigorosamente proibito variare la velocità del transpallet elettrico. Tutti i ricambi originali del<br />
costruttore sono certificati dalle Autorità <strong>d'</strong>Assicurazione della Qualità. Per assicurare la sicurezza e<br />
l'affidabilità del transpallet elettrico, si consiglia <strong>di</strong> utilizzare i ricambi del costruttore. I ricambi sostituiti,<br />
inclusi oli e carburanti, devono essere scaricati in zone definite dalle leggi per la protezione ambientale.<br />
5.2 Misure <strong>di</strong> sicurezza per la <strong>manutenzione</strong> del transpallet elettrico<br />
Personale <strong>di</strong> <strong>manutenzione</strong>: La <strong>manutenzione</strong>, la riparazione devono essere effettuate solo da personale<br />
qualificato e formato dall'Azienda.<br />
Sollevamento del transpallet elettrico: Durante il sollevamento del transpallet elettrico, il <strong>di</strong>spositivo <strong>di</strong><br />
sollevamento deve essere sicuro ed affidabile. Quando il transpallet elettrico è alzato, si devono prendere<br />
tutte le misure <strong>di</strong> sicurezza per evitare lo scivolamento o il capovolgimento del transpallet elettrico (si<br />
possono usare dei cunei <strong>di</strong> legno). Il transpallet elettrico può essere alzato dal suo <strong>di</strong>spositivo <strong>di</strong><br />
Traduzione delle istruzioni originali
sollevamento solo se il cavo rilegato è abbastanza resistente.<br />
Pulizia: E' severamente proibito utilizzare dei prodotti infiammabili per la pulizia del transpallet elettrico.<br />
Prima <strong>di</strong> pulire, prendere le dovute precauzioni per evitare <strong>di</strong> provocare scintille (che possono essere causate<br />
da un cortocircuito). Prima <strong>di</strong> manipolare la batteria, staccarla. Gli elementi elettrici e l'insieme dei<br />
componenti elettronici possono essere puliti solamente con un compressore ad aria leggero o con una<br />
spazzola isolante o antistatica.<br />
Se il transpallet elettrico viene pulito con un pulitore a getto <strong>d'</strong>acqua o ad alta pressione, si prega <strong>di</strong> coprire prima<br />
tutti gli elementi elettrici e l'insieme dei componenti elettronici per proteggerli dall'umi<strong>di</strong>tà ed evitare guasti. È<br />
severamente proibito pulire con un erogatore <strong>di</strong> vapore.<br />
Operazioni del sistema elettrico<br />
Solo personale adeguatamente formato può operare sul sistema elettrico del transpallet. Per evitare scosse<br />
elettriche, prendere tutte le dovute precauzioni. Staccare prima <strong>di</strong> ogni operazione la batteria.<br />
Operazioni <strong>di</strong> saldatura: Per evitare <strong>di</strong> danneggiare gli elementi elettrici e l'insieme dei componenti<br />
elettronici, rimuoverli dal transpallet elettrico e allontanarli prima <strong>di</strong> iniziare a saldare.<br />
Installazione: Dopo aver sistemato o sostituito i ricambi idraulici, elettrici o elettronici, si prega <strong>di</strong> rimetterli<br />
nella loro posizione iniziale.<br />
Ruote: La qualità delle ruote si ripercuote sulla stabilità e sulla guida del transpallet elettrico. La sostituzione<br />
delle ruote deve essere controllata e approvata dall'Azienda. Durante la sostituzione delle ruote, il<br />
transpallet elettrico deve rimanere in orizzontale nella sua posizione iniziale (le ruote devono essere<br />
cambiate in coppia, sia la destra e la sinistra).<br />
Catene <strong>di</strong> sollevamento: Senza lubrificazione, le catene si consumano rapidamente. L'intervallo <strong>di</strong> tempo<br />
fornito nella <strong>lista</strong> <strong>di</strong> <strong>manutenzione</strong> è valido per un <strong>uso</strong> in con<strong>di</strong>zioni normali. In caso <strong>di</strong> utilizzo del<br />
transpallet elettrico in ambienti polverosi, a temperature inferiori allo zero e per impieghi <strong>parti</strong>colarmente<br />
gravosi, occorre lubrificarli con maggior regolarità..<br />
Tubazioni idrauliche: Le tubazioni idrauliche e l'insieme del sistema idraulico devono essere cambiati ogni<br />
sei anni.<br />
5.3 Manutenzione ed ispezioni<br />
Un'accurata <strong>manutenzione</strong> garantisce il buon funzionamento del transpallet elettrico. La negligenza dei<br />
consigli del <strong>manuale</strong> <strong>di</strong> <strong>manutenzione</strong> può guastare il transpallet elettrico e <strong>di</strong>ventare un potenziale pericolo<br />
per le persone e cose.<br />
Il programma <strong>di</strong> <strong>manutenzione</strong> è basato su un <strong>uso</strong> del transpallet elettrico in con<strong>di</strong>zioni normali. Se il transpallet<br />
elettrico è utilizzato in ambienti polverosi, a temperature inferiori allo zero e per impieghi <strong>parti</strong>colarmente gravosi,<br />
occorre ridurre l'intervalli tra i vari interventi <strong>di</strong> <strong>manutenzione</strong>.<br />
Si prega <strong>di</strong> seguire le fasi <strong>di</strong> <strong>manutenzione</strong> specificate <strong>di</strong> seguito:<br />
Programma <strong>di</strong> <strong>manutenzione</strong><br />
O= verificare, revisionare, regolare<br />
Batteria X= sostituire<br />
Ricambio Controllo richiesto Giornaliero<br />
(8 ore)<br />
Settimanale<br />
(50 ore)<br />
Mensile<br />
(200 ore)<br />
Trimestrale<br />
(600 ore)<br />
Semestrale<br />
(1200 ore)<br />
Batteria Livello elettrolito O O O O<br />
Densità elettrolito O O O O<br />
Livello batteria O O O O O<br />
Stato terminali O O O O O<br />
Stato cavi<br />
connessione<br />
O O O O O<br />
Traduzione delle istruzioni originali
Variatore<br />
Pulizia della<br />
superficie batteria<br />
Presenza <strong>di</strong><br />
utensili nella<br />
batteria<br />
Stato tappi<br />
batteria<br />
Immagazzinament<br />
o (lontano da fonti<br />
<strong>di</strong> calore)<br />
Ricambio Controllo richiesto Giornaliero<br />
(8 ore)<br />
Variatore<br />
Motore<br />
Controllo stato<br />
usura connettori<br />
Controllo stato<br />
usura teleruttori<br />
Controllo stato<br />
usura interruttore<br />
marcia<br />
Controllo<br />
connessione tra<br />
motore, batterie e<br />
unità <strong>di</strong> potenza<br />
Ricambio Controllo richiesto Giorn<br />
aliero<br />
(8 ore)<br />
Motore<br />
O O O O<br />
O O O O O<br />
O O O O<br />
O O O O O<br />
Settimana<br />
le<br />
(50 ore)<br />
Settimanale<br />
(50 ore)<br />
Mensile<br />
(200 ore)<br />
Mensile<br />
(200 ore)<br />
Trimestrale<br />
(600 ore)<br />
Semestrale<br />
(1200 ore)<br />
O O<br />
O O<br />
O O<br />
O O<br />
Trimestrale (600 ore) Semestrale (1200 ore)<br />
Pulizia O O O<br />
Pulizia o<br />
sostituzione dei<br />
cuscinetti<br />
Controllo usura<br />
delle spazzole e del<br />
commutatore e della<br />
molla<br />
O O O<br />
Stato connessioni O O O<br />
Spazzole motore O O<br />
O<br />
Traduzione delle istruzioni originali
Trasmissione<br />
Ricambio Controllo<br />
richiesto<br />
Trasmissione<br />
Sterzo<br />
Rumore<br />
anomalo<br />
Controllo<br />
per<strong>di</strong>ta olio<br />
Sostituzione<br />
olio<br />
Lubrificazion<br />
e rulli<br />
Maneggevole<br />
zza<br />
Rumore<br />
anomalo<br />
Rotazione<br />
timone<br />
Giornaliero<br />
(8 ore)<br />
Ruote (ruota motrice, stabilizzatrice e <strong>d'</strong>appoggio)<br />
Ricambio Controllo<br />
richiesto<br />
Ruota<br />
motrice,<br />
stabilizzatrice<br />
e <strong>d'</strong>appoggio)<br />
Usura ed<br />
eventuali<br />
rotture<br />
Serraggio<br />
bulloni<br />
Sistema <strong>di</strong> frenaggio<br />
Presenza <strong>di</strong><br />
corpi estranei<br />
Ricambio Controllo<br />
richiesto<br />
Micro freno<br />
Tamburo<br />
freni<br />
Controllo stato<br />
del freno con il<br />
timone nella<br />
posizione<br />
verticale o <strong>di</strong><br />
guida<br />
Controllo stato<br />
micro<br />
Settimanale<br />
(50 ore)<br />
Mensile<br />
(200 ore)<br />
Trimestrale<br />
(600 ore)<br />
Semestrale<br />
(1200 ore)<br />
O O O O O<br />
O O O O O<br />
O O O O<br />
O O O O O<br />
O O O O O<br />
O O O O O<br />
Giornaliero<br />
(8 ore)<br />
Settimanale<br />
(50 ore)<br />
Mensile<br />
(200 ore)<br />
Trimestrale<br />
(600 ore)<br />
X<br />
Semestrale<br />
(1200 ore)<br />
O O O O O<br />
O O O O<br />
O O O O O<br />
Giornaliero<br />
(8 ore)<br />
Settimanale<br />
(50 ore)<br />
Mensile<br />
(200 ore)<br />
Trimestrale<br />
(600 ore)<br />
Semestrale<br />
(1200 ore)<br />
O O O O O<br />
O O O<br />
Serraggio O O O<br />
Usura O O<br />
Traduzione delle istruzioni originali
Maneggevolez<br />
za<br />
Spazio tra il<br />
tamburo e le<br />
Sistema idraulico ganasce<br />
O O O O O<br />
O O<br />
Ricambio Maneggevolez<br />
Controllo Giornaliero O Settimanale O Mensile O Trimestrale O Semestrale O<br />
za<br />
richiesto (8 ore) (50 ore) (200 ore) (600 ore) (1200 ore)<br />
Controllo<br />
livello olio ed<br />
Sistema idraulico eventuali<br />
O O O O X<br />
Ricambio<br />
Serbatoio<br />
per<strong>di</strong>te<br />
Controllo<br />
Pulizia richiesto filtro<br />
Giornaliero<br />
(8 ore)<br />
Settimanale<br />
(50 ore)<br />
Mensile<br />
(200 ore)<br />
Trimestrale<br />
(600 ore)<br />
Semestrale<br />
(1200 Oore)<br />
aspirazione<br />
Controllo O O O O X<br />
Eliminazione<br />
livello olio ed<br />
impurità eventuali<br />
O<br />
Serbatoio<br />
per<strong>di</strong>te<br />
Controllo<br />
eventuali Pulizia filtro<br />
per<strong>di</strong>te aspirazione <strong>d'</strong>olio,<br />
O O O<br />
O<br />
Flessibili e ce<strong>di</strong>menti,<br />
Eliminazione<br />
O<br />
giunti deformazioni<br />
impurità<br />
o danni<br />
Controllo<br />
O O O<br />
Sostituzione<br />
eventuali<br />
X<br />
tubazioni<br />
per<strong>di</strong>te <strong>d'</strong>olio,<br />
1-2 anni<br />
Flessibili e ce<strong>di</strong>menti, Controllo O O O O O<br />
giunti pompa deformazioni<br />
o idraulica danni per<br />
Sostituzione<br />
eventuali<br />
X<br />
Pompa tubazioni<br />
per<strong>di</strong>te <strong>d'</strong>olio<br />
1-2 anni<br />
e rumori<br />
Controllo O O O O O<br />
Controllare<br />
pompa<br />
usura<br />
idraulica per<br />
ingranaggi<br />
eventuali<br />
X O O O<br />
Pompa per<strong>di</strong>te <strong>d'</strong>olio<br />
5.4 Riparazione e rumori <strong>manutenzione</strong><br />
5.4.1 Operazioni preliminari alla <strong>manutenzione</strong><br />
Controllare<br />
X O O O<br />
Prendere tutte le misure <strong>di</strong> sicurezza per evitare un eventuale incidente durante la riparazione o la<br />
usura<br />
<strong>manutenzione</strong> del transpallet elettrico, agendo come segue:<br />
ingranaggi<br />
● Parcheggiare bene il transpallet elettrico<br />
● Premere il pulsante <strong>di</strong> emergenza e staccare la batteria.<br />
5.4<br />
5.5.2<br />
Riparazione<br />
Controllo livello<br />
e <strong>manutenzione</strong><br />
olio<br />
5.4.1<br />
Allestire<br />
Operazioni<br />
il transpallet<br />
preliminari<br />
elettrico<br />
alla<br />
per<br />
<strong>manutenzione</strong><br />
la riparazione o per la <strong>manutenzione</strong><br />
Prendere tutte le misure <strong>di</strong> sicurezza per evitare un eventuale incidente durante la riparazione o la<br />
● Rimuovere le sei viti<br />
<strong>manutenzione</strong> del transpallet elettrico, agendo come segue:<br />
● Aprire il cofano<br />
● Parcheggiare bene il transpallet elettrico<br />
● Verificare il livello dell'olio nel serbatoio.<br />
● Premere il pulsante <strong>di</strong> emergenza e staccare la batteria.<br />
5.5.2 Controllo livello olio<br />
Allestire il transpallet elettrico per la riparazione o per la <strong>manutenzione</strong><br />
● Rimuovere le sei viti<br />
● Aprire il cofano<br />
● Verificare il livello dell'olio nel serbatoio.<br />
Traduzione delle istruzioni originali
Durante l'ispezione, le forche e il il carico devono essere all'altezza più bassa.<br />
5.5.3 Controllo dei fusibili<br />
Allestire il il transpallet elettrico per la riparazione o per la <strong>manutenzione</strong><br />
● Aprire le protezioni sul lato sinistro<br />
● Consultare la scheda dei fusibili per conoscere il il voltaggio e sostituirli se necessario.<br />
Co<strong>di</strong>ce Descrizione Amperaggio<br />
FU Fusibile del circuito principale 150A<br />
FU1 Fusibile del controllo guida 10A<br />
FU2 Fusibile del controllo <strong>di</strong><br />
70A<br />
sollevamento<br />
5.4.4Utilisazione Utilizzo<br />
del transpallet elettrico dopo la <strong>manutenzione</strong><br />
Prima <strong>di</strong> utilizzare il il transpallet elettrico, portare a termine le seguenti operazioni:<br />
● Pulire il il transpallet elettrico<br />
● Controllare i i freni<br />
● Controllare il il pulsante <strong>d'</strong>emergenza<br />
● Controllare l'avvisatore acustico.<br />
5.5 Immagazzinamento del transpallet elettrico<br />
In caso <strong>di</strong> un lungo periodo <strong>di</strong> immagazzinamento, per più <strong>di</strong> due mesi, si si deve collocare il il transpallet<br />
elettrico in un luogo asciutto, pulito e al riparo dal gelo Prima <strong>di</strong> depositare il il transpallet elettrico. prendere<br />
le dovute precauzioni. Durante e dopo l'immagazzinamento, seguire le seguenti in<strong>di</strong>cazioni:<br />
Durante l'immagazzinamento, il il transpallet elettrico deve essere sollevato per tenere le le ruote staccate dal suolo.<br />
Cosi, le le ruote e cuscinetti non si si deterioreranno.<br />
Se il il periodo <strong>di</strong> immagazzinamento è superiore ai sei mesi, si si prega <strong>di</strong> contattare il il servizio clienti per avere<br />
maggiori istruzioni.<br />
5.5.1 Operazioni preliminari all'immagazzinamento<br />
● Pulire a fondo il il transpallet elettrico<br />
● Verificare i i freni<br />
● Verificare il il livello dell'olio idraulico e rabboccare se necessario<br />
● Ingrassare tutte le <strong>parti</strong> per proteggerle<br />
● Consultare la <strong>lista</strong> Lubrificazione e lubrificare i i ricambi<br />
● Ricaricare la batteria<br />
● Staccare e pulire la batteria, lubrificare gli elettro<strong>di</strong>.<br />
Si Si consiglia <strong>di</strong> seguire anche le le istruzioni della <strong>manutenzione</strong> della batteria.<br />
5.5.2 Misure da prendere durante l'immagazzinamento<br />
Ogni due mesi: caricare la batteria.<br />
Uso della batteria del transpallet elettrico<br />
E' importante caricare regolarmente la batteria. Altrimenti il il consumo totale della batteria provoca lo scarico<br />
automatico e può danneggiare la batteria.<br />
5.5.3 Riavviamento<br />
● Pulire a fondo il il transpallet elettrico<br />
● Consultare la <strong>lista</strong> Lubrificazione e lubrificare i i ricambi<br />
● Pulire la batteria, ingrassare gli elettro<strong>di</strong> e connetterla<br />
● Ricaricare la batteria<br />
● Verificare che non ci ci sia dell'acqua nell'olio motore e sostituirlo se necessario<br />
● Verificare che non ci ci sia dell'acqua nell'olio idraulico e sostituirlo se necessario<br />
● Avviare il il transpallet elettrico.<br />
Uso della batteria del transpallet elettrico<br />
Se il il sistema elettrico è guasto, spazzolare tutte le connessioni elettriche esposte con un detersivo adeguato.<br />
Ripetere questa fase fino a togliere lo strato <strong>di</strong> ossidazione.<br />
Traduzione delle istruzioni originali
Dopo la messa in moto, testare imme<strong>di</strong>atamente il freno elettromagnetico.<br />
5.5.4 Problemi, cause, soluzioni<br />
Trovate qui sotto gli elementi per <strong>di</strong>agnosticare ed eliminare i guasti che possono accadere durante l'<strong>uso</strong> del<br />
transpallet elettrico:<br />
mettere pag 16 17 18 19 wwp<br />
Le Impossibilità pag. 20-23a seconda <strong>di</strong> del movimento modello del in commissionatore avanti e in<strong>di</strong>etro .<br />
Mettere il timone nella posizione <strong>di</strong><br />
Se un problema persiste nonostante queste soluzioni, si prega <strong>di</strong> informarne il Servizio Clienti.<br />
guida e controllare i rumori<br />
SI<br />
Rumore?<br />
Controllare il variatore<br />
NO<br />
Co<strong>di</strong>ce del problema in<strong>di</strong>cato sul variatore<br />
Togliere il filo S fuori dal<br />
variatore. Controllare la<br />
resistenza tra S1 e A1. Resistenza<br />
< 100Ώ<br />
Sostituire il variatore<br />
Co<strong>di</strong>ce problema del variatore<br />
Controllare i contatti principali<br />
Controllare il micro inching. Problema? Regolare o sostituire<br />
SI<br />
SI<br />
Sostituire il motore<br />
Togliere la corrente, controllare la resistenza tra B2 e B3.<br />
Resistenza < 100Ώ? Sostutuire i contatti<br />
Traduzione delle istruzioni originali
Impossibilità <strong>di</strong> sollevamento<br />
Controllare l'in<strong>di</strong>catore<br />
batteria<br />
Normale?<br />
Controllare i rumori<br />
del motore<br />
Normale?<br />
Sovraccaricare<br />
Controllare le connessioni del<br />
sistema idraulico e il cilindro<br />
sollevamento<br />
Per<strong>di</strong>te?<br />
Sufficiente? Aggiungere olio<br />
Controllare la<br />
valvola idraulica<br />
SI<br />
SI<br />
NO<br />
NO<br />
Controllare il serbatoio olio<br />
SI<br />
NO<br />
NO<br />
SI<br />
SI<br />
NO<br />
Controllare il fusibile FU1 e FU2 e il bottone<br />
<strong>di</strong> emergenza<br />
Controllare il rumore del teleruttore<br />
Scaricare<br />
Sostituire la connessione<br />
o il cilindro<br />
Sostituire la valvola<br />
Rumore?<br />
Controllare il micro che controlla il limite <strong>di</strong> sollevamento e le sue connessioni<br />
SI<br />
Normale<br />
Controllare le connessioni<br />
del teleruttore<br />
all'interno del timone.<br />
Allentate?<br />
NO<br />
Controllare il micro <strong>di</strong><br />
sollevamento ITEM 2<br />
(P8). Normale?<br />
SI<br />
SI<br />
NO<br />
Controllare e sostituire<br />
il fusibile principale<br />
NO<br />
Controllare il voltaggio tra B2 e B3<br />
del teleruttore e sostituire<br />
SI<br />
NO<br />
Stringerle<br />
Sostituire<br />
Traduzione delle istruzioni originali
Impossibilità <strong>di</strong> <strong>di</strong>scesa<br />
Controllare l'in<strong>di</strong>catore batteria<br />
SI<br />
Normale?<br />
Controllare il filo 33 all'interno<br />
del timone<br />
Allentato?<br />
Normali?<br />
NO<br />
Controllare il micro <strong>di</strong> <strong>di</strong>scesa e i fili<br />
SI<br />
Controllare la valvola idraulica<br />
NO<br />
SI<br />
NO<br />
Controllare il fusibile FU1 e FU2 e il bottone <strong>di</strong><br />
emergenza<br />
Stringerlo<br />
Fissare o sostituire<br />
Sostituire la valvola<br />
Traduzione delle istruzioni originali
Co<strong>di</strong>ce del problema in<strong>di</strong>cato sul variatore<br />
Aprire la scatola del timone, controllare le connessioni dei filo del micro inching e il No.<br />
11 e No. 12<br />
Allentati?<br />
Stringerli<br />
Controllare la resistenza tra il filo 6 e il 7 (all'interno<br />
della scatola del timone)<br />
5K Ω - O<br />
Sostituire il potenziometro<br />
Controllare il micro marcia avanti e<br />
in<strong>di</strong>etro<br />
Co<strong>di</strong>ce del problema in<strong>di</strong>cato sul variatore<br />
Controllare il rumore del<br />
teleruttore<br />
Rumore?<br />
NO<br />
SI<br />
Controllare il voltaggio tra il<br />
filo 16 e B-24V<br />
SI<br />
SI<br />
Sostituire il teleruttore<br />
Controllare la resistenza<br />
tra i due fili del teleruttore<br />
4.
Schema elettrico<br />
Circuit <strong>di</strong>agram for WP60-13<br />
23<br />
Traduzione delle istruzioni originali
Traduction en français<br />
Attention: Ne pas utiliser le transpalette élecrique avant <strong>d'</strong>avoir lu et compris ce manuel <strong>d'</strong>utilisation.<br />
Sommaire<br />
Preface<br />
1. Sécurité lors de la mise en service<br />
2. Spécificités techniques<br />
3. Entretien, chargement et remplacement de la batterie<br />
4. Consignes <strong>d'</strong>utilisation<br />
5. Entretien<br />
6. Problèmes et solutions<br />
7. Schémas électrique<br />
8. Liste des pièces détachées<br />
Preface<br />
FalconLift vous remercie <strong>d'</strong>avoir choisi ce transpalete électrique. Pour votre sécurité et pour une utilisation<br />
correcte du transpalette élecrique, veuillez lire attentivement ces instructions et ces mises en garde avant<br />
toute utilisation<br />
Le manuel <strong>d'</strong>utilisation du transpalette élecrique a été conçu afin de vous fournir une maîtrise parfaite et<br />
sécurisée lors de l'utilisation du transpalette électrique.<br />
Les consignes de sécurités ainsi que les avertissements sont caractérisés par les symboles suivants:<br />
1.Les consignes de sécurité doivent être observées avant toute utilisation afin <strong>d'</strong>éviter toute blessure<br />
intentionnelle ou afin <strong>d'</strong>endommager le matériel.<br />
2. L'avertissement doit être observé afin <strong>d'</strong>éviter toute blessure corporelle ou endommagement du<br />
matériel.<br />
3.Notification et caractéristique générales avant utilisation.<br />
Ce transpalette électrique se compose essentiellement <strong>d'</strong>acier, il peut donc être complètement recyclé. Les pièces<br />
inutilisées après réparation, maintenance, nettoyage ou démolition, doivent être collectées et déposées de façon à<br />
respecter la nature selon les <strong>di</strong>rectives du pays en question. Le matériel doit être déchargé dans des zones adéquates. Le<br />
matériel recyclable doit être pris en charge par les autorités publiques. Tout abandon sauvage dans la nature de filtres à<br />
huile, de batteries ou composants électroniques peuvent avoir un effet nocif sur l'environnement et sur la santé.<br />
Toutes les informations reportées dans ce manuel se référent à des données <strong>di</strong>sponibles au moment de l'impression<br />
du manuel. Compte tenu du développement constant de nos produits ainsi que de leur renouvellement, nous nous<br />
réservons le droit <strong>d'</strong>apporter des mo<strong>di</strong>fications sur nos produits à n'importe quel moment sans avertir et sans encourir<br />
de sanction. Il est donc souhaitable de toujours vérifier si de possibles mo<strong>di</strong>fications ont été apportées.<br />
1. Sécurité lors de la mise en service<br />
1.1 Présence de l'opérateur obligatoire<br />
Ce transpalette électrique doit être manipulé par une personne compétente. Celle-ci peut montrer aux<br />
utilisateurs de façon réaliste le déplacement et le fonctionnement du transpalette électrique.<br />
1.2 Droit, obligation et responsabilité de l'opérateur<br />
L'opérateur doit comprendre ses droits ainsi que ses obligations et doit avoir reçu une formation sur le<br />
fonctionnement du transpalette électrique. De même, l'opérateur doit maîtriser les caractéristiques reportées<br />
dans ce manuel <strong>d'</strong>utilisation. Lors du fonctionnement du transpalette électrique, l'opérateur doit porter des<br />
chaussures de sécurité.<br />
Traduction Manuel Originel
1.3 Utilisation inter<strong>di</strong>te aux personnes non-autorisées<br />
Durant le fonctionnement, l'opérateur doit être responsable du transpalette électrique et doit empêcher les<br />
personnes non-autorisées à conduire ou manipuler le transpalette électrique. Il est strictement inter<strong>di</strong>t de<br />
porter ou de charger des personnes à l'aide du transpalette électrique.<br />
1.4 Défaut ou erreur<br />
En cas <strong>d'</strong>erreur ou de défaut, veuillez immé<strong>di</strong>atement avertir le fournisseur. Si le transpalette électrique ne<br />
fonctionne pas normalement (roues ou freins usés) , veuillez arrêter l'utilisation du transpalette électrique<br />
jusqu'à sa réparation.<br />
1.5 Réparation<br />
Sans une formation professionnelle et sans autorisation <strong>parti</strong>culière, l'opérateur ne doit pas réparer ou<br />
changer les pièces du transpalette électrique. Tout changement par l'opérateur de l'installation des<br />
commandes ou des <strong>di</strong>spositifs de sécurité est strictement inter<strong>di</strong>t sous peine <strong>d'</strong>entraîner une perte <strong>d'</strong>efficacité<br />
du transpalette électrique.<br />
Toutes les pièces détachées du constructeur sont certifiées par les Autorités <strong>d'</strong>Assurance de la Qualité. Afin de<br />
garantir le fonctionnement sûr et fiable du transpalette électrique, toutes les pièces détachées du constructeur peuvent<br />
être utilisées. Chaque pièce changée, huiles et alimentations incluses, doit s'effectuer en accord avec les réglementations<br />
de la protection environnementale.<br />
1.6 Zone dangereuse<br />
On entend par zone dangereuse: endroit où le transpalette électrique ou bien son <strong>di</strong>spositif de levage<br />
(comme les fourches ou les fixations) sont en mouvement et peuvent devenir un facteur potentiellement<br />
dangereux; ou bien endroit de transport des charges. En général, l'échelle des zones dangereuses comprend<br />
la phase <strong>d'</strong>abaissement de la charge ou de l'abaissement de la fixation du transpalette électrique.<br />
Les personnes non-autorisées doivent se tenir à l'écart des zones dangereuses. En cas de danger, l'opérateur doit<br />
avertir. Au cas où quelqu'un serait toujours dans la zone dangereuse alors qu'il a été demandé <strong>d'</strong>évacuer, l'opérateur<br />
doit immé<strong>di</strong>atement arrêter le transpalette électrique.<br />
1.7 Travailler dans des environnements dangereux<br />
Lorsque le transpalette électrique est utilisé dans une zone à risque, où dans n'importe quelle zone où le<br />
risque est important, il doit être spécialement équipé.<br />
En général le transpalette électrique n'est pas équipé pour ce genre de situations.<br />
1.8 Dispositif de sécurité et signaux <strong>d'</strong>alerte<br />
Veuillez être très attentif aux <strong>di</strong>spositifs de sécurité, aux signaux <strong>d'</strong>alerte ainsi qu'aux avertissements<br />
introduits dans le guide <strong>d'</strong>instruction.<br />
1.9 Utilisation dans des lieux publics<br />
Le transpalette électrique ne doit pas être utilisé sur des routes publiques sauf dans une zone spécifique.<br />
1.10 Distance entre les véhicules<br />
Veuillez prendre en compte que le véhicule devant vous peut toujours freiner brusquement. Veuillez garder<br />
vos <strong>di</strong>stances.<br />
1.11 Passagers<br />
Les passagers ne doivent pas monter sur le transpalette électrique, sauf in<strong>di</strong>cation contraire figurant sur le<br />
transpalette électrique.<br />
1.12 Utilisation dans des ascenseurs ou sur une plateforme élévatrice<br />
Le transpalette électrique ne peut être utilisé dans un ascenseur ou sur une plateforme élévatrice sauf sur<br />
autorisation spéciale. L'ascenseur et la plateforme élévatrice avec une capacité de charge suffisante peuvent<br />
être utilisés pour transporter le transpalette électrique avec la permission de celui qui conduit le transpalette<br />
électrique. L'opérateur doit <strong>d'</strong>abord confirmer avant toute manœuvre dans un ascenseur ou sur une<br />
plateforme élévatrice. La charge doit être placée dans une bonne position afin qu'elle ne touche pas les<br />
parois de l'ascenseur lorsque le transpalette électrique y pénètre. Si des personnes doivent utiliser l'ascenseur<br />
en même temps que le transpalette électrique, celles-ci doivent monter après que le transpalette électrique<br />
soit correctement placé dans l'ascenseur, et elles doivent en sortir avant que le transpalette électrique soit<br />
déplacé.<br />
1.13 Voies étroites et zones de travaux<br />
Traduction Manuel Originel
en même temps que le transpalette électrique, celles-ci doivent monter après que le transpalette électrique<br />
soit correctement placé dans l'ascenseur, et elles doivent en sortir avant que le transpalette électrique soit<br />
déplacé.<br />
1.13 Voies étroites et zones de travaux<br />
Lors de situations <strong>parti</strong>culières, comme lorsque le transpalette électrique doit passer dans une voie étroite,<br />
les personnes non-autorisées doivent s'éloigner de la zone de travaux et le chargement doit être placé dans<br />
un com<strong>parti</strong>ment spécial.<br />
1.14 Gestion des opérations<br />
La conduite à grande vitesse peut s'effectuer selon les con<strong>di</strong>tions du local. La basse vitesse est conseillée<br />
dans les virages, dans les allées étroites, à proximité des portes battantes ou dans des voies encombrées.<br />
L'opérateur doit être capable de mesurer <strong>d'</strong>un coup <strong>d'</strong>œil la <strong>di</strong>stance de freinage et il doit contrôler son<br />
transpalette électrique en permanence. Freinage brutal (sauf en cas <strong>d'</strong>urgence), rapide demi-tour ou<br />
dépassement dans des voies encombrées sont inter<strong>di</strong>ts. De même qu'il est inter<strong>di</strong>t <strong>d'</strong>atteindre des personnes<br />
à l'aide du transpalette électrique ou de charger des personnes à bord.<br />
1.15 Visibilité<br />
L'opérateur doit regarder dans le sens de la marche afin de pouvoir lire les panneaux signalétiques placés<br />
sur sa route. Si le chargement bloque la visibilité, il est conseillé de conduire en marche arrière. Si ce n'est pas<br />
mieux de cette façon, <strong>d'</strong>autres personnes peuvent se placer à proximité du transpalette électrique pour<br />
in<strong>di</strong>quer au conducteur la route et les dangers.<br />
1.16 Pente<br />
Si le transpalette électrique doit passer sur une pente étroite, celle-ci doit être préalablement nettoyée et elle<br />
doit être antidérapante. On peut conduire le transpalette électrique sur des pentes stipulées par les<br />
spécifications techniques (manuel <strong>d'</strong>instruction). La charge doit être placée vers le haut en <strong>di</strong>rection de la<br />
pente. Les demi-tours et les stationnements dans les pentes sont inter<strong>di</strong>ts. Dans les pentes, il convient de<br />
conduire à vitesse réduite. L'opérateur doit toujours être prêt à freiner à tout moment.<br />
1.17 Limite de chargement<br />
Veuillez vérifier attentivement les avis et les <strong>di</strong>rectives concernant les limites de chargement ou de gonflage<br />
des pneus afin de ne pas les dépasser.<br />
1.18 Transports<br />
Le transpalette électrique doit être conduit avec les fourches placées à la hauteur minimum de 300mm sauf<br />
lorsque l'on range ou l'on déplace les chargements. Il vaut mieux conduire le transpalette électrique dans le<br />
sens opposé aux fourches lorsque c'est possible. Cela confère une meilleure visibilité et manœuvrabilité.<br />
Lorsque l'on conduit le transpalette électrique fourches vers l'avant, cela rend les manœuvres plus aléatoires.<br />
1.19 Caractéristiques de charge<br />
Le chargement doit être correctement placé, afin qu'il soit sur et fiable. Les chargements plus hauts que le<br />
transpalette électrique sont inter<strong>di</strong>ts.<br />
1.20 Transpalette électrique sur une plateforme de chargement <strong>d'</strong>un autre véhicule ou dans une passerelle<br />
<strong>d'</strong>intercommunication<br />
Avant que le transpalette électrique soit conduit sur un quai de chargement ou sur la plateforme <strong>d'</strong>un<br />
camion ou <strong>d'</strong>un wagon, vous devez toujours vérifier la capacité de charge maximum de la passerelle<br />
<strong>d'</strong>intercommunication. Vous devriez aussi trouver des <strong>di</strong>spositifs de sécurité pour empêcher le glissement de<br />
la passerelle <strong>d'</strong>intercommunication. Le conducteur doit se souvenir aussi de la capacité de charge maximum<br />
de son véhicule dans lequel vous aller y mettre le transpalette électrique. Ici aussi vous devriez trouver des<br />
<strong>di</strong>spositifs (comme par exemple des sabots de freins) qui empêche le transpalette électrique de bouger.<br />
1.21 Stationnement<br />
Le transpalette électrique ne doit pas se trouver en dehors des aires de parking spécifiques. Le transpalette<br />
électrique doit toujours être garé sur une surface plane. Si le transpalette électrique est muni <strong>d'</strong>un frein de<br />
stationnement, il convient de le mettre. Les fourches doivent être à la position la plus basse, de sorte que<br />
personne ne puisse accidentellement trébucher sur celles-ci. Veuillez toujours mettre l'allumage sur “OFF”<br />
afin que le transpalette électrique soit éteint. Les personnes non-autorisées ne doivent pas utiliser le<br />
transpalette électrique. Veuillez toujours retirer la clé de contact lorsque laissez le transpalette électrique.<br />
Si le transpalette électrique n'est pas utilisé pendant un long moment sans être rechargé (entre deux déplacement<br />
par exemple), le câble de la batterie doit être déconnecté.<br />
1.22 Signalisation<br />
Veuillez utiliser les <strong>di</strong>spositifs de signalisation pour être vu.<br />
Traduction Manuel Originel
1.23 Chaussures de sécurité<br />
Les chaussures de sécurité doivent être portées lorsque l'on conduit le transpalette électrique selon la norme<br />
européenne EN-345:1-S1.<br />
1.24 Pièces ad<strong>di</strong>tionnelles/Remorques<br />
Après la livraison, vous devez contacter le fournisseur si vous voulez équiper le transpalette électrique <strong>d'</strong>une<br />
pièce supplémentaire, <strong>d'</strong>un attelage de remorque ou de tout autre accessoires car cela pourrait interférer sur<br />
la capacité de freinage ou sur la stabilité du transpalette électrique.<br />
2. Spécificités techniques<br />
2.1Application<br />
Le transpalette électrique a été spécialement conçu pour une utilisation sur <strong>di</strong>fférents types de sols. Avec sa<br />
structure compacte, le transpalette électrique est efficace dans les lieux qui requièrent une grande gestion de<br />
la marchan<strong>di</strong>se, comme dans les usines, les ateliers, les quais et dans les petits entrepôts. De même, il peut<br />
être utilisé pour charger ou décharger la marchan<strong>di</strong>se des camions (voire la capacité de chargement sur la<br />
fiche technique).<br />
2.2 Caractéristiques techniques<br />
2.2.1 Fiche technique<br />
Inserire le schede tecniche del commisionatore in oggetto<br />
1.1 COSTRUTTORE / MANUFACTURER / CONSTRUCTEUR FALCONLIFT<br />
2.2.2 Fiche technique pour transpalette électrique standard<br />
1.2 Modello/Model designation/Désignation du constructeur FLDINO25<br />
Cette fiche spécifique en accord avec la norme VDI 2198 prévoit seulement les valeurs techniques pour le<br />
1.3 Alimentazione/Power supply/Mode de translation Elettrico/Electric/Electrique<br />
transpalette électrique standard. Les types de transpalette électrique non-standard, les équipements<br />
1.4 Tipo <strong>di</strong> guida/Type of control/ Mode de conduite Su pedana/Rider/Sur platforme<br />
ad<strong>di</strong>tionnels, 1.5 Portata/Load etc capacity/ peuvent Capacité nominale donner <strong>d'</strong>autres valeurs. On se réserve Qle droit kg de tout 2500 changement technique ou<br />
de toute 1.6 amélioration.<br />
Baricentro del carico/Load centre/Centre de gravité de la charge nominale c mm 600<br />
1.8 Distanza del carico/Load <strong>di</strong>stance/Déport avant de la charge x mm 973<br />
2.2.3 Normes 1.9 Interasse/Wheelbase/Empattement Européennes<br />
y mm 1520<br />
2.1 Peso proprio/Service weight/Poids à vide kg 543<br />
Le niveau du bruit continu doit être
2.2 Caractéristiques techniques<br />
2.2.1 Fiche technique<br />
Inserire le schede tecniche del commisionatore in oggetto<br />
2.2.2 Fiche technique pour transpalette électrique standard<br />
Cette fiche spécifique en accord avec la norme VDI 2198 prévoit seulement les valeurs techniques pour le<br />
transpalette électrique standard. Les types de transpalette électrique non-standard, les équipements<br />
ad<strong>di</strong>tionnels, etc peuvent donner <strong>d'</strong>autres valeurs. On se réserve le droit de tout changement technique ou<br />
de toute amélioration.<br />
2.2.3 Normes Européennes<br />
Le niveau du bruit continu doit être
soient sur «OFF». Veuillez charger la batterie dans un lieu sec et aéré et éloignez-la des flammes. Lorsque vous utilisez<br />
le transpalette électrique, la batterie doit être chargée au minimum une fois par mois.<br />
Régulièrement, la batterie doit être rechargée de façon correcte. Lorsqu'elle est à plat, une alarme<br />
commencera à clignoter sur l'in<strong>di</strong>cateur de décharge de la batterie pendant le fonctionnement. Veuillez alors<br />
effectuer le rechargement.<br />
Chargement complètement automatique: le transpalette électrique est muni <strong>d'</strong>un chargeur intelligent et<br />
totalement automatique. Lorsque la prise est branchée au secteur, l'in<strong>di</strong>cateur rouge du chargeur clignote. Le<br />
chargeur ajuste automatiquement le courant selon les capacités résiduelles de la batterie, ce qui confère le<br />
bon déroulement du chargement. Après avoir rechargé la batterie, le voyant vert du chargeur clignote et le<br />
chargement est automatiquement stoppé. Le chargement dure en moyenne 5 à 7 heures.<br />
Il est inter<strong>di</strong>t de recharger la batterie avant quelle ne soit complètement déchargée.<br />
Lors du chargement, les bouchons des éléments de la batterie contenant l'eau doivent être ouverts afin de faire<br />
circuler l'air. Avant le chargement, assurez-vous qu'il n'y ait aucun objet métallique sur la batterie et que les joints des<br />
câbles et des prises ne soient pas défectueux. Toutes les mesures de sécurité, incluant les règles supplémentaires et la<br />
procédure de préparation, doivent être strictement observées.<br />
3.2.1 Charge initiale<br />
1. Si l'électrolyte de la batterie a <strong>di</strong>minué ou a été retiré, l'acide doit être versé dans la batterie. Il se compose<br />
<strong>d'</strong>un acide sulfurique exclusif et <strong>d'</strong>une eau exclusive <strong>d'</strong>acides de plomb. La gravité spécifique de l'électrolyte<br />
ajouté doit être de 1.280 ± 0.005 à la température ambiante de 25°C. Versez l'électrolyte composé dans la<br />
batterie, avec 15-20mm en plus par rapport au niveau limite.<br />
Lorsque la température des élément est en-dessous de 35°C, elle peut être connectée au courant et chargée.<br />
2. Les charges initiales s'effectuent en 2 étapes: A) lorsque le voltage final des éléments est inférieur à 2.4V, le<br />
courant doit être à 0.5Am;B) lorsque la tension s'élève à 2.4V, le courant doit être converti à la deuxième<br />
étape, 0.25A. Continuez le chargement jusqu'à ce que des bulles <strong>d'</strong>air sortent de l'électrolyte. Assurez-vous<br />
que le courant reste constant pendant 3 heures. Lorsque la densité de l'électrolyte atteint 1.280 ± 0.005, il ne<br />
doit pas bouger pendant 3 heures. A ce moment là, la quantité totale de charge électrique doit être 4/5 fois la<br />
capacité normale, et le chargement doit durer 70 heures.<br />
3.2.2 Chargement équilibré<br />
Lors du fonctionnement, si la capacité de tension n'est pas uniforme, cela veut <strong>di</strong>re qu'il faut de l'électrolyte<br />
et de la densité. On peut éliminer ce problème grâce au chargement équilibré, afin que les éléments<br />
redeviennent stables.<br />
On peut utiliser le chargement équilibré dans les con<strong>di</strong>tions suivantes:<br />
1) Lorsque les éléments dont le voltage de déchargement sont habituellement en dessous du voltage final<br />
(1.7V/élément).<br />
2) Lorsque les éléments ont un taux élevé de courant de déchargement (exemple: le moteur de conduite ou le<br />
moteur de levée qui travaillent en même temps).<br />
3) Lorsque la batterie ne doit pas être rechargée régulièrement après le déchargement.<br />
4) Lorsque la batterie est en chargement ou lorsque la batterie n'a pas été utilisée pendant longtemps.<br />
Étapes pour le chargement équilibré:<br />
1) Chargez au courant 0.1 I5A.<br />
2) Lorsque la tension atteint 2.5V et que des bulles <strong>d'</strong>air sortent de l'électrolyte, maintenez le chargement à<br />
0.05 I5A.<br />
3) Lorsque la batterie est complètement chargée, veuillez arrêter le chargement pendant une demie-heure.<br />
Ensuite, reprenez le chargement à 0.025 I5A pendant une heure.<br />
4) Stoppez à nouveau le chargement pendant une demie-heure, puis chargez pendant une autre heure à<br />
0.025 I5A .<br />
5) Répétez l'étape 4 sauf si des bulles <strong>d'</strong>air sortent de l'électrolyte dès que vous branchez le chargeur.<br />
Il est important <strong>d'</strong>effectuer tous les mois un rechargement équilibré pour les batteries en utilisation.<br />
3.3 In<strong>di</strong>cateur de niveau de batterie<br />
In<strong>di</strong>cateur de capacité de la batterie: Le déchargement de la batterie est signalé par l'in<strong>di</strong>cateur de capacité<br />
de la batterie par <strong>di</strong>x barres qui correspondent chacune à 10% de la capacité.<br />
Traduction Manuel Originel
Lorsque la batterie se décharge, les barres lumineuses s'éteignent en partant du “1” vers le “0”.<br />
Le signal “ALARM” apparait lorsque la capacité de la batterie est inférieure ou égale à 30%. A ce moment là,<br />
la batterie a besoin <strong>d'</strong>être rechargée.<br />
Le signal “ALARM” et un “STOP” clignotant apparaissent lorsque la capacité de la batterie est inférieure ou<br />
égale à 20%. A cet instant, les fonctions <strong>d'</strong>élévation du transpalette électrique se coupent automatiquement et<br />
se bloquent.<br />
Mettere le immagini a pag 8 e 9 del catalogo WWP<br />
Capacité suffisante Rechargement requis capacité insuffisante<br />
Si l'in<strong>di</strong>cateur de capacité de la batterie in<strong>di</strong>que un niveau insuffisant peu après la mise en service du <strong>di</strong>spositif de<br />
levage, la fonction <strong>d'</strong>élévation reprendra seulement lorsque la batterie aura récupéré 70% de ses capacités.<br />
4. Consignes <strong>d'</strong>utilisation<br />
4.1 Mise en service du transpalette électrique<br />
L'opérateur doit empêcher toute personnes de s'approcher de la zone de danger lors de la mise en service et le<br />
fonctionnement du transpalette électrique ou lorsqu'il charge du matériel.<br />
Contrôles habituels avant chaque mise en service:<br />
● Vérifier si le transpalette électrique n'a aucune défaillance (<strong>parti</strong>culièrement Capacité suffisiante au niveau des roues et<br />
des fourches)<br />
● Vérifier si la batterie est correctement fixée et si les câbles sont bien branchés<br />
Mise en service<br />
● Enclenchez le bouton de parking <strong>d'</strong>urgence<br />
● Insérez la clé dans le contact et tournez la à droite sur la position “I”<br />
● Le niveau de capacité de batterie in<strong>di</strong>que la capacité actuelle<br />
● Vérifiez le klaxon<br />
● Vérifier le fonctionnement des freins sur la poignée de timon<br />
4.3 Fonctionnement du transpalette électrique<br />
4.3.1 Mettre en route, conduire et garer le transpalette électrique<br />
Vous devez prendre un maximum de précautions lors de la mise en service et lors de la conduite du transpalette<br />
électrique en <strong>parti</strong>culier lorsqu'une personne s'approche de l'appareil.<br />
Lors de la conduite, il est formellement inter<strong>di</strong>t de faire monter des personnes Rechargement sur le transpalette requis électrique.<br />
Parking <strong>d'</strong>urgence<br />
Mettre le parking <strong>d'</strong>urgence lorsque toutes les fonctions électriques sont éteintes.<br />
Frein forcé<br />
Lorsque vous relâchez la poignée de timon, le frein effectif se met automatiquement (figure B1).<br />
Si la poignée de timon met du temps à se mettre en frein effectif, veuillez vous assurer de trouver le défaut et de le<br />
réparer. Si nécessaire, veuillez remplacer le vérin de la poignée de timon.<br />
Démarrage<br />
Le couvercle de la batterie doit être fixé correctement avant tout démarrage.<br />
Mettre en route le transpalette électrique<br />
La vitesse de conduite est régulée par le contrôleur.<br />
● Mettre le timon dans la position “F”<br />
Capacité insuffisante<br />
● Déterminer la <strong>di</strong>rection désirée en tournant le timon à droite ou à gauche. Le timon permet le<br />
freinage et il permet de conduire à l'aide des régulateurs de vitesse<br />
Conduite<br />
● Basculez la poignée de timon vers la gauche ou vers la droite pour conduire.<br />
Lorsque la batterie se décharge, les barres lumineuses s'éteignent en partant du “1” vers le “0”.<br />
Conduite en pente<br />
Le signal “ALARM” apparait lorsque la capacité de la batterie est inférieure ou égale à 30%. A ce moment là,<br />
La charge doit dans la <strong>di</strong>rection de la pente.<br />
la batterie a besoin <strong>d'</strong>être rechargée.<br />
Prenez vos mesures de sécurité lorsque le transpalette électrique glisse vers le bas: lorsque le bouton de contrôle est sur<br />
Le signal “ALARM” et un “STOP” clignotant apparaissent lorsque la capacité de la batterie est inférieure ou<br />
la position “O”, veuillez pousser immé<strong>di</strong>atement la poignée de timon vers l'arrière et relâchez-la pour enclencher le<br />
égale à 20%. A cet instant, les fonctions <strong>d'</strong>élévation du transpalette électrique se coupent automatiquement et<br />
frein électromagnétique afin de pouvoir contrôler la vitesse et la <strong>di</strong>rection du transpalette électrique (pour les<br />
se bloquent.<br />
glissements vers le bas).<br />
Mettere le immagini a pag 8 e 9 del catalogo WWP<br />
Capacité suffisante Rechargement requis capacité insuffisante<br />
Si l'in<strong>di</strong>cateur de capacité de la batterie in<strong>di</strong>que un niveau insuffisant peu après la mise en service du <strong>di</strong>spositif de<br />
levage, la fonction <strong>d'</strong>élévation reprendra seulement lorsque la batterie aura récupéré 70% de ses capacités.<br />
4. Consignes <strong>d'</strong>utilisation<br />
Traduction Manuel Originel<br />
4.1 Mise en service du transpalette électrique
Capacité suffisante Rechargement requis capacité insuffisante<br />
Si l'in<strong>di</strong>cateur de capacité de la batterie in<strong>di</strong>que un niveau insuffisant peu après la mise en service du <strong>di</strong>spositif de<br />
levage, la fonction <strong>d'</strong>élévation reprendra seulement lorsque la batterie aura récupéré 70% de ses capacités.<br />
4. Consignes <strong>d'</strong>utilisation<br />
4.1 Mise en service du transpalette électrique<br />
L'opérateur doit empêcher toute personnes de s'approcher de la zone de danger lors de la mise en service et le<br />
fonctionnement du transpalette électrique ou lorsqu'il charge du matériel.<br />
Contrôles habituels avant chaque mise en service:<br />
● Vérifier si le transpalette électrique n'a aucune défaillance (<strong>parti</strong>culièrement au niveau des roues et<br />
des fourches)<br />
● Vérifier si la batterie est correctement fixée et si les câbles sont bien branchés<br />
Mise en service<br />
● Enclenchez le bouton de parking <strong>d'</strong>urgence<br />
● Insérez la clé dans le contact et tournez la à droite sur la position “I”<br />
● Le niveau de capacité de batterie in<strong>di</strong>que la capacité actuelle<br />
● Vérifiez le klaxon<br />
● Vérifier le fonctionnement des freins sur la poignée de timon<br />
4.2 4.3 Fonctionnement du transpalette électrique<br />
4.2.1<br />
4.3.1 Mettre en route, conduire et garer le transpalette électrique<br />
Vous devez prendre un maximum de précautions lors de la mise en service et lors de la conduite du transpalette<br />
électrique en <strong>parti</strong>culier lorsqu'une personne s'approche de l'appareil.<br />
Lors de la conduite, il est formellement inter<strong>di</strong>t de faire monter des personnes sur le transpalette électrique.<br />
Parking <strong>d'</strong>urgence<br />
Mettre le parking <strong>d'</strong>urgence lorsque toutes les fonctions électriques sont éteintes.<br />
Frein forcé<br />
Lorsque vous relâchez la poignée de timon, le frein effectif se met automatiquement (figure B1).<br />
Si la poignée de timon met du temps à se mettre en frein effectif, veuillez vous assurer de trouver le défaut et de le<br />
réparer. Si nécessaire, veuillez remplacer le vérin de la poignée de timon.<br />
Démarrage<br />
Le couvercle de la batterie doit être fixé correctement avant tout démarrage.<br />
Mettre en route le transpalette électrique<br />
La vitesse de conduite est régulée par le contrôleur.<br />
● Mettre le timon dans la position “F”<br />
● Déterminer la <strong>di</strong>rection désirée en tournant le timon à droite ou à gauche. Le timon permet le<br />
freinage et il permet de conduire à l'aide des régulateurs de vitesse<br />
Conduite<br />
● Basculez la poignée de timon vers la gauche ou vers la droite pour conduire.<br />
Conduite en pente<br />
La charge doit dans la <strong>di</strong>rection de la pente.<br />
Prenez vos mesures de sécurité lorsque le transpalette électrique glisse vers le bas: lorsque le bouton de contrôle est sur<br />
la position “O”, veuillez pousser immé<strong>di</strong>atement la poignée de timon vers l'arrière et relâchez-la pour enclencher le<br />
frein électromagnétique afin de pouvoir contrôler la vitesse et la <strong>di</strong>rection du transpalette électrique (pour les<br />
glissements vers le bas).<br />
Traduction Manuel Originel
Freinage<br />
L'opérateur doit être capable de comprendre si les performances des freins sont adaptées aux con<strong>di</strong>tions de conduite.<br />
Le transpalette électrique possède trois types de frein:<br />
● Le frein électromagnétique<br />
● Le frein <strong>d'</strong>inversion de marche<br />
● Le frein de relâche<br />
Frein électromagnétique<br />
En cas <strong>d'</strong>urgence, le transpalette électrique peut être uniquement stoppé à l'aide du frein électromagnétique<br />
(poignée de timon).<br />
● Basculer la poignée de timon vers le haut ou vers le bas pour enclencher le frein (B1) et (B2), le<br />
moteur de conduite est mécaniquement stoppé.<br />
Quand vous relâchez la poignée de timon, celle-ci se met automatiquement sur la position de freinage (B1).<br />
Lorsque vous garer le transpalette électrique, le frein électromagnétique a la fonction de frein à main.<br />
Frein <strong>d'</strong>inversion de marche<br />
Si le système de contrôle ou l'unité motrice sont hors <strong>d'</strong>usage, on peut utiliser le freinage <strong>d'</strong>inversion de marche.<br />
● Tournez le timon dans le sens inverse de conduite jusqu'à ce que le transpalette électrique s'arrête<br />
● Relâcher le timon<br />
Frein de relâche<br />
● Après avoir relâché le timon, celui-ci retourne dans la position “0” et le transpalette électrique<br />
s'arrête suite à l'inertie du moteur<br />
Le taux de réduction de la vitesse est lié à la position de contrôleur de marche.<br />
Si le frein de relâche est retiré par le personnel de maintenance et si le timon est sur la position “0”, le transpalette<br />
électrique peut être arrête seulement par le frein électromagnétique ou par le freinage <strong>d'</strong>inversion de marche.<br />
4.2.2<br />
4.3.2 Fonctionnement lors du chargement/déchargement de marchan<strong>di</strong>se<br />
Avant de charger ou de décharger la marchan<strong>di</strong>se, l'opérateur doit vérifier si le chargement est bien placé sur les<br />
fourches et si le poids du chargement correspond aux capacité de chargement du transpalette électrique. Il est<br />
déconseillé de prolonger la durée du soulèvement en charge maximale.<br />
● Les fourches doivent être insérées jusqu'au fond du chargement dans la meilleure position<br />
● Le fonctionnement des boutons “UP” et “DOWN” (montée et descente) induit une montée ou une<br />
descente à une vitesse fixe.<br />
Élévation des fourches<br />
● Appuyer sur le bouton de contrôle “FORK LIFTING” (élévation des fourches) et maintenez-le<br />
enfoncé jusqu'à l'obtention de la hauteur désirée. Faites attention à la hauteur limite.<br />
Abaissement des fourches<br />
● Appuyez sur le bouton de contrôle “FORK LOWERING” (abaissement des fourches) pour abaisser<br />
Traduction Manuel Originel
les fourches à la hauteur voulue.<br />
5. Entretien<br />
5.1 Opération de sécurité et respect de l'environnement<br />
Les instructions mentionnées dans la <strong>parti</strong>e «Opération <strong>d'</strong>inspection et de maintenance» doivent être<br />
appliquées selon le programme de la Liste de Maintenance.<br />
Les pièces ou les conseils de sécurité ne peuvent pas être changés sans autorisation. Il est strictement inter<strong>di</strong>t de<br />
mo<strong>di</strong>fier la vitesse du transpalette électrique.<br />
Toutes les pièces détachées du constructeur sont qualifiées par les Autorités <strong>d'</strong>Assurance de la Qualité. Afin<br />
<strong>d'</strong>assurer la sécurité et la fiabilité du transpalette électrique, il convient <strong>d'</strong>utiliser les pièces détachées du<br />
constructeur. Les pièces remplacées, huiles et carburants, doivent être déposés dans des zones définies par<br />
les lois de protection environnementale.<br />
5.2 Règles de sécurité pour l'entretien du transpalette électrique<br />
Personnel de maintenance: seules les professionnels qualifiés et formés par le fabriquant sont autorisés à<br />
réparer ou à entretenir le transpalette électrique. Le service après-vente du fabriquant a <strong>di</strong>spatché des<br />
techniciens spéciaux qui sont autorisés à signer le livret <strong>d'</strong>entretien dans le service de maintenance désigné<br />
par le fabriquant.<br />
Élévation du transpalette électrique: lors de l'élévation du transpalette électrique, son <strong>di</strong>spositif de levage<br />
doit être sur et fiable (en <strong>parti</strong>culier la position de levée). Lorsque le transpalette électrique est levé, toutes les<br />
mesures de sécurité doivent être prises pour éviter le glissement ou le retournement du transpalette<br />
électrique (des blocs de bois peuvent être utilisés). Le transpalette électrique peut être levé au niveau du<br />
<strong>di</strong>spositif de levage à con<strong>di</strong>tions que les fourches sont reliées à un câble assez solide.<br />
Nettoyage: Il est strictement inter<strong>di</strong>t <strong>d'</strong>utiliser des produits inflammables pour le nettoyage du transpalette<br />
électrique. Avant de commencer le nettoyage, veuillez prendre vos mesures de sécurité afin <strong>d'</strong>éviter toute<br />
étincelle (qui peuvent par exemple être causées par un court-circuit). Avant toute manipulation sur la<br />
batterie, veuillez la brancher. Tous les éléments électriques et l'ensemble des composants électroniques<br />
peuvent être uniquement nettoyés à l'aide <strong>d'</strong>un compresseur à air doux ou à l'aide <strong>d'</strong>une brosse isolante et<br />
antistatique.<br />
Si vous utilisez un nettoyeur à jet <strong>d'</strong>eau propre ou à haute pression, veuillez <strong>d'</strong>abord couvrir les éléments<br />
électriques et l'ensemble des composants électroniques afin de les protéger de l'humi<strong>di</strong>té qui pourrait entrainer un<br />
mauvais fonctionnement.<br />
Le nettoyage à l'aide <strong>d'</strong>une buse à vapeur est inter<strong>di</strong>t.<br />
Manipulation du système électrique<br />
Seuls les professionnels qualifiés peuvent manipuler le système électrique du transpalette électrique. Afin<br />
<strong>d'</strong>éviter les chocs électriques, veuillez prendre toutes vos précautions. Veuillez débrancher la batterie avant<br />
toute manipulation.<br />
Soudage: Fin <strong>d'</strong>éviter l'endommagement des éléments électriques et l'ensemble des composants<br />
électroniques, veuillez les retirer du transpalette électrique et les éloigner avant de souder.<br />
Installation: Après avoir réparé ou remplacé des composants hydrauliques, électriques ou électroniques,<br />
veuillez les remettre à leur position initiale.<br />
Roues: La qualité des roues se répercute sur la stabilité et sur la conduite du transpalette électrique. Le<br />
changement des roues doit être vu et approuvé par le constructeur. Lors de la substitution des roues, le<br />
transpalette électrique doit rester dans sa position initiale, à l'horizontale (les roues doivent être changées par<br />
paire, droite et gauche).<br />
Chaines de levage et galets: Sans graissage, les chaines de levage et les galets s'usent rapidement. Le temps<br />
<strong>d'</strong>intervalle du manuel de maintenance est valable lors de con<strong>di</strong>tions normales <strong>d'</strong>utilisation. Au cas où le<br />
lieux de travail est dégradé ( poussière, températures extrêmes), il est nécessaire de les graisser<br />
régulièrement.<br />
Tuyau <strong>d'</strong>huile hydraulique: Le tuyau <strong>d'</strong>huile hydraulique ainsi que l'ensemble du système hydraulique doit<br />
être changé tous les 6 ans.<br />
5.3 Maintenance et inspection<br />
Traduction Manuel Originel
égulièrement.<br />
Tuyau <strong>d'</strong>huile hydraulique: Le tuyau <strong>d'</strong>huile hydraulique ainsi que l'ensemble du système hydraulique doit<br />
être changé tous les 6 ans.<br />
5.3 Maintenance et inspection<br />
Une maintenance complète et professionnelle assure le fonctionnement sécurisé du transpalette électrique.<br />
Le non-respect et la négligence des conseils du manuel <strong>d'</strong>entretien peut causer la défaillance du transpalette<br />
électrique et peut même devenir un danger potentiel pour les personnes et le matériel.<br />
Le programme de maintenance est basé sur une utilisation du transpalette électrique en con<strong>di</strong>tions normales,<br />
chaque opération est prise en compte singulièrement. Le cycle de maintenance sera écourté si vous soumettez le<br />
transpalette électrique à des con<strong>di</strong>tions <strong>d'</strong>utilisation <strong>di</strong>fficiles, comme la poussière, les températures extrêmes ou lorsque<br />
vous utilisez toutes ses fonctions en même temps.<br />
Veuillez procéder aux opérations de maintenance en suivant le cycle de maintenance in<strong>di</strong>qué ci-dessous:<br />
Planning de maintenance O= vérifier maintenance<br />
Batterie X= remplacer<br />
Partie Contrôle<br />
Batterie<br />
Variateur<br />
Niveau<br />
électrolyte<br />
Densité<br />
électrolyte<br />
Niveau<br />
batterie<br />
Etat<br />
terminaux<br />
Etat câbles de<br />
connexion<br />
Nettoyage<br />
surface<br />
batterie<br />
Aucun outil<br />
sur la batterie<br />
Journalier<br />
(8 h)<br />
Hebdomadaire<br />
(50 h)<br />
Mensuel<br />
(200 h)<br />
Trimestriel<br />
(600 h)<br />
Semestriel<br />
(1200 h)<br />
O O O O<br />
O O O O<br />
O O O O O<br />
O O O O O<br />
O O O O O<br />
O O O O<br />
O O O O O<br />
Etancéité O O O O<br />
Entreposage<br />
(à l'abris de<br />
flamme, etc.)<br />
Partie Contrôle<br />
Variateur<br />
Etat<br />
connecteur<br />
Etat<br />
contacteur<br />
Etat<br />
interrupteur<br />
de marche<br />
Connexion<br />
entre moteur,<br />
batterie et<br />
unité de<br />
puissance<br />
O O O O O<br />
Journalier<br />
(8 h)<br />
Hebdomadaire<br />
(50 h)<br />
Mensuel<br />
(200 h)<br />
Trimestriel<br />
(600 h)<br />
Semestriel<br />
(1200 h)<br />
O O<br />
O O<br />
O O<br />
O O<br />
Traduction Manuel Originel
Moteur<br />
Partie Contrôle<br />
Moteur<br />
Journalier<br />
(8 h)<br />
Hebdomadaire<br />
(50 h)<br />
Mensuel<br />
(200 h)<br />
Trimestriel<br />
(600 h)<br />
Semestriel<br />
(1200 h)<br />
Nettoyage O O O<br />
Nettoyage ou<br />
remplacement des<br />
roulements<br />
Etat balais et<br />
commutateur-<br />
Surchauffe<br />
anormale!<br />
O<br />
O O O<br />
Etat connexions O O O<br />
Remplacement<br />
balais<br />
Transmission côntrole<br />
Partie Contrôle<br />
Boite de<br />
transmission<br />
Direction<br />
Journalier<br />
(8 h)<br />
Hebdomadaire<br />
(50 h)<br />
Mensuel<br />
(200 h)<br />
O O<br />
Trimestriel<br />
(600 h)<br />
Semestriel<br />
(1200 h)<br />
Bruit douteux O O O O O<br />
Pertes <strong>d'</strong>huile O O O O O<br />
Remplacemen<br />
t de l'huile<br />
Lubrification<br />
roulement<br />
O O O O<br />
Flui<strong>di</strong>té O O O O O<br />
Bruit douteux O O O O O<br />
Poignée O O O O O<br />
Roues (roue motrice, roue stabilisatrice et roue <strong>d'</strong>appui)<br />
Partie Contrôle<br />
Roue motrice,<br />
roue<br />
stabilisatrice<br />
et roue<br />
<strong>d'</strong>appui<br />
Journalier<br />
(8 h)<br />
Hebdomadaire<br />
(50 h)<br />
Mensuel<br />
(200 h)<br />
Trimestriel<br />
(600 h)<br />
X<br />
Semestriel<br />
(1200 h)<br />
Etat général O O O O O<br />
Serrage O O O O<br />
Usure O O O O O<br />
Traduction Manuel Originel
Système de frein<br />
Partie Contrôle<br />
Micro frein<br />
Tambour<br />
frein<br />
Etat du frein<br />
lorsque la<br />
poignée est en<br />
position<br />
verticale ou<br />
de conduite<br />
Serrage de<br />
micro<br />
Journalier<br />
(8 h)<br />
Hbodomadaire<br />
(50 h)<br />
Mensuel<br />
(200 h)<br />
Trimestriel<br />
(600 h)<br />
Semestriel<br />
(1200 h)<br />
O O O O O<br />
O O O<br />
Etanchéité O O O<br />
Usure O O<br />
Nettoyage<br />
(entre<br />
tambour et<br />
mâchoires)<br />
Système hydraulique<br />
O O<br />
Flui<strong>di</strong>té O O O O O<br />
Partie Contrôle<br />
Réservoir<br />
Flexibles et<br />
joints<br />
Pompe<br />
Niveau<br />
<strong>d'</strong>huile et<br />
remplacement<br />
Nettoyage<br />
crépine<br />
Elimination<br />
<strong>d'</strong>impurités<br />
Pertes <strong>d'</strong>huile,<br />
usure,<br />
déformations<br />
et<br />
endommage=<br />
ments<br />
Replacement<br />
flexibles<br />
Pertes <strong>d'</strong>huile<br />
et bruit<br />
douteux<br />
Journalier<br />
(8 h)<br />
Hebodomadaire<br />
(50 h)<br />
Mensuel<br />
(200 h)<br />
Trimestriel<br />
(600 h)<br />
Semestriel<br />
(1200 h)<br />
O O O O X<br />
O<br />
O<br />
O O O<br />
X<br />
1-2 ans<br />
O O O O O<br />
Engrenage X O O O<br />
5.4 Opération de rectification pour la réparation et pour la maintenance<br />
5.4.1 Préparation du transpalette électrique à la réparation ou à la maintenance<br />
Prenez toutes vos mesures de sécurité pour éviter tous incident pendant la réparation ou la maintenance du<br />
transpalette électrique, en suivant les in<strong>di</strong>cations suivantes:<br />
Traduction Manuel Originel
● Garez le transpalette électrique en toute sécurité;<br />
● Enclenchez le bouton <strong>d'</strong>urgence et débranchez la batterie.<br />
5.4.2 Inspection du niveau <strong>d'</strong>huile<br />
Préparation du transpalette électrique à la réparation ou à la maintenance;<br />
● Ouvrir le couvercle du timon;<br />
● Vérifier le niveau <strong>d'</strong>huile.<br />
Durant l'inspection, les fourches doivent être au plus bas.<br />
5.4.3 Contrôle des fusibles<br />
Préparation du transpalette électrique à la réparation ou à la maintenance;<br />
● Ouvrir le couvercle du timon<br />
● Consulter la fiche des fusibles pour connaître le voltage de ceux-ci, et remplacer-les si nécessaire.<br />
CODE DESIGNATION AMPERAGE<br />
FU Fusible du circuit principal 200A<br />
FU1<br />
Fusible du contrôle des<br />
mouvements<br />
FU2 Fusible du contrôle de levée 6A<br />
5.4.4 Utilisation du transpalette électrique après la maintenance<br />
Après la maintenance ou la réparation du transpalette électrique, veuillez conclure par ces opérations<br />
in<strong>di</strong>quées ci-dessous avant <strong>d'</strong>utiliser le transpalette électrique:<br />
● Nettoyez le transpalette électrique<br />
● Contrôlez les freins<br />
● Vérifiez le bouton <strong>d'</strong>urgence<br />
● Contrôlez le klaxon.<br />
5.5 Immobilisation du transpalette électrique<br />
Si vous immobilisez le transpalette électrique pendant plus de deux mois, veuillez vous assurer qu'il soit<br />
entreposé dans un endrois sec où il ne puisse pas geler. Après son immobolité, vous devez prendre toutes les<br />
mesures nécessaires. Pendant et après l'immobilisation, veuillez exécuter les opérations suivantes:<br />
Durant l'immobilité du transpalette électrique, celui-ci doit être surélevé, afin que les roues ne touchent pas le sol.<br />
De cette façon, elles seront protégées contre les dégradations.<br />
Si le transpalette électrique est inutilisé pendant plus de 6 mois, veuillez contacter le service de maintenance<br />
pour avoir plus de détails sur les opérations à suivre.<br />
5.5.1 Opérations avant l'immobilisation<br />
● Nettoyez complètement le transpalette électrique<br />
● Contrôlez les freins<br />
● Graissez les pièces pour les protéger<br />
● Consultez la liste des pièces à graisser<br />
● Rechargez la batterie<br />
● Débranchez et nettoyez la batterie, graissez les électrodes de la batterie.<br />
Vous pouvez aussi suivre les instruction concernant la manutention de la batterie.<br />
5.5.2 Mesures à prendre pendant l'immobilisation<br />
Tous les 2 mois: rechargez la batterie.<br />
Faire fonctionner la batterie du transpalette électrique.<br />
Il est important de recharger régulièrement la batterie. Le déchargement total de la batterie causera la<br />
décharge automatique de celle-ci et pourra même l'endommager.<br />
5.5.3 Remise en service<br />
● Nettoyez complètement le transpalette électrique<br />
● Consultez la liste des pièces à graisser<br />
● Nettoyez la batterie, graissez les électrodes de la batterie et branchez-la<br />
● Rechargez la batterie<br />
● Contrôlez qu'il n'y ait pas <strong>d'</strong>eau dans l'huile <strong>d'</strong>engrenage et remplacez-la si besoin<br />
● Vérifiez s'il n'y a pas <strong>d'</strong>eau dans l'huile hydraulique et remplacez-la si besoin<br />
Traduction Manuel Originel<br />
● Mettez le transpalette électrique en route.<br />
Faire fonctionner la batterie du transpalette électrique.<br />
10A
● Contrôlez qu'il n'y ait pas <strong>d'</strong>eau dans l'huile <strong>d'</strong>engrenage et remplacez-la si besoin<br />
● Vérifiez s'il n'y a pas <strong>d'</strong>eau dans l'huile hydraulique et remplacez-la si besoin<br />
● Mettez le transpalette électrique en route.<br />
Faire fonctionner la batterie du transpalette électrique.<br />
● Au cas où il y aurait un problème avec le système électrique, veuillez utiliser un nettoyant pour<br />
contact sur les connexion électriques exposées. Répétez cette opération afin <strong>d'</strong>éliminer la couche<br />
<strong>d'</strong>oxydation sur les pièces de connexions de la carte de contrôle du timon.<br />
Après la remise en service, veuillez tester le frein électromagnétique.<br />
5.5.4 Problèmes, causes, solutions<br />
Veuillez trouver ci-dessous les éléments pour <strong>di</strong>agnostiquer et éliminer les défauts simples qui puissent<br />
survenir lors de l'utilisation du transpalette électrique:<br />
mettere pag 16 17 18 19 wwp tradotte<br />
Si un problème persiste malgré ces solutions, veuillez-en informer le service après-vente du fabriquant pour qu'un<br />
professionnel Mettre entrainé le timon PAS DE MARCHE AVANT ET/OU ARRIERE<br />
puisque en position l'éra<strong>di</strong>quer. de<br />
marche, et ecouter les bruits<br />
OUI<br />
Clique?<br />
Vérifier le variateur<br />
NON<br />
NON<br />
CODE D'ERREUR SUR LE VARIATEUR<br />
Débrancher le câble S1 du<br />
variateur. Vérifier la résistance<br />
entre S1 et A1.<br />
Resistence
PAS DE LEVEE<br />
Vérifier l’in<strong>di</strong>cateur<br />
de batterie<br />
Normal?<br />
OUI<br />
Contrôler les bruits<br />
du moteur<br />
Normal?<br />
OUI<br />
NON<br />
OUI<br />
NON<br />
NON<br />
OUI<br />
Verifier le système de connexion<br />
de l’huile et le vérin de levée<br />
Perte?<br />
Vérifier le réservoir <strong>d'</strong>huile<br />
Suffisant?<br />
Côntroler la valve<br />
hydraulique<br />
Contrôler les fusibles FU1/FU2 et<br />
l’arrêt d’urgence<br />
Contrôler le bruit du<br />
contacteur<br />
Replacer la connexion<br />
ou le vérin<br />
Remplir<br />
La remplacer<br />
OUI<br />
NON<br />
OUI<br />
Clique?<br />
Normal?<br />
NON<br />
Cotrôler le câble de<br />
connexion dans le<br />
timon. Desserré?<br />
OUI<br />
Vérifier le contacteur de<br />
levée 2 (P8). Normal?<br />
Vérifier et remplacer le fusible<br />
principal<br />
NON<br />
Vérifier le voltage entre B2 et B3 du<br />
contacteur et le remplacer<br />
Surchagé? Décharger Vérifier le commutateur de limitation de levée et ses câbles de connexion<br />
OUI<br />
NON<br />
Le remplacer ou<br />
l’ajuster<br />
Le resserrer<br />
Le remplacer
PAS DE DESCENTE<br />
Vérifier l’in<strong>di</strong>cateur<br />
de batterie<br />
OUI<br />
NON<br />
OUI<br />
NON<br />
Normal? Contrôler les fusibles FU1/FU2 et l’arrêt d’urgence<br />
Vérifier le câble 33 dans le<br />
timon<br />
OUI<br />
Desserré? Resserrer<br />
Contrôler le contacteur de descente et les câbles<br />
NON<br />
Normal? L’ajuster ou le<br />
remplacer<br />
Contrôler la valve hydraulique<br />
La remplacer
CODE D'ERREUR SUR LE VARIATEUR<br />
Contrôler les câbles de connexion des micros dans la poignée de timon<br />
et les câbles n° 11 et 12<br />
NON<br />
Contrôler la résistance entre des câbles 6 et 7 (à l'intérieur<br />
de la poignée du timon)<br />
NON<br />
Remplacer le potentiomètre<br />
Vérifier le bruit du contacteur<br />
NON<br />
Desseré Resserer<br />
Clique?<br />
OUI<br />
Contrôler le micro de marche et<br />
de recul<br />
CODE D'ERREUR SUR LE VARIATEUR<br />
OUI<br />
OUI<br />
Le remplacer<br />
Le remplacer<br />
Contrôler le voltage entre le<br />
câble 16 et B-24V?<br />
Contrôler la resistance<br />
entre les 2 connecteurs du<br />
câble 4. < 0..1<br />
NON<br />
Remplacer le câble 4<br />
OUI<br />
Remplacer le contacteur
Schema électrique<br />
Circuit <strong>di</strong>agram for WP60-13<br />
23
Spare parts index In<strong>di</strong>ce <strong>parti</strong> <strong>di</strong> <strong>ricambio</strong> Sommaire pièces<br />
détachées<br />
1. Steering control system Complesso sterzo Système de <strong>di</strong>rection<br />
2. Handle assembly Timone Timon<br />
3. Switch box assembly Complessivo bottoni Assemble des buttons<br />
3 BIS Switch box assembly Complessivo bottoni Assemble des buttons<br />
4. Driving system Trasmissione Transmission<br />
4 BIS Driving system Trasmissione Transmission<br />
5. Gear box assembly Complessivo scatola ingranaggi Boîte de transmission<br />
6. Drive motor Motore guida Moteur de conduite<br />
7. Hydraulic system Sistema idraulico Système hydraulique<br />
7 BIS Hydraulic system Sistema idraulico Système hydraulique<br />
8. Hydraulic power unit Motore pompa Moteur pompe<br />
9.Valve assembly Complessivo valvola Assemble valve<br />
10. Oil pump Pompa idraulica Pompe Hydraulique<br />
11. Frame Telaio Chassis<br />
12. Balance wheel assembly Complessivo ruota stabilizzatrice Assemble roue stabilisatrice<br />
13. Electric panel assembly Complessivo pannello elettrico Assemble èlectrique<br />
14 Footboard assembly Complessivo pedana Assemble plateforme<br />
15. Forked frame Forche Fourches<br />
16. Compartment Cofanatura Capot<br />
17. Protect arms Protezioni laterali Protections latérales<br />
18. Battery assembly Complessivo batteria Assemble batterie
1. Steering control system / Complesso sterzo / Système de <strong>di</strong>rection
1. Steering control system / Complesso sterzo / Système de <strong>di</strong>rection
2. Handle assembly / Timone / Timon
2. Handle assembly / Timone / Timon
3. Switch box assembly / Complessivo bottoni / Assemble des buttons
3. Switch box assembly / Complessivo bottoni / Assemble des buttons
3.BIS Switch box assembly / Complessivo bottoni / Assemble des<br />
buttons
3 BIS Switch box assembly / Complessivo bottoni / Assemble des<br />
buttons
4. Driving system / Trasmissione / Transmission
4. Driving system / Trasmissione / Transmission
4 BIS Driving system / Trasmissione / Transmission
4 BIS Driving system / Trasmissione / Transmission
5. Gear box assembly / Complessivo scatola ingranaggi / Boîte de<br />
transmission
5. Gear box assembly / Complessivo scatola ingranaggi / Boîte de<br />
transmission
6. Drive motor / Motore guida / Moteur de conduite
6. Drive motor / Motore guida / Moteur de conduite
7. Hydraulic system / Sistema idraulico / Système hydraulique
7. Hydraulic system / Sistema idraulico / Système hydraulique
7 BIS Hydraulic system / Sistema idraulico / Système hydraulique
7 BIS Hydraulic system / Sistema idraulico / Système hydraulique
8. Hydraulic power unit / Motore pompa / Moteur pompe
8. Hydraulic power unit / Motore pompa / Moteur pompe
9. Valve assembly / Complessivo valvola / Assemble valve
9. Valve assembly / Complessivo valvola / Assemble valve
10. Oil pump / Pompa idraulica / Pompe hydraulique
10. Oil pump / Pompa idraulica / Pompe hydraulique
11. Frame / Telaio / Chassis
11. Frame / Telaio / Chassis
12. Balance wheel assembly / Complessivo ruota stabilizzatrice /<br />
Assemble roue stabilisatrice
12. Balance wheel assembly / Complessivo ruota stabilizzatrice /<br />
Assemble roue stabilisatrice
13. Electric panel assembly / Complessivo pannello elettrico
13. Electric panel assembly / Complessivo pannello elettrico
14. Footboard assembly / Complessivo pedana / Assemble plateforme
14. Footboard assembly / Complessivo pedana / Assemble plateforme
15. Forked frame / Forche / Fourches
15. Forked frame / Forche / Fourches
16. Compartment (for footboard) / Com<strong>parti</strong>mento / Com<strong>parti</strong>ment
16. Compartment (for footboard) / Com<strong>parti</strong>mento / Com<strong>parti</strong>ment
17. Protect arms / Protezioni laterali / Protections latérales
17. Protect arms / Protezioni laterali / Protections latérales
18. Battery assembly / Complessivo batteria / Assemble batterie
18. Battery assembly / Complessivo batteria / Assemble batterie<br />
1 FLBATT24315F Battery 24V 315Ah (1)<br />
2 FLCB2440 Battery charger (1)
SEDE/HEADQUARTERS<br />
ULIVIERI RICAMBI S.r.l. Via Massa - Avenza, 36 - 54100 Massa<br />
Tel. + 39 0585 794311 Fax +39 0585 794360<br />
www.ulivieriricambi.it - ulivieri@ulivieriricambi.it