- Page 4: PerfectView CAM60ADR2 34 54
- Page 9 and 10: PerfectView CAM60ADRErklärung der
- Page 11 and 12: PerfectView CAM60ADRSicherheits- un
- Page 13 and 14: PerfectView CAM60ADR3 LieferumfangL
- Page 15 and 16: PerfectView CAM60ADRHinweise zum el
- Page 17 and 18: PerfectView CAM60ADRKamera montiere
- Page 19 and 20: PerfectView CAM60ADRKamera montiere
- Page 21 and 22: PerfectView CAM60ADRGewährleistung
- Page 23 and 24: PerfectView CAM60ADRExplanation of
- Page 25 and 26: PerfectView CAM60ADRSafety and inst
- Page 27 and 28: PerfectView CAM60ADR3 Scope of deli
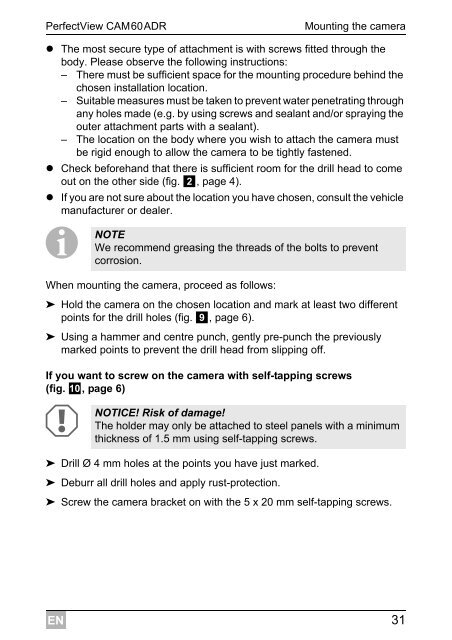
- Page 29: PerfectView CAM60ADRMounting the ca
- Page 33 and 34: PerfectView CAM60ADRMounting the ca
- Page 35 and 36: PerfectView CAM60ADR12 Technical da
- Page 37 and 38: PerfectView CAM60ADRConsignes de s
- Page 39 and 40: PerfectView CAM60ADRConsignes de s
- Page 41 and 42: PerfectView CAM60ADRDescription tec
- Page 43 and 44: PerfectView CAM60ADRMontage de la c
- Page 45 and 46: PerfectView CAM60ADRMontage de la c
- Page 47 and 48: PerfectView CAM60ADRMontage de la c
- Page 49 and 50: PerfectView CAM60ADR11 Retraitement
- Page 51 and 52: PerfectView CAM60ADRIndicaciones de
- Page 53 and 54: PerfectView CAM60ADRIndicaciones de
- Page 55 and 56: PerfectView CAM60ADRDescripción t
- Page 57 and 58: PerfectView CAM60ADRMontaje de la c
- Page 59 and 60: PerfectView CAM60ADRMontaje de la c
- Page 61 and 62: PerfectView CAM60ADRMontaje de la c
- Page 63 and 64: PerfectView CAM60ADR11 Eliminación
- Page 65 and 66: PerfectView CAM60ADRIndicazioni di
- Page 67 and 68: PerfectView CAM60ADRIndicazioni di
- Page 69 and 70: PerfectView CAM60ADR6 Descrizione t
- Page 71 and 72: PerfectView CAM60ADRMontaggio della
- Page 73 and 74: PerfectView CAM60ADRMontaggio della
- Page 75 and 76: PerfectView CAM60ADRMontaggio della
- Page 77 and 78: PerfectView CAM60ADR12 Specifiche t
- Page 79 and 80: PerfectView CAM60ADRVeiligheids- en
- Page 81 and 82:
PerfectView CAM60ADRVeiligheids- en
- Page 83 and 84:
PerfectView CAM60ADRTechnische besc
- Page 85 and 86:
PerfectView CAM60ADRCamera monteren
- Page 87 and 88:
PerfectView CAM60ADRCamera monteren
- Page 89 and 90:
PerfectView CAM60ADRCamera onderhou
- Page 91 and 92:
PerfectView CAM60ADRForklaring af s
- Page 93 and 94:
PerfectView CAM60ADRSikkerheds- og
- Page 95 and 96:
PerfectView CAM60ADR3 Leveringsomfa
- Page 97 and 98:
PerfectView CAM60ADRMontering af ka
- Page 99 and 100:
PerfectView CAM60ADRMontering af ka
- Page 101 and 102:
PerfectView CAM60ADRMontering af ka
- Page 103 and 104:
PerfectView CAM60ADR12 Tekniske dat
- Page 105 and 106:
PerfectView CAM60ADRSäkerhets- och
- Page 107 and 108:
PerfectView CAM60ADRSäkerhets- och
- Page 109 and 110:
PerfectView CAM60ADRTeknisk beskriv
- Page 111 and 112:
PerfectView CAM60ADRMontera kameran
- Page 113 and 114:
PerfectView CAM60ADRMontera kameran
- Page 115 and 116:
PerfectView CAM60ADR11 Avfallshante
- Page 117 and 118:
PerfectView CAM60ADRRåd om sikkerh
- Page 119 and 120:
PerfectView CAM60ADRRåd om sikkerh
- Page 121 and 122:
PerfectView CAM60ADRRåd om elektri
- Page 123 and 124:
PerfectView CAM60ADRMontere kamerae
- Page 125 and 126:
PerfectView CAM60ADRMontere kamerae
- Page 127 and 128:
PerfectView CAM60ADRStell og rengj
- Page 129 and 130:
PerfectView CAM60ADRSymbolien selit
- Page 131 and 132:
PerfectView CAM60ADRTurvallisuus- j
- Page 133 and 134:
PerfectView CAM60ADR3 Toimituskokon
- Page 135 and 136:
PerfectView CAM60ADRKameran asentam
- Page 137 and 138:
PerfectView CAM60ADRKameran asentam
- Page 139 and 140:
PerfectView CAM60ADRKameran asentam
- Page 141 and 142:
PerfectView CAM60ADR12 Tekniset tie
- Page 143 and 144:
PerfectView CAM60ADRIndicações de
- Page 145 and 146:
PerfectView CAM60ADRIndicações de
- Page 147 and 148:
PerfectView CAM60ADRDescrição té
- Page 149 and 150:
PerfectView CAM60ADRMontar a câmar
- Page 151 and 152:
PerfectView CAM60ADRMontar a câmar
- Page 153 and 154:
PerfectView CAM60ADRConservar e lim
- Page 155 and 156:
PerfectView CAM60ADR12 Dados técni
- Page 157 and 158:
PerfectView CAM60ADRУказани
- Page 159 and 160:
PerfectView CAM60ADRУказани
- Page 161 and 162:
PerfectView CAM60ADR3 Объем п
- Page 163 and 164:
PerfectView CAM60ADRУказани
- Page 165 and 166:
PerfectView CAM60ADRМонтаж к
- Page 167 and 168:
PerfectView CAM60ADRМонтаж к
- Page 169 and 170:
PerfectView CAM60ADRУход и о
- Page 171 and 172:
PerfectView CAM60ADRObjaśnienia sy
- Page 173 and 174:
PerfectView CAM60ADRUwagi dotycząc
- Page 175 and 176:
PerfectView CAM60ADRZakres dostawyK
- Page 177 and 178:
PerfectView CAM60ADRWskazówki dot.
- Page 179 and 180:
PerfectView CAM60ADRMontaż kameryD
- Page 181 and 182:
PerfectView CAM60ADRMontaż kameryP
- Page 183 and 184:
PerfectView CAM60ADRPielęgnacja i
- Page 185 and 186:
PerfectView CAM60ADRVysvětlení sy
- Page 187 and 188:
PerfectView CAM60ADRBezpečnostní
- Page 189 and 190:
PerfectView CAM60ADR3 Obsah dodávk
- Page 191 and 192:
PerfectView CAM60ADRMontáž kamery
- Page 193 and 194:
PerfectView CAM60ADRMontáž kamery
- Page 195 and 196:
PerfectView CAM60ADRMontáž kamery
- Page 197 and 198:
PerfectView CAM60ADR12 Technické
- Page 199 and 200:
PerfectView CAM60ADRPokyny týkajú
- Page 201 and 202:
PerfectView CAM60ADRPokyny týkajú
- Page 203 and 204:
PerfectView CAM60ADRTechnický opis
- Page 205 and 206:
PerfectView CAM60ADRMontáž kamery
- Page 207 and 208:
PerfectView CAM60ADRMontáž kamery
- Page 209 and 210:
PerfectView CAM60ADROšetrovanie a
- Page 211 and 212:
PerfectView CAM60ADRSzimbólumok ma
- Page 213 and 214:
PerfectView CAM60ADRBiztonsági és
- Page 215 and 216:
PerfectView CAM60ADR3 Szállítási
- Page 217 and 218:
PerfectView CAM60ADRMegjegyzések a
- Page 219 and 220:
PerfectView CAM60ADRA kamera felsze
- Page 221 and 222:
PerfectView CAM60ADRA kamera felsze
- Page 223 and 224:
PerfectView CAM60ADR11 Ártalmatlan


