

Sony RM-LVR1 - RM-LVR1 Istruzioni per l'uso Francese
Sony RM-LVR1 - RM-LVR1 Istruzioni per l'uso Francese
Sony RM-LVR1 - RM-LVR1 Istruzioni per l'uso Francese

You also want an ePaper? Increase the reach of your titles
YUMPU automatically turns print PDFs into web optimized ePapers that Google loves.
4-486-833-23 (1)<br />
Live-View Remote<br />
Afficheur instantané à distance<br />
<strong>RM</strong>-<strong>LVR1</strong><br />
© 2013 <strong>Sony</strong> Corporation<br />
Printed in China<br />
Owner’s Record<br />
The model and serial numbers are located on the bottom. Record the serial number in<br />
the space provided below. Refer to these numbers whenever you call your <strong>Sony</strong> dealer<br />
regarding this product.<br />
Model No. <strong>RM</strong>-<strong>LVR1</strong><br />
Serial No.<br />
Precaution<br />
The nameplate is located on the bottom exterior.<br />
If you need to check it, detach the belt.<br />
WARNING<br />
To reduce the risk of fire or electric shock,<br />
1) do not expose the unit to rain or moisture.<br />
2) do not place objects filled with liquids, such as vases, on the apparatus.<br />
Do not expose the batteries to excessive heat such as sunshine, fire or the like.<br />
CAUTION<br />
Observer the following cautions, as there may be a risk of heat generation, fire or<br />
explosion.<br />
* Lithium-ion battery is built into the product.<br />
ˎCharge the product by the designated charging method.<br />
ˎ Do not place the product in or near fire, or put the product in a microwave.<br />
ˎ<br />
ˎ Do not leave the product in a car in hot weather.<br />
ˎ<br />
ˎ Do not store or use the product in a hot and humid place such as in a sauna bath.<br />
ˎ<br />
ˎ Do not disassemble, crush or pierce the product.<br />
ˎ<br />
ˎ Do not expose the product to excessive shock such as dropping from a high place.<br />
ˎ<br />
ˎ Do not expose the product to high tem<strong>per</strong>atures above 60 °C (140 °F).<br />
ˎ<br />
ˎ Keep the product dry.<br />
ˎˎ<br />
Dispose of the product appropriately.<br />
Charge the product by the designated charging method in the instruction manual.<br />
Replace the battery with the specified type only. Otherwise, fire or injury may result.<br />
For Customers in the USA<br />
CAUTION<br />
You are cautioned that any changes or modifications not expressly approved in this<br />
manual could void your authority to o<strong>per</strong>ate this equipment.<br />
Note<br />
This equipment has been tested and found to comply with the limits for a Class B<br />
digital device, pursuant to Part 15 of the FCC Rules.<br />
These limits are designed to provide reasonable protection against harmful<br />
interference in a residential installation. This equipment generates, uses, and can<br />
radiate radio frequency energy and, if not installed and used in accordance with the<br />
instructions, may cause harmful interference to radio communications.<br />
However, there is no guarantee that interference will not occur in a particular<br />
installation. If this equipment does cause harmful interference to radio or television<br />
reception, which can be determined by turning the equipment off and on, the user is<br />
encouraged to try to correct the interference by one or more of the following measures:<br />
Reorient or relocate the receiving antenna.<br />
ˋˋ<br />
Increase the separation between the equipment and receiver.<br />
ˋˋ<br />
Connect the equipment into an outlet on a circuit different from that to which the<br />
ˋˋ<br />
receiver is connected.<br />
Consult the dealer or an ex<strong>per</strong>ienced radio/TV technician for help.<br />
ˋˋ<br />
The supplied interface cable must be used with the equipment in order to comply with<br />
the limits for a digital device pursuant to Subpart B of Part 15 of FCC Rules.<br />
For Customers in the U.S.A. and CANADA<br />
This device complies with Part 15 of the FCC Rules. O<strong>per</strong>ation is subject to the<br />
following two conditions: (1) This device may not cause harmful interference, and<br />
(2) this device must accept any interference received, including interference that may<br />
cause undesired o<strong>per</strong>ation.<br />
CAN ICES-3 B/NMB-3 B<br />
RECYCLING LITHIUM-ION BATTERIES<br />
Lithium-Ion batteries are recyclable.<br />
You can help preserve our environment by returning your used<br />
rechargeable batteries to the collection and recycling location nearest<br />
you.<br />
For more information regarding recycling of rechargeable batteries, call<br />
toll free 1-800-822- 8837, or visit http://www.call2recycle.org<br />
Caution: Do not handle damaged or leaking Lithium-Ion batteries.<br />
This equipment must not be co-located or o<strong>per</strong>ated in conjunction with any other<br />
antenna or transmitter.<br />
This equipment complies with FCC/IC radiation exposure limits set forth for an<br />
uncontrolled environment and meets the FCC radio frequency (RF) Exposure<br />
Guidelines in Supplement C to OET65 and RSS-102 of the IC radio frequency (RF)<br />
Exposure rules. This equipment has very low levels of RF energy that are deemed to<br />
comply without testing of specific absorption ratio (SAR).<br />
For Customers in CANADA<br />
This device complies with Industry Canada licence-exempt RSS standard(s).<br />
O<strong>per</strong>ation is subject to the following two conditions: (1) this device may not cause<br />
interference, and (2) this device must accept any interference, including interference<br />
that may cause undesired o<strong>per</strong>ation of the device.<br />
Under Industry Canada regulations, this radio transmitter may only o<strong>per</strong>ate using<br />
an antenna of a type and maximum (or lesser) gain approved for the transmitter by<br />
Industry Canada. To reduce potential radio interference to other users, the antenna<br />
type and its gain should be so chosen that the equivalent isotropically radiated power<br />
(e.i.r.p.) is not more than that necessary for successful communication.<br />
For Customers in Europe<br />
< Notice for the customers in the countries applying EU Directives ><br />
Manufacturer: <strong>Sony</strong> Corporation, 1-7-1 Konan Minato-ku Tokyo, 108-0075 Japan<br />
For EU product compliance: <strong>Sony</strong> Deutschland GmbH, Hedelfinger Strasse 61, 70327<br />
Stuttgart, Germany<br />
Hereby, <strong>Sony</strong> Corporation, declares that this <strong>RM</strong>-<strong>LVR1</strong> Live-View Remote is in<br />
compliance with the essential requirements and other relevant provisions of the<br />
Directive 1999/5/EC. For details, please access the following URL:<br />
http://www.compliance.sony.de/<br />
This product has been tested and found compliant with the limits set out in the EMC<br />
regulation for using connection cables shorter than 3 meters (9.8 feet).<br />
O<strong>per</strong>ating Instructions<br />
Mode d’emploi<br />
Manual de instrucciones<br />
Also refer to the Handbook (PDF) installed in this unit.<br />
Reportez-vous également au manuel (PDF) installé dans cet appareil.<br />
Consulte también el Manual (PDF) instalado en esta unidad.<br />
Cleaning after using this unit under/near water<br />
ˎAlways clean this unit with water within 60 minutes of use, and do not open the<br />
ˎ Multi terminal cover before cleaning is finished. Sand or water may get inside where<br />
it cannot be seen, and will degrade water-proof <strong>per</strong>formance if not rinsed out.<br />
ˎAllow this unit to sit in pure water poured into a cleaning bowl for about 5 minutes.<br />
ˎ Then, gently shake this unit and press each button under the water to clean away any<br />
salt, sand or other matter lodged around the buttons (See illustration ).<br />
ˎAfter rinsing, wipe away any drops of water with a soft cloth. Allow this unit to dry<br />
ˎ completely in a shady location with good ventilation. Do not blow dry with a hair<br />
dryer as there is a risk of deformation and/or degraded water-proof <strong>per</strong>formance.<br />
ˎWipe away any drops of water or dust from the Multi terminal cover with a soft dry<br />
ˎ cloth.<br />
ˎBubbles may appear when this unit is placed underwater. This is not a malfunction.<br />
ˎ The unit body may become discolored if it comes into contact with sunscreen or<br />
ˎ<br />
ˎ suntan oil. If this unit does come into contact with sunscreen or suntan oil, quickly<br />
wipe it clean.<br />
ˎDo not allow this unit to sit with salt water inside it or on its surface. This may lead<br />
ˎ to corrosion or discoloration, and degradation of the water-proof <strong>per</strong>formance.<br />
Disposal<br />
ˎˎRemove the battery pack before disposing of this unit.<br />
Remove the battery pack (See illustration )<br />
The built-in battery pack is recyclable.<br />
When disposing of this unit, remove the built-in battery pack and take it to your<br />
dealer.<br />
Notes<br />
When removing the battery pack, be careful of the following.<br />
ˎRemove the screws, etc. away from small children to prevent accidental<br />
ˎ swallowing.<br />
ˎˎBe careful not to injure your nails or fingers.<br />
Important information<br />
Do not remove the screws except when disposing of this unit. We will refuse repairs<br />
or replacement if we judge there to have been unwarranted disassembly.<br />
1 Press the ON/OFF (Power) button to turn off the power of this unit.<br />
2 Disconnect the connected cables.<br />
3 Remove the screws with a Phillips-head screwdriver. (4 screws)<br />
4 Detach the cover.<br />
5 Push the hook outwards and remove the battery pack.<br />
Battery pack<br />
On charging this unit<br />
ˎCharge this unit before using for the first time.<br />
ˎ We recommend charging this unit in an ambient tem<strong>per</strong>ature of between 10 °C to<br />
ˎ<br />
ˎ 30 °C (50 °F to 86 °F) until the CHG (Charge) lamp turns off. This unit may not be<br />
effectively charged in tem<strong>per</strong>atures outside this range.<br />
ˎˎThe CHG (Charge) lamp may light up in the following situations:<br />
Battery pack is damaged<br />
ˋˋ<br />
ˎIf the tem<strong>per</strong>ature of this unit is low, put it in a warm place.<br />
ˎ If the tem<strong>per</strong>ature of this unit is high, put it in a cool place.<br />
ˎˎ<br />
O<strong>per</strong>ating time of the battery pack<br />
Status of unit Display O<strong>per</strong>ating time<br />
REC Live-View Approx. 240 minutes<br />
Wi-Fi ON Clock display Approx. 280 minutes<br />
Wi-Fi OFF Clock display Approx. 340 minutes<br />
Notes<br />
ˎThese are the approximate o<strong>per</strong>ating times when using this unit with a fully charged<br />
ˎ battery pack, with the<br />
Panel Brightness set to HI and at an ambient tem<strong>per</strong>ature<br />
of 25 °C (77 °F).<br />
Checking the remaining battery charge<br />
A remaining charge indicator appears on the LCD screen of this unit.<br />
High Low<br />
Notes<br />
ˎIt takes about 30 seconds until the correct remaining charge indicator appears.<br />
ˎ The displayed remaining charge indicator may not be correct under certain<br />
ˎ<br />
ˎ circumstances.<br />
Effective use of the battery pack<br />
ˎBattery pack <strong>per</strong>formance decreases at a low ambient tem<strong>per</strong>ature. In cold places,<br />
ˎ therefore, the o<strong>per</strong>ational time of the battery pack is shorter.<br />
Remaining battery charge<br />
ˎIf the battery pack runs out quickly even though the remaining charge indicator<br />
ˎ is high, fully charge this unit again. The remaining charge indicator will then be<br />
displayed correctly. Note that it may not be displayed correctly in the following<br />
situations:<br />
This unit is used for a long time at high ambient tem<strong>per</strong>ature<br />
ˋˋ<br />
This unit is left fully charged<br />
ˋˋ<br />
This unit is used heavily<br />
ˋˋ<br />
On the overheat protection<br />
ˎDepending on this unit and battery tem<strong>per</strong>ature, the power of this unit may turn off<br />
ˎ automatically to protect this unit. A message will be displayed on the LCD screen<br />
before the power turns off.<br />
How to store the battery pack<br />
ˎFully discharge this unit before storing, and store it in a cool, dry place. To maintain<br />
ˎ this unit’s function, fully charge this unit and then fully discharge it at least once a<br />
year while storing.<br />
Battery pack life<br />
ˎThe battery pack has a limited life. Battery capacity decreases over time and through<br />
ˎ repeated use. If there is a significant decrease in usage time between charges, it is<br />
probably time to replace it. Take it to your <strong>Sony</strong> dealer.<br />
ˎˎThe battery pack life varies according to how the battery pack is used.<br />
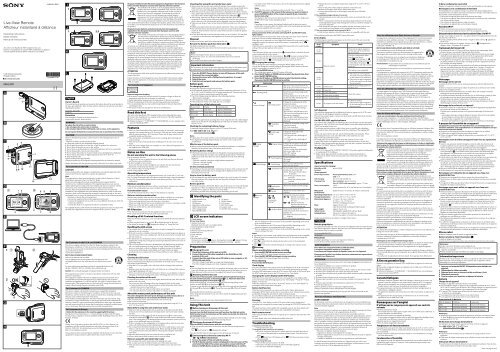
Identifying the parts<br />
1 Multi terminal cover<br />
2 MENU button<br />
3 DISP button<br />
4 Multi/Micro USB terminal<br />
5 RESET (Reset) button<br />
6 CHG (Charge) lamp<br />
7 REC/ENTER button<br />
8 UP button<br />
9 DOWN button<br />
10 LCD screen<br />
11 REC/Wi-Fi lamp<br />
12 Loop for a belt<br />
13 ON/OFF (Power) button<br />
LCD screen indicators<br />
Clock display<br />
Live-View display<br />
1 Airplane mode icon<br />
Displayed when this unit is in Airplane Mode.<br />
2 Remaining battery charge indicator<br />
3 Clock display<br />
4 Memory card warning indicator<br />
5 Button hold icon<br />
6 Zoom indicator<br />
7 REC icon<br />
8 Shooting mode indicator<br />
During movie recording, appears. During photo shooting, appears. During<br />
interval photo recording, appears. During audio recording, appears.<br />
Preparation<br />
Charging this unit<br />
1 Check that the power of this unit set to OFF.<br />
2 Connect the micro USB cable (supplied) to the Multi/Micro USB<br />
terminal of this unit.<br />
3 Connect the other end of the micro USB cable to your computer or AC-<br />
UD20 (sold separately).<br />
The CHG (Charge) lamp lights up orange and charging begins.<br />
The CHG (Charge) lamp goes out when charging is completed.<br />
Notes<br />
ˎYou can charge this unit even if it is not completely discharged. Also, even if this unit<br />
ˎ is not fully charged, you can use the partial charge capacity of the battery pack as is.<br />
ˎˎWhen the power of this unit is on, it is supplied with power but not charged.<br />
Attaching a belt to this unit<br />
Put this unit on the base plate and thread the belt through the belt loop of<br />
this unit and the base plate, as illustrated in -1. Attach the belt to this<br />
unit and the base plate as illustrated in -1.<br />
When attaching the belt, you can adjust the length of the belt depending on the<br />
position to attach , in the illustration -1.<br />
To attach to your arm, place the belt loop of this unit on the wrist side and thread the<br />
belt through as illustrated in -2. Thread the excess part of the belt through<br />
.<br />
Attaching the belt incorrectly may cause injury.<br />
When using this unit attached to your arm, always attach the supplied base plate and<br />
belt correctly.<br />
Notes<br />
Be careful not to drop this unit when detaching the belt from it.<br />
Using This Unit<br />
Before turning on the power of this unit<br />
Be sure that the Multi terminal cover of this unit is closed.<br />
Securely close the Multi terminal cover until you hear the slide lock on the<br />
Multi terminal cover click into place and the yellow mark under the slide lock<br />
can no longer be seen.<br />
ˎIf any foreign matter such as sand gets inside the Multi terminal cover, the sealing<br />
ˎ gasket may be scratched, leading to water entering this unit.<br />
Turning on the power of this unit<br />
Press the ON/OFF (Power) button with this unit charged.<br />
ˎWhen you turn this unit on for the first time, the date and time setting screen is<br />
ˎ displayed.<br />
See “ Clock Setting” in “ Changing the settings.”<br />
Press the ON/OFF (Power) button again to turn off the power of this unit.<br />
Connecting this unit and a camera by Wi-Fi<br />
( : SINGLE connection)<br />
1 Turn on the power of this unit and the camera.<br />
2 The Wi-Fi device selection screen is displayed on the LCD screen of this<br />
unit. Select the SSID of the camera you want to connect with the UP<br />
button or DOWN button and press the REC/ENTER button to confirm.<br />
For details on the SSID of your camera, refer to the o<strong>per</strong>ating instructions supplied<br />
with the camera.<br />
Notes<br />
The SSID of the camera is displayed on this unit with “Direct-” removed.<br />
3 If [ACPT?] appears on the screen of the camera you want to connect,<br />
press the ENTER button of the camera to <strong>per</strong>mit direct connection.<br />
(Action Cam only)<br />
The display on the LCD screen of this unit switches to the Live-View display and<br />
the REC/Wi-Fi lamp of this unit lights up blue.<br />
Notes<br />
Depending on your camera, the displayed indicator and the button to press to<br />
<strong>per</strong>mit direct connection differ. For details, refer to the startup guide and o<strong>per</strong>ating<br />
instructions supplied with your camera.<br />
This unit is now connected to your camera through Wi-Fi.<br />
During connection of this unit and a camera by Wi-Fi, the REC/Wi-Fi lamp<br />
lights up blue.<br />
You do not need to do steps 2 and 3 when connecting to the same camera from the<br />
next time. This unit connects automatically to your camera.<br />
When this unit is connected to a <strong>Sony</strong> Digital Still Camera QX series model or other<br />
compatible camera, the exposure mode of the camera is automatically set to “<br />
Intelligent Auto”.<br />
When this unit is connected to a <strong>Sony</strong> Digital Still Camera QX series model, the date<br />
setting of this unit also appears in the camera.<br />
Notes<br />
When the power of this unit is turned on or<br />
Airplane Mode is canceled, this unit<br />
connects automatically to the camera.<br />
If connection is cut due to the environment or<br />
Disconnect is selected from<br />
the menu, this unit does not connect automatically to the camera. To connect it,<br />
o<strong>per</strong>ate steps 2 and 3 in “ Connecting this unit and a camera by Wi-Fi.”<br />
Changing the settings<br />
You can change this unit’s settings by pressing the MENU button of this unit.<br />
You can also change the camera’s settings by pressing the MENU button of this unit<br />
while it is connected to a camera by Wi-Fi.<br />
1 Press the MENU button.<br />
The setting items appear on the LCD screen of this unit.<br />
2 Press the UP button or DOWN button to select the desired item, then<br />
press the REC/ENTER button.<br />
3 Press the UP button or DOWN button to select the desired setting,<br />
then press the REC/ENTER button to confirm.<br />
Setting item<br />
Disconnect<br />
Disconnect the camera from Wi-Fi.<br />
The LCD screen of this unit returns to<br />
the Wi-Fi device select screen.<br />
Shooting Mode<br />
Switch between the shooting modes<br />
of the camera.<br />
Settings displayed on the LCD screen<br />
of this unit differ depending on the<br />
connected camera.<br />
Camera Settings*<br />
Recording mode**<br />
Change the recording mode of the<br />
connected camera.<br />
When the connecting camera is set<br />
to movie recording, this setting is<br />
available.<br />
Press the REC/ENTER button once:<br />
The current recording mode icon of<br />
the camera is displayed.<br />
Press the REC/ENTER button twice:<br />
The recording mode select screen is<br />
displayed.<br />
SteadyShot<br />
Setting<br />
Change the SteadyShot setting of the<br />
connected camera.<br />
ON: Uses SteadyShot<br />
OFF: Does not use SteadyShot.<br />
Field Angle<br />
Setting<br />
Change the field angle of the<br />
connected camera.<br />
120°: Records with a field angle of<br />
120°<br />
170°: Records with a field angle of<br />
170°<br />
Display<br />
Settings<br />
Display Rotate<br />
Change the orientation of the LCD<br />
screen and the UP button/DOWN<br />
button of this unit.<br />
Use this setting when attaching the<br />
belt to your right arm, etc.<br />
ON: 180° rotating<br />
OFF: No rotating<br />
Panel Brightness<br />
Set the brightness of the LCD screen.<br />
HI: Bright<br />
LO: Dark<br />
Main Settings Clock Setting Set the year/month/day/time.<br />
Select the date format.<br />
Auto Power Off<br />
Set the length of time until this unit<br />
switches to Auto Power Off.<br />
30min: Power goes off after about<br />
30 minutes.<br />
5min: Power goes off after about<br />
5 minutes.<br />
1min: Power goes off after about<br />
1 minute.<br />
OFF: Does not turn off automatically.<br />
Resetting the<br />
Settings<br />
Restore the default network settings.<br />
Version<br />
Display the version of this unit<br />
software.<br />
Network<br />
Settings<br />
Connection<br />
Setting***<br />
Change the connection setting.<br />
: SINGLE connection<br />
O<strong>per</strong>ates one camera with<br />
this unit.<br />
: MULTI connection<br />
O<strong>per</strong>ates more than one<br />
camera with this unit.<br />
Airplane Mode<br />
Temporarily disable all Wi-Fi<br />
related functions when you board an<br />
airplane, etc.<br />
ON: Select this when on board an<br />
airplane.<br />
OFF: Select this for normal use.<br />
* The icon displayed on the LCD screen of this unit differs depending on the mode<br />
of the connected camera.<br />
** The icon displayed on the LCD screen of this unit differs depending on the<br />
connected camera or its recording mode while connecting.<br />
*** The icon displayed on the LCD screen of this unit differs depending on the current<br />
connect setting of this unit.<br />
Notes<br />
ˎDepending on your camera, some setting items and settings may not be compatible.<br />
ˎ When this unit is not connected to the camera by Wi-Fi, you cannot change the<br />
ˎ<br />
ˎ camera settings.<br />
ˎSelect<br />
ˎ to return from the setting selection select screen to the setting item<br />
selection screen.<br />
ˎSelect<br />
ˎ to activate the selected setting item or setting in the selection screen.<br />
Shooting<br />
Movie recording/Interval photo recording<br />
1 Press the REC/ENTER button to start recording.<br />
The blue REC/Wi-Fi lamp changes from blue to red.<br />
2 Press the REC/ENTER button again to stop recording.<br />
The red REC/Wi-Fi lamp changes from red to blue.<br />
Photo shooting<br />
Press the REC/ENTER button.<br />
Clock display<br />
Press the DISP button of this unit to show the clock display on the LCD screen when<br />
the Live-View display is on the LCD screen of this unit or during movie recording.<br />
Press the DISP button again to turn the LCD screen to OFF mode. In OFF mode, press<br />
the DISP button again to return the LCD screen to Live-View display.<br />
Changing the screen display by the DISP button<br />
When this unit is connected to a camera, you can change the screen display of this<br />
unit’s LCD screen in the following sequence: Live-View display Icon off Clock<br />
display Screen off<br />
When this unit’s LCD screen is set to “Screen off,” returns to “Live-View display” by<br />
pressing the DISP button of this unit again.<br />
Button hold function<br />
When this unit is connected to a camera, set this unit to button hold status by<br />
pressing the MENU button of this unit for 2 seconds or more. This prevents you from<br />
accidentally pressing this unit’s buttons while carrying it around.<br />
To cancel button hold mode, press the MENU button of this unit for 2 seconds or<br />
more, or press the ON/OFF (Power) button to turn off the power of this unit.<br />
Zooming<br />
When the Live-View display is on the LCD screen of this unit or during movie<br />
recording, you can o<strong>per</strong>ate the camera zoom by pressing the UP/DOWN button of this<br />
unit.<br />
The zoom function is only available with compatible cameras. For more details, refer<br />
to the Instruction Manual of the camera and compatibility information.<br />
Multi camera control<br />
When using the HDR-AS100V, you can o<strong>per</strong>ate up to 5 cameras at the same time with<br />
this unit.<br />
For more details, refer to the Handbook installed in this unit.<br />
Troubleshooting<br />
ÿÿCannot turn on this unit.<br />
Charge the battery pack.<br />
ÿÿThe power of this unit turns off suddenly.<br />
If you do not o<strong>per</strong>ate this unit for a certain <strong>per</strong>iod of time while the power is<br />
on, it turns off automatically to conserve the battery pack. Turn this unit on<br />
again.<br />
If the<br />
Auto Power Off setting is set to [ OFF], the power does not turn<br />
off automatically.<br />
ÿÿCannot charge this unit.<br />
Turn off this unit and connect it by USB.<br />
Disconnect and then reconnect the micro USB cable (supplied).<br />
Use the micro USB cable (supplied).<br />
<br />
<br />
<br />
<br />
<br />
<br />
<br />
<br />
<br />
<br />
<br />
<br />
<br />
1<br />
2<br />
<br />
7<br />
8 9 10 11<br />
4<br />
5<br />
6<br />
2<br />
3<br />
1<br />
13<br />
12<br />
AM<br />
3<br />
1 2<br />
8<br />
2<br />
7<br />
6<br />
5<br />
4<br />
1<br />
1<br />
<br />
<br />
<br />
<br />
<br />
2<br />
2,3<br />
Charge this unit in an ambient tem<strong>per</strong>ature range of 10 °C to 30 °C (50 °F to<br />
86 °F).<br />
Turn on the power of the computer and then connect this unit.<br />
Release the computer from sleep or hibernation status.<br />
Connect this unit directly to the computer using the micro USB cable<br />
(supplied).<br />
ÿÿThe remaining charge indicator is incorrect.<br />
This phenomenon occurs when you use this unit in an extremely hot or cold<br />
location.<br />
There is a discrepancy between the remaining charge indicator and the actual<br />
remaining battery charge. Fully discharge this unit once, and then recharge it to<br />
correct the indication.<br />
Fully charge this unit again. If the problem <strong>per</strong>sists, the battery pack is worn<br />
out. Consult your <strong>Sony</strong> dealer or local authorized <strong>Sony</strong> service facility.<br />
ÿÿThis unit cannot connect to the camera by Wi-Fi.<br />
Visit the <strong>Sony</strong> website to check that the camera is compatible with this unit.<br />
If the problem <strong>per</strong>sists, press the RESET button of this unit.<br />
Error display<br />
The following error numbers may appear on the LCD screen of this unit to provide<br />
error information about a function.<br />
Error<br />
number<br />
Symptom<br />
Cause<br />
01-01<br />
02-02<br />
Failed to connect<br />
There may be signal congestion.<br />
Or this unit may be too far from<br />
the access point.<br />
01-02<br />
The device information differs<br />
from the actual device.<br />
Select<br />
Main Settings <br />
Resetting the Settings and execute<br />
it. Then follow the steps in “<br />
Connecting this unit and a camera<br />
by Wi-Fi.”<br />
01-03<br />
01-04<br />
The camera is not compatible.<br />
03-01<br />
03-02<br />
ˎThe camera is not recognized.<br />
ˎ You need to do some o<strong>per</strong>ation<br />
on the camera to be connected.<br />
ˎThere may be signal congestion.<br />
ˎ Or this unit may be too far from<br />
the access point.<br />
02-01 Camera error<br />
Confirm the accessing camera or<br />
memory card.<br />
04-03 Cannot set<br />
Check the camera.<br />
05-01 Cannot take photos<br />
05-02 Cannot start recording<br />
05-03 Cannot stop recording<br />
04-04 No response from the camera<br />
ˎCheck the camera.<br />
ˎ There may be signal congestion.<br />
ˎ<br />
ˎ Or this unit may be too far from<br />
the access point.<br />
Self-diagnosis<br />
If an indication beginning with an alphabetical character appears on the LCD screen<br />
of this unit, the self-diagnosis function is working.<br />
This unit may require repairs. Contact your <strong>Sony</strong> dealer and tell them all the numbers<br />
beginning with E or C.<br />
On GNU GPL/LGPL applied software<br />
The software that is eligible for the following GNU General Public License (hereinafter<br />
referred to as “GPL”) or GNU Lesser General Public License (hereinafter referred to as<br />
“LGPL”) are included in this unit.<br />
This informs you that you have a right to have access to, modify, and redistribute<br />
source code for these software programs under the conditions of the supplied GPL/<br />
LGPL.<br />
Source code is provided on the web. Use the following URL to download it. When<br />
downloading the source code, select <strong>RM</strong>-<strong>LVR1</strong> as the model for your unit.<br />
http://www.sony.net/Products/Linux/<br />
We would prefer you do not contact us about the contents of source code.<br />
Copies of the licenses (in English) are stored in the internal memory of your unit.<br />
Establish a Mass Storage connection between your unit and a computer, and read the<br />
files in the “LICENSE” folder in “PMHOME.”<br />
Trademarks<br />
ˎWi-Fi, Wi-Fi logo and Wi-Fi PROTECTED SET-UP are either registered trademarks<br />
ˎ or trademarks of Wi-Fi Alliance.<br />
ˎAdobe, Adobe logo and Adobe Acrobat are either registered trademarks or<br />
ˎ trademarks of Adobe Systems Incorporated in the United States and/or other<br />
countries.<br />
Specifications<br />
[Input terminal for charging]<br />
Multi/Micro USB<br />
terminal:<br />
micro-B/USB<br />
[Power, general]<br />
Power requirements:<br />
Rechargeable battery pack: 3.6 V<br />
USB: 5.0 V<br />
USB charging:<br />
DC 5.0 V, 500 mA/800 mA<br />
Charging time:<br />
Via a computer: Approx. 245 min<br />
Via a AC-UD20 (sold separately): Approx. 175 min<br />
Power consumption:<br />
1.0 W<br />
(when connected by Wi-Fi and during Live-View display)<br />
Waterproof<br />
<strong>per</strong>formance:<br />
Depth of water 3 m (10 feet), 30 minutes continuously<br />
O<strong>per</strong>ating tem<strong>per</strong>ature: -10 °C to +40 °C (14 °F to 104 °F)<br />
Storage tem<strong>per</strong>ature:<br />
-20 °C to +60 °C (-4 °F to +140 °F)<br />
Dimentions (Approx.):<br />
72.3 mm × 50.2 mm × 20.8 mm<br />
(2 7/8 in. × 2 in. × 27/32 in.)<br />
(W/H/D, excluding protrusions)<br />
Mass:<br />
Approx. 63 g (2.3 oz)<br />
(only the main body including the battery pack)<br />
Total weight<br />
(when in use):<br />
Approx. 93 g (3.3 oz)<br />
(including the supplied belt and base plate)<br />
Included items: This unit (1), Micro USB cable (1),<br />
Belt (1), Base plate (1), Set of printed documentation<br />
Design and specifications are subject to change without notice.<br />
Note du propriétaire<br />
Les numéros de modèle et de série se trouvent sous l’appareil. Notez le numéro de série<br />
dans l’espace approprié ci-dessous. Reportez-vous à ces numéros lorsque vous appelez<br />
votre vendeur <strong>Sony</strong> au sujet de ce produit.<br />
No. de modèle <strong>RM</strong>-<strong>LVR1</strong><br />
No. de série<br />
Précautions<br />
La plaque signalétique se trouve sous l’appareil, à l’extérieur.<br />
Si vous devez la vérifier, détachez le bracelet.<br />
AVERTISSEMENT<br />
Pour réduire les risques d’incendie ou d’électrocution,<br />
1) n’exposez l’appareil à la pluie ou à l’humidité ;<br />
2) ne placez pas d’objets remplis de liquides (vases, etc.) sur l’appareil.<br />
N’exposez pas les piles à une chaleur excessive, notamment aux rayons directs<br />
du soleil, à une flamme, etc.<br />
ATTENTION<br />
Prenez les précautions suivantes pour éviter tout risque de dégagement de chaleur, de<br />
feu ou d’explosion.<br />
* Une batterie au lithium-ion se trouve à l’intérieur du produit.<br />
ˎChargez le produit de la façon indiquée.<br />
ˎ Ne mettez pas le produit dans le feu ou près du feu, ni dans un four à micro-ondes.<br />
ˎ<br />
ˎ Ne laissez pas le produit dans une voiture par temps très chaud.<br />
ˎ<br />
ˎ Ne rangez pas et n’utilisez pas le produit à un endroit chaud et humide, comme dans<br />
ˎ<br />
ˎ un sauna.<br />
ˎNe démontez pas, n’écrasez pas et ne <strong>per</strong>cez pas le produit.<br />
ˎ N’exposez pas le produit à un choc excessif, par exemple en le laissant tomber de<br />
ˎ<br />
ˎ haut.<br />
ˎN’exposez pas le produit à des températures supérieures à 60 °C (140 °F).<br />
ˎ Gardez le produit au sec.<br />
ˎˎ<br />
Mettez le produit au rebut en respectant la réglementation.<br />
Chargez le produit de la façon indiquée dans le mode d’emploi.<br />
Remplacez la batterie uniquement par le type spécifié. Sinon, un incendie ou des<br />
blessures sont possibles.<br />
Pour les utilisateurs aux États-Unis<br />
AVERTISSEMENT<br />
Par la présente, vous êtes avisé du fait que tout changement ou toute modification ne<br />
faisant pas l’objet d’une autorisation expresse dans le présent manuel pourrait annuler<br />
votre droit d’utiliser l’appareil.<br />
Note<br />
L’appareil a été testé et est conforme aux exigences d’un appareil numérique de Classe<br />
B, conformément à la Partie 15 de la réglementation de la FCC.<br />
Ces critères sont conçus pour fournir une protection raisonnable contre les<br />
interférences nuisibles dans un environnement résidentiel. L’appareil génère, utilise et<br />
peut émettre des fréquences radio; s’il n’est pas installé et utilisé conformément aux<br />
instructions, il pourrait provoquer des interférences nuisibles aux communications<br />
radio. Cependant, il n’est pas possible de garantir que des interférences ne seront pas<br />
provoquées dans certaines conditions particulières. Si l’appareil devait provoquer des<br />
interférences nuisibles à la réception radio ou à la télévision, ce qui peut être démontré<br />
en allumant et éteignant l’appareil, il est recommandé à l’utilisateur d’essayer de<br />
corriger cette situation par l’une ou l’autre des mesures suivantes :<br />
Réorienter ou déplacer l’antenne réceptrice.<br />
ˋˋ<br />
Augmenter la distance entre l’appareil et le récepteur.<br />
ˋˋ<br />
Brancher l’appareil dans une prise ou sur un circuit différent de celui sur lequel le<br />
ˋˋ<br />
récepteur est branché.<br />
Consulter le détaillant ou un technicien expérimenté en radio/téléviseurs.<br />
ˋˋ<br />
Le câble d’interface fourni doit être utilisé avec l’appareil pour que celui-ci soit<br />
conforme aux critères régissant les appareils numériques, conformément à la souspartie<br />
B de la Partie 15 de la réglementation de la FCC.<br />
Pour les utilisateurs aux États-Unis et au Canada<br />
Cet appareil est conforme à la section 15 des règlements FCC. Son fonctionnement<br />
est soumis aux deux conditions suivantes : (1) cet appareil ne doit pas provoquer<br />
d’interférences nuisibles, (2) cet appareil doit accepter toute interférence, y compris<br />
celles susceptibles de provoquer son fonctionnement indésirable.<br />
CAN ICES-3 B/NMB-3 B<br />
RECYCLAGE DES ACCUMULATEURS AUX IONS DE LITHIUM<br />
Les accumulateurs aux ions de lithium sont recyclables.<br />
Vous pouvez contribuer à préserver l’environnement en rapportant les<br />
piles usagées dans un point de collecte et de recyclage le plus proche.<br />
Pour plus d’informations sur le recyclage des accumulateurs, téléphonez<br />
au numéro gratuit 1-800-822-8837 (Etats-Unis et Canada uniquement),<br />
ou visitez http://www.call2recycle.org<br />
Avertissement : Ne pas utiliser des accumulateurs aux ions de lithium qui sont<br />
endommagés ou qui fuient.<br />
Cet équipement ne doit pas être co-situé ou utilisé en conjonction avec une autre<br />
antenne ou émetteur.<br />
Cet équipement est conforme aux exigences de la FCC (Commission américaine des<br />
communications) et d’IC (Industrie Canada) relatives aux limites d’exposition aux<br />
radiations énoncées pour un environnement non contrôlé. Il est également conforme<br />
aux directives de la FCC en matière d’exposition aux fréquences radioélectriques<br />
(RF) énoncées au Supplément C de l’OET65, ainsi qu’aux normes d’IC relatives à<br />
l’exposition aux fréquences radioélectriques énoncées au CNR-102 (Cahier des charges<br />
sur les normes radioélectriques). Cet équipement présente des niveaux très peu élevés<br />
d’énergie RF, réputés conformes sans test du débit d’absorption spécifique (SAR).<br />
Pour les utilisateurs au Canada<br />
Le présent appareil est conforme aux CNR d’Industrie Canada applicables aux<br />
appareils radio exempts de licence. L’exploitation est autorisée aux deux conditions<br />
suivantes : (1) l’appareil ne doit pas produire de brouillage, et (2) cet appareil<br />
doit accepter tout brouillage, y compris un brouillage qui pourrait provoquer un<br />
fonctionnement inopportun de l’appareil.<br />
Conformément à la réglementation d’Industrie Canada, le présent émetteur radio peut<br />
fonctionner avec une antenne d’un type et d’un gain maximal (ou inférieur) approuvé<br />
pour l’émetteur par Industrie Canada. Dans le but de réduire les risques de brouillage<br />
radioélectrique à l’intention des autres utilisateurs, il faut choisir le type d’antenne et<br />
son gain de sorte que la puissance isotrope rayonnée équivalente (p.i.r.e.) ne dépasse<br />
pas l’intensité nécessaire à l’établissement d’une communication satisfaisante.<br />
Pour les clients en Europe<br />
< Avis aux consommateurs des pays appliquant les Directives UE ><br />
Fabricant: <strong>Sony</strong> Corporation, 1-7-1 Konan Minato-ku Tokyo, 108-0075 Japon<br />
Pour toute question relative à la conformité des produits dans l’UE: <strong>Sony</strong> Deutschland<br />
GmbH, Hedelfinger Strasse 61, 70327 Stuttgart, Allemagne<br />
Par la présente <strong>Sony</strong> Corporation déclare que cet Afficheur instantané à distance <strong>RM</strong>-<br />
<strong>LVR1</strong> est conforme aux exigences essentielles et aux autres dispositions <strong>per</strong>tinentes<br />
de la Directive 1999/5/EC. Pour toute information complémentaire, veuillez consulter<br />
l’URL suivante:<br />
http://www.compliance.sony.de/<br />
Cet appareil a été testé et jugé conforme aux limites établies par la Réglementation<br />
EMC visant l’utilisation de câbles de raccordement de moins de 3 mètres (9,8 pieds).<br />
Traitement des appareils électriques et électroniques en fin de vie (Applicable<br />
dans les pays de l’Union Européenne et aux autres pays européens disposant<br />
de systèmes de collecte sélective)<br />
Ce symbole, apposé sur le produit ou sur son emballage, indique que ce<br />
produit ne doit pas être traité avec les déchets ménagers. Il doit être<br />
remis à un point de collecte approprié pour le recyclage des<br />
équipements électriques et électroniques. En vous assurant que ce<br />
produit sont mis au rebut de façon appropriée, vous participez<br />
activement à la prévention des conséquences négatives que leur<br />
mauvais traitement pourrait provoquer sur l’environnement et sur la<br />
santé humaine. Le recyclage des matériaux contribue par ailleurs à la<br />
preservation des ressources naturelles. Pour toute information complémentaire au<br />
sujet du recyclage de ce produit, vous pouvez contacter votre municipalité, votre<br />
déchetterie locale ou le point de vente où vous avez acheté le produit.<br />
Elimination des piles et accumulateurs et des Equipements Electriques et<br />
Electroniques usagés (Applicable dans les pays de l’Union Européenne et aux<br />
autres pays européens disposant de systèmes de collecte sélective)<br />
Ce symbole apposé sur le produit, la pile ou l’accumulateur ou sur<br />
l’emballage, indique que le produit et les piles et accumulateurs fournis<br />
avec ce produit ne doivent pas être traités comme de simples déchets<br />
ménagers.<br />
Sur certains types de piles, ce symbole apparaît parfois combiné avec<br />
un symbole chimique. Les symboles pour le mercure (Hg) ou le plomb<br />
(Pb) sont rajoutés lorsque ces piles contiennent plus de 0,0005% de mercure ou 0,004%<br />
de plomb.<br />
En vous assurant que les produits, piles et accumulateurs sont mis au rebut de façon<br />
appropriée, vous participez activement à la prévention des conséquences négatives<br />
que leur mauvais traitement pourrait provoquer sur l’environnement et sur la santé<br />
humaine. Le recyclage des matériaux contribue par ailleurs à la préservation des<br />
ressources naturelles.<br />
Pour les produits qui pour des raisons de sécurité, de <strong>per</strong>formance ou d’intégrité de<br />
données nécessitent une connexion <strong>per</strong>manente à une pile ou à un accumulateur, il<br />
conviendra de vous rapprocher d’un Service Technique qualifié pour effectuer son<br />
remplacement.<br />
En rapportant votre appareil électrique, les piles et accumulateurs en fin de vie à un<br />
point de collecte approprié vous vous assurez que le produit, la pile ou l’accumulateur<br />
incorporé sera traité correctement.<br />
Pour tous les autres cas de figure et afin d’enlever les piles ou accumulateurs en toute<br />
sécurité de votre appareil, reportez-vous au manuel d’utilisation.<br />
Rapportez les piles et accumulateurs, et les équipements électriques et électroniques<br />
usagés au point de collecte approprié pour le recyclage.<br />
Pour toute information complémentaire au sujet du recyclage de ce produit ou des<br />
piles et accumulateurs, vous pouvez contacter votre municipalité, votre déchetterie<br />
locale ou le point de vente où vous avez acheté ce produit.<br />
ATTENTION<br />
Les champs électromagnétiques à certaines fréquences peuvent avoir une influence sur<br />
l’image et le son de cette caméra.<br />
Si de l’électricité statique ou de l’électromagnétisme devait interrompre le transfert<br />
(l’arrêter), redémarrez l’application ou débranchez et rebranchez le câble de<br />
communication (USB, etc.).<br />
Remarques sur les enregistrements longue durée<br />
ˎSi l’alimentation devait être coupée, laissez cet appareil au moins 10 minutes éteint<br />
ˎ pour que la température à l’intérieur puisse baisser à un niveau acceptable.<br />
ˎÀ des températures ambiantes élevées, la température de cet appareil augmente<br />
ˎ rapidement.<br />
ˎLorsque la température de cet appareil augmente, la qualité de l’image se détériore.<br />
ˎ Il est conseillé d’attendre que la température de cet appareil baisse avant de continuer<br />
ˎ<br />
ˎ à filmer.<br />
ˎˎLa surface de cet appareil peut devenir chaude. Il ne s’agit pas d’une défectuosité.<br />
À lire en premier lieu<br />
Reportez-vous également au manuel (PDF) installé dans cet appareil en suivant ces<br />
étapes :<br />
ʓʓRaccordez cet appareil chargé à un ordinateur avec le câble micro-USB (fourni).<br />
ʔʔAllumez l’appareil.<br />
ʕAffichez [Ordinateur]<br />
ʕ<br />
[PMHOME] [HANDBOOK] sur votre ordinateur,<br />
puis ouvrez le manuel (PDF).<br />
Caractéristiques<br />
ˎL’afficheur instantané à distance <strong>RM</strong>-<strong>LVR1</strong> (désigné ci-dessous par le terme « cet<br />
ˎ appareil ») peut être utilisé avec une caméra <strong>Sony</strong> à fonction Wi-Fi. Cet appareil<br />
peut ne pas être compatible avec toutes les caméras dotées de la fonction Wi-Fi.<br />
Veuillez visiter le site <strong>Sony</strong> pour les modèles et les fonctions compatibles.<br />
ˎCet appareil présente une fonction d’enregistrement de base (enregistrement de<br />
ˎ vidéo, photos et réglage de caméra).<br />
ˎCet appareil est étanche à l’eau et peut donc être utilisé sous la pluie, la neige ou à la<br />
ˎ plage.<br />
ˎCet appareil peut être chargé depuis un ordinateur ou un AC-UD20 (vendu<br />
ˎ séparément) avec le câble micro-USB.<br />
Remarques sur l’emploi<br />
N’utilisez pas/ne rangez pas cet appareil aux endroits<br />
suivants<br />
ˎEndroit extrêmement chaud<br />
ˎ Par exemple dans une voiture garée en plein soleil, car le coffret peut se déformer, ce<br />
qui peut entraîner une défectuosité.<br />
ˎEn plein soleil ou près d’un appareil de chauffage<br />
ˎ Si vous rangez cet appareil en plein soleil ou près d’un appareil de chauffage, il peut<br />
se décolorer ou se déformer, ce qui peut entraîner une défectuosité.<br />
ˎEndroit exposé à un magnétisme puissant<br />
ˎ Près de champs magnétiques puissants<br />
ˎˎ<br />
Température de fonctionnement<br />
Cet appareil est conçu pour être utilisé à une température de -10 °C à +40 °C (14 °F à<br />
104 °F). L’emploi dans des lieux extrêmement froids ou chauds hors de cette plage n’est<br />
pas recommandé.<br />
ˎL’écran LCD et le coffret peuvent devenir chauds en cours d’utilisation. Il ne s’agit<br />
ˎ pas d’une défectuosité.<br />
Condensation d’humidité<br />
Si cet appareil est porté directement d’un endroit froid vers un endroit chaud, de la<br />
condensation peut se former à l’intérieur. Cette condensation peut entraîner une<br />
défectuosité de l’appareil.<br />
Si de la condensation se produit<br />
Éteignez cet appareil et attendez environ 1 heure que l’humidité se soit évaporée.<br />
Remarques sur la condensation d’humidité<br />
De l’humidité peut se condenser lorsque vous portez directement l’appareil d’un<br />
endroit froid vers un endroit chaud (ou inversement) ou lorsque vous l’utilisez dans un<br />
lieu humide, comme mentionné ci-dessous.<br />
Vous portez cet appareil d’une piste de ski dans un lieu chaud<br />
ˋˋ<br />
Vous portez cet appareil d’une voiture ou d’une pièce refroidie par l’air conditionné<br />
ˋˋ<br />
vers un lieu extérieur chaud<br />
Vous utilisez cet appareil après un orage ou la pluie<br />
ˋˋ<br />
Vous utilisez cet appareil dans un lieu chaud et humide<br />
ˋˋ<br />
Fonction Wi-Fi<br />
ˎUtilisez cet accessoire en accord avec la réglementation locale.<br />
ˎ Vous ne pouvez pas utiliser la fonction Wi-Fi de cet appareil sous l’eau.<br />
ˎˎ<br />
Désactivation de toutes les fonctions liées à la Wi-Fi<br />
Lorsque vous voyagez en avion, etc., vous pouvez désactiver temporairement toutes les<br />
fonctions liées à la Wi-Fi.<br />
ˎLorsque [Airplane Mode] (Mode avion) est réglé sur [On] (activé),<br />
ˎ apparaît sur<br />
l’écran LCD.<br />
ˎPour tous les détails sur les réglages, reportez-vous à «<br />
ˎ<br />
Changement des<br />
réglages » dans « Utilisation de cet appareil ».<br />
Traitement de l’écran LCD<br />
ˎNe laissez pas l’écran LCD face au soleil car il pourrait être endommagé. Faites<br />
ˎ attention lorsque vous installez l’appareil près d’une fenêtre.<br />
ˎSi cet appareil est utilisé dans un lieu froid, des lignes horizontales ou une image<br />
ˎ résiduelle peuvent apparaître sur l’écran LCD. Il ne s’agit pas d’une défectuosité.<br />
Lorsque l’appareil devient chaud, l’écran LCD redevient normal.<br />
ˎSi une photo ou une image fixe, par exemple une image divisée ou le code temporel<br />
ˎ est affiché pendant un certain temps, une image peut rester su<strong>per</strong>posée sur l’écran<br />
LCD comme une image fantôme.<br />
ˎL’écran LCD de cet appareil est le produit d’une très haute technologie de précision,<br />
ˎ mais une très faible proportion de pixels risquent de se « bloquer » et seront soit<br />
toujours éteints (noirs) soit toujours éclairés (rouges, verts ou bleus), ou bien<br />
clignoteront. De plus, compte tenu des caractéristiques physiques de l’affichage à<br />
cristaux liquides, des pixels « bloqués » peuvent apparaître spontanément après<br />
une très longue période d’utilisation. Ces phénomènes ne proviennent pas d’une<br />
défectuosité.<br />
Nettoyage<br />
Nettoyage de l’écran LCD<br />
La surface de l’écran LCD a reçu un traitement spécial qui réduit la réflexion de la<br />
lumière.<br />
Comme un mauvais entretien peut réduire les <strong>per</strong>formances de l’écran LCD, veuillez<br />
respecter les consignes suivantes :<br />
ˎEssuyez l’écran LCD doucement avec un chiffon doux, par exemple un tissu de<br />
ˎ nettoyage ou un tissu spécial pour lunettes.<br />
ˎLes tâches <strong>per</strong>sistantes peuvent être enlevées avec un chiffon doux, comme un tissu<br />
ˎ de nettoyage ou un tissu spécial pour lunettes légèrement mouillé d’eau.<br />
ˎN’utilisez jamais de solvant, comme l’alcool, le benzène ou le diluant, ni de<br />
ˎ détergent acide, alcalin ou abrasif ou de tissu de nettoyage chimique qui risquent<br />
d’endommager la surface de l’écran LCD.<br />
Nettoyage de la surface de cet appareil<br />
ˎNettoyez la surface de cet appareil avec un chiffon doux légèrement imprégné d’eau,<br />
ˎ puis essuyez la surface avec un chiffon sec.<br />
N’utilisez pas les produits suivants car ils peuvent endommager la finition ou le<br />
coffret.<br />
Les produits chimiques comme le diluant, le benzène, l’alcool, les tissus jetables,<br />
ˋˋ<br />
les insectifuges, les écrans solaires ou les insecticides, etc.<br />
Ne touchez pas cet appareil avec ces produits sur la main.<br />
ˋˋ<br />
Ne laissez pas longtemps cet appareil au contact de caoutchouc ou de plastique.<br />
ˋˋ<br />
À propos de l’étanchéité de cet appareil<br />
Cet appareil est conçu pour être étanche à l’eau. Les dommages dus à une<br />
mauvaise utilisation, à un usage abusif ou à un entretien inadapté ne sont pas<br />
couverts par la garantie limitée.<br />
ˎN’exposez pas cet appareil à de l’eau sous pression, comme l’eau du robinet.<br />
ˎ N’utilisez pas cet appareil dans les sources d’eau chaude.<br />
ˎ<br />
ˎ Utilisez cet appareil dans la plage de températures recommandée, de 0 °C à 40 °C<br />
ˎ<br />
ˎ (32 °F à 104 °F).<br />
Remarques avant d’utiliser cet appareil sous l’eau ou à proximité<br />
de l’eau<br />
ˎAssurez-vous qu’aucune matière étrangère, comme du sable, des cheveux ou de<br />
ˎ la saleté ne pénètre sous le couvercle de la multiprise. La moindre particule d’une<br />
matière étrangère peut entraîner une infiltration d’eau dans l’appareil.<br />
ˎAssurez-vous que le joint torique<br />
ˎ<br />
et les surfaces de contact ne sont pas éraflées<br />
(Voir l’illustration ). La moindre éraflure peut entraîner une infiltration d’eau<br />
dans l’appareil. Si le joint torique ou ses surfaces de contact devaient être éraflés,<br />
consultez votre vendeur <strong>Sony</strong> ou un service après-vente agréé <strong>Sony</strong>.<br />
ˎSi de la saleté ou du sable devait se déposer sur le joint torique ou sur ses surfaces de<br />
ˎ contact, essuyez bien la zone avec un chiffon doux ne laissant pas de fibres.<br />
ˎN’ouvrez pas et ne fermez pas le couvercle de la multiprise avec des mains humides<br />
ˎ ou sableuse, ni près de l’eau. Du sable ou de l’eau pourrait pénétrer à l’intérieur.<br />
Avant d’ouvrir le couvercle de la multiprise, effectuez les opérations mentionnées<br />
dans « Nettoyage après avoir utilisé cet appareil sous l’eau ou à proximité de l’eau ».<br />
ˎOuvrez le couvercle de la multiprise quand cet appareil est entièrement sec.<br />
ˎ Vérifiez toujours si le couvercle de la multiprise est bien fermé.<br />
ˎˎ<br />
Remarques sur l’utilisation de cet appareil sous l’eau ou à<br />
proximité de l’eau<br />
ˎN’exposez pas cet appareil à des chocs, comme lors d’un saut dans l’eau.<br />
ˎ N’ouvrez pas et ne fermez pas le couvercle de la multiprise sous l’eau ou à proximité<br />
ˎ<br />
ˎ de l’eau.<br />
ˎCet appareil ne flotte pas dans l’eau. Utilisez le bracelet fourni avec cet appareil pour<br />
ˎ l’empêcher de tomber au fond de l’eau.<br />
Nettoyage après avoir utilisé cet appareil sous l’eau ou à<br />
proximité de l’eau<br />
ˎNettoyez toujours cet appareil à l’eau dans les 60 minutes qui suivent son utilisation<br />
ˎ et n’ouvrez pas le couvercle de la multiprise tant que l’appareil n’a pas été entièrement<br />
nettoyé. Du sable ou de l’eau peut pénétrer à l’intérieur de l’appareil de façon<br />
im<strong>per</strong>ceptible, réduisant son étanchéité.<br />
ˎLaissez cet appareil dans une cuvette remplie d’eau claire pendant environ 5 minutes.<br />
ˎ Ensuite, secouez doucement cet appareil et appuyez sur chaque bouton sous l’eau<br />
pour enlever le sel, le sable ou toute autre matière pris autour des boutons (Voir<br />
l’illustration ).<br />
ˎAprès l’avoir rincé, essuyez la moindre goutte d’eau avec un chiffon doux. Laissez cet<br />
ˎ appareil complètement sécher à l’ombre mais à un endroit bien ventilé. Ne le séchez<br />
pas avec un sèche-cheveux car la chaleur risque de déformer le coffret et/ou de<br />
dégrader sa <strong>per</strong>formance d’étanchéité.<br />
ˎEssuyez la moindre goutte d’eau ou la moindre poussière du couvercle de la<br />
ˎ multiprise avec un chiffon sec et doux.<br />
ˎDes bulles peuvent apparaître lorsque cet appareil est mis sous l’eau. Il ne s’agit pas<br />
ˎ d’une défectuosité.<br />
ˎLe coffret de cet appareil peut se décolorer si de l’écran solaire ou de l’huile solaire<br />
ˎ tombe dessus. Si de l’écran solaire ou de l’huile solaire devait tomber sur cet appareil,<br />
nettoyez-le rapidement.<br />
ˎNe laissez pas d’eau salée à l’intérieur ou sur cet appareil. Le sel peut provoquer de la<br />
ˎ corrosion ou de la décoloration, et réduire la <strong>per</strong>formance d’étanchéité.<br />
Mise au rebut<br />
ˎˎRetirez la batterie avant de mettre cet appareil au rebut.<br />
Retirer la batterie (Voir l’illustration )<br />
La batterie intégrée est recyclable.<br />
Avant de mettre cet appareil au rebut, retirez la batterie et portez-la à votre vendeur.<br />
Remarques<br />
Lorsque vous retirez la batterie, tenez compte de ceci.<br />
ˎRetirez les vis, etc. hors de portée des enfants en bas âge pour éviter toute<br />
ˎ ingestion accidentelle.<br />
ˎˎFaites attention de ne pas vous blesser aux ongles ou aux doigts.<br />
Information importante<br />
Ne déposez les vis que lorsque vous mettez cet appareil au rebut. Nous refuserons<br />
toute réparation ou tout échange si nous estimons que cet appareil a subi un<br />
démontage non couvert par la garantie.<br />
1 Appuyez sur la touche ON/OFF (Alimentation) pour éteindre cet<br />
appareil.<br />
2 Débranchez les câbles raccordés.<br />
3 Déposez les vis avec un tournevis à tête cruciforme. (4 vis)<br />
4 Détachez le couvercle.<br />
5 Tirez le crochet vers l’extérieur et déposez la batterie.<br />
Batterie<br />
Charge de cet appareil<br />
ˎChargez cet appareil la première fois que vous l’utilisez.<br />
ˎ Il est conseillé de charger cet appareil à une température ambiante de 10 °C à 30 °C<br />
ˎ<br />
ˎ (50 °F à 86 °F) jusqu’à ce que le témoin CHG (Charge) s’éteigne. Cet appareil peut ne<br />
pas se charger convenablement à des températures hors de cette plage.<br />
ˎˎLe témoin CHG (Charge) peut s’éclairer dans la situation suivante :<br />
La batterie est endommagée<br />
ˋˋ<br />
ˎSi cet appareil est trop froid, mettez-le à un endroit chaud.<br />
ˎ Si cet appareil est trop chaud, mettez-le à un endroit froid.<br />
ˎˎ<br />
Autonomie de la batterie<br />
État de l’appareil Afficheur Autonomie<br />
REC Affichage instantané Environ 240 minutes<br />
Wi-Fi ON Indication de l’heure Environ 280 minutes<br />
Wi-Fi OFF Indication de l’heure Environ 340 minutes<br />
Remarques<br />
ˎˎAutonomies approximatives quand cet appareil est utilisé avec une batterie pleine,<br />
Panel Brightness (Luminosité du panneau) réglé sur HI et une température<br />
ambiante de 25 °C (77 °F).<br />
Vérification de la charge de la batterie<br />
Un indicateur de charge restante apparaît sur l’écran LCD de cet appareil.<br />
Élevé Faible<br />
Remarques<br />
ˎIl faut environ 30 secondes pour que l’indicateur de charge restante correct<br />
ˎ apparaisse.<br />
ˎL’indicateur de charge restante peut ne pas afficher le niveau correct dans certaines<br />
ˎ situations.<br />
Utilisation efficace de la batterie<br />
ˎLa <strong>per</strong>formance de la batterie diminue à basse température ambiante. Dans les lieux<br />
ˎ froids, l’autonomie de la batterie sera donc plus courte.<br />
Disposal of Old Electrical & Electronic Equipment (Applicable in the European<br />
Union and other European countries with separate collection systems)<br />
This symbol on the product or on its packaging indicates that this<br />
product shall not be treated as household waste. Instead it shall be<br />
handed over to the applicable collection point for the recycling of<br />
electrical and electronic equipment. By ensuring this product is<br />
disposed of correctly, you will help prevent potential negative<br />
consequences for the environment and human health, which could<br />
otherwise be caused by inappropriate waste handling of this product.<br />
The recycling of materials will help to conserve natural resources. For<br />
more detailed information about recycling of this product, please contact your local<br />
Civic Office, your household waste disposal service or the shop where you purchased<br />
the product.<br />
Disposal of waste batteries and electrical and electronic equipment<br />
(applicable in the European Union and other European countries with<br />
separate collection systems)<br />
This symbol on the product, the battery or on the packaging indicates<br />
that the product and the battery shall not be treated as household<br />
waste. On certain batteries this symbol might be used in combination<br />
with a chemical symbol. The chemical symbols for mercury (Hg) or<br />
lead (Pb) are added if the battery contains more than 0.0005% mercury<br />
or 0.004% lead. By ensuring these products and batteries are disposed<br />
of correctly, you will help prevent potentially negative consequences for the<br />
environment and human health which could otherwise be caused by inappropriate<br />
waste handling. The recycling of the materials will help to conserve natural resources.<br />
In case of products that for safety, <strong>per</strong>formance or data integrity reasons require a<br />
<strong>per</strong>manent connection with an incorporated battery, this battery should be replaced by<br />
qualified service staff only. To ensure that the battery and the electrical and electronic<br />
equipment will be treated pro<strong>per</strong>ly, hand over these products at end-of-life to the<br />
applicable collection point for the recycling of electrical and electronic equipment.<br />
For all other batteries, please view the section on how to remove the battery from<br />
the product safely. Hand the battery over to the applicable collection point for the<br />
recycling of waste batteries. For more detailed information about recycling of this<br />
product or battery, please contact your local Civic Office, your household waste<br />
disposal service or the shop where you purchased the product or battery.<br />
ATTENTION<br />
The electromagnetic fields at the specific frequencies may influence the picture and<br />
sound of this unit.<br />
If static electricity or electromagnetism causes data transfer to discontinue midway<br />
(fail), restart the application or disconnect and connect the communication cable<br />
(USB, etc.) again.<br />
For Customers in Singapore<br />
Notes on long-time recording<br />
ˎIf the power is turned off, leave this unit for 10 minutes or longer to allow the<br />
ˎ tem<strong>per</strong>ature inside this unit to decrease to a safe level.<br />
ˎUnder high ambient tem<strong>per</strong>atures, the tem<strong>per</strong>ature of this unit rises quickly.<br />
ˎ When the tem<strong>per</strong>ature of this unit rises, the image quality may deteriorate.<br />
ˎ<br />
ˎ It is recommended that you wait until the tem<strong>per</strong>ature of this unit drops before<br />
ˎ<br />
ˎ continuing to shoot.<br />
ˎˎThe surface of this unit may get hot. This is not a malfunction.<br />
Read this first<br />
Also refer to the Handbook (PDF) installed in this unit by following these steps:<br />
ʓʓConnect the charged unit to a computer with the micro USB cable (supplied).<br />
ʔʔTurn on the power of this unit.<br />
ʕDisplay [Computer]<br />
ʕ<br />
[PMHOME] [HANDBOOK] on your computer, then<br />
open the Handbook (PDF).<br />
Features<br />
ˎThis Live-View Remote <strong>RM</strong>-<strong>LVR1</strong> (referred to below as “this unit”) can be used to<br />
ˎ o<strong>per</strong>ate a <strong>Sony</strong> camera that has a Wi-Fi function. This unit may not be compatible<br />
with all cameras that have a Wi-Fi function. Please visit the <strong>Sony</strong> website to find<br />
compatible models and functions.<br />
ˎThis unit has basic recording functions (movie recording, photo shooting and<br />
ˎ camera setting).<br />
ˎThis unit has water-proof specifications enabling use in the rain, snow, or at the<br />
ˎ beach.<br />
ˎThis unit can be charged from your computer or a AC-UD20 (sold separately) via<br />
ˎ the supplied micro USB cable.<br />
Notes on Use<br />
Do not use/store this unit in the following places<br />
ˎIn an extremely hot place<br />
ˎ In places such as in a car parked in the sun, the unit body may become deformed<br />
and this may cause a malfunction.<br />
ˎIn direct sunlight or near a heater<br />
ˎ If you store this unit in direct sunlight or near a heater, this unit may become<br />
discolored or deformed, and this may cause a malfunction.<br />
ˎIn a location subject to strong vibration<br />
ˎ Near strong magnetic fields<br />
ˎˎ<br />
O<strong>per</strong>ating tem<strong>per</strong>ature<br />
This unit is designed for use in tem<strong>per</strong>atures between -10 °C and +40 °C (14 °F and<br />
104 °F). Using in extremely cold or hot places outside this range is not recommended.<br />
ˎThe LCD screen and the cabinet become warm during o<strong>per</strong>ation. This is not a<br />
ˎ malfunction.<br />
Moisture condensation<br />
If this unit is brought directly from a cold to a warm location, moisture may condense<br />
inside it. This condensation may cause a malfunction of this unit.<br />
If condensation occurs<br />
Turn off this unit and wait about 1 hour for the moisture to evaporate.<br />
Notes on moisture condensation<br />
Moisture may condense when you move this unit from a cold place to a warm place<br />
(or vice versa) or when you use this unit in a humid place, as shown below.<br />
When you bring this unit from a ski slope into a warm place<br />
ˋˋ<br />
When you bring this unit from an air-conditioned car or room to a hot place outside<br />
ˋˋ<br />
When you use this unit after a squall or rain shower<br />
ˋˋ<br />
When you use this unit in a hot and humid place<br />
ˋˋ<br />
Wi-Fi function<br />
ˎUse this unit in accordance with the regulations of the area of use.<br />
ˎ You cannot use the Wi-Fi function of this unit underwater.<br />
ˎˎ<br />
Disabling all Wi-Fi related functions<br />
When you board an airplane, etc., you can temporarily disable all functions related to<br />
Wi-Fi.<br />
ˎWhen [Airplane Mode] is set to [On],<br />
ˎ is displayed on the LCD screen.<br />
ˎFor details on settings, see “<br />
ˎ<br />
Changing the settings” in “Using This Unit.”<br />
Handling the LCD screen<br />
ˎDo not leave the LCD screen facing the sun as it may be damaged. Be careful when<br />
ˎ placing the unit by a window.<br />
ˎIf the unit is used in a cold place, horizontal lines or a residual image may appear on<br />
ˎ the LCD screen. This is not a malfunction. The LCD screen returns to normal when<br />
the unit warms up.<br />
ˎIf a still picture or a fixed picture such as a frame of a divided picture or time code is<br />
ˎ displayed for a long time, an image may remain su<strong>per</strong>imposed on the LCD screen as<br />
a ghosting image.<br />
ˎThe LCD panel fitted to this unit is manufactured with high precision technology,<br />
ˎ but a very small proportion of pixels may be “stuck”, either always off (black),<br />
always on (red, green, or blue), or flashing. In addition, because of the physical<br />
characteristics of the liquid crystal display, such “stuck” pixels may appear<br />
spontaneously over a long <strong>per</strong>iod of use. These problems are not a malfunction.<br />
Cleaning<br />
Cleaning the LCD screen<br />
The LCD screen surface is specially treated to reduce the reflection of light.<br />
Incorrect maintenance may impair the <strong>per</strong>formance of the LCD screen, so take care<br />
with respect to the following:<br />
ˎWipe the LCD screen gently with a soft cloth such as a cleaning cloth or glasses<br />
ˎ cloth.<br />
ˎStubborn stains may be removed with a soft cloth such as a cleaning cloth or glasses<br />
ˎ cloth slightly dampened with water.<br />
ˎNever use a solvent such as alcohol, benzene or thinner, or acid, alkaline or abrasive<br />
ˎ detergent, or chemical cleaning cloth, as they will damage the LCD screen surface.<br />
Cleaning the surface of this unit<br />
ˎClean this unit surface with a soft cloth slightly moistened with water, then wipe the<br />
ˎ surface with a dry cloth.<br />
Do not use any of the following as they may damage the finish or the casing.<br />
Chemical products such as thinner, benzine, alcohol, disposable cloths, insect<br />
ˋˋ<br />
repellent, sunscreen or insecticide, etc.<br />
Do not touch this unit with any of the above on your hand.<br />
ˋˋ<br />
Do not leave this unit in contact with rubber or vinyl for a long time.<br />
ˋˋ<br />
About the water-proof <strong>per</strong>formance of this unit<br />
This unit is designed to be water-proof. Damage caused by misuse, abuse, or<br />
impro<strong>per</strong> maintenance is not covered by the limited warranty.<br />
ˎDo not subject this unit to pressurized water, such as from a tap.<br />
ˎ Do not use in hot springs.<br />
ˎ<br />
ˎ Use this unit in the recommended o<strong>per</strong>ating water tem<strong>per</strong>ature range of 0 °C to<br />
ˎ<br />
ˎ 40 °C (32 °F to 104 °F).<br />
Notes before using this unit under/near water<br />
ˎMake sure that no foreign matter such as sand, hair, or dirt gets inside the Multi<br />
ˎ terminal cover. Even a small amount of foreign matter may lead to water entering<br />
this unit.<br />
ˎConfirm that the sealing gasket<br />
ˎ<br />
and its mating surfaces have not become<br />
scratched (See illustration ). Even a small scratch may lead to water entering this<br />
unit. If the sealing gasket or its mating surfaces become scratched, consult your <strong>Sony</strong><br />
dealer or local authorized <strong>Sony</strong> service facility.<br />
ˎIf dirt or sand gets on the sealing gasket or its mating surfaces, wipe the area clean<br />
ˎ with a soft cloth that does not leave behind any fibers.<br />
ˎDo not open/close the Multi terminal cover with wet or sandy hands or near water.<br />
ˎ There is a risk of sand or water getting inside. Before opening the Multi terminal<br />
cover, <strong>per</strong>form the procedure described in “Cleaning after using this unit under/<br />
near water.”<br />
ˎOpen the Multi terminal card cover when this unit is completely dry.<br />
ˎ Always check that the Multi terminal cover is securely locked.<br />
ˎˎ<br />
Notes on using this unit under/near water<br />
ˎDo not subject this unit to shock such as by jumping into water.<br />
ˎ Do not open and close the Multi terminal cover while under/near water.<br />
ˎ<br />
ˎ This unit sinks in water. Use the belt supplied with this unit to prevent it from<br />
ˎ<br />
ˎ sinking.<br />
<br />
<br />
<br />
<br />
(Suite à la page arrière)
(Suite de la page avant)<br />
Tratamiento de las baterías y equipos eléctricos y electrónicos al final de su<br />
vida útil (aplicable en la Unión Europea y en países europeos con sistemas de<br />
tratamiento selectivo de residuos)<br />
Este símbolo en el producto, en la batería o en el embalaje indica que el<br />
producto y la batería no pueden ser tratados como un residuo<br />
doméstico normal. En algunas baterías este símbolo puede utilizarse en<br />
combinación con un símbolo químico. El símbolo químico del<br />
mercurio (Hg) o del plomo (Pb) se añadirá si la batería contiene más<br />
del 0,0005% de mercurio o del 0,004% de plomo. Al asegurarse de que<br />
estos productos y baterías se desechan correctamente, usted ayuda a prevenir las<br />
consecuencias potencialmente negativas para el medio ambiente y la salud humana<br />
que podrían derivarse de la incorrecta manipulación. El reciclaje de materiales ayuda a<br />
conservar los recursos naturales.<br />
En el caso de productos que por razones de seguridad, rendimiento o mantenimiento<br />
de datos sea necesaria una conexión <strong>per</strong>manente con la batería incorporada, esta<br />
batería solo deberá ser reemplazada por <strong>per</strong>sonal técnico cualificado para ello. Para<br />
asegurarse de que la batería será tratada correctamente, entregue estos productos al<br />
final de su vida útil en un punto de recogida para el reciclado de aparatos eléctricos y<br />
electrónicos. Para las demás baterías, consulte la sección donde se indica cómo extraer<br />
la batería del producto de forma segura. Deposite la batería en el correspondiente<br />
punto de recogida para el reciclado de baterías. Para recibir información detallada<br />
sobre el reciclaje de este producto o de la batería, póngase en contacto con el<br />
ayuntamiento, el punto de recogida más cercano o el establecimiento donde ha<br />
adquirido el producto o la batería.<br />
ATENCIÓN<br />
Los campos electromagnéticos a frecuencias específicas pueden influir en la imagen y<br />
el sonido de esta cámara.<br />
Si la electricidad estática o el electromagnetismo interrumpen la transferencia de datos<br />
(fallo), reinicie la aplicación o desconecte y vuelva a conectar el cable de comunicación<br />
(USB, etc.).<br />
AVISO IMPORTANTE PARA MÉXICO<br />
La o<strong>per</strong>ación de este equipo está sujeta a las siguientes dos condiciones: (1) es posible<br />
que este equipo o dispositivo no cause interferencia <strong>per</strong>judicial y (2) este equipo o<br />
dispositivo debe aceptar cualquier interferencia, incluyendo la que pueda causar su<br />
o<strong>per</strong>ación no deseada.<br />
Para consultar la información relacionada al número del certificado, refiérase a la<br />
etiqueta del empaque y/o del producto.<br />
Notas sobre la grabación de larga duración<br />
ˎSi desconecta la alimentación, deje esta unidad durante 10 minutos o más para<br />
ˎ <strong>per</strong>mitir que la tem<strong>per</strong>atura de su interior descienda hasta un nivel seguro.<br />
ˎBajo tem<strong>per</strong>aturas ambiente altas, la tem<strong>per</strong>atura de esta unidad se eleva<br />
ˎ rápidamente.<br />
ˎCuando la tem<strong>per</strong>atura de esta unidad se eleva, la calidad de la imagen se puede<br />
ˎ deteriorar.<br />
ˎSe recomienda es<strong>per</strong>ar hasta que la tem<strong>per</strong>atura de esta unidad descienda antes de<br />
ˎ seguir fotografiando.<br />
ˎˎLa su<strong>per</strong>ficie de esta unidad puede calentarse. Esto no significa mal funcionamiento.<br />
Lea esto primero<br />
Consulte también el Manual (PDF) instalado en esta unidad siguiendo estos pasos:<br />
ʓʓConecte la unidad cargada a un ordenador con el cable micro USB (suministrado).<br />
ʔʔConecte la alimentación de esta unidad.<br />
ʕHaga que se visualice [Equipo]<br />
ʕ<br />
[PMHOME] [HANDBOOK] en su<br />
ordenador, y después abra el Manual (PDF).<br />
Características<br />
ˎEste mando a distancia Live-View <strong>RM</strong>-<strong>LVR1</strong> (en adelante, “esta unidad”) puede<br />
ˎ utilizarse para o<strong>per</strong>ar una cámara <strong>Sony</strong> que posea función Wi-Fi. Esta unidad puede<br />
no ser compatible con todas las cámaras que posean función Wi-Fi. Para enterarse<br />
de los modelos compatibles y las funciones, visite el sitio Web de <strong>Sony</strong>.<br />
ˎEsta unidad tiene las funciones básicas de grabación (grabación de películas, toma<br />
ˎ de fotos y ajuste de cámara).<br />
ˎEsta unidad cuenta con especificaciones a prueba de agua que <strong>per</strong>miten utilizarla en<br />
ˎ la lluvia, la nieve o en la playa.<br />
ˎEsta unidad puede cargarse desde su ordenador o un AC-UD20 (vendido aparte) a<br />
ˎ través del cable micro USB suministrado.<br />
Notas sobre la utilización<br />
No utilice/guarde esta unidad en los lugares siguientes<br />
ˎEn un lugar extremadamente cálido<br />
ˎ En lugares tales como en un automóvil aparcado al sol, el cuerpo de la unidad puede<br />
deformarse y esto puede ocasionar un fallo de funcionamiento.<br />
ˎA la luz solar directa o cerca de un aparato de calefacción<br />
ˎ Si guarda esta unidad a la luz solar directa o cerca de un aparato de calefacción,<br />
esta unidad puede decolorarse o deformarse, y esto podría ocasionar un fallo de<br />
funcionamiento.<br />
ˎEn un lugar sometido a fuertes vibraciones<br />
ˎ Cerca de campos magnéticos intensos<br />
ˎˎ<br />
Tem<strong>per</strong>atura de funcionamiento<br />
Esta unidad está diseñada para su uso en tem<strong>per</strong>aturas entre -10 °C y +40 °C<br />
No se recomienda utilizarla en lugares extremadamente fríos o calientes fuera de esta<br />
gama.<br />
ˎLa pantalla LCD y la caja se calientan durante la o<strong>per</strong>ación. Esto no significa mal<br />
ˎ funcionamiento.<br />
Condensación de humedad<br />
Si esta unidad se traslada directamente de un lugar frío a otro cálido, puede<br />
condensarse humedad en su interior. Esta condensación podría causer un fallo de<br />
funcionamiento de esta unidad.<br />
Si se produce condensación<br />
Desconecte la alimentación de esta unidad y es<strong>per</strong>e aproximadamente 1 hora hasta<br />
que la humedad se evapore.<br />
Notas sobre la condensación de humedad<br />
La humedad puede condensarse al trasladar esta unidad de un lugar frío a otro<br />
cálido (o viceversa) o si se utiliza esta unidad en un lugar húmedo, como se indica a<br />
continuación.<br />
Cuando traslade esta unidad de una pista de esquí a un lugar cálido<br />
ˋˋ<br />
Cuando traslade esta unidad de un automóvil o una sala con aire acondicionado a<br />
ˋˋ<br />
un lugar cálido exterior<br />
Cuando se utilice esta unidad después de una tormenta o lluvia<br />
ˋˋ<br />
Cuando se utilice esta unidad en un lugar cálido y húmedo<br />
ˋˋ<br />
Función Wi-Fi<br />
ˎUtilice esta unidad de acuerdo con las regulaciones del área en la que vaya a usarla.<br />
ˎ No podrá utilizar la función Wi-Fi de esta cámara bajo el agua.<br />
ˎˎ<br />
Desactivación de todas las funciones relacionadas con<br />
Wi-Fi<br />
Cuando viaje en avión, etc., puede desactivar temporalmente todas las funciones<br />
relacionadas con Wi-Fi.<br />
ˎCuando ajuste [Airplane Mode] (Modo avión) a [On] (Activado), en la pantalla<br />
ˎ LCD se mostrará .<br />
ˎCon respecto a los detalles sobre los ajustes, consulte “<br />
ˎ<br />
Cambio de los ajustes” en<br />
“Utilización de esta unidad”.<br />
Manejo de la pantalla LCD<br />
ˎNo deje la pantalla LCD encarada hacia el sol ya que podría dañarse. Tenga cuidado<br />
ˎ cuando coloque la unidad junto a una ventana.<br />
ˎSi utiliza la unidad en un lugar frío, es posible que en la pantalla LCD aparezcan<br />
ˎ líneas horizontales o una imagen residual. Esto no significa mal funcionamiento.<br />
Cuando se caliente la unidad, la pantalla LCD volverá a la normalidad.<br />
ˎSi una imagen fija como un cuadro de una imagen dividida o código de tiempo se<br />
ˎ visualiza durante mucho tiempo, una imagen puede <strong>per</strong>manecer su<strong>per</strong>puesta en la<br />
pantalla LCD como imagen fantasma.<br />
ˎLa pantalla LCD de esta unidad ha sido fabricada con tecnología de alta<br />
ˎ precisión, <strong>per</strong>o una muy pequeña proporción de píxeles puede “adherirse”, ya<br />
sea estando siempre desactivados (negros), siempre activados (rojos, verdes,<br />
o azules), o parpadeando. Además, después de mucho tiempo de utilización,<br />
debido a las características físicas del visualizador de cristal líquido, tales píxeles<br />
“adheridos” pueden aparecer espontáneamente. Estos problemas no significan mal<br />
funcionamiento.<br />
Limpieza<br />
Limpieza de la pantalla LCD<br />
La su<strong>per</strong>ficie de la pantalla LCD está especialmente tratada para reducir la reflexión<br />
de la luz.<br />
El mantenimiento incorrecto puede deteriorar el rendimiento de la pantalla LCD, por<br />
lo que deberá tener cuidado con respecto a lo siguiente:<br />
ˎFrote suavemente la pantalla LCD con un paño suave, como un paño de limpieza o<br />
ˎ un paño para gafas.<br />
ˎLas manchas resistentes podrán eliminarse con un paño suave, como un paño de<br />
ˎ limpieza o un paño para gafas ligeramente humedecido en agua.<br />
ˎNo utilice nunca disolventes como alcohol, benceno o diluyente de pintura, ni ácido,<br />
ˎ detergente alcalino o abrasivo, ni tampoco un paño de limpieza con productos<br />
químicos, ya que dañaría la su<strong>per</strong>ficie de la pantalla LCD.<br />
Limpieza de la su<strong>per</strong>ficie de esta unidad<br />
ˎLimpie esta unidad con un paño ligeramente humedecido en agua, y después frótela<br />
ˎ con un paño suave y seco.<br />
No utilice nada de lo siguiente porque podría dañar el acabado o la caja.<br />
Productos químicos tales como diluyente, benceno, alcohol, paños desechables,<br />
ˋˋ<br />
repelente de insectos, bloqueador solar o insecticida, etc.<br />
No toque esta unidad con nada de lo indicado arriba en sus manos.<br />
ˋˋ<br />
No deje esta unidad en contacto con caucho o vinilo durante mucho tiempo.<br />
ˋˋ<br />
Acerca del rendimiento a prueba de agua de esta unidad<br />
Esta unidad está diseñada para ser a prueba de agua. Los daños causados por<br />
uso indebido, abuso, o mantenimiento incorrecto no están cubiertos por la<br />
garantía limitada.<br />
ˎNo exponga esta unidad a agua a presión, tal como la de un grifo.<br />
ˎ No la utilice en aguas termales.<br />
ˎ<br />
ˎ Utilice esta unidad en la gama de tem<strong>per</strong>atura de agua de funcionamiento<br />
ˎ<br />
ˎ recomendada de 0 °C a 40 °C<br />
Notas antes de utilizar esta unidad bajo/cerca del agua<br />
ˎAsegúrese de que no haya materias extrañas como arena, pelo, o suciedad en el<br />
ˎ interior de la tapa del terminal múltiple. Incluso una pequeña cantidad de materias<br />
extrañas podría hacer que entrase agua en esta unidad.<br />
ˎConfirme que la junta de estanqueidad<br />
ˎ<br />
y sus su<strong>per</strong>ficies de acoplamiento <br />
no estén rayadas (Consulte la ilustración ). Incluso un pequeño rasguño podría<br />
hacer que entrase agua en esta unidad. Si la junta de estanqueidad o sus su<strong>per</strong>ficies<br />
de acoplamiento se rayan, póngase en contacto con su proveedor <strong>Sony</strong> o con el<br />
centro de servicio local autorizado por <strong>Sony</strong>.<br />
ˎSi la suciedad o arena entran en la junta de estanqueidad o sus su<strong>per</strong>ficies de<br />
ˎ acoplamiento, limpie el área con un paño suave que no deje fibras.<br />
No abra/cierre la tapa del terminal múltiple con las manos húmedas o arenosas, ni<br />
ˎ<br />
ˎ cerca del agua. Existiría el riesgo de que en el interior entrase arena o agua. Antes de<br />
abrir la tapa del terminal múltiple, realice el procedimiento descrito en “Limpieza<br />
después de utilizar esta unidad bajo/cerca del agua”.<br />
ˎAbra la tapa del terminal múltiple cuando esta unidad esté completamente seca.<br />
ˎ Compruebe siempre que la tapa del terminal múltiple esté bloqueada con seguridad.<br />
ˎˎ<br />
Notas sobre la utilización de esta unidad bajo/cerca del agua<br />
ˎNo exponga esta unidad a golpes como saltando al agua.<br />
ˎ No abra ni cierre la tapa del terminal múltiple mientras esté bajo/cerca del agua.<br />
ˎ<br />
ˎ Esta unidad se hunde en el agua. Utilice la correa suministrada con esta unidad para<br />
ˎ<br />
ˎ evitar se que hunda.<br />
Limpieza después de utilizar esta unidad bajo/cerca del agua<br />
ˎLimpie siempre esta unidad con aguan antes de 60 minutos de haberla utilizado, y<br />
ˎ no abra la tapa del terminal múltiple antes de haber finalizado la limpieza. La arena<br />
o el agua podrían entrar donde no pudieran verse, y reducirían el rendimiento a<br />
prueba de agua si no se enjuaga bien.<br />
ˎDeje esta unidad en agua pura vertida en un recipiente de limpieza durante unos<br />
ˎ 5 minutos. A continuación, agite suavemente esta unidad y presione cada botón bajo<br />
el agua para limpiar cualquier sal, arena u otro material que pueda haber alrededor<br />
de los botones (Consulte la ilustración ).<br />
ˎDespués de enjuagar, limpie las gotas de agua con un paño suave. Permita que<br />
ˎ esta unidad se seque por completo en un lugar sombreado con buena ventilación.<br />
No seque con un secador de pelo, ya que existiría riesgo de deformación y/o<br />
degradación del rendimiento a prueba de agua.<br />
ˎLimpie las gotas de agua o el polvo de la tapa del terminal múltiple con un paño<br />
ˎ suave y seco.<br />
ˎCuando coloque esta unidad bajo el agua pueden aparecer burbujas. Esto no<br />
ˎ significa mal funcionamiento.<br />
ˎEl cuerpo de la unidad puede decolorarse si entra en contacto con bloqueador solar<br />
ˎ o aceite bronceador. Si esta unidad entra en contacto con bloqueador solar o aceite<br />
bronceador, límpiela rápidamente.<br />
ˎNo <strong>per</strong>mita que en esta unidad entre agua salada ni que se moje su su<strong>per</strong>ficie<br />
ˎ con ella. Esto podría conducir a la corrosión o decoloración, y degradación del<br />
rendimiento a prueba de agua.<br />
Desecho<br />
ˎˎQuite la batería antes de desechar esta unidad.<br />
Quite la batería (Consulte la ilustración )<br />
La batería incorporada es reciclable.<br />
Cuando vaya a desechar esta unidad, quítele la batería incorporada y llévela a su<br />
proveedor.<br />
Notas<br />
Cuando quite la batería, tenga cuidado de lo siguiente.<br />
ˎMantenga los tornillos, etc, fuera del alcance de niños pequeños para evitar su<br />
ˎ tragado accidental.<br />
ˎˎTenga cuidado de no dañar sus uñas o dedos.<br />
Información importante<br />
No quite los tornillos excepto para desechar esta unidad. Nos negaremos a<br />
realizar reparaciones o el reemplazo si juzgamos que esta unidad se ha desarmado<br />
injustificadamente.<br />
1 Pulse el botón ON/OFF (Alimentación) para desconectar la<br />
alimentación de esta unidad.<br />
2 Desconecte los cables conectados.<br />
3 Retire los tornillos con un destornillador de cabeza Phillips.<br />
(4 tornillos)<br />
4 Retire la cubierta.<br />
5 Empuje el gancho hacia afuera y extraiga la batería.<br />
Batería<br />
Acerca de la carga de esta unidad<br />
ˎCargue esta unidad antes de utilizarla por primera vez.<br />
ˎ Recomendamos cargar esta unidad a una tem<strong>per</strong>atura ambiente de 10 °C a 30 °C<br />
ˎ<br />
ˎ hasta que la lámpara CHG (Carga) se apague. Esta unidad puede no recargarse con<br />
eficacia a tem<strong>per</strong>aturas fuera de esta gama.<br />
ˎˎLa lámpara CHG (Carga) puede encenderse en las situaciones siguientes:<br />
La batería está dañada<br />
ˋˋ<br />
ˎSi la tem<strong>per</strong>atura de esta unidad es baja, póngala en un lugar cálido.<br />
ˎ Si la tem<strong>per</strong>atura de esta unidad es alta, póngala en un lugar frío.<br />
ˎˎ<br />
Tiempo de o<strong>per</strong>ación de la batería<br />
Estado de la unidad Visualización Tiempo de o<strong>per</strong>ación<br />
REC Live-View Aprox. 240 minutos<br />
Wi-Fi ON Visualización del reloj Aprox. 280 minutos<br />
Wi-Fi OFF Visualización del reloj Aprox. 340 minutos<br />
Notas<br />
ˎEstos son los tiempos de funcionamiento aproximados cuando utilice esta unidad<br />
ˎ con una batería completamente cargada, con el<br />
Panel Brightness (Brillo del<br />
panel) ajustado a HI y a una tem<strong>per</strong>atura ambiente de 25 °C<br />
Comprobación de la carga restante de la batería<br />
Un indicador de carga restante aparece en la pantalla LCD de esta unidad.<br />
Alta Baja<br />
Notas<br />
ˎEl indicador de carga restante correcto tarda unos 30 segundos en aparecer.<br />
ˎ El indicador de carga restante restante puede no ser correcto bajo ciertas<br />
ˎ<br />
ˎ circunstancias.<br />
Utilización efectiva de la batería<br />
ˎEl rendimiento de la batería se reduce a una tem<strong>per</strong>atura ambiente baja. En lugares<br />
ˎ fríos, por lo tanto, el tiempo de o<strong>per</strong>ación de la batería es más corto.<br />
Carga de batería restante<br />
ˎSi la batería se agota rápidamente aunque el indicador de carga restante sea alto,<br />
ˎ vuelva a cargar completamente esta unidad. Después, el indicador de carga restante<br />
restante se visualizará correctamente. Tenga en cuenta que es posible que no se<br />
visualice correctamente en las situaciones siguientes:<br />
Esta unidad se utiliza durante mucho tiempo a alta tem<strong>per</strong>atura ambiente<br />
ˋˋ<br />
Esta unidad se deja completamente cargada<br />
ˋˋ<br />
Esta unidad se utiliza mucho<br />
ˋˋ<br />
Acerca de la protección contra el sobrecalentamiento<br />
ˎDependiendo de la tem<strong>per</strong>atura de esta unidad y la batería, la alimentación de esta<br />
ˎ unidad puede desconectarse automáticamente para proteger esta unidad. Antes de<br />
desconectarse la alimentación se visualizará un mensaje en la pantalla LCD.<br />
Cómo guardar la batería<br />
ˎDescargue completamente esta unidad antes de almacenarla, y guárdela en un<br />
ˎ lugar fresco y seco. Para mantener el funcionamiento de esta unidad, cargue<br />
completamente esta unidad y descárguela totalmente por lo menos una vez al año<br />
durante el almacenamiento.<br />
Vida de la batería<br />
ˎLa batería tiene una vida limitada. La capacidad de la batería disminuye con el<br />
ˎ tiempo y a través del uso repetido. Si hay una disminución significativa en el tiempo<br />
de uso entre cargas, es probable que sea hora de reemplazarla. Llévela a su proveedor<br />
<strong>Sony</strong>.<br />
ˎˎLa vida de la batería varía de acuerdo con la forma en que se utiliza.<br />
Identificación de los componentes<br />
1 Tapa del terminal múltiple<br />
2 Botón MENU<br />
3 Botón DISP<br />
4 Terminal multi/micro USB<br />
5 Botón RESET (Reposición)<br />
6 Lámpara CHG (Carga)<br />
7 Botón REC/ENTER<br />
8 Botón UP<br />
9 Botón DOWN<br />
10 Pantalla LCD<br />
11 Lámpara REC/Wi-Fi<br />
12 Anilla para una correa<br />
13 Botón ON/OFF (Alimentación)<br />
Indicadores de la pantalla LCD<br />
Visualización del reloj<br />
Visualización de Live-View<br />
1 Icono Airplane Mode (Modo avión)<br />
Visualizado cuando esta unidad está en Airplane Mode (Modo avión).<br />
2 Indicador de carga de batería restante<br />
3 Visualización del reloj<br />
4 Indicador de advertencia de tarjeta de memoria<br />
5 Icono de bloqueo de botones<br />
6 Indicador de zoom<br />
7 Icono REC<br />
8 Indicador de modo de toma de imágenes<br />
Durante la grabación de películas, aparece<br />
. Durante la grabación de fotos,<br />
aparece . Durante la grabación de fotos a intervalos, aparece . Durante la<br />
grabación de audio, aparece .<br />
Preparativos<br />
Carga de esta unidad<br />
1 Compruebe que la alimentación de esta unidad esté ajustada a OFF.<br />
2 Conecte el cable micro USB (suministrado) al terminal multi/micro USB<br />
de esta unidad.<br />
3 Conecte el otro extremo del cable micro USB a su ordenador o un AC-<br />
UD20 (vendido aparte).<br />
La lámpara CHG (carga) se encenderá en naranja y se iniciará la carga.<br />
La lámpara CHG (carga) se apagará cuando finalice la carga.<br />
Notas<br />
ˎPuede cargar esta unidad, aunque no esté completamente descargada. Además,<br />
ˎ incluso si esta unidad no está completamente cargada, puede utilizar la capacidad de<br />
carga parcial de la batería como es.<br />
ˎCuando conecte la alimentación de esta unidad, suministrará alimentación <strong>per</strong>o no<br />
ˎ se cargará.<br />
Fijación de una correa a esta unidad<br />
Coloque esta unidad sobre la placa base y pase la correa a través de la anilla<br />
para correa de esta unidad y la placa base, como muestra la ilustración<br />
-1. Fije la correa a esta unidad y la placa base como muestra la ilustración<br />
-1.<br />
Cuando fije la correa, podrá ajustar la longitud de la correa dependiendo de la<br />
posición de fijación , de la ilustración -1.<br />
Para fijar en su brazo , coloque la hebilla para correa de esta unidad en el lado muñeca<br />
y pase la correa a través de como se ilustra en -2. Pase la parte sobrante de la<br />
correa a través de .<br />
La colocación de la correa de forma incorrecta puede causar lesiones.<br />
Cuando utilice esta unidad fijada a su brazo, coloque siempre la placa base y la correa<br />
correctamente.<br />
Notas<br />
Tenga cuidado de que esta unidad no se caiga cuando le quite la correa.<br />
Utilización de esta unidad<br />
Antes de conectar la alimentación de esta unidad<br />
Cerciórese de que la tapa del terminal múltiple de esta unidad esté cerrada.<br />
Cierre con seguridad la tapa del terminal múltiple hasta escuchar el cierre<br />
deslizante de la tapa del terminal múltiple chasqueando en su sitio, y la marca<br />
amarilla bajo el cierre deslizante ya no podrá verse.<br />
ˎSi cualquier materia extraña como arena entra en el interior de la tapa del terminal<br />
ˎ múltiple, junta de estanqueidad puede rayarse, lo que conduciría a entrada de agua<br />
en esta unidad.<br />
Conexión de la alimentación de esta unidad<br />
Pulse el botón ON/OFF (Alimentación) con esta unidad cargada.<br />
ˎCuando conecte la alimentación de esta unidad por primera vez, se visualizará la<br />
ˎ pantalla de ajuste de la fecha y la hora.<br />
Consulte “ Clock Setting (Ajuste del reloj)” en “ Cambio de los ajustes.”<br />
Vuelva a pulsar el botón ON/OFF (Alimentación) para desconectar la alimentación de<br />
esta unidad.<br />
Conexión de esta unidad y una cámara mediante Wi-Fi<br />
( : Conexión SINGLE)<br />
1 Conecte la alimentación de esta unidad y de la cámara.<br />
2 La pantalla de selección de dispositivo Wi-Fi se visualizará en la<br />
pantalla LCD de esta unidad. Seleccione el SSID de la cámara que<br />
desee conectar con el botón UP o el botón DOWN y pulse el botón<br />
REC/ENTER para confirmar.<br />
Con respecto a los detalles sobre el SSID de su cámara, consulte el manual de<br />
instrucciones suministrado con la cámara.<br />
Notas<br />
El SSID de la cámara se visualiza en esta unidad con “Direct-” quitado.<br />
3 Si aparece [ACPT?] en la pantalla de la cámara que desea conectar,<br />
pulse el botón ENTER de la cámara para <strong>per</strong>mitir la conexión directa.<br />
(Action Cam (cámara de acción) solamente)<br />
La visualización en la pantalla LCD de esta unidad cambiará a la visualización de<br />
Live-View y la lámpara REC/Wi-Fi de esta unidad se encenderá en azul.<br />
Notas<br />
Dependiendo de su cámara, el indicador visualizado y el botón que hay que pulsar<br />
para <strong>per</strong>mitir la conexión directa difieren. Con respecto a los detalles, consulte la<br />
guía de inicio y el manual de instrucciones suministrados con su cámara.<br />
Esta unidad estará conectada ahora a la cámara a través de Wi-Fi.<br />
Durante la conexión de esta unidad y una cámara mediante Wi-Fi, la lámpara<br />
REC/Wi-Fi estará encendida en azul.<br />
No necesitará realizar los pasos 2 y 3 cuando conecte a la misma cámara desde la<br />
próxima vez. Esta unidad se conectará automáticamente a su cámara.<br />
Cuando esta unidad se conecte a un modelo de cámara fotográfica digital de la serie<br />
QX <strong>Sony</strong> o a otra cámara compatible, el modo de exposición de la cámara se ajustará<br />
automáticamente a “<br />
Intelligent Auto”.<br />
Cuando esta unidad se conecte a un modelo de cámara fotográfica digital de la serie<br />
QX <strong>Sony</strong>, el ajuste de la fecha de esta unidad también aparecerá en la cámara.<br />
Notas<br />
Cuando conecte la alimentación de esta unidad o cancele<br />
Airplane Mode (Modo<br />
avión), esta unidad se conectará automáticamente a la cámara.<br />
Si la alimentación se corta debido al entorno o si selecciona<br />
Disconnect<br />
(Desconectar) desde el menú, esta unidad no se conectará automáticamente a la<br />
cámara. Para conectarla, realice los pasos 2 y 3 de “ Conexión de esta unidad y una<br />
cámara mediante Wi-Fi”.<br />
Cambio de los ajustes<br />
Puede cambiar los ajustes de esta unidad pulsando el botón MENU de esta unidad.<br />
También puede cambiar los ajustes de la cámara pulsando el botón MENU de esta<br />
unidad mientras esta unidad esté conectada a la cámara mediante Wi-Fi.<br />
1 Pulse el botón MENU.<br />
El elemento de ajuste aparece en la pantalla LCD de esta unidad.<br />
2 Pulse el botón UP o el botón DOWN para seleccionar el elemento<br />
deseado, y después pulse el botón REC/ENTER.<br />
3 Pulse el botón UP o el botón DOWN para seleccionar el ajuste deseado,<br />
y después pulse el botón REC/ENTER para confirmar.<br />
Elemento de ajuste<br />
Disconnect (Desconectar)<br />
Desconecta la cámara de Wi-Fi. La<br />
pantalla LCD de esta unidad volverá a<br />
la pantalla de selección de dispositivo<br />
Wi-Fi.<br />
Shooting Mode<br />
(Modo de toma de imágenes)<br />
Cambia entre los modos de toma de<br />
imágenes de la cámara.<br />
Los ajustes visualizados en la<br />
pantalla LCD de esta unidad difieren<br />
dependiendo de la cámara conectada.<br />
Camera Settings<br />
(Ajustes de<br />
cámara)*<br />
Recording mode<br />
(Modo de<br />
grabación)**<br />
Cambia el modo de grabación de la<br />
cámara conectada.<br />
Cuando la cámara conectada se ajuste<br />
a grabación de películas, este ajuste<br />
estará disponible.<br />
Pulse una vez el botón REC/ENTER:<br />
Se visualizará el icono de modo de<br />
grabación actual de la cámara.<br />
Pulse dos veces el botón REC/<br />
ENTER:<br />
Se visualizará la pantalla de selección<br />
de modo de grabación.<br />
SteadyShot<br />
Setting<br />
(Ajuste de<br />
SteadyShot)<br />
Cambia el ajuste de SteadyShot de la<br />
cámara conectada.<br />
ON: Utiliza SteadyShot.<br />
OFF: No utiliza SteadyShot.<br />
Field Angle<br />
Setting<br />
(Ajuste de ángulo de<br />
campo)<br />
Cambia el ángulo de campo de la<br />
cámara conectada.<br />
120°: Graba con un ángulo de campo<br />
de 120°<br />
170°: Graba con un ángulo de campo<br />
de 170°<br />
Display Settings<br />
(Ajustes de<br />
visualización)<br />
Display Rotate<br />
(Girar visualización)<br />
Cambia la orientación de la pantalla<br />
LCD y el botón UP/botón DOWN de<br />
esta unidad.<br />
Utilice este ajuste cuando fije la<br />
correa a su brazo derecho, etc.<br />
ON: Giro de 180°<br />
OFF: Sin giro<br />
Panel Brightness<br />
(Brillo del panel)<br />
Ajusta el brillo de la pantalla LCD.<br />
HI: Brillante<br />
LO: Oscura<br />
Main Settings<br />
(Ajustes<br />
principales)<br />
Clock Setting<br />
(Ajuste del reloj)<br />
Ajusta el año/mes/día/hora.<br />
Seleccione el formato de fecha.<br />
Auto Power Off<br />
(Apagado<br />
automático)<br />
Ajusta el tiempo hasta que<br />
esta unidad cambia a Apagado<br />
automático.<br />
30min: La alimentación se desconecta<br />
después de aproximadamente<br />
30 minutos.<br />
5min: La alimentación se desconecta<br />
después de aproximadamente<br />
5 minutos.<br />
1min: La alimentación se desconecta<br />
después de aproximadamente<br />
1 minuto.<br />
OFF: La alimentación no se<br />
desconecta automáticamente.<br />
Resetting the<br />
Settings<br />
(Reponer los ajustes)<br />
Devuelve los ajustes de red a los<br />
predeterminados.<br />
Version (Versión)<br />
Visualiza la versión del software de<br />
esta unidad.<br />
Network Settings<br />
(Ajustes de red)<br />
Connection Setting<br />
(Ajuste de<br />
conexión)***<br />
Cambia el ajuste de conexión.<br />
: Conexión SINGLE<br />
O<strong>per</strong>a una cámara con<br />
esta unidad.<br />
: Conexión MULTI<br />
O<strong>per</strong>a más de una cámara<br />
con esta unidad.<br />
Airplane Mode<br />
(Modo avión)<br />
Desactiva temporalmente todas las<br />
funciones relacionadas con Wi-Fi al<br />
subir a un avión, etc.<br />
ON: Seleccione esto cuando suba a<br />
un avión.<br />
OFF: Seleccione esto para utilización<br />
normal.<br />
* El icono visualizado en la pantalla LCD de esta unidad difiere dependiendo del<br />
modo de la cámara conectada.<br />
** El icono visualizado en la pantalla LCD de esta unidad difiere dependiendo de la<br />
cámara conectada o su modo de grabación durante la conexión.<br />
*** El icono visualizado en la pantalla LCD de esta unidad difiere dependiendo del<br />
ajuste de conexión actual de esta unidad.<br />
Notas<br />
ˎDependiendo de su cámara, algunos elementos de ajuste y ajustes pueden no ser<br />
ˎ compatibles.<br />
ˎCuando esta unidad no esté conectada a la cámara mediante Wi-Fi, no podrá<br />
ˎ cambiar los ajustes de la cámara.<br />
ˎSeleccione<br />
ˎ para volver desde la pantalla de selección de ajustes a la pantalla de<br />
selección de elementos de ajuste.<br />
ˎSeleccione<br />
ˎ para activar el elemento de ajuste o el ajuste seleccionado en la<br />
pantalla de selección.<br />
Toma de imágenes<br />
Grabación de películas / Grabación de fotos a intervalos<br />
1 Pulse el botón REC/ENTER para iniciar la grabación.<br />
Lámpara azul REC/Wi-Fi cambiará de azul a roja.<br />
2 Pulse de nuevo el botón REC/ENTER para detener la grabación.<br />
Lámpara roja REC/Wi-Fi cambiará de roja a azul.<br />
Toma de fotos<br />
Pulse el botón REC/ENTER.<br />
État de la charge de la batterie<br />
ˎSi la batterie s’épuise rapidement bien que l’indicateur de charge restante de la<br />
ˎ batterie soit élevé, chargez la batterie complètement une nouvelle fois. L’indicateur<br />
de charge restante de la batterie affichera alors le niveau correct. Notez que le niveau<br />
risque de ne pas être indiqué correctement dans les situations suivantes :<br />
Cet appareil a été utilisé longtemps à une température ambiante élevée<br />
ˋˋ<br />
Cet appareil a été laissé complètement chargé<br />
ˋˋ<br />
Cet appareil a été très utilisé<br />
ˋˋ<br />
Protection contre une surchauffe<br />
ˎSelon la température de cet appareil et de la batterie, l’alimentation de cet appareil<br />
ˎ peut se cou<strong>per</strong> automatiquement pour le protéger contre une surchauffe. Un<br />
message apparaîtra alors sur l’écran LCD avant que l’alimentation ne soit coupée.<br />
Comment ranger la batterie<br />
ˎDéchargez complètement cet appareil avant de le ranger, et rangez-le dans un<br />
ˎ endroit froid et sec. Pour que cet appareil fonctionne toujours parfaitement,<br />
chargez-le complètement puis déchargez-le au moins une fois dans l’année lorsque<br />
vous ne l’utilisez pas.<br />
Durée de vie de la batterie<br />
ˎLa batterie a une durée de vie limitée. La capacité de la batterie diminue à long terme<br />
ˎ du fait d’un usage répété. Si l’autonomie de la batterie se réduit significativement, il<br />
est probablement temps de remplacer la batterie. Portez-la à votre vendeur <strong>Sony</strong>.<br />
ˎˎLa durée de vie de la batterie dépend de la façon dont la batterie a été utilisée.<br />
Identification des éléments<br />
1 Couvercle multiprise<br />
2 Touche MENU<br />
3 Touche DISP<br />
4 Multiprise/micro-USB<br />
5 Touche RESET (Réinitialisation)<br />
6 Témoin CHG (Charge)<br />
7 Touche REC/ENTER<br />
8 Touche UP<br />
9 Touche DOWN<br />
10 Écran LCD<br />
11 Témoin REC/Wi-Fi<br />
12 Boucle pour un bracelet<br />
13 Touche ON/OFF (Alimentation)<br />
Indicateurs sur l’écran LCD<br />
Indication de l’heure<br />
Affichage instantané<br />
1 Icône Airplane Mode (Mode avion)<br />
Apparaît lorsque cet appareil est en Airplane Mode (Mode avion).<br />
2 Indicateur de charge restante de la batterie<br />
3 Indication de l’heure<br />
4 Témoin d’avertissement de la carte mémoire<br />
5 Icône de blocage des boutons<br />
6 Témoin de zoom<br />
7 Icône REC<br />
8 Témoin du mode de prise de vue<br />
Pendant l’enregistrement de vidéo,<br />
s’affiche. Pendant la prise de vue,<br />
s’affiche. Pendant l’enregistrement de photos par intervalle,<br />
s’affiche. Pendant<br />
l’enregistrement audio,<br />
s’affiche.<br />
Préparatifs<br />
Charge de cet appareil<br />
1 Assurez-vous que la touche d’alimentation de cet appareil est sur OFF.<br />
2 Raccordez le câble micro-USB (fourni) sur la multiprise/micro-USB de<br />
cet appareil.<br />
3 Raccordez l’autre extrémité du câble micro-USB à votre ordinateur ou<br />
à l’AC-UD20 (vendu séparément).<br />
Le témoin CHG (Charge) s’allume en orange et la charge commence.<br />
Le témoin CHG (Charge) s’éteint lorsque la charge est terminée.<br />
Remarques<br />
ˎVous pouvez charger cet appareil même s’il n’est pas complètement déchargé. En<br />
ˎ outre, même si cet appareil n’est pas complètement chargé, vous pouvez utiliser la<br />
batterie telle quelle.<br />
ˎˎLorsque cet appareil est allumé, il est alimenté mais pas chargé.<br />
Fixation du bracelet à cet appareil<br />
Posez cet appareil sur le socle et faites passer le bracelet par la boucle<br />
du bracelet de cet appareil et le socle, comme indiqué sur l’illustration<br />
dans -1. Fixez le bracelet à l’appareil et le socle comme indiqué sur<br />
l’illustration dans -1.<br />
Lors de la fixation du bracelet, vous pouvez régler sa longueur selon la position de<br />
fixation , dans l’illustration -1.<br />
Pour mettre le bracelet au bras, placez la boucle du bracelet de cet appareil sur le côté<br />
poignet et faites passer le bracelet par comme indiqué dans -2. Faites passer le<br />
reste de la partie du bracelet par .<br />
Mal fixé, le bracelet peut causer des blessures.<br />
Lorsque cet appareil est utilisé au bras, le socle et le bracelet doivent être correctement<br />
rattachés.<br />
Remarques<br />
Faites attention de ne pas laisser tomber cet appareil lorsque vous détachez le bracelet.<br />
Utilisation de cet appareil<br />
Avant d’allumer cet appareil<br />
Assurez-vous que le couvercle de la multiprise de cet appareil est bien fermé.<br />
Fermez bien le couvercle de la multiprise de manière à entendre le déclic du<br />
poussoir du couvercle et que le repère jaune sous le poussoir ne soit plus<br />
visible.<br />
ˎSi une matière étrangère, comme du sable, se prend dans le couvercle de la<br />
ˎ multiprise, le joint torique risque d’être rayé, ce qui peut produire une infiltration<br />
d’eau.<br />
Mise sous tension de cet appareil<br />
Appuyez sur la touche ON/ OFF (Alimentation) quand cet appareil est chargé.<br />
ˎLa première fois que vous allumez cet accessoire, l’écran de réglage de la date et de<br />
ˎ l’heure s’affiche.<br />
Reportez-vous à «<br />
Clock Setting (Réglage de l’heure) » dans « Changement<br />
des réglages. »<br />
Appuyez à nouveau sur la touche ON/OFF (Alimentation) pour éteindre cet appareil.<br />
Connexion de cet appareil et d’une caméra par Wi-Fi<br />
( : Connexion SINGLE)<br />
1 Allumez cet appareil et la caméra.<br />
2 L’écran de sélection du dispositif Wi-Fi apparaît sur l’écran LCD de cet<br />
appareil. Sélectionnez le SSID de la caméra que vous voulez connecter<br />
avec la touche UP ou la touche DOWN et appuyez sur la touche REC/<br />
ENTER pour confirmer.<br />
Pour les détails sur le SSID de votre caméra, reportez-vous au mode d’emploi<br />
fourni avec la caméra.<br />
Remarques<br />
Le SSID de la caméra apparaît sur cet appareil sans « Direct- ».<br />
3 Si [ACPT?] apparaît sur l’écran de la caméra que vous voulez connecter,<br />
appuyez sur la touche ENTER de la caméra pour <strong>per</strong>mettre la<br />
connexion directe. (Caméra d’action uniquement)<br />
L’affichage sur l’écran LCD de cet appareil bascule sur l’affichage instantané et le<br />
témoin REC/Wi-Fi de cet appareil s’allume en bleu.<br />
Remarques<br />
Selon la caméra, l’indicateur affiché et la touche à presser pour <strong>per</strong>mettre la<br />
connexion directe seront différents. Pour plus de détails, reportez-vous au guide de<br />
démarrage et au mode d’emploi fournis avec votre caméra.<br />
Cet appareil est maintenant connecté à votre caméra par Wi-Fi.<br />
Pendant la connexion de cet appareil à la caméra par Wi-Fi, le témoin REC/<br />
Wi-Fi s’allume en bleu.<br />
Vous n’aurez pas besoin de faire les opérations 2 et 3 lors de la prochaine connexion à<br />
la même caméra. Cet appareil se connecte automatiquement à votre caméra.<br />
Lorsque cet appareil est connecté à un modèle d’appareil photo numérique <strong>Sony</strong> de la<br />
gamme QX ou à un autre appareil photo compatible, le mode d’exposition de l’appareil<br />
photo est automatiquement défini sur « Intelligent Auto ».<br />
Lorsque cet appareil est connecté à un modèle d’appareil photo numérique <strong>Sony</strong> de la<br />
gamme QX, le réglage de date de cet appareil s’affiche également dans l’appareil photo.<br />
Remarques<br />
Lorsque cet appareil est sous tension ou<br />
Airplane Mode (Mode avion) est annulé,<br />
il se connecte automatiquement à la caméra.<br />
Si la connexion est coupé en raison de l’environnement ou<br />
Disconnect<br />
(Déconnecter) est sélectionné sur le menu, cet appareil ne se connectera pas<br />
automatiquement à la caméra. Pour la connecter, effectuez les opérations 2 et 3 de<br />
« Connexion de cet appareil et d’une caméra par Wi-Fi ».<br />
Changement des réglages<br />
Vous pouvez changer les réglages de cet appareil en appuyant sur la touche MENU de<br />
cet appareil.<br />
Vous pouvez aussi changer les réglages de la caméra en appuyant sur la touche MENU<br />
de cet appareil quand il est connecté à une caméra par Wi-Fi.<br />
1 Appuyez sur la touche MENU.<br />
Les paramètres apparaissent sur l’écran LCD de cet appareil.<br />
2 Appuyez sur la touche UP ou DOWN pour sélectionner le paramètre<br />
souhaité, puis appuyez sur la touche REC/ENTER.<br />
3 Appuyez sur la touche UP ou DOWN pour sélectionner le réglage<br />
souhaité, puis appuyez sur la touche REC/ENTER pour le valider.<br />
Paramètre<br />
Disconnect (Déconnecter)<br />
Déconnecter la caméra de la Wi-Fi.<br />
L’écran LCD de cet appareil revient<br />
à l’écran de sélection du dispositif<br />
Wi-Fi.<br />
Shooting Mode<br />
(Mode de prise de vue)<br />
Basculer entre les modes de prise de<br />
vue de la caméra.<br />
Les réglages apparaissant sur l’écran<br />
LCD de cet appareil dépendent de la<br />
caméra connectée.<br />
Camera Settings<br />
(Réglages de<br />
l’appareil photo)*<br />
Recording mode<br />
(Mode<br />
d’enregistrement)**<br />
Pour changer le mode<br />
d’enregistrement de l’appareil photo<br />
connecté.<br />
Ce réglage est disponible lorsque<br />
l’appareil photo connecté est réglé sur<br />
l’enregistrement de vidéo.<br />
Appuyez une fois sur le bouton REC/<br />
ENTER :<br />
L’icône du mode d’enregistrement en<br />
cours de l’appareil photo s’affiche.<br />
Appuyez deux fois sur le bouton REC/<br />
ENTER :<br />
L’écran de sélection du mode<br />
d’enregistrement s’affiche.<br />
SteadyShot<br />
Setting<br />
(Réglage SteadyShot)<br />
Pour changer le réglage SteadyShot de<br />
l’appareil photo connecté.<br />
ON : SteadyShot activé.<br />
OFF : SteadyShot désactivé.<br />
Field Angle<br />
Setting<br />
(Réglage de l’angle<br />
de champ)<br />
Pour changer l’angle de champ de<br />
l’appareil photo connecté.<br />
120° : enregistre à un angle de champ<br />
de 120°<br />
170° : enregistre à un angle de champ<br />
de 170°<br />
Display Settings<br />
(Réglages de<br />
l’affichage)<br />
Display Rotate<br />
(Rotation de<br />
l’affichage)<br />
Changer l’orientation de l’écran LCD<br />
et des touches UP/DOWN de cet<br />
appareil.<br />
Utilisez ce réglage lorsque vous<br />
attachez le bracelet à votre bras droit,<br />
etc.<br />
ON : Rotation de 180°<br />
OFF : Pas de rotation<br />
Panel Brightness<br />
(Luminosité du<br />
panneau)<br />
Régler la luminosité de l’écran LCD.<br />
HI : Lumineux<br />
LO : Sombre<br />
Main Settings<br />
(Réglages<br />
principaux)<br />
Clock Setting<br />
(Réglage de l’heure)<br />
Pour régler l’année/le mois/le<br />
jour/l’heure.<br />
Sélectionnez le format de date.<br />
Auto Power Off<br />
(Désactivation<br />
automatique)<br />
Réglez le délai au bout duquel<br />
cet appareil se désactive<br />
automatiquement.<br />
30min : L’appareil s’éteint au bout de<br />
30 minutes.<br />
5min : L’appareil s’éteint au bout de<br />
5 minutes.<br />
1min : L’appareil s’éteint au bout de<br />
1 minute.<br />
OFF : L’appareil ne s’éteint pas<br />
automatiquement.<br />
Resetting<br />
the Settings<br />
(Réinitialisation des<br />
réglages)<br />
Rétablir les réglages par défaut.<br />
Version<br />
(Version)<br />
Afficher la version du logiciel de cet<br />
appareil.<br />
Network Settings<br />
(Réglages réseau)<br />
Connection Setting<br />
(Réglage de<br />
connexion)***<br />
Pour changer le réglage de connexion.<br />
: Connexion SINGLE<br />
Contrôle un seul appareil<br />
photo avec cet appareil.<br />
: Connexion MULTI<br />
Contrôle plusieurs<br />
appareils photo avec cet<br />
appareil.<br />
Airplane Mode<br />
(Mode avion)<br />
Désactiver temporairement toutes les<br />
fonctions liées à la Wi-Fi à bord d’un<br />
avion, etc.<br />
ON : Sélectionnez ceci à bord d’un<br />
avion.<br />
OFF : Sélectionnez ceci en temps<br />
normal.<br />
* L’icône affichée sur l’écran LCD de cet appareil varie selon le mode de l’appareil<br />
photo connecté.<br />
** L’icône affichée sur l’écran LCD de cet appareil varie selon l’appareil photo connecté<br />
ou son mode d’enregistrement pendant la connexion.<br />
*** L’icône affichée sur l’écran LCD de cet appareil varie selon le réglage de connexion<br />
actuel de cet appareil.<br />
Remarques<br />
ˎSelon la caméra, certains paramètres et réglages ne seront pas compatibles.<br />
ˎ Lorsque cet appareil n’est pas connecté à la caméra par Wi-Fi, les réglages de caméra<br />
ˎ<br />
ˎ ne peuvent pas être changés.<br />
ˎSélectionnez<br />
ˎ pour revenir de l’écran de sélection de réglage à l’écran de sélection<br />
de paramètre.<br />
ˎSélectionnez<br />
ˎ pour activer le paramètre ou le réglage sélectionné sur l’écran de<br />
sélection.<br />
Prise de vue<br />
Enregistrement de vidéo / Enregistrement de photo à intervalle<br />
1 Appuyez sur la touche REC/ENTER pour enregistrer.<br />
Le témoin bleu REC/Wi-Fi devient rouge.<br />
2 Appuyez à nouveau sur la touche REC/ENTER pour arrêter<br />
l’enregistrement.<br />
Le témoin rouge REC/Wi-Fi devient bleu.<br />
Prise de vue<br />
Appuyez sur la touche REC/ENTER.<br />
Indication de l’heure<br />
Appuyez sur la touche DISP de cet appareil pour voir l’heure sur l’écran LCD<br />
lorsque l’affichage instantané est visible sur l’écran LCD de cet appareil ou pendant<br />
l’enregistrement vidéo.<br />
Appuyez à nouveau sur la touche DISP pour mettre l’écran LCD en mode OFF. En<br />
mode OFF, appuyez à nouveau sur la touche DISP pour revenir à l’affichage instantané<br />
sur l’écran LCD.<br />
Changement de l’affichage à l’aide du bouton DISP<br />
Lorsque cet appareil est connecté à un appareil photo, vous pouvez changer l’affichage<br />
de l’écran LCD de cet appareil comme suit : Afficheur instantané Icône désactivée<br />
Affichage de l’heure Écran désactivé<br />
Lorsque l’écran LCD de cet appareil est réglé sur « Screen off » (Écran désactivé), il<br />
revient à « Live-View display » (Afficheur instantané) en appuyant une nouvelle fois<br />
sur le bouton DISP de cet appareil.<br />
Fonction de blocage des boutons<br />
Lorsque cet appareil est connecté à un appareil photo, bloquez les boutons de cet<br />
appareil en appuyant sur le bouton MENU de cet appareil pendant au moins deux<br />
secondes. Ceci évite d’appuyer accidentellement sur les boutons de l’appareil pendant<br />
son transport.<br />
Pour annuler le mode de blocage des boutons, appuyez sur le bouton MENU de<br />
cet appareil pendant au moins deux secondes, ou appuyez sur le bouton ON/OFF<br />
(Alimentation) pour éteindre cet appareil.<br />
Zoom<br />
Lorsque l’afficheur instantané est sur l’écran LCD de cet appareil ou pendant<br />
l’enregistrement d’une vidéo, vous pouvez contrôler le zoom de l’appareil photo en<br />
appuyant sur le bouton UP/DOWN de cet appareil.<br />
La fonction de zoom n’est disponible qu’avec les appareils photo compatibles. Pour<br />
plus d’informations, reportez-vous au mode d’emploi de l’appareil photo et aux<br />
informations sur la compatibilité.<br />
Contrôle de plusieurs appareils photo<br />
Avec HDR-AS100V, vous pouvez contrôler simultanément jusqu’à cinq appareils photo<br />
avec cet appareil.<br />
Pour plus d’informations, reportez-vous au manuel installé dans cet appareil.<br />
En cas de problème<br />
ÿÿImpossible d’allumer cet appareil.<br />
Chargez la batterie.<br />
ÿÿL’alimentation de cet appareil est soudainement coupée.<br />
Si vous n’utilisez pas cet appareil pendant un certain temps quand il est allumé,<br />
il s’éteint automatiquement pour préserver la batterie. Allumez à nouveau cet<br />
appareil.<br />
Si le réglage<br />
Auto Power Off (Désactivation automatique) est sur [<br />
OFF], l’alimentation ne sera pas coupée automatiquement.<br />
ÿÿImpossible de charger cet appareil.<br />
Éteignez cet appareil et branchez-le par l’USB.<br />
Débranchez et rebranchez le câble micro-USB (fourni).<br />
Utilisez le câble micro-USB (fourni).<br />
Chargez cet appareil à une température ambiante de 10 °C à 30 °C (50 °F à<br />
86 °F).<br />
Allumez l’ordinateur puis raccordez-le à cet appareil.<br />
Sortez l’ordinateur de l’état de veille ou d’hibernation.<br />
Raccordez cet appareil à l’ordinateur avec le câble micro-USB (fourni).<br />
ÿÿL’indicateur de charge restante n’est pas correct.<br />
Ce phénomène se produit quand cet appareil est utilisé dans un endroit très<br />
chaud ou très froid.<br />
Il y a une différence entre l’indicateur de charge restante et la charge restante<br />
réelle de la batterie. Chargez une fois cet appareil pleinement puis rechargez-le<br />
pour corriger l’indication.<br />
Chargez une nouvelle fois cet appareil pleinement. Si le problème <strong>per</strong>siste, la<br />
batterie est probablement usée. Contactez votre vendeur <strong>Sony</strong> ou un service<br />
après-vente agréé <strong>Sony</strong>.<br />
ÿÿCet appareil ne peut pas être connecté à la caméra par Wi-Fi.<br />
Visitez le site <strong>Sony</strong> pour vérifier la compatibilité de la caméra avec cet appareil.<br />
Si le problème <strong>per</strong>siste, appuyez sur la touche RESET de cet appareil.<br />
Affichage d’erreurs<br />
Les numéros d’erreurs suivants apparaissent sur l’écran LCD de cet appareil pour<br />
fournir des informations sur une fonction.<br />
<br />
<br />
<br />
<br />
<br />
<br />
<br />
<br />
<br />
<br />
<br />
<br />
<br />
1<br />
2<br />
<br />
7<br />
8 9 10 11<br />
4<br />
5<br />
6<br />
2<br />
3<br />
1<br />
13<br />
12<br />
AM<br />
3<br />
1 2<br />
8<br />
2<br />
7<br />
6<br />
5<br />
4<br />
1<br />
1<br />
<br />
<br />
<br />
<br />
<br />
2<br />
2,3<br />
<br />
<br />
<br />
<br />
Numéro<br />
d’erreur<br />
Symptôme<br />
Cause<br />
01-01<br />
02-02<br />
Échec de la connexion<br />
Il y a peut-être un encombrement<br />
des signaux. Ou bien cet appareil<br />
est trop loin du point d’accès.<br />
01-02<br />
Les infos du dispositif diffèrent du<br />
dispositif actuel.<br />
Sélectionnez<br />
Main Settings<br />
(Réglages principaux) <br />
Resetting the Settings<br />
(Réinitialisation des réglages) et<br />
validez. Effectuez les opération<br />
mentionnées dans « Connexion<br />
de cet appareil et d’une caméra par<br />
Wi-Fi ».<br />
01-03<br />
01-04<br />
La camera n’est pas compatible.<br />
03-01<br />
03-02<br />
ˎLa caméra n’est pas reconnue.<br />
ˎ Vous devez effectuer certaines<br />
opérations sur la caméra devant<br />
être connectée.<br />
ˎIl y a peut-être un<br />
ˎ encombrement des signaux. Ou<br />
bien cet appareil est trop loin du<br />
point d’accès.<br />
02-01 Erreur de caméra<br />
Vérifiez la caméra ou la carte<br />
mémoire devant être accédée.<br />
04-03 Réglage impossible<br />
Vérifiez la caméra.<br />
05-01 Prise de vue impossible<br />
05-02<br />
Démarrage de l’enregistrement<br />
impossible<br />
05-03<br />
Arrêt de l’enregistrement<br />
impossible<br />
04-04 Aucune réaction de la caméra<br />
ˎVérifiez la caméra.<br />
ˎ Il y a peut-être un<br />
ˎ<br />
ˎ encombrement des signaux. Ou<br />
bien cet appareil est trop loin du<br />
point d’accès.<br />
Autodiagnostic<br />
Si une indication commençant par un caractère alphabétique apparaît sur l’écran LCD<br />
de cet appareil, l’autodiagnostic fonctionne.<br />
Cet appareil doit éventuellement être réparé. Contactez votre vendeur <strong>Sony</strong> et indiquez<br />
les numéros commençant par E ou C.<br />
À propos du logiciel éligible pour la licence GNU GPL/LGPL<br />
Les logiciels éligibles pour la licence GNU General Public License suivante (ci-après<br />
dénommée « GPL ») ou GNU Lesser General Public License (ci-après dénommée<br />
« LGPL ») sont fournis dans cet appareil.<br />
Nous vous informons que vous avez le droit d’accéder au code source de ces<br />
programmes pour le modifier ou le redistribuer en respectant les conditions relatives à<br />
la licence GPL/LGPL fournie.<br />
Vous trouverez le code source sur le Web. Utilisez l’adresse Internet suivante pour le<br />
télécharger. Lors du téléchargement du code source, sélectionnez <strong>RM</strong>-<strong>LVR1</strong> comme<br />
modèle pour votre appareil.<br />
http://www.sony.net/Products/Linux/<br />
Veuillez éviter de nous contacter au sujet du contenu du code source.<br />
Des copies des licences (en anglais) sont enregistrées dans la mémoire interne de votre<br />
appareil.<br />
Établissez une connexion de stockage de masse entre votre appareil et un ordinateur et<br />
lisez les fichiers contenus dans le dossier « LICENSE » dans « PMHOME ».<br />
Marques commerciales<br />
ˎWi-Fi, le logo Wi-Fi et Wi-Fi PROTECTED SET-UP sont des marques déposées ou<br />
ˎ commerciales de Wi-Fi Alliance.<br />
ˎAdobe, le logo d’Adobe et Adobe Acrobat sont des marques déposées ou<br />
ˎ commerciales d’Adobe Systems Incorporated aux États-Unis et/ou dans d’autres<br />
pays.<br />
Spécifications<br />
[Prise d’entrée pour la charge]<br />
Multiprise/micro-USB :<br />
micro-B/USB<br />
[Alimentation, généralité]<br />
Alimentation :<br />
Batterie rechargeable : 3,6 V<br />
USB : 5,0 V<br />
Charge par USB :<br />
CC 5,0 V 500 mA/800 mA<br />
Temps de charge :<br />
Par ordinateur : Environ 245 minutes<br />
Par un AC-UD20 (vendu séparément) :<br />
Environ 175 minutes<br />
Consommation :<br />
1,0 W<br />
(lors d’une connexion Wi-Fi et pendant l’affichage<br />
instantané)<br />
Performance de<br />
l’étanchéité :<br />
Profondeur d’eau 3 m (10 pieds), 30 minutes en continu<br />
Température de<br />
fonctionnement :<br />
-10 °C à +40 °C (14 °F à 104 °F)<br />
Température<br />
d’entreposage :<br />
-20 °C à +60 °C (-4 °F à +140 °F)<br />
Dimensions (environ) :<br />
72,3 mm × 50,2 mm × 20,8 mm<br />
(2 7/8 po. × 2 po. × 27/32 po.)<br />
(L/H/P, sans les saillies)<br />
Poids :<br />
Environ 63 g (2,3 oz)<br />
(appareil photo avec batterie seulement)<br />
Poids total (pendant<br />
l’usage) :<br />
Environ 93 g (3,3 oz) (avec le bracelet et le socle)<br />
Articles inclus :<br />
Cet appareil (1), Câble micro-USB (1), Bracelet (1), Socle<br />
(1), Jeu de documents imprimés<br />
La conception et les spécifications peuvent être modifiées sans préavis.<br />
“Esta hoja es parte del manual de instrucciones”<br />
Nombre del producto: Mando a distancia Live-View<br />
Modelo: <strong>RM</strong>-<strong>LVR1</strong><br />
Precaución<br />
La placa de identificación se encuentra en la parte inferior exterior.<br />
Si necesita comprobarla, quite la correa.<br />
AVISO<br />
Para reducir el riesgo de incendios o descargas eléctricas,<br />
1) no exponga la unidad a la lluvia o la humedad.<br />
2) no coloque sobre el aparato objetos que contengan líquidos, como, por<br />
ejemplo, jarrones.<br />
No exponga las pilas a fuentes de calor excesivo, como la luz solar directa, el<br />
fuego o similares.<br />
PRECAUCIÓN<br />
Observe las precauciones siguientes, ya que puede haber un riesgo de generación de<br />
calor, fuego o explosión.<br />
* El producto tiene una batería de iones de litio incorporada.<br />
ˎCargue el producto mediante el método de carga designado.<br />
ˎ No coloque el producto cerca de fuego ni en un microondas.<br />
ˎ<br />
ˎ No deje el producto en un automóvil en clima cálido.<br />
ˎ<br />
ˎ No almacene ni utilice el producto en un lugar caluroso y húmedo como en un baño<br />
ˎ<br />
ˎ de sauna.<br />
ˎNo desmonte, aplaste ni <strong>per</strong>fore el producto.<br />
ˎ No exponga el producto a impactos fuertes como la caída desde un lugar alto.<br />
ˎ<br />
ˎ No exponga el producto a tem<strong>per</strong>aturas su<strong>per</strong>iores a 60 °C<br />
ˎ<br />
ˎ Mantenga el producto seco.<br />
ˎˎ<br />
Deseche el producto adecuadamente.<br />
Cargue el producto mediante el método de carga designado en el manual de<br />
instrucciones.<br />
Sustituya la batería por otra del tipo especificado solamente. De lo contrario, esto<br />
podría resultar en un incendio o en lesiones.<br />
Para los clientes en Europa<br />
< Aviso para los clientes de países en los que se aplican las directivas de la UE ><br />
Fabricante: <strong>Sony</strong> Corporation, 1-7-1 Konan Minato-ku Tokyo, 108-0075 Japón<br />
Para la conformidad del producto en la UE: <strong>Sony</strong> Deutschland GmbH, Hedelfinger<br />
Strasse 61, 70327 Stuttgart, Alemania<br />
Por medio de la presente <strong>Sony</strong> Corporation declara que este <strong>RM</strong>-<strong>LVR1</strong> Mando<br />
a distancia Live-View cumple con los requisitos esenciales y cualesquiera otras<br />
disposiciones aplicables o exigibles de la Directiva 1999/5/CE. Para mayor<br />
información, por favor consulte la siguiente URL:<br />
http://www.compliance.sony.de/<br />
Este producto ha sido probado y cumple con los límites establecidos en el Reglamento<br />
de EMC para el uso de cables de conexión de menos de 3 metros de longitud.<br />
Tratamiento de los equipos eléctricos y electrónicos al final de su vida<br />
útil (aplicable en la Unión Europea y en países europeos con sistemas de<br />
tratamiento selectivode residuos)<br />
Este símbolo en el equipo o en su embalaje indica que el presente<br />
producto no puede ser tratado como residuos doméstico normal. Debe<br />
entregarse en el correspondiente punto de recogida de equipos<br />
eléctricos y electrónicos. Al asegurarse de que este producto se desecha<br />
correctamente, usted ayuda a prevenir las consecuencias<br />
potencialmente negativas para el medio ambiente y la salud humana<br />
que podrían derivarse de la incorrecta manipulación en el momento de<br />
deshacerse de este producto. El reciclaje de materiales ayuda a<br />
conservar los recursos naturales.<br />
Para recibir información detallada sobre el reciclaje de este producto, póngase en<br />
contacto con el ayuntamiento, el punto de recogida más cercano o el establecimiento<br />
donde ha adquirido el producto.<br />
Visualización del reloj<br />
Pulse el botón DISP de esta unidad paras que se muestre visualización del reloj en la<br />
pantalla LCD cuando la visualización de Live-View esté en la pantalla LCD de esta<br />
unidad o durante la grabación de películas.<br />
Vuelva a pulsar el botón DISP para poner la pantalla LCD en el modo OFF. En<br />
el modo OFF, vuelva a pulsar el botón DISP para devolver la pantalla LCD a a<br />
visualización de Live-View.<br />
Cambio de la visualización de la pantalla mediante el botón DISP<br />
Cuando esta unidad esté conectada a una cámara, podrá cambiar la visualización de la<br />
pantalla LCD de esta unidad en la secuencia siguiente: Visualización de Live-View <br />
Sin iconos Visualización del reloj Pantalla apagada<br />
Cuando la pantalla LCD de esta unidad esté ajustada a “Pantalla apagada”, al pulsar de<br />
nuevo el botón DISP se volverá a la “Visualización de Live-View”.<br />
Función de bloqueo de botones<br />
Cuando esta unidad esté conectada a una cámara, ponga esta unidad en el estado de<br />
bloqueo de botones pulsando el botón MENU de esta unidad durante 2 segundos o<br />
más. Esto evitará que se pulsen accidentalmente los botones de esta unidad mientras<br />
se transporte.<br />
Para cancelar el modo de bloqueo de botones, pulse el botón MENU de esta unidad<br />
durante 2 o más, o pulse el botón ON/OFF (alimentación) para desconectar la<br />
alimentación de esta unidad.<br />
Utilización del zoom<br />
Cuando la visualización de Live-View esté en la pantalla LCD de esta unidad o durante<br />
la grabación de películas, podrá accionar el zoom de la cámara pulsando el botón UP/<br />
DOWN de esta unidad.<br />
La función de zoom solamente estará disponible con cámaras compatibles. Para<br />
más detalles, consulte el manual de instrucciones de la cámara y la información de<br />
compatibilidad.<br />
Control de múltiples cámaras<br />
Cuando utilice la HDR-AS100V, podrá o<strong>per</strong>ar hasta 5 cámaras al mismo tiempo con<br />
esta unidad.<br />
Para más detalles, consulte el Manual instalado en esta unidad.<br />
Solución de problemas<br />
ÿÿNo se puede conectar la alimentación de esta unidad.<br />
Cargue la batería.<br />
ÿÿLa alimentación de esta unidad se desconecta repentinamente.<br />
Si no utiliza esta unidad durante un determinado <strong>per</strong>íodo de tiempo mientras<br />
las alimentación esté conectada, se desconectará automáticamente para<br />
conservar la batería. Vuelva a conectar la alimentación de esta unidad.<br />
Si el ajuste de<br />
Auto Power Off (Apagado automático) es [ OFF], la<br />
alimentación no se desconectará automáticamente.<br />
ÿÿNo es posible cargar esta unidad.<br />
Desconecte la alimentación de esta unidad y conecte la unidad mediante USB.<br />
Desconecte y vuelva a conectar el cable micro USB (suministrado).<br />
Utilice siempre el cable micro USB (suministrado).<br />
Cargue esta unidad en la gama de tem<strong>per</strong>atura ambiente de 10 °C a 30 °C<br />
Conecte la alimentación del ordenador y después conecte esta unidad.<br />
Abandone el modo de reposo o hibernación del ordenador.<br />
Conecte esta unidad directamente al ordenador utilizando el cable micro USB<br />
(suministrado).<br />
ÿÿEl indicador de carga de batería restante es incorrecto.<br />
Este fenómeno ocurre cuando utiliza esta unidad en un lugar extremadamente<br />
cálido o frío.<br />
Existe una discrepancia entre el indicador de carga restante y la carga restante<br />
real de la batería. Descargue completamente la unidad una vez, y después<br />
recárguela para corregir la indicación.<br />
Vuelva a cargar completamente esta unidad. Si el problema <strong>per</strong>siste, la vida de<br />
la batería se habrá agotado. Póngase en contacto con un proveedor <strong>Sony</strong> o con<br />
el centro de servicio local autorizado por <strong>Sony</strong>.<br />
ÿÿEsta unidad no puede conectarse a la cámara mediante Wi-Fi.<br />
Visite el sitio Web de <strong>Sony</strong> para comprobar si la cámara es compatible con esta<br />
unidad.<br />
Si el problema <strong>per</strong>siste, pulse el botón RESET de esta unidad.<br />
Visualización de errores<br />
Los números de error siguientes pueden aparecer en la pantalla LCD de esta unidad<br />
para proporcionar información de error acerca de una función.<br />
Número<br />
de error<br />
Síntoma<br />
Causa<br />
01-01<br />
02-02<br />
No se pudo conectar<br />
Puede haber congestión de<br />
señales. O esta unidad puede estar<br />
demasiado lejos del punto de<br />
acceso.<br />
01-02<br />
La información del dispositivo<br />
difiere del dispositivo real.<br />
Seleccione<br />
Main Settings<br />
(Ajustes principales) <br />
Resetting the Settings (Reponer los<br />
ajustes) y ejecútelo. Después siga<br />
los pasos de “ Conexión de esta<br />
unidad y una cámara mediante<br />
Wi-Fi”.<br />
01-03<br />
01-04<br />
La cámara no es compatible.<br />
03-01<br />
03-02<br />
ˎNo se reconoce la cámara.<br />
ˎ Necesita realizar alguna<br />
o<strong>per</strong>ación en la cámara que<br />
desea conectar.<br />
ˎPuede haber congestión de<br />
ˎ señales. O esta unidad puede<br />
estar demasiado lejos del punto<br />
de acceso.<br />
02-01 Error de cámara<br />
Confirme la cámara de acceso o la<br />
tarjeta de memoria.<br />
04-03 No se puede establecer<br />
Compruebe la cámara.<br />
05-01 No es posible tomar fotos<br />
05-02 No es posible iniciar la grabación<br />
05-03 No es posible detener la grabación<br />
04-04 No hay respuesta de la cámara<br />
ˎCompruebe la cámara.<br />
ˎ Puede haber congestión de<br />
ˎ<br />
ˎ señales. O esta unidad puede<br />
estar demasiado lejos del punto<br />
de acceso.<br />
Autodiagnóstico<br />
Si en la pantalla LCD de esta unidad aparece una indicación que comience por un<br />
carácter alfabético, estará trabajando la función de autodiagnóstico.<br />
Esta unidad puede requerir reparaciones. Póngase en contacto con su proveedor <strong>Sony</strong><br />
e indíquele todos los números que comience por E o C.<br />
Sobre el software GNU GPL/LGPL aplicado<br />
El software que es elegible para la siguiente Licencia Pública General de GNU (en lo<br />
sucesivo denominada “GPL”) o Licencia Pública General Reducida de GNU (en lo<br />
sucesivo denominada “LGPL”) se incluyen en esta unidad.<br />
Se le informa que tiene derecho a acceder, modificar y redistribuir el código fuente<br />
de estos programas de software en las condiciones de las licencias GPL/LGPL<br />
suministradas.<br />
El código fuente se proporciona en la web. Utilice la siguiente dirección para<br />
descargarlo. Cuando descargue el código fuente, seleccione <strong>RM</strong>-<strong>LVR1</strong> como modelo<br />
de unidad.<br />
http://www.sony.net/Products/Linux/<br />
Es preferible que no se comunique con nosotros acerca del contenido del código<br />
fuente.<br />
Las copias de las licencias (en inglés) se almacenan en la memoria interna de la<br />
unidad.<br />
Establezca una conexión de almacenamiento masivo entre la unidad y un equipo, y lea<br />
los archivos en la carpeta “LICENSE” en “PMHOME.”<br />
Marcas comerciales<br />
ˎWi-Fi, el logotipo Wi-Fi y Wi-Fi PROTECTED SET-UP son marcas comerciales<br />
ˎ registradas o marcas comerciales de Wi-Fi Alliance.<br />
ˎAdobe, el logotipo Adobe y Adobe Acrobat son marcas comerciales registradas o<br />
ˎ marcas comerciales de Adobe Systems Incorporated en los Estados Unidos y/u otros<br />
países.<br />
Especificaciones<br />
[Terminal de entrada para carga]<br />
Terminal multi/micro<br />
USB:<br />
micro-B/USB<br />
[Alimentación, general]<br />
Requisitos de<br />
alimentación:<br />
Batería recargable: cc 3,6 V<br />
USB: cc 5,0 V<br />
Carga a través de USB:<br />
cc 5,0 V 500 mA/800 mA<br />
Tiempo de carga:<br />
A través de un ordenador: Aprox. 245 min<br />
A través de AC-UD20 (vendido aparte): Aprox. 175 min<br />
Consumo de energía:<br />
1,0 W<br />
(cuando se conecte mediante Wi-Fi y durante la<br />
visualización de Live-View)<br />
Rendimiento a prueba<br />
de agua:<br />
Profundidad de agua de 3 m, 30 minutos continuamente<br />
Tem<strong>per</strong>atura de<br />
funcionamiento:<br />
-10 °C a +40 °C<br />
Tem<strong>per</strong>atura de<br />
almacenamiento:<br />
-20 °C a +60 °C<br />
Dimensiones (Aprox.):<br />
72,3 mm × 50,2 mm × 20,8 mm<br />
(An/Al/Prf, excluyendo partes salientes)<br />
Peso:<br />
Aprox. 63 g<br />
(solamente el cuerpo principal incluyendo la batería)<br />
Peso total (en uso):<br />
Aprox. 93 g<br />
(incluyendo la correa y la placa base suministradas)<br />
Elementos incluidos:<br />
Esta unidad (1), Cable micro USB (1), Correa (1), Placa<br />
base (1), Juego de documentación impresa<br />
El diseño y las especificaciones están sujetos a cambio sin previo aviso.


