

BlackandDecker Lavapavimenti A Vapore- Fsmh1621 - Type 1 - Instruction Manual (Inglese)
BlackandDecker Lavapavimenti A Vapore- Fsmh1621 - Type 1 - Instruction Manual (Inglese)
BlackandDecker Lavapavimenti A Vapore- Fsmh1621 - Type 1 - Instruction Manual (Inglese)

Create successful ePaper yourself
Turn your PDF publications into a flip-book with our unique Google optimized e-Paper software.
(Original instructions)<br />
ENGLISH<br />
Intended use<br />
Your Black & Decker steam mop has been designed for<br />
sanitising and cleaning sealed hardwood, sealed laminate,<br />
linoleum, vinyl, ceramic tile, stone and marble floors and for<br />
refreshing carpets. This appliance is intended for indoor<br />
household use only.<br />
Warning! Read all of the 'Safety, Maintenance,<br />
Service' manual carefully before operating<br />
this appliance.<br />
Read all of this manual carefully before operating<br />
the appliance.<br />
Features<br />
This appliance includes some or all of the following features.<br />
1. ON/Off switch<br />
2. Lock off button<br />
3. Trigger switch<br />
4. Steam nozzle<br />
5. Hand held steam cleaner<br />
6. Autoselect TM button<br />
7. Filler cap<br />
8. Water tank<br />
9. Steam mop body<br />
10. Handle<br />
11. Steam head<br />
12. Steam head cleaning pad<br />
13. Delta head cleaning pad<br />
14. Carpet glider<br />
15. Bottom cable tidy hook<br />
16. Top cable tidy hook<br />
17. Cable management clip<br />
18. Jug<br />
Accessories<br />
This appliance includes some of the following accessories<br />
others are available to purchase from the Black & Decker<br />
website.<br />
The performance of your appliance depends on the accessory<br />
used. Black & Decker accessories are engineered to high<br />
quality standards and designed to enhance the performance<br />
of your appliance. By using these accessories you will get the<br />
very best from your appliance.<br />
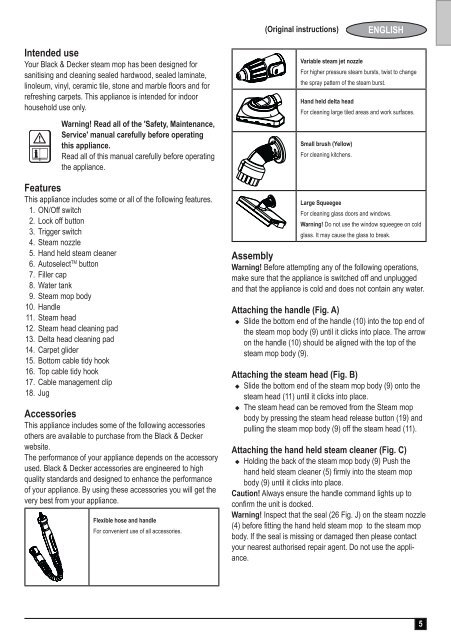
Flexible hose and handle<br />
For convenient use of all accessories.<br />
Variable steam jet nozzle<br />
For higher pressure steam bursts, twist to change<br />
the spray pattern of the steam burst.<br />
Hand held delta head<br />
For cleaning large tiled areas and work surfaces.<br />
Small brush (Yellow)<br />
For cleaning kitchens.<br />
Large Squeegee<br />
For cleaning glass doors and windows.<br />
Warning! Do not use the window squeegee on cold<br />
glass. It may cause the glass to break.<br />
Assembly<br />
Warning! Before attempting any of the following operations,<br />
make sure that the appliance is switched off and unplugged<br />
and that the appliance is cold and does not contain any water.<br />
Attaching the handle (Fig. A)<br />
u Slide the bottom end of the handle (10) into the top end of<br />
the steam mop body (9) until it clicks into place. The arrow<br />
on the handle (10) should be aligned with the top of the<br />
steam mop body (9).<br />
Attaching the steam head (Fig. B)<br />
u Slide the bottom end of the steam mop body (9) onto the<br />
steam head (11) until it clicks into place.<br />
u The steam head can be removed from the Steam mop<br />
body by pressing the steam head release button (19) and<br />
pulling the steam mop body (9) off the steam head (11).<br />
Attaching the hand held steam cleaner (Fig. C)<br />
u Holding the back of the steam mop body (9) Push the<br />
hand held steam cleaner (5) firmly into the steam mop<br />
body (9) until it clicks into place.<br />
Caution! Always ensure the handle command lights up to<br />
confirm the unit is docked.<br />
Warning! Inspect that the seal (26 Fig. J) on the steam nozzle<br />
(4) before fitting the hand held steam mop to the steam mop<br />
body. If the seal is missing or damaged then please contact<br />
your nearest authorised repair agent. Do not use the appliance.<br />
5


