

BlackandDecker Trapano- Kd353 - Type 1 - Instruction Manual
BlackandDecker Trapano- Kd353 - Type 1 - Instruction Manual
BlackandDecker Trapano- Kd353 - Type 1 - Instruction Manual

Create successful ePaper yourself
Turn your PDF publications into a flip-book with our unique Google optimized e-Paper software.
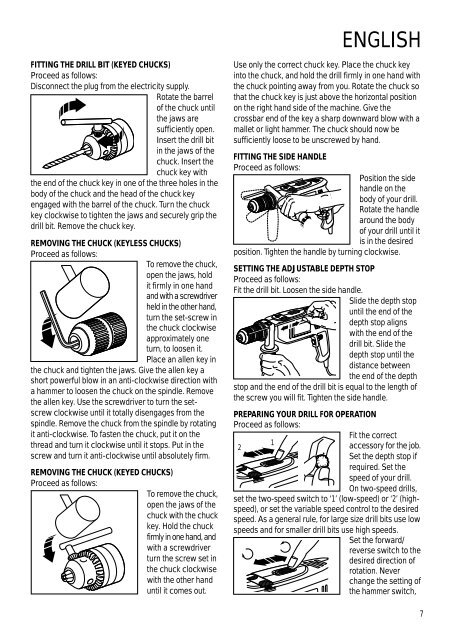
FITTING THE DRILL BIT (KEYED CHUCKS)<br />
Proceed as follows:<br />
Disconnect the plug from the electricity supply.<br />
Rotate the barrel<br />
of the chuck until<br />
the jaws are<br />
sufficiently open.<br />
Insert the drill bit<br />
in the jaws of the<br />
chuck. Insert the<br />
chuck key with<br />
the end of the chuck key in one of the three holes in the<br />
body of the chuck and the head of the chuck key<br />
engaged with the barrel of the chuck. Turn the chuck<br />
key clockwise to tighten the jaws and securely grip the<br />
drill bit. Remove the chuck key.<br />
REMOVING THE CHUCK (KEYLESS CHUCKS)<br />
Proceed as follows:<br />
To remove the chuck,<br />
open the jaws, hold<br />
it firmly in one hand<br />
and with a screwdriver<br />
held in the other hand,<br />
turn the set-screw in<br />
the chuck clockwise<br />
approximately one<br />
turn, to loosen it.<br />
Place an allen key in<br />
the chuck and tighten the jaws. Give the allen key a<br />
short powerful blow in an anti-clockwise direction with<br />
a hammer to loosen the chuck on the spindle. Remove<br />
the allen key. Use the screwdriver to turn the setscrew<br />
clockwise until it totally disengages from the<br />
spindle. Remove the chuck from the spindle by rotating<br />
it anti-clockwise. To fasten the chuck, put it on the<br />
thread and turn it clockwise until it stops. Put in the<br />
screw and turn it anti-clockwise until absolutely firm.<br />
REMOVING THE CHUCK (KEYED CHUCKS)<br />
Proceed as follows:<br />
To remove the chuck,<br />
open the jaws of the<br />
chuck with the chuck<br />
key. Hold the chuck<br />
firmly in one hand, and<br />
with a screwdriver<br />
turn the screw set in<br />
the chuck clockwise<br />
with the other hand<br />
until it comes out.<br />
ENGLISH<br />
Use only the correct chuck key. Place the chuck key<br />
into the chuck, and hold the drill firmly in one hand with<br />
the chuck pointing away from you. Rotate the chuck so<br />
that the chuck key is just above the horizontal position<br />
on the right hand side of the machine. Give the<br />
crossbar end of the key a sharp downward blow with a<br />
mallet or light hammer. The chuck should now be<br />
sufficiently loose to be unscrewed by hand.<br />
FITTING THE SIDE HANDLE<br />
Proceed as follows:<br />
Position the side<br />
handle on the<br />
body of your drill.<br />
Rotate the handle<br />
around the body<br />
of your drill until it<br />
is in the desired<br />
position. Tighten the handle by turning clockwise.<br />
SETTING THE ADJUSTABLE DEPTH STOP<br />
Proceed as follows:<br />
Fit the drill bit. Loosen the side handle.<br />
Slide the depth stop<br />
until the end of the<br />
depth stop aligns<br />
with the end of the<br />
drill bit. Slide the<br />
depth stop until the<br />
distance between<br />
the end of the depth<br />
stop and the end of the drill bit is equal to the length of<br />
the screw you will fit. Tighten the side handle.<br />
PREPARING YOUR DRILL FOR OPERATION<br />
Proceed as follows:<br />
Fit the correct<br />
1<br />
2<br />
accessory for the job.<br />
Set the depth stop if<br />
required. Set the<br />
speed of your drill.<br />
On two-speed drills,<br />
set the two-speed switch to ‘1’ (low-speed) or ‘2’ (highspeed),<br />
or set the variable speed control to the desired<br />
speed. As a general rule, for large size drill bits use low<br />
speeds and for smaller drill bits use high speeds.<br />
Set the forward/<br />
reverse switch to the<br />
desired direction of<br />
rotation. Never<br />
change the setting of<br />
the hammer switch,<br />
7


